Prostor CABANA User manual
WWW.PROSTOR.BE
14-03-2014
OUTDOOR LIVING
CABANA

ODL-B100 Pag. 2
NEDERLANDS
0. OVERZICHT
1. PLAATSEN VAN DE GRONDBEVESTIGING
2. VERBINDING HORIZONTALE LIGGERS MET VERTICALE PALEN
3. PLAATSEN VAN ACHTERSTE DEEL
4. PLAATSEN VAN VOORSTE DEEL
5. MONTEREN VAN DE ARMPROFIELEN
6. VOORBEREIDEN VOUWDAK
7. OPHANGEN VOUWDAK
8. MONTAGE VAST VOLGPROFIEL
9. MONTAGE AFDEKKAPJES VOLGPROFIELEN
10. MONTAGE EN GEBRUIK VAN DE SLUITHAAK
11. MONTAGE AFDEKKAP (OPTIONEEL)
12. GARANTIECERTIFICAAT
CABANA
3,5 x 3,5 m (overmeten) te monteren met 2 personen
CABANA
3,5 x 3,5 m (dimension extérieure) à monter avec 2 personnes
CABANA
3,5 x 3,5 m (außenmaße) mit 2 personen zu montieren
CABANA
3,5 x 3,5 m (outer size) to be mounted with 2 people
FRANCAIS
0. VU ECLATE
1. PLACER LES FIXATIONS AU SOL
2. RACCORDEMENT DES POUTRES HORIZONTALES AVEC LES POTEAUX VERTICAUX
3. PLACER LA PARTIE ARRIERE
4. PLACER LA PARTIE AVANT
5. MONTAGE DES PROFILS BRAS
6. PREPARATION DU TOIT PLIABLE
7. MONTAGE DU TOIT PLIABLE
8. MONTAGE DU PROFIL DE TOILE FIXE
9. MONTAGE DES CACHES POUR PROFILS DE TOILE
10. MONTAGE ET USAGE DU MORAILLON
11. MONTAGE DU PROFIL DE PROTECTION (EN OPTION)
12. CERTIFICAT DE GARANTIE
DEUTSCH
0. ÜBERSICHT
1. INSTALLATION BODENMONTAGE
2. VERBINDUNG HORIZONTALE BALKEN MIT VERTICALEN PFOSTEN
3. PLATZIERUNG VOM HINTEREN TEIL
4. PLATZIERUNG VOM FRONT TEIL
5. MONTAGE DER ARMPROFILE
6. VORBEREITUNG FALTDACH
7. AUFHÄNGEN FALTDACH
8. MONTAGE FESTES LAUFPROFIL
9. MONTAGE KAPPEN LAUFPROFILE
10. MONTAGE UND VERWENDUNG DER SCHLIESSE
11. MONTAGE AFDECKKAPPE (OPTIONAL)
12. GARANTIE-ZERTIFIKAT
ENGLISH
0. OVERVIEW
1. PLACING THE GROUND FIXATION
2. CONNECTING HORIZONTAL BEAMS WITH VERTICAL POLES
3. PLACING OF REAR PART
4. PLACING OF FRONT PART
5. MOUNTING OF THE ARM PROFILES
6. PREPARING FOLDING ROOF
7. HANG FOLDING ROOF
8. MOUNTING FIXED FLOWPROFILES
9. MOUNTING END CAPS FLOWPROFILES
10. MOUNTING AND USE OF THE CLOSING HOOK
11. MOUNTING ROOF COVER (OPTIONAL)
12. WARRANTY CERTIFICATE
3
4
4
5
5
6
7
8
9
10
10
11
12-15
3
4
4
5
5
6
7
8
9
10
10
11
12-15
3
4
4
5
5
6
7
8
9
10
10
11
12-15
3
4
4
5
5
6
7
8
9
10
10
11
12-15

ODL-B100 Pag. 3
0. OVERZICHT
› Controleer of alle onderdelen aanwezig zijn, en of de afmetingen overeenkomen met de bestelling.
Armprofiel rechts
Profile bras droite
Armprofile rechts
Arm profile right
Vouwdak
Toit pliable
Faltdach
Folding roof
Afdekkap (optioneel)
Profil de protection (en option)
Afdekkappe (optional)
Roof cover (optional)
Arm profiel links
Profile bras gauche
Armprofile links
Arm profile left
Horizontale ligger met tourniquet
Poutre horizontale avec tourniquet
Horizontaler Balken mit Führungsschiene
Horizontal beam with tourniquet
Horizontale ligger
Poutre horizontale
Horizontaler Balken
Horizontal beam
Grondbevestiging
Fixations au sol
Bodenmontage
Ground fixation
4x
DIN 7991 M8x20
4x
Haak voor wagentje
Crochet pour chariot
Haken für Trolley
Hook for wagon
14x
DIN603 M6x130
2x
Screw DIN7504K_6.3x16
2x
DIN 985 M6
18x
washer DIN125 M6
18x
Verticale paal
Poteau vertical
Vertikal Pfosten
Vertical pole
Verticale paal
Poteau vertical
Vertikal Pfosten
Vertical pole
Verticale paal
Poteau vertical
Vertikal Pfosten
Vertical pole
Clips voor wagentje
Clips pour chariot
Clips für Trolley
Wagonclips
14x
0. VU ECLATE
0. ÜBERSICHT
0. OVERVIEW
› Contrôlez si toutes les pièces vous ont été livrés et si les dimensions concordent à votre commande initiale.
› Prüfen Sie, ob alle Teile vorhanden sind, und dass die Dimensionen der Bestellung entspricht.
› Make sure all parts are present, and that the dimensions match the order.
Afdekkapje volgprofiel
Cache pour profil de toile
Kappe Folgenprofile
End cap flow profile
16x
Spacer volgprofiel
Entretoise pour profil de toile
Abstandhalter Folgenprofile
Spacer flow profile
2x
Sluithaak
Moraillon
Schliesse
Closing hook
1x
Wagentje
Chariot
Karren
Wagon
12x
Voorste wagentje
Chariot avant
Karren front
First wagon
2x
DIN 7981 4,2 x 25 Coated
2x
OPTION
L1
L2
W1
W2
Volgprofiel
Profil de toile
Laufprofil
Flowprofile
Verticale paal
Poteau vertical
Vertikal Pfosten
Vertical pole
Vast volgprofiel (met tourniquet)
Profil de toile fix (avec tourniquet)
Fest Laufprofil (mit Führungsschiene)
Fixed flowprofile (with tourniquet)
Tourniquet
Führungsschiene
ODL-B100 Pag. 4
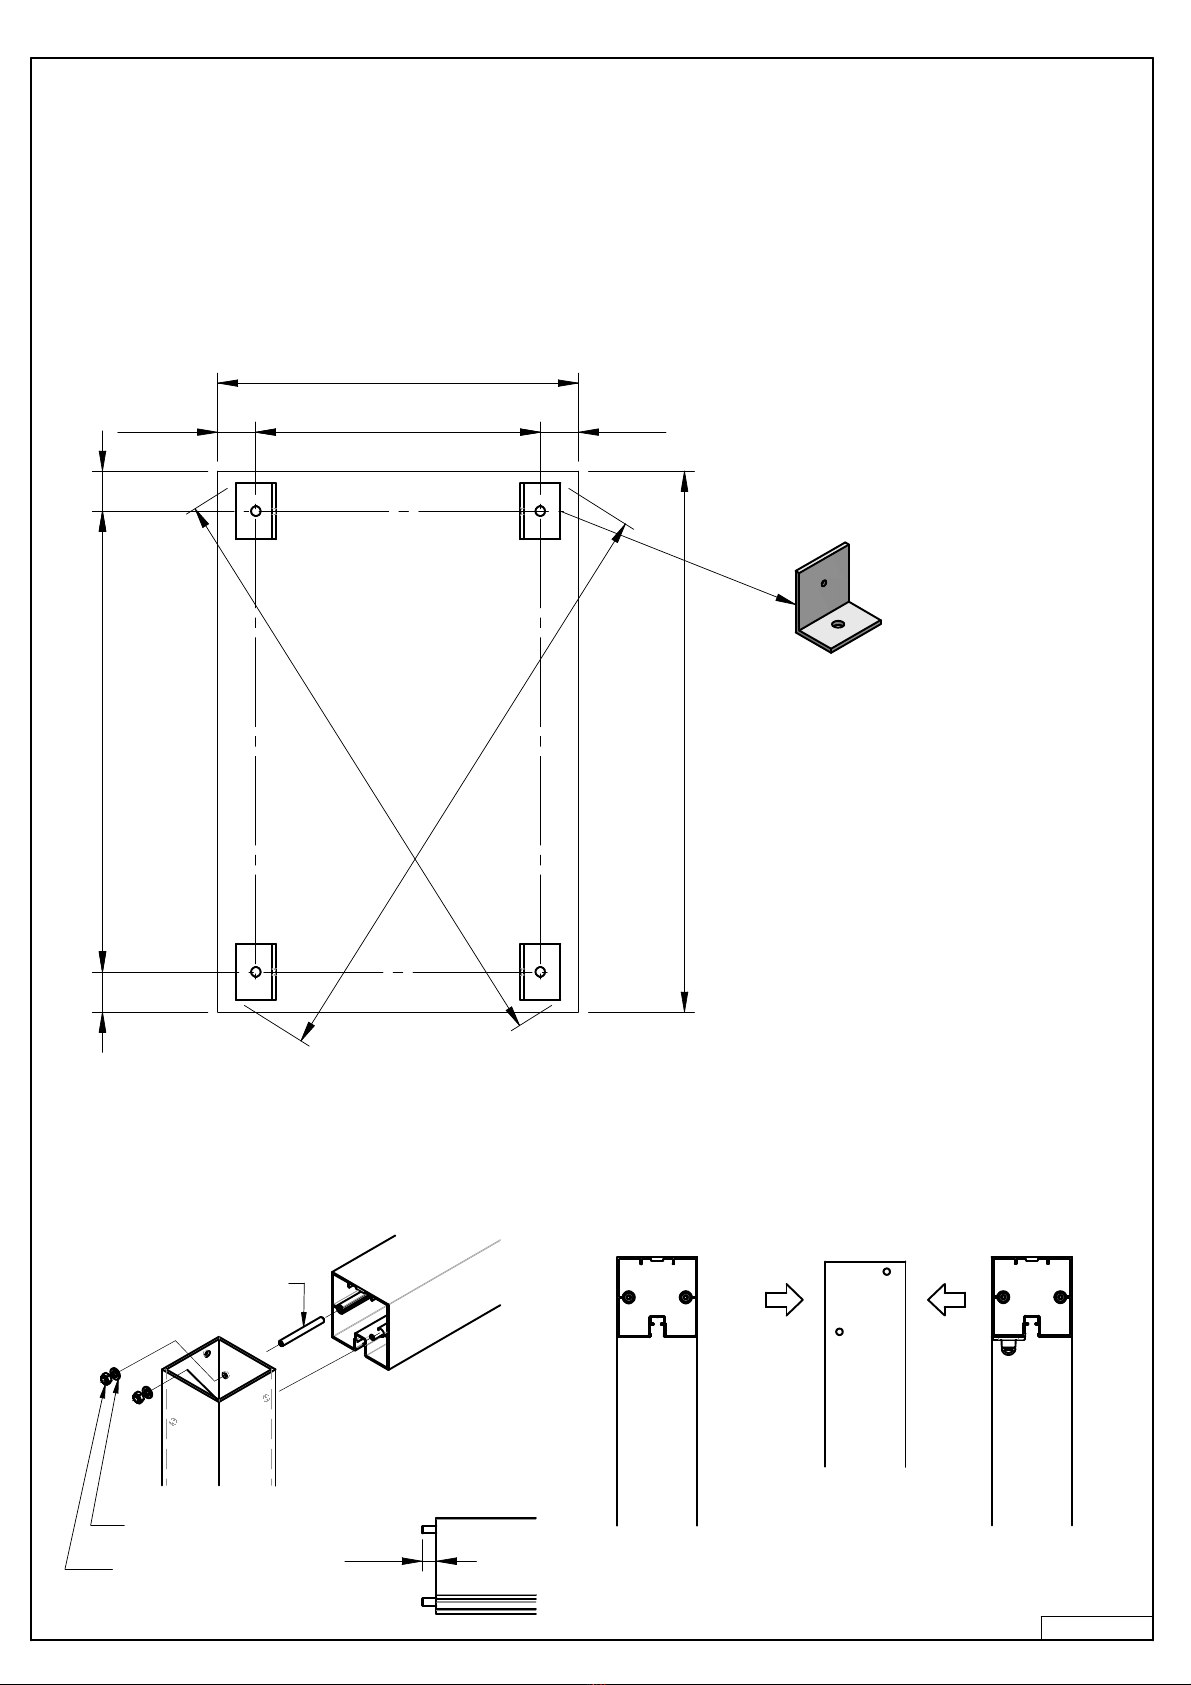
1. PLAATSEN VAN GRONDBEVESTIGING
› Plaats de grondbevestiging volgens onderstaande tekening. Controleer het geheel door diagonaal te meten,
het verschil mag niet meer dan 5mm bedragen.
W
L
52 W-104 52
40L-8040
=
=
2. VERBINDING HORIZONTALE LIGGERS MET VERTIKALE PALEN
DIN 985 M6
washer DIN125 M6
12
inbusbout DIN916 M6x60
1. PLACER LES FIXATIONS AU SOL
1. INSTALLATION BODENMONTAGE
1. PLACING THE GROUND FIXATION
› Placez les fixations au sol suivant le dessin ci-dessous. Vérifiez la totalité en prenant la mesure sur les diagonales, il ne peut
pas y avoir plus de 5 mm de différence.
› Legen Sie die Bodenbefestigung (lt. Zeichnung unten). Überprüfen Sie, dass die gesamten Maße anhand der Zeichnung.
Prüfen Sie auch die Diagonalen. Der Unterschied soltte 5mm nicht überschreiten.
› Place the ground fixation according to the drawing below. Check the unit by measuring diagonally, the difference may not
exceed 5mm.
2. RACCORDEMENT DES POUTRES HORIZONTALES AVEC LES POTEAUX VERTICAUX
2. VERBINDUNG HORIZONTALE BALKEN MIT VERTICALEN PFOSTEN
2. CONNECTING HORIZONTAL BEAMS WITH VERTICAL POLES
L1
L2
W1
W2
(*) Bevestigingsmateriaal voor grondbevestiging niet meegeleverd.
(*) Éléments de fixation pour la fixation au sol non inclus.
(*) Befestigungsteile für die Bodenbefestigung nicht inbegriffen.
(*) Fasteners for ground fixation not included.
(*)
ODL-B100 Pag. 5
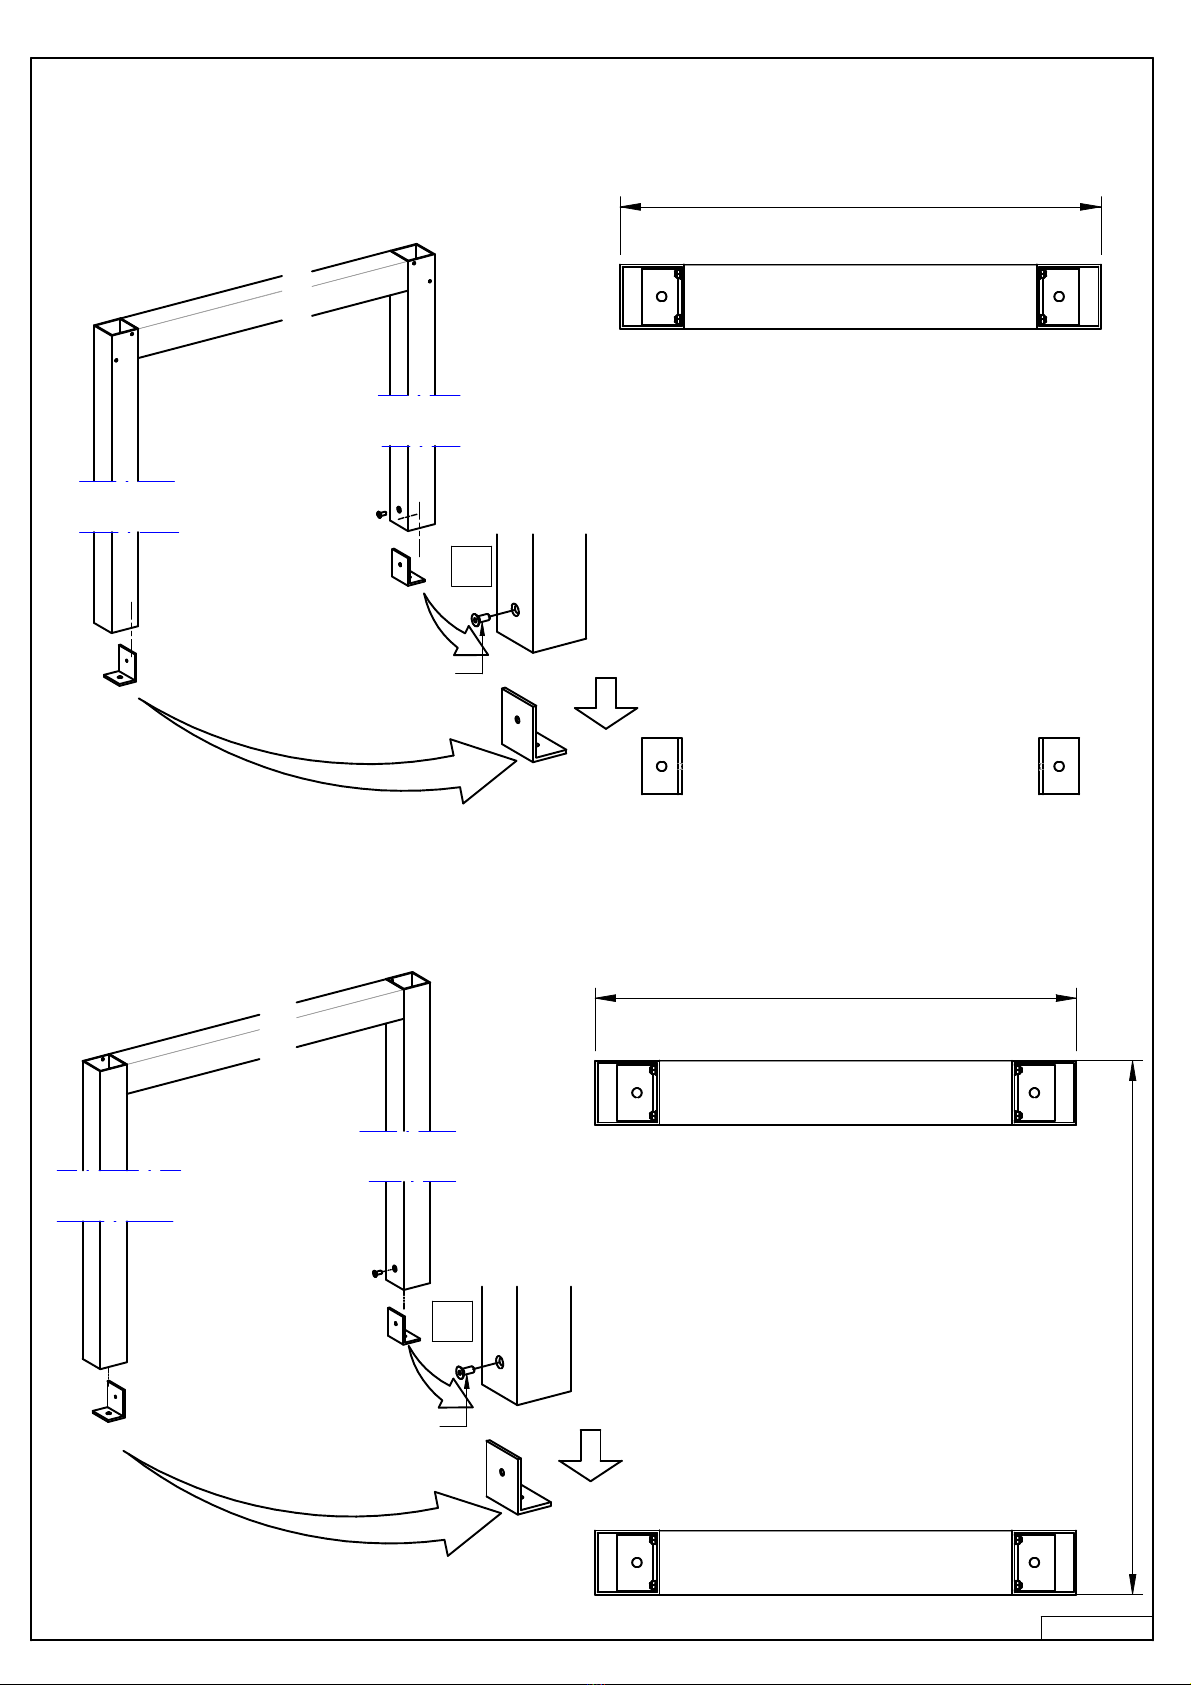
3. PLAATSEN VAN ACHTERSTE DEEL
ISO 7380 M8x20
1
2
4. PLAATSEN VAN VOORSTE DEEL
W
L
W
ISO 7380 M8x20
1
2
3. PLACER LA PARTIE ARRIERE
3. PLATZIERUNG VOM HINTEREN TEIL
3. PLACING OF REAR PART
4. PLACER LA PARTIE AVANT
4. PLATZIERUNG VOM FRONT TEIL
4. PLACING OF FRONT PART
L1
L2
W1
W2
L1
L2
W1
W2

ODL-B100 Pag. 6
5. MONTEREN VAN DE ARMPROFIELEN
DIN 985 M6
› Plaats eerst de wagentjes in het armprofiel
1
5. MONTAGE DES PROFILS BRAS
5. MONTAGE DER ARMPROFILE
5. MOUNTING OF THE ARM PROFILES
› Placez d'abord les chariots dans le profile bras
› Zuerst schieben Sie die Karren in das Armprofil
› First place the wagons in the arm profile
L1
L2
W1
W2
ODL-B100 Pag. 7
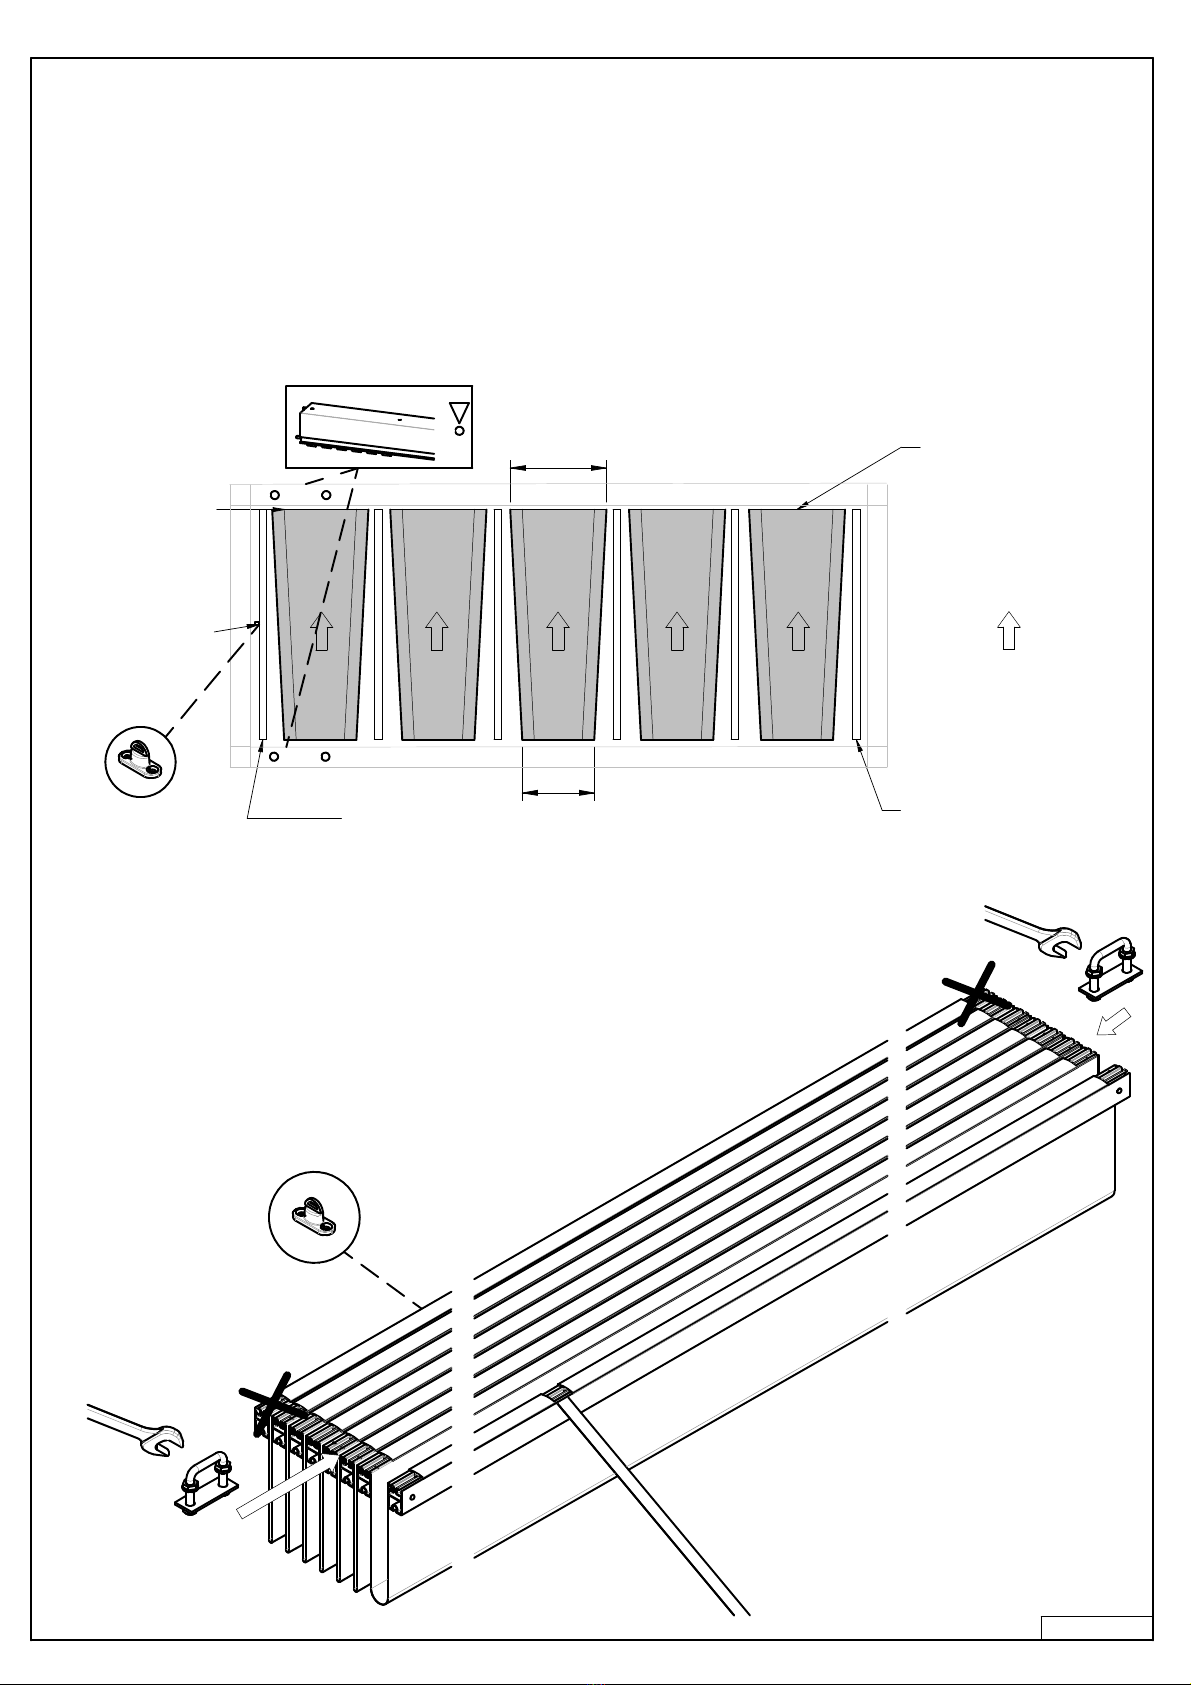
6. VOORBEREIDEN VOUWDAK
› Het vast volgprofiel
wordt aan het frame bevestigd aan de W2-kant. Het regenwater zal stromen naar de breedste
zijde van het doek, dit is dan de L1-kant van uw Cabana. (zie figuur)
y
x
AFWATERING
Vast volgprofiel (met tourniquet)
Profil de toile fix (avec tourniquet)
Fest Laufprofil (mit Führungsschiene)
Fixed flowprofile (with tourniquet)
Eerste volgprofiel
Premier profile de toile
Ersten Laufprofil
First flowprofile
Laatste doek
Dernière toile
Letztes Tuch
Back canvas
Eerste doek
Première toile
Ersten Tuch
Front canvas
W1
L2
W2
L1
Tourniquet doek
Tourniquet toile
Führungsschiene Tuch
Tourniquet canvas
6. PREPARATION DU TOIT PLIABLE
6. VORBEREITUNG FALTDACH
6. PREPARING FOLDING ROOF
› Le profil de toile fix se fixe au cadre au côté W2. L'eau va s'évacuer vers le côté de toile le plus large, ceci est le côté L1 de votre Cabana.
(voir image)
› Die Fest Laufprofil sind an dem Rahmen der Seiten W2 angebracht. Das Regenwasser wird auf die breiteste Seite des Daches fließen,
diese ist die L1 Seite des Cabana. (siehe Bild)
› The fixed flowprofile is attached to the frame on the W2-side. The rain water will flow to the broadest side of the screen, this is the L1-side
of your Cabana. (see figure)
VIDANGER
ENTWÄSSERUNGSRICHTUNG
DRAIN
› Monteer op elk volgprofiel (uitgezonderd het laatste) twee ophanghaakjes. Het
plaatje komt gelijk met de zijkant van het profiel. Schroef deze vast.
› Prévoyiez pour chaque profil de toile de 2 crochets (sauf pour le dernier). Le petit crochet
se glisse parfaitement sur le côté du profile. Visez le crochet pour le fixer.
› Montieren Sie auf jedes Laufprofil (mit Ausnahme des Letzten)
zwei Haken. Die Platte ist bündig mit der Seite des Profils.
Schrauben Sie es.
› Provide each flowprofile (except the last) with two hooks. The plate is equal with the side
of the profile. Fasten these with screws.
ODL-B100 Pag. 8
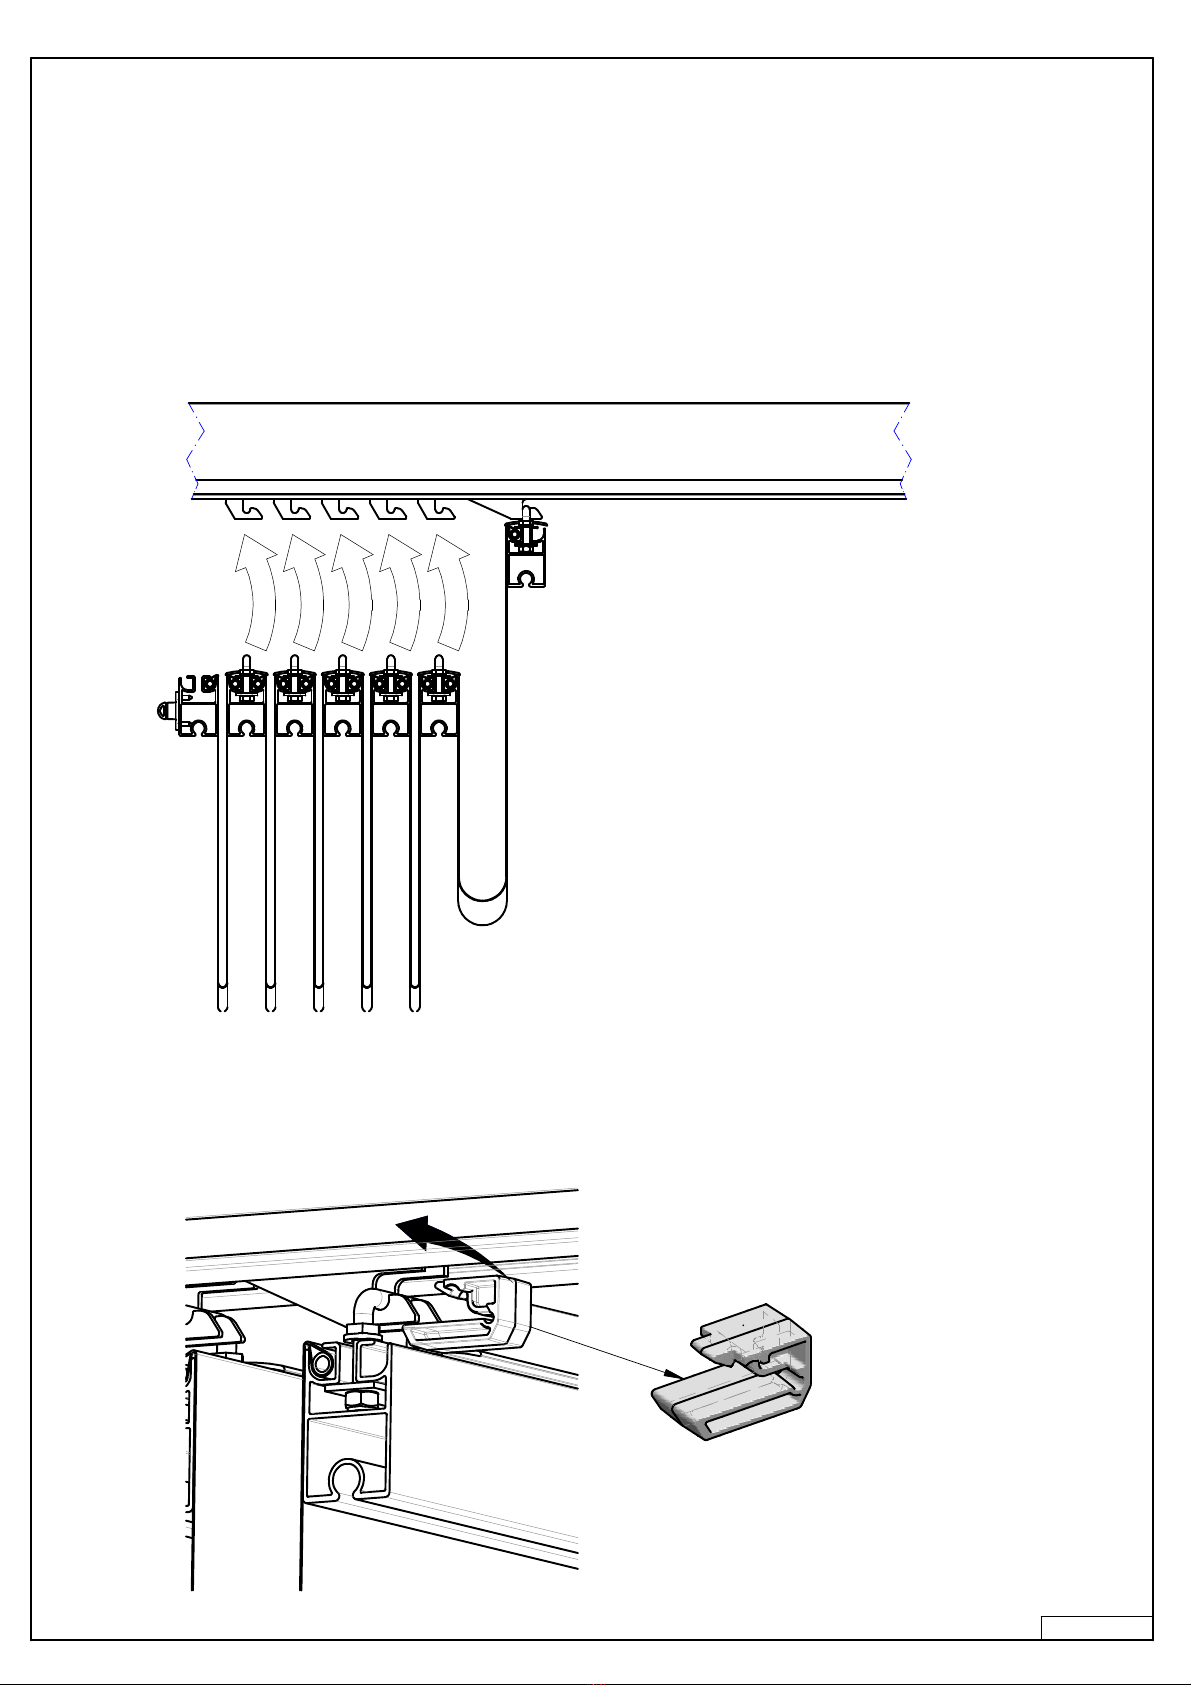
7. OPHANGEN VOUWDAK
› Haak het eerste volgprofiel in de eerste wagentjes, het tweede volgprofiel in de tweede wagentjes, ...
7. MONTAGE DU TOIT PLIABLE
7. HANG FOLDING ROOF
7. AUFHÄNGEN FALTDACH
› Voorzie elke haak van een kunststof clips.
› Accrochez le premier profil de toile au premier chariot qui se trouves dans la poutre (qui est déjà prémontée), le second profil
de toile au second chariot qui se trouves dans la poutre, etc ...
› Haken Sie die ersten Laufprofil in der ersten Karre, der zweiten Laufprofil in den zweiten Karre, ...
› Hook the first flowprofile in the first wagon, the second flowprofile in the second wagon, ...
› Pour terminer, il faut appliquer les clips sur chaque crochet pour tout fixer.
› Geben Sie jedem Haken mit einem Kunststoff clips zu blockieren.
› Provide each wagon with a plastic clips to block.

ODL-B100 Pag. 9
8. MONTAGE VAST VOLGPROFIEL
› Monteer de bout DIN603 M6x130 op de spacer voor volgprofiel. Schuif deze in het vast
volgprofiel.
Plaats het vast volgprofiel tegen de armprofielen en de bouten door de gaten Ø7 van
de armprofielen. Schroef deze vast met de borgmoeren DIN985 M6.
DIN603 M6x130
2x
DIN 985 M6
2x
8. MONTAGE DU PROFIL DE TOILE FIXE
8. MONTAGE FESTES LAUFPROFIL
8. MOUNTING FIXED FLOWPROFILES
› Montez le boulon DIN603 M6x130 sur l'entretoise pour profil de toile. Glissez le dans le profil de toile fix. Placez le
profil de toile fix contre le profil de bras, passez les boulons à travers des trous diamètre 7 des profils de bras. Visez
les avec les écrous de blocages DIN985 M6.
› Installieren Sie die Schraube DIN603 M6x130 auf die Abstandhalter Laufprofile. Schieben Sie ihn in die
Laufprofile. Platzieren Sie den Laufprofil an den Armprofil und die Schrauben dürch die Löcher Ø7 die Armprofile.
Fixieren mit der Kontermuttern DIN985 M6.
› Install the bolt DIN603 M6x130 on the spacer fixed flowprofile. Slide it into the fixed flowprofile. Place the fixed
flowprofile against the arm profile and the bolts through the holes Ø7 of the arm profiles. Secure it with the locking
nuts DIN985 M6.
Spacer volgprofiel
Entretoise pour profil de toile
Abstandhalter Laufprofile
Spacer flowprofile
2x
washer DIN125 M6
2x

ODL-B100 Pag. 10
9. MONTAGE AFDEKKAPJES VOLGPROFIELEN
› Duw de afdekkapjes op beide uiteinden van de volgprofielen.
9. MONTAGE DES CACHES POUR PROFILS DE TOILE
9. MONTAGE KAPPEN LAUFPROFILE
9. MOUNTING END CAPS FLOWPROFILES
› Schieben Sie die Kappen auf beiden Enden des Laufprofile.
› Push the end caps onto both sides of the flowprofiles.
› Fixez les caches pour profil de toile aux 2 extrémités de chaque profil.
Afwatering
Vidanger
Entwässerungsrichtung
Drain
10. MONTAGE EN GEBRUIK VAN DE SLUITHAAK
10. MONTAGE ET USAGE DU MORAILLON
10. MONTAGE UND VERWENDUNG DER SCHLIESSE
10. MOUNTING AND USE OF THE CLOSING HOOK
screw DIN7982
Ø4,2 x 25 coated
2x
click
OPENEN - OUVRIR - ÖFFNEN - OPEN
SLUITEN - FERMER - SCHLIEßEN - CLOSE

ODL-B100 Pag. 11
11. MONTAGE AFDEKKAP (OPTIONEEL)
› Plaats de afdekkap op de armprofielen zoals aangegeven in de figuur. Maak de
kap vast op de armprofielen met zelftappende schroeven.
Screw DIN7504K_6.3x16
2x
› Let op: verwijder
eerst de plastic
pluggen
11. MONTAGE DU PROFIL DE PROTECTION (EN OPTION)
11. MONTAGE AFDECKKAPPE (OPTIONAL)
11. MOUNTING ROOF COVER (OPTIONAL)
› Placez le profile de protection sur les profils bras comme sur le dessin ci-dessous.
Fixez le profil de protection aux bras avec des vis autoforantes.
› Legen Sie die Afdeckkappe auf die Armprofile, wie in der Abbildung dargestellt.
Fixieren Sie die Afdeckkappe auf die Armprofile mit selbstschneidenden Schrauben.
› Place the roof cover on the arm profiles as shown in the figure. Attach the cover
onto the arm profiles with self-tapping screws.
OPTION
› Remarque: Commencez par
retirer les bouchons en plastique
› Hinweis: Entfernen Sie zuerst
die Kunststoffstopfen
› Note: First remove the plastic
plugs
ODL-B100 Pag. 12
1. Garantiebepalingen
A. Duur van de garantie
Prostor garandeert uw Cabana voor een periode van 2 jaar vanaf aankoopdatum. Op het doek gelden de garantievoorschriften van de
respectievelijke fabrikant. Een herstelling onder waarborg leidt nooit tot een verlenging van de garantieperiode.
B. Wat omvat deze garantie?
De garantie omvat het kosteloos versturen van elk defect onderdeel.
C. Wat valt niet onder deze garantie?
- Schade berokkend door een ongeval, nalatigheid, storm, vorst, waterophoping, slechte montage, negeren van de voorschriften,
verkeerd gebruik of normale slijtage.
- Schade door blootstelling aan schadelijke atmosferische omstandigheden ten gevolge van industrie of aan hoog zoutgehalte.
- Kleine kleurafwijkingen t.o.v. de kleurstalen en tussen de componenten en profielen die een gevolg zijn van het industrieel proces.
- Kosten voor het demonteren of herplaatsen van het defecte onderdeel of de overkapping en de daaruit voortvloeiende schade of
daaraan verbonden verplaatsingskosten.
- Schade aan derden.
- Herstellingskosten via derden.
2. Procedure bij garantie
Neem steeds contact op met uw erkende Prostorverdeler!
Uw verdeler zal ter plaatse uw Cabana herstellen of de te vervangen onderdelen vaststellen, deze bij Prostor bestellen en de herstelling
zo spoedig mogelijk uitvoeren.
Procedure te volgen door de dealer bij het herstellen van vervangonderdelen:
- Contacteer de Prostor klantendienst voor een retournummer
- Geef het type product, productnummer en aard van het probleem door.
- Verpak het onderdeel voor verzending en vermeld het retournummer op de verpakking.
- Prostor laat het onderdeel ophalen bij de verdeler door zijn transporteur.
- Niet ge-autoriseerde zendingen of leveringen door derden worden altijd geweigerd.
-In geval van hoge herstellingskosten neemt Prostor eerst contact op.
- U ontvangt het herstelde onderdeel of de nodige wisselstukken zo snel mogelijk
3. Correct gebruik en onderhoud van uw Cabana
A. Gebruik
- De Cabana is een terrasoverkapping, en geen ruimte voor opslag van al dan niet waardevolle voorwerpen (meubels, etc).
- Bij stormwind of sneeuwval het vouwdoek openen, zodat het doek veilig opgeplooid is.
- Bij het bewegen van het doek kunnen condensatiedruppels naar beneden vallen.
B. Reiniging
- Reinig met een niet-agressief schoonmaakmiddel en lauw water. Spoel na met water.
- Gebruik voor het reinigen geen schuurmiddelen of hogedrukreiniger.
12. GARANTIECERTIFICAAT

ODL-B100 Pag. 13
12. CERTIFICAT DE GARANTIE
1. Dispositions de garantie
A. Durée de la garantie
Prostor garandit cette Cabana pour une période de 2 ans à compter de la date d'installation. La toile est couverte par la garantie du
fabricant.La réparation sous garantie n'entraîne jamais la prorogation de la période de garantie initiale.
B. Qu'englobe cette garantie?
La garantie englobe l'envoi gratuit de tout élément défectueux ou l'envoi de l'article après intervention gratuite.
C. Qu'est-ce qui n'est pas couvert par la garantie?
- Dégâts qui sont la suite d'un accident, d'une négligence, d'une tempête, du vent, d'une inendation, d'un montage incorrect, d'une
manque d'entretien, d'utilisations incorrectes ou d'usure normale.
- Dégats qui sont causés par l'exposition à des circonstances climatologiques nuisibles en raison de présence d'industries ou d'un taux
de sel trop élevé dans l'air ambiant.
- Légers écarts de teinte par rapport aux échantillons et entre les composants et les profiles, qui sont la suite du processus de fabrication.
- Des frais d'installations ou réinstallations de l'élément défectueux ou le store complet par des tiers et les frais de déplacement engagés
par eux.
- Dégats causés à des tiers.
- Les frais de réparation par des tiers.
2. La procédure en cas de garantie
Contactez toujours un revendeur Prostor agréé!
L'installateur réparera votre protection solaire sur place ou définira les éléments à remplacer, les commandera chez Prostor et effectuera
la réparation le plus rapidement possible.
Procédure à respecter par le concessionnaire pour le retour des pièces détachées à réparer ou à remplacer:
- Contactez le service clients Prostor pour obtenir un numéro de retour.
- Indiquez le type et le numéro de produit ainsi que la nature du problème.
- Emballez les éléments à retourner et indiquez le numéro de retour sur l'emballage.
- Prostor fera enlever le colis chez l'installateur par ses soins. Des retours non autorisés ou effectués par des tiers seront
systématiquement refusés.
- Au cas où les frais de réparation seraient trop élevés, Prostor contactera l'installateur.
- Prostor retournera dans les meilleurs délais les éléments réparés ou les pièces détachées nécessaires.
3. Entretien et usage correct de votre protection solaire
A. Usage
- La Cabana est un abri de terrasse, et non pas un espace pour stocker des objets coûteux.
- Ouvrez le toit quand il neige.
- Des gouttes d’eau peuvent tomber des toiles repliables lors de l’ouverture ou la fermeture.
B. Nettoyage
- Nettoyez à la brosse ou à l'aspirateur puis avec un détergent doux et de l'eau tiède. Rincer à l'eau claire.
- Ne refermez la toile que lorsque le tissu est parfaitement sec.
ODL-B100 Pag. 14
1. Garantiebedingungen
A. Dauer der Garantie
Prostor gewährt auf Ihre Terrassenüberdachung 2 Jahre ab Rechnungsdatum. Die Garantie des Stoffes wird durch die Hersteller
abgedeckt; Reparaturen unter Garantie, bedeuten nicht, dass sich die Gewährleistungsfrist verlängert.
B. Was ist in der Garantie enthalten?
Die Garantie deckt den Versand aller Ersatzteile frei Haus zum Standort des Cabanas.
C. Was ist in der Garantie nicht enthalten?
■Schäden, die durch einen Unfall, Fahrlässigkeit,Sturm, Wind, Ansammlung von Wasser, falsche
Installation, nicht nach den Wartungsvorschriften entsprechen, falsche Verwendung oder natürliche
Alterung entstanden sind.
■Schäden, die durch die Exposition gegenüber gefährlichen atmosphärischen Stoffen verursacht.
■Situationen durch Industrie oder einem hohen Salzgehalt entstanden sind.
■Kleine Farbabweichungen zwischen dem Stoff und dem Farbmuster und zwischen den Komponenten und Profilen, die von dem
industriellen Prozess verursacht wurden.
■Schäden an Dritten. Reparaturkosten durch einen Dritten.
2. Verfahren für die Garantie
Bitte kontaktieren Sie immer Ihren zertifiziert Prostor Händler!
Ihr Fachhändler repariert Ihren Terrassenüberdachung oder wird Ihnen helfen, herauszufinden, welche Teile ersetzt werden müssen. Er
wird diese bei Prostor bestellen und die Reparatur so schnell wie möglich durchführen.
Verfahren zu befolgen vom Händler bei der Reparatur von Ersatzteilen:
■Kontaktieren Sie den Prostor Kundendienst, um eine Reklamationsnummer zu erhalten.
■Geben Sie dem den Produkt-Typ, die Seriennummer und die eine Beschreibung des Problems.
■Verpacken Sie das defekte Teil ordnungsgemäß ein,und versehen den Karton mit der Reklamationsnummer.
■Prostor beauftragt seinen Transporter, die Teile bei Ihnen abzuholen.
Nicht autorisierten Sendungen oder Lieferungen von Dritten werden immer abgelehnt.
■Falls Reparaturkosten auf Sie zukommen, wird Prostor sich mit Ihnen in Verbindung setzen.
■Sie erhalten die reparierten Teile oder Ersatzteile so schnell wie möglich.
3. Der richtige Einsatz und die Wartung Ihrer Terrassenüberdachung
A. Verwenden
- Die Cabana ist ein Terrassenüberdachung, und kein Raum zu speichern ob oder ob nicht Wertsachen (Mobel, etc.)
- Beim Bewegen der Tuch, Kondensation Tropfen können fallen.
B. Reinigung
- Reinigen Sie mit einem milden Reinigungsmittel und lauwarmem Wasser. Spüllen Sie das Tuch mit Wasser.
- Verwenden Sie für die Reinigung kein Scheuermittel oder Hochdruckreiniger.
12. GARANTIE-ZERTIFIKAT

ODL-B100 Pag. 15
12. WARRANTY CERTIFICATE
1. Requirements for warranty
A. Duration of the warranty
Prostor guarantuees your Cabana for a period of 2 years. The warranty for fabric and spare parts is covered by the respective
manufacturers. Repair under warranty never means that the warranty period will be extended.
B. What does this warranty contain?
This warranty covers dispatch of all spare parts free of charge or dispatch upon repair of a default article.
C. What is not covered by this warranty?
- Damage caused by an accident, negligence, storm, wind, accumulation of water, wrong installation, not following the maintenance
instructions, wrong use or natural ageing.
- Damage caused by exposure to hazardous atmospheric situations due to industry or a high salt level.
- Small colour variations between the fabric and the colour samples and between the components and profiles, which are caused by the
industrial process.
- Costs for taking off or reinstalling the Cabana or the faulty part and damage or travelling costs resulting from it.
- Discoloration of the fabric/kristal due to external causes such as nicotine, smog or others.
- Damage to a third party.
- Repair costs by a third party.
2. Procedure in case of warranty
Please always consult your certified Prostor dealer!
Your dealer will repair your Cabana on the spot or will determine the parts that have to be replaced. He will order these from Prostor and
will carry out the repair as soon as possible.
Procedure to be followed by the dealer when replacing parts:
- Contact the Prostor customer service in order to obtain a return note number.
- Indicate product type, product number and the nature of the problem.
- Wrap the part carefully before dispatch and indicate the return note number on the wrapping.
- Prostor gives authorisation to its transporter to collect the part at the installers'.
- Non authorised returns or deliveries by a third party will always be refused.
- Prostor will contact you in case the repair cost will be too high.
- You will receive the repaired article or the necessary spare parts as soon as possible.
3. Correct use and maintenance of your Cabana
A. Use
- The Cabana is a sun shading system; not a storing place for your valuables (Furniture, etc…).
- In case of snow open the roof.
- When moving the roof fabric, moisture water can fall off the fabric.
B. Cleaning
- Clean the fabric by using a brush or vacuum cleaner, a nonaggressive cleaning product and tepid water.
- Do not close the Cabana until the fabric is dry. Never use an abrasive or a high pressure hose.

ODL-B100 Pag. 16
De waarborgbepalingen zijn onderdeel van de leverings-, betalings-, en verkoopsvoorwaarden.
Les termes de cette garantie font partie des conditions de livraison, de paiement et de vente.
The warranty terms are part of the delivery terms, payment terms and sales conditions.
Die Garantiebedingungen sind Bestandteil der Lieferbedingungen, Zahlungs- und Verkaufsbedingungen.
Brutsaert Trading - Lourdesstraat 84 - 8940 Geluwe (Belgium) - www.prostor.be - info@prostor.be
eindcontrole kwaliteitsnummer - numéro de contrôle final - final inspection quality number - Endkontrolle Qualitätsnummer
stempel - adres verkoper - installateur
cachet - adresse vendeur - installateur
stamp - address seller - installer
Stempel - Adress Verkaüfer - Installateur
Table of contents
Popular Outdoor Furnishing manuals by other brands

X-METAL
X-METAL 8610 Assembly instructions

Patio Sense
Patio Sense Simone 62441 manual

Hanover
Hanover Monaco MONDN7PCSW6RDTLLC-SU-R manual

Jack-Post
Jack-Post JPC-801-JE Use and care guide

Replas
Replas PREMIER SETTING 1.8m In Ground Assembly instructions

Yardistry
Yardistry MERIDIAN OCTAGON YM11924 Installation and operating instructions

Crosley Furniture
Crosley Furniture Kaplan CO6111 quick start guide

Backyard Discovery
Backyard Discovery 1906549 Owner's manual & assembly instructions

Safavieh Outdoor
Safavieh Outdoor Warlen PAT9016 quick start guide

Joyside
Joyside BW3S-M12-BEIGE instruction manual

Big Lots
Big Lots SW-RK1114 Assembly instruction

BENITO
BENITO Urban Gavarres VM311 Anchoring instructions


