PROTEA SVG 500 Technical manual

SVG 500
OPERATION INSTRUCTIONS
&
SPARES MANUALS

1
Ref. No.: CK 91/04496/23 Vat No.: 4830119907
Tel: 011 828 9935
Mobile: 082 458 7257
Email: [email protected]
Email: sean@proturf.co.za
For further information on any Protea products, please visit our website www.proteamachines.com
Postal Address
Germiston
Gauteng
South Africa
Manufacturers of Protea Range of Mowers, Sodcutters, Scarifiers
PROTEA TURF EQUIPMENT cc
Physical Address
BEDFORDVIEW
SOUTH AFRICA
32 Shaft Road
CONTACT DETAILS:
P.O.BOX 1673
Knights
2008 GAUTENG

1
Know your controls. Read the owner's manual 13 Stop the engine whenever you leave the
carefully. Learn how to stop engine quickly in an mower, even for a moment.
emergency.
14 Stop the engine before pushing mower
2
Make sure the lawn is clear of sticks, stones, across gravel drives, walks or roads.
bones, wire and debris. They could be thrown
by the blade. 15 Do not allow children or people
unfamiliar with these instructions to use
3
Stop the engine and disconnect spark plug wire the mower.
before checking or working on the mower.
16 On slopes or wet grass, be extra careful of
4
Before using, always visually inspect to see that your footing.
blade bolts and cutter assembly are not worn or
damaged. Replace worn or damaged blades 17 Never cut grass by pulling the mower towards
bolts in sets to preserve balance. you.
Damaged blades and worn bolts are a
major hazard. 18 Never use an electrically powered mower in
the rain or when grass is wet.
5
Check all nuts, bolts and screws often, always
be sure the mower is in safe operating 19 Be extremely careful when using a ride on
condition. Use only replacement parts made
mower on slopes.
and guaranteed by the original manufacturer
of your mower 20 Never leave wind-up starters in a wound
condition.
6
Add fuel BEFORE starting engine. Avoid spilling
petrol and do not fill the tank while the engine is 21 Do not over speed the engine or alter governor
running or while you are smoking. settings. Excessive speed is dangerous
and shortens mower life.
7
Do not mow whilst people, especially children
or pets are in the mowing area. 22 It is advisable to wear suitable eye protection
when operating a mower.
8
Never use the mower unless the grass catcher ,
or guards provided by the manufacturer, 23 Turn the fuel off at the conclusion of mowing
are in position. and reduce the throttle setting during
engine run-out.
9
Do not mow barefoot or in open sandals.
Wear long trousers and heavy shoes. 24 Store fuel in a cool place in a container
specifically designed for the purpose. In
10
Disengage all blade and drive clutches before general, plastic containers are unsuitable.
starting.
25 Never pick up or carry a mower when it is
11
Start the engine carefully with feet well away operating.
from the blades.
12
Do not operate engine in a confined space where
exhaust fumes (carbon monoxide) can collect.
POWER LAWNMOWER SAFETY PRECAUTIONS

SPECIFICATIONS
SVG500 SCARIFIER – VERTICUTTER – GROOMER
MOTOR
4/5HP Petrol Driven or 220V 1.5kW
electric
WHEELS
Steel split rims fitted with heavy duty
ball bearings, rubber tyres and wheel
scrapers
MASS
51kg - 62kg
(depending on the Reel used)
HEIGHT ADJUSTMENT
Variable sliding adjustment on all
four wheels
BLADE-TYPE SCARIFIER REEL
CUTTING WIDTH
BODY
Approximately 484mm (19")
Rustproof solid aluminium casting
CUTTING BLADES
VERTICUT REEL
18 Straight hardened and tempered
Spring Steel blades for verticutting,
spaced 25.4mm (1") apart
SPECIFICATIONS CORRECT AT TIME OF PRINTING, BUT ARE SUBJECT TO CHANGE
WITHOUT PRIOR NOTICE
Specially hardened and tempered
Spring Steel
18 Offset hardened and tempered
Spring Steel blades for scarifying,
spaced 25.4mm (1") apart
5 rows of hardened steel concrete
nails spaced 115mm apart with 24
nails per row at 25mm centres
GROOMING REEL
41 hardened and tempered Spring
Steel blades spaced 10mm apart
with 13 cutting tips per blade
PIN-TYPE SCARIFIER REEL

SPECIFICATIONS
SVG500 SCARIFIER – VERTICUTTER – GROOMER
SPECIFICATIONS CORRECT AT TIME OF PRINTING, BUT ARE SUBJECT TO CHANGE
WITHOUT PRIOR NOTICE
Pin-Type Scarifying Reel: 120 Hardened Concrete Nails
TO ADJUST HEIGHT OF CUT
Short trial runs at various height adjustments will help determine desired depth of cut. All four wheels can
be adjusted separately.
Notches on the top of the quadrants provide a reference and indicate equal movement on all wheels.
When transporting by pushing, disengage clutch and adjust reel to maximum height to prevent blade-
striking obstructions.
460198
OPERATING INSTRUCTIONS
Before starting engine, clutch lever should be in upward or release position.To start engine, follow
procedure outlined in engine manufacture’s instruction book. Maintain correct oil level in crankcase and
when operating under dry, dusty conditions, service the air filter and change engine oil frequently. When
ready to engage the machine, raise front wheels off ground slightly by bearing down on handle, increase
the engine throttle and then lower wheels onto turf.
460103
Blade-Type Scarifying Reel: 18 Offset Blades with 25.4mm Spacing
460200
Verticutting Reel: 18 Straight Blades with 25.4mm Spacing
460197
Grooming Reel: 41 Star Shaped Blades with 10mm Spacing
TO ADJUST DRIVE BELTS
This is affected by adjusting the 2 nuts found on the control rod
Front wheel quadrant, 461026, can be lowered further to give additional depth of cut.
TO REMOVE REEL
Remove the Belt Guard. Slip the belts off of the Pulley. Loosen and remove the two bolts each side of body,
which support the Reel. The Reel can now be safely removed from the machine.
TO REPLACE BLADES
Once the Reel has been removed from the machine, loosen and remove the nut and bearing in front of the
Pulley, Slide the pulley off the shaft, loosen and remove the hexagonal nut and the blades can now be slid
off of the shaft. Reassemble with liberal amounts of grease to aid in future replacements.

15
1
15
16
4
7
9
17
11
12
10
14
6
8
5
2
3
13
ELECTRIC
PAGE 1

ILLUS NO DESCRIPTION PART NO
1 Handle 461953
2 Cord Carrier 305445
3 Cord Grip 173024
4 Lever 305470
5 Cord Hanger Shaft 461952
6 Woodruf Key 3802051
7 Switch 1662067
8 2.2kw Single Phase. 1671610
9 Flange Adaptor Plate 461950
10 Foot Adaptor Plate 461951
11 Plug Base 1661150
12 Cord Extention Plug 1661235
13 Cord Hanger Hook 163029
14 1/2 UNF Nut Standard
15 M10 x 20 Screw & Washer Standard
16 8mm Flat Washer& 3mm Split Pin Standard
17 Drive Shaft 461960
ELECTRIC
Refer Figure
PAGE 2

14
13
3
4
5
15
11
12
2
1
6
7
8
9
10
PETROL FIG 1
PAGE 3

ILLUS.
NO.
DESCRIPTION
PART
NO.
1 Engine 5HP 6200302
2 V Belt - 13x770 - For EY20 3601297
3 Drive Shaft Pulley 461464
4 Drive Shaft (Petrol) 461878
5 Drive Shaft Bearing Ext. 461843
6 5/16 UNF x 1" Screw & Spring Washer Standard
7 Belt Guard 461368
8 Rear Cover 461480
9 Drive Shaft Key 657109
10 Ball Bearing 1128382
11 40mm INT. Circlip 1502012
12 Woodruff Key No.6 3802051
13 M12 Flat Washer Standard
14 1/2" UNF Nut Standard
15 Bearing Extrension Support 461448
16 M8 x 12 Grub Screw Standard
REFER FIGURE 1
SECTION 1
PAGE 4

8
8
5
2
9
4
1
3
6
7
FIGURE 2
PAGE 5

ILLUS.
NO.
DESCRIPTION
PART
NO.
1 Handle 461536
2 Control Lever with M10 Flat Washer & M3 Split Pin 305470
3 Control Rod with M8 Flat Washer & M3 Split Pin 461180
4 Inter Lever Bracket with 3/8" x 2" UNF Bolt & Nut 461181
5 Inter Control Lever 461552
6
Jockey Pulley Control Rod with M8 Flat Washer & M3 Split Pin 461190
7 Control Rod Pivot 461350
8 M8 x 30 Screw & Nyloc Nut Standard
9 Throttle Cable 656720
SECTION 2
REFER FIGURE 2
PAGE 6
2
2
4
4
1
22
16
21
20
19
18
5
6
4
3
4
15
3
12
11
10
9
7
8
13
14
FIGURE 3
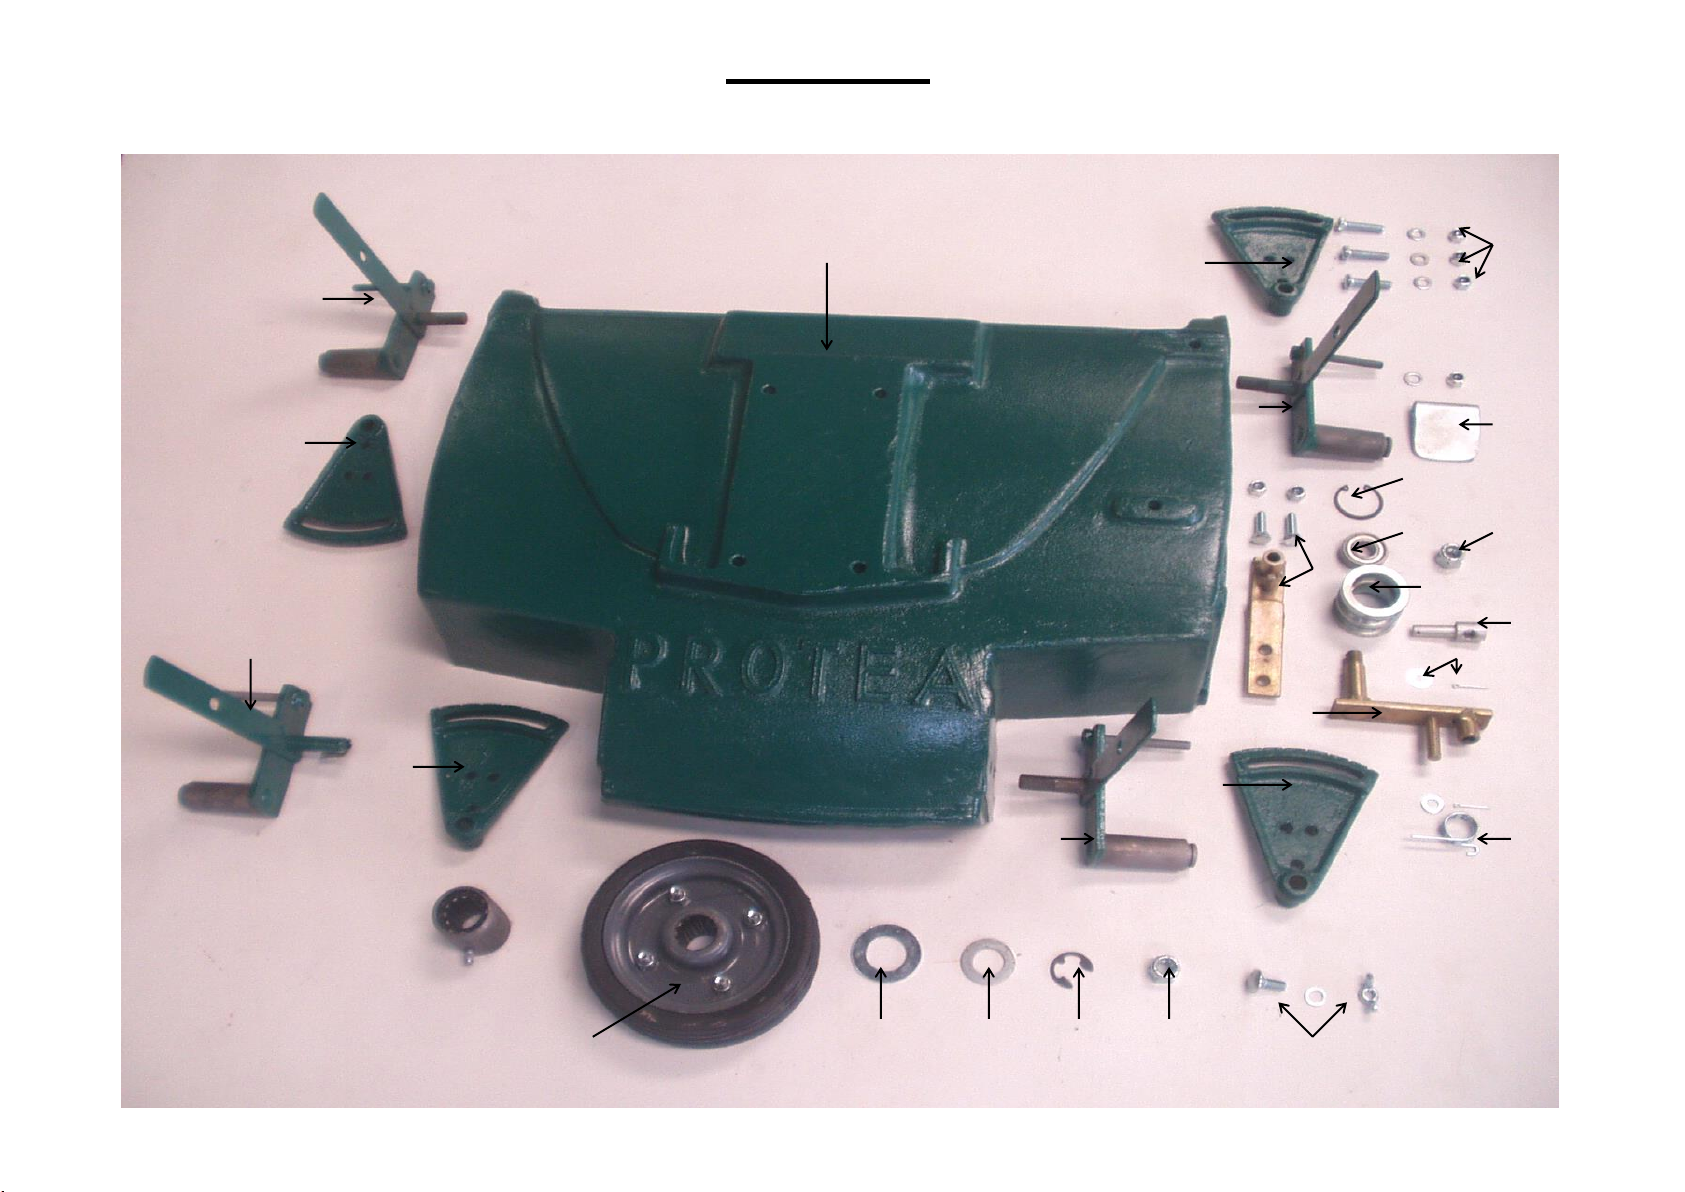
PAGE 7

ILLUS.
NO.
DESCRIPTION
PART
NO.
1 Body 461018
2 RH Adjusting Lever 461974
3 LH Adjusting Lever 461982
4 Wheel Quadrant 461026
5 Quadrant Bolt/Nut/Spring Washer M8 x 35 Standard
6 Mud Scraper 461704
7 INT Circlip M35 Standard
8 Jockey Arm Assy. with M8 x 25 Screw & Nyloc Nut 461229
9 Jockey Pulley Bearing 1126226
10 Jockey Pulley 461560
11 Jockey Pulley Lock Nut 1/2" UNF Standard
12 Control Rod Pivot 461350
13 Jockey Fulcrum Bracket 461296
14 M3 Split Pin & M10 Flat Washer Standard
15 Jockey Arm Spring 461270
16 Carriage Bolt & Wing Nut for Adjuster Lever Standard
18 Wheel Complete 6361583
19 Wheel Shim Washer M25 Standard
20 Circlip Washer M20 Standard
21 Circlip 454723
22 Nylon Lock Nut 1/2 UNF Standard
23 Tommy Bar Assy - Not shown 461998
SECTION 3
REFER FIGURE 3
PAGE 8
1
2
3
4
15
16
17
20
21
18
19
6
5
10
11
12
13
14
7
8
9
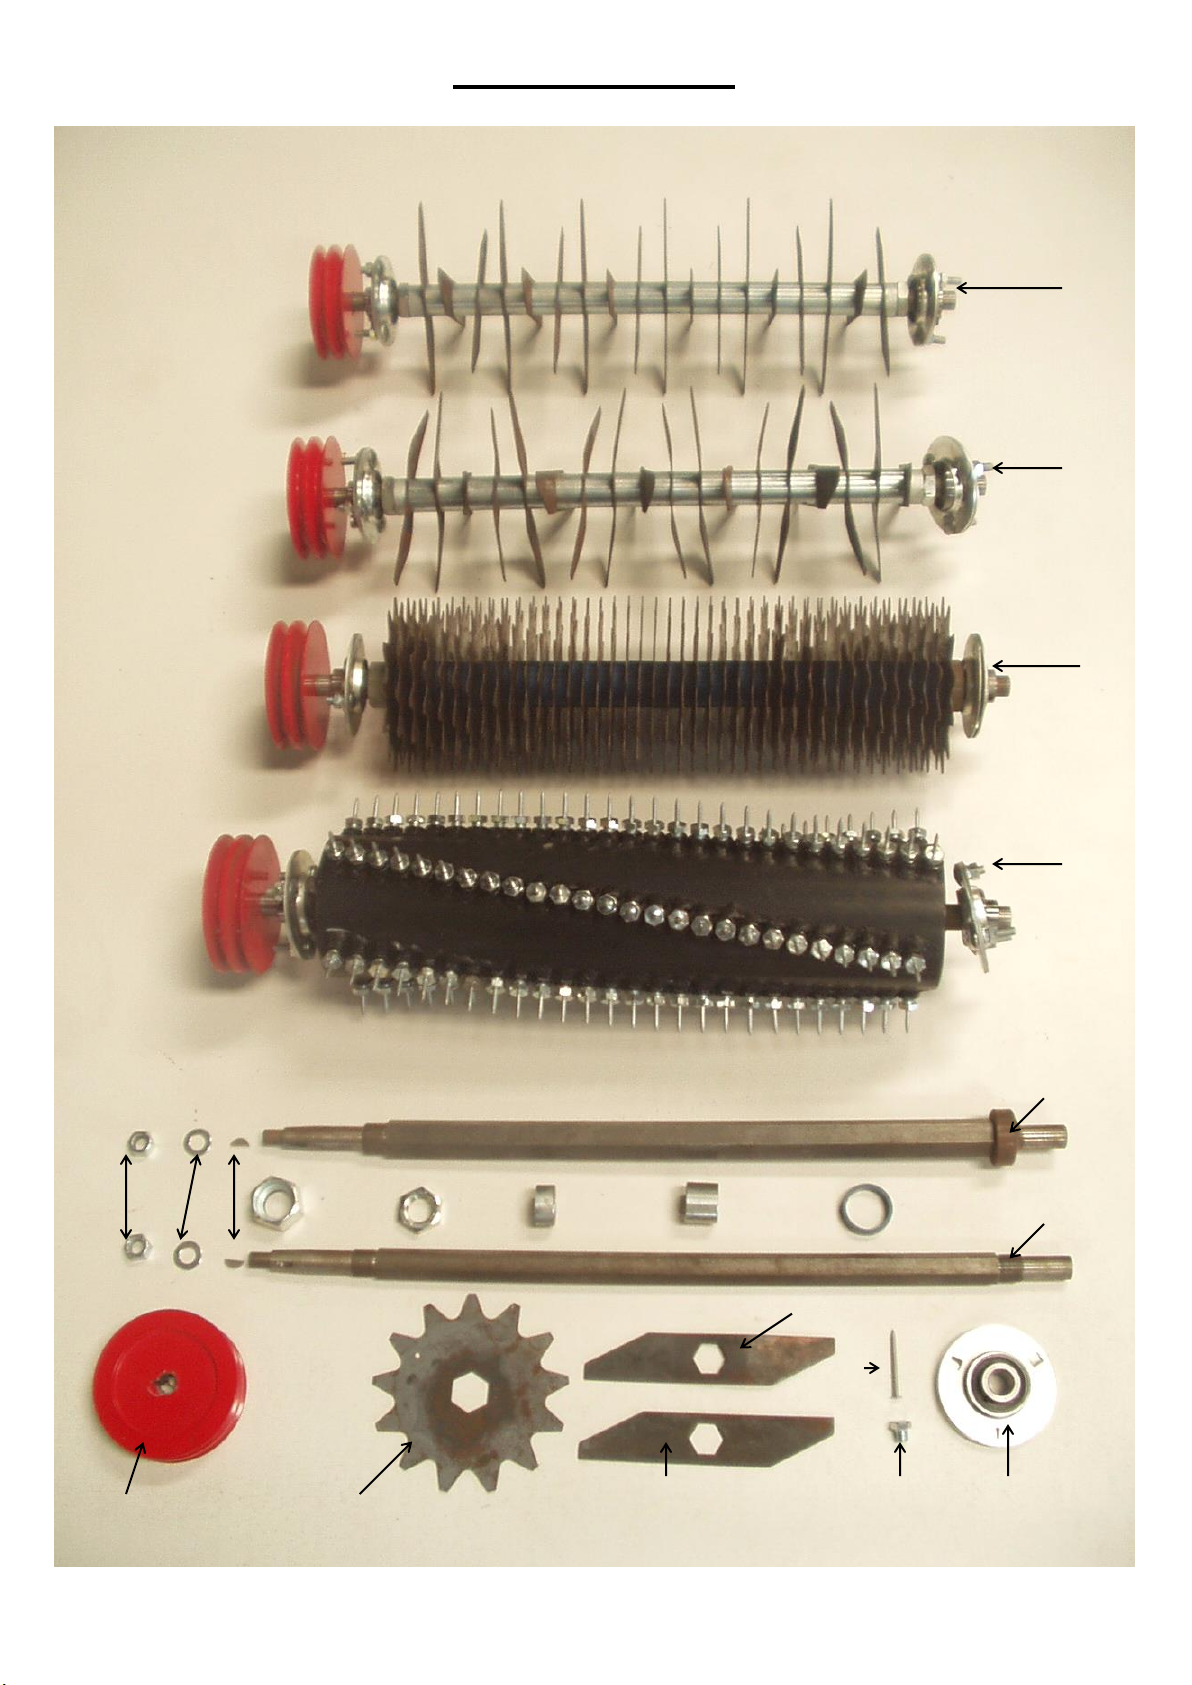
ACCESSORIES
PAGE 9

ILLUS.
NO.
DESCRIPTION
PART
NO.
1 Verticut Reel Assy (19 Straight Blades) 460200
2 Scarifier Reel Assy (19 Offset Blades) 460103
3 Groomer Reel Assy (41 Blades) 460197
4 Pin Type Reel Assy (120 Pins) 460198
5 Groomer Reel Shaft 461956
6 Scarifier/Verticut Reel Shaft 461149
7 Shaft Lock Nut 1/2" UNF Standard
8 M12 Spring Washer Standard
9 Woodruf Key 3802051
10 Groomer Blade Lock Nut 659880
11 Verticut/Scarifier Blade Lock Nut 2441303
12 Verticut/Scarifier End Blade Spacer 461165
13 Verticut/Scarifier Blade Spacer 461659
14 Groomer Blade Spacer 5306082
15 Shaft Pulley 461173
16 Groomer Blade 5306081
17 Verticut Blade (Straight) 461640
18 Scarifier Blade (Offset) 461130
19 Scarifier Nail 2441305
20 Scarifier Nail Bolt 461957
21 Shaft Bearing 1721010
SVG ACCESSORIES
PAGE 10
Other PROTEA Lawn Mower manuals


Popular Lawn Mower manuals by other brands

Alamo Industrial
Alamo Industrial A-Boom Operator's manual

Earthwase
Earthwase 60236 T2 Operator's manual

Great Dane
Great Dane Chariot / Chariot LX GDRZ48-17KAE Operator's manual

Craftsman
Craftsman 917.378441 owner's manual

Snapper
Snapper 2167517BV Safety instructions & operator's manual

Toro
Toro 72030 manual


