Supplied By www.heating spares.co Tel. 0161 620 6677
25
24
To replace safety valve
• Drain down heating circuit of boiler as described previously.
Simplification: for simpler work remove gas valve module and pump as described
previously.
• Remove expansion vessel hose from hydraulic block.
• Remove draining pipe from safety valve and unscrew safety valve.
• Fit replacement safety valve in reverse order to removal.
Important: Seal the safety valve thread by jointing compound.
To replace domestic heat exchanger
• Drain down heating circuit of boiler as described previously.
Drain down hot water circuit of boiler as follows:
• From below boiler, close cold water inlet isolating valve.
• Open a hot tap to drain hot water circuit.
• Remove gas valve.
• Unclip pump and pull forwards.
• Disconnect expansion flexible hose at connection to vessel fixing.
• Remove fixing screws and plate exchanger over hydraulic block.
• Fit replacement heat exchanger in reverse order to removal, ensuring seals are cor-
rectly positioned in hydraulic block.
• Open isolating valves on flow and return connections, refill, vent and pressurise
boiler. Check for leaks.
• Open cold water isolating valve. Check for leaks.
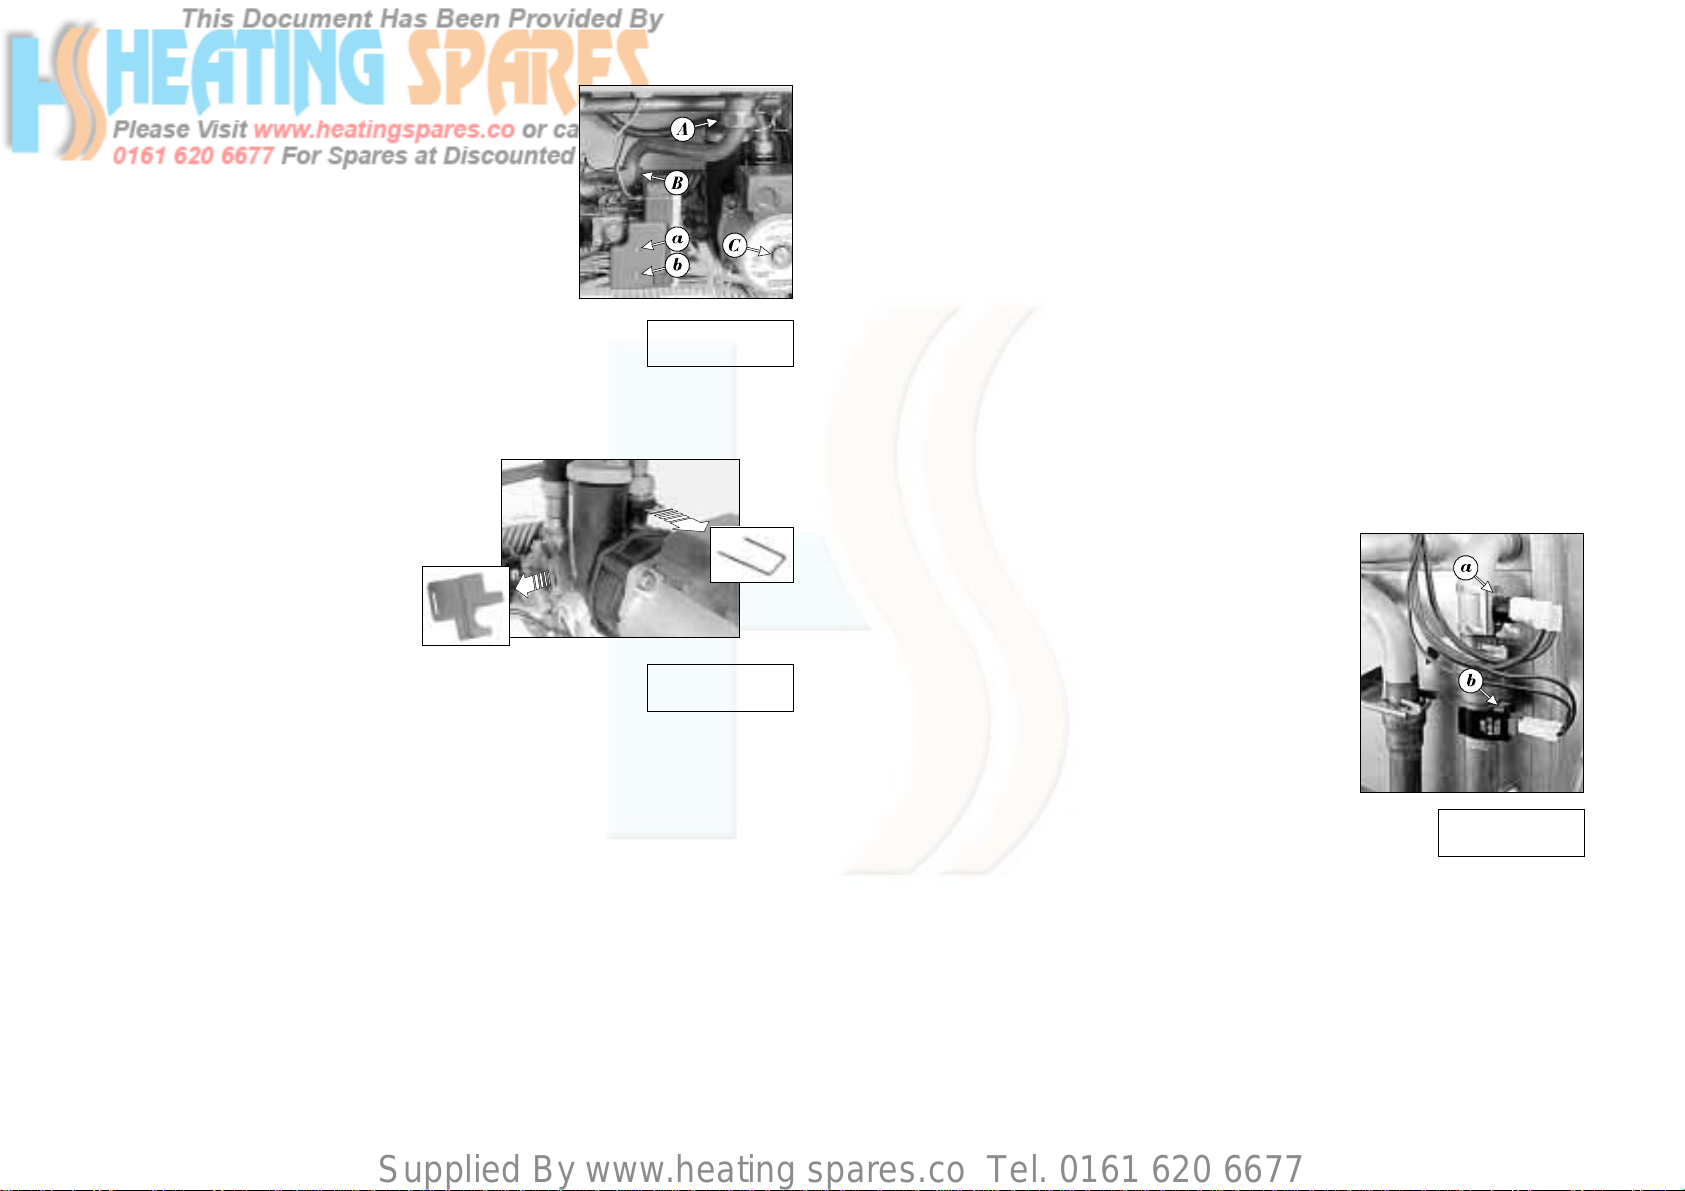
To replace overheat thermostats
Important: Isolate boiler from electrical supply before
this operation – connections to overheat thermostats
are mains voltage.
• Locate overheat thermostat (a) to left hand side of
sealed chamber, see diagram 20.
• Unclip thermostat from pipe.
• Pull off electrical connections from thermostat.
• Fit replacement thermostat in reverse order to remov-
al.
Note: No heat sink compound is required. The polarity
of the connections is not important.
To replace heating water thermistor
• Locate thermistor (b) clipped onto flow pipe to left hand side of
sealed chamber below overheat thermostat, see diagram 20.
• Unclip thermistor from pipe.
• Pull off electrical connections from thermistor.
• Fit replacement thermistor in reverse order to removal.
Note: No heat sink compound is required.
The polarity of the connections is not important.
To replace hot water thermistor
• Pull off electrical connections from thermistor and unscrew thermistor from left part of
hydraulic block.
• Remove gas valve module as described previously.
• Fit replacement thermistor in reverse order to removal.
Note: The polarity of the connections is not important.
To replace gas valve module
• Locate gas valve module attached to side of gas valve,
see diagram 18.
• Unscrew screws (a) and (b) securing cover onto gas
valve module.
• Remove cover and disconnect multi-plug from module.
• Disconnect ignition and flame sense leads from mod-
ule and withdraw module from gas valve.
• Fit replacement module in reverse order to removal.
• Reconnect ignition and flame sense leads, the con-
nections are uniquely sized to ensure correct replace-
ment.
• Refit cover ensuring all sealing grommets are correctly
located in module body.
To replace gas valve
• Ensure that gas supply is turned off at gas cock.
• Unscrew screw (a) and remove gas valve module.
• Undo nuts securing gas supply pipe be-
tween burner and gas valve and remove
pipe, taking care not to lose sealing wash-
ers, see diagram 18.
• Remove gas inlet connection to boiler.
• Unscrew 2 screws securing gas
valve to boiler bottom.
• Remove gas valve by lifting up-
wards and out of boiler.
• Fit replacement gas valve in re-
verse order to removal.
• Check for gas-tightness.
To replace burner
• Remove burner as described in ‘Cleaning the burner’.
• Fit replacement burner in reverse order to removal.
• Check if the injectors are correct.
To replace pump
Drain down heating circuit only of boiler as follows:
• From below boiler, close isolating valves on flow and return connections to boiler.
• Open boiler drain valve on left hand side of hydraulic block.
Note: It is not necessary to drain down entire heating circuit to carry out this work.
Simplification: for simpler work remove gas valve module and right side cover.
• Disconnect pump cable.
• Remove 2 clips fixing pump, see diagram 19.
• Unscrew 2 screws securing the pump to boiler bottom.
• Lift up the pipe and remove pump by lifting forward and out of boiler.
• Fit replacement pump in reverse order to removal.
• Open isolating valves on flow and return connections,
• Refill, vent and pressurise boiler. Check for leaks.
Diagram 18
Diagram 19
Diagram 20


 KTZ User manual")


