ProtoMachines LED2 Assembly instructions

ProtoMachines
www.ProtoMachines.com
support@protomachines.com
LED2 –Full Color Light
Operating/Safety Instructions
THANK YOU for choosing the ProtoMachines
LED2 Full Color LED Light. It is the result of years of
research and development and represents the cutting
edge of full color LED technology. Please review these
instructions carefully to familiarize yourself with the design
and operation of this device.
SPECIFICATIONS:
Input voltage:
7.4VDC
Input power:
10 watts
Ambient temperature:
32F - 122F
(0C - 50C)
Humidity:
85% or less
Weight:
0.85lb (390g)
Dimensions:
8” x 4” x 2.5” LWH
Compatible batteries:
Li-ion 2x18650 PCB
٭Specifications subject to change without notice.
٭Designated trademarks and brands are the property of their
respective owners.
© 2015 ProtoMachines LLC All rights reserved.
IMPORTANT SAFETY
INSTRUCTIONS:
WARNING:
When using any battery operated device, basic
safety precautions should always be followed
to reduce the risk of fire, electric shock and personal
injury, including the following:
1. Read this instruction manual carefully and understand it
fully before use.
2. Keep out of reach of children. This is not a toy.
3. The heatsink may become very hot during usage.
Do not touch the heatsink until it has cooled down.
Do not block the heatsink fins or impede airflow.
4. Do not drop. The product may malfunction if subjected
to strong shocks or vibration. Do not operate if it has
received a sharp blow, been dropped, or damaged.
5. Keep dry. This device is not waterproof. Do not
immerse in or expose to water.
6. Keep dust and debris away from the controls.
7. Do not disassemble this device. There are no user
serviceable parts inside.
8. To prevent accidents or excessive battery drain, always
remove the batteries after use, before storage or
transport.
9. If any problem develops, consult your reseller or
ProtoMachines for assistance.
WARNING:
This is an extremely powerful LED light source.
Always use common sense when operating
this product.
Do not stare directly into the beam.
Do not aim at your eyes, or the eyes of other people or
animals. Prolonged exposure may result in injury or
blindness.
Please do not use this product if you do not fully
understand these instructions and warnings.
CARE AND STORAGE:
Cleaning
To remove dust and fingerprints from the body of the
LED2, wipe gently with a soft, dry cloth.
To clean the LCD screen or front lens, wipe the surface
lightly with a soft dry cloth only. Do not apply pressure or
use alcohol, thinner or other volatile chemicals.
Storage
When the LED2 will not be used for an extended period of
time, remove the batteries and store it in a cool, dry area
away from direct sunlight. Do not store your LED2 near
flammable or corrosive chemicals, near strong
electromagnetic fields, or in temperatures above 122°F
(50°C) or below 32°F (0°C).
OPERATION
Installing the batteries
The LED2 is powered by two (2) 18650 Li-ion batteries.
Always use PCB protected cells capable of at least 3A
discharge rate.
Always switch the light off before inserting or removing
the batteries.
1. Slide latch towards the rear and open battery door.
2. Insert two (2) 18650 Li-ion batteries with polarities as
shown.
3. Close the battery door while holding the latch in the
open position. Make sure the latch springs back into its
full-forward position after the door is closed.
Removing the batteries
1. Press and hold the front edge of the battery door to
release the battery latch.
2. Slide battery latch towards the rear to open door.
3. Remove batteries and re-close battery door.
Sleep mode
The LED2 will automatically enter Sleep Mode after being
inactive for a few minutes. Pressing the POWER switch
or OK button will wake the LED2 out of Sleep Mode. The
LED2 will NOT enter sleep mode as long as the POWER
switch is turned on.
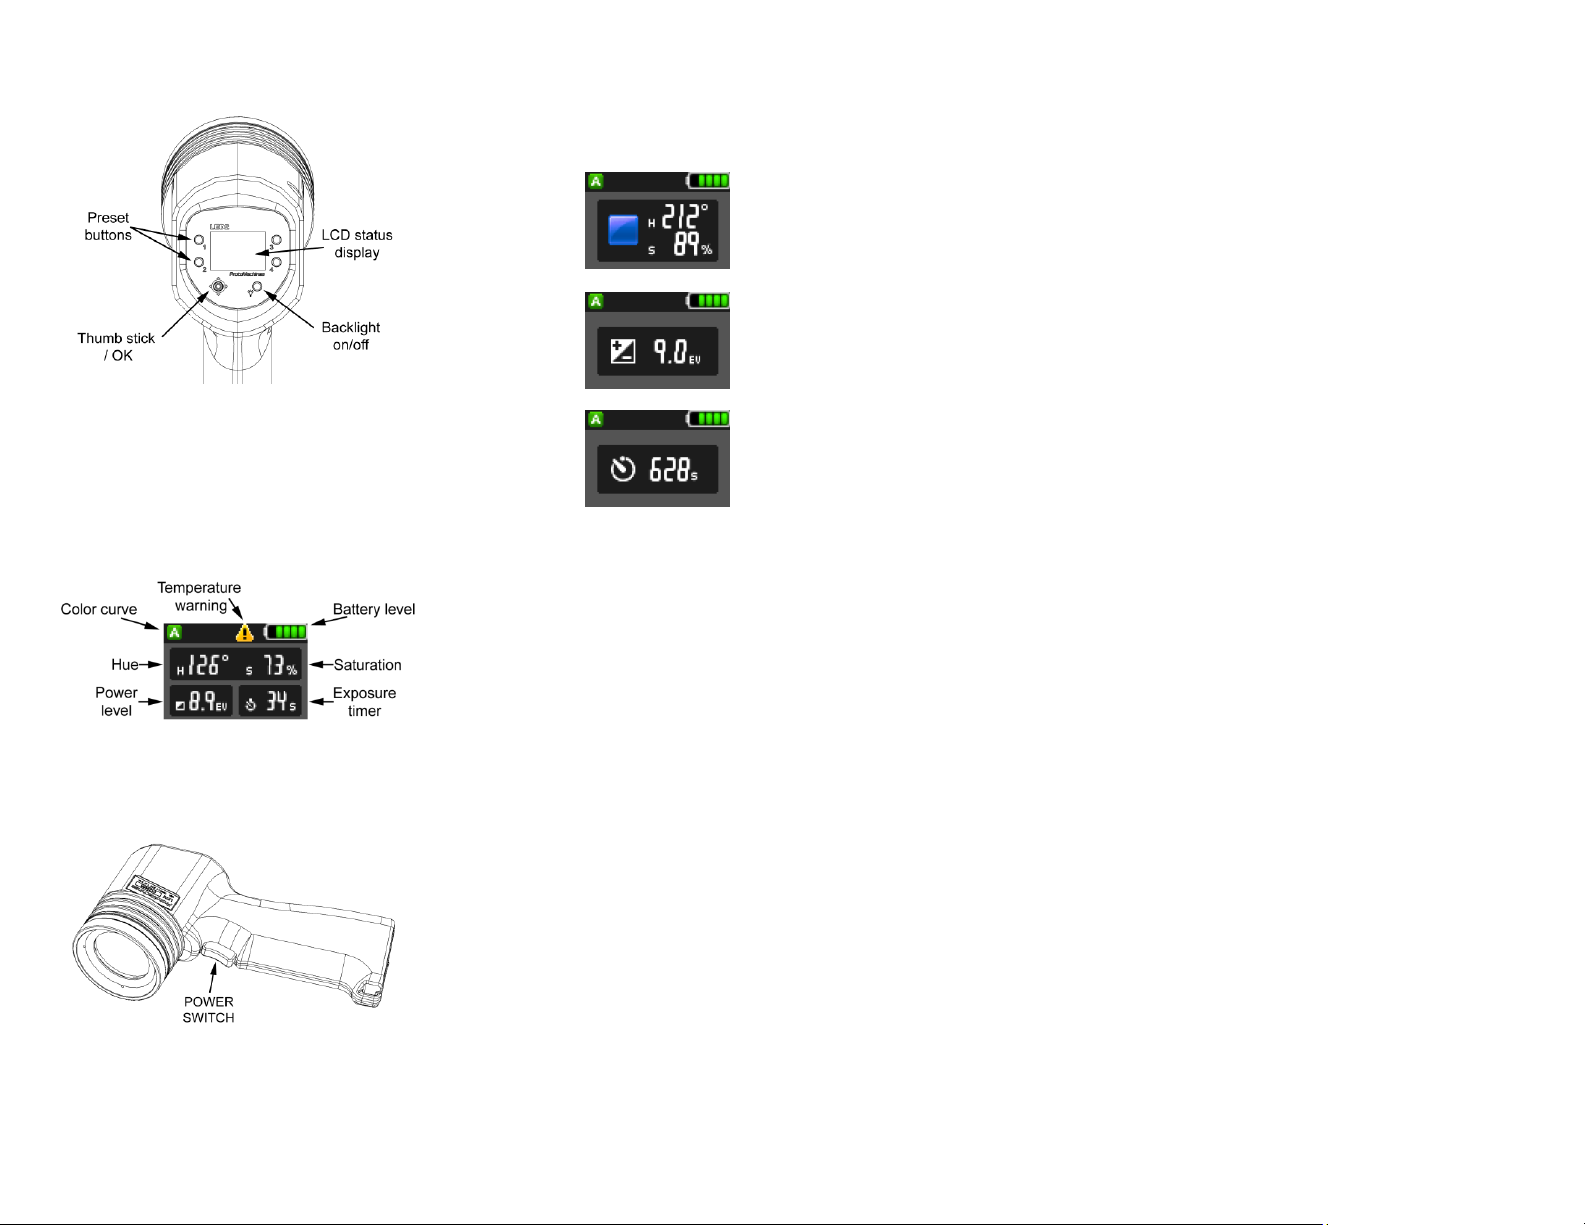
User controls
Home Screen
The Home Screen displays a snapshot of the LED2’s
current settings and status. The toolbar at the top of the
display shows the active color curve, temperature
warnings, and battery level. The current color, power and
timer values are also displayed. The background of the
Home Screen is tinted to provide a rough indication of the
currently active color
Turning on/off
Make sure batteries with adequate charge are installed.
The battery level icon will give an estimation of remaining
battery life.
Press the POWER switch to turn on the light.
To turn off, press the POWER switch again.
Adjusting the active settings
To change the active color settings, press the OK button
from the Home screen. This will bring you to the
hue/saturation selection screen.
Move the thumbstick UP/DOWN to
change the hue and LEFT/RIGHT
to adjust the saturation. Press OK
to advance to power selection.
Move the thumbstick UP/DOWN to
adjust the exposure in 0.1 stop
increments, or LEFT/RIGHT to
adjust the exposure in whole stop
increments. Press OK to advance
to timer selection.
Move the thumbstick UP/DOWN to
adjust timer in 1 second
increments, or LEFT/RIGHT to
adjust in 100 second increments.
Press OK to return to Home
Screen. Set to --- to disable timer.
NOTE - the new timer value will not become active until
the next time the output is switched on using the POWER
switch.
Recalling presets
The PRESET buttons can recall a combination of hue,
saturation, power level and exposure duration. The
PRESET buttons operate in a similar fashion to presets
on a car radio.
Presets 1 - 4 (and 5 –8) are retrieved by pressing or
double-pressing the numbered buttons respectively. For
example, button 1 will retrieve preset 1 if single pressed
and preset 5 if double-pressed.
Storing presets
Once you have tuned your desired color/power/timer
settings, press and hold the appropriate PRESET button
until the preset save menu is displayed. Use the
thumbstick to navigate among the settings.
Save single press –Save settings to presets 1 –4
respectively. These can be recalled later with a
single press of the appropriate preset button.
Save double press –Save settings to presets 5 –8
respectively. These can be recalled later with a
double press of the appropriate preset button
Hue/sat/power/timer –Press OK to toggle whether
each attribute is saved respectively. For example if
just the HUE checkbox is selected, activating this
preset will only recall the hue (and the other settings
will be unaffected.)
Main menu
The Main menu contains additional functionality and can
be accessed by pressing and holding the OK button.
Power off –Puts the LED2 into sleep mode and
disables LED output. Note this is not a substitute for
removing the batteries in preparation for storage.
Output color profile –Select a color curve to match
camera sensor or usage.
RAW –Optimized for human vision. Maximum output.
Curve A –Balanced for most camera sensors.
Curve B –May yield smoother results with some sensors.
LED color balance –Allows fine tuning of LED color
output to match certain camera sensors.
LCD color balance –Allows tuning of display color
balance. Adjustment is not advised.
Restore factory defaults –Erases changes to user
settings. Does not reset LED or LCD adjustments.
Backlight operation
The backlight may be temporarily disabled by pressing the
BACKLIGHT button. Pressing it again toggles it back on.
The backlight will turn off automatically when the LED2
enters Sleep mode. Manually toggling the backlight will
not trigger sleep mode nor extend battery life.
LIMITED WARRANTY
Before using this product, please read this warranty
carefully. By using your LED2 Light, you agree to the
terms and conditions of this warranty. If you do not
accept this warranty, do not use your LED2 Light.
ProtoMachines will not be liable for any indirect,
incidental, or punitive damages arising from use of this
product.
The LED2 Light is warranted to the original purchaser to
be free from manufacturing and component defects for
one (1) year from the date of purchase. This limited
warranty is the sole and exclusive remedy, offered in lieu
of all other warranties, expressed or implied.
ProtoMachines has sole discretion to determine
manufacturer’s defects and will (at its option) repair or
replace it, or refund the purchase price. Repair may use
new or refurbished parts. Replacement may be with a
new or refurbished unit.
This warranty does not cover normal wear and tear,
damage caused by accident, abuse, misuse, modification
of the product, or external causes such as acts of nature,
or damage to or from any non-ProtoMachines product
used in connection with this product. This warranty is void
if the product is disassembled or used for commercial
and/or rental purposes. Rev 2.0
Other ProtoMachines Lighting Equipment manuals

Popular Lighting Equipment manuals by other brands


hillvert
hillvert HT-WEDGE-50 user manual

ambiance
ambiance LV-054 Installation and safety instructions

Philips
Philips MasterColor CDM P-5970 Brochure & specs

NORDRIDE
NORDRIDE VISION LED BALLOON operating instructions

Chauvet
Chauvet SlimPAR QUAD 12 IRC Quick reference guide

Chauvet
Chauvet COLORtube user manual

ETC
ETC Source Four HID PARNel user guide
Osram
Osram TRAXON Media Pixel Ribbon DMX Outdoor Flat Mounting guide

Larson Electronics
Larson Electronics LEDSB-3XQF12V-1227-WF-3XKT Installation and mounting guide

Wetelux
Wetelux 81 61 76 instruction manual

EuroLite
EuroLite 51930439 user manual

Elation
Elation TVL4000 User instructions