ProVcom PROV-H-710 User manual

PROVCOM®
Conference Phone System
Installtation Setup
User manual
PROV-H-710

IMPORTANT SAFETY INSTRUCTIONS
When using your telephone equipment, basic safety precautions should
always be followed to reduce the risk of fire, electric shock and injury to
persons, including the following:
•This unit is NOT waterproof! DO NOT expose this unit to moisture.
•DO NOT expose this unit to rain.
•Do not use this product near water, for example, near a bath tub, wash bowl,
kitchen sink or laundry tub, in a wet basement or near a swimming pool.
•Avoid using a telephone (other than a cordless type) during an electrical
storm. There may be a remote risk of electric shock from lightning.
•Do not use the telephone to report a gas leak in the vicinity of the leak.
•Use only the power cord indicated in this manual.
SAVE THESE INSTRUCTIONS!
Important Notice:
•Under power failure conditions this appliance may not operate. Please
ensure that a separate telephone, not dependent on local power, is
available for emergency use.
Contents
WHAT’S IN THE BOX? .........................................................................................4
Installing your phone ...........................................................................................5
Installing your phone ...........................................................................................6
Connection Diagram............................................................................................6
Connecting IP Phone ........................................................................................... 7
GETTING TO KNOW YOUR PHONE..................................................................8
Keypad.....................................................................................................................9
USING YOUR PHONE......................................................................................... 10
Dial a Call............................................................................................................ 10
VoIP Line............................................................................................................. 10
PSTN Line............................................................................................................10
Answer a Call..................................................................................................... 10
Receive Another Call ........................................................................................ 10
Mute a Call...........................................................................................................10
Hold a Call ...........................................................................................................10
Web login.............................................................................................................10
Redial a Call........................................................................................................10
End a Call ........................................................................................................... 10
Conference Call ...................................................................................................11
Selection/Soft Keys .............................................................................................11
Record a Conversation.......................................................................................11
Play a Conversation............................................................................................11
Call Waiting...........................................................................................................11
For Chinese Customer........................................................................................11
USING THE MENU.................................................................................................12
Phonebook............................................................................................................13
Search For an Entry............................................................................................13
Add an Entry........................................................................................................13
Speed Dial ...........................................................................................................13
Erase All................................................................................................................13
Call History ...........................................................................................................14
Incoming Calls......................................................................................................14
Dialed Numbers ...................................................................................................14
Erase Record .......................................................................................................14
Phone Setting.......................................................................................................15
Call Forward.........................................................................................................15
All Forward............................................................................................................15
Busy Forward.......................................................................................................16
No Answer Forward.............................................................................................16
Ring Timeout........................................................................................................16
Do not Disturb ......................................................................................................16
Alarm Setting........................................................................................................16
Date & Time Setting............................................................................................17
Volume & Gain.....................................................................................................17
Ringer....................................................................................................................18

Auto Dial ...............................................................................................................18
PSTN Flash..........................................................................................................18
INSTALLING EXTENSION microphones ........................................................ 19

WHAT’S IN THE BOX?
Conference Phone System
AC Adaptor/Interface Module
RJ 45 Cable X 2
RJ 11 Cable
8-Stream Cable
(Telephone Line Cord)
OPTIONAL ACCESSORIES
EACOME
Extra Microphone (up to 2)
E4P4C-Stream Cable X 2
•If any items are missing or damaged, contact your place of purchase immediately.
Never use damaged products!
•Need help? Get answers at our website:
please refer to the VoIP user manual.
Installing your phone
For best performance of the VoIP Conference Phone, avoid the following
locations when selecting an installation location:
•Areas with high background noise. The microphone(s) might pick up these
sounds and prevent the speakerphone from going into receiving mode
when you finish talking.
•Surfaces affected by vibration.
•Recessed areas such as in a corner, under a cupboard, or next to a
cabinet. These locations may cause an echo effect.
CAUTION:
To reduce risk of personal injury, fire, or damage, use only the
power adaptor supplied with this product.
1. Plug one end of an 8-Stream cable into the EXT jack of the AC adaptor.
Plug the other end into the POWER jack on the port bay of the VoIP
Conference Phone. See (1) on the connection diagram, page 6.
2. Plug the Telephone Line cord into the LINE jack on the AC adaptor. Plug
the other end into a telephone wall jack.
See (2) on the connection diagram.
3. Plug the optional extra microphones into the EXT1 and EXT2 jacks of the
VP300. See (5) & (6) on the connection diagram.
4. Plug the AC adaptor cord into a standard AC power outlet. The VoIP
Conference Phone display will show ‘SYSTEM BOOTING...’ and then the
standby display. See (3) on the connection diagram.
5. For VoIP calls, and PC Web-Brower control of VoIP Conference Phone
settings: See pages 7 and 10.
NOTE:
•The VoIP Conference Phone is properly installed for PSTN (land line)
use if you press and hear a dial tone - the display will show ‘PSTN
Dialing’. Otherwise, recheck all the installation steps.
•In the event of a power outage, the VoIP Conference Phone will not be
able to make and receive calls.
45
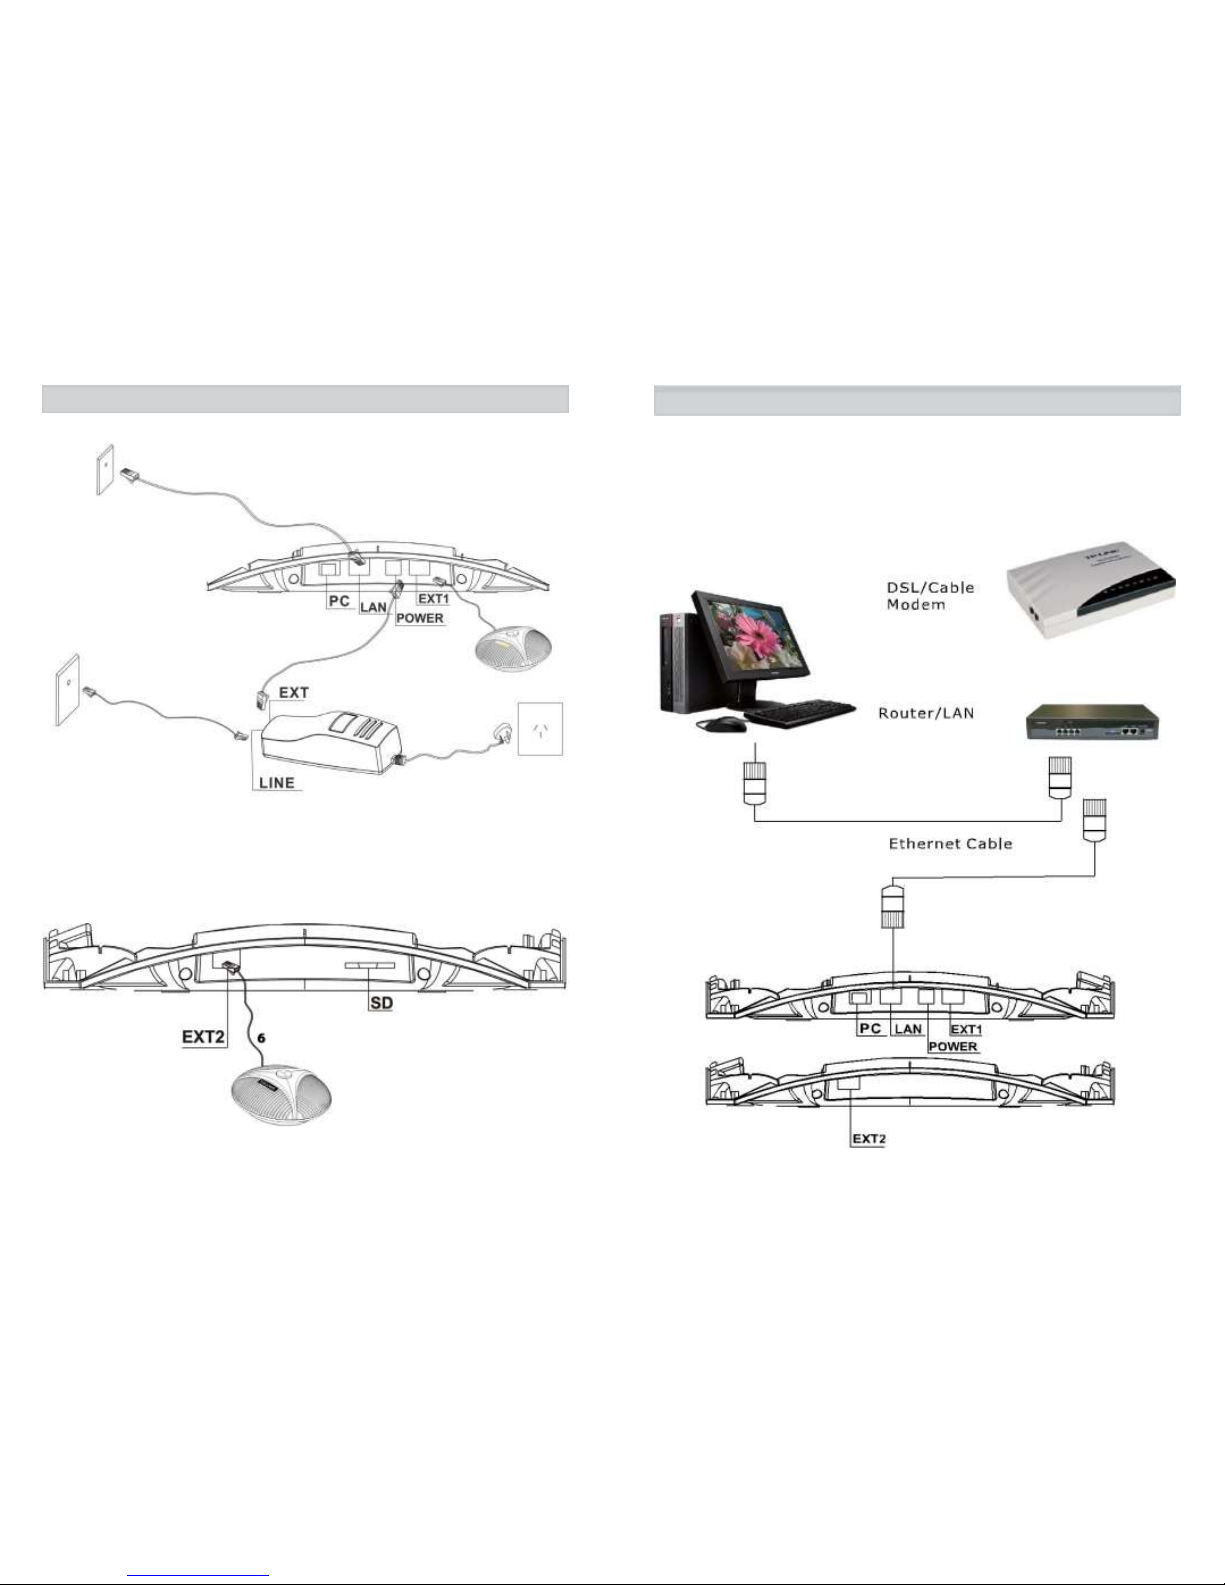
Installing your phone
Connection Diagram
4
Ethernet jack
5
1
2
Wall phone jack
3
1.8-Stream Cable
2.Telephone Line Cord
3.Power Cord
4.RJ45 Cable
5.Extra Microphone 1 (4P4C,Optional)
6. Extra Microphone 2 (4P4C,Optional)
Connecting IP Phone
Connect the IP phone as shown by the following diagram:
67

GETTING TO KNOW YOUR PHONE
Parts of the Phone
2
4
1
3
2
1.LCD
2.Microphone
3.Keypad
4.Speaker
Keypad
Menu
SIP Keys
Navigation
LCD
Keys
OK
Selection/Soft
Keys
Mute
Volume
Hold
Conference
Redial
VoIP
On/Off
Dial Keypad
Keys
What it does
Navigation Keys - Helps you navigate through various
options. OK - Select a particular setting.
VOLUME - Helps you decrease/increase the speaker/ringer volume.
MUTE - Mute the microphone.
REDIAL - Dial the last dialed number.
HOLD - Places the call on hold.
CONFERENCE - Hold a 3-way conference; two more
participants can join the call.
VoIP - Use this button to make a VoIP call.
Selection/Soft Keys - Helps you select the options
that are displayed on the LCD.
MENU - Displays all the available settings and options.
ON/OFF - Use this button to make a PSTN call.
Use this button to answer or end PSTN & VoIP calls.
SIP Keys - For VoIP function (see VoIP manual)
89
Table of contents


