Provo Craft Cricut Imagine User manual


CONTENTS
Diagrams...........................................................................................4
Safety Information............................................................................5
FCC Statement..................................................................................6
Getting Started................................................................................7
Installing the Cutting Blade Assembly.....................................7
Installing the HP®Inkjet Print Cartridge...................................8
Calibration..............................................................................10
Positioning Your Cricut Imagine™Machine.............................10
What Your Cricut Imagine™Machine Can Cut..........................11
Basic Operations.............................................................................12
Setup......................................................................................12
Preparing the Cutting Mat......................................................13
Place Paper on Cutting Mat....................................................13
Print & Cut..............................................................................14
Cutting on Lightweight or Heavyweight Materials.......................18
Adjusting Blade Depth...........................................................18
Adjusting Cut Speed..............................................................19
Adjusting Cut Pressure...........................................................19
Multi-Cut................................................................................19
Basic Care.......................................................................................20
Blade Life.................................................................................20
Replacing the Cutting Blade..................................................20
Caring for the Cutting Mat.....................................................21
Maintaining the Print Cartridges.............................................21
Replacing a Print Cartridge.....................................................21
Cleaning Your Cricut Imagine™Machine................................22
Additional Basic Care Tips.....................................................22
Advanced Cricut Imagine™Use....................................................23
Viewing Cartridge Content....................................................23
Image Queue...........................................................................23
Image Editor............................................................................24
Layered Images.......................................................................24
Colors and User Palette..........................................................25
Editor Controls........................................................................26
Project Preview........................................................................27
Set Up Job...............................................................................27
Project Quantity.......................................................................27
Art Quantity.............................................................................28
Fit to Page................................................................................28
Auto-Fill..................................................................................28
Load Last.................................................................................28
Cut Settings.............................................................................29
Flip Horizontal..........................................................................29

CONTENTS (CONTINUED)
Paper Size.................................................................................29
Settings...........................................................................................30
Print & Cut................................................................................30
Print Quality.............................................................................30
Paper Type................................................................................30
HP Ink.......................................................................................30
Clean Print Heads....................................................................30
Border Preferences..................................................................31
Size..........................................................................................31
Calibration..............................................................................31
Screen.....................................................................................31
Print.........................................................................................32
Blade.......................................................................................32
Restore Defaults......................................................................33
Troubleshooting.............................................................................34

4
FRONT DIAGRAM
BACK DIAGRAM
DIAGRAMS

5
SAFETY INFORMATION
Disconnect electrical power before servicing or cleaning.
Do not place your fingers or other objects in the Cricut Imagine™while it is
connected to electrical power, powered on, or during cutting operations. Rapid
movements of the cutting carriage during operation may cause bodily injury and/
or damage to the Cricut Imagine™
.
Always follow basic safety precautions when using this product to reduce risk of
injury from fire or electric shock. Read and understand all instructions in the docu-
mentation that comes with the Cricut Imagine™
.
Use only a grounded electrical outlet when connecting this product to a power
source. If you do not know whether the outlet is grounded, check with a
qualified electrician.
Observe all warnings and instructions marked on the product.
Do not install or use this product near water, or when you are wet.
Install the product securely on a stable surface.
Install the product in a protected location where no one can step on or trip over
the power cord and the power cord cannot be damaged.
If the product does not operate normally, see Troubleshooting.
There are no user-serviceable parts inside. Refer servicing to qualified
service personnel.
The power cord cannot be repaired. If it is defective, it should be discarded or
returned to the supplier.
Ozone-depleting chemicals, such as chlorofluorocarbons (CFCs), have been elimi-
nated from the Provo Craft manufacturing processes.
This product contains lead in the solder that might require special handling at
end-of-life.
SAFETY INFORMATION

6
FCC STATEMENT
The U.S. Federal Communications Commission (in 47 cfr 15.105) has specified that
the following notices be brought to the attention of users of this product.
This device complies with part 15 of the FCC rules. Operation is subject to the fol-
lowing two conditions: (1) This device may not cause harmful interference, and (2)
this device must accept any interference received, including interference that may
cause undesired operation.
Shielded Cables
Use of a shielded data cable is required to comply with the Class B limits of Part
15 of the FCC Rules.
Pursuant to Part 15.21 of the FCC Rules, any changes or modifications to this
equipment not expressly approved by the Provo Craft, may cause harmful
interference and void the FCC authorization to operate this equipment.
NOTE: This equipment has been tested and found to comply with the limits for
a Class B digital device, pursuant to Part 15 of the FCC Rules. These limits are
designed to provide reasonable protection against harmful interference in a
residential installation. This equipment generates, uses and can radiate radio fre-
quency energy and, if not installed and used in accordance with the instructions,
may cause harmful interference to radio communications. However, there is no
guarantee that interference will not occur in a particular installation. If this equip-
ment does cause harmful interference to radio or television reception, which can
be determined by turning the equipment off and on, the user is encouraged to try
to correct the interference by one or more of the following measures:
• Reorient or relocate the receiving antenna.
• Increase the separation between the equipment and receiver.
• Connect the equipment into an outlet on a circuit different from that to which
the receiver is connected.
• Consult the dealer or an experienced radio/TV technician for help.
FCC STATEMENT

7
GETTING STARTED
Installing the Cutting Blade Assembly
Please note that the Cricut Imagine™cutting blade assembly is located in the bot-
tom of your box, separate from the machine. Before you turn the machine on, you
will need to insert the blade assembly. To do this:
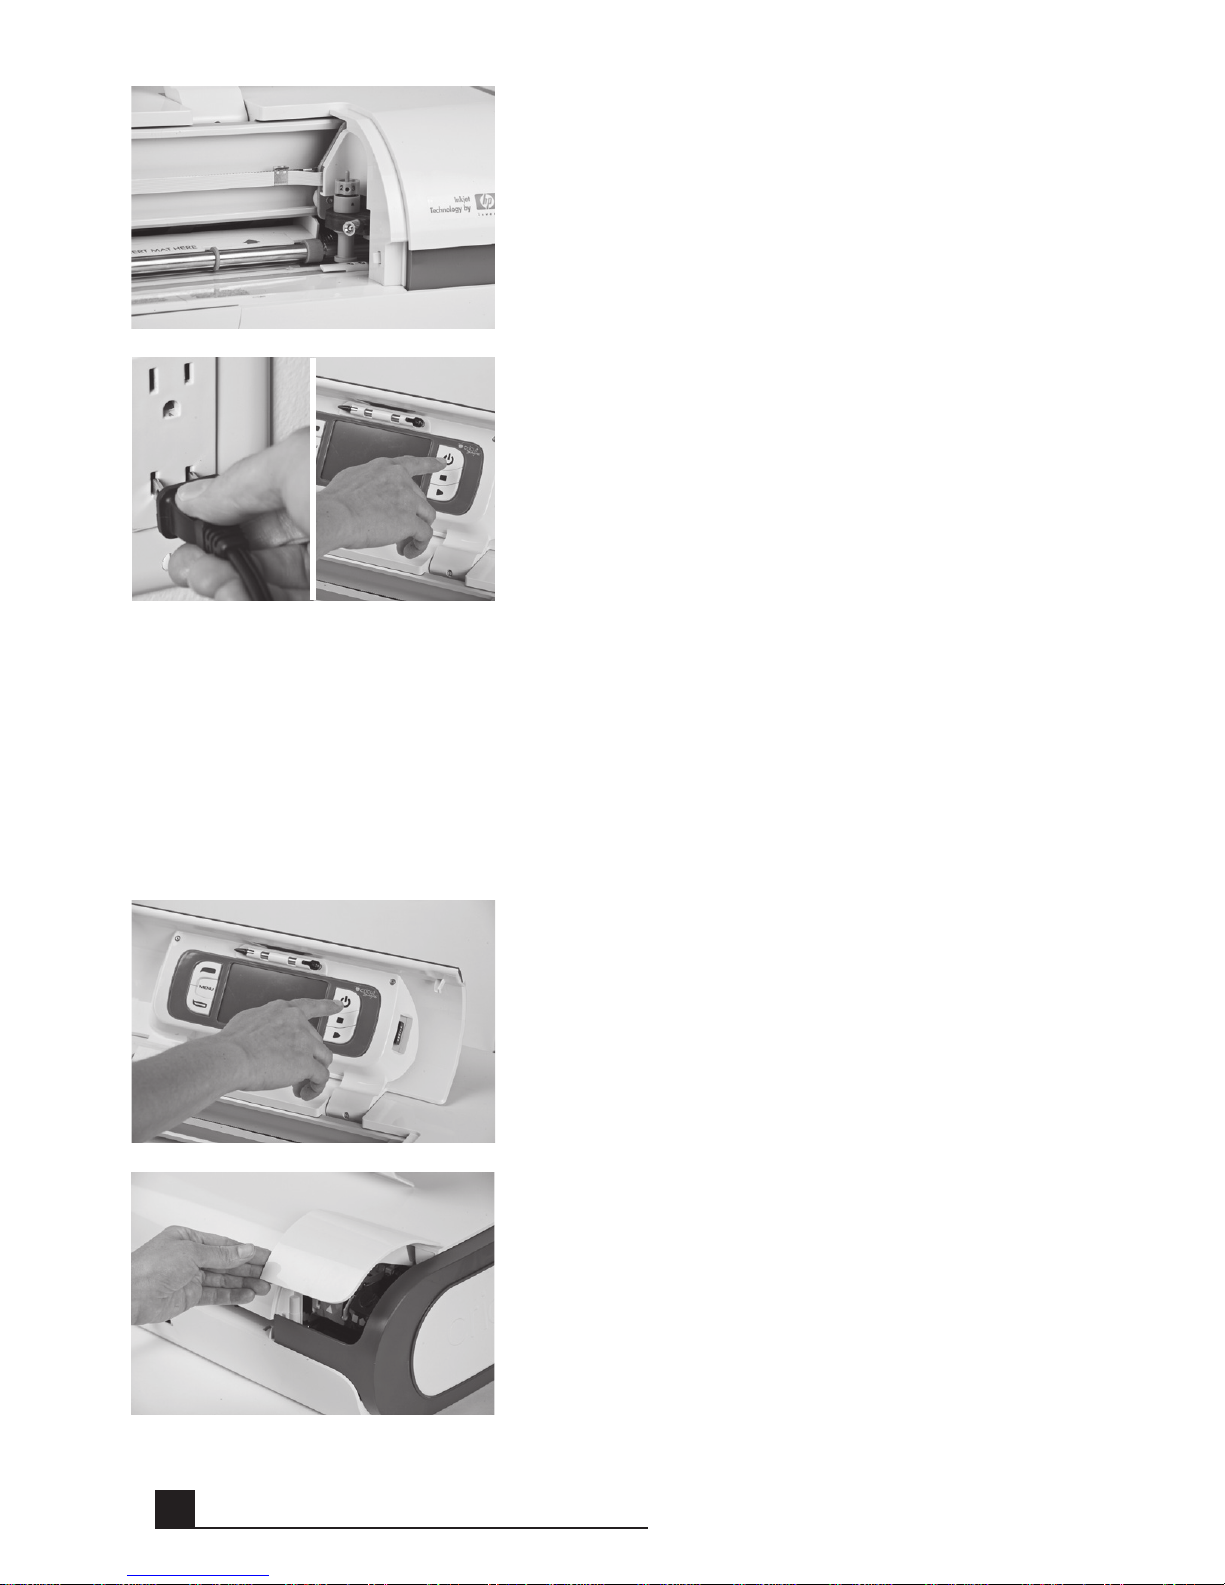
1. Remove the cardboard inserts from both
sides of the carriage. Open the front door
on the Cricut Imagine™machine. Manually
move the blade carriage assembly to the
left by grasping the black cradle arm and
pulling the assembly toward the center of
the opening.
2. Remove the cutting blade assembly from
its bag. The blade assembly fits into the
black cradle on the left side of the carriage.
Rotate the adjustment knob on the top of
the blade assembly so that the black arrow
on the blade assembly points to the number
3 on the adjustment knob.
3. Locate the silver nut and turn it counter-
clockwise until it loosens enough that you
can swing the screw to the right. Be careful
not to loosen the screw too much or it will
fall out.
4. Open the left arm of the black cradle and
position the cutting blade assembly inside
as shown with the black arrow facing you.
Ensure that the cutting blade has been
inserted into the assembly with the sharp
blade end pointing down. Close the cradle,
swing the nut back to the left, and tighten it
by turning it clockwise.
GETTING STARTED
8
Installing the HP®Inkjet Print Cartridge
Two print cartridges are available for use with the Cricut Imagine™
machine: black
and tri-color. To install a print cartridge for the first time:
1. Turn the machine on by pressing the
Power button.
2. After the initial loading screen, open the ink
access door located at the back left corner
of the machine and lift the green and black
print cartridge latches.
5. Return the cutter head assembly to its stor-
age position by gently pushing the assembly
to the right until it stops.
6. Plug the machine in and press the Power
button to place the blade assembly in cut-
ting position.
GETTING STARTED

9
3. Remove the print cartridge from its pack-
age, and then remove the clear nozzle pro-
tective tape by pulling on the pink pull-tab.
CAUTION: To prevent clogs, ink failure,
and bad electrical connections, do not
touch the print cartridge ink nozzles or
copper contacts, and do not remove the
copper contacts.
4. Find the identification symbol on the print
cartridge and locate the print cartridge
latch which has the same symbol.
5. Hold the print cartridge with the copper
contacts facing the printer, and then slide
the print cartridge fully into the cradle.
NOTE: If you have trouble inserting the
print cartridge after lifting the cartridge
latch, verify that the printer is on and wait a
few seconds for the carriage to disengage
before inserting the print cartridge.
6. Push down on the print cartridge latch until
it snaps closed. Make sure the latch does
not spring back open.
NOTE: If the latch springs back open,
remove the print cartridge and repeat steps
4 and 5.
7. Close the ink access door.
GETTING STARTED

10
Calibration
Prior to your first use of your Cricut Imagine™
, the machine will run three calibra-
tion routines. There are instructions on the screen which will direct you through
each calibration process.
The first calibration is a screen calibration and will not require any printing or cut-
ting. The next two calibrations will require you to put a 12"x 12"white piece of
paper on the mat and insert the mat into the machine. For assistance in mount-
ing paper on the mat for the first time, please see instructions on page 13. After
inserting the second piece of 12"x 12"white paper and the cut and print are
complete, the Cricut Imagine™will ask you to select a number and letter for which
the printed lines are cut most accurately. Click Test Cut and the machine will begin
cutting. Examine the cut in the center of the page to determine if the cut stayed
inside the printed line. If the cut was successful in staying inside the printed line,
click the Accept button. If the cut was outside of the printed lines, select Repeat
to run the test again. For more information on the Print & Cut calibrations, see the
instructions on page 32.
Positioning Your Cricut Imagine™Machine
Place your Cricut Imagine™machine at least 12"(30.48 cm) from the edge of your
table to prevent it from tipping and causing possible injury. Allow 12"(30.48 cm) in
the back of the Cricut Imagine™machine for mat movement.
When positioning your Cricut Imagine™machine, choose a location that:
• cannot be accessed by children. The Cricut Imagine™machine is not a toy
and contains components, including a sharp blade, that could be hazardous
to children.
• is a hard, stable, and flat surface within 6 feet (1.83 meters) of a grounded
electrical outlet, and that has a minimum clearance of 12"(30.48 cm) behind the
Cricut Imagine™machine for paper movement.
• is indoors or in a dry location where the Cricut®cartridges are not directly
exposed to the effects of the weather.
• is away from direct exposure to sunlight or extreme temperatures such as in
parked cars, storage sheds, sunrooms, etc.
WARNING! Your Cricut Imagine™machine should never be left or stored outside,
in locations without heat or air conditioning, or in environments where the ma-
chine or cartridges can come in contact with water. It is recommended your
Cricut Imagine™be maintained in an area with temperatures between 60 and 90 °F
(15.5 and 32.2 °C).
GETTING STARTED

11
What Your Cricut Imagine™Machine Can Cut
The Cricut Imagine™machine can cut a wide range of materials, from vellum and
cardstock to poster board and vinyl. Since any material which passes through the
Cricut Imagine™needs to flex slightly to make it successfully through the rollers,
it is not recommended that rigid materials such as thick chipboard be used in the
machine. The Cricut Imagine™machine can, however, cut thin chipboard with the
use of the Multi-Cut function. More details about Multi-Cut can be found on
page 19.
The Cricut Imagine™is designed to provide a print-to-cut alignment of +/-1 mm for
images up to 5.5"(140 mm) in size. Images larger than 5.5"(140 mm) may have up
to a +/-0.7% margin in the print-to-cut alignment.
TIP: The repeated cutting of heavy materials may reduce the life of your Cricut
Imagine™machine’s cutting blade and mat. Replacement mats and blades can be
purchased anywhere that Cricut®products are sold.
GETTING STARTED
12
BASIC OPERATIONS
Setup
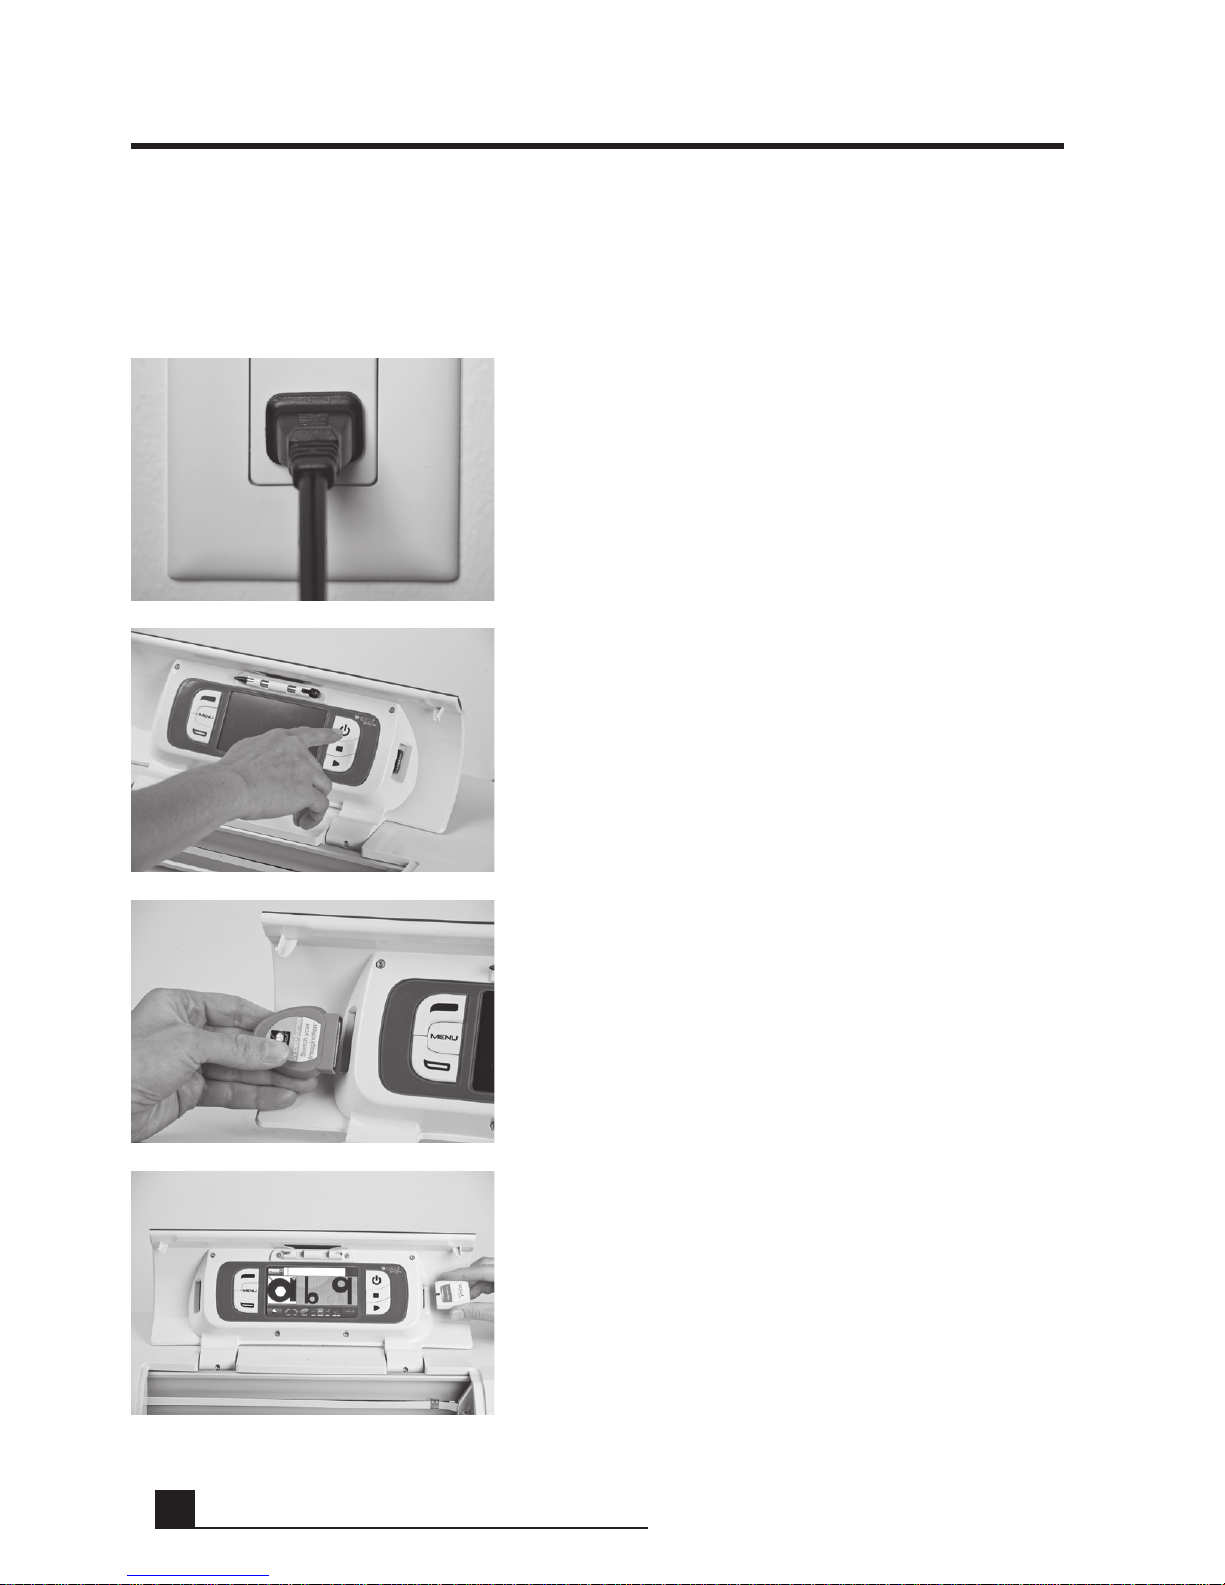
1. Plug your Cricut Imagine™into a grounded
electrical outlet.
2. Turn it on by pressing the Power button to
the right side of the display.
3. Insert any original Cricut®cartridge you
wish to use into the slot on the left side of
the display.
4. Insert the Cricut Imagine™Art Cartridge in
the slot on the right side of the display.
BASIC OPERATIONS
13
Preparing the Cutting Mat
The Cricut Imagine™can cut materials as large as 12"x 12"(30.48 cm x 30.48 cm).
The machine performance cannot be assured for materials smaller than 3"x 3"
(7.62 cm x 7.62 cm). Seventy-five pound cardstock is recommended for
best results.
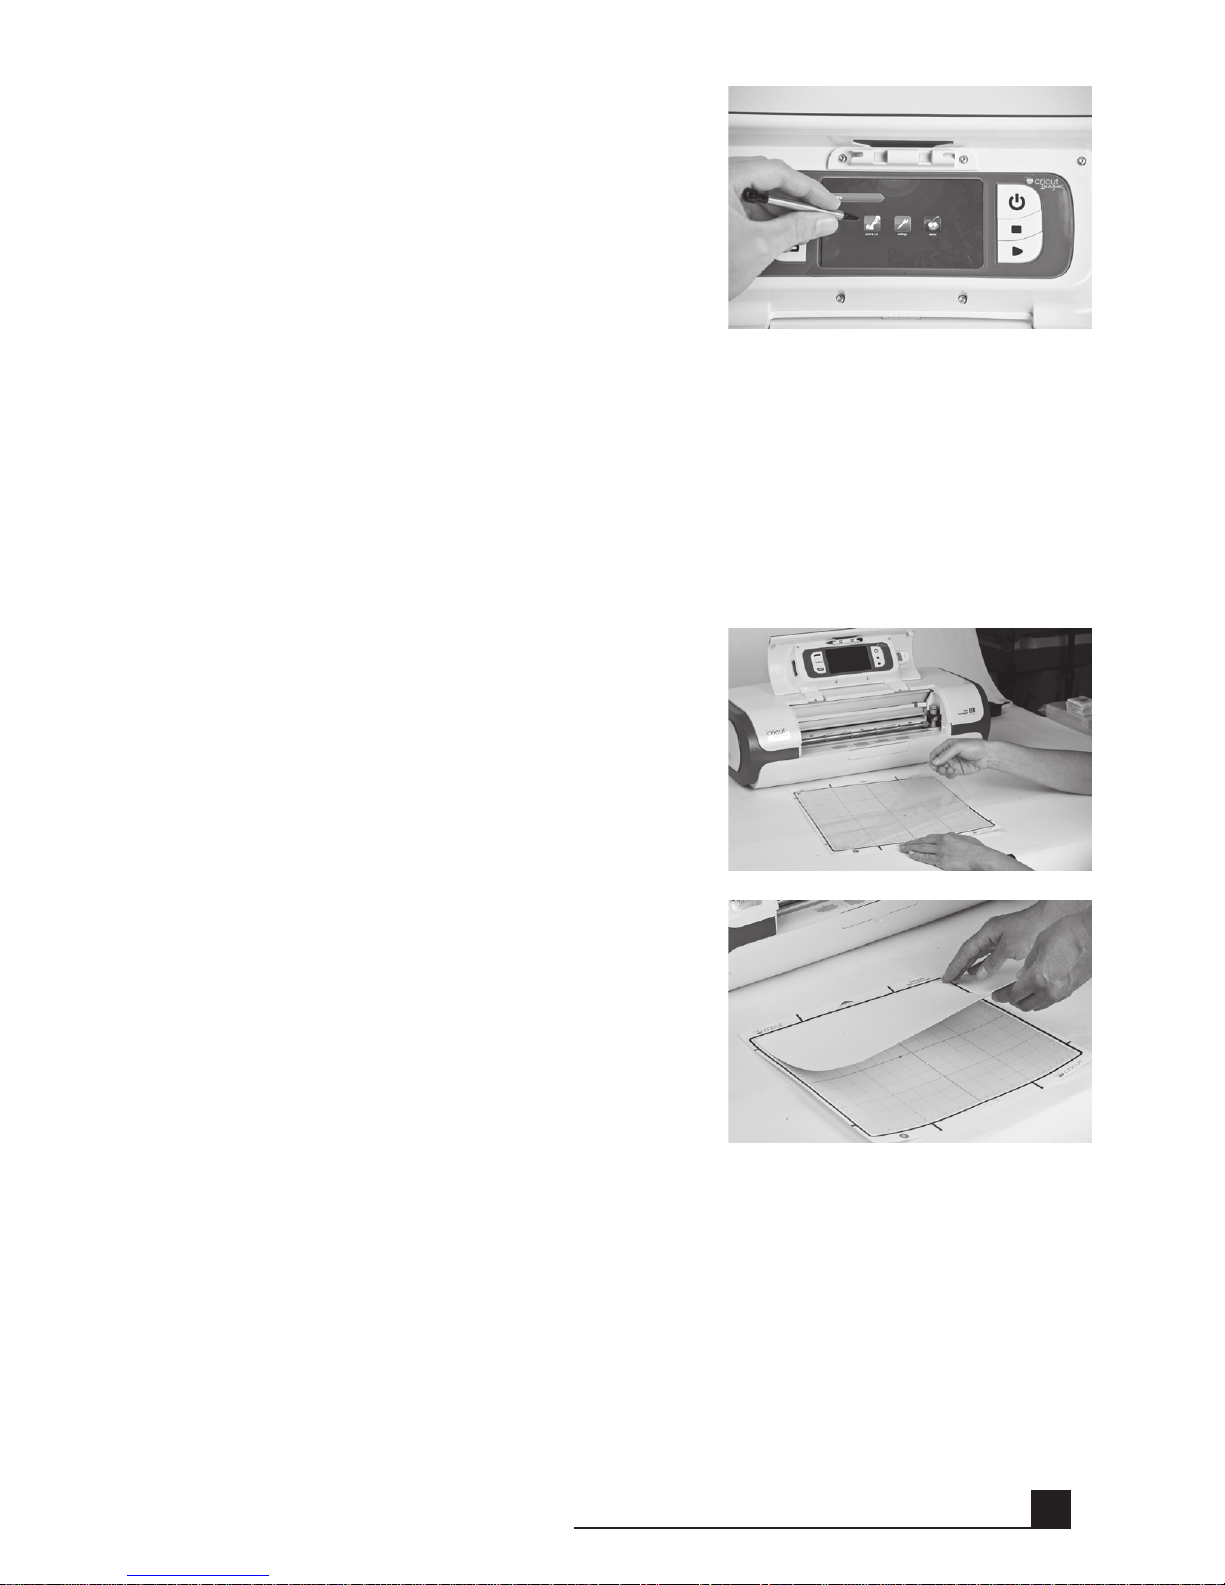
Place Paper on Cutting Mat
A 12"x 12"(30.48 cm x 30.48 cm) paper size is
recommended for the first try.
1. Remove clear protective cover from
cutting mat.
2. Align a corner of the paper with the
triangular icon in the top left corner of the
cutting mat.
3. Press and smooth from the center of the
paper to the edges of the cutting mat to
adhere it well. Your paper is ready to be cut.
TIP: The surface of the cutting mat has been
treated to make it slightly tacky to hold the
paper in place during cutting. Remove paper
slowly when using lightweight materials such
as vellum. If small or delicate pieces are diffi-
cult to remove, use Cricut Tools™
.Cricut Tools™
are not included with your Cricut Imagine™
,
but are available wherever Cricut®products
are sold.
5. If you do not wish to use a cartridge, select-
ing any of the welcome screen options will
allow you to continue.
BASIC OPERATIONS

14
Print & Cut
To begin working with an image, click the
Print & Cut button on the left of the Cricut
Imagine™menu screen. You can always return
to the menu screen by pressing the Menu but-
ton to the left of the screen.
Choose an image source. This is done by
clicking on one of three content source icons
located at the lower left corner of the display.
The left icon is for original Cricut®art, the cen-
ter icon is for art which comes with your Cricut
Imagine™, and the right icon is for Cricut
Imagine™cartridge art.
You can scroll through the images in the
default Gallery View by clicking the screen
and dragging slowly to the left or right. Click
any image you would like to print and cut to
select it. The image that is selected will be
highlighted in white.
Click the green plus sign to add the image to
the Image Queue.
BASIC OPERATIONS

15
Click the Next button at the bottom right of
the Image Gallery.
This will show you a preview of your project.
The preview shows you where the images will
be located on the paper.
To the side of the preview, several job options
can be controlled. Additional information on
the controls in the Set Up Job area can be
found on page 27.
The Settings area, also accessible on the Menu
screen, contains controls for print quality,
paper type, border preferences, machine
calibrations, as well as system defaults and
information about ink levels. For information
about the Settings area, see page 30.
Another view featuring a Keypad layout is
available by clicking the drop down list in the
top left corner of the screen. To return to the
Gallery view, use the same drop down list and
select an option other than Keypad. For more
details on the two views, see page 23.
Note: Selecting All will display all images in
the gallery. Selecting Icons will only show
images with a single layer. Selecting Images
will only show the images that have more than
one layer. Selecting Bonus will show the bonus
content included with this cartridge.
Original Cricut®art will only be visible in
Keypad layout.
BASIC OPERATIONS

16
Having edited and applied the changes to your
image, click Next in the bottom right corner
to continue.
You are now prompted to load the cutting mat
with the paper. Be sure the paper is mounted
correctly according to the previous instruc-
tions. Insert the mat into the Cricut Imagine™
with the arrow pointing toward the machine.
Insert the mat above the exposed rollers at the
label INSERT MAT HERE. Gently insert the mat
until you feel it hit the back of the print rollers.
TIP: For best results, center the mat in the
mat guide.
Hold the mat near the machine at the center,
applying gentle pressure to the mat. Click
the Go! button on the screen of the Cricut
Imagine™, continuing to apply pressure until
the mat is completely loaded.
Your project will begin printing and cutting.
You’re on the way to your first of many exciting
Cricut Imagine™creations!
When the operation is complete, the Cricut
Imagine™machine will eject the mat out the
front of the machine.
BASIC OPERATIONS

17
WARNING! Do not touch the mat during printing and cutting even if the mat
stops moving. There are many steps to printing and cutting, one of which is dry-
ing. During drying and other steps the machine may appear to be doing nothing.
Do not touch the mat until the Cricut Imagine™ejects it from the machine.
Gently remove images from the cutting mat. If it is difficult to remove the charac-
ters, use a craft knife or Cricut Tools™(sold separately) to carefully remove the im-
ages. Once all images are removed, clean off any small scraps of paper remaining
on the cutting mat. This will improve cutting mat performance in the future.
TIP: To extend the life of your cutting mat, always cover it with the protective
cover and never leave paper on it for an extended period of time.
BASIC OPERATIONS

18
CUTTING ON LIGHTWEIGHT OR HEAVYWEIGHT
MATERIALS
Your Cricut Imagine™can cut a variety of materials. For an optimal cut on light-
weight materials such as vellum or heavyweight materials such as thin cardstock,
you may need to adjust the blade depth, speed of the cut, or cut pressure.
Adjusting Blade Depth
Remove the cutting blade assembly from the Cricut Imagine™machine to change
the setting on the adjustment knob. However, if the arrow is facing forward, you
can leave the cutting blade assembly attached and simply spin the top of the
adjustment knob to change the setting.
WARNING! Always unplug your Cricut Imagine™machine before removing the
cutting blade assembly!
To remove the cutting blade assembly (Figure 1), first turn the Cricut Imagine™off.
Then slide the cutting carriage aside to expose the blade clamp screw. Locate the
screw and turn it counterclockwise until it loosens enough that you can swing the
screw to the right (Figure 2). Be careful not to loosen the screw too much, or it will
fall out. Remove the cutting blade assembly from the machine. Next, locate the
adjustment knob (Figure 3) on the top of the cutting blade assembly, and turn it to
your desired setting.
The smaller the number on the adjustment knob, the shorter the blade depth will
be. Shorter blade depths are recommended for light weight materials, and longer
blade lengths for heavier materials. Reinstall the cutting blade assembly into the
Cricut Imagine™machine by reversing the procedure to remove the cutting blade
assembly. Test the setting on a scrap piece of paper and make adjustments
as necessary.
TIP: Cutting on cardstock and other heavy materials will reduce the life of your
blade, but it will produce the best cuts.
Figure 3Figure 2Figure 1
CUTTING ON LIGHTWEIGHT OR HEAVYWEIGHT MATERIALS

19
TIP: If the Cricut Imagine™produces poor cutting results, always insert a new
blade first before trying other options.
Adjusting Cut Speed
The Cut Speed setting allows you to control the cutting speed for an optimal cut
on a variety of papers. If you regularly cut on heavyweight materials, you may want
to adjust this setting up to increase the cutting speed. For lightweight materials or
for smaller, more detailed cuts, you may want to turn the setting down to decrease
the cutting speed. After each adjustment, you should test the setting with a scrap
piece of paper, readjusting as necessary until you achieve the desired results.
Controls of the Cut Speed can be found in the Project Preview screen in the Cut
Settings section. Press the up arrow to increase the speed and the down arrow
to decrease it. As a general rule, decrease the speed if your cuts are being torn.
If this doesn’t work, you may need to change the cut pressure, adjust the blade
depth, or replace the blade.
Adjusting Cut Pressure
The Cut Pressure setting allows you to control how hard the cutting mechanism
presses against the paper. For heavyweight materials, you may want to move the
setting up to increase the cut pressure. For lightweight materials, you may want
to change the setting down to decrease the pressure. After each adjustment, you
should test the setting with a scrap piece of paper, readjusting as necessary until
you achieve the desired results.
Controls for the Cut Pressure can be found in the Project Preview screen in the
Cut Settings section. Press the up arrow to increase the speed and the down ar-
row to decrease it. As a general rule, increase the pressure if your selections are
not being cut completely through the paper. If this doesn’t work, the cut speed or
blade depth may need to be adjusted.
Multi-Cut
The Multi-Cut function allows you to cut a selected image multiple times on top
of the original cut lines. This allows the machine to cut thicker materials, such as
thin chipboard.
Controls for Multi-Cut can be found in the Project Preview screen in the Cut Set-
tings section. You can select how many times the lines of the image should be cut
by pressing the up and down keys.
CUTTING ON LIGHTWEIGHT OR HEAVYWEIGHT MATERIALS

20
BASIC CARE
Blade Life
You can expect anywhere from 500 to 1500 single cuts from your cutting blade
before it requires replacement. Your actual cutting blade life will vary, depend-
ing on the settings you use and the materials you cut. When the quality of your
cuts decreases, it is probably time to replace your cutting blade. For best results,
use only genuine Cricut®Replacement Cutting Blades, available at participating
Cricut®retailers (part #290002).
Replacing the Cutting Blade
WARNING! Always unplug your Cricut Imagine™before replacing the
cutting blade.
To change the cutting blade, you must first remove the cutting blade assembly. To
remove the cutting blade assembly (Figure 1), locate the screw and turn it counter-
clockwise until it loosens enough that you can swing the screw to the right (Figure
2). Be careful not to loosen the screw too much, or it will fall out.
Remove the cutting blade assembly from the machine. After removing the cutting
blade assembly, locate the blade release at the top of the cutting blade assembly
and push it in (Figure 3). The blade will emerge from the cutting blade assembly.
You will need to gently pull the blade away from the magnet holding it in place
(Figure 4).
To install the new blade, first remove the protective cover from the new blade.
Carefully insert the shaft of the blade into the hole in the bottom of the cut-
ting blade assembly. The blade should be sucked up inside the shaft if properly
installed (Figure 5). The replacement cutting blade is now installed. Place the
protective cover over the old blade and dispose of it. Reinstall the cutting blade
assembly into the Cricut Imagine™reversing the procedure to remove the cutting
blade assembly.
Figure 1 Figure 2 Figure 3 Figure 4 Figure 5
BASIC CARE
Table of contents
Languages:


