ProWood Outdoor Storage Box User manual
Make your outdoors great with other project plans available at www.ProWoodLumber.com Page 1 of 10
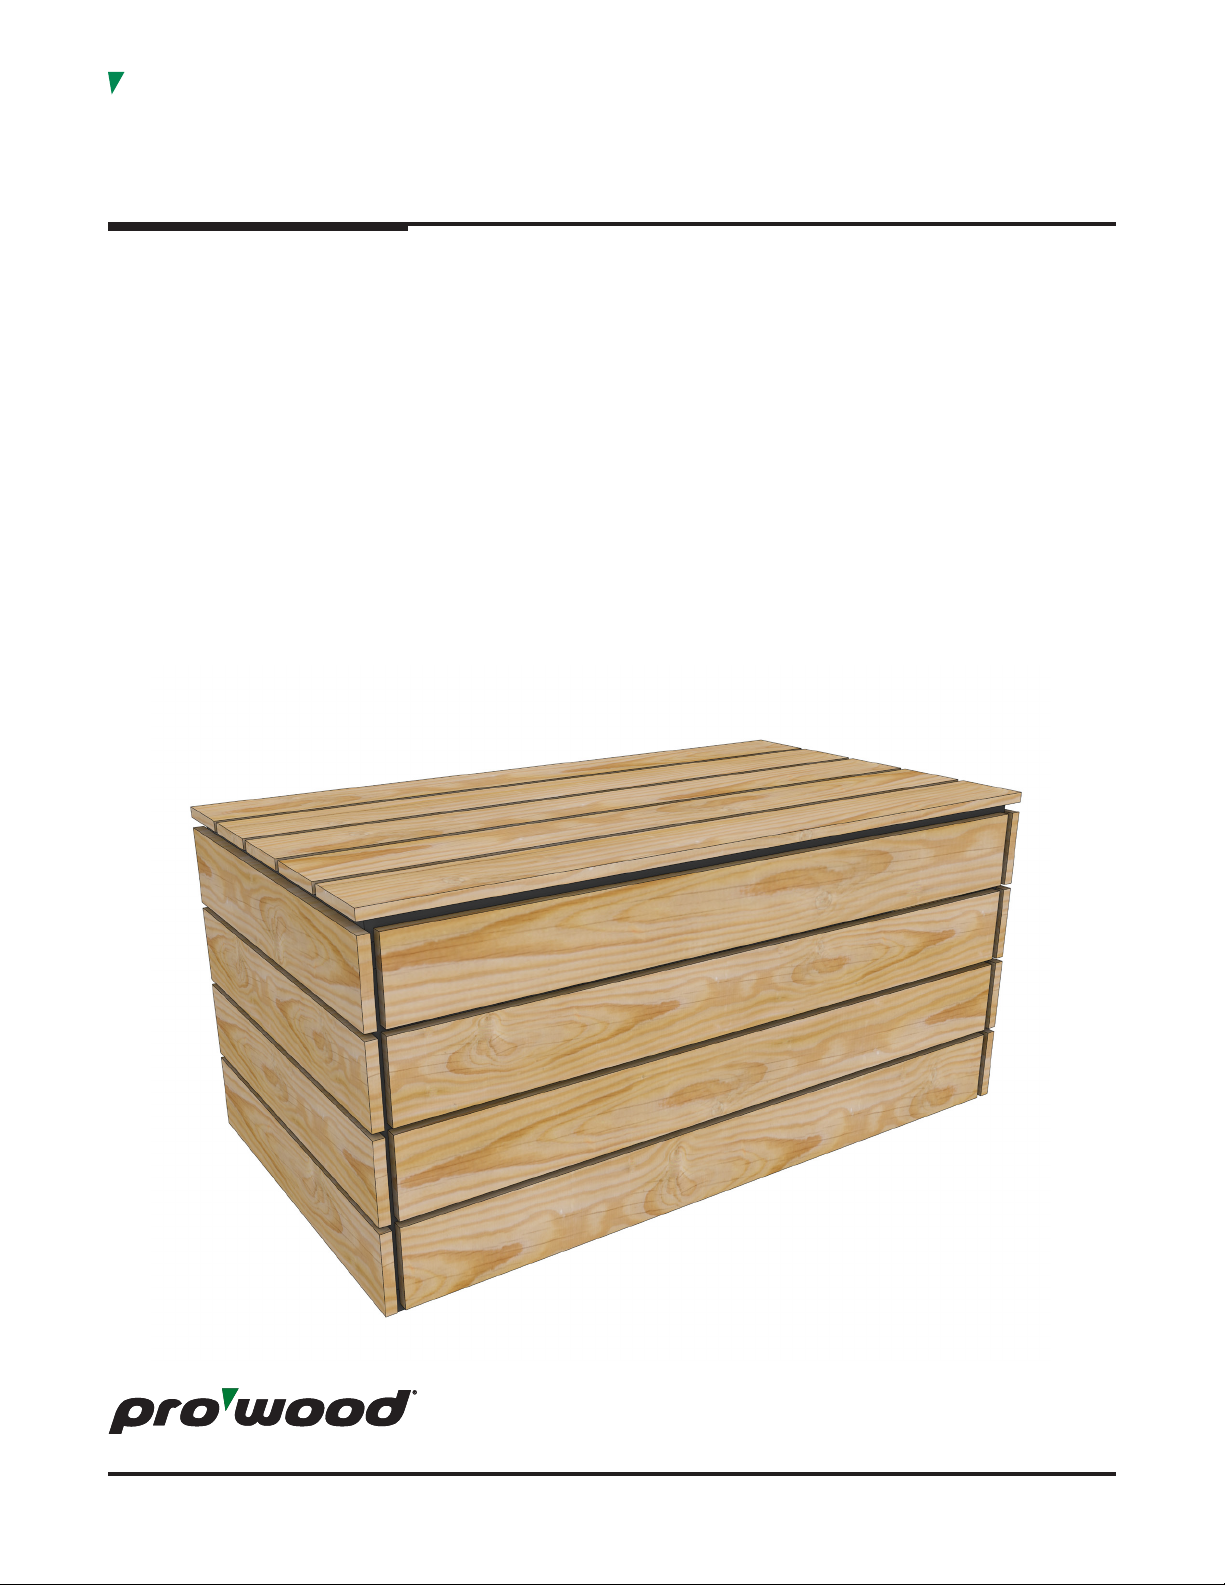
ProWood®Project Plan
outdoor storage box
Purchased Materials:
• (13) 2"x 2"x 8' ProWood®ground-contact
rated lumber
• (9) 1"x 6"x 12' ProWood® ground-contact
rated lumber
• (1) Box of #8 x 2" exterior wood
screws
• (1) Box of #8 x 2-1/2" exterior wood
screws
• (1) 48" Continuous Hinge
Optional:
• (1) 55 Gallon Tote (for weatherproofing)
• (1) 24"chain/rope (for box lid)
• Water sealer
• Exterior stain, black (for interior frame)
If your wood project touches or comes near the ground, use pressure-treated
lumber that is rated for ground contact to ensure long-term performance.
Basic Tools:
• Tape measure
• Carpenter’s square
• Circular or table saw
• 3/16" drill bit (for pre-drilling)
• Power drill with screw driving bit
Optional:
• Impact driver
• Sander or sandpaper (for removing ink stamps on lumber)
• Pocket hole jig (for predrilling interior frame)
• Orbital sander, planer or table router (for beveled board
edges)
Make your outdoors great with other project plans available at www.ProWoodLumber.com Page 2 of 10
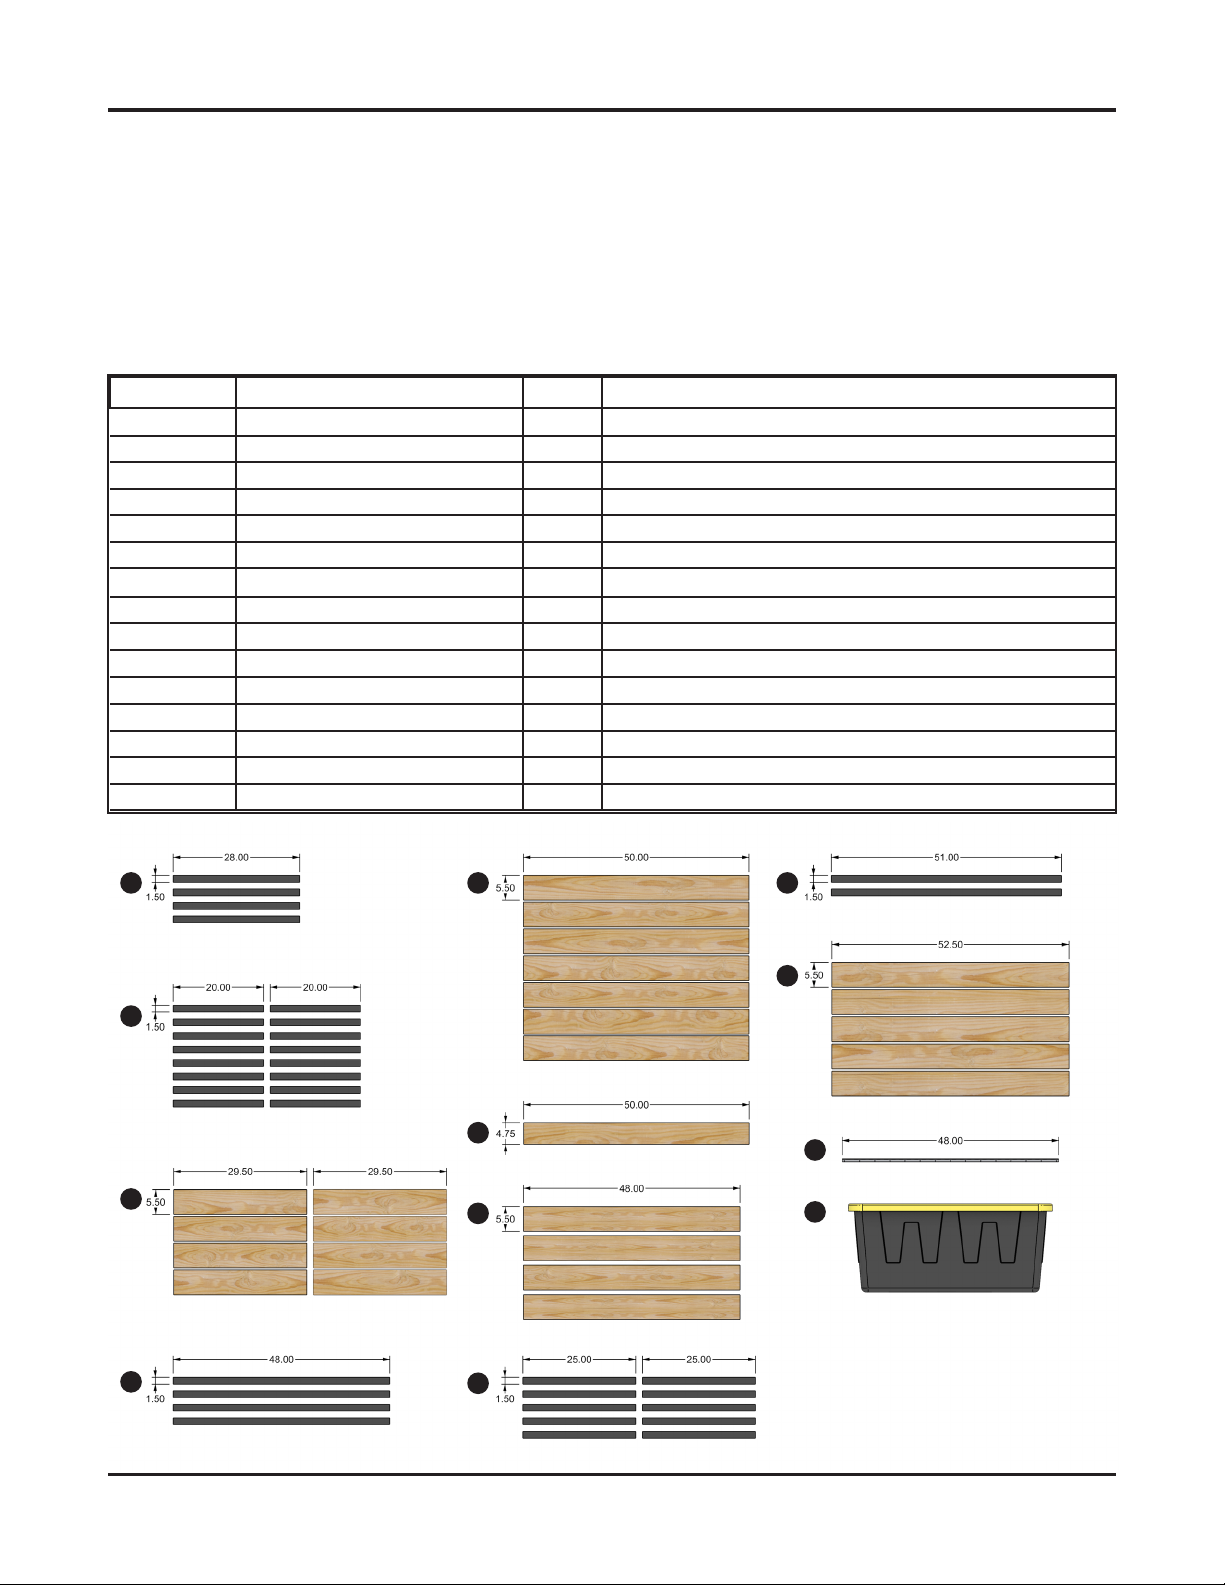
Cut Wood to Size
Caution: Always wear gloves, a dust mask and eye protection
when sawing, sanding or machining wood. Always use a circular,
miter saw or table saw on a clean, flat and level surface.
We recommend only cutting lumber for each sections as you
assemble. To save on material, measure and cut previously cut
lumber rather than continually cutting from a new board. Lumber
has both nominal and actual dimensions, meaning your 2"x 2" post
or 1" x 6" board may actually be a slightly different size.
General Assembly Tips
• Establish a screw pattern to enhance the overall look and feel
of the final assembled product.
• Pre-drill all screw holes with a drill bit to ease screw
insertion and prevent wood splitting.
• Countersink all screws so the head of a countersunk screw,
when placed in the hole, will sit flush with the surface of the
surrounding material.
Item No. Name Qty. Description
A Frame - Side Rails 4 1-1/2" x 1-1/2" x 28"
B Frame - Vertical Support Rails 16 1-1/2" x 1-1/2" x 20"
C Side Board 8 3/4" x 5-1/2" x 29-1/2"
D Frame - Front/Back Top Rails 4 1-1/2" x 1-1/2" x 48"
E Front/Back Board 7 3/4" x 5-1/2"x 50"
F Hinge Detail Board 1 3/4" x 4-3/4" x 50"
G Floor Board 4 3/4" x 5-1/2" x 48"
H Frame - Cross Support Rails 10 1-1/2" x 1-1/2" x 25"
I Frame - Top Outer Rails 2 1-1/2" x 1-1/2" x 51"
J Top Board 5 3/4" x 5-1/2" x 52-1/2"
K Continuous Hinge 1 Continuous Hinge - 48"
L 55 gal Tote 1 55 Gallon Tote
M Fastener - Exterior Wood Screw - 2"
N Fastener - Exterior Wood Screw 2-1/2"
O Chain 1 24"
K
C
B
A
D
E
H
I
G
F
J
L
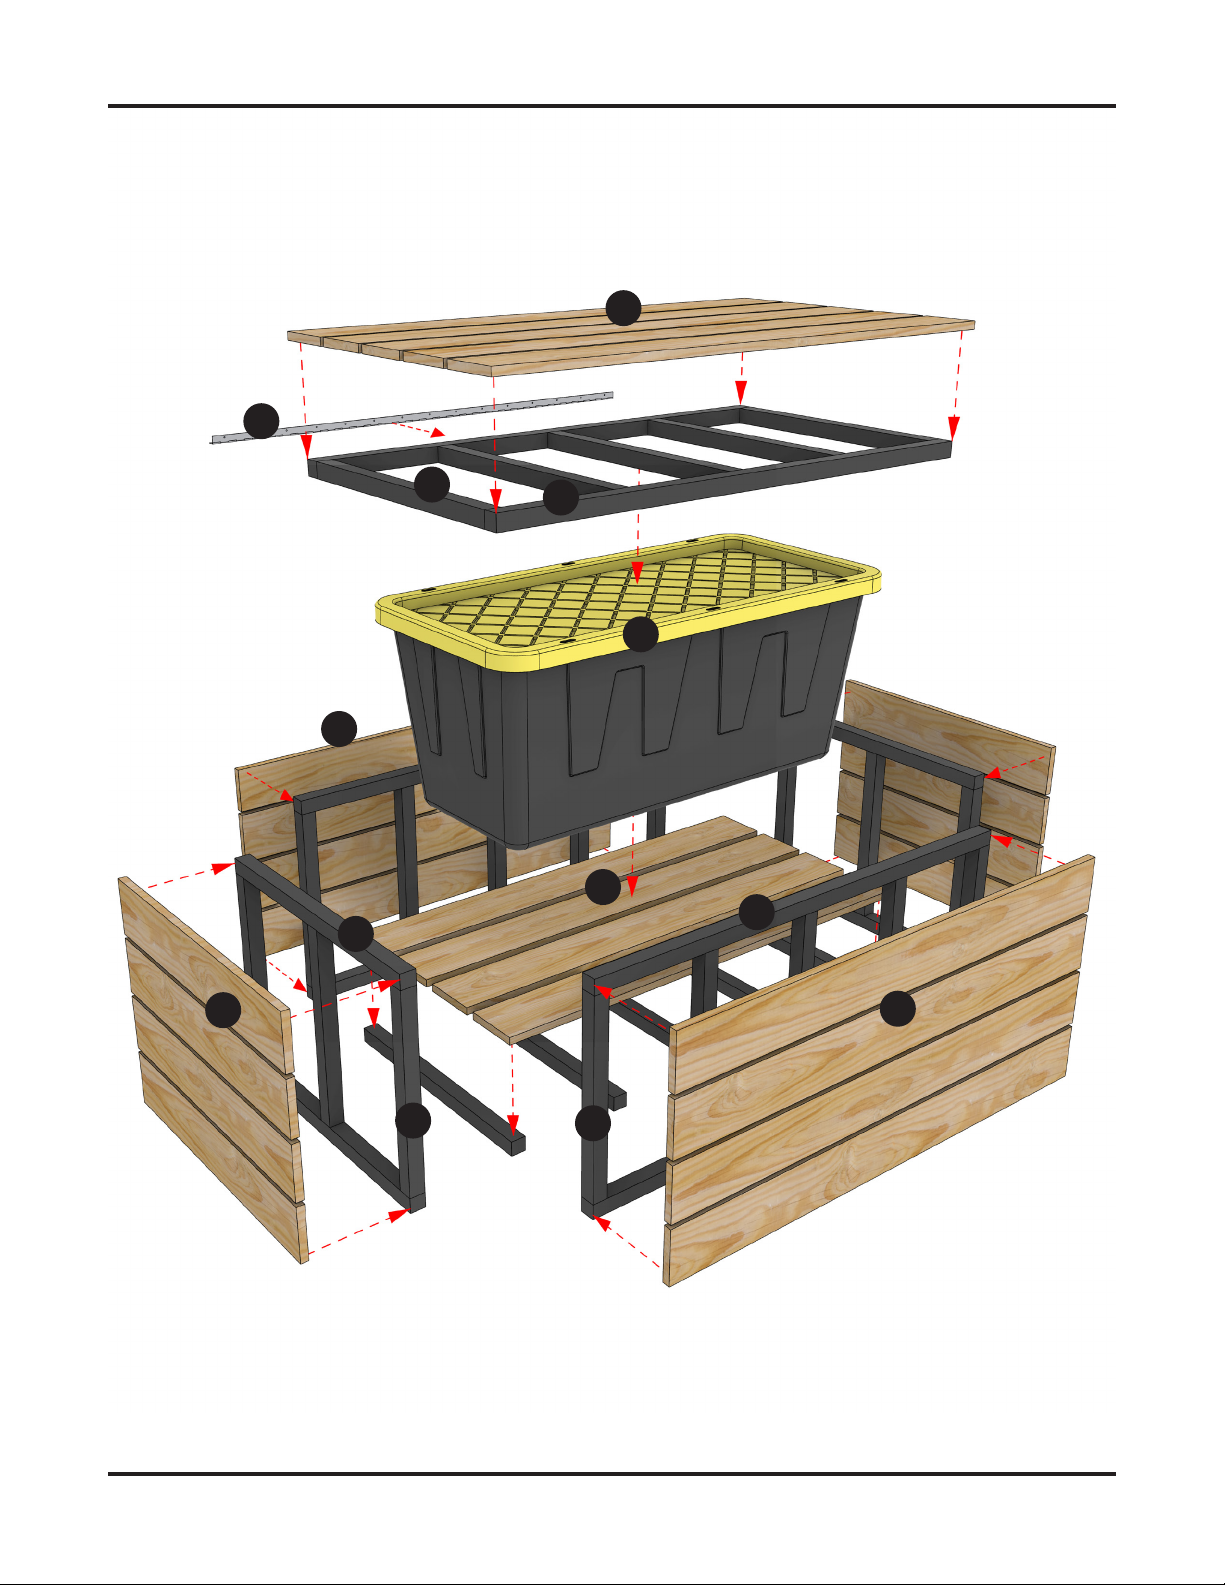
More plans available at www.prowoodlumber.com
fig. 1
L
Make your outdoors great with other project plans available at www.ProWoodLumber.com Page 3 of 10
B
C
D
E
F
G
HI
J
K
A
B

Step 2
Assemble Box Front and Back
See fig. 3 and fig. 12
• Predrill and fasten the five (B) vertical support rails to
the two (D) top rails using (M) fasteners.
• Space your top and bottom (E) boards, with your
bottom (E) boards inset 1/2" and your top (E) boards
offset 3/4". Predrill the (D) top rails and (B) vertical
support rails and fasten the top and bottom (E)
boards using (M) fasteners.
• Equally space the inner-two (E) boards between the
top and bottom (E) board. Predrill the (B) rails and
fasten using (M) fasteners.
• Note: When assembling box back, ensure top (F)
board is flush with top (D) rail.
Make your outdoors great with other project plans available at www.ProWoodLumber.com Page 4 of 10
D
fig. 3
For detailed dimensions, refer to pages 9 and 10.
E
Pocket hole option Face screw option
Optional fastener methods:
Step 1
Assemble Box Sides
See fig. 2 and fig. 11
• Predrill and fasten the three (B) vertical support rails
to the two (A) top rails using (M) fasteners.
• Space your top and bottom (C) boards with your
bottom (C) board inset 1/2" and your top (C) board
offset 3/4". Predrill the (A) top rails and (B) side rails
and fasten the (C) boards using (M) fasteners.
• Equally space the inner (C) boards between
the top and bottom boards and fasten with (M)
fasteners.
• Repeat for the other box side. fig. 2
If desired, you may also stain your 2"x2" rails prior to
installation for a clean look, both inside and out.
B
A
C
B

fig. 7
Make your outdoors great with other project plans available at www.ProWoodLumber.com Page 5 of 10
Step 3
Fasten All Sides
See fig. 4
• Position the four assembled sides; the outer side
of the front and back panel (B) vertical support
rails should touch the front of the side (B) vertical
support rails. Predrill and fasten the four sides using
(N) fasteners.
• Using a carpenter's square, ensure all four sides
meet at a 90° angle. Adjust as needed.
B
G
H
D
fig. 4
Step 4
Install Bottom Cross-Support Rails
See fig. 5 and fig. 13
• Predrill the five (H) cross-support rails using a pocket
hole jig. If a pocket hole jig is not available, predrill
at a 45° angle.
• Position the (H) cross-support rails in between the
two bottom (D) rails. Fasten using (M) fasteners.
fig. 5
Step 5
Install Bottom Panels
See fig. 6 and fig. 13
• Evenly space each of the (G) floor boards on top of
the (H) cross-support rails. Predrill and fasten each of
the (G) floor boards using (M) fasteners.
H

Make your outdoors great with other project plans available at www.ProWoodLumber.com Page 6 of 10
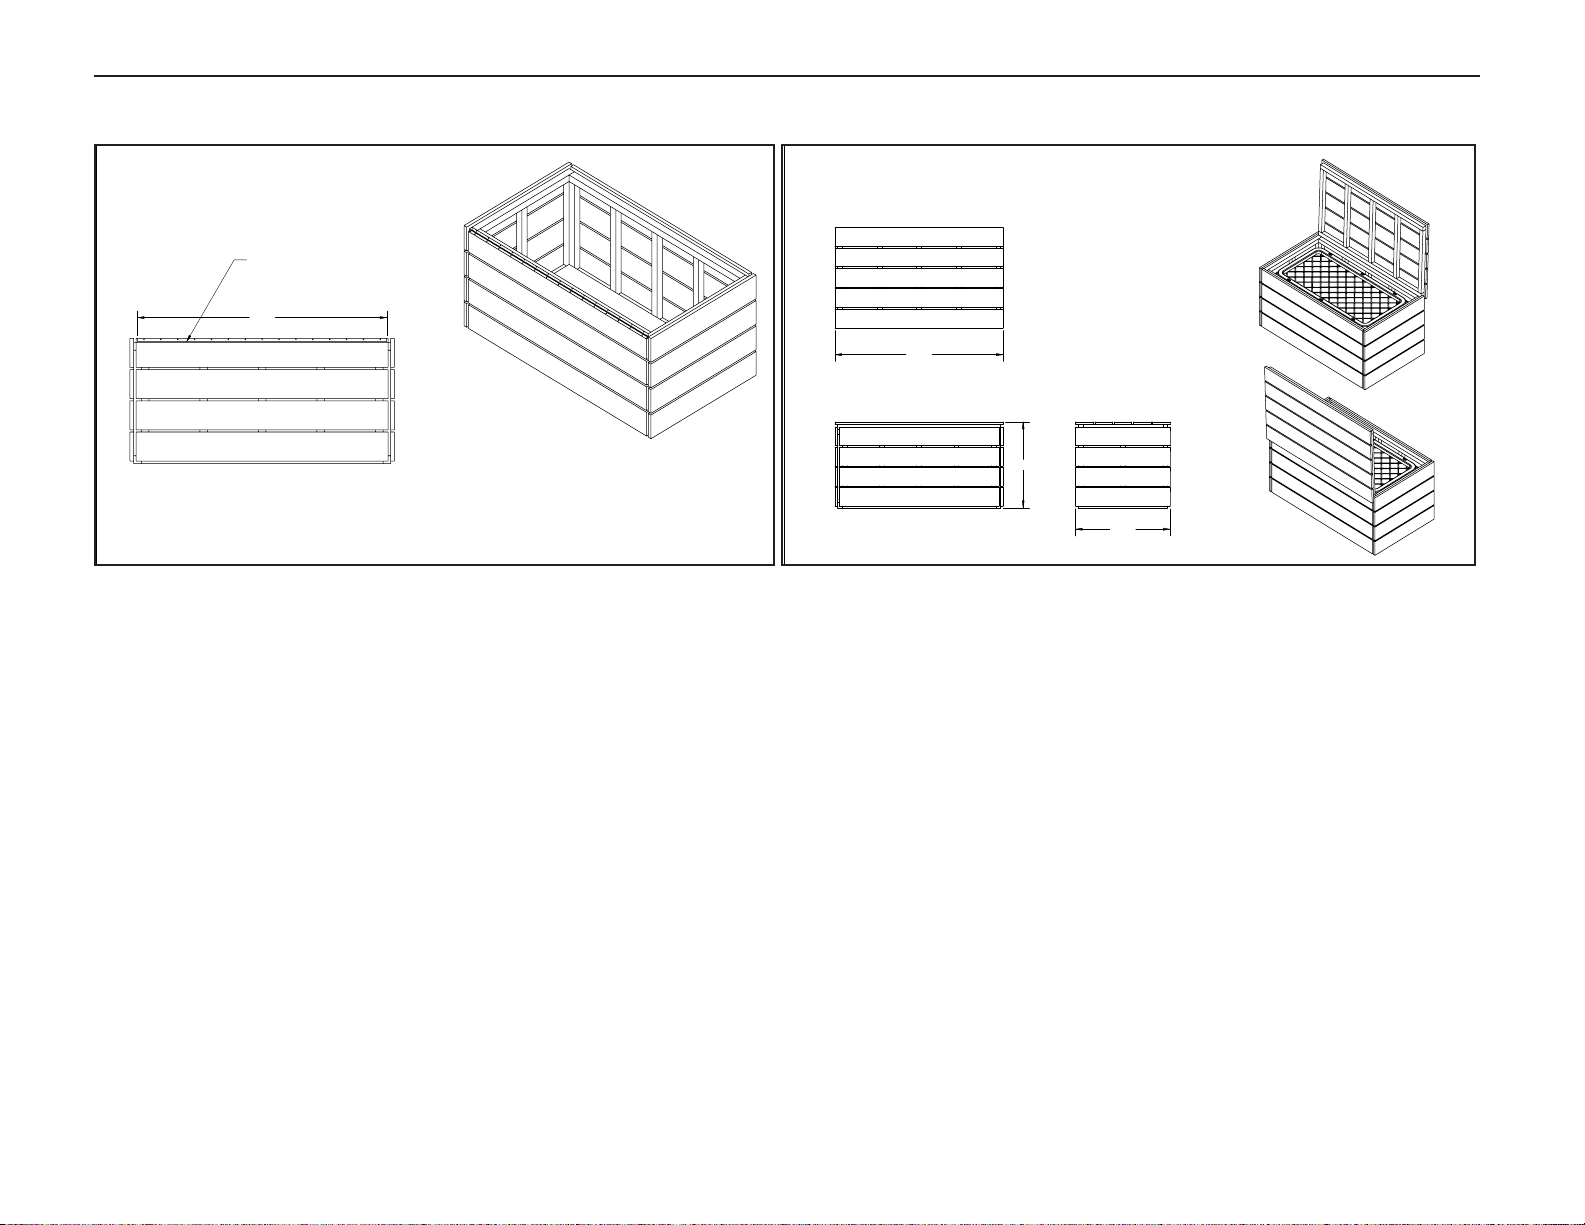
Step 6
Assemble Lid
See fig. 8 and fig. 14
• Predrill and fasten the (H) cross-support rails using
to the (I) top outer rails using (M) fasteners.
• Place your two outer (J) boards 3/4" offset from the
(I) top outer rails. Predrill your (I) rails and fasten
using (M) fasteners.
• Equally space your three inner (J) boards in between
the two fastened (J) boards. Predrill your (H) cross-
support rails and fasten using (M) fasteners.
• Test fit assembled lid on top of assembled box.
Make adjustments as needed.
fig. 8
K
L
I
J
H
Step 7
Attach Lid to Base
See fig. 9 and fig. 15
• Attach your (K) continuous hinge to your assembled
lid using provided fasteners. Place and fasten to the
box base.
• Attach the lid to the box using K) continuous hinge.
• Note: When fastening (K) continuous hinge, ensure
top (F) board is flush with top (D) rail.
Optional:
• You may add (O) chain from the box base to
assembled lid with two (M) fasteners. Attach the chain
from (A) frame side rail and corresponding (H) frame
cross-support rail.
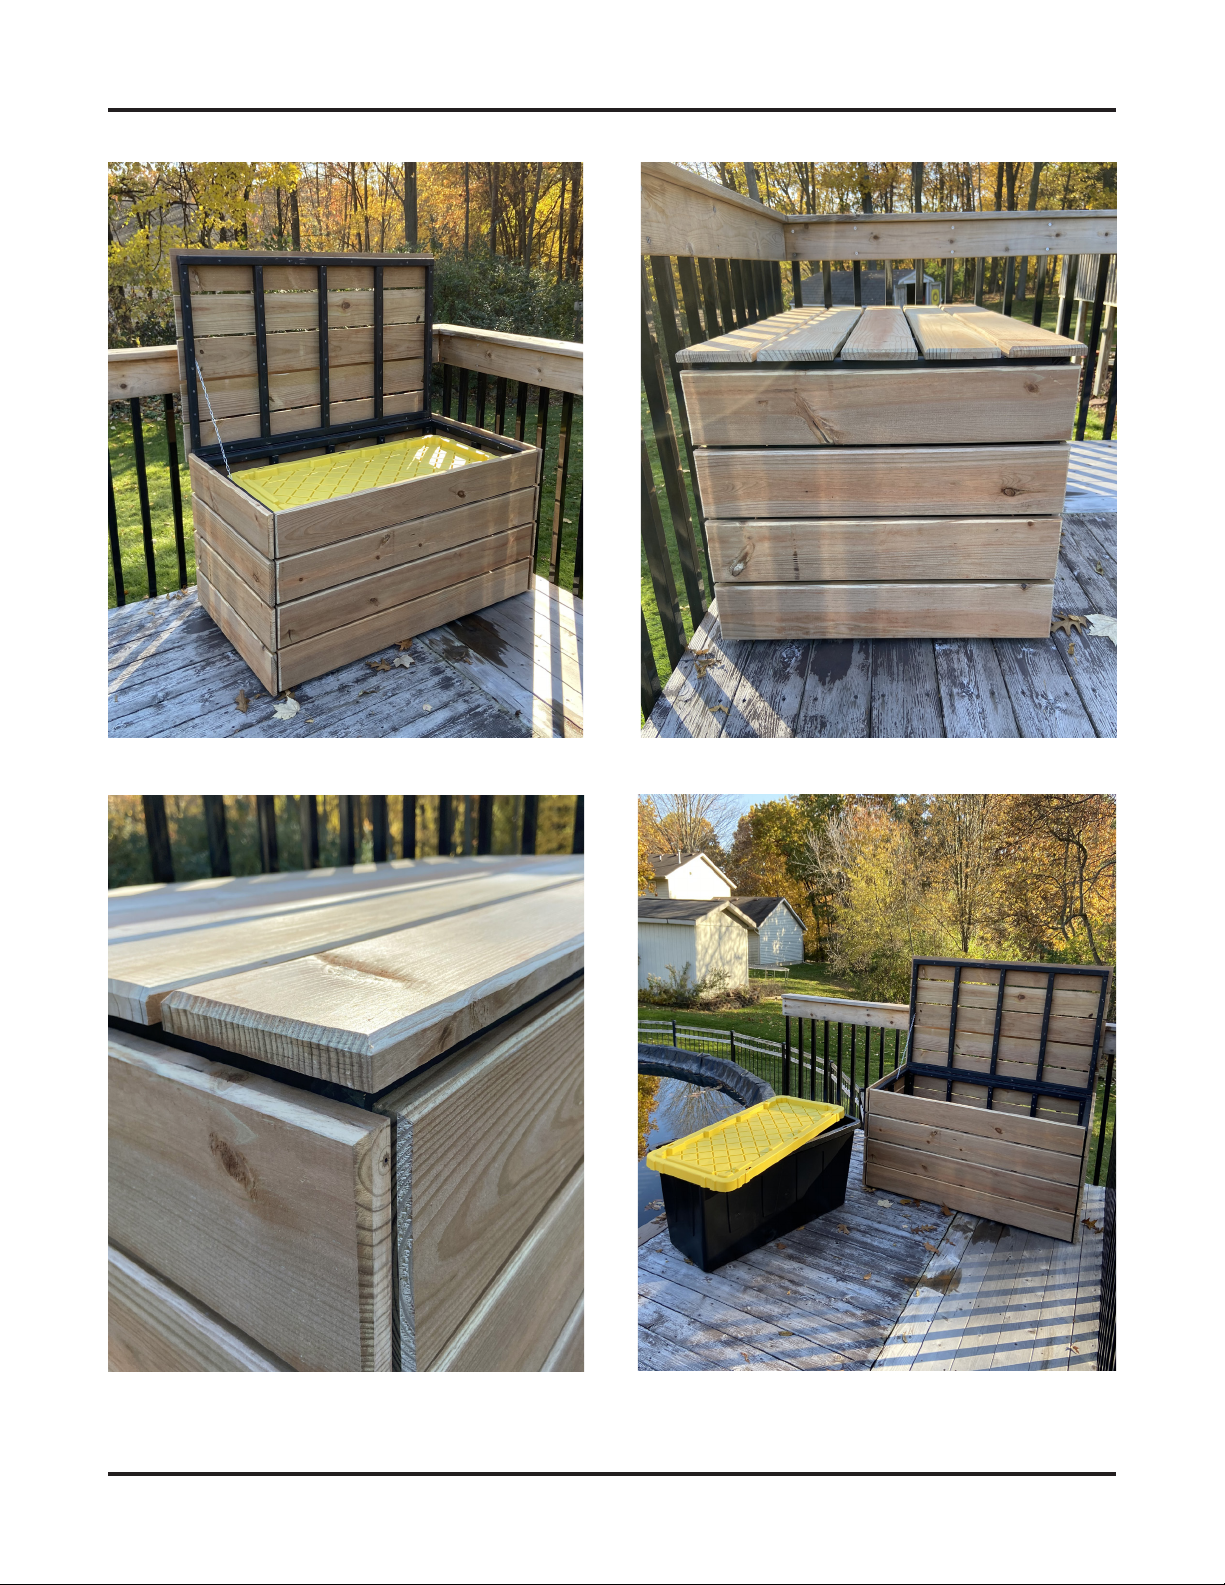
• Insert (L) 55 gallon tote into box. There should be
ample room on all sides to accommodate for opening
and closing the tote without removing it from the box. fig. 9
O
Step 8
Cleanup and Disposal
See fig. 10 and fig. 16
• If desired, use a sander to remove any ink stamps
from your lumber using sandpaper or a sander.
• Dispose of any unused lumber properly. Follow
ProWood disposal guidelines.
• Apply a water sealer to your finished product once
per year or as needed. fig. 10
F
More plans available at www.prowoodlumber.com
ProWood is a registered trademark of UFP Industries Inc., in the U.S. ©2021 UFP Industries. All rights reserved.
This document is for illustration purposes only. Use of this product must be in accordance with all local zoning and/or building codes. Consumer assumes all risks and liability
associated with the use of this product. For details on safe handling, go to UFPI.com/ptinfo. Warrantor does not provide any warranty, either express or implied, and shall not
be liable for any damages, including consequential damages. 7094 06/14
Make your outdoors great with other project plans available at www.ProWoodLumber.com Page 7 of 10

Make your outdoors great with other project plans available at www.ProWoodLumber.com Page 8 of 10

5.50
29.50
FRONT VIEW
.50
.75
1.50
TYP
SIDE VIEW
28.00
14.00
20.00
.75
BACK VIEW
TOP VIEW
SIDES x2
5.50
50.00
FRONT VIEW
.75
.50
1.50
TYP
SIDE VIEW
12.375
24.00
48.00
20.00
1.00
Remove .75" from the back
top board for hinge detail
BACK VIEW
TOP VIEW
Front/Back
AA
TOP VIEW
12.375
24.00
35.625
48.00
B
B
SECTION A-A
FRONT VIEW
5.50
SIDE VIEW
SECTION B-B
SPACE GAPS EQUALLY
BASE
5.50
52.50
FRONT VIEW
.75
1.50
TYP
SIDE VIEW
51.00
25.00
.75
13.125
25.50
BACK VIEW
TOP VIEW
TOP
Make your outdoors great with other project plans available at www.ProWoodLumber.com Page 9 of 10
fig. 11 fig. 12
fig. 13 fig. 14
Step 1 Step 2
Step 4 &5 Step 6
25.25
FRONT VIEW
52.50
TOP VIEW
29.50
SIDE VIEW
ASSEMBLED
48.00
BACK VIEW
SCREW HINGE TO
BACK
HINGE DETAIL
Make your outdoors great with other project plans available at www.ProWoodLumber.com Page 10 of 10
fig. 15 fig. 16
Step 7 Step 8
Popular Outdoor Storage manuals by other brands
Arrow Storage Products
Arrow Storage Products FKCS02 Series Owner's manual & assembly guide

SmartStore
SmartStore SS3020 Assembly instructions

Riverlea
Riverlea Duratuf KIWI MK4B Assembly instructions
Arrow Storage Products
Arrow Storage Products EP84 Owner's manual & assembly instructions

Tiger
Tiger Copley General assembly instructions

Asgard
Asgard GLADIATOR PLUS 1 manual


Best Barns
Best Barns Geneva Assembly Book

Schaffner
Schaffner HOLZLAGER-BANK 7023 Assembly instructions

Lifetime
Lifetime 6422 Owner's manual outdoor storage keep this identi?cation number in case you need to contact our custom

Rowlinson
Rowlinson SS225D Assembly instructions

Palmako
Palmako FR19-272 installation manual
Arrow
Arrow Rom Owner's manual & assembly guide