Proxomed kardiomed 200 cycle User manual

User Manual kardiomed cycle 200 med Version 1.0
Seite 1 von 15

User Manual kardiomed cycle 200 med Version 1.0
Seite 2 von 15
Contents
1 General..................................................................................................................................... 3
2 Classification of the unit ......................................................................................................... 3
3 Assembly for partly disassembled delivery............................................................................. 3
4 Safety warnings ....................................................................................................................... 5
4.1 Safe assembly of the unit................................................................................................. 5
4.2 Safe training .....................................................................................................................6
4.3 Indications and contraindications.................................................................................... 7
5 Operating of the display ......................................................................................................... 7
5.1 Polar –pulse system.......................................................................................................... 7
5.2 Overview display/button functions..................................................................................8
5.3 Display...............................................................................................................................9
5.4 Quickstart.......................................................................................................................... 9
5.5 Programming the monitor...............................................................................................9
5.6 Adjusting the resistance...................................................................................................9
5.7 Training control via the storage media..........................................................................10
5.8 Results ..............................................................................................................................10
5.9 Programs of the cycle......................................................................................................10
5.10 Pulse controlled Training ................................................................................................ 11
5.11 Interface PC...................................................................................................................... 11
6 Maintenance ...........................................................................................................................12
6.1 Instructions for the error condition detection (failure).................................................12
6.2 Instructions for preventive maintenance by the operator ............................................12
6.3 Maintenance for authorised specialists..........................................................................13
6.4 Performance of the metrological control pursuant Medical Devices Operator
Ordinance ...................................................................................................................................13
6.5 Conduction of a safety-related control (According to the transposition of the medical
device directive 93/42 EEC into national law) ...........................................................................13
7 Technical Data ........................................................................................................................13
8 Warranty .................................................................................................................................14
User Manual kardiomed cycle 200 med Version 1.0
Seite 3 von 15
1General
Read the instruction manual with its security advices and warnings prior to the initial use of
the units, to secure a safe and conventional use. Keep this document for future reference
and pass it with the unit in case of resale.
2Classification of the unit
The units of the cardio line med are medical products accordingly to guideline 93/42 EEC, categorized in class IIa.
In the control range of the brake, the tolerance is less than 5% or under 50 watts less than 3 watts.
The items of the cardio line are consistent with the standard EN 957 and designed for supervised range.
Only one person at a time can use the unit; the maximum usage weight has to be less than 130 kg.
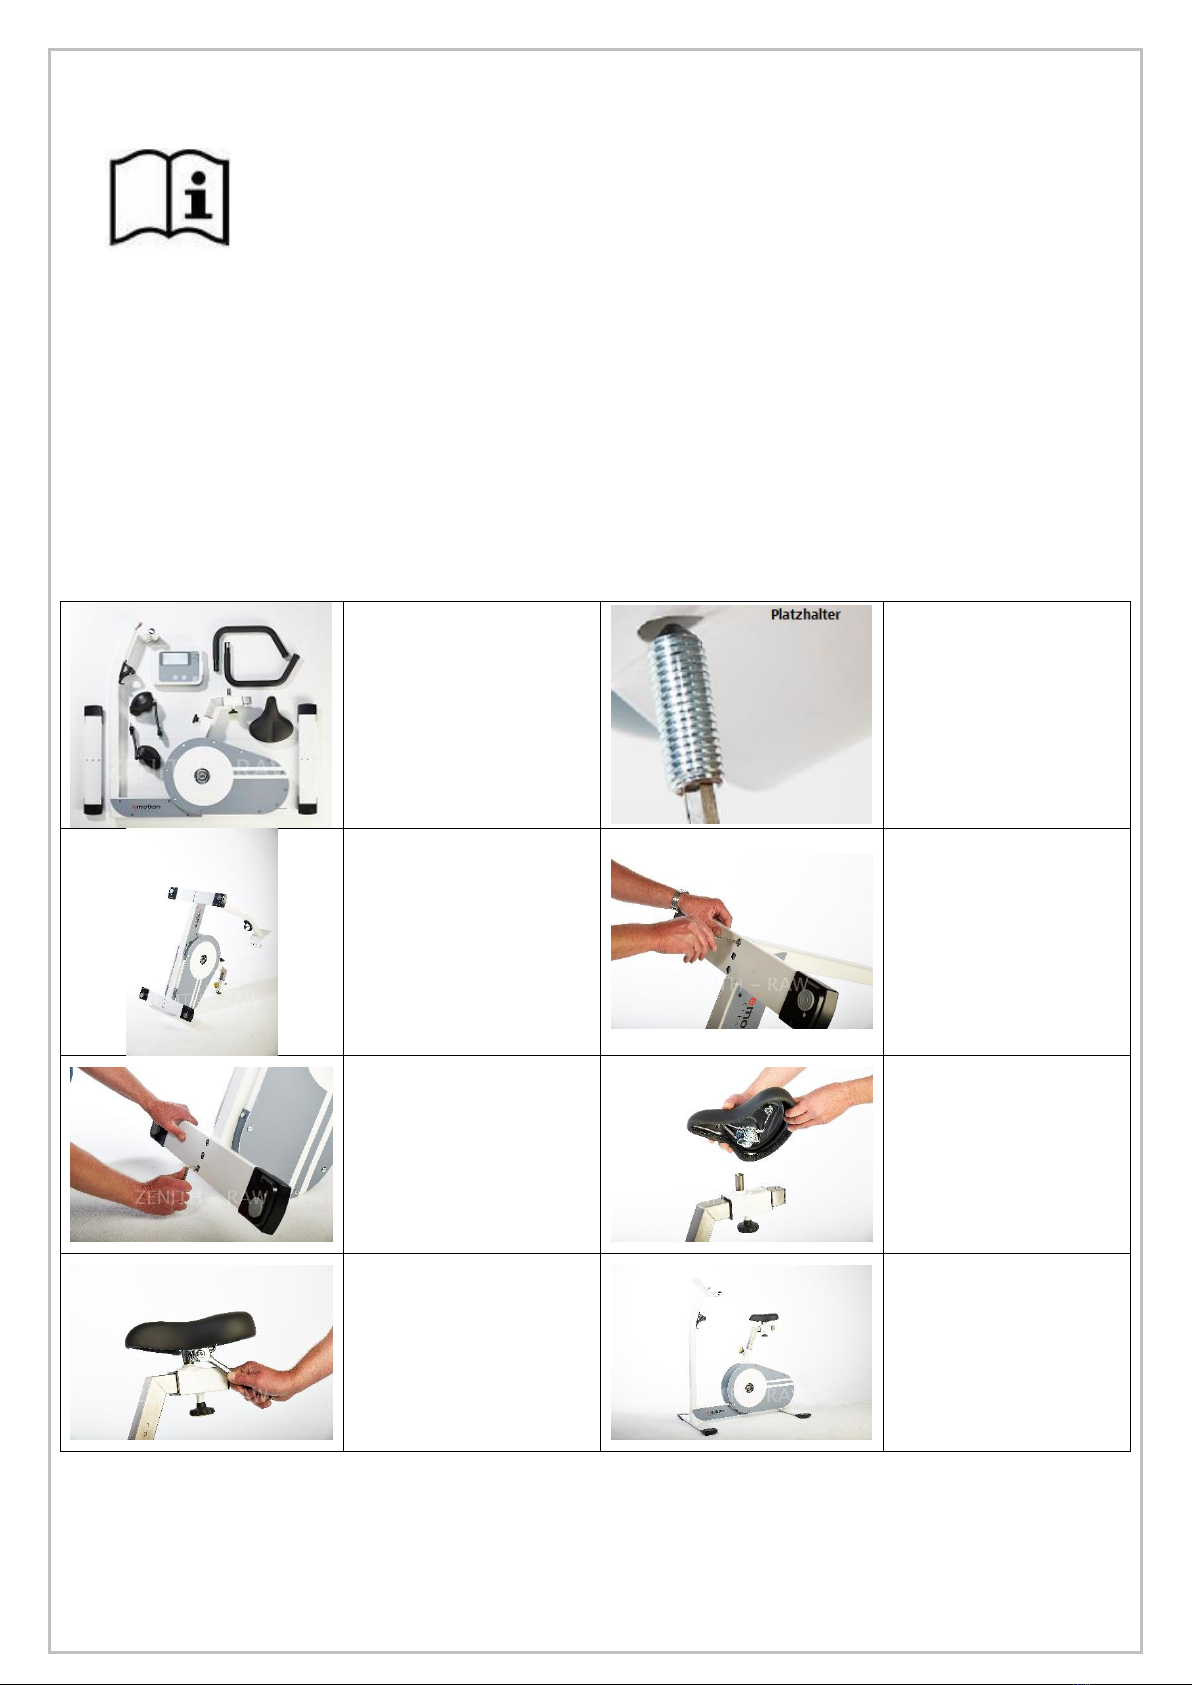
3Assembly for partly disassembled delivery
To ensure a cost reduced transport, the unit of this type can get delivered partly disassembled. This way up to 4
units fit on one pallet. Is this the case the unit has to get assembled as followed:
1.Check the main
components for
completeness….
2. …and then the screw
set.
3 First the feet get
mounted. Therefore
place the corpus on a
soft surface (e.g.
blanket) tilted on the
back of the casing and
the seat pole. (Beware of
damages at the
casing!!!)
4 With 2x3 screws of
the sort A first the front
(rubber foot
up/front)…
5 …then the back foot
(rubber foot to the back)
get mounted. Beware to
tighten the screws.
6 Now the unit gets
placed upright again
and the saddle gets put
on the cylindrical
bracket.
7 The incline of the
saddle influences the
seating comfort. Beware
of a horizontal
orientation of the
saddle.
8 Tighten the nut at the
saddle with a socket
size 14.
User Manual kardiomed cycle 200 med Version 1.0
Seite 4 von 15
9 The pedals as well as
the cranks are marked
with the side (R/L). Screw
the left crank and left
pedal together.
10 Place the crank onto
the axis and fix with
the axis screw (B) with a
14mm socket. Tighten
the crank very strong
(Retighten chapter 6.2)
11 For the finish covert
he axis screw with a
cover cap (C).
12 Repeat steps 9 to 11
with the right side.
Important: Beware that
you mount the cranks
right and left 180°
offset.
13 Next the monitor gets
fixed. Therefore unscrew
the four outer screws of
the monitor backside.
14 Carefully open the
casing and lead the red
cable coming out of the
unit mast through the
according hole on the
backside of the
monitor.
15 Place the plug on the
horizontal placed socket.
You can recognize the
proper lock in place by a
„klick“.
16 Next the monitor
front gets put back on
and the monitor gets
fixed with the four
screws (D).
17 Afterwards the 4
outer casing screws get
screwed back in to seal
the casing properly.
18 The flat steel bar is
loosely premounted
with two setscrews in
the handlebar socket.
Remove the right screw
only and insert the
right part of the
handlebar…
19 …and fix this part
with the setscrew
loosely.
20 Next loosen the left
screw and repeat the
past two steps with the
left side.
21 Adjust the handlebar
that the handles are
parallel with the
monitor front…
22 …in this position the
setscrews get finally
tightened.
Finished!
User Manual kardiomed cycle 200 med Version 1.0
Seite 5 von 15
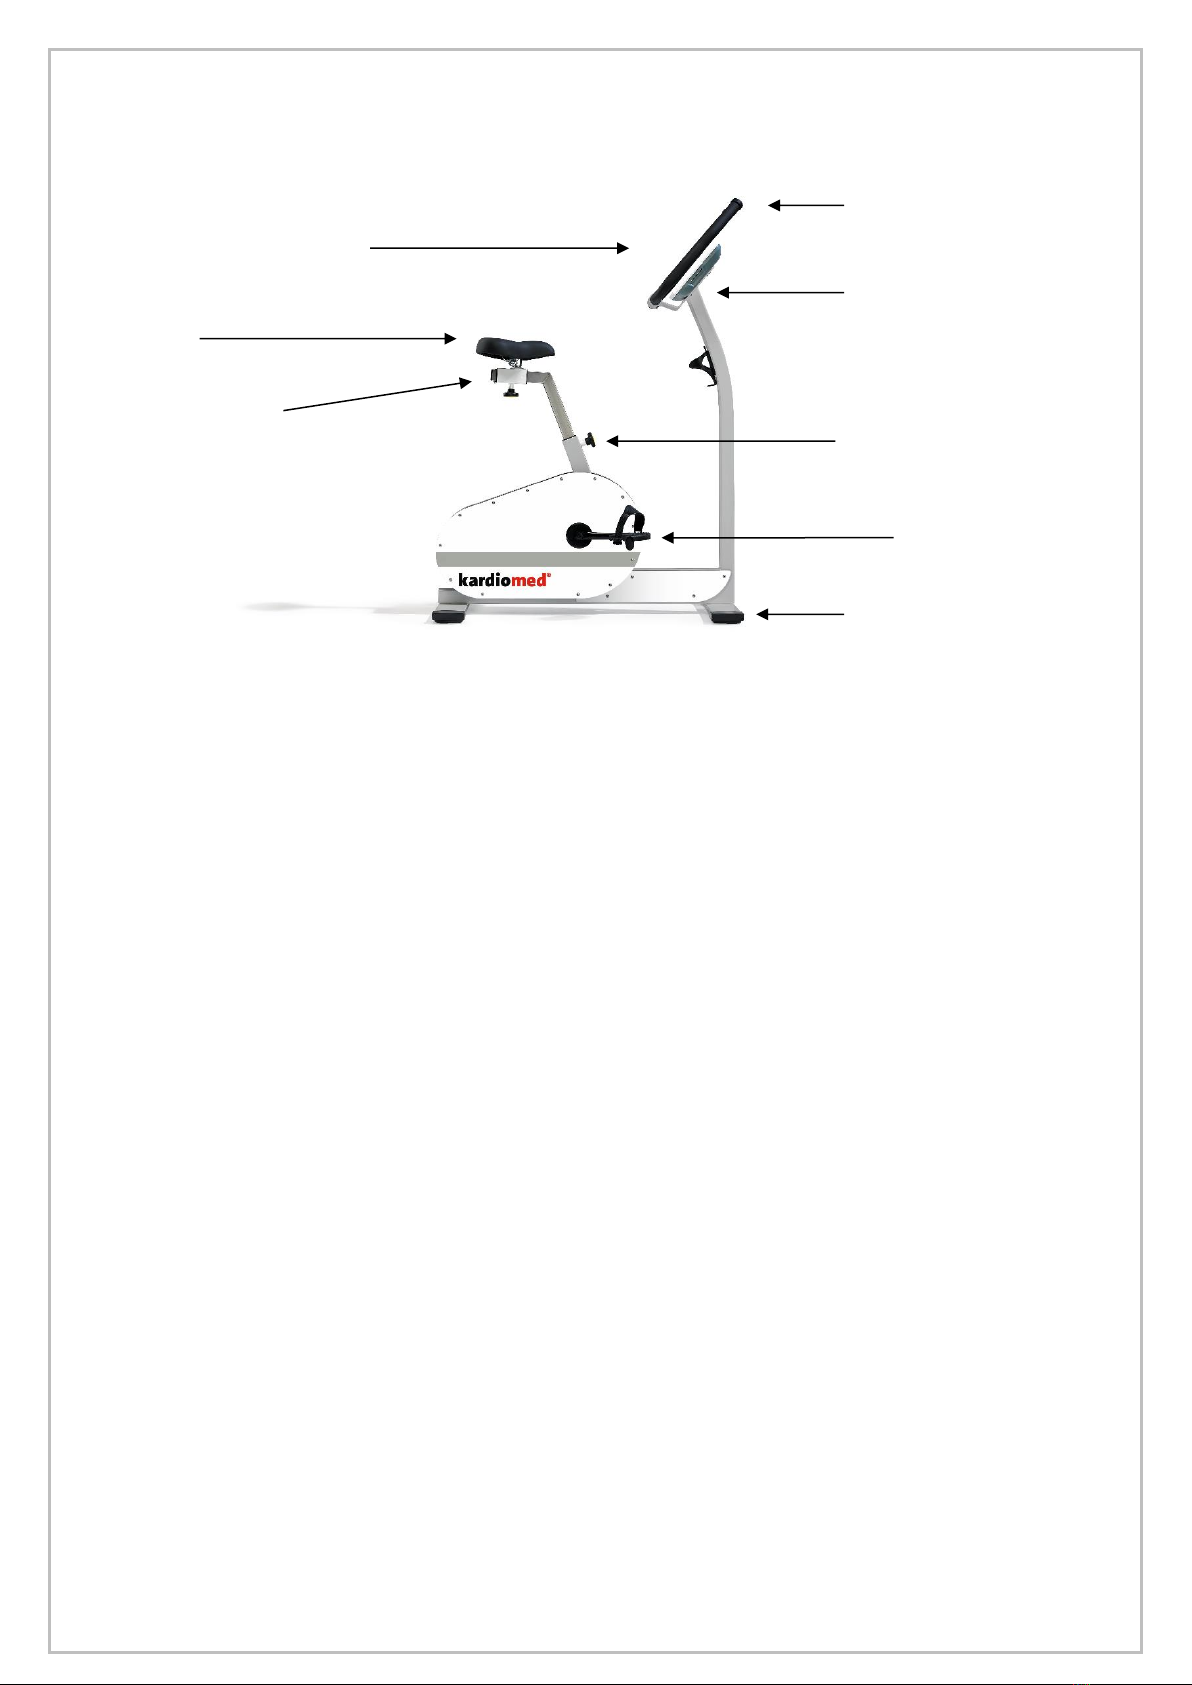
4Safety warnings
4.1 Safe assembly of the unit
Adjustment
feet for
levelling
Pedals
Handlebar
Saddle
Adjusting screw for
the horizontal
saddle adjustment
Adjusting lever for the
vertical saddle adjustment
Position of the Typ
Label
Monitor for individual
settings and visualization
of the training data

User Manual kardiomed cycle 200 med Version 1.0
Seite 6 von 15
Place the unit on a solid, flat and non-sliding ground and level the unit with
the adjusting feet, so that it does not move.
For the set-up a safety clearance of 100 cm to all sides is necessary to ensure a
safe access also in emergencies. Safety clearances between the devices are allowed to
overlap; see picture.
The usage may only take place in dry rooms (< 65% humidity, > 0 < 45°C room
temperature).
Pay attention that there is no electromagnetic radiation like mobile phones or
fluorescent tubes because they may affect the measurement of the heart rate.
Don´t locate the units on thick rubber mats. Ensure that the unit gets airing
from all sides.
All units of the cardio line are self-powered. The user will either generate the electricity by pedalling or
–especially while programming –will be supported by the standard, built-in battery pack. The battery
power will last for about two years. See topic “4 Maintenance” for battery change.
Attention: Please consider the standards for care, maintenance and servicing in chapter 4 of this manual.
4.2 Safe training
Before starting to exercise, the fitness of the user has to be ensured by an authorised specialist or a
doctor. Please note topic 3.3 contra indications.
Excessive exercise can be dangerous.
When nausea or dizziness occurs, the work-out has to be stopped right away and a doctor needs to be
allocated.
The training on the units is allowed with unbruised skin only.
During exercising light, tight fitting clothing, which cannot be caught in parts of the unit is
recommended. Always wear sports shoes to ensure a good balance on the pedals.
Please check the unit before exercising for a good level, faulty parts or other manipulations. In case of a
defect or if you are not sure, ask a supervisor.
Before the beginning of the workout it must be assured that no one is close to moving parts, to avoid a
danger for a third person. Above all, hold unattended children off the units.
As a safety function, the stop button is always active and immediately slows down the motion when
pushed.
To exercise in a biomechanical proper position the unit has to get adjusted. Positioning: On the cycle
med the horizontal as well as the vertical seat position can get adjusted. To change the vertical seat
position, loosen the bolt on the front of the seat post and manually position the desired height. Safety:
When adjusting the vertical seat position, make sure that the bolt is back in the starting position before
putting any weight on the seat. The seat position can be noted via the scale on the front side of the seat
post, by that the user can easily adjust the seat positioning when repeating the workout. The position
should be chosen to ensure that in the lowest pedal position the knee still has a 10° bending.
To adjust the horizontal position, the seat knob should be loosened, and then the seat can be moved
forwards or backwards. Afterwards the knob must be retightened. The horizontal position has an effect
on the load, resting on the arms during the workout (slope of the upper body).
Warning: The system to control the heart rate can be faulty. Excessive workouts can lead to serious
injury or death. When nausea or dizziness occurs, the work-out has to be stopped right away.
Warning: Solely use unit with the casing.
Warning if using optional power supply: use exclusively medical power supply units according to IEC
60601-1 which are approved by the manufacturer.

User Manual kardiomed cycle 200 med Version 1.0
Seite 7 von 15
4.3 Indications and contraindications
Indications
Mobility of the locomotors apparatus
Strengthening of the muscles
Strengthening of the cardiovascular system
Contraindications
Cardiovascular affections
Pains of the locomotors apparatus
During workout
Pains in the thoracic region
Nausea
Dizziness
Pain in the joints involved in the motion
When taking medication ask for a doctor’s training advice.
5Operating of the display
Three programs allow an individual and diversified training
5.1 Polar –pulse system
Every piece of equipment of the cardio line includes the original Polar Pulse System, which receives signals from
a breast belt by the exerciser (the breast belt is not included in the delivery of the equipment). The wireless
transmission to the electric display is coded. The Polar©technology is based on a magnetic field, which transfers
the signals. This magnetic field can be interfered by several sources. The most common reason is the use of
breast belts that are not 100% compatible with the Polar©System and commonly have a longer range. Cell
phones, speakers, TVs, power lines, fluorescent tubes, and motors with high power can also interfere with the
Polar Pulse System.
The measuring of the pulse frequency is ECG precise. Only when using coded breast belts, like T31C, the heart
rate gets transferred coded. When using an uncoded breast belt, like T31, the transfer is uncoded.
Backlight
All ergometers are equipped with a monochrome backlight for the LCD-Display.
The backlight turns on automatically after a few seconds using the ergometer and depending of the break
resistance can be operated dimmed.
Due to the backlight it´s easier to read the display, even if lighting conditions are bad.
Safety advice according to DIN EN ISO 20957
Warning! Systems for the heart rate surveillance can be faulty.
Excessive workouts can lead to serious physical damage or death.
Abort the workout immediately when dizziness or nausea occurs.

User Manual kardiomed cycle 200 med Version 1.0
Seite 8 von 15
5.2 Overview display/button functions
Erläuterung der Tasten im Uhrzeigersinn beginnend von der Stopptaste:
Clockwise explanation of the buttons, starting with the Stop button.
The STOP button stops the workout and activates the electronic brake (except for the treadmill), which
will brake at a maximum workload for 8 seconds to bring the movement to a halt. After that, the COOL
function can be used to conduct a cool down with low intensity.
The PROG button must be pressed to start the selection of programs available.
The Cool button stops the workout before the end of the chosen program, begins with the cool down
mode and finishes the workout with a low intensity. The workout data is shown and saved on the
storage media if the workout has been started using a storage media
Reset button –Initially, the Reset button is not visible for the user. It is hidden in the extension of the
upper edge of the LCD-display to the left. If the system should operate faulty, the reset button gives you
the option to restart the processor. This is only possible if no activity is being conducted on the unit,
meaning zero revolutions.
The +button increases value of the parameters
By using the Enter button, values of parameters or display modes are selected.
The - button decreases the value of the parameters.
Reset button
User Manual kardiomed cycle 200 med Version 1.0
Seite 9 von 15
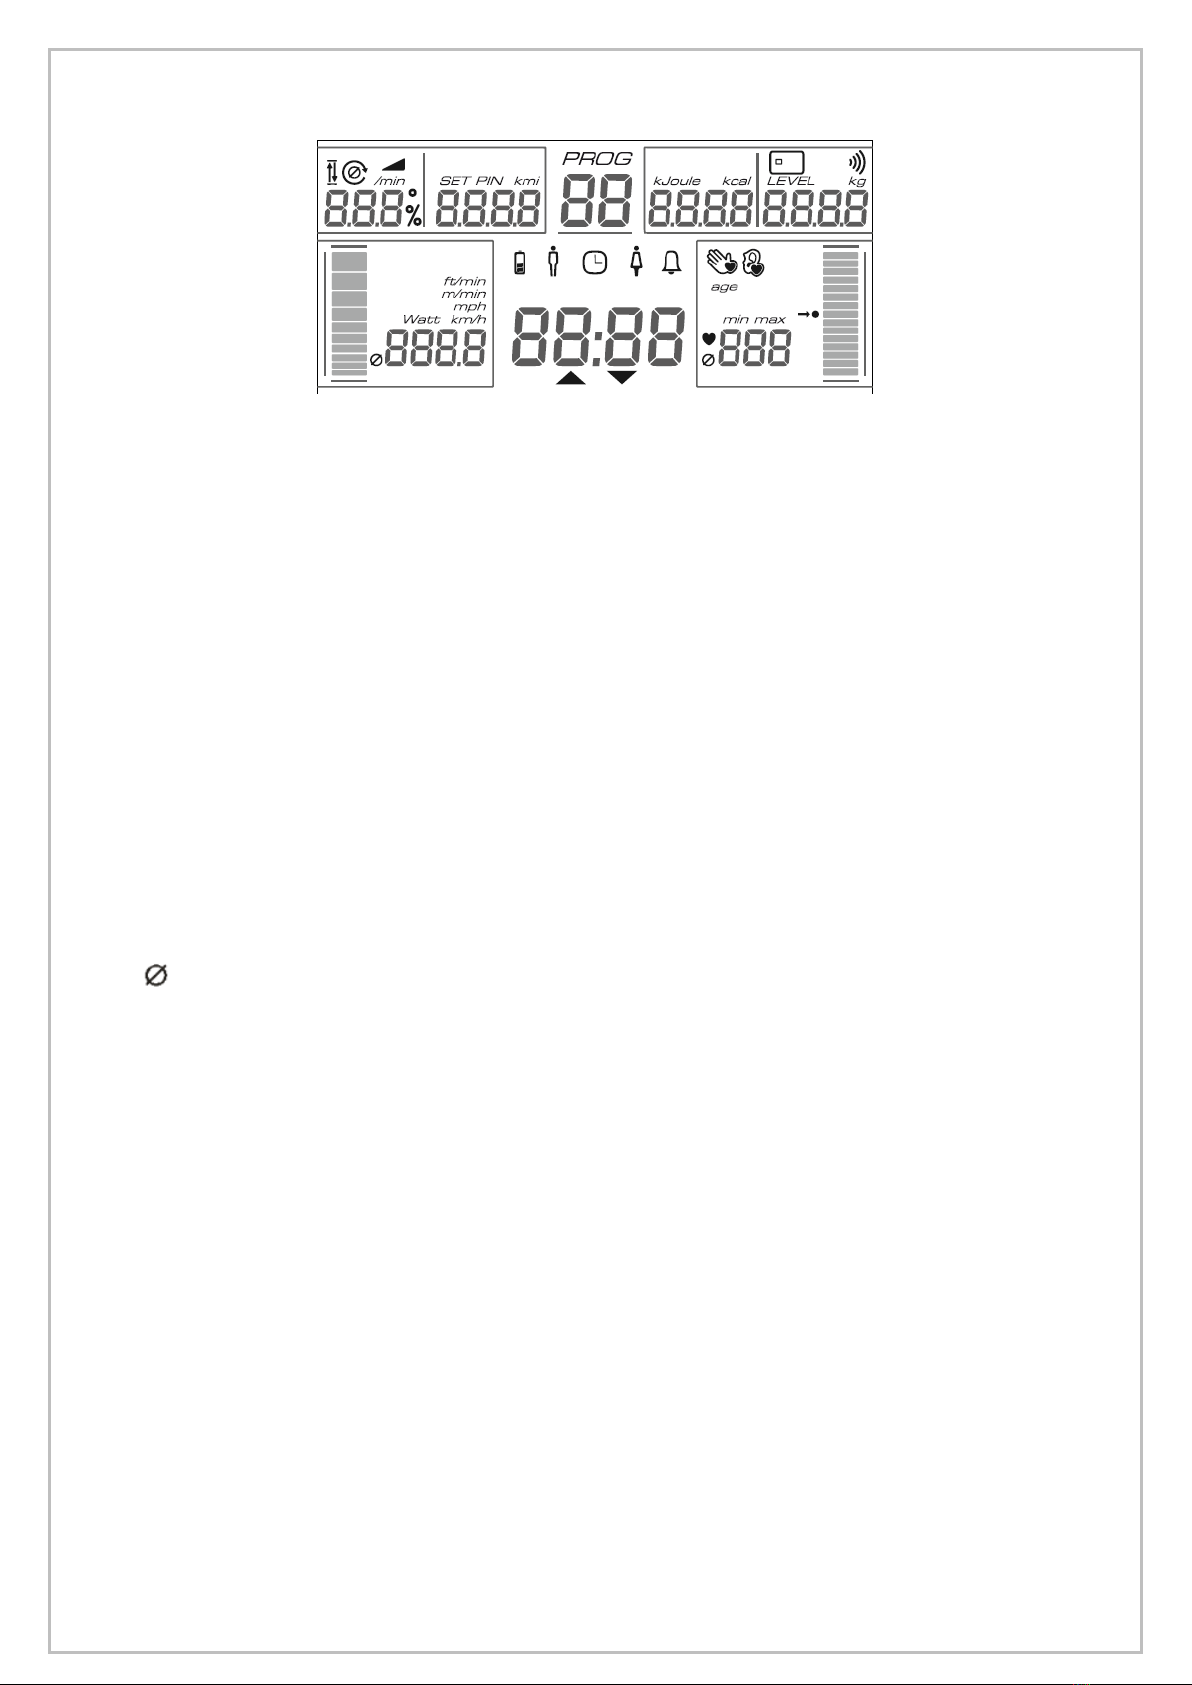
5.3 Display
Fig.1: In this image all segments of the LCD display can be seen. In usage only the relevant information is shown..
Depending on the program, the following parameters are shown:
Program: Number of the program
Time: Actual accumulated time of workout or remaining, effective workout time. An arrow indicates the
counting direction
Pulse: Display of heart frequency, if a breast belt is worn or the hand pulse sensors are touched. As an
indicator that the heart frequency is being measured using the hand pulse system, a symbolized hand is
shown. The pulse indicator display makes it visible in which pulse area the trainee is working out. At a
pulse of 130, the indicator bar is filled to the middle, indicating reasonable intensity. When training in a
pulse controlled program, the centre of the bar indicates the target heart frequency.
Wattage: The performance is displayed in watts. Corresponding to the digital figures, the intensity is
displayed via a graphical bar indicator.
Km/h: The performance is being shown in km/h. Corresponding to the digital figure, the speed is
displayed with a graphical bar indicator.
Rpm: Pedal revolutions per minute
Km: Depending on the program, either the accumulated or the remaining distance is displayed.
K-Cal: Depending on the program, the accumulated calories burned or the remaining calories to be
burned are shown.
Level: Display of the actual intensity 1-21
Storage media: The symbol for the storage media appears whenever a member card is inserted into the
slot.
If any of the digital figures are shown in combination with this symbol, the figures shown are
average figures of the workout session
5.4 Quickstart
The display can be activated by pedalling unless the power is already supplied by the battery pack.
When starting the workout by pedalling, the quick start program is automatically activated and does not need
any menu programming. The resistance can be chosen by pressing the +/- button.
5.5 Programming the monitor
When the button Prog is pressed, the programming function becomes activated. By pressing +/-, the desired
program can be selected. The name and number of optional programs are displayed.
Press ENTER to confirm the program. Via the menu control, information can be requested to ensure a correct
control of the program. The figures displayed can be adjusted by pressing +/-. Every selection must be confirmed
with ENTER. After all required information has been entered, the program starts automatically.
5.6 Adjusting the resistance
Except for the fully automated programs, all program resistances can be manually adjusted by using +/- during
the workout. In some programs, this is done via a level/step system from 1-21, in other programs via selecting the
desired wattage.

User Manual kardiomed cycle 200 med Version 1.0
Seite 10 von 15
5.7 Training control via the storage media
The storage media has a standard fitting in all units of the cardio line. The storage media systems supports the
user in all aspects of training activities.
The system consists of a monitor unit with the storage media reader. The slot used to enter the media is located
on right side of the monitor casing and the media must be entered. An acoustical signal proves the acceptance
of the storage media. The storage media system makes training with all units of the cardio line easier and more
efficient. The programming of the media can be done directly on the ergometer.
The planning of the training can also be made with the optional PC software “motion training manager.” If the
software is used, the individual training programs are transferred to the storage media. All results are saved on
the storage media and can be analysed on the PC after the results have been transferred .
Programming Training Schedules manually onto the Member media
One must get onto the ergometer and begin pedalling or activate the monitor by pressing any button.
The individual data for the desired program has to be entered manually on the monitor. The program
then starts.
The trainer media is entered into the slot until an acoustical signal indicates that the media has been
recognized.
The member media gets inserted. Now the maximum number of workouts (1-255) can get chosen.
Confirm with ENTER. After the acoustic signal the data is saved and the member card is functioning.
Selecting 255 workouts equals no limitation.
When the defined amount of workouts has been conducted, new program data has to get stored on the
storage media.
The member card is intended to be used by the training person. After the desired program has been saved, the
card simply has to be entered to start the workout. The workout is controlled automatically and no further
programming is necessary. All workout results are saved automatically on the storage media after each
workout.
Special functions of the trainer card: Deleting the data on member media
If you want to delete all data of a medium, then you have to insert the trainer medium twice. Afterwards you
insert the member medium and all the data on the card will be deleted. The “Results total” can be deleted by
pushing the buttons + and –(3 seconds) at the same time. Only the results will get deleted, not the training
plan.
Functioning of the Member medium
The trainee must get onto the ergometer and begin pedalling. Next, the storage media has to be entered into
the slot. The accumulated results of previous workouts on all types of ergometers and for the type used at the
moment are shown for four seconds each.
After that, the personal workout that was previously saved on the storage media is being started automatically
and the workout session can begin. The storage media can be removed after the workout is over or interrupted
by pressing the COOL button. The end of a training will always get indicated by a peep.
The results of the actual session are displayed on the monitor and saved onto the storage media immediately
after the end of the workout. After several seconds the time counts up and the cool down starts.
5.8 Results
After the end of each workout or after pressing the COOL button, all workout results will be shown on the
display. According to the program selected, the relevant results are shown. When there is no reaction the
workout will be stopped after showing the results. By pushing the COOL button, the workout can be stopped at
any time.
The results are shown in the parameter area as well as in the dot matrix section. Some figures are average
values (wattage, km/h, rpm, pulse, and meters of heights/min), some are accumulated values (km, k-cal, time,
and meters of heights). Average values are marked with the Øsymbol. This enables the control of personal
fitness-development and thereby motivates a frequent user.
If the training has been conducted using a storage media, the training results from every type of ergometer are
saved separately onto the storage media. The analysis of the results saved can be done at the ergometer directly
or on a PC if an according software is available.
5.9 Programs of the cycle
Programs of the cardio line med according to usage and biofeedback

User Manual kardiomed cycle 200 med Version 1.0
Seite 11 von 15
Programms
cycle med
usage
manual
Storage
media
Controlling via
PC software
1 Quick
x
x
x
2 Watt
x
x
x
4 Puls
x
x
x
Program specifications
Quick Start
The quick start program allows an immediate workout start. The trainee simply has to begin pedalling, and the
display starts operating. No programming is required.
Using the +/-buttons, the level (degree of intensity) can be varied at all times.
The program works in an rpm-dependent mode, which means that the intensity varies according to rpm.
Using the Scan button, the figures and the graphical displays vary.
Pressing the COOL button will initiate a display of the results as well as concludes the program.
Watt
The program exclusively manages the endurance of the workout and works rpm-independent, which means the
output stays constant, when increasing the rpm.
After activating the display, one gets to the program choice with the Prog-button. If one chooses the program
Watt, one can choose the initial resistance between 25 and 250 watts. The endurance in minutes gets selected
with +/- and confirmed with ENTER. Within the program one can change the wattage anytime with +/- in 5
watts steps up to 500 watts. If the rpm is too low to generate the chosen power/watt, the rpm indicator flashes.
The remaining time is permanently shown in the display. After the end of the workout or after the cancelling
with the COOL button the relevant results are shown in the display.
Pulse
The pulse training option is an intelligent training program that ensures a workout intensity that is optimal for
reaching training goals without the need of manual interference. The desired target heart rate (depending on
the desired training aim) must be entered at the beginning of the workout. The ergometer then adjusts the
resistance to the actual heart rate in a manner that allows the target heart rate zone to be reached, but not
exceeded. Additionally, the program can evaluate the development of the heart rate and use the determined
fitness level to adjust the resistance, which allows for an optimal warm-up.
If the initial resistance is set above a certain limit, no warm-up will be done and the resistance is immediately
adjusted to the desired heart frequency (see motion pulse manager brochure). This program functions in the
rpm-independent mode.
The pulse program requires three figures to work properly:
Desired heart frequency during the workout
Initial intensity in watts (25-50 watts in general (for the cross 100 watts);
Training time in the effective heart rate range
Everything else is managed by the program control. The time entered is the time of workout in the effective
heart rate range, which means that the time of the warm-up will not be counted.
The +/- buttons are always active during the workout. If the initial intensity is increased to more than 45 watts
during the first two minutes of the workout, the program control will increase the intensity immediately to
reach the target heart rate as quickly as possible. By doing so, the user can perform a so called cross training,
whereby the resistance is adjusted to the expected wattage during the workout and the ergometer will simply
make fine tunings to the resistance.
Once the target heart rate has been reached, the +/-buttons can be used to change the target heart rate.
At the conclusion of the training, the results are shown on the display.
5.10 Pulse controlled Training
Concerning the working of pulse controlled programs such as Pulse program/ Pulse, Watt sensitive and Therapy,
please refer to the brochure “motion pulse manager”.
5.11 Interface PC
The ergometer is equipped with an RS 232 interface –not galvanically isolated. This way the unit can get
controlled via PC, ECG, Spiro, etc. if the units use the same protocol. The unit generates enough electricity for
the interface. To start the communication the unit needs to get operated.
Beware to clarify the electrical safety when using the unit for medical purposes. If you have questions contact
your dealer.

User Manual kardiomed cycle 200 med Version 1.0
Seite 12 von 15
6Maintenance
All cardio machines from emotion fitness are characterized by excellent quality. The units are durable and only
need little maintenance, to function over a long period of time. The required maintenance hast to get
conducted conscientious.
Warning: Only authorised service is allowed to open the unit.
You can only keep the safety level by checking the unit regularly for damage and attrition. Damaged parts need
to get replaced right away and the unit needs to get decommissioned until its repair
6.1 Instructions for the error condition detection (failure)
In case failure occurs at a machine that you cannot classify, please contact emotion fitness GmbH & Co.
KG. For every error report please hold ready the serial number and model type of the faulty machine. It
can be important to diagnose properly and to provide the correct spare parts!
6.2 Instructions for preventive maintenance by the operator
Check the unit visually before every usage but at least daily particularly for damaged parts, loose
connections and atypical noises.
Despite an excellent quality the unit has to get intensely inspected. Document the inspection for medical
machines in the medical booklet.
All connections and weld seams need to get checked
Clean the unit well.
Check all the screws for tightness.
Check the saddle and saddle pole for damages. Beware to exchange the saddle every 2 years to
prevent fatigue of the material.
Check the cranks and pedals for damages and tightness.
In general:
Clean the devices with mild purifier and a wet cloth to get off aggressive sweat. Dry the device
afterwards.
The usage of spray bottles is not allowed; it has shown that the unit never dries at spots that can´t
be reached. Rust may occur.
Pay attention that no liquids run into the monitor as it could destroy parts of the electronic.
If disinfection is required only use acryl-des® disinfection cloths (see http://www.schuelke.com/).
The monitor is showing the sign for low battery voltage when the function without electricity from
the brake can´t be guaranteed. Exchange the 3AA batteries by loosening the four screws of the
monitor casing and take of the front carefully. Please pay attention that you put the batteries in the
right way, note the signing. Dispose the batteries according to the provisions. There is a return
obligation; the customer can choose if he wants to give the batteries to the local disposer or to the
distributor free of charge.
Beware to not put the machines on thick rubber mats where the frame gets pushed in. The bottom
of the frame needs to get ventilated.
Check the casing for tightness.
Check the locking pins for proper function.
When using the machine regularly please check the unit parts visually, especially screws, bolts,
weldseams and other fixtures.
Check the tightness of the unit feet. .
Check if the cranks are mounted tight to the axis. Therefore you need a 14 mm socket.
Important: Retighten the cranks after 10 hours of usage! Damages on the cranks or axis due to not
retightening are not considered a warranty case!
Check the seat post for damages due to overload.

User Manual kardiomed cycle 200 med Version 1.0
Seite 13 von 15
Clean the parts of the seat post and seat sleigh with silicone spray and wipe it dry afterwards.
Check the pedal straps for damages.
Only use original spare parts, therefore please contact us.
Warning: Retorque cranks and pedals
After the first 10 hours in usage the cranks and pedals need to get retorqued.
If they don´t get retightened, damage of the axis, pedals or cranks is possible and the warranty doesn´t
cover the damage.
6.3 Maintenance for authorised specialists
According to the transposition of the medical device directive 93/42 EEC into national law, emotion fitness calls
for a maintenance check with examination of all relevant component parts by an authorized employee/partner.
This maintenance check needs to be conducted every 12 months on all medical devices of emotion fitness. For
all necessitated control steps please also consider your countries local requirements.
6.4 Performance of the metrological control pursuant Medical Devices Operator Ordinance
Medical products have to undergo a technical measurement check every 24 months. The date of the next
control is shown on the control badge, which you will find next to the type plate.
The possible calibration in the course of the technical measurement check can only get performed by an
authorised company or professional. Contact your dealer in case you need a reference.
6.5 Conduction of a safety-related control (According to the transposition of the medical device directive
93/42 EEC into national law)
At all medical training devices a technical safety check has to be conducted at least every 12 months and after
repair by an authorized employee or partner. This check needs to also include the control of the measurement
functionalities (speed and pulse) and all safety-relevant components.
The conduction of the Maintenance, Safety-Related Controls and Metrological Controls is in the sole
responsibility of the operator!
§ 2 subparagraph 2: This law also applies to the use, operation and maintaining of products that have not been
placed on the market as a medical device but are being used with the intended purpose of a medical device as
described in the national laws resulting from medical device directive 93/42EEC.
They are regarded as medical devices in terms of the medical device guideline.
7Technical Data
The information about measurements and weight can vary because of changes.
Measurements
Weight
Max. user weight
106 cm x 65 cm x 139 cm (L/B/H)
64 kg
130 kg
System of resistance: self-powered brake without the external power supply
buffer battery: 3 x AA/ R03/ UM4 –mignon cell
range of performance is between 25 and 300 watts/ rpm independent
freewheel: existing
Following EU-guidelines are fulfilled:
DIN EN ISO 20957-1 SA
DIN EN ISO 20957-5 SA
DIN EN 60601-1
2001/95/EG allg. general product safety guideline
93/42/EWG medical product guideline

User Manual kardiomed cycle 200 med Version 1.0
Seite 14 von 15
8Warranty
The following is based on the legal warranty.
As a distributor, Proxomed Medizintechnik GmbH provides cost free service for professional users such as fitness
gyms for up to two years on parts and one year for working hours. This offer applies only if proper use and
maintenance as described in this manual can be proven.
The warranty is terminated as soon as the product is serviced or repaired by an unauthorised person. If a
warranty case occurs, proxomed Medizintechnik GmbH must be informed immediately in written form or e-
mail. The owner must provide information including the serial number, detailed error report, the date of
purchase, and the name of the original supplier.
proxomed Medizintechnik GmbH will initiate service, but reserves the right to decide about the mode of service.
The following procedures are possible:
1. The service is conducted on-site by our service employees.
2. The required spare part(s) are shipped.
3. An exchange unit is arranged and sent to the user.
The defective parts must be sent to proxomed within 48 hours. Otherwise the cost for spare parts that have
been delivered will be charged.
If causes for repairs lie outside of the warranty conditions, proxomed Medizintechnik GmbH reserves the right
to require payment for all costs of the repair.
Some consumable parts are excluded from the warranty. These include the overlay, seat, crank arms, crank arm
fixings, pedals, pedal straps, storage batteries, footsteps and the foam covering for the handrails. The Polar®
pulse systems are covered by the legal guarantee.
These warranty conditions do not in any way interfere with general legal claims.
Our General Conditions of Export can be seen and downloaded in the latest version on our webpage
www.proxomed.com.
Manufacturer according to MPG
emotion fitness GmbH & Co KG
Trippstadter Str. 68
67691 Hochspeyer
Telefon: +49 (0)6305-71499-0
Telefax: +49 (0)6305-71499-111
E-Mail: info@emotion-fitness.de
Exklusiv sales of the proxomed® kardiomed 521 units
proxomed® Medizintechnik GmbH
Daimlerstraße 6
63755 Alzenau
Telefon : +49 (0)6023 9168-0
Telefax : +49 (0)6023 916868
Internet : www.proxomed.de
E-mail : info@proxomed.com
German headquarters:

User Manual kardiomed cycle 200 med Version 1.0
Seite 15 von 15
proxomed®Medizintechnik GmbH
Daimlerstraße 6
D-63755 Alzenau
Tel.: +49 6023 9168-0
Fax: +49 6023 9168-68
www.proxomed.de
Office Switzerland:
proxomedMedizintechnik
Seestrasse 161
CH-8266 Steckborn
Tel.: +41 52762 1300
Fax: +41 52762 1470
www.proxomed.de
Changes:
proxomed® reserves the right to change any
product if this action, in our opinion, leads to
improved quality and functionality. All images
in these operating instructions are—due to
printing—only similar. We take no
responsibility for printing errors. Errors and
omissions excepted..
User Manual kardiomed® 200 cycle,
valid since: Oct. 2015
emotion fitness GmbH & Co KG is a
company certified by the Berlin Cert GmbH
10062900, kardiomed 200 Cycle up to 130 kg user weight
proxomed®is a company certified by the
TÜV SÜD Product Service GmbH.
Table of contents


