PSMailers PSM10K User manual
PSMailers™
PSM10K
Operating Manual


psmailers.com • 800.464.5030 PSMailers™
PSM10K 3
A Message to Our Customers
Thank you for purchasing the PSM10K. The PSMailers
product line is the result of over 30 years of experience in
the document processing industry. Through interfacing with
customers like yourself and from hands-on experience in the
field, our Research and Development Team has focused on
a solution providing both the dependability you expect from
today’s technology, while returning operational efficiency to
your organization.
The result of our experience and research is a powerful tool to
improve your bottom line. We hope you enjoy this machine.
User comments and suggestions are always welcomed by our
development team.

PSMailers™
PSM10K 800.464.5030 • psmailers.com
4
Table of Contents
Operator Safety ................................................................... 5
Specifications ..................................................................... 6
Unpacking & Setup .......................................................... 7-8
Unpacking ......................................................................... 7
Setup ................................................................................. 8
Machine Overview ......................................................... 9-11
Mac
hine Diagram .............................................................. 9
Capabilities ........................................................................ 9
Controls ........................................................................... 10
Fold Plates ....................................................................... 11
Identifying Your Fold ....................................................11
Feed Table Setup ......................................................... 12-15
Setting the Paper Guide Width ........................................ 12
Setting the Feed Gauge .................................................. 13
Setting the Exit Guide Wheels ......................................... 14
Setting the Fold Plates .................................................... 15
Machine Operation ...................................................... 16-18
Loading the Feed Table ................................................... 16
Operating the PSM10K
.....................................................
17
Operating in Batch Mode (Optional Counter) .................17
Setting the Batch Total ..........................................17
Running in Batch Mode ........................................17
Resetting the Batch Count ....................................18
Operating in Manual Mode ..........................................18
Resetting the Count......................................................18
Maintenance ...................................................................... 19
Troubleshooting ........................................................... 20-23
Automatically Clearing a Paper Jam ............................... 20
Manually Clearing a Paper Jam ....................................... 20
Diagnosing the Paper Jam ..........................................21
Misaligned Folds ............................................................. 21
Paper Feed Problems ...................................................... 22
Double Feeds ..............................................................22
Won’t Feed ..................................................................23
Machine Won’t Run ......................................................... 23

psmailers.com • 800.464.5030 PSMailers™
PSM10K 5
Operator Safety
• Please review and follow all the safety precautions to
ensure safe equipment operation. The user is responsible for
safe operating conditions. Read all operating instructions prior
to operating machine.
Warning: Do not attempt to handle the equipment alone. It
requires two people to handle and lift the equipment out of
the packaging.
Warning: This unit contains moving parts. Watch for Caution,
Warning, and Electrical stickers detailing proper operating
conditions and user safety.
• Never remove guards or product safety switches. Removal of
guards or switches will cause the unit to run improperly and
can result in personal injury.
• Keep all hands, fingers and objects away from moving parts.
Never attempt to reach into the machine while the power is
on. Turn off the machine and disconnect the power cord before
cleaning or servicing the machine, and before removing either
fold plate. Injury may occur if proper operating procedure is
not followed.
• Plug the power cord into 115 VAC, 60 Hz outlet only. Voltage
up to 120 V will not damage the machine.
• Thepowercordandplugmustbeaccessibleatalltimesfor
disconnection.
• Thisunitisequippedwitha3-wire,groundedelectricalcord.
If the cord becomes damaged and needs to be replaced, it
must be replaced with an authorized part available through
the manufacturer or an authorized service agent.
• Allmachinemaintenanceshouldbeperformedonlybyfactory
authorized service personnel using factory authorized replace-
ment parts. Contact your sales rep for more information.
• KeepthePSM10K away from extreme heat and moisture.
• NeveroperatethePSM10K while tired, drowsy, or under
the influence of medication, drugs, or alcohol. Failure to do
so can result in personal injury.
• NeveroperatethePSM10K with loose clothing or jewelry.
Contain all long hair and neck ties prior to operating machine.
Failure to do so could result in clothing, jewelry, or hair
becoming entangled in moving parts.
PSMailers™
PSM10K 800.464.5030 • psmailers.com
6
Specifications
The PSM10K is designed to fold and seal up to 10,000 docu-
ments per hour, ensuring a good seal and a clean fold on every
form, every time, whether the paper is perforated or plain.
The adjustable fold plates allow the machine to meet your
changing document processing requirements. Below are the
detailed machine specifications.
PSM10K Specications
Variable Speed Yes, 10,000/hour
Duty Cycle 125,000 sheets/month
Fold Types C, V, Z, EZ, EC return envelope & custom folds
Fold Patterns
11˝ Half (V) 14˝ Half (V)
11˝ Letter (C) 14˝ (Z)
11˝ (Z) 14˝ Return Envelope (EC)
14˝ Eccentric Z (EZ)
Paper Sizes Up to 14˝ long, up to 8.5˝ wide
Counter Manual/Batch
Conveyor 36˝ hinged conveyor included
Feed System Bottom feed system
Drive System AC fixed
Electrical 115 VAC, 60 Hz, 5A
Dimensions 12˝H x 21.5˝W x 41˝D
Weight 75 Lbs.
psmailers.com • 800.464.5030 PSMailers™
PSM10K 7
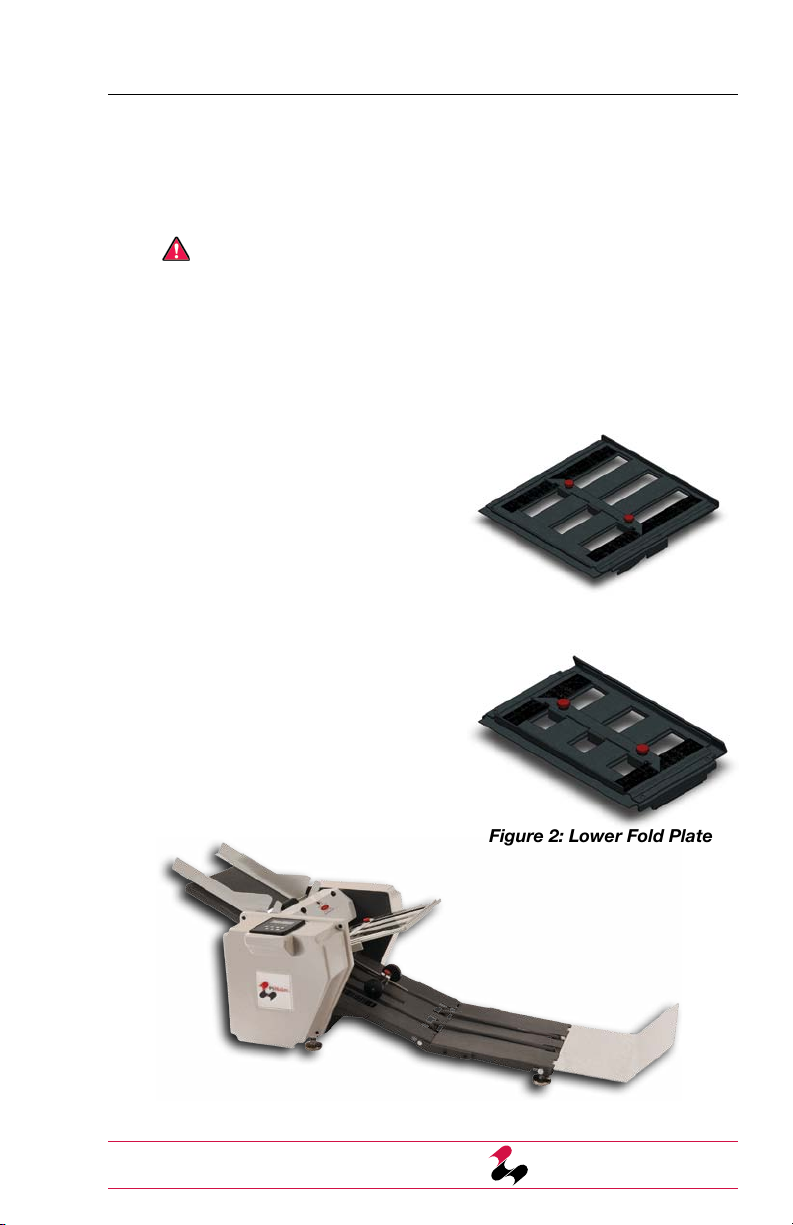
Figure 1: Upper Fold Plate
Figure 2: Lower Fold Plate
Figure 3: PSM10K
Unpacking & Setup
Unpacking
When opening the PSM10K packaging, inspect it for any
shipping damage. The shipper should be notified at once and
the packing materials saved if there is any serious damage.
Warning: Do not attempt to remove the equipment from
the packaging alone. Two people are required at all times
to remove packaging and move the equipment.
Please make sure the following items are present in the
packaging.
If any items are missing please contact your sales rep before
continuing.
1. This manual (1)
2. PSM10K (1)
3. AC Power Cord (1)
4. Upper & Lower Fold Plates
(1 each)
5. Paper Guides (2)
6. Tool Kit
a. Breaker Bar
b. 7/16˝ Socket
c. 3/16˝ T-Handle Hex Driver

PSMailers™
PSM10K 800.464.5030 • psmailers.com
8
Unpacking & Setup
Setup
Warning: Do not attempt to remove the equipment from
the packaging alone. Two people are required at all times to
move the equipment.
Place the PSM10K on a sturdy table or cart. Check to verify that
both fold plates are properly installed (see Figures 4 & 5). Both fold
plates should rest snugly on the placement pins.
First insert the power cord into the PSM10K and then into a
standard 115 VAC, 60 Hz outlet.
The power cord must be accessible for disconnect.
Figure 4: Upper Fold Plate
in Proper Position
Figure 5: Lower Fold Plate
in Proper Position

psmailers.com • 800.464.5030 PSMailers™
PSM10K 9
Machine Overview
Machine Diagram
Capabilities
Your PSM10K is designed to be a versatile folding and sealing
machine. Its capabilities include:
• Foldingplainpaperandformsfrom20lb.paperto
80 lb. stock.
• Foldingallstandardfoldpatterns (see fold diagrams,
page 11).
• Single fold capability: when the bottom fold plate is in the
half fold position, the upper fold plate can be set to lengths
other than the standard V-Fold depending on your special
needs.
Figure 6: Machine Diagram
Control Panel
Feed Table
Feed Gauge
Upper Fold
Plate
Lower Fold Plate
(back of unit,
not shown)
Access
Panel
Adjustable
Paper Stops
Conveyor
Catch Plate
Exit Guide
Wheels
Exit Guide
Wheel
Adjustment
Knob
Paper Guides
Feed Guide
Adjuster
Knobs
Figure 6: Machine Diagram
PSMailers™
PSM10K 800.464.5030 • psmailers.com
10
Machine Overview
Controls
Familiarize yourself with all machine controls prior to
operating the machine.
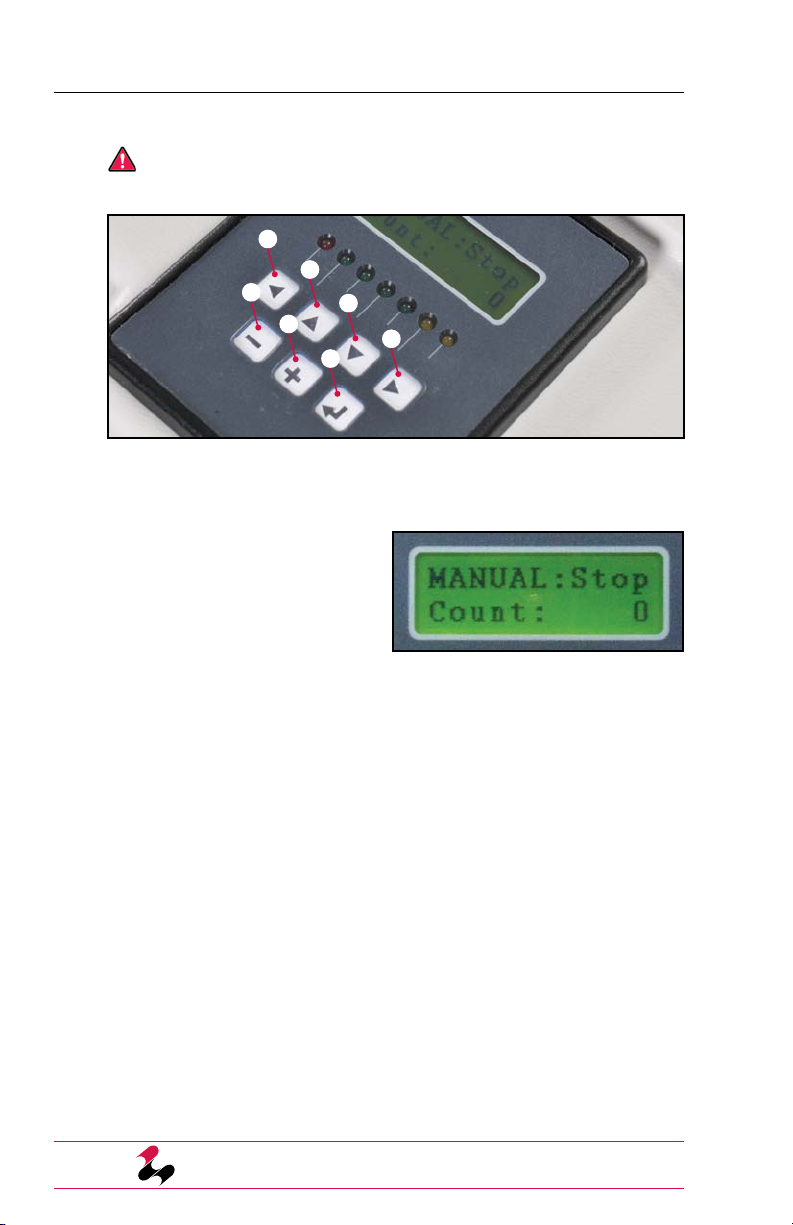
Figure 7: Control Panel
➊
➋
➌
➍
➎
➏
➐
The PSM10K Control
Panel has 7 buttons and
a 2-line digital display to
communicate with the user
(Figure 7). When the machine
is turned on, the display looks
like Figure 8.
➊Reverse button is used to clear a jam (lower fold plate must
be removed).
➋& ➌ Speed Up / Speed Down buttons are used to set the
Batch Count.
➍Run button is used to start the machine.
➎Mode button cycles through the operating modes.
➏Clear button is used to clear counts.
➐Stop button is used to stop the machine
Figure 8: Default Mode
psmailers.com • 800.464.5030 PSMailers™
PSM10K 11
Machine Overview
Fold Plates
The PSM10K is equipped with adjustable fold plates. The red
thumbscrews can be loosened to allow you to move the paper
stop to the correct position for your form, then tightened to hold
the stop in place. All standard folds are marked on the scales of
both the upper and lower fold plates. Set both fold plates to the
desired setting (i.e. 11˝ Z-Fold) in order to perform that fold.
See Setting the Fold Plates (page 15) for more information.
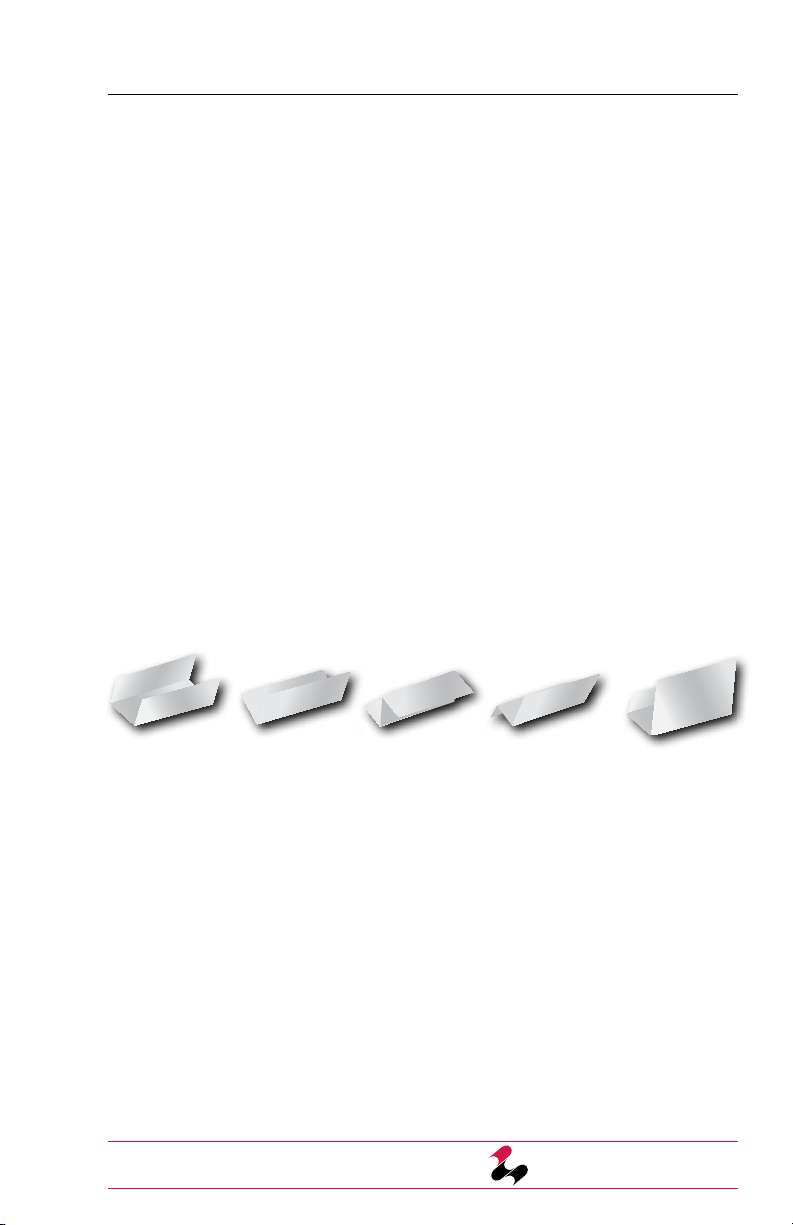
Identifying Your Fold
1. Identify your paper size. 11˝ forms are the standard letter
size; 14˝ forms are the standard legal size. Measure the
form if necessary.
2. Identify the fold shape from the diagrams below.
Note: The Eccentric Z (EZ) and the The Eccentric C (EC)
folds are a similar shape as the standard Z-Fold and C-Fold,
but the lengths of the folds are not equal.
C-Fold V-Fold Z-Fold EZ-Fold
Eccentric Z-Fold
EC-Fold
Eccentric
C-Fold

PSMailers™
PSM10K 800.464.5030 • psmailers.com
12
Feed Table Setup
Setting the Paper Guide Width
1. Loosen the Feed Guide Adjuster Knobs but
don’t fully remove them (1-2 turns clockwise
will loosen them).
2. Place a 1/2˝ stack of the form to be run on
the feed table.
3. Line the paper stack up against the
stationery paper guide.
4. Push the moveable paper guide up against the paper stack
so all the paper is aligned and the paper guide is snug
against the side of the stack.
5. Hold the moveable paper guide in place with one hand and
tighten the feed guide adjuster knobs with the other.
Paper Guides
Feed Guide
Adjuster Knobs
Figure 9: Feed Table Paper Guide Adjustment
psmailers.com • 800.464.5030 PSMailers™
PSM10K 13
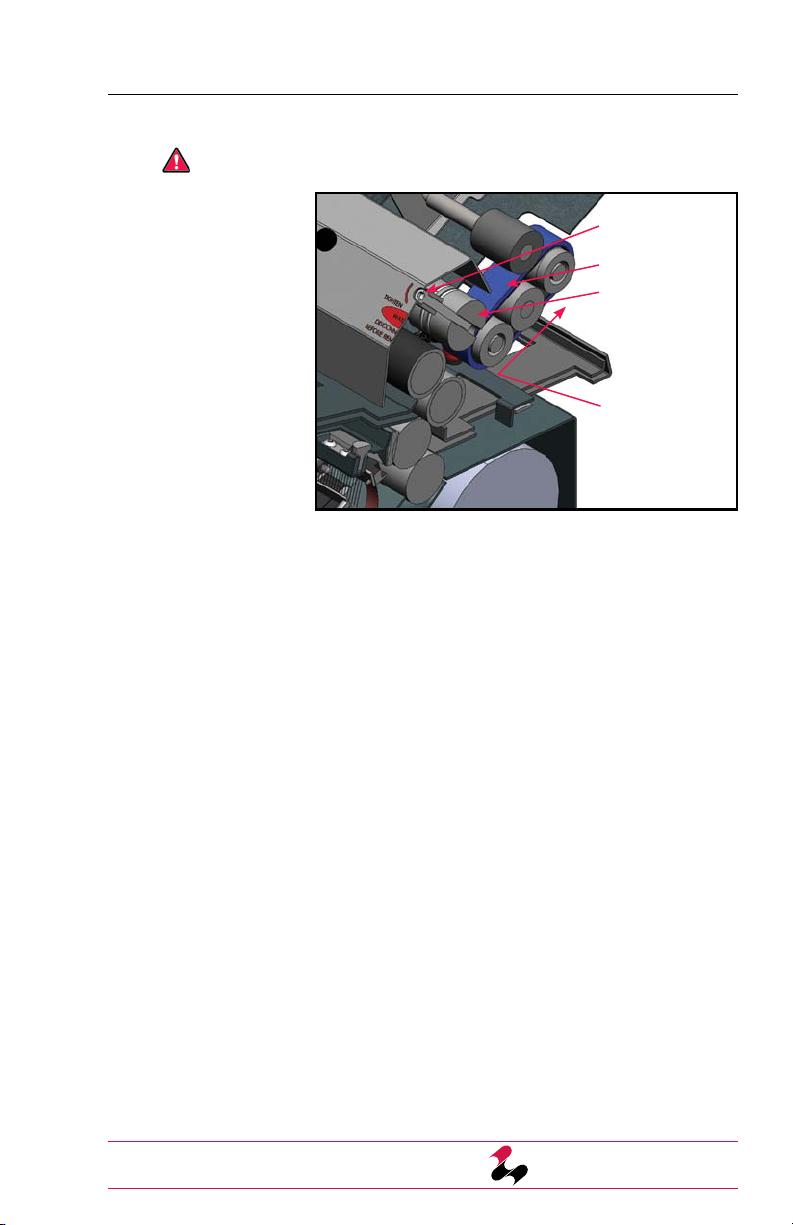
Feed Table Setup
Setting the Feed Gauge
Make sure that the power switch is in the off position.
To properly
set the Feed
Gauge
System,
refer to
Figure 10.
1. Remove all paper from the feed table.
2. Insert the provided 3/16˝ T-Handle Hex Driver (inside tool kit)
into Feed Gauge Adjustment Screw.
3. Turn the T-Handle 1/4 turn clockwise to loosen the Feed
Gauge Wheel.
4. Place one form on the feed table and hand feed the form
about 2˝ into the machine by moving the feed belt with
your hand.
5. Turn the T-Handle 1/4 turn counter-clockwise.
6. Pull the paper out of the machine. You should feel resistance,
but not too much. Repeat steps 4-6 until there is a moderate
amount of resistance when pulling the form out. If it feels too
tight, turn the T-Handle 1/4 turn clockwise.
7. Return the T-Handle to the tool kit.
Figure 10: Feed Gauge Cross Section
Feed Gauge
Adjustment Screw
Feed Gauge Belt
Feed Gauge Roll
(#3 Roller)
Move Feed Belt,
with your hand,
in this direction
to hand feed the
form into the
machine

PSMailers™
PSM10K 800.464.5030 • psmailers.com
14
Feed Table Setup
Setting the Exit Guide Wheels
Exit Guide Wheels
Exit Guide Wheel
Adjustment Knob
Figure 11: Exit Guide Wheels
The placement of the Exit Guide Wheel is important for the
proper functioning of the conveyor (see Figure 11). To set the
location:
1. Take a folded form and place it so one edge is just touching
the steel roll.
2. Loosen the red Exit Guide Wheel Adjustment Knob.
3. Move the Exit Guide Wheels so they just touch the front
edge of the form (see Figure 12).
4. Tighten the Exit Guide Wheel Adjustment Knob.
Figure 12: Exit Guide Wheel Adjustment
Folded Forms

psmailers.com • 800.464.5030 PSMailers™
PSM10K 15
Feed Table Setup
Setting the Fold Plates
1. Remove the fold plate from the machine.
2. Loosen the thumb-
screws by turning
counter-clockwise
3. Line up the tips on both
sides of the paper stop
with the appropriate line
on the scale so that the
appropriate white line on
the scale is just visible
(see Figure 13).
a. If you are doing a V-Fold, you do not have to set the
paper stop on the Lower Fold Plate.
4. Make sure that the paper stop is set up square by double-
checking that the scales on both sides show the same fold
selected or the same inch reading.
5. Tighten the thumbscrews, being careful that the paper stop
does not slide out of square.
6. Return the Fold Plate to the machine, making sure it is
resting properly on the placement pins.
a. If you are doing a V-Fold, replace the Lower Fold Plate
backwards, so that the flat face is facing in and the slot
is facing out.
For a custom form, the fold plate scales measure distance
in inches from the fold, so the paper stop can be set to the
appropriate measurement. If you are unclear about which
figures to use, measure the lengths of the folds on your form
(the distance from the perforations or fold marks to the edge of
the paper) or contact your sales rep for more information.
Figure 13: Paper Stop Alignment
Paper Stop
Indicator Point
PSMailers™
PSM10K 800.464.5030 • psmailers.com
16
Machine Operation
➊➋
C-Folds & EC-Folds
➊
V-Folds
➋➊
Z-Folds & EZ-Folds
Loading the Feed Table
Before loading the feed table, square up the stack of paper you
are going to load by placing it on edge on a flat surface. Place the
stack onto the table so the front of the stack butts up against the
feed gauge cover (do not push hard).
The proper orientation of the paper when loaded onto the feed
table depends on the type of fold you are doing and the layout
of your form. The diagrams below show the order in which folds
will be performed when run through the machine with the right-
hand paper edge being loaded into the machine first (red arrow
shows paper path).
All forms should be loaded with glue on the leading edge facing
up (the glue is usually visible as yellow, blue or red stripes
around the edge of the form). With Z- and EZ-Folds you have
multiple ways to load the form and still have glue on the leading
edge facing up, either one will work. With EZ-Folds though, care
must be taken to ensure the upper fold plate is set to the proper
length for the leading fold (the bottom fold plate setting remains
the same either way).
Feed Table Capacities
11˝ Forms: 150 Sheets; 14˝ Forms: 100 Sheets

psmailers.com • 800.464.5030 PSMailers™
PSM10K 17
Machine Operation
Operating the PSM10K
The PSM10K can operate in two modes: Manual and Batch.
• Manual Mode: the machine runs forms and keeps a running
count until stopped by the operator.
• Batch Mode: the Batch Total is set and the machine runs
forms until the Batch Total is reached, at which point the
machine stops.
Operating in Batch Mode (optional counter)
To enter Batch Mode, press
the Mode button until the
screen displays Batch Mode
(Figure 14).
Setting the Batch Total
1. Make sure that the machine is in Batch Mode
2. Use the Up or Down button to change the Batch Total
(displayed in the lower right corner of the screen). Both
buttons can be held down to continuously change the
count, and if the change is over 20, holding the button
down causes the count to change in steps of 10, though
at this point releasing and pressing the button once will
still increase the count one at a time.
3. Press the Mode button once to lock in the number.
Running in Batch Mode
When the Batch Total is set, press the Run button to start the
machine. The machine will run and the Batch Count of forms
processed will be displayed in the middle of the lower line of
the screen (Figure14). Press Stop to stop the machine. This
will not reset the Batch Total or the Batch Count. Press Run
again to start the machine.
Figure 14: Batch Mode

PSMailers™
PSM10K 800.464.5030 • psmailers.com
18
Machine Operation
Resetting the Batch Count
The Batch Count is the running tally of forms processed for this
batch. To reset it during or at the end of a batch, press the Clear
button. The screen will ask you to confirm the reset by pressing
the Clear again. Pressing any other button will cancel the reset.
Operating in Manual Mode
To enter Manual Mode, press
the Mode button until
the
screen displays
Manual Mode
(Figure 15).
Resetting the Count
To reset the count when in Manual Mode press the Clear button.
Figure 15: Manual Mode

psmailers.com • 800.464.5030 PSMailers™
PSM10K 19
Maintenance
Regular maintenance on the PSM10K will ensure the machine
continues to function properly and will extend the life of the
machine. Perform the following steps every 10,000 forms or
once a month:
1. Disconnect the power cord from the machine.
2. Remove both fold plates.
3. Vacuum any paper dust or toner that has accumulated on
the feed table and on the rollers.
Make sure that the power cord has been disconnected
before continuing!
4. Open the access panel in the side cover opposite the
control panel.
5. Insert the 7/16˝ socket at the end of the breaker bar (inside
the tool box) over the hex shaped end on the #3 roller
(Figure 10, page 13). This bar can now be used to rotate
the rollers.
6. Clean the stainless steel rollers with a household cleaner
to remove any accumulated toner. As you clean, use the
breaker bar to rotate the rollers so that the entire roller
surface is cleaned.
7. Clean the rubber rollers and the feed belts using a rubber
roll rejuvenator (available at your local office supply store).
Use the breaker bar to rotate the rolls and feed belt as you
clean so all the rubber surfaces are cleaned.
8. Return the breaker bar to the tool kit and replace the access
panel.
9. Replace the fold plates.
10. Make sure that the power switch is in the OFF position.
11. Connect the power cord to the machine.

PSMailers™
PSM10K 800.464.5030 • psmailers.com
20
Troubleshooting
Automatically Clearing a Paper Jam
If paper becomes jammed in the machine:
1. Remove all paper from the Feed Table.
2. If the Breaker Power Switch has tripped (light is off), flip to
the ON (lit) position.
3. Remove the Lower Fold Plate.
4. Press the Reverse button.
5. The paper should exit from the back (where the lower fold
plate normally sits). If it doesn’t, try pressing the Reverse
button again. If the paper is not moving or you cannot see it,
then you need to manually clear the jam (see next section).
6. Replace the Lower Fold Plate.
Manually Clearing a Paper Jam
1. Disconnect the power cord from the machine.
Make sure that the power cord has been disconnected
before continuing!
2. Remove all paper from the Feed Table.
3. Remove the Lower Fold Plate from the machine.
4. Remove the access panel in the side cover.
5. Place the Breaker Bar socket (inside the tool box) over the
hex end of the #3 roller (Figure 10, page 13).
6. Rotate the breaker bar clockwise until the jammed form is
out of the machine.
7. Replace the lower fold plate.
8. Replace the paper on the feed table.
9. Return the breaker bar to the tool kit.
10. Replace the side cover access panel.
11. Make sure that the power switch is in the OFF position.
12. Connect the power cord to the machine.
Table of contents


