PURAPOOL PURACHLOR BLU Series User manual

INSTALLATION INSTRUCTIONS & PRODUCT MANUAL
SALT CHLORINATOR
PURACHLOR BLU Series | PURACHLOR GOLD

TABLE OF CONTENTS
Congratulations on your purchase of a PURACHLOR SALT CHLORINATOR.
Please read through the entire Manual before installing your new unit.
Your System must be installed and operated as specified.
IMPORTANT WARNINGS & SAFETY INSTRUCTIONS ..............1
INSTALLATION PROCEDURE....................................................4
INSTALLATION LOCATION
BELOW GRADE INSTALLATION
INSTALLATION TOOLS LIST
CONTROL CENTRE INSTALLATION
OXY CELL INSTALLATION
WATER PREPARATION AND SYSTEM START UP.....................8
HOW THE PURACHLOR SALT CHLORINATOR WORKS
SALT REQUIREMENTS
HOW TO ADD SALT TO THE POOL
SALT ADDITION GUIDE
SYSTEM OPERATION...............................................................13
OXYGEN PRODUCTION
HIGH CALCIUM MODE
18hr BOOST
POLARITY
WINTER MODE
TIMER OPERATION...................................................................15
CUSTOMER RESPONSIBILITIES...............................................16
TROUBLESHOOTING...............................................................17
WATER CARE GENERAL GUIDELINES.....................................19
WATER CARE WEEKLY TESTS.................................................20
RECORD CARD........................................................................21

IMPORTANT WARNINGS & SAFETY INSTRUCTIONS
Read this Manual completely before attempting installation.
Failure to install in accordance with the installation instructions
could void warranty and result in injury or death.
All permanent electrical connections should be made by a qualified electrician.
Install at least 1.5 metres (5ft) from wall of pool.
Follow all applicable electrical codes.
The PURACHLOR BLU / GOLD must be installed in an outdoor location, covered
and fully sheltered from weather, or indoors in a forced air ventilated room and
installed so that the orientation is exactly as shown in following instructions.
DANGER
DANGER
WARNING
•
ELECTRIC SHOCK HAZARD: Be sure to turn power OFF and
disconnect from power source before any service work is performed.
Failure to do so could result in serious injury or death.
To reduce the risk of electric shock, do not use an extension cord to
connect unit to electric supply; provide a properly located outlet.
For your safety and machine longevity, do not store or use gasoline,
chemicals or other flammable liquids or vapors near this appliance.
Mount the PURACHLOR BLU / GOLD so that it is inaccessible to
anyone in the pool. Never attempt any servicing while unit is wet.
If unit is not operated according to instructions, high dosages of
harmful substances may potentially be released.
To maintain cosmetic integrity, protect this unit from direct prolonged
sunlight exposure.
WARNING
WARNING
Page 1

IMPORTANT WARNINGS & SAFETY INSTRUCTIONS
CHEMICAL USE HAZARD
To avoid personal injury when working with pool chemicals, always wear rubber
gloves, eye protection, covered shoes and work in a well-ventilated area. Use
caution when choosing a location to open and use chemicals as they may
damage any surface they have contact with.
The addition of certain chemicals can reduce the effectiveness of sanitation.
Always make sure that proper residual sanitation levels are maintained to avoid
personal injury.
This product produces chlorine. Individuals with any type of chlorine sensitivity
should take the appropriate precautions to avoid injury or illness.
NOTICE
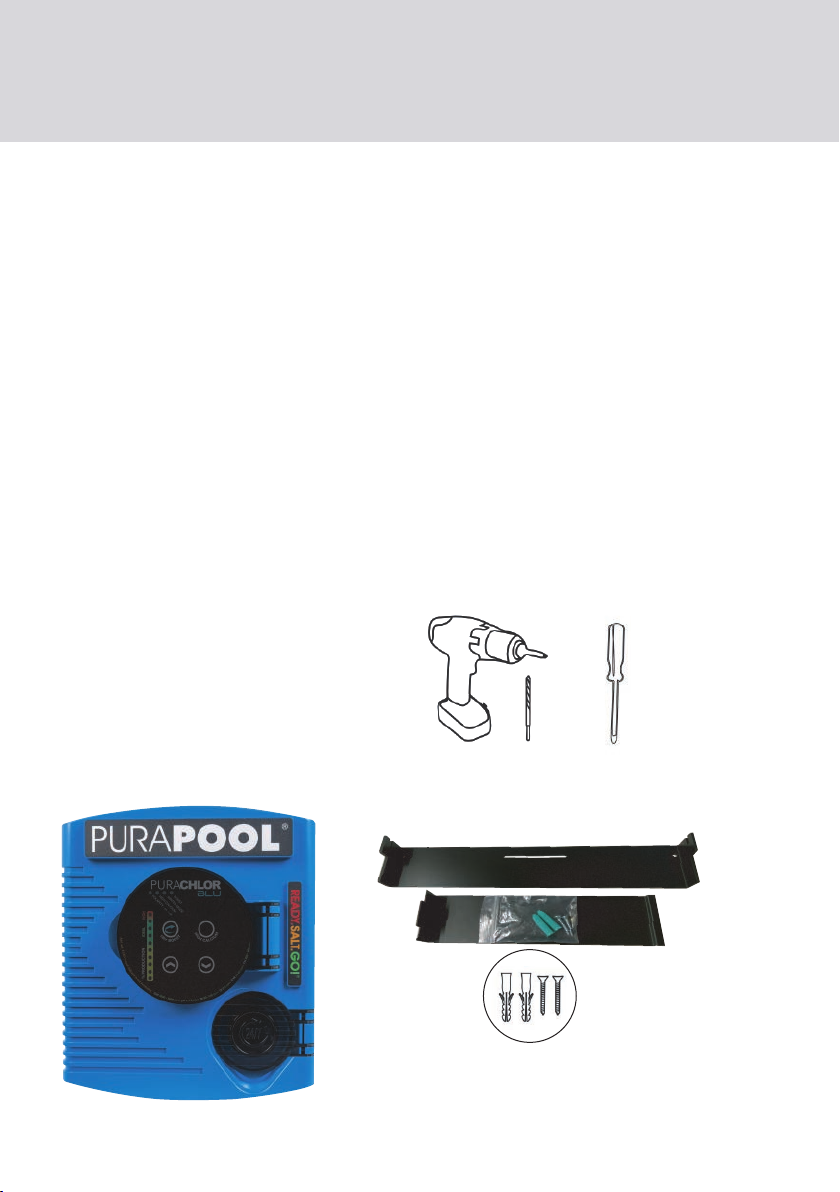
To reduce the risk of injury, installation and service should be done by a
qualified pool service professional, certified electrician or an authorized
PURAPOOL® representative.
Attention Installer: This Manual contains important information about the
installation, operation and safe use of this product. Before installing this
product, read and follow all warning notices and instructions which are includ-
ed. This information should be given to the owner and/or operator of this
equipment.
PREVENT CHILD INJURY AND DROWNING
DO NOT permit children to operate this product. DO NOT let anyone, sit,
step, lean, or climb on any equipment installed as part of your pool’s operation-
al system.
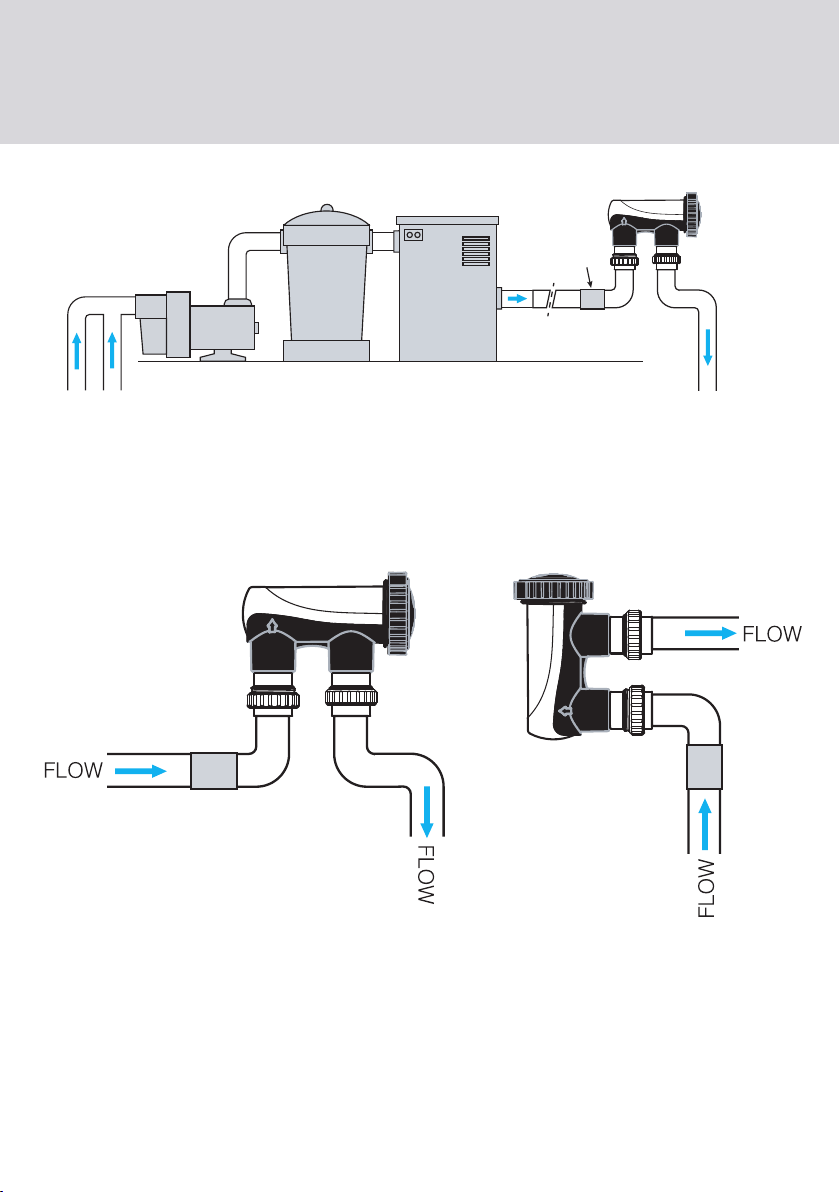
EQUIPMENT WATER PRESSURE HAZARD
Always turn pump off prior to installing or removing the electrolytic cell. Your
pump/ filter is operated under pressure and the pressure must be released
before you begin work. Please see your pump/ filter Owner’s Manual for further
instructions. To avoid cell damage, water pressure in the cell must not exceed
150 PSI. DO NOT operate electrolytic cell without proper flow or water circula-
tion. A build-up of flammable gases will result in hazardous conditions.
Page 2

• The PURACHLOR BLU / GOLD must be installed and operated as specified
in the Owner’s Manual.
• Power to the PURACHLOR BLU / GOLD should be turned off before unplug-
ging the electrolytic cell from the cell housing to prevent cell damage and low
voltage sparks. Scratching or bending plates in the cell housing will reduce cell
life.
• DO NOT use any type of lubricant on the O-ring. The O-ring (and the chan-
nel it seats into) must be kept clean in order to make a strong seal.
• High water temperatures above 40° Celcius (104 ° Fahrenheit) or direct
sunlight can cause the cell housing exterior plastic to discolour. This is not a
warranty claim.
• Follow Installation Instructions on page 7 for location and mounting of the
Control Centre.
• Visibly inspect the cell frequently to check and prevent the accumulation of
pool debris that (for any reason) may have bypassed the pool filter.
• Direct sunlight can cause the Control Centre cover to discolour. This is not a
warranty claim.
The PURACHLOR BLU / GOLD must be installed by a qualified pool profes-
sional, certified electrician or authorised PURAPOOL® representative.
IMPORTANT WARNINGS & SAFETY INSTRUCTIONS
FAILURE TO HEED THE FOLLOWING COULD CAUSE
DAMAGE TO POOL EQUIPMENT OR PERSONAL INJURY
Page 3

INSTALLATION PROCEDURE
INSTALLATION LOCATION
a. It is recommended to install the electrolytic cell as the last piece of pool equipment
in line, on the return to the pool, after the heater. (See Figure 1 on page 6)
b. Installing horizontally will ensure the flow sensor remains submerged.
c. If installed vertically, the cell cap must be on top.
d. Always use a check valve before the cell to prevent chlorine backflow.
e. All fittings are 2 inch socket.
f. Do not install on pools using a stainless steel liner or stainless steel plumbing.
BELOW GRADE (GROUND) INSTALLATION:
g. This exists when the water level of the pool is above the height of the pool equip-
ment.
h. The system should be wired to the load side of the time clock to power on ONLY
when the primary pump is operating. Alternatively, plug the pump power cord directly
into the power socket on the PURACHLOR BLU / GOLD.
i. If valves are not present to isolate the equipment, one ball valve should be installed
on the inlet side of the cell. This allows the cell to be removed for cleaning when
necessary.
j. A one-way check valve should be installed on the outlet side of the cell. This will
eliminate the possibility of having a gas build-up (which could cause possible cell
damage.)
Failure to follow proper below grade installation
procedures may lead to damage to pool equipment.
Page 4

Page 5
ELECTROLYTIC CELL INSTALLATION PROCEDURE
a. Locate pool return line after the heater or filter as shown in ( Figure 1 page 6 )
This is the preferred location for the cell housing.
b. Cut and glue the vertical plumbing risers from the main plumbing into place.
Install union nut and tailpiece onto pipe. Install the cell housing to the top of the
risers, making sure the cell housing is level.
c. Install the O-ring into the receiving channel inside the cell housing and then slide
the cell into the cell housing making sure the key way on the black plastic base aligns
with the matching key in the cell housing.
d. Put the main cap into place and hand tighten only; be sure not to strip the threads.
e. Connect the cell cord to the Control Centre. Align the three pins of the cell cord
plug with the snapfit connector on the Control Centre base and insert the connector
until it clicks in place. Alternatively if you have a junction box model, connect and
screw the 3 colour coded wires directly to the 3 postion junction box.
INSTALLATION TOOLS LIST
The following items are required:
1 x Level
1 x Hacksaw
PVC fittings
PVC primer & Type P glue

Page 6
Return to Pool
Pump
From Pool
Filter Heater
Image is not to scale
PURACHLOR Cell
Figure 1: Location within pool filtration system
1. Horizontally mounted
(Preferred alignment)
2. Vertically mounted
(Use if space is limited)
Figure 2: Orientation of electrolytic cell
ELECTROLYTIC CELL INSTALLATION PROCEDURE

Page 7
CONTROL CENTRE INSTALLATION TOOLS LIST
The following items are required:
1 x Control Centre
2 x Mounting Brackets
2 x Mounting Screws
2 x Wall plugs
Phillips Head Screwdriver
Drill and 7mm bit
CONTROL CENTRE INSTALLATION
The Control Centre should be installed at least 1m above ground in a well
ventilated area away form direct sunlight and rain exposure.
The Contol Centre should be mounted no further that 2.5 metres away from the
electrolytic cell.
Ensure that the Control Centre is not installed in a closed unventilated shed. Do
not store chemicals or fertilizers near the Control Centre installation or corro-
sion may occur.
If mounting the Control Centre on a post install a flat panel as a waterproof
backing plate.
Mount the Control Centre with the Green Plugs and Mounting Brackets
supplied.

Page 8
INSTALLATION PROCEDURE
a. Balance your water chemistry according to the Water Chemistry Parameters (see
Table 1). Add the proper amount of salts and circulate 36 hours before starting the
PURACHLOR BLU / GOLD
b. Start system at the 80% Chlorine output level and operate normally. For the first
two weeks test the water every 2-3 days for proper sanitation residual levels. Raise or
lower the Chlorine Output by pressing the Output Control Arrows as needed. See
Operation Instructions on pages 12-14.
c. If sanitation residuals are still below the 1-3 ppm range, PRESS the 18hr BOOST
button. See Troubleshooting on pages 17-18.
d. The rule of thumb for daily runtime of the PURACHLOR BLU / GOLD system (with
balanced water and running at >70% production) is;
1 hour of operation for every 3°C of ambient temperature.
(i.e. 30°C would equal 10 hours of run time).*
* For high humidity conditions, irregular flow rates,undersized pumps/ filters or
variable speed pumps add 2 hours to runtimes. (e.g. Asia, Africa, South America)
e. Once Chlorine Output percentage setting is set, output should only be adjusted for
increased sanitation demand situations.
PARAMETER LEVEL DETAILS
FREE CHLORINE 2.0 - 3.0 ppm
pH 7.2 - 7.6
TOTAL ALKALINITY (TA) 90 - 130 ppm Protects pH and prevents rapid pH "bounce".
CYANURIC ACID / STABILIZER 30 - 50 ppm Protects chlorine from destruction by sunlight.
Must be added manually.
CALCIUM HARDNESS 200 - 400 ppm
PHOSPHATES ZERO
SALT RESIDUAL 3500 - 5000 ppm Ideal level for Chlorine production.
Recommended level for residential pools to
keep chlorine at a proper range for sanitization
High pH reduces sanitizer efficiency. Low pH
damages pool surfaces and irritates skin and eyes
Excess calcium can increase scaling problems.
Low calcium (soft water) can damage surfaces)
Can deplete free available chlorine.
Table 1: Water Chemistry Parameters

SALT REQUIREMENTS
HOW THE PURACHLOR BLU / GOLD WORKS
At System Start Up the pool water should have a 3500-5000 ppm salt residual. As
part of the daily filtration cycle, the pool water is passed through the PURACHLOR
BLU / GOLD electrolytic cell to produce chlorine which is instantly dissolved into the
water. The PURACHLOR BLU / GOLD destroys bacteria, viruses and algae. When the
chlorine is spent it reverts back into dissolved salt, restarting the cycle.
WATER PREPARATION AND TIPS ON WATER CHEMISTRY
Pool water that is not maintained properly will cause damage to the electrolytic cell,
shorten the life of the cell and possibly void the cell warranty. Properly balancing pool
water chemistry is the most important aspect of maintaining a swimming pool. Pool
water must be tested regularly in order to properly maintain its chemical balance.
SALT REQUIREMENTS
a. The PURACHLOR BLU / GOLD operates best with a salt range of 3500-5000 ppm.
The cell will continue to operate with a minimum of 3000 ppm and up to 35,000 ppm
without any adverse effects to the unit.
b. NOTE: HIGH salt level above 8,000 ppm may cause corrosion problems with
metallic fixtures, light rings, ladders and handrails.
c. Salt level should be checked monthly. The salt level should never be allowed to fall
below 3000ppm.
Page 9

SALT REQUIREMENTS
HOW TO ADD SALT TO THE POOL
d. 2kg for every 1,000 litres of water will raise the mineral levels by100ppm.
e. Salt level is lowered through dilution (adding fresh water or rainfall), water
splashed out of the pool and/or backwashing the filter. Salt is not lost through
evaporation. If the salinity level drops below the recommended salinity range, use
Table 2 on page 11 to determine the amount of salts that has to be added to
obtain the proper salinity level.
f. Determine salt level as discussed above. Use Table 2 to calculate the amount of
salt needed.
g. Power on the pump to circulate the pool water.
h. Slowly pour in the salt around the outer perimeter of the pool for quick and even
distribution.
i. Brush the pool bottom to distribute the salt evenly and allow water to circulate for
36 hours to dissolve completely. After 24 hours, confirm salt level reading.
DO NOT attempt to add salts via the skimmer box or surge tank as this can cause
damage to the filtration system and the PURACHLOR BLU / GOLD.
DO NOT have any automatic suction type pool cleaners operating until the salts
have completely dissolved. Allow the salts to dissolve for 3-6 hours before initial
powering of the PURACHLOR BLU / GOLD.
j. Power on the PURACHLOR BLU / GOLD and set output percentage to desired
output level.
Page 10

SALT REQUIREMENTS
Page 11
SALT ADDITION GUIDE
Use the below table to determine your current concentration of salt in ppm
and pool volume in litres. Find your desired salt concentration and add the
required amount of salt. e.g. a 40,000 Litre pool with a starting salt
concentration of 1000ppm will require 120kg of salt to raise to 4000ppm
Salt
concentration
0ppm
1000ppm
2000ppm
3000ppm
4000ppm
5000ppm
20,000
Litres
0kg
20kg
40kg
60kg
80kg
100kg
40,000
Litres
0kg
40kg
80kg
120kg
160kg
200kg
60,000
Litres
0kg
60kg
120kg
180kg
240kg
300kg
80,000
Litres
0kg
80kg
160kg
240kg
320kg
380kg
100,000
Litres
0kg
100kg
200kg
300kg
400kg
500kg
150,000
Litres
0kg
150kg
300kg
450kg
600kg
750kg
Pool Volume
Table 2: Salt Addition guide

CONTROL CENTRE OPERATION
Before switching ON the PURACHLOR BLU / GOLD make sure the pump and
PURACHLOR BLU / GOLD are plugged into the power outlet.
Once the PURACHLOR BLU / GOLD is switched ON and salts are present in the
water, you can adjust the Chlorine production output by pressing the
UP or DOWN buttons.
The PURACHLOR BLU / GOLD will only start up when salts are added.
SYSTEM OPERATION
Figure 3: Operations Panel
Page 12
IDEAL
HIGH
H
I
G
H
C
A
L
C
I
U
M
1
8
h
r
B
O
O
S
T
% PRODUCTION
POLARITY
HIGH CALCIUM
WINTER MODE
BOOST
- on + off
A
d
d
s
a
l
t
i
f
L
E
D
o
u
t
p
u
t
i
n
d
i
c
a
t
o
r
i
s
n
o
t
i
n
c
r
e
a
s
i
n
g
.
S
a
l
t
3
5
0
0
-
5
0
0
0
p
p
m
p
H
7
-
7
.
6
p
p
m
T
A
9
0
-
1
3
0
p
p
m
C
l
2
-
3
p
p
m
C
Y
A
3
0
-
6
0
p
p
m
C
H
2
0
0
-
4
0
0
p
p
m

LED INDICATOR CHLORINE PRODUCTION % Output
A series of 10 LEDs indicates the chlorine production level of the
PURACHLOR BLU / GOLD.
Adjustment of the output level is performed using the buttons.
The output level should only be reduced if an excess of chlorine is
being produced.
Yellow - indicates the production level is too LOW. (Ok for small
pools or spas.)
Green - indicates correct operating levels.
Red - indicates production is too HIGH.
BUTTON - INCREASE CHLORINE PRODUCTION
Press the UP arrow to increase chlorine production.
BUTTON - DECREASE CHLORINE PRODUCTION
Press the DOWN arrow to decrease chlorine production.
LED INDICATOR - HIGH CALCIUM
Illuminated LED Indicates when the PURACHLOR BLU / GOLD is
set to operate in a high calcium environment. Unnecessary use will
shorten electrolytic cell life.
BUTTON - HIGH CALCIUM
Press to toggle between high and low calcium setting.
Eg: USA and South East Asia have many areas of high calcium.
Use HIGH CALCIUM option when very hard water (above 500ppm)
is used to top up the swimming pool
SYSTEM OPERATION
Page 13

BUTTON - 18hr BOOST
Press to super sanitize for 18 hours at maximum output.
Sufficent salt levels must be present in the swimming pool!
On completion the PURACHLOR BLU / GOLD will revert to your
original settings.
LED INDICATOR - BOOST
Illuminated LED indicates when BOOST function is on.
BOOST will automatically switch off after 18hrs.
LED INDICATOR - POLARITY
Illuminated LED indicates when the PURACHLOR BLU / GOLD is in
negative polarity. Depending on the High Calcium setting the polarity
will change automatically every 4.5 hrs to 7hrs. - this prolongs the life
of the cell and minimizes build up between the cell blades. The clean-
ing cycle operates in both polarities.
LED INDICATOR - WINTER MODE
Illuminated LED indicates when the external toggle switch is ON
( located on the bottom rear left of the PURACHLOR BLU / GOLD
Control Centre.)
Use the Winter Mode function when a pool cover is in use
OR in cooler climates below 20°C.
In this Mode the chlorine production reduces by 50% and the output
UP and DOWN button controls are disabled.
SYSTEM OPERATION
Page 14
1
8
h
r
B
O
O
S
T

TIMER OPERATION
SETTING UP
The outer dial should be set to the current time. Rotate the dial slowly in a clock-
wise direction until the correct hour is aligned with the arrow printed on the dial.
Note that the outer dial is printed with the 24hr clock
8.00am = 8 on the dial, 8.00pm = 20 on the dial.
Clock hands will allow for fine adjustment of the current time setting of the dial.
DO NOT attempt to rotate the dial in an anti-clockwise direction.
The time switch is programmed by pushing the tappets to the outer ring position
for the entire period that the load is to be turned “ON”, i.e. 15 minutes for each
tappet on the 24hr dial. When the tappet is pushed to the inside the switch is in
the “OFF” position.
ON OFF
Tappet Position
1
2
3
4
5
6
7
8
9
10
11
12
13
14
15
16
17
18
19
20
21
22
23
24
12
6
6
FIXED ON
FIXED OFF
-
TIMER
Page 15
TOGGLE SWITCH
DO NOT push the toggle switch inwards when changing
position - this will break the inner plastic cogs.
NOTE: Timer is not covered by warranty.

The electrolytic cell should be periodically inspected for accumulation of any
foreign deposits. Common Causes of Premature Cell Failure:-
• pH not kept within operating range.
• Operating the cell with not enough salt in the water.
• Excessive accumulation of calcium deposits on the cell.
• Low water flowing through the cell.
• Damage to electrode coating caused by scraping with sharp object.
• Cleaning the cell in too strong an acid solution.
• Acid washing the cell for too long and too often.
CUSTOMER RESPONSIBILITIES
Before you call for service please read the Operating Instructions
carefully and check through the following points regarding your
responsibilities as a customer.
A service fee will be charged should service be required as a result of
any of the following:
1. Power point not turned ON.
2. Faulty Power point.
3. Time Clock set incorrectly.
4. Unit incorrectly installed.
5. Switches and controls incorrectly set.
6. Poor water chemistry (Mineral salt levels, pH, Alk, Calcium etc).
7. Cell not maintained.
8. Water flow too low.
9. The unit having been tampered with by unauthorized persons.
Page 16

Page 17
SITUATION POSSIBLE CAUSE CORRECTIVE ACTION
TROUBLE SHOOTING
Increase salt level by adding salt
according to Table 2 Salt addition
Guide on page 11.
Insufficient run time Increase daily run time. Recommend 1
hour of run time per 3 degrees ambient
temp.
Chlorine Output percentage
set too low.
Increase the Chlorine Production Level
Recent increases in weather
temperature without increasing
the Chlorine Output of the system
Temporary loss of chlorine due
to heavy rain, leaves, fertilizer
or heavy bather load, recent
party, or pets using pool
Set Output to BOOST (Super
Chlorinate for 18 hours). Re-check-
if still too low, superchlorinate with
outside source. (Take water sample
to pool professional).
Loss of salt due to rain or
added water.
Low salt level (less than
3,000ppm).
Cold water, low mineral salt
level, cell is over-calcified or
phosphates in water.
Check cell and clean, check mineral
salt level, check water temperature and
check phosphate levels.
Confirm that O-ring has not been
lubricated. Clean the O-ring slot of
any dirt or debris. Fully seat the
O-ring into the slot before inserting
the cell back into the housing.
Cell cap may be cross
threaded.
Unscrew cap and confirm that the cap
screws onto the housing without
resistance.
Water is leaking
from the cell plug.
Water is travelling through a
crack in the cell base and up
the cell cord.
Low or no
chlorine residual
in pool
O-ring may be improperly
seated.
Unable to
increase chlorine
production
The cell housing is
leaking from the
cap (bottom of cell
cap or through the
cord hole)
Contact Purapool Support

TROUBLE SHOOTING
Page 18
SITUATION POSSIBLE CAUSE CORRECTIVE ACTION
Red Ouput
LED Flashing.
Unstable Voltage Switch OFF System.
Wait 60 seconds.
Switch system ON to Reset.
If System does not reset
contact Purapool Support
Multiple Power surges
Short circuits in power
No Ouput
LED lights are
on.
Problem with power to
Control Centre.
No AC power to Control
Centre.
Check to make sure ON/OFF
Switch is on.
Make sure pump is on.
Check circuit breaker on base of
Control Centre- if tripped firmly
press button twice to reset.
Electrolytic Cell Failure
(end of life).
Install new Electrolytic Cell.
Verify Time Clock is providing
220V AC to the Control Centre.
(CERTIFIED POOL PROFESSION-
AL, OR ELECTRICIAN).
Very low salts in water. Add salts as per Table
2 page 11
The system will
not turn on.
Circuit Breaker is tripped.
Integrated Circuit Board
may be damaged.
Firmly press button twice to
reset ( on base of Control
Centre).
Incorrect or no Voltage
coming from power
source.
Check the power source
(CERTIFIED POOL PROFES-
SIONAL OR ELECTRICIAN).
Contact Purapool Support
System in reverse
polarity cleaning mode.
Wait for 3 minutes for this mode
to finish and recheck LED Lights.
This manual suits for next models
1
Table of contents
Other PURAPOOL Water Filtration System manuals
Popular Water Filtration System manuals by other brands

Penguin Water
Penguin Water 200-PWRO Series manual

Waterco
Waterco HYDROCHLOR ST owner's manual

Everpure
Everpure PBS-400 installation instructions

Culligan
Culligan RVF-10 Installation and operation instructions

Master
Master MBA-MM-1040 Installation and operation manual

EM-Technik
EM-Technik 7F400 Assembly and operation instructions