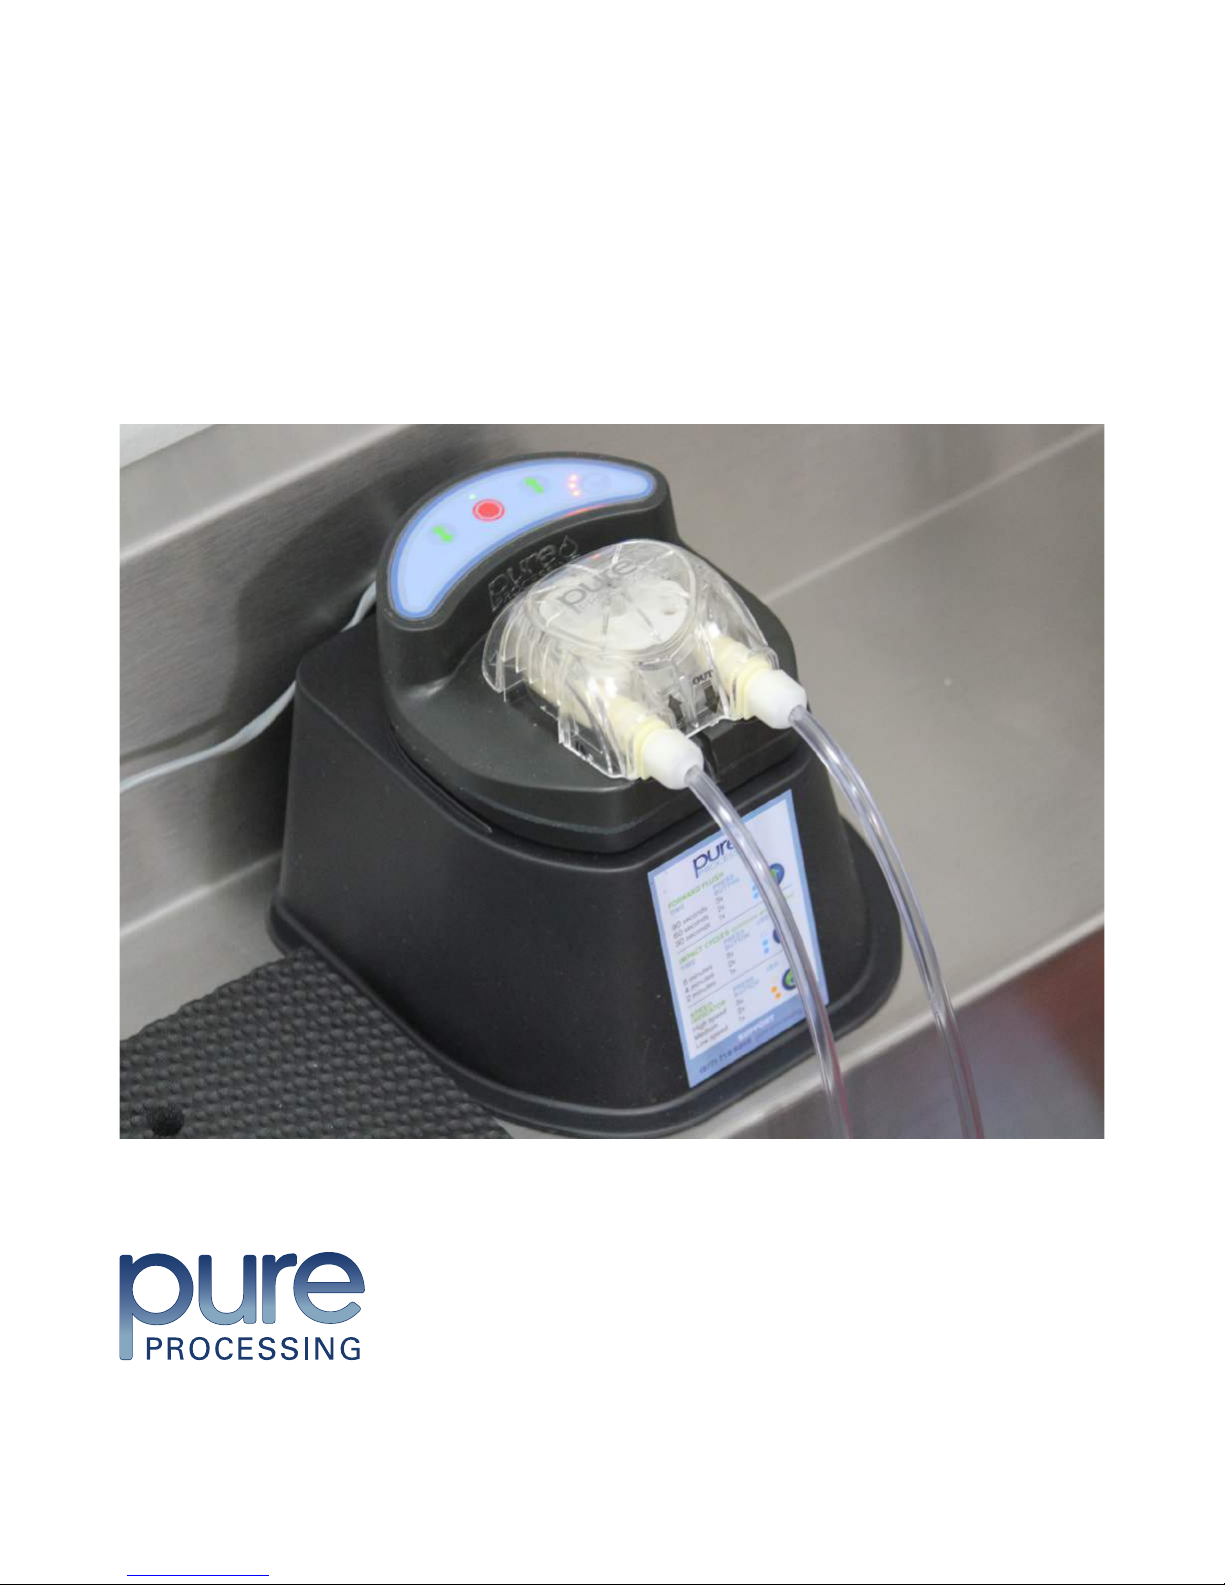
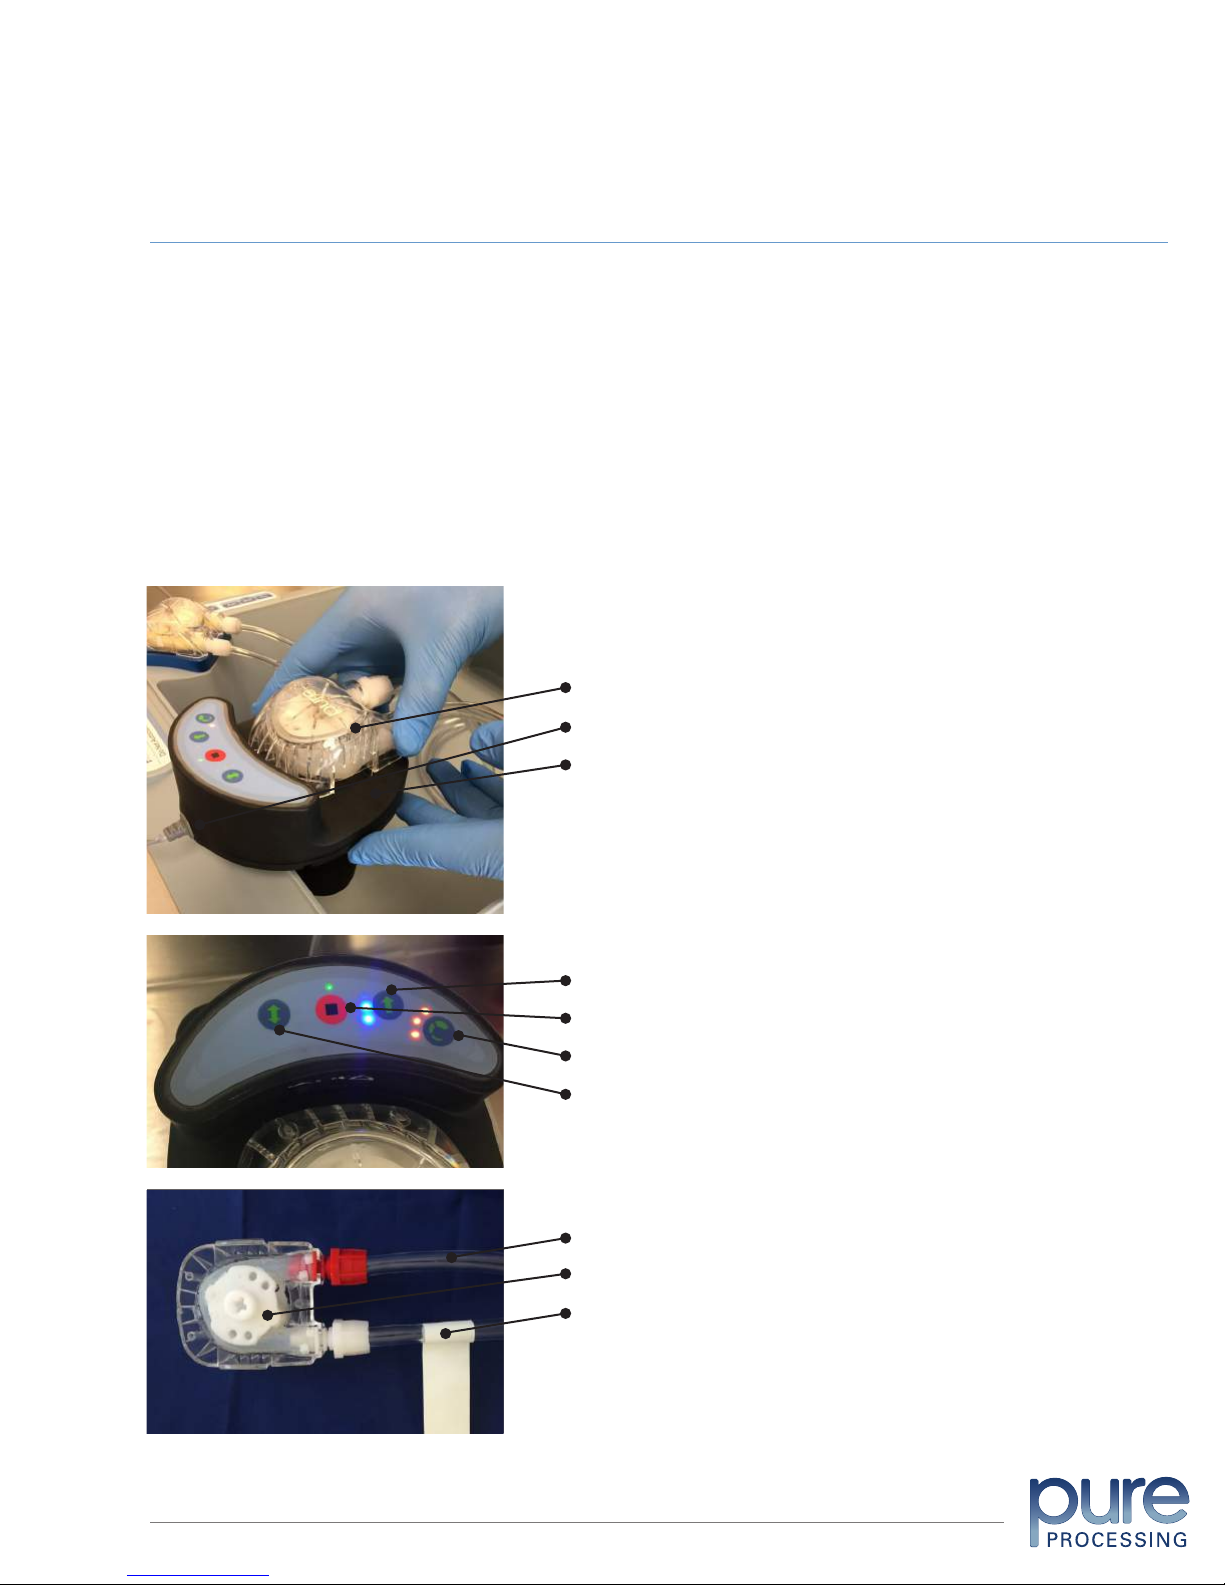
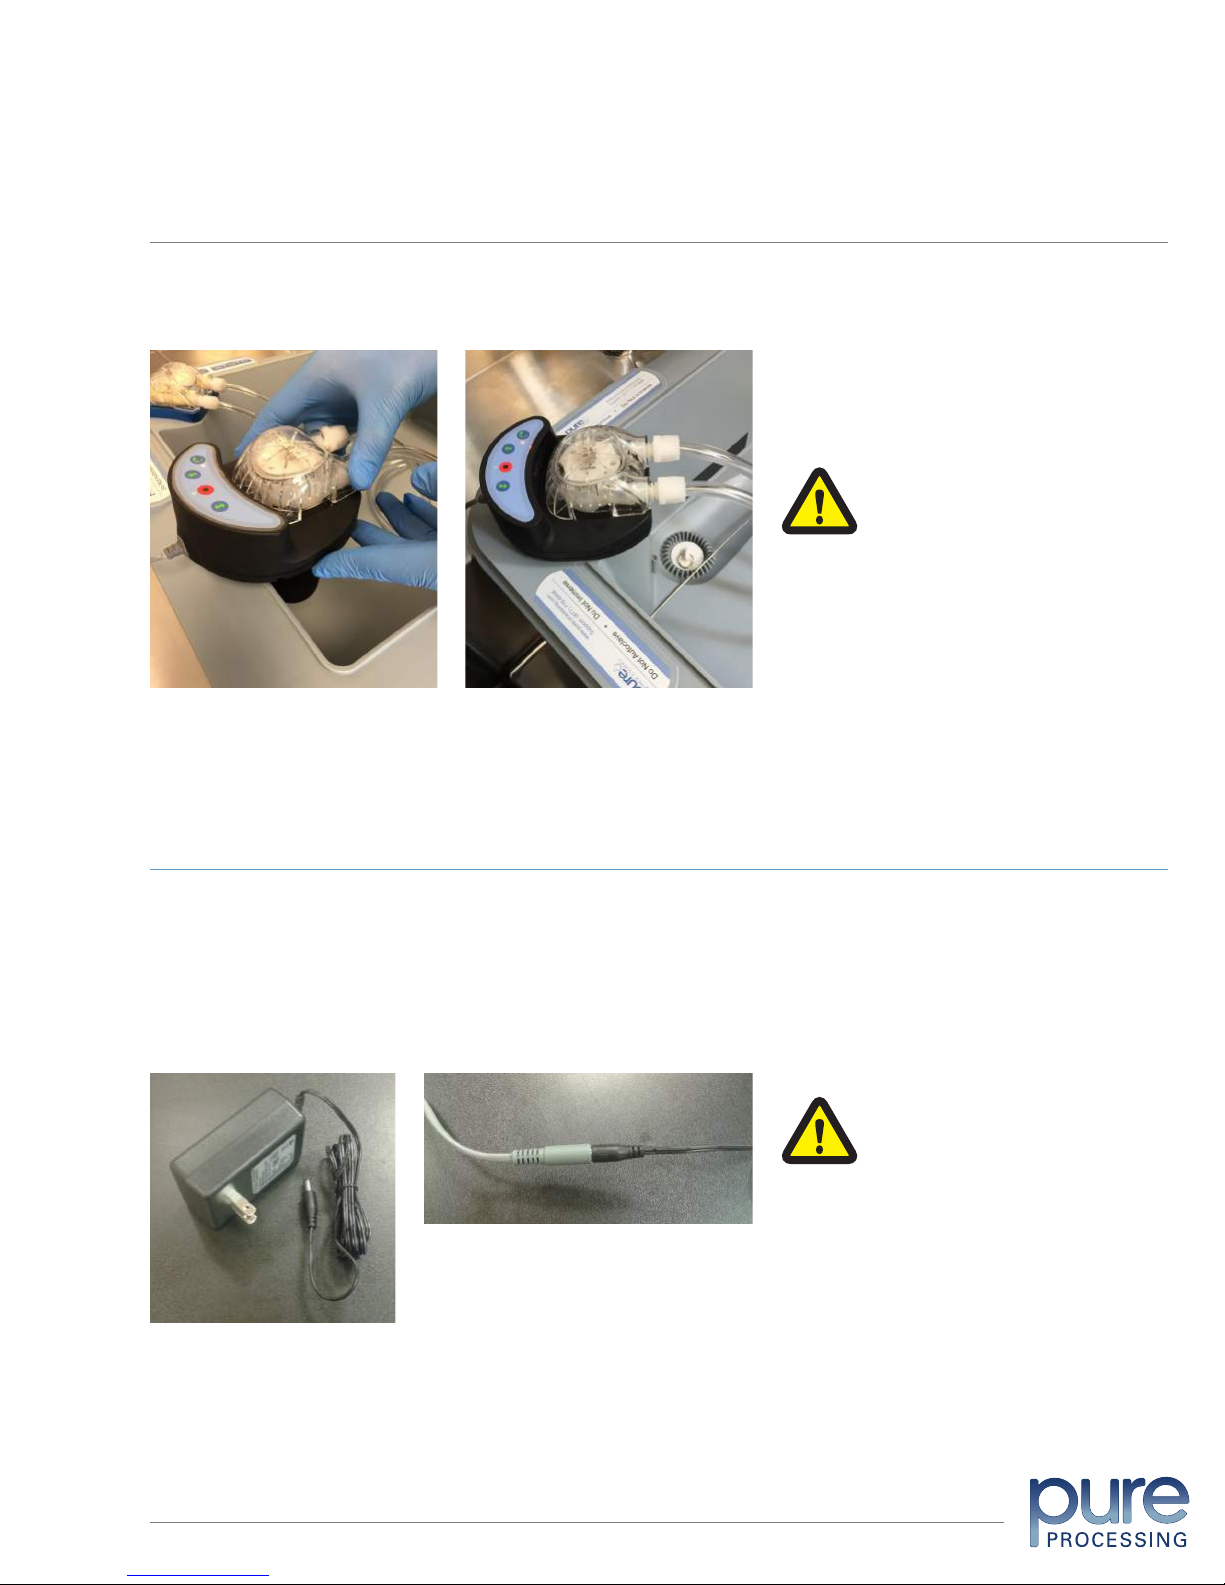
PURE FlexiPump User manual

FlexiPump™ Independent Flushing System
User Manual
Pure Processing, LLC
470 Mission Street, Unit 2
Carol Stream, Illinois 60188
www.pure-processing.com
Support 877-718-6868 Manual FPIFS 0001/September 2017

OVERVIEW: FlexiPump™ Independent Flushing System
SYSTEM DESCRIPTION
INSTALLATION: Set-up with Nest Accessory
INSTALLATION: Set-up with Sink Rail Accessory
INSTALLATION: Set-up Horizontal wall mount
INSTALLATION: Set-up on a wall
INSTALLATION: Set-up on PureStation™ Sink Insert
INSTALLATION: Set-up power supply
INSTALLATION: Set-up tube sets
OPERATION: General guidelines for speed control
OPERATION: Connecting devices to the FlexiPump system
OPERATION: Connecting flexible endoscopes to the FlexiPump system
OPERATION: PSI Settings
OPERATION: General rules and guidelines for flexible endoscope speed control
OPERATION: FlexiPump Cycles
OPERATION: Keypad Operation
MAINTENANCE: Decontaminating the tube set
MAINTENANCE: Cleaning FlexiPump Surfaces
MAINTENANCE: Step-by-Step Instructions for Replacing Tube Sets
MAINTENANCE: Flow Validation
TROUBLESHOOTING
REPLACEMENT PARTS
REPLACEMENT ADAPTERS
ADDITIONAL ACCESSORIES
DAILY ASSURANCE LOG
3
3
4
4
5
5
6
6
7
7
8
9
10
11
11
11
12
12
13
15
16
17
18
19
TABLE OF CONTENTS
FlexiPump™ Independent Flushing System User Manual © Pure Processing, LLC. 2017. All rights reserved.
2
20

The FlexiPump system is designed for use in a medical reprocessing area. It is engineered to provide opti-
mal flushing capacity, installation flexibility, and easy use and maintenance. It can be used independently or
with a Pure Station™ Sink Insert, and has been fully tested for use with a wide variety of reusable lumened
devices, including rigid and flexible endoscopes, minimally invasive surgical devices, ocular and robotic
devices, and suction tips.
The FlexiPump System is adaptable for counter, sink or wall installation near a water source. Accessories
are available from Pure Processing to adapt the system to multiple additional uses. The FlexiPump tube sets
connect to most devices, with or without luer locks and/or ports. A pressure relief feature is included to help
protect scopes during flushing. The FlexiPump system can be used alone or can augment existing pumps.
Up to three devices can be flushed at once through each FlexiPump unit.
OVERVIEW
FlexiPump™ Independent Flushing System
DESCRIPTION
Components
Removable cap with side tabs
Electric cord
Pump housing
Internal Components
Supply Tube (connects to medical devices)
Rotor
Squeeze Tube
Key Pad
Forward Flush button
Stop Cycle button
Speed Control button
Impact Cycle button
FlexiPump™ Independent Flushing System User Manual © Pure Processing, LLC. 2017All rights reserved.
3

Your FlexiPump system does not come with a tube set installed. To install your first tube set, please see the
Maintenance section in this manual (page 12). ou can also visit our website for a video tutorial on how to
install your tube sets.
OPERATION
Set-up: new FlexiPump Independent Flushing System
The Nest Accessory can be set up on any counter near a sink. Simply insert the FlexiPump system into the
Nest with tubes facing the labeled front of the accessory. Plug the power supply cord into an electrical outlet.
Set-up: with Nest Accessory
The Sink Rail accessory (sold separately) adheres to the top inside surface of a clean sink at the top
edge. Once the rail is attached, lock the back of the FlexiPump system onto the sink rail track, then plug
the FlexiPump power supply cord into a wall outlet. PureStationTM systems also include a sink rail track for
locking the FlexiPump system onto the side of the Insert.
Set-up: with Sink Rail Accessory
Use extra caution with sink
wall installations to avoid
impact with hard surfaces.
FlexiPump™ Independent Flushing System User Manual © Pure Processing, LLC. 2017. All rights reserved.
4
Do not place pumps directly
under a water supply.

Install your angle wall bracket on a wall. The two small holes on the back piece will be attached to the wall.
Place the FlexiPump nest hole (located on the back) over the thru bolt.
Place the FlexiPump unit into the Nest. Keep one hand on the FlexiPump and attach the pump holder
bracket around the back of the FlexiPump, on the gray cord. Connect the other side of the pump holder
bracket around the thru bolt.
Screw the wing nut onto the thru bolt and twist to the right until the wing nut is secured.
OPERATION
Set-up: Horizontal wall mount
The nest accessory can be mounted on a wall or pegboard using the two through-holes in the back of
the accessory. Simply hang the nest on a wall near a sink and insert the FlexiPump unit. Then plug the
cord into an outlet. (Hardware not included.)
Set-up: on a wall
5
Mounting holes
FlexiPump™ Independent Flushing System User Manual © Pure Processing, LLC. 2017. All rights reserved.

The FlexiPump system can be inserted into the corner well of the PureStation Sink Insert, or along the side
ridges molded into the sink.
OPERATION
Set-up: on Pure Station™ Sink Insert
6
The FlexiPump unit is not meant
to be submerged; use caution
when installing near water.
Once your FlexiPump system has been installed in its preferred place, remove the black power cord from
your FlexiPump box. Take the barrel end of the gray cord found at the back of the FlexiPump and insert the
barrel end of the black power supply to the gray cord. Make sure there are no frays in the wires.
Once both barrel cords have been tightly secured, plug the power supply into your wall outlet. Run the
forward flush on your FlexiPump to make sure that the power has been installed correctly.
Set-up: power supply
Do not submerge the power or
barrel cords. Please use caution
when installing near water.
FlexiPump™ Independent Flushing System User Manual © Pure Processing, LLC. 2017. All rights reserved.

OPERATION
Set-up: tube sets
7
Too much pressure and speed
for small devices can result in
tube set damage.
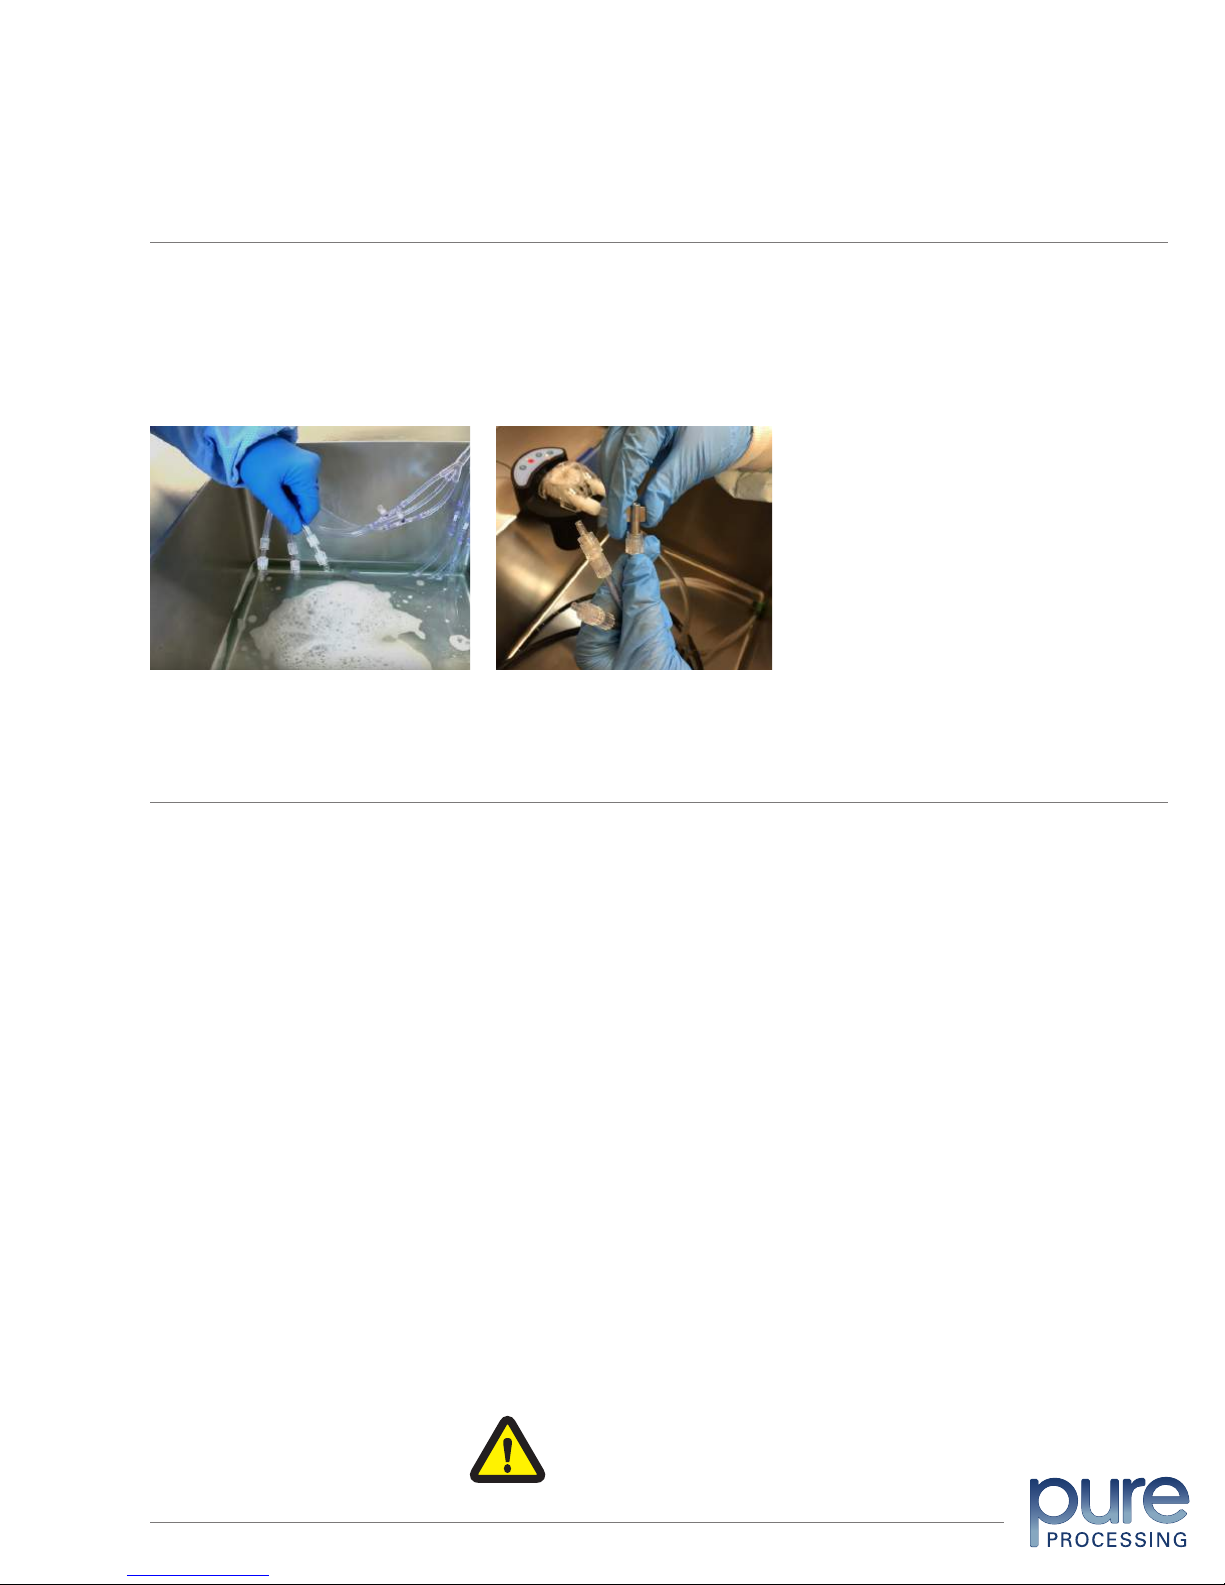
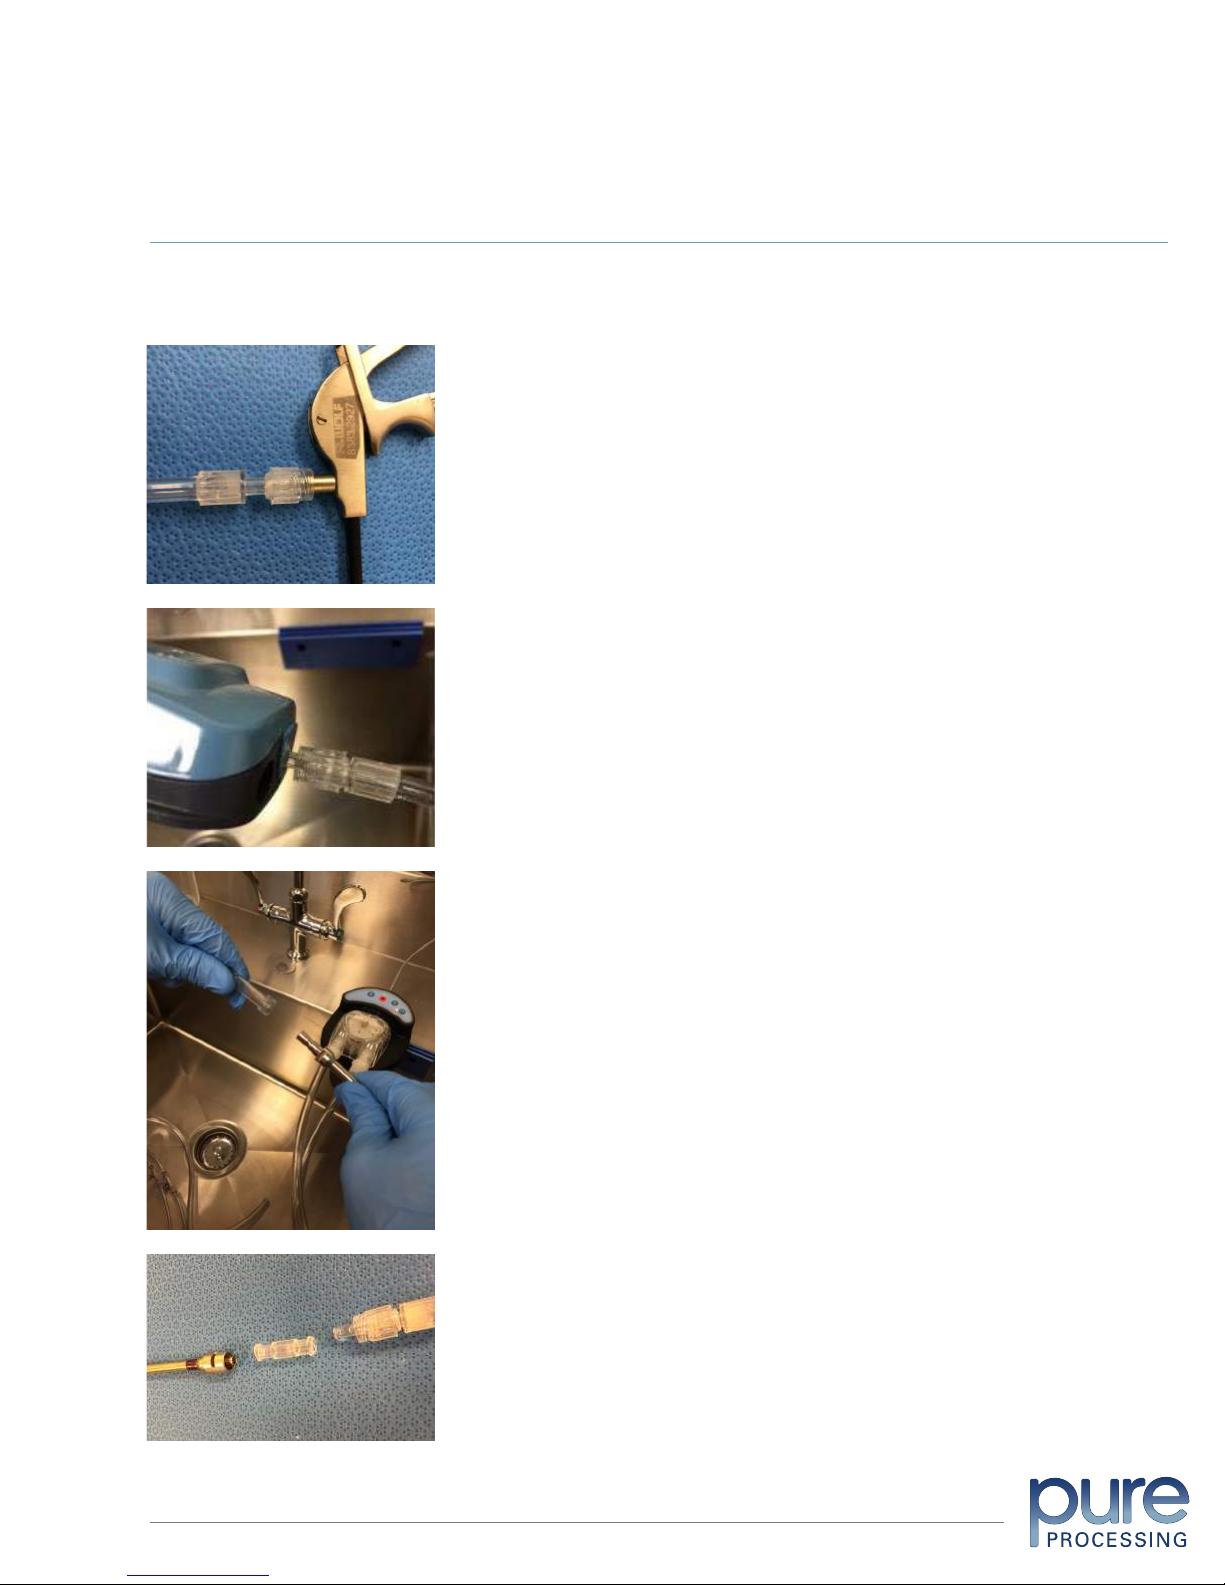
The drop-down tube on each new tube set is 30 inches long. If the tube is too long for your sink, it can
be cut to shorten it. Each FlexiPump tube set comes with three (3) leads, each of which can be attached
to an instrument. You can use all three at once. If you have fewer than three devices to flush, you can cap
off the unused lead(s) to ensure appropriate pressure into the lead(s) with attached devices. Use the end
cap provided with your tube set. You may also re-use end caps from other FlexiPump tube sets.
Because fluid will take the path of least resistance, it is important that instrument channels attached to a
FlexiPump system are approximately the same diameter, to assure consistent flushing into all the devices.
Do not attach a large-diameter lumen to one lead and a small-diameter lumen to another on the
same pump system.
Low speed
This setting is designed for small channels, 1 to 3 millimeters (mm) in size. This setting will flush 500
milliliters (ml) of fluid in one minute into all three channels (166 ml through each lead). Do not turn
up the speed when you hear the motor slowing down. The smaller channels cannot accommodate
any higher flow volume. Trying to force it to go faster will cause a back-up in the motor and will make
the pressure release valve drain fluid.
Medium speed
This setting is designed for channels that are 2 to 3 mm in diameter. This setting will flush 750 ml
of fluid in one minute into all three channels (250 ml through each lead). Do not turn up the speed
if you hear the motor slowing down. However, if there is fluid draining from the pressure relief valve,
you can consider slowing the pump speed.
High Speed
This setting will flush 1,000 ml of fluid in one minute into all three channels (333 mlthrough each
lead). This is used for channels larger than 4 mm in diameter.
General guidelines for speed control
FlexiPump™ Independent Flushing System User Manual © Pure Processing, LLC. 2017. All rights reserved.

Many lumened/channeled devices can be properly connected and flushed with the FlexiPump system.
OPERATION
Connecting devices to the FlexiPump system
For devices with luer locks
Twist the FlexiPump tube collar onto the
device with a luer, until locked
Flush the device following manufacturer’s
recommendations
8
For devices with luer ports
Pull the tube collar back
Insert the slip tip into the device
Flush according to manufacturer’s
recommendations
For devices without luer locks or ports
Use a cup adaptor to create a tight seal
Flush according to manufacturer’s
recommendations
For devices with female luer locks
Use a female-to-female luer lock adapter
Flush according to manufacturer’s
recommendations
FlexiPump™ Independent Flushing System User Manual © Pure Processing, LLC. 2017. All rights reserved.

It is important to follow the manufacturer’s instructions for use (IFU) for each flexible endoscope. The Flexi-
Pump system replaces the syringe flushing method in the pre-cleaning sections of these IFU.*
OPERATION
Connecting flexible endoscopes to the FlexiPump
Independent Flushing System
The injector tube (or suction channel tube in this example) is
used to inject reprocessing fluids into the instrument channel,
suction channel, and air/water channels of the endoscope. It is
also used to flush air through these channels to expel fluids.
Follow the device manufacturer’s IFU to attach the injector
tube to the scope.
9
Attach the FlexiPump tube set luer locks to the suction channel port and
air/water port of the injector tube. Directions may vary depending on the
scope and the manufacturer.
Cap off all unused tubes on the FlexiPump Tube Set. If there are two
channels on the endoscope, place a FlexiPump end cap on the end of
the third FlexiPump tube lead. If you are flushing only one channel or lu-
men, cap off the other two FlexiPump tube leads with luer end caps.
Select the appropriate flush function and speed (page 9) and flush the
device.
IMPORTANT
Most endoscope manufacturers specify how much cleaning solution to flush through the device.
Follow IFU’s to prepare the cleaning solution. Carefully monitor all device exit points for flushing
cleaning solution to ensure copious flushing.
Be sure to rinse devices per manufacturer’s IFU.
To eject solutions from a scope, remove the drop-down tube from the reprocessing fluid container.
Allow pump to run. This will inject air into the scope and purge fluid from the device. Then continue
to the next reprocessing step.
FlexiPump™ Independent Flushing System User Manual © Pure Processing, LLC. 2017. All rights reserved.

OPERATION
Flushing flexible endoscopes with the FlexiPump
Independent Flushing System
10
If the pump sounds or looks stressed,
turn the speed setting down to avoid
unnecessary wear on the motor.
PSI Settings
Please refer to the manufacturer’s IFU for each endoscope’s pressure requirements. The FlexiPump system
can be used with a low-pressure tube set or a higher-pressure tube set. In general, smaller flexible devices
(urology scopes and bronchoscopes, for example) require lower pressure.
General rules and guidelines for flexible endoscope speed control
There are three (3) tubes on each FlexiPump tube set. If any tubes are not in use, be sure they are
secured with end caps provided in the tube set.
When using all three tubes of the tube set for flushing, the MEDIUM or HIGH FlexiPump speed
should be used.
When using two tubes, make sure the third tube is capped and the FlexiPump is set for LOW,
MEDIUM or (in some cases) HIGH speed.
When using only one of the three tubes of the FlexiPump tube set, cap off the other two tubes and
setthe FlexiPump speed to LOW, MEDIUM or (in rare cases) HIGH speed.
PLEASE NOTE: the FlexiPump Independent Flushing System is intended for pre-cleaning and flushing of lumened
devices. It is not for final treatment and does not replace manual brushing and rinsing. Refer to each medical device
manufacturer’s instructions for use for complete pre-cleaning instructions.
FlexiPump™ Independent Flushing System User Manual © Pure Processing, LLC. 2017. All rights reserved.

11
Too much pressure and speed can cause tube set damage.
Key Pad Operation
Speed Control
Push the button ONCE for low (500 ml per minute),TWICE
for medium (750 ml per minute), and THREE TIMES for
highspeed (1,000 ml per minute)
Forward Flush
Press the button ONCE for 30 seconds, TWICE for 60sec-
onds and THREE TIMES for 90 seconds
Stop
Press to stop all pump action and cancel any cycle
Impact
Press for clogged devices. Press the button ONCE for two
(2)minutes, TWICE for four (4) minutes, and THREE TIMES
for six (6)minutes.
FlexiPump™ Independent
Flushing System In-service
1. Properly dilute the enzymatic detergent* and place the down tube into the cleaning solution. *We highly
recommend PureChannel™ Flush Instrument Channel Cleaner & Foam
2. Connect up to three channeled devices at once - the tip of the tube set has the same luer fitting you
would find on a syringe; this allows you to connect almost any instrument. We also offer other connection
accessories to facilitate attaching additional types of instrument components.
3. Push forward flush to start. Watch for solution coming out of the devices.
To maximize the fluid pressure: cap off unused leads one by one. Gray end caps come with each tube set. Capping
of 2 of the 3 leads will create almost 50 psi of pressure in the remaining lead. REMEMBER: High pressure does not
result in good cleaning. Good cleaning is copious amounts of cleaning solutions with the appropriate cleaner.
CAUTION: Running the pump on high can create aerosols and deliver too much pressure to delicate devices. Use only
for appropriate channels.
Robotics: You can flush up to two ports at once, using our XL Slip Tip accessory. Attach the two leads to the slip tips,
and plug into the ports. Cap off the unused lead on the tube set so all fluid gets directly to the robotic device.
Decontaminating tube sets: Important to decontaminate after every shift change, with a water-based ready to use
solution***. Pump the solution into the tube set and allow 5 minutes of contact time. When done, pump water through
to rinse. ***We highly recommend the validated ProSpray™ Surface Disinfectant.
Replace tube sets every thirty days. Please see log sheet.
PHONE 877.718.6868 WEB www.pure-processing.com
Most frequently used button; time controlled:
• 1 LED light- 30 seconds
• 2 LED lights- 60 seconds
• 3 LED lights- 90 seconds
Stops the flushing
It’s important to control the volume without too much pressure:
• 1 LED light- Low- for small devices 1-2 mm diameter, such as suction tips and eye instruments
(500 ml** per min.)
• 2 LED lights- Medium- medium devices 2-3 mm diameter (750 ml** per min.)
• 3 LED lights- High- large devices, 4 mm and larger diameter, such as laparoscopic, robotic, or
orthopedic lumens (1000 ml** per min.)
**Milliliters flushed is the total volume. Example: if three devices are flushed at the same time on
high speed – each device flushes 333 ml per minute.
Used on devices that have material clog or impact. The impact cycle will create a push and pull
pressure- moving in a forward direction, and then stopping to reverse and create suction. This feature
will allow the clog to soften up and allow you to push a brush through.
Time controlled:
• 1 LED light: 2 minutes
• 2 LED lights: 4 minutes
• 3 LED lights: 6 minutes
Forward Flush
Speed/Volume
Impact Cycle
Stop
KEY PAD FUNCTIONS
The Forward flush cycle is used for flushing channels. There are three options for this cycle: 30 seconds,
60 seconds and 90 seconds.
The Impact cycle is used ONLY for devices that are clogged. The FlexiPump tube set must be
decontaminated after each Impact Cycle run.
The Speed Indicator shows one, two or three lights, to indicate the pump speed selected.
FlexiPump™ Independent Flushing System User Manual © Pure Processing, LLC. 2017. All rights reserved.

MAINTENANCE
Decontaminating the tube set
12
Bleach or alcohol
disinfectants are
not compatible
with the FlexiPump
Disinfect the tube sets at least daily, preferably at every shift change.
Step 1 Pour 500mL of your ready to use disinfectant into an open, clean container.
Step 2 Place the drop down tube into the container with disinfectant, assuring it's fully submerged.
Step 3 Press the forward flush button to begin filling tube set with disinfectant. Run at least 100mL of disinfectant
through the tube leads. Press STOP.
Step 4 Attach end caps onto all the tube leads and set the speed control on Low. Position your pressure relief valves
over a container or sink bay. Run a Forward Flush until disinfect is expelled through the pressure relief valves. Press
STOP. Your tubes are now completely filled with disinfectant.
Step 5 The disinfectant should remain inside tubing for the contact time of the disinfectant.
Step 6 After the contact time has elapsed, in a empty sink basin, point the tube leads downward. Slowly take off the
end caps. Some pressure will have built up inside, so use caution.
Step 7 Run the remainder of the disinfectant through the tube sets.
Step 8 Fill a container with 500 mL of clean water and place the drop down tube inside. Rinse at least 500mL
through the tube leads to ensure a proper rinse.
Cleaning FlexiPump surfaces
The surfaces of the system should be cleaned daily and whenever there is visible soil.
Step 1 Wipe all external surfaces with a ready to use disinfectant, including the tubing, and allow
them to air-dry.
Step 2 Wipe the surfaces of the Nest accessory and/or Rail accessory (if used) and let them air-dry.
FlexiPump™ Independent Flushing System User Manual © Pure Processing, LLC. 2017. All rights reserved.

MAINTENANCE
Instructions for replacing the tube set
13
Step-by-Step Instructions for Replacing a Tube Set
PHONE 877.718.6868 WEB www.pure-processing.com
Thread your new tube set
around the Tube Rotor (as
pictured above). It is important
that the red tube component is
on the right side in this step.
STEP 4
Place the new tube set and rotor
inside the pump cap. Properly
align the tube set fittings so that
they are properly situated in the
cap fittings.
STEP 5
Flip the Cap right-side up.
Notice the red component is on
the left side now.
STEP 6
TUBE SET/CAP FITTINGS
Remove the Pump Cap by
pressing on both side tabs and
pulling gently.
STEP 1
Flip the Pump Cap upside down
(as pictured above) and unthread
the tubing from the Tube Rotor.
STEP 2
Now that the old set has been
taken out, remove the Tube
Rotor from the Pump Cap.
STEP 3
PUMP CAP TUBE ROTOR
Press on both sides of the
Pump Cap and place it back
onto the base, making sure
that it snaps down fully.
FINAL STEP
If you experience difficulty
snapping the cap into place, try
activating the “forward flush”
button and then proceed to
push the cap down until it
fastens into place properly.
TIP
FORWARD FLUSH
FlexiPump™ Independent Flushing System User Manual © Pure Processing, LLC. 2017. All rights reserved.

MAINTENANCE
Instructions for replacing the tube set
14
Tube Set Instructions
1. Infection Prevention
Hard water deposits could potentially build up on the inside surface of the tube set.
2. Reduced Flow Rate
The squeeze tube can lose its elasticity with time and frequent use.
3. Reduced Pump Life
The factory-applied tube set lubricant eventually wears away, resulting in more resistance
and more work for the pump. This can reduce the pump’s overall useful lifetime.
PHONE 877.718.6868 WEB www.pure-processing.com
The Importance of Changing Tube Sets
Each tube set will include a 30 day timestrip®attached.
Best Practice Solution
Whenever you change a tube set, write your initials and expiration date on the back
of the timestrip®label.
Inititals:
Expiration Date:
FlexiPump™ Independent Flushing System User Manual © Pure Processing, LLC. 2017. All rights reserved.

Conducting a Flow Validation Test
The flow validation will test every speed on the FlexiPump: low, medium, and high for 30 seconds each to assure
your FlexiPump is dispensing the right amount of liquid. We recommend running the flow validation test at least
once a day. You may use the log provided in the back of this manual to keep track of your flow validation tests.
Step 1Place the down tube into a container of water that contains at least 1000mL of water. Remove all the end
caps from the 3 tube leads.
Step 2Run an initial Forward flush until you see water dispensed from each tube lead. Hit STOP.
Step 3Place the 3 tube leads into the solution caddy container. Make sure to hold the 3 tube leads into the
container while the pump isrunning. This will measure how much liquid isdispensed during the flush cycles.
Step 4Make sure your Speed button is on the low setting, showing 1 LEDlight. Press the Forward Flush button
once to run the FlexiPump for 30 seconds on Low. Verify that at least 250mL of water was dispensed.
Step 5Empty the solution container and refill your container of water, assuring that you have at least 1000mL of
water.Place the tube leads back into the solution container.
Step 6 Set your Speed button to medium, showing 2 LEDlights. Pressthe Forward Flush button once for a 30
second cycle. Verify that at least 375mL of water was dispensed.
Step 7 Empty the solution container and refill your container of water, assuring that you have at least 1000mL of
water. Place the tube leads back into the solution container.
Step 8Set your Speed button to high, showing 3 LEDlights. Pressthe Forward Flush button once for a 30
second cycle. Verify that at least 500mL of water was dispensed.
Time Speed Water Dispensed
30 Seconds Low 250 mL
30 Seconds Medium 375 mL
30 Seconds High 500 mL
15
If the pump does not pass the flow validation
test, please contact your Pure Processing
representative to troubleshoot the issue.
FlexiPump™ Independent Flushing System User Manual © Pure Processing, LLC. 2017. All rights reserved.

TROUBLESHOOTING
Problem Recommendation Notes
1. No Power Unit
Disconnect the black and gray cords at the barrel connector. Reconnect
making sure they are tight. If there is no power, slightly turn the adapter to
engage the two and tighten. Repeat as necessary.
2. Power to unit but
buttons don’t work
Disconnect the black and gray cords at the barrel connector. Reconnect
making sure they are tight. If there is no power, slightly turn the adapter to
engage the two and tighten. Repeat as necessary.
3. Pump is not working Disconnect the power cord from outlet and from the FlexiPump unit. Recon-
nect the cord and plug in. Press a control button to see if it works
If it still doesn’t work,
go to #4
4. Pump does not work Reset the unit by hitting stop, and then press the Forward Flush 30-second
button.
If it still does not
operate, contact Pure
Processing Customer
Service.
5. Rotor is spinning but
no solution is coming
out the end of the device
Make sure the drop-down tube is fully submerged. Also check for kinks in
the tubing. Make sure you have the correct end of the tubing in the solution.
6. Luer lock is broken
or separated from the
tubing
Change the tube set.
7. Devices are not clean
Check the device manufacturer’s cleaning recommendations. Check the
disinfectant instructions for use. Confirm that all directions have been prop-
erly followed.
8. Impact Cycle is not
working
Impact Cycle works in conjunction with detergent. Ensure that proper
detergent is used for the type of soil in the device (protein-based enzyme
for blood, e.g.).
If still not working,
see #7
9. Impact Cycle is not
flushing
Conduct a flow validation test:
1. Place drop-down tube into container of clean water
2. Press the Forward Flush button once for a 30-second flush
3. When a steady stream of water exits the connector, press the Stop
button
If it still does not
operate, contact Pure
Processing
Customer Service.
10. Water is leaking
from under the cap
1. Check the tube set for cracks
2. Change the tube set if cracked
11. One or more
components on the
tube set are broken
Replace the entire tube set
12. Unit is not running
and I have a red
blinking light
Allow the unit to cool down for 30 minutes, and then resume use.
Contact us if this does not remedy the issue.
This can occur after
prolonged use.
13. Speed control is
stuck on HIGH Allow the unit to reset for 15 seconds. Press the speed control to test.
14. Unit makes a lot of
noise Use a surface liner under the nest to reduce vibration
15. Unit stopped while
flushing Unplug the unit to reset it. Repeat interrupted flushing cycle
16. Pump cap will not
stay locked to the base Replace the cap
Probably cracked or
broken where locks
engage
17. My tube set is
leaking
Unscrew the threaded tube set nut from the connector on both the red and
white sides. If the tube has slid off the connector, push it back into place
until it is snug. Re-screw the tube set nut tightly so that no threading is
visible.
Please contact Pure
Processing Customer
Service if additional
help is required.
18. There’s a tear in my
tube set
Replace your tube set. Most tears occur because the lubrication on the
tube set was removed. The lubricant is necessary to prevent the pump from
overexertion and unnecessary strain.
16FlexiPump™ Independent Flushing System User Manual © Pure Processing, LLC. 2017. All rights reserved.

FLEXIPUMP REPLACEMENT PARTS
17
Item Product Code
FlexiPump™ Irrigation Tube Set Two-Lead, 15 psi or 30 psi; box of 6 FXITS-0215psi6
FXITS-0230psi6
FlexiPump™ Irrigation Tube Set Three-Lead, 15 psi or 30 psi; box of 6 FXITS-0315psi6
FXITS-0330psi6
FlexiPump™ Power Supply FPPS-01
FlexiPump™ Pump Cap FLX-CAP-01
FlexiPump™ Pump Rotor FLX-ROTOR-01
FlexiPump™ Nest Accessory FLX-NEST
FlexiPump™ Sink Well Adapter FPSWA-01
FlexiPump™ Two-Lead Pre-Assembled Pump Cap and Rotor Tube Set;
15 or 30 psi
FXITS-PREA-
0215psi6
FXITS-PREA-
0230-psi6
FlexiPump™ Three-Lead Pre-Assembled Pump Cap and Rotor Tube Set;
15 or 30 psi
FXITS-PREA-
0315psi6
FXITS-PREA-
0330psi6
FlexiPump™ Independent Flushing System User Manual © Pure Processing, LLC. 2017. All rights reserved.

REPLACEMENT ADAPTERS
18
Item Product Code
End Cap (to seal FlexiPump tube) PSFP-LLSC-10
Female-to-Female Luer Lock
FFLL-10
FFLL-30
FFLL-50
XL Slip Tip Adapter
XLSLIP-10
XLSLIP-20
XLSLIP-30
Rubber Cup Adapter RCA-01
Large Rubber Sealing Bridge RBLG-01
Small Sealing Bridge Rbsm-01
FlexiPump™ Ceramic Weight and Filter FPCW-01
FlexiPump™ Accessory Kit ACC-KIT
TimeStrip™ Time Indicators TM-1M
FlexiPump™ Independent Flushing System User Manual © Pure Processing, LLC. 2017. All rights reserved.

ADDITIONAL ACCESSORIES
19
These products are available from Pure Processing, Inc. and are compatible for use with the FlexiPump system:
Item Product Code
PureChannel™ Flush Instrument Channel Cleaner, 1 gallon size/32 oz. size PSCF-08
PSCF-32oz
PureChannel™ Flush Touch-less Auto Dispenser PCFTAD-01
Pro-Spray™ Ready-to-Use Disinfectant/Cleaner, 1 gallon size/32 oz. size PSC128-1
ProSpray™ Ready-to-use Disinfectant/Cleaner Wipes; Soft pack,
Cannister, Tall Cannister
PSW
PSWC
PSWCT
ProWash Multi-Purpose Instrument Detergent and Cart Wash; 1 GAL,
5 GAL, 15 GAL
PRW128-1
PRW640-1
PRW-1920
PureStation™ Sink Insert PS1616
PS1626
PureStation™ Dedicated Eye Sink PSFP1616-EYE
PSFP1626-EYE
FlexiPump™ Independent Flushing System User Manual © Pure Processing, LLC. 2017. All rights reserved.

FLEXIPUMP™ INDEPENDENT FLUSHING SYSTEM
20
Daily Assurance Log
© Pure Processing, Inc. 2015. All rights reserved. FlexiPump™Independent Flushing System User Manual; April 2015
17
Day
Decontamination Procedure
Initials
1
Yes
No
2
Yes
No
3
Yes
No
4
Yes
No
5
Yes
No
6
Yes
No
7
Yes
No
8
Yes
No
9
Yes
No
10
Yes
No
11
Yes
No
12
Yes
No
13
Yes
No
14
Yes
No
15
Yes
No
16
Yes
No
17
Yes
No
18
Yes
No
19
Yes
No
20
Yes
No
21
Yes
No
22
Yes
No
23
Yes
No
24
Yes
No
25
Yes
No
26
Yes
No
27
Yes
No
28
Yes
No
29
Yes
No
30
Yes
No
31
Yes
No
Month and Year
Unit Number
FlexiPump™ Independent Flushing System
Daily AssuranceLog
Tube Replacement Name: Date:
Day
Flow Validation Test
Initials
1
Pass
Fail
2
Pass
Fail
3
Pass
Fail
4
Pass
Fail
5
Pass
Fail
6
Pass
Fail
7
Pass
Fail
8
Pass
Fail
9
Pass
Fail
10
Pass
Fail
11
Pass
Fail
12
Pass
Fail
13
Pass
Fail
14
Pass
Fail
15
Pass
Fail
16
Pass
Fail
17
Pass
Fail
18
Pass
Fail
19
Pass
Fail
20
Pass
Fail
21
Pass
Fail
22
Pass
Fail
23
Pass
Fail
24
Pass
Fail
25
Pass
Fail
26
Pass
Fail
27
Pass
Fail
28
Pass
Fail
29
Pass
Fail
30
Pass
Fail
31
Pass
Fail
Pure Processing Customer Support 1-877-718-6868
FlexiPump™ Independent Flushing System User Manual © Pure Processing, LLC. 2017. All rights reserved.
Table of contents
Popular Medical Equipment manuals by other brands

Medi-Globe
Medi-Globe ENDO-FLEX ZB0100 Instructions for use

iMediSync
iMediSync iSyncWave User manual and installation guide

BMC
BMC 3B Luna G3 APAP Quick operation manual

MEDI RENT
MEDI RENT BIO-COMPRESSION PANTS Setup guide

Ossur
Ossur DIRECT SOCKET TOOL KIT Instructions for use

Pari
Pari BOY N Instructions for use

Air Techniques
Air Techniques MOJAVE LT3M User and installation manual

ArtiCure
ArtiCure Isolator Transpolar pen Instructions for use

HEINE
HEINE EN200 Series Instructions for use

FujiFilm
FujiFilm SonoSite PowerPark user guide

Kodak
Kodak X-Omat M43 PROCESSOR Diagnostics guide

Bioness
Bioness Vector Elite Clinicians Guide