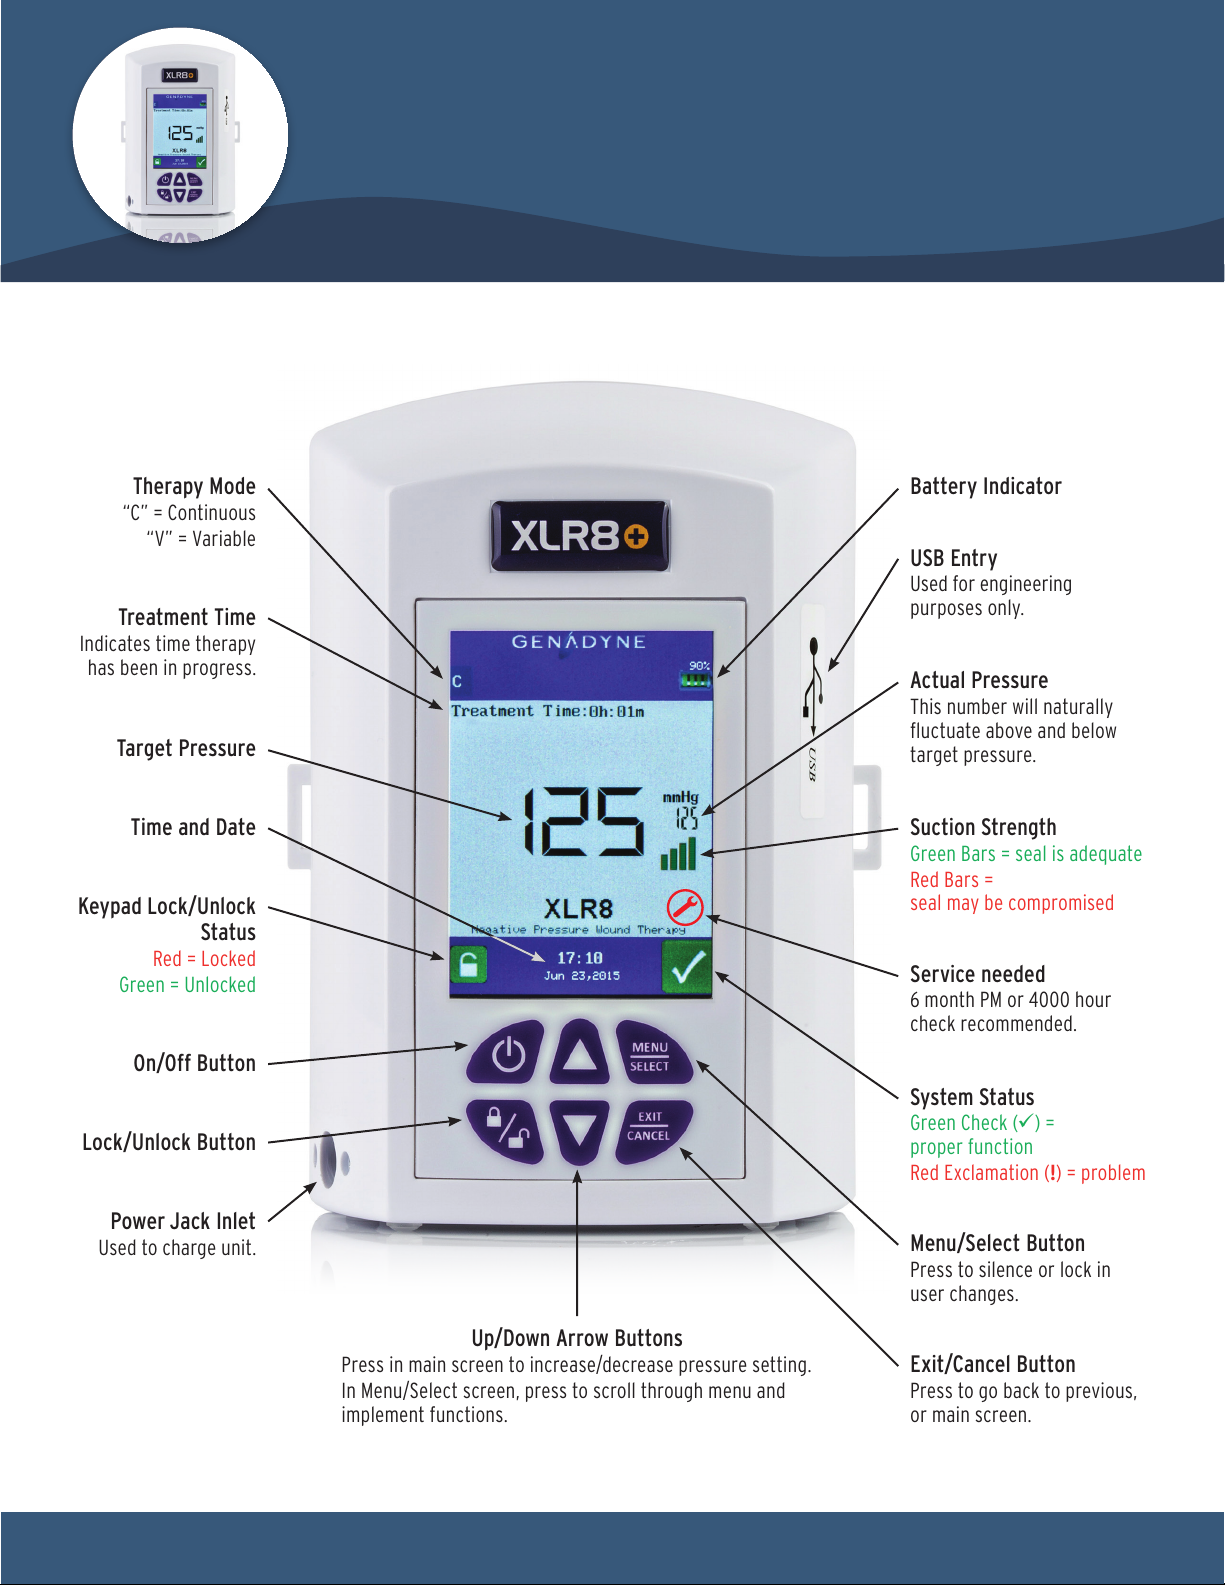
Quick Reference Guide Button-ology
Adjust Pressure Setting: The user can adjust the pressure
in the main screen by pressing the up arrow button to
increase the vacuum pressure or the down arrow button
to decrease the vacuum pressure. The pressure may be
adjusted in 1 mm/hg increments. Or, if arrow is HELD down,
the pressure will increase/decrease in 10 mm/hg increments,
to advance to the prescribed pressure setting quickly.
The large number in the center of the LCD screen will only
change if the user physically changes it. Adjustments should
be based on the physician’s order.
The small number on the right side of the LCD screen (above
the bars showing suction strength) indicates the pressure in
the wound. This number will naturally fluctuate above and
below the target pressure setting due to the permeability
in the drape. Drape permeability prevents moisture build-up
under the drape and helps ensure that intact skin remains
clean and dry. If the small number drops 40 mm/hg or more
below the prescribed pressure setting too many times in a
minute, the pump will display an alert indicating there is
a leak in the system.
Lock/Unlock Pump: Press and hold the Lock/Unlock
and Exit/Cancel buttons at the same time for
5 seconds. This will either lock or unlock the pump. When
unlocked, you will notice a green open lock icon on the
bottom left of the LCD screen, or when locked, a red closed
lock icon . A locked screen disables the user from making
any changes to pump settings.
Reset Treatment Time: Press and HOLD the Menu/Select
button , press and RELEASE the On/Off button , and
then press and RELEASE the Lock/Unlock button . Finally,
RELEASE the Menu/Select button .
Clear Alert Log: User MUST be in the main screen.
Press and HOLD the Menu/Select button , press and
RELEASE the Lock/Unlock button , and then press and
RELEASE the Exit/Cancel button . Finally, RELEASE the
Menu/Select button .
Silence Alert: Press the Menu/Select button .
(Note: the alert will sound again after 5 minutes if problem
is not resolved.)
Setting Variable Pressure: Press the Menu/Select
button. The Treatment Mode may already be highlighted.
If not, arrow up or down to highlight Treatment Mode.
Once highlighted, press the Menu/Select button .
Arrow down to highlight Variable. Once highlighted,
press the Menu/Select button ; this allows the user
to access the Variable screen to adjust high/low time and
high/low pressure settings.
Set Variable High Pressure Time: Press the up or down
arrow button in 1 minute increments. This can be
set from 1 to 15 minutes. To lock in time, press the
Menu/Select button .
Set Variable High Pressure: Press the up or down arrow
button to set high pressure. To lock in high pressure,
press the Menu/Select button .
Set Variable Low Pressure Time: Press the up or down
arrow button in 1 minute increments. This can be
set from 1 to 15 minutes. To lock in time, press the
Menu/Select button .
Set Variable Low Pressure: Press the up or down arrow
button to set low pressure. To lock in low pressure,
press the Menu/Select button .
Setting Intensity Mode: Press the Menu/Select button .
Use the up or down arrow button, to highlight Intensity.
Once highlighted, press the Menu/Select button .
Press the up or down arrow button to set intensity to
1, 2 or 3. The 3 settings of the intensity mode allow the
user to adjust the suction speed of the XLR8+ device.
Setting 1 will run at the lowest speed, while setting 3 will
run at the highest speed.
To lock in the intensity setting, press the Menu/Select
button .
©2016 Genadyne Biotechnologies, Inc. CLN-012 02/16
Questions? Call 1.800.208.2025 or 516.217.0010 | email [email protected] | www.genadyne.com XLR8/XLR8 Plus
Quick Reference Button Guide
XLR8/XLR8 Plus
AMT - Genadyne - XLR8/XLR8 Plus - Quick Reference Guide - 071322
All trademarks, service marks and company names are the property of their respective owners.
17595 Cartwright Road | Irvine, CA 92614
General Inquiries: (800) 232-9266
Customer Service: (855) 392-9268