PurePower RATING User manual

OPERATOR’s
MANUAL
2-in-1BRAD NAILER/STAPLER
MANUEL D’UTILISATION DU CLOUEUSE/AGRAFEUSE
MANUAL DEL OPERADOR DEL CLAVADORA/GRAPADORA
PUREPOWEREQUIPMENT

2www.purepowerequipment.com
TABLE OF CONTENTS
INTRODUCTION 3
SAFETY OVERVIEW 4
SPECIFICATIONS 6
UNPACKING 7
LOADING FASTENERS 7
OPERATION 8
ADJUSTING THE EXHAUST 8
SAFETY NOSE 8
NON-MARRING PAD 8
DEPTH ADJUSTMENT 8
SETTING THE AIR PRESSURE 9
RECOMMENDED AIR HOOK UP 9
FASTENERS 10
MAINTENANCE 11
ANTI-DUST CAP 11
LUBRICATION 11
CLEANING 11
COLD WEATHER OPERATION 11
TROUBLE SHOOTING 12
CLEARING JAMS 12
TROUBLE SHOOTING CHART 13
WARRANTY 14
NOTES 15

3
www.purepowerequipment.com
INTRODUCTION
Congratulations on your purchase of a Pure Power Equipment air tool
You can be confident that this machine is constructed and tested with optimum
performance and quality in mind.
Reading this manual will help get you the best results for set-up, operation,
maintenance and avoid personal injury or damage to your machine. By knowing
how best to operate this machine, you will be better positioned to show others
who may also operate the unit.
All the information in this manual is based on the latest product information
available at the time of printing. Pure Power Equipment reserves the right to
make changes at any time without notice or incurring any obligation.
Owner/Operator Responsibility
The owner/operator must have a thorough understanding of the operation,
maintenance and dangers associated with using this machine. It must be
understood that it is ultimately up to the owner/operator to safely use this
machine as outlined in this manual.
This manual is considered a part of the machine and needs to be kept in a safe
location. If the machine is resold or given to someone else, this manual needs to
be included.
It is recommended that you record the product identification numbers in this
manual. These numbers are important to have on hand if you need to contact
technical support (1-866-850-6662). The model and serial number can be found
on the box and on a decal on the machine.
PRODUCT IDENTIFICATION
Model Number:
Serial Number:
Date of Purchase:
Dealer Name:

4www.purepowerequipment.com
SAFETY OVERVIEW
The safety alert symbol ( ) is used with a signal word (DANGER, CAUTION,
WARNING), a pictorial and a safety message to alert you to hazards.
DANGER indicates a hazard that, if not avoided, will result in death or serious
injury.
WARNING indicates a hazard that, if not avoided, could result in death or serious
injury.
CAUTION indicates a hazard that, if not avoided, might result in minor or
moderate injury.
NOTICE indicates a situation that could result in equipment or property damage.
SAVE THESE INSTRUCTIONS - SAFETY RULES
This is the safety alert symbol. It is used to alert you to
potential personal injury hazards. Obey all safety messages
that follow this symbol to avoid possible injury or death.
IMPORTANT SAFETY INSTRUCTIONS - SAVE THESE INSTRUCTIONS
WARNING – When using this product, the following precautions should always
be observed and adhered to.
1. Read all instructions before using the product.
2. Know how to stop the product quickly. Be thoroughly familiar with the controls.
of this engine as well as the machinery that it may be attached to.
3. Stay alert. Watch what you are doing.
4. Do not operate the product when fatigued or under the inuence of alcohol or
drugs.
5. Keep operating area clear of other people and animals. Especially children.
6. Do not overreach or stand on unstable support. Instead, keep solid
footing and balance at all times.
7. Follow the maintenance instructions specied in the manual.
8. Never modify or remove any components of the air compressor. This may
expose moving parts or electrical components that can cause injury.

5
www.purepowerequipment.com
SAFETY OVERVIEW
WARNING - WORK AREA
• Keep the work area clean and well lit. Cluttered benches and dark areas
increase the risks of accidents
• Do not operate the tool in explosive atmospheres, such as in the presence
of ammable liquids, gases, or dust. The tool creates a spark which may ignite
ammable liquids, gases or dust.
• Avoid unintentional misres. Always use caution to avoid accidentally ring.
Do not point at yourself or anyone else regardless if it contains fasteners or
not.
WARNING – PERSONAL SAFETY
• NEVER re a nail into another nail. Doing so can cause deection or broken
parts to become projectiles causing injury or damage.
• NEVER have your nger on the trigger unless you are about to re the nailer.
Having your nger on the trigger at any other time can result in a misre that
may cause injury or damage.
• NEVER point the nailer at yourself or anyone else regardless if you believe if it
is loaded with nails or staples or not.
• ALWAYS wear safety goggles for eye protection. Other protective equipment
such as hearing protection, steel toe boots, safety apparel, work gloves and
face shield are all recommended. Do not wear loose clothing or jewelry and
contain longer hair to avoid getting them caught in moving parts.
WARNING – TOOL USE AND CARE
• ALWAYS make sure the hose can move freely. Hose entanglements or
obstructions may cause a sudden restriction of movement that can lead to a
dangerous misre.
• DO NOT wrap the hose around any parts of your body. This is an unsafe
practice.
• DO NOT carry or move the tool by dragging or pulling on the air hose that it is
attached to.
• ALWAYS assume the tool is loaded with nails or staples and may be able to
re at any time.
• NEVER attempt to repair or make modications to the tool. Do not tamper
with the safety features. This is a pressurized tool and may cause explosive
decompression of air if damaged.
• Wash your hands after handling. This product, the nails or staples, or the air
line may contain chemicals known to the State of California to cause cancer
and birth defences or other reproductive harm.
• NEVER spray ammable materials in the vicinity of the air compressor
because it may be an ignition source.
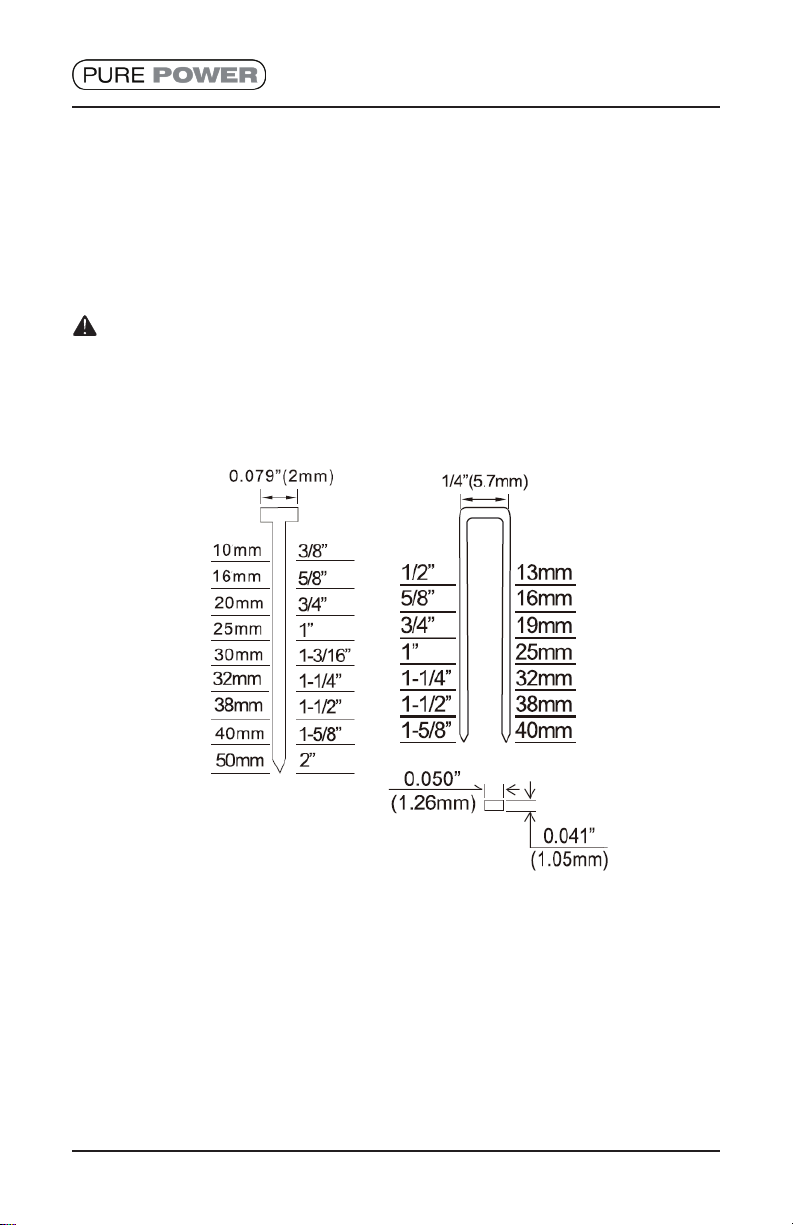
• ALWAYS use fasteners that a designed and intended for this tool. Never use
other types of fasteners and make the t.
• ALWAYS store the tool out of reach of children and other untrained people.
• ALWAYS check the tool before operation. Ensure the contact mechanism is
working properly. Do not use the tool if there is damage.
• DO NOT use the nailer if the trigger is not working properly.
• ALWAYS secure the work piece that is being nailed and ensure the proper
length of fastener is being used. If the fastener is too long, it can shoot out the
other side of the work piece causing injury.
• NEVER use this tool as a hammer or blunt instrument.
• NEVER use gasoline or other ammable liquids to clean the tool. This tool can
cause sparks when ring, which may ignite.
• NEVER use a check valve or similar device to trap air in the tool. Make sure
that when the tool is disconnected from the air source that it cannot re.

6www.purepowerequipment.com
CAUTION – OPERATION
• Avoid dropping the tool. Impacts can case damage.
• Avoid using the tool when the magazine is empty. This will accelerate the wear
of moving parts.
• NEVER re the nailer into a hard service such as metal. This can cause the
driving pin to break and no longer function.
• DO NOT use the tool when an air leak is present. This can lead to malfunctions
and possible damage.
• ALWAYS use air tool oil to lubricate this tool. Failure to do so will cause the
tool to wear out faster and eventually seize.
• DO NOT drive fasteners near the edge of a workpiece. The work piece may
split causing the fastener or fragments to become projectiles causing injury or
damage.
• Avoid using the tool at steep angles. This may result in the fastener deecting
o the surface and becoming projectiles causing injury or damage.
WARNING- AIR SUPPLY AND CONNECTIONS
• ALWAYS use a pressure regulated air source to supply this tool. Unregulated
air may cause damage and if it exceeds 200 PSI, the tool may explode causing
serious injury or death.
• NEVER exceed the maximum recommended pressure rating of 110 PSI when
operating this tool to maintain safe operation.
• NEVER use any type of reactive gases such as oxygen. Explosion or re may
occur causing serious injury or death.
• ALWAYS use matching ttings when connecting to an air hose. The tool comes
standard with a 1/4” Industrial (M) type plug.
• ALWAYS be careful when connecting to the air supply because the tool may
re unexpectedly. Always point the tool in a safe direction.
• ALWAYS disconnect the air source under the following circumstances.
• Before loading or unloading.
• Before making any adjustments.
• When maintaining the tool.
• When touching he safety mechanism.
• When clearing a jam
• When transporting the tool to a dierent work area.
• When not in use.
SAFETY OVERVIEW
SPECIFICATIONS
ITEM RATING
Air Inlet 1/4" FNPT
Pressure Range 60 PSI to 110 PSI
Maximum Pressure 110 PSI
Fastener type 18 gauge Brad Nails or 1/4" Crown Staples
Maximum Fastener length 2" Nails / 1-5/8" Staples
Magazine Capacity 100 Fasteners
Air Exhaust 360° Adjustable Direction
Reload Indicator Side of Magazine
Air Consumption 5.87 CFM per 100 Nails @ 90 PSI
Weight 2.9 lbs

7
www.purepowerequipment.com
UNPACKING
• This tool arrives completely assembled in the box.
• Carefully remove the tool and any accessories from the box.
• Inspect the tool carefully to ensure there is no damage or missing parts.
• Read the manual and operate the tool to ensure functionality.
• Keep the box and all packing material until you have inspected and operated
the tool and are satised.
LOADING FASTENERS
1. Only load while the air tool is NOT connected to an air source.
2. Push down the latch button at the bottom of the magazine.
2. Pull down on the magazine cover to slide it open.
3. Make sure the fasteners are clean and undamaged to help prevent jambs.
4. For brad nails: Insert a stick of 18 ga. brad nails into the front magazine rail.
Make sure the pointed ends are resting on the bottom ledge of the magazine
when loading.
5. For staples: Set the stick 1/4" 18 ga. narrow crown staples on top of the
magazine so that there is a leg of the staple on either side of the rail.
6. Slide the magazine cover up until the latch button engages to secure the
magazine.
Latch Button
Magazine Cover
Push to top
Magazine Rail
Nails tips contact front rail
Staples

8www.purepowerequipment.com
OPERATION
ADJUSTING THE EXHAUST
Every time the air tool is fired it will exhaust air out of the back. This tool has an
adjustable exhaust to direct the air flow according to the operators preference.
To adjust, turn the back cap by hand so the exhaust is pointing in the desired
direction. No tools are needed.
SAFETY NOSE
The front of the nailer has a safety built into the nose. The nailer will not fire until
BOTH the safety nose is depressed and the trigger is pulled. The safety nose
must be able to freely move up and down to work properly. Do not use the tool if
the safety nose has been compromised.
NON-MARRING PAD
The non-marring pad is attached to the nose to help prevent marring and denting
of the working surface.
DEPTH ADJUSTMENT
This tool has the ability to adjust the depth the fasteners are set into the
workpiece. To adjust, use the drive depth adjustment wheel on the side of the
tool.
1. Disconnect the tool from air source.
2. Turn the depth wheel counter clockwise the decrease the depth.
3. Turn the depth wheel clockwise to increase the depth.
4. Reconnect the tool to the air source.
5. Drive a test nail after each adjustment until the desired depth is set.
Depth Adjustment Wheel
Too Deep Flush
Too Shallow
Flush
OPERATION

9
www.purepowerequipment.com
SETTING THE AIR PRESSURE
This tool is designed to operate between 60 and 100 PSI. Air pressure can be
adjusted with the regulator on the air compressor.
The air pressure will affect the depth the fastener will be set in the work piece.
Adjusting the air pressure may be sufficient to achieve the desired depth of
fasteners.
It is recommend to test fire the tool into scrap wood to determine proper set
depth.
RECOMMENDED AIR HOOK UP
The air compressor must be able to maintain a minimum of 60 PSI when the tool
is in use. A lower PSI will cause a loss of power and inconsistent operation.
The air pressure should never be more than 110 PSI. Any higher can lead to
excessive tool wear and potential failure. Never use an air compressor that can
produce more than 200 PSI because the tool may burst if the pressure becomes
too high.
This tool works best with dry, clean air which can be achieved by adding a filter
system onto an air compressor. For the filter to function properly it needs to be
50 feet away from the air compressor. Adding an air tool oiler will keep the nailer
consistently lubricated.
The below diagram shows an set up example:
OPERATION
Nailer Air Compressor
Air Hose
Quick Coupler
Quick Coupler Regulator
Quick Plug
FilterOiler
FIRING THE TOOL
This tool is designed for single sequential mode only. This mode requires the
safety nose first be depressed against the work surface and then trigger to be
depressed to fire a fastener.
Once fired, both the trigger and safety nose need to be released so the tool can
be reset to fire again.

10 www.purepowerequipment.com
FASTENERS
FASTENER TYPE
This tool can use two types of fasteners that are typically called:
• 18 Gauge Brad Nails are narrow nails with small heads to minimize the
chances to split wood. These nails are great for decorative molding, wood
trimming, panelling or any other type intricate nish work.
• 1/4" Narrow Crown Staples derive their name from the size of the crown, (the
connecting horizontal part holding the legs together). The twin legs and crown
of the staple have greater holding strength compared to the brad nail. These
fasteners tend to be better for larger building cabinets, bookcases, drawers or
other similar projects.
Caution - Do not use any other type of fastener with this tool. If you do use a
different type of fastener, it will likely lead to tool failure, if they can be used at all.
18 GAUGE
BRAD NAILS
1/4" NARROW
CROWN STAPLES

11
www.purepowerequipment.com
MAINTENANCE
ANTI-DUST CAP
This air tool comes with a rubber anti-dust cap installed on its air plug. Keep the
air plug covered by the anti-dust cap when the tool is not in use.
LUBRICATION
The moving parts in the air nailer require a light application of oil to maintain best
performance and lifespan. The oil added into the air plug will help prevent rust.
To manually add oil, follow the below steps.
1. Disconnect the tool from the air source.
2. Turn the tool upside down so the air inlet plug is pointing up. Place 2 - 3
of pneumatic air tool oil into the air inlet plug. Only use oil that is specifically
designated for pneumatic air tools. Do not use any other type of oil because it
may accelerate the wear of moving parts and the seals.
3. After oiling, reconnect the air source and fire the air tool several times to cycle
the oil through it. Wipe off any excessive oil.
Caution - excessive oil can contaminate a work surface. Always test fire the
tool on a scrap work piece before using on a work surface.
Caution - lack of lubrication will greatly reduce the lifespan of the tool. It is the
owners responsibility to properly maintain the tool.
CLEANING
Do not use solvents when cleaning any of the plastic or rubber parts. If solvents
are used they will cause plastic and rubber parts to degrade faster. Use of normal
soaps, clean water, and clean cloths is recommended to wipe away dirt. Do not
submerge or rinse under water.
COLD WEATHER OPERATION
When the temperature reaches, or drops below, freezing temperature the
moisture in the air line may freeze and prevent tool operation. It is recommended
to keep the air tool lubricated to help prevent the tool from seizing.
Caution - do not store the tool in freezing temperatures. Ice formation within
the tool may cause permanent damage and tool failure.

12 www.purepowerequipment.com
TROUBLE SHOOTING
CLEARING JAMS
A fastener may become jammed in the firing mechanism of the tool. The jam
must be cleared before the tool an be used again.
1 Disconnect the tool from the air source.
2. Remove the fasteners from the tool.
3. Remove all the three bolts on the top of the nose plate.
4. Remove the top nose cap.
5. Move the safety nose assembly to the side.
6. Remove the second nose plate to expose the drive pin and fasteners.
7. Carefully remove the jammed fastener. DO NOT bend the driver pin.
8. Reassemble the tool in reverse order that it was taken apart.
9. Reload fasteners and reconnect air source.
10. Test fire to ensure proper function.
Nose plate
Nose plate bolts

13
www.purepowerequipment.com
PROBLEM CAUSE SOLUTION
Air leaking at trigger
valve.
O-rings in trigger valve
housing are damaged.
Replace o-rings. Check operation of
safety nose.
Air leaking between
housing and nose.
Loose screws in housing Tighten screws.
Damaged o-rings Replace o-rings
Damage to bumper Replace bumper
Air leaking between
housing and cap.
Loose screws Tighten screws
Damaged gasket Replace gasket
Tool skips driving
fastener.
Worn bumper Replace bumper
Dirt in nose piece Clean drive channel
Dirt or damage prevent
fasteners from moving freely
in magazine
Clean magazine
Damager pusher spring Replace spring
Inadequate air flow to tool Check fitting, hose or compressor
Worn o-ring on piston or lack
of lubrication Replace and lubricate o-rings
Air leaks Tighten screws and fittings
Cap seal leaking Replace Gasket
Tool runs slow or
has loss of power
Tool not lubricated Lubricate nailer
Broken spring in cylinder cap Replace spring
Exhaust port in cap is
blocked Replace damaged internal parts
Fasteners are
jammed in tool
Guide on driver is worn Replace guide
Fasteners are not correct
size Use only recommended fasteners
Fasteners are bent Replace with undamaged fasteners
Magazine or nose screws
are loose Tighten screws
Driver is damaged Replace driver
TROUBLE SHOOTING

14 www.purepowerequipment.com
NOTES
Pure Power Equipment warrants the original retail purchaser that this air nailer
is free from defects in material and workmanship for the periods set forth below.
If defects are found in Pure Power Equipment products within the limitations
outlined in this warranty statement, Pure Power Equipment, at its sole discretion,
will repair or replace the product free of charge.
The warranty coverage begins on the date of purchase by the end-user. Valid
proof of purchase must be presented with the warranty claim.
• Pure Power Air Nailers 1 Year
This warranty is limited to defects that occurred during regular operational use.
This warranty does not cover failures due to lack of service, negligence, abuse
or misuse. Including, but not limited to, freezing damage, alterations, chemical
deterioration, scale build-up, rust, corrosion, thermal shock, thermal expansion,
transportation damage, oil changes, valve adjustments, lack of maintenance,
or using incorrect repair parts. Furthermore, using the wrong power supply is
considered a form of misuse.
This warranty also does not cover normal wearing items such as o-rings, valves,
seals, lters, spark plugs or packings. These are considered to be maintenance
items.
Pure Power Equipment expressly disclaims liability for injuries to persons or
property or for incidental damages, rental loss, time loss, transportation costs,
or consequential damages. It is the buyer’s responsibility to ensure the correct
installation and application of the product purchased.
THE WARRANTY CONTAINED HEREIN IS IN LIEU OF ALL OTHER
WARRANTIES, EXPRESS OR IMPLIED, INCLUDING ANY IMPLIED
WARRANTY OR FITNESS FOR A PARTICULAR PURPOSE. Pure Power
Equipment does not authorize any of its dealers, service centers, agents,
employees or any other party to expand, extend or modify the scope of this
warranty in any manner on behalf of Pure Power Equipment.
To obtain warranty, the claimant must take the product, with their original proof of
purchase, to an authorized service center.
Pure Power service centers are associated with BE Power Equipment service
centers that can be found on the website:
https://www.bepowerequipment.com/service-centers
If you cannot resolve the warranty claim satisfactorily, contact the Pure Power
Equipment Warranty Department (1-866-850-6662). Be prepared with details of
the defect, proof of purchase, model, and the pressure washer’s serial number.
WARRANTY

15
www.purepowerequipment.com
NOTES

DO NOT RETURN THIS PRODUCT TO THE RETAILER
CONTACT OUR CUSTOMER SERVICE if you need assistance
with the assembly, operation, or if you experience a problem with your
pressure washer, please call 1-866-850-6662
Monday - Friday. 8AM to 430PM PST.
NE RENVOYEZ PAS CE PRODUIT AU DÉTAILLANT, CONTACTEZ
NOTRE SERVICE À LA CLIENTÈLE si vous avez besoin d’aide pour
l’assemblage, le fonctionnement ou si vous rencontrez un problème avec
votre nettoyeur haute pression, veuillez appeler le 1-866-850-6662
Lundi à Vendredi. De 8h à 430h PST.
NO DEVUELVA ESTE PRODUCTO AL MINORISTA
COMUNÍQUESE CON NUESTRO SERVICIO DE ATENCIÓN AL
CLIENTE si necesita ayuda con el ensamblaje, el funcionamiento o si
tiene algún problema con su hidrolimpiadora, llame al 1-866-850-6662
Lunes a Viernes, de 8AM a 430PM PST.
PUREPOWEREQUIPMENT
Table of contents