PVC Presidio Sentinel Guardrail Step Series User manual

February 2010
PRESIDIO®
PRESIDIO®
Sentinel
®Step
Guardrail Series
Sentinel
®Step
Guardrail Series
Top Rail Aluminum
Insert
1-1/2" Square 1-1/2" Colonial
Bottom Rail
*Accessories items may be purchased separately.
2" x 3-1/2"
Bottom Stair
Bracket
Guardrail Step Kit Instructions
TOOLS REQUIRED: Tape Measure - Screw Gun - Screw/Drill Bit
Chop Saw/Hack Saw - Square - Level
GUARDRAIL STEP KIT CONTENTS
2" x 3-1/2"
Top Stair
Bracket
Bottom Rail
2" x 3-1/2"
Webbed
Top Rail
Alzar
2" x 3-1/2"
Bottom Stair
Bracket
* 4" Post Cap
*4" x 4"
PVC Post
* 4" Post Skirt
Balusters
11
7
878
"
4538
"
3838
"
178
"
138
"
138
"
11
7
878
"
3938
"
3238
"
178
"
138
"
138
"
2" x 3-1/2"
Top Stair
Bracket
Alzar
Bottom Stair
Bracket
Alzar
Top Stair
Bracket
Alzar
Bottom Stair
Bracket
Alzar
Top Stair
Bracket
Components 4' Kit 6' Kit 8' Kit
Top Rail - Alzar with pre-routed holes (1) (1) (1)
Bottom Rail - 2" x 3-1/2" Webbed with pre-routed
holes (1) (1) (1)
Aluminum Insert - for top rail (1) (1) (1)
2" x 3-1/2" Top & Bottom Guardrail Brackets
- with nylon post brackets, covers and fasteners
(2) (2) (2)
Balusters - 1-1/2" Square or 1-1/2" Colonial
(one style per selected kit) (7) (11) (15)
Alzar Top & Bottom Guardrail Brackets
- with nylon post brackets, covers and fasteners
(2) (2) (2)

PRESIDIO®
PRESIDIO
®
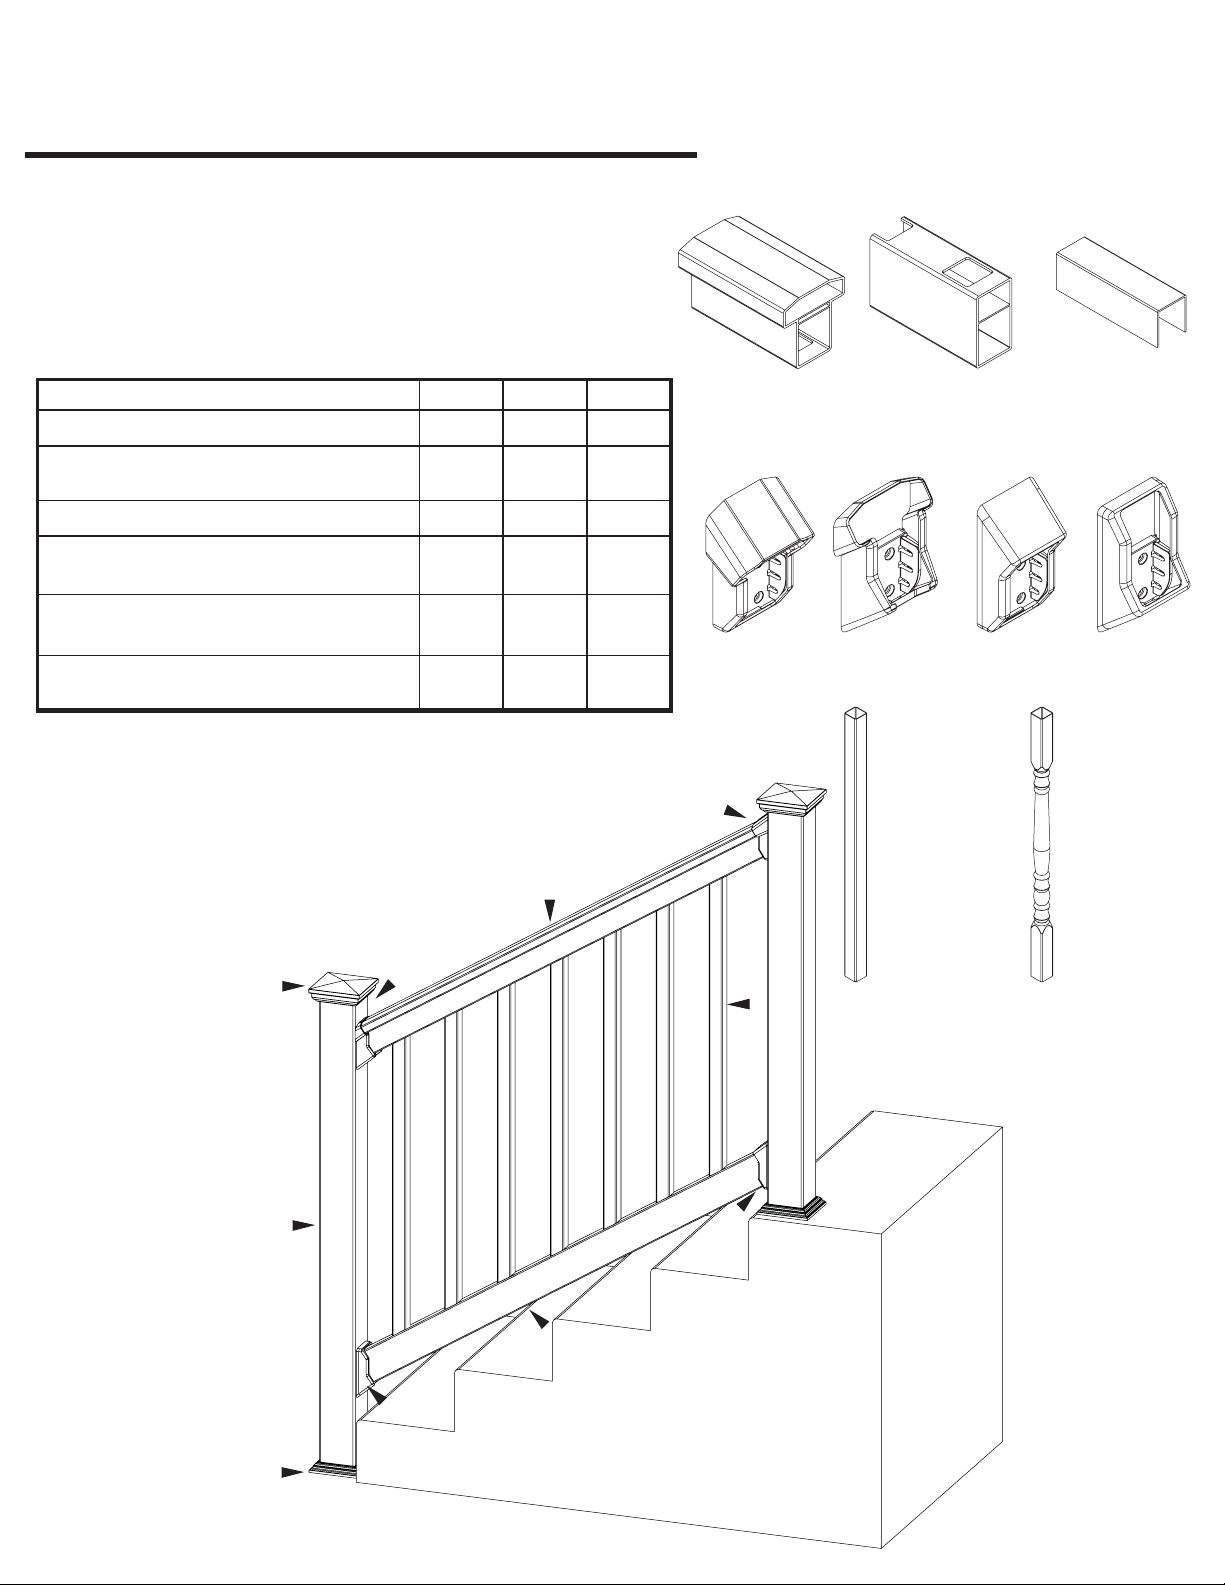
Step Kits are designed for a standard 7/11 rise/run or a 32-1/2° angle. The following instructions and illustrations are
designed with the upper post support fastened 1-3/8" from the edge of the porch or deck surface and the lower post support fastened
1-3/8" from the foot of the steps. (See illustration in Step 1)
Step 1 - Prepare and install posts and decking. Prepare the posts and mounting surfaces to which the railing section will be attached.
A typical installation uses a 4" x 4" vinyl post sleeved over either a 4" x 4" treated wood post, or an LMT Blu-Mount with aluminum or
PVC guides. When using PRESIDIO
®
PVC Decking, the upper most 4" x 4" post (installed at the deck or landing surface) should
extend 38-1/2" above the wood joist framed structure for 36" high railing systems, and 44-1/2" above the wood joist framed structure
for 42" high railing systems. The remaining 4" x 4" staircase posts should be cut 7" longer to accommodate for the 7" stair riser. (See
illustration below). Cut and fasten the posts to the wood framing or if you are installing your PRESIDIO
®
guardrail system on a
concrete surface, install LMT Blu-Mounts to the concrete pad / staircase following the supplied Blu-Mount installation instructions .
Install decking boards over or around post supports. (Please refer to the decking installation instruction manual for the correct
installation procedures of the deck boards.) Sleeve the post supports with a 4" vinyl post. The installed post sleeves must be plumb for
correct installation of the rail section. If vinyl post skirts are being used at the base of the posts, slide the post skirts into position so that
they come to rest around the base of the 4" x 4" sleeved post.
Step 3 - Measure and cut the bottom rail. The bottom rail is identified by having two hollow cavities inside the rail. Measure the
distance between the base plates of opposing nylon post brackets keeping the tape measure 1" above the end of the step treads while
maintaining a 32-1/2° angle. If cutting of the bottom rail is necessary, cut an equal amount off both ends of the rail so to maintain
uniform baluster spacing between the posts. Loosely position the 2" x 3-1/2" bracket covers on opposing ends of the bottom rail.
Step 2 - Secure post mounting brackets.Attach the nylon post brackets to the sleeved posts by using the (4) #10 x 1-1/2" pan-head
screws for the 4" x 4" treated wood post, or the (4) #10 x 1" pan-head screws for the LMT Blu-Mount with aluminum or PVC guides.
Measure and secure the bottom nylon post brackets in accordance with the illustration provided in Step 1. Similarly secure the top
nylon post brackets to the sleeved 4" x 4" posts as illustrated.
Sentinel
®Guardrail Step Series Assembly Instructions
Sentinel
®Guardrail Step Series Assembly Instructions
PRESIDIO
®
Step Kits are designed for a standard 7/11 rise/run or a 32-1/2° angle.
For 42"
Guardrails
11
7
878
"
4538
"
3838
"
178
"
138
"
138
"
For 36"
Guardrails
11
7
878
"
3938
"
3238
"
178
"
138
"
138
"

PRESIDIO®
Step 6 - Measure and cut the top rail. If cutting of the top rail is necessary cut an equal amount off both ends of the rail to maintain a
uniform baluster spacing between the posts. The rail kits are provided with an aluminum insert that must be used. Cut the aluminum
insert to the appropriate length of the measured top rail. Insert the aluminum into the top rail and loosely position the alzar bracket
covers on opposing ends of the top rail.
Step 5 - Insert the balusters. Having secured the bottom rail into place, insert the balusters into the bottom rail. If the 1-1/2" colonial
balusters are being used make sure the balusters are inserted so the baluster tapers are uniformly installed.
1-1/2" Square 1-1/2" Colonial
Step 4 - Secure the bottom rail.Attach the bottom rail to the nylon post brackets by using the (4) #10 x 1" pan-head screws. The
bottom rail will be 1" off the step tread nosing with the rail inserted correctly into the nylon post brackets. Fasten two screws into each
side of the nylon post bracket using the top and bottom slots of the nylon post brackets. Once secured, snap the 2" x 3-1/2" step
bracket covers positioned in Step 3 onto the nylon post brackets.
11
7
878
"
4538
"
3838
"
178
"
138
"
138
"
11
7
878
"
3938
"
3238
"
178
"
138
"
138
"

PRESIDIO®
Step 7 - Secure the top rail. Position the top rail over the exposed ends of the balusters so that it is positioned on the resting flange of
the installed nylon post brackets. Attach the top rail to the nylon post brackets by using the (4) #10 x 1" pan-head screws. Fasten two
screws into each side of the nylon post bracket using the top and bottom slots of the nylon post brackets. Snap the alzar bracket covers
positioned in Step 6 onto the nylon post brackets.
Step 8 - Finish the section. Secure the 4" x 4" post caps onto the post tops by applying PVC adhesive to the internal surfaces of the
post caps. Set the caps onto the post tops. Wipe off any excess adhesive.
11
7
878
"
4538
"
3838
"
178
"
138
"
138
"
11
7
878
"
3938
"
3238
"
178
"
138
"
138
"
Poly Vinyl Creations - Your Distributor of Choice for
Vinyl, Steel, and Aluminum Products
www.polyvinylc.com
Corporate: 800-780-3362
Branch (GA, AL, TN, LA): 877-68-FENCE
Branch (NC, SC, VA): 888-PVC-FENCE
Table of contents
Popular Indoor Furnishing manuals by other brands

Coaster
Coaster Twyla 115101 Assembly instructions

Axor
Axor Starck X Specification sheet

Core Products
Core Products MANHATTAN MN915 Instruction leaflet

Jasper
Jasper JSI Reef installation instructions

GLITZHOME
GLITZHOME OFFICE CHAIR Assembly instruction

VARIDESK.com
VARIDESK.com ProDesk Electric Series manual