Qiyang IAC-IMX6-Kit User manual

IAC-IMX6-Kit Linux Function And
Test Manual
Version: V 1.0
2017.04
QIYANG INTELLIGENT TECHNOLOGY Co., Ltd
Copyright Reserved

IAC-IMX6-Kit Linux Function and Test Manual
Website:http://www.qiytech.com
©2014 Qiyangtech Copyright
Catalogue
Version Illustration: ..........................................................................................................................3
Ⅰ. Preparation..................................................................................................................................5
Ⅱ. Mainboard Test............................................................................................................................6
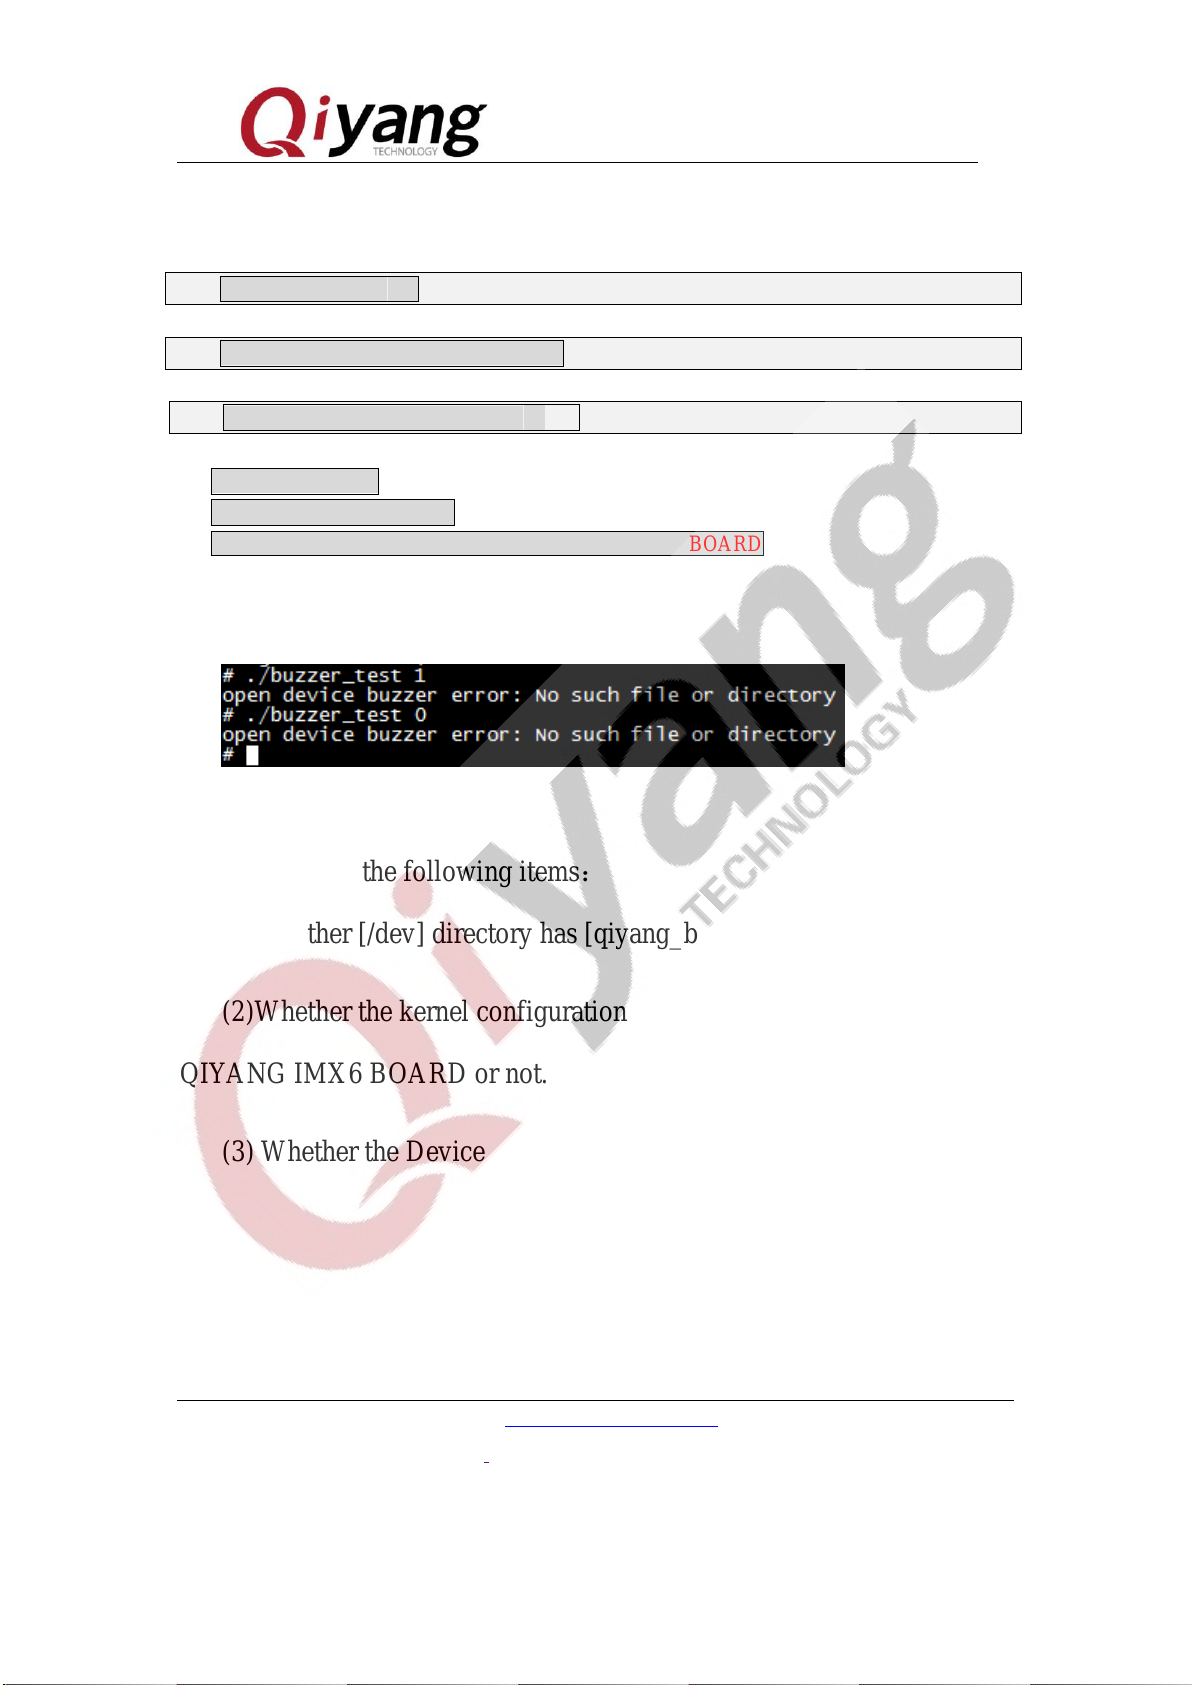
2.1. Buzzer Test ........................................................................................................................6
2.2. RTC Test............................................................................................................................7
2.3 Watchdog Test ..................................................................................................................13
2.4 GPIO Test .........................................................................................................................14
2.5. Serial Port Test.................................................................................................................18
2.6. SPI Test............................................................................................................................26
2.7. CAN Test ........................................................................................................................28
2.8. Audio & Video Test.........................................................................................................32
2.9 LAN Test...........................................................................................................................36
2.10. USB Test........................................................................................................................39
2.11. SD Card Test..................................................................................................................42
2.12 SATATest........................................................................................................................45
2.13 HDMI Test ......................................................................................................................47
2.14 LVDS Test.......................................................................................................................48
2.15、QT Test.........................................................................................................................50
2.16. Touch Panel Test ............................................................................................................52
2.17、CAMERATest .............................................................................................................55
2.18、3G/4G Test ...................................................................................................................58
2.19、Wifi Test.......................................................................................................................60
2.20、RS485 Test...................................................................................................................63
Ⅲ. Test Summary............................................................................................................................65

IAC-IMX6-Kit Linux Function and Test Manual
Website:http://www.qiytech.com
©2014 Qiyangtech Copyright
Ⅰ. Preparation
Before testing, please read QY-IMX6-KIT Linux User Manual. pdf,
and connect to the mainboard according to that manual.
Power on mainboard, after system starts, then input [root] user to
enter into file system of the board, as the following picture shown:
Mainboard test program is in [/usr/test] directory, please switch to this
directory, the following testing operations will be done in this directory.
#cd /usr/test/
# ls

IAC-IMX6-Kit Linux Function and Test Manual
Website:http://www.qiytech.com
©2014 Qiyangtech Copyright
Ⅱ. Mainboard Test
2.1. Buzzer Test
IAC-IMX6-Kit mainboard use [GPIO 6_31] to control the buzzer on
the board. When set to low level, buzzer does not work; when set to high
level, buzzer works.
Test Principle:
This test is to realize the buzzer to work.
Test Process & Result:
Run buzzer test program [buzzer_test]
Illustration: [Buzzer_test 0] buzzer does not work, close buzzer
[Buzzer_test 1] buzzer works.
1. Open buzzer, hear the buzzer is buzzing continuously on board.
Press [Ctrl+C] to exit the program.
./buzzer_test /dev/qiyang_buzzer 1
2. Close buzzer, press [Ctrl+C] to exit the program.
./buzzer_test /dev/qiyang_buzzer 0

IAC-IMX6-Kit Linux Function and Test Manual
Website:http://www.qiytech.com
©2014 Qiyangtech Copyright
Device Node:
/dev/qiyang_buzzer
Test Code:
CD/Test Code/ buzzer_test/buzzer_test.c
Driver Code:
linux-3.0.101/drivers/misc/buzzer.c
The Kernel Options:
Device Drivers --->
Misc devices --->
<*> BUZZER FOR QIYANG IMX6 BOARD
FAQ:
Debug UART prints information:
Please check the following items:
(1)Whether [/dev] directory has [qiyang_buzzer] device node or not.
(2)Whether the kernel configuration select <*> BUZZER FOR
QIYANG IMX6 BOARD or not.
(3) Whether the Device tree file enable [qiyang_buzzer]node or not.
2.2. RTC Test
IAC-IMX6-KIT mainboard adopts I2C2 connect to DS3231 Chip on

IAC-IMX6-Kit Linux Function and Test Manual
Website:http://www.qiytech.com
©2014 Qiyangtech Copyright
the back plane as the external hardware clock. Please confirm you have
already installed the battery on back plane before testing RTC.
Test Principle:
Set system time through [date] system command, and then write
system time into hardware clock through [hwclock]command. Through
[rtc_test ]test program to read hardware clock and print it. After powering
off, then restart it to check whether the time is accurate.
Test Process & Result:
1.Execute [date] command on the board and check the current system
clock.
#date
2.Set system clock through [date] command, for example, to set
according to the current PC time.
#date 022710412014 /* month day hour minute year */
3.Use [hwclcok] command to write system time into hardware clock
chip.

IAC-IMX6-Kit Linux Function and Test Manual
Any question, please send E-mail :supports@qiyangtech.com Page 10 of 66
Website:http://www.qiytech.com
©2014 Qiyangtech Copyright
The current program will print 10 pcs of hardware time, then exit. If
you want to exit early, please press [Ctrl+C] to check whether the RTC
clock works accurately, no losing seconds.
6.Power off, then power on to check system and hardware clock again.
To check whether the time is saved or not, whether the time is accurate.
7.After comparing with PC time, there is no error. If you need to test
long time work’s accuracy, you can power off and power on separately
for aging test for several days or weeks or months to test the time error.

IAC-IMX6-Kit Linux Function and Test Manual
Any question, please send E-mail :supports@qiyangtech.com Page 11 of 66
Website:http://www.qiytech.com
©2014 Qiyangtech Copyright
Before publishing, our board will be tested for aging test for 1 month,
and the time error does not exceed 2S.
For our delivery goods, we will make it for aging test for more than
24 hours, and time error does not exceed 1S. .
Device Node:
/dev/rtc
/dev/rtc0
Test Code:
CD/Source Code /Test Code/ rtc_test/rtc_test.c
Driver Code:
ds1338 Driver:linux-3.0.101/drivers/rtc/rtc-ds1307.c
i2c Driver:linux-3.0.101/drivers/i2c/busses/i2c-imx.c
The Kernel Options:
I2c2:
I2c2:
Device Drivers --->
I2C support --->
[*] Enable compatibility bits for old user-space
< *> I2C device interface
< > I2C bus multiplexing support
[*] Autoselect pertinent helper modules
I2C Hardware Bus support --->
[ ] I2C Core debugging messages
[ ] I2C Algorithm debugging messages
[ ] I2C Bus debugging messages

IAC-IMX6-Kit Linux Function and Test Manual
Any question, please send E-mail :supports@qiyangtech.com Page 12 of 66
Website:http://www.qiytech.com
©2014 Qiyangtech Copyright
rtc:
Device Drivers --->
[*] Real Time Clock --->
[*] Set system time from RTC on startup and resume
(rtc0) RTC used to set the system time
[ ] RTC debug support
*** RTC interfaces ***
[*] /sys/class/rtc/rtcN (sysfs)
[*] /proc/driver/rtc (procfs for rtc0)
[*] /dev/rtcN (character devices)
[ ] RTC UIE emulation on dev interface
<*> Dallas/Maxim DS1307/37/38/39/40, ST M41T00, EPSON RX-8025
FAQ:
Situation: time can not be saved, time travel error is huge, can not
check hardware clock
Debug UART prints the following information:
Please check the following items:
(1) Whether BT1 on the base plane has installed the battery and
whether the battery has the electricity.
(2)Please check whether [/dev/rtc0]and [/dev/rtc1]node are in
[/dev]directory.

IAC-IMX6-Kit Linux Function and Test Manual
Any question, please send E-mail :supports@qiyangtech.com Page 13 of 66
Website:http://www.qiytech.com
©2014 Qiyangtech Copyright
(3)Whether the kernel configuration option has been configured.
2.3 Watchdog Test
Test Principle:
Hardware Watchdog, GPIO5_20 enable Watchdog, GPIO5_18
executing ‘Feeding Dog’ operations.
Test Process &Result:
1.Boot Watchdog, and execute ‘feeding dog’operations. You can see the
system will not reboot. Press [Ctrl+C] to exit the program.
./watchdog_feed_test /dev/qy_watchdog
2.Boot Watchdog, but do not execute ‘feeding dog’operations, system
reboot after 1.6 seconds later.
./watchdog_notfeed_test /dev/qy_watchdog
Device Node:
/dev/qy_watchdog
Test Code:
CD/Source Code /Test Code/watchdog_test/watchdog_feed_test.c
CD/Source Code /Test Code/watchdog_test/watchdog_notfeed_test.c
Driver Code:
linux-3.0.101/drivers/misc/watchdog.c
The Kernel Options:
Device Drivers --->
[*] Misc devices --->
[*] WATCH_DOG FOR QIYANG BOARD

IAC-IMX6-Kit Linux Function and Test Manual
Any question, please send E-mail :supports@qiyangtech.com Page 14 of 66
Website:http://www.qiytech.com
©2014 Qiyangtech Copyright
FAQ:
1. The system did not reboot, after executing
[./watchdog_notfeed_test]. Please check the watchdog’s chipset if
it is damaged.
2.4 GPIO Test
This test aim at the following 16 channel GPIO Definition:
J16[GPIO1_4、GPIO1_7、GPIO1_8、GPIO1_9、GPIO7_11、
GPIO7_12、GPIO7_13、GPIO4_5]
J31[GPIO4_24、GPIO4_26、GPIO4_28、GPIO4_30、GPIO5_5、
GPIO5_7、GPIO5_9、GPIO5_11]
Test Principle:
[Gpio_test 0] test the situation when gpio do not have external
connection, set all pin to low level, then set them to high level, through
external measure [gpio] actual level to confirm whether gpio is normal or
not.
[Gpio_test 1] will read external level signal directly, user can
compare read level data and connected level data to confirm whether
[gpio] is normal or not.
Test Process & Result:

IAC-IMX6-Kit Linux Function and Test Manual
Any question, please send E-mail :supports@qiyangtech.com Page 15 of 66
Website:http://www.qiytech.com
©2014 Qiyangtech Copyright
1.Run[gpio]test program [gpio_test]
./gpio_test
It shows the following print information:
Illustration: [gpio_test <device> 0] set [gpio] high level and low level
[gpio_test <device> 1] obtain gpio level
2. GPIO on J16, J31 is without external signal, execute:
./gpio_test /dev/qiyang_imx6_gpio 0
As the above picture shown, set each [gpio] to low level, use

IAC-IMX6-Kit Linux Function and Test Manual
Any question, please send E-mail :supports@qiyangtech.com Page 16 of 66
Website:http://www.qiytech.com
©2014 Qiyangtech Copyright
multimeter to measure each [gpio]’s actual level value to confirm whether
the [gpio]is normal or not ,press [Enter], then set all [gpio] to high level
to measure [gpio] actual level value to confirm whether [gpio] is normal
or not.
Press [Enter], it hints [OK]:
3. Connect the pin by external 3.3V (Internal pin is weak pull-up)
./gpio_test /dev/qiyang_imx6_gpio 1

IAC-IMX6-Kit Linux Function and Test Manual
Any question, please send E-mail :supports@qiyangtech.com Page 17 of 66
Website:http://www.qiytech.com
©2014 Qiyangtech Copyright
As above picture shown, obtain each [gpio]’s level status, users can
change the actual connected [gpio] signal to confirm whether [gpio]
signal is normal or not.
Device Node:
/dev/qiyang_imx6_gpio
Test Code:
CD/Test Code/gpio_test/gpio_test.c
Driver Code:
linux-3.0.101/drivers/misc/qy_imx6_gpio.c
The Kernel Options:
Device Drivers --->
Misc devices --->
<*> IMX6 GPIO TEST FOR QIYANG BOARD
FAQ:
Debug UART shows:
QY-IMX6S-v1.x Gpio Start Testing...

IAC-IMX6-Kit Linux Function and Test Manual
Any question, please send E-mail :supports@qiyangtech.com Page 18 of 66
Website:http://www.qiytech.com
©2014 Qiyangtech Copyright
Please check the following items:
(1)Whether there is [/dev/qiyang_imx6_gpio] node in [/dev] directory
(2)Whether the kernel configuration select [ <*> IMX6 GPIO TEST
FOR QIYANG BOARD]option.
2.5. Serial Port Test
There are 3-ch serial ports on IAC-IMX6-KIT mainboard: 1-ch serial
port is used for debug port(J6), other 2-ch serial port are regarded as
common RS232 port or RS485.
This test program only aims at testing of common RS232.
Serial Port and hardware relations:
Serial Port
Hardware Position
Device Node
DBG(Debug
UART)
J7 (Rx, Tx,GND To Pin
1,Pin2,Pin3)
/dev/ttymxc0
COM1
J6(Rx,Tx,GND To Pin1,Pin2,Pin5)
/dev/ttymxc3
COM2
J31(Rx,Tx,GND To
Pin3,Pin4,Pin6)
/dev/ttymxc4
Test Principle:
Test program realized that one serial port send character data
[/dev/ttymxcx" test string!] every one second, [X ]is actual testing port number,

IAC-IMX6-Kit Linux Function and Test Manual
Any question, please send E-mail :supports@qiyangtech.com Page 19 of 66
Website:http://www.qiytech.com
©2014 Qiyangtech Copyright
at the same time, through multithreading way, block read serial ports data
and print.
Test Process & Result:
When testing, you may need to use 2-ch serial port on PC:
(1)1-ch is used for connecting the debugging serial port, it is used for
interaction.
(2)1-ch is to connect to the serial port which is under test, it is used
for the date’s receiving and transmitting.
If there is only 1-ch serial port on PC mainframe, the serial port is
connected to the serial port under test, connect to the mainboard by
network cable, log in mainboard system by [telnet], operate it as the
debug UART.
The mainboard’s default IP address: 192.168.1.71,click [Start] button
on PC, select [Run], input [cmd],click [Confirm].

IAC-IMX6-Kit Linux Function and Test Manual
Any question, please send E-mail :supports@qiyangtech.com Page 20 of 66
Website:http://www.qiytech.com
©2014 Qiyangtech Copyright
picture 1
Input[telent 192.168.1.71] in running window.
Input [root]user to enter into the console, enter into [/usr/test]test
directory.
Other manuals for IAC-IMX6-Kit
1
This manual suits for next models
1
Table of contents
Other Qiyang Motherboard manuals