Qiyang QY-RK3288 User manual

QY-RK3288 Android User Manual
Any question, please send E-mail:supports@qiyangtech.com Page 1 of 17
Sales E-mail:[email protected]m [email protected]m
Website:http://www.qiytech.com
©2014 Qiyangtech Copyright
QY-RK3288 Android User Manual
V1.0
2017/10/16

QY-RK3288 Android User Manual
Any question, please send E-mail:supports@qiyangtech.com Page 2 of 17
Sales E-mail:[email protected]m [email protected]m
Website:http://www.qiytech.com
©2014 Qiyangtech Copyright
Version Record
Date
Version
Description
Revisor
2017-10-16
V1.0
Initial version
Software:Android5.1.1,kernel 3.10.0
Hardware:QY-RK3288 Rev.A

QY-RK3288 Android User Manual
Any question, please send E-mail:supports@qiyangtech.com Page 3 of 17
Sales E-mail:[email protected]m [email protected]m
Website:http://www.qiytech.com
©2014 Qiyangtech Copyright
Introduction
QY-RK3288 is a high performance platform that has powerful
function of muti-threading, graphic processing and hardware decoding,
and it applies to the Android version of 5.1.1. It can be applied to
industrial control, data acquisition, information communication, medical
equipment, video monitoring, on-board entertainment and so on.
QY-RK3288 can support infrared, bluetooth 4.0, dual-band wifi,
4K*2K HDMI output and rich outer extension interfaces, which are
suitable for some high performance occasions such as smart living room,
smart kitchen, background music and smart home control etc.
QY-RK3288 supports 4k HDMI output and hardware decoding of
H.265. And it can build high definition indoor outdoor advertisement
machine and build car intelligent entertainment media center and so on.
Welcome to visit our website of www.qiyangtech.com.

QY-RK3288 Android User Manual
Any question, please send E-mail:supports@qiyangtech.com Page 4 of 17
Sales E-mail:[email protected]m [email protected]m
Website:http://www.qiytech.com
©2014 Qiyangtech Copyright
Catalogue
Version Record ............................................................................................................................. 2
Introduction................................................................................................................................. 3
Catalogue ....................................................................................................................................... 4
Ⅰ. Tutorials ................................................................................................................................. 5
1.1 Start Guidance .............................................................................................................. 5
1.2 Firmware update........................................................................................................... 5
1.3 Serial Port Debugging...............................................................................................11
1.4 Start Mode Description.............................................................................................12
Ⅱ. Android Development......................................................................................................14
2.1 Compile Android firmware ...................................................................................... 14
2.2 Use ADB......................................................................................................................16

QY-RK3288 Android User Manual
Any question, please send E-mail:supports@qiyangtech.com Page 5 of 17
Sales E-mail:[email protected]m [email protected]m
Website:http://www.qiytech.com
©2014 Qiyangtech Copyright
Ⅰ. Tutorials
1.1 Start Guidance
1.1.1 Accessories
QY-RK3288 includes the following accessories:
◆A piece of QY - RK3288S motherboard
◆A USB-OTG connecting line, Debug serial line(three lines), Serial
connection
◆A piece of 12V-2.5A power adapter
◆WIFI antenna
1.1.2 Starting up
Use the dedicated adapter to power the board and wait for more than 10 seconds, the
D6 heartbeat lights on the board will start flashing, which indicates the system has
started normally.
1.2 Firmware update
1.2.1 Freface
This article explains how to program the firmware files on the host to the flash
memory of the development board through the Micro USB OTG line. When
upgrading, you need to select the appropriate upgrade mode according to the host
operating system and firmware type.

QY-RK3288 Android User Manual
Any question, please send E-mail:supports@qiyangtech.com Page 6 of 17
Sales E-mail:[email protected]m [email protected]m
Website:http://www.qiytech.com
©2014 Qiyangtech Copyright
1.2.2 Preparation
◆A piece of QY - RK3288S motherboard
◆Firmware
◆Host machine
◆A piece of Micro USB OTG cable
Generally, there are two types of firmware:
◆A single unified firmware update.img will pack the parameters loader,
parameters and all partitions images together for the firmware release.
◆Rich partition images ,such as kernel.img, boot.img,recovery.img, etc. are
generated during the development phase.
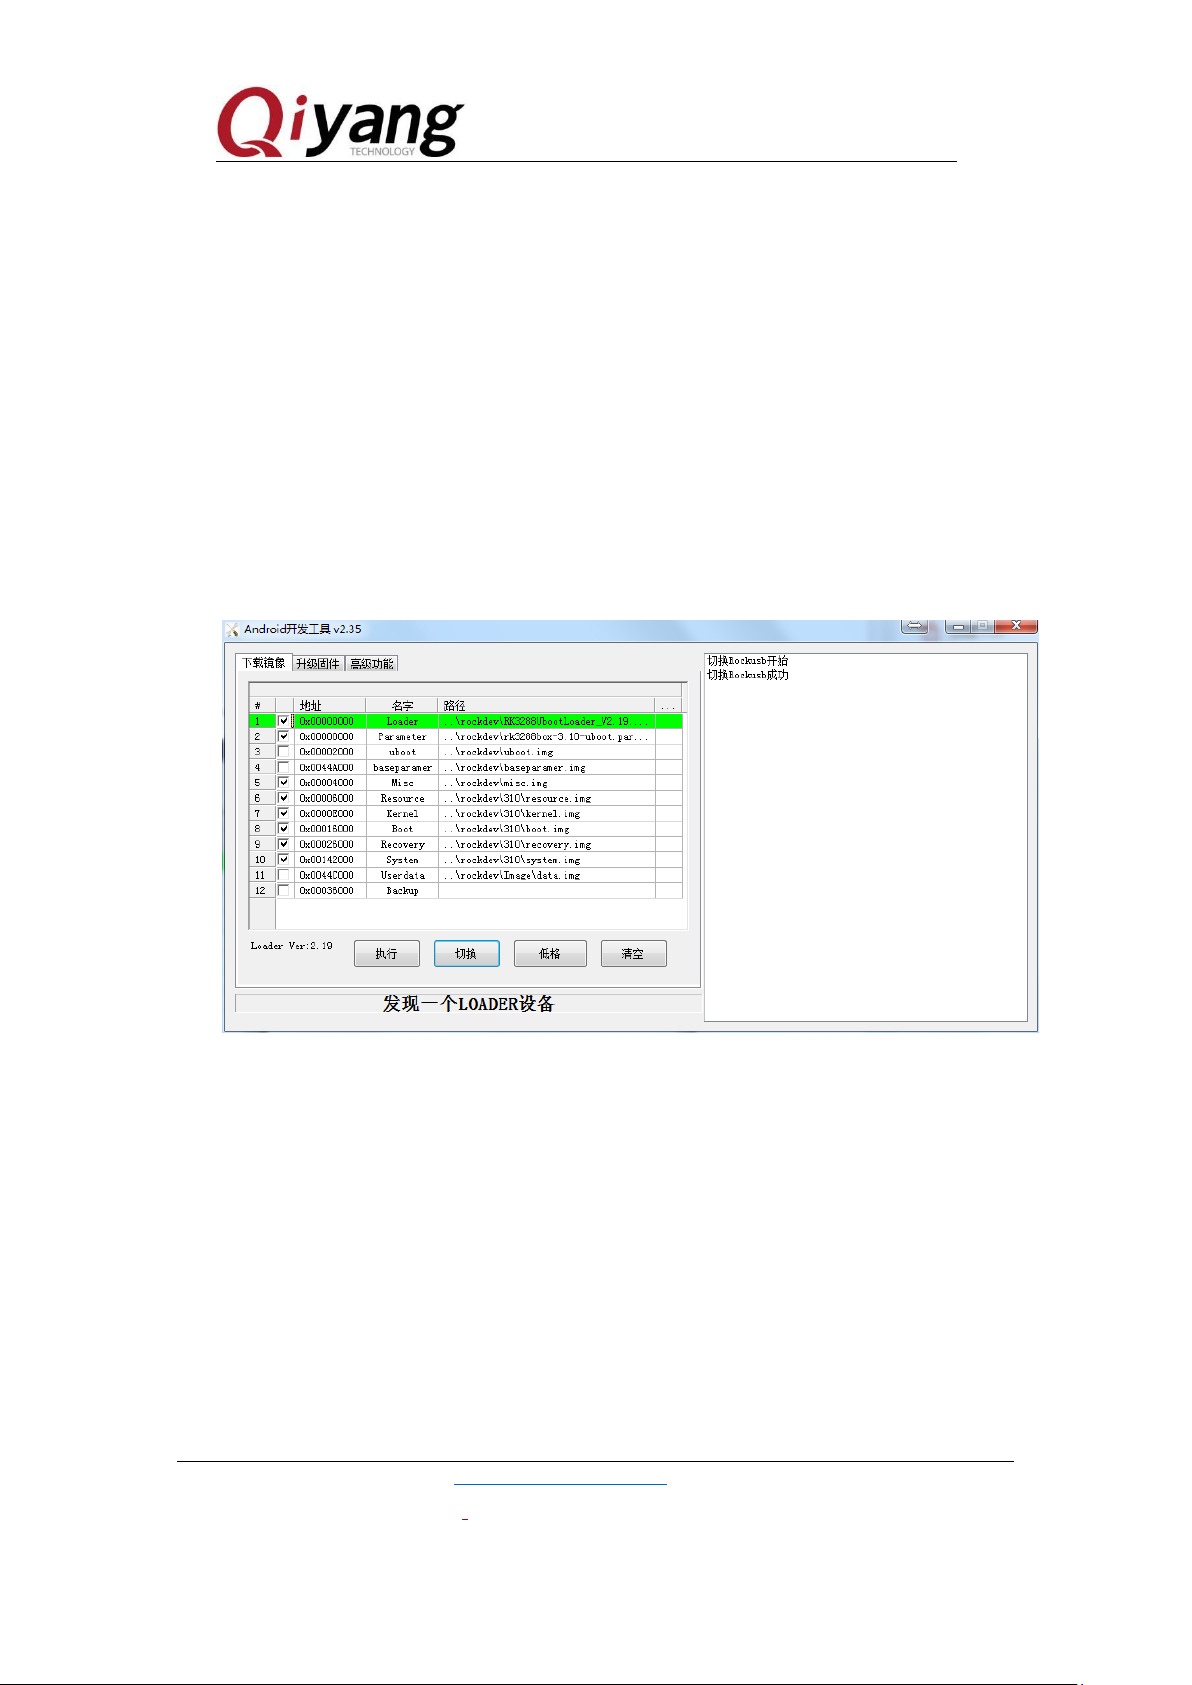
Here, we will explain how to program the firmware:
Host machine should support the following operating systems:
◆ Windows XP (32-bit or 64-bit)
◆ Windows 7 (32-bit or 64-bit)
◆ Windows 8 (32-bit or 64-bit)
◆ Linux (32-bit or 64-bit)
1.2.3 windows
You should use the AndroidTool.exe to program/flash the firmware, and you need to
install the RK USB driver before using the programming tools. If the driver has been
installed, you can skip this step.
1.2.4 Install the RK USB driver
Copy the [DriverAssitant_v4.2.rar] driver package to the host machine, extract, and

QY-RK3288 Android User Manual
Any question, please send E-mail:supports@qiyangtech.com Page 7 of 17
Sales E-mail:[email protected]m [email protected]m
Website:http://www.qiytech.com
©2014 Qiyangtech Copyright
then run the [driverinstall.exe]. In order to make all devices to use the updated drivers,
please select "driver uninstall" and then select driver install. The steps as shown
below:
1.2.5 Connecting device
1.Make sure the device is connected to the power adapter, and power on.
2.Use the micro usb otg cable to connect the device and host machine.
3.Press the RECOVERY(SW1) key on the device and hold it.
4. Press the RESET(SW2) button with several seconds.
5. After 2 seconds later, loose [RECOVERY]button.
Release the RECOVERTY key after two seconds.
6.You should note it that if the device is not found after press the RESET key, please
press the POWERON key when you still press the RECOVERY key, and then release
the RECOVERY.
Host machine would indicate that the new hardware is discovered and configured
successfully. Open the device manager, you will see the new device “Rockusb
Device” as shown below. If not, you need to come back to the previous the step to
reinstall the driver.

QY-RK3288 Android User Manual
Sales E-mail:[email protected]m [email protected]m
Website:http://www.qiytech.com
©2014 Qiyangtech Copyright
1.2.6 Program the firmware
Copy the firmware [AndroidTool_Release_v2.35_xxxxx.zip] to the host, then extract
it, run the [AndroidTool.exe] in the directory, and then click [Execute] as shown:
Next, the partition images will be programmed automatically.

QY-RK3288 Android User Manual
Sales E-mail:[email protected]m [email protected]m
Website:http://www.qiytech.com
©2014 Qiyangtech Copyright
1.2.7 Program the Unified Firmware
Steps are as follows:
1. Switch to the upgrade firmware page as shown below
2. Press the “firmware” button and open the firmware file you want to upgrade
under the [AndroidTool_Release_v2.35\rockdev\directory]. The upgrade tool will
display the detailed firmware information.
3. Press the “upgrade” button.
If it fails to upgrade, you can try to press the “erase the flash” button to erase the flash,
and then to upgrade.
4. You should note it that if the firmware loader version you programmed is not
consistent with original machine, please erase the flash before upgrading the
firmware.

QY-RK3288 Android User Manual
Sales E-mail:[email protected]m [email protected]m
Website:http://www.qiytech.com
©2014 Qiyangtech Copyright
1.2.8 Program/Flash the partition mapping
Steps:
1. Switch to the “download mirror” page as below.
2. Tick the partitions you need to program/flash ,and you can tick more.
Make sure that the path of the image file is correct, and the blank table cell on
the right of the point path will be selected again if needed.
3. Click the “excute” button to upgrade, and the device will restart automatically
after upgrade.
1.2.9 Linux
No testing.

QY-RK3288 Android User Manual
Sales E-mail:[email protected]m [email protected]m
Website:http://www.qiytech.com
©2014 Qiyangtech Copyright
1.3 Serial Port Debugging
1.3.1 Select adapter
Generally, the desktop host is provided with the RS232 serial port. If you don't have
or use a laptop, you will need a USB To UART adapter. The adapters are divided into
the following types according to the chips
◆PL2303
◆CH340
In general, the adapter with GH340 chip is more stable, but expensive.
1.3.2 Hardware Connection
Connect the UART of host machine to UART connector of the development board
1.3.3 RK3288 uses the following serial parameters
◆Baud rate: 115200
◆Data bits:8
◆Stop bits:1
◆Parity check: Without
◆Fluid control: Without
1.3.4 Use Windows UART to debug
After installing the USB To UART driver, inserting the USB to UART cable, the
system will hint the new hardware and initialization, then COM port can be found
from the device manager, as below:

QY-RK3288 Android User Manual
Sales E-mail:[email protected]m [email protected]m
Website:http://www.qiytech.com
©2014 Qiyangtech Copyright
The COM1 comes from the host machine, and the COM3 is the USB to UART port.
Putty or SecureCRT is usually used in Windows. Putty is an open source software
which is easy to use. And the specific application method can be searched online.
1.4 Start Mode Description
1.4.1 Preface
RK3288 has flexible start modes. In generally, the development board is not bricking
unless the hardware is damaged. If the accident such as the bootloader corrupted
occurs during the upgrade progress, you can’t re-upgrade it. You still can go to
MaskRom mode to fix it.

QY-RK3288 Android User Manual
Sales E-mail:[email protected]m [email protected]m
Website:http://www.qiytech.com
©2014 Qiyangtech Copyright
1.4.2 Loading Method
RK3288 has 20KB of BootRom and 100KB internal SRAM to support the loading
system of the following devices:
8-bit Async Nand Flash
8-bit toggle Nand Flash
SPI interface
eMMC interface
SDMMC interface
In other words, RK3288 not only supports Nand Flash, SPI Flash, eMMC Flash
startup, but also supports SD card startup.
1.4.3 Start Mode
Three types of start modes:
◆Normal mode
Normal mode is the normal boot process, and each components are loaded in
sequence and enter into the system normally.
◆Loader mode
In the Loader mode, the bootloader will enter into the upgrade status and wait
for the host command, used for firmware upgrade. To enter into Load mode,
you must let the bootloader detect the RECOVERY key pressed at startup,
and the USB is connected:
Make sure the device is connected to the power adapter and in Power On status.
Use the micro usb otg line to connect the device and host.
Press the RECOVERY key on the device and hold it.
Press the RESET button briefly.

QY-RK3288 Android User Manual
Sales E-mail:[email protected]m [email protected]m
Website:http://www.qiytech.com
©2014 Qiyangtech Copyright
Release the RECOVERTY key
Notice: You should note it that if the device is not found after press the RESET
key, please also press the POWERON key when you still press the RECOVERY key,
then release the RECOVERY.
◆MaskRom mode
The MaskRom mode is used to repair the system when the bootloader is
damaged. In general, you don't need to go into MaskRom mode, only if the
bootloader check fails (the IDR block is not read or the bootloader is
corrupted), the BootRom code enters MaskRom mode. At this point, the
BootRom code waits for the host to pass the bootloader code through the
USB port, then load and run it.
Ⅱ. Android Development
2.1 Compile Android Firmware
2.1.1 Preparation
The computer should be with high configuration to compile Android.
◆CPU supports 64-bit
◆6GB physical memory and swap memory
◆30GB free Disk space , and source tree should occupy about 8G.
Supports: Ubuntu14.04.
Software packages need to be installed:
JDK7
vim git samba gnupg flex bison gperf build-essential zip curl zlib1g-dev libc6-dev
lib32ncurses5-dev x11proto-core-dev libx11-dev lib32z-dev libgl1-mesa-dev
g++-multilib tofrodos python-markdown libxml2-utils xsltproc libc6-dev:i386

QY-RK3288 Android User Manual
Sales E-mail:[email protected]m [email protected]m
Website:http://www.qiytech.com
©2014 Qiyangtech Copyright
gcc-multilib lzma git-core libc6-dev-i386 ccache unzip m4 u-boot-tools uuid-dev
liblzo2-dev liblzo2-dev:i386 uuid-dev:i386 openssh-server
2.1.2 Download the default Android SDK
Copy the android source code from CD to host machine, and unzip it.
2.1.3 Compile image
Enter into the SDK root directory:
Execute [source build.sh]
Next, you start compiling, it takes long time for first compiling.
2.1.4 Flash partition image
After compiling, the following image files are generated:
boot.img:The boot image of the Android initial file, which initializes and loads
system partition.
Kernel.img:Kernel image
misc.img:Misc partition image, which is used for switching the start mode and the
parameter passing of the recovery mode.
Recovery.img:The recovery image
resource.img: Resource image, which contains boot image and the kernel’s device
tree information.
system.img : System partition image of Android, ext4 file system format.
If you are using the Windows system, copy the above images to
AndroidTool’s(firmware upgrade for windows) rockdev\Image directory and then use
the update document to program the partition Image. The advantages are that you can
use the default configuration and not modify the path of the file.

QY-RK3288 Android User Manual
Sales E-mail:[email protected]m [email protected]m
Website:http://www.qiytech.com
©2014 Qiyangtech Copyright
2.2 Use ADB
2.2.1 Foreword
ADB (Android Debug Bridge) is an Android command-line debugging tool that can
perform multiple functions, such as tracking system logs, uploading and downloading
files, and installing applications etc.
2.2.3 Ready to connect
Enter the developer option under the option, and check the “USB debug” option. Then
connect device and host with the USB OTG cable.
2.2.4 The installation of ADB under the Windows
Install the RK USB driver at first, then download the adb tool from the web and unzip
it to the host, and add the adb’s path to the environment variable for easy use.
Open a command-line window and write down [adb shell].
If work normally, you can enter the [adb shell] and run commands on the device.

QY-RK3288 Android User Manual
Sales E-mail:[email protected]m [email protected]m
Website:http://www.qiytech.com
©2014 Qiyangtech Copyright
Zhejiang Qiyang Intelligent Technology Co. Ltd.
Tel:0571-87858811 / 87858822
Fax:0571-89935912
Support:0571-89935913
E-MAIL:supports@qiyangtech.com
Web: http://www.qiytech.com
Add:5F, building 3A, NO.8 Xiyuanyi Road, West Lake Science
Park, Hangzhou, China
Postcode:310012
Other manuals for QY-RK3288
1
Table of contents
Other Qiyang Motherboard manuals