QMAXZ Lighting QM Series User manual

USER MANUAL ENGLISH Version 3.06
M-serie
s
Q
QMAXZ Lighting©2009,
all rights reserved
www.qmaxz.com

QM series manual v3.06 ©QMAXZ 2009
- 1 -

QM series manual v3.06 ©QMAXZ 2009
- 2 -
TABLE OF CONTENTS
1. Introduction Page 3
2. Unpacking Page 3
3. Safety information Page 3
4. Rigging the fixture Page 4
5. Lamp replacement Page 5
5.1 Lamp installation Page 6
5.2 Lamp adjustment Page 6
6. Power and Signal connection Page 7
6.1 AC Power Page 7
6.2 Fuse replacement Page 7
6.3 Signal connection Page 8
6.4 Fixture start up Page 9
7. Fixture function menu Page 9
7.1 Function menu navigation Page 9
7.2 Function menu QM(E)575S/QM(E)700S Page 10
7.3 Function menu QM(E)575W/QM(E)700W Page 18
7.4 Menu Functions Page 26
7.5 Control DMX channels Page 28
8. Gobo and gobo size Page 29
8.1 Fixed metal gobos Page 29
8.2 Rotating glass gobos Page 29
8.3 Gobo positions Page 30
8.4 Gobo replacement Page 30
9. Maintenance Page 31
10. QM-series technical data Page 32
10.1Technical data Page 32
10.2 Photometric data Page 32
10.3 Dimensional drawings Page 33
11. DMX Protocol Page 34
11.1 QM(E)575S/QM(E)700S Page 34
11.2 QM(E)575W/QM(E)700W Page 37
12. Troubleshooting Page 39
13. Info Page 40

QM series manual v3.06 ©QMAXZ 2009
- 3 -
1. INTRODUCTION
Thank you for choosing a QMAXZ QM-series product. The design & production are passed through
quality control to ensure the superior liability. This manual provides necessary information regarding
product safety, installation and operation of this product.
It is important to read ALL accompanying safety instructions, installation notes and
instructions to avoid damage to the product and potential injury to yourself or others.
For the latest updates of product documentation, please visit the user support area of the QMAXZ
website at www.qmaxz.com
NOTE: Information and Specifications in this document are subject to change without notice.
QMAXZ Lighting assumes no responsibility or liability for any errors or inaccuracies that may appear
in this manual.
2. UNPACKING
Open the box according to the instructions on the out side of the box to avoid damage of the fixture!
Please check if the following items are packed together with the fixture:
•User Manual
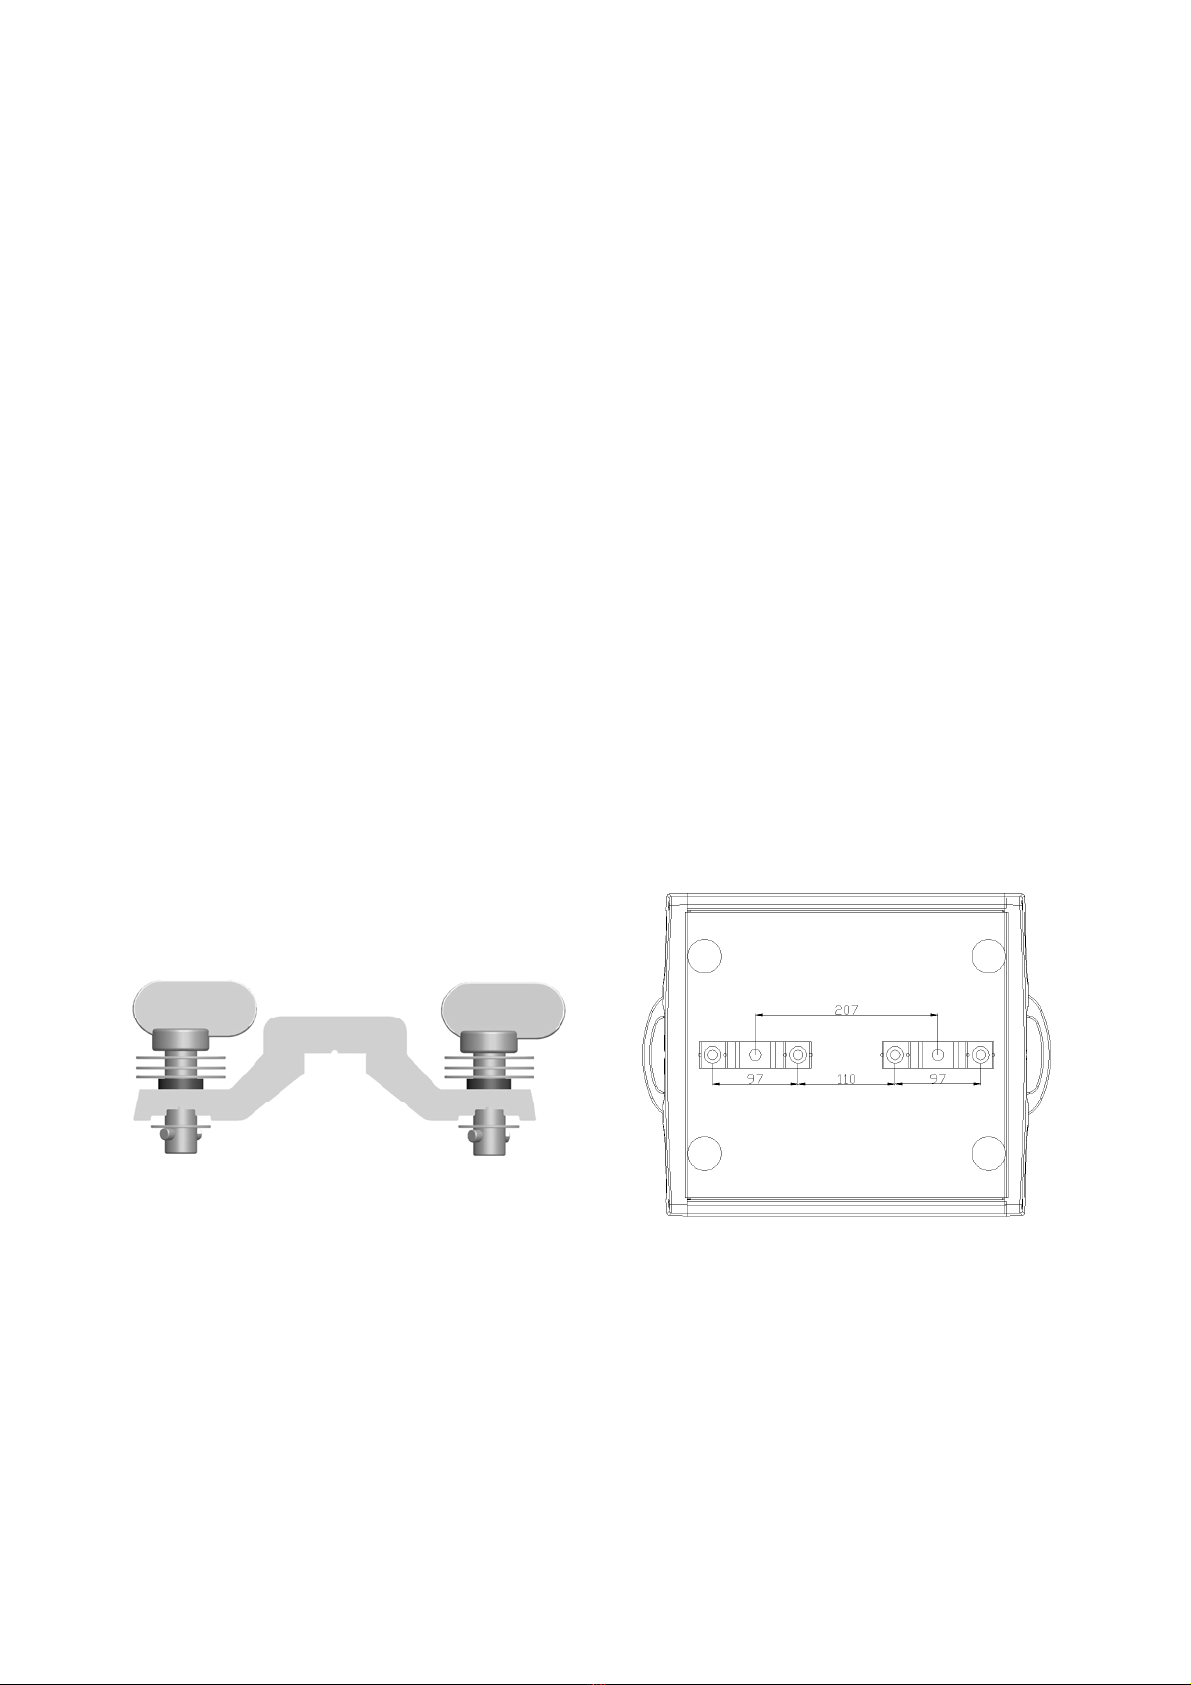
•2 mounting brackets
•Safety Cable
•Light Bulb
3. SAFETY INFORMATION
Warning! Read the safety instructions in this manual before installing and operating the
fixture. This product is for professional use only and was designed for indoor use.
Please consider that unauthorized modifications on the fixture are forbidden due to safety reasons.
Never lift the fixture by holding it at the projector-head, as the mechanics may be damaged. Always
hold the fixture at the transport handles.
Protection from burns and fire
•The minimum distance between the light-output and a flammable retarding object must be at
least 0,8 meter. Keep flammable materials well away from the fixture.
•Do not illuminate surfaces within 2 meter of the fixture.
•Provide a minimum clearance of 0.1 meters around fans and air vents.
•The ambient temperature (Ta) must be within 2°C (36°F) and 43°C (102°F)
•Under normal conditions, the highest sectional surface temperature may be up to 90°C
(194°F).
•Allow the fixture to cool for at least 15 minutes before handling.
•Never place filters or other materials over the lens or air entrances.

QM series manual v3.06 ©QMAXZ 2009
- 4 -
Protection from electric shock
•Keep the fixture away from rain and moisture.
•Disconnect the fixture from AC power before removing or installing the lamp, fuses, or any
part, and when not in use.
•This device falls under protection class I. Therefore always ground (earth) the fixture
electrically.
•Make sure that the power cord is not damaged. Check the fixture and the power cord from
time to time.
•Make sure that the available voltage is not higher than stated on the power panel.
•Make sure that the power-switch is set to OFF-position before you connect the device.
•Connecting the main power supply should be done by a qualified professional person.
•Refer for any service operation not described in this manual to a qualified technician.
Protection from UV radiation and lamp explosion
•Never operate the fixture with missing or damaged lenses and/or covers.
•When replacing the lamp, allow the fixture to cool for at least 30 minutes before opening the
fixture or removing the lamp. Protect your hands and eyes with gloves and safety glasses.
•Do not stare directly into the light. Never look at an exposed lamp while it is lit.
•Replace the lamp if it becomes defective or worn out, or before usage exceeds the maximum
life time.
4. RIGGING THE FIXTURE
Fixture base
Mounting Bracket
Attach both of the supplied mounting brackets to the fixture base by placing the brackets on the
fixture base matching the mounting holes and turning the twist locks by 90 degrees clockwise until
they are mounted tightly. Always use both brackets when rigging the fixture.
When hooks or clamps are connected to the brackets for rigging, verify that the hooks or clamps are
undamaged and can bear at least 10 times the weight of the fixture.
To un-mount the brackets turn the twist lock by 90 degrees counter clockwise and release the
brackets from the fixture base.

QM series manual v3.06 ©QMAXZ 2009
- 5 -
Requirements for the rigging place:
When mounting the fixture vertically the P/T speed must be set to speed 6 in the fixture
menu(default value).
•For safety the fixture should have a secondary fixing with a safety cord through the truss and
safety bracket of the fixture. The safety cord must bear at least 10 times the weight of the
fixture.
•When rigging, de-rigging or servicing the fixture make sure that no people are staying in the
area below the fixture and other endangered areas.
•Check that the tilt lock is released.
•Verify that there are no combustible materials or surfaces to be illuminated within 2 meters (78
inches) of the fixture and that there are no flammable materials nearby.
•Check that there is no possibility of heads or yokes colliding with other fixtures.
•If any accidents happen due to not following the above instructions, the manufacturer will not
be responsible for it.
5. LAMP REPLACEMENT
Installing any other lamp then advised by the manufacturer may create a safety hazard or
damage the fixture!
Model Philips
QM575S MSI 575HR/2, SFC10-4
QM575W MSI 575HR/2, SFC10-4
QME575S MSI 575HR/2, SFC10-4
QME575W MSI 575HR/2, SFC10-4
QM700S MSR GOLD700 SA/2 DE, SFC10-4
QM700W MSR GOLD700 SA/2 DE, SFC10-4
QMAXZ fixtures are tested with PHILIPS bulbs. QMAXZ also advises to use the same bulbs for
replacement. QMAXZ is not responsible for any damage to the fixture when using other bulbs!

QM series manual v3.06 ©QMAXZ 2009
- 6 -
5.1 Lamp Installation
Switching the lamp off before it’s warmed up will decrease the lamp’s life time.
To reduce the risk of explosion, replace the lamp when it reaches the limit of its average life time.
Never exceed the lamp’s average life time by more than 10%. To read running hours from the control
panel, please refer to display function menu chapter 7. Replace the lamp immediately if it is deformed
or in any way defective.
1. Disconnect the fixture from power and let it cool down for at least 30 minutes.
2. Loosen the 4 fastening screws on the lamp housing cover plate.
3. Carefully pull out the cover with the lamp assembly.
4. Remove the old lamp and insert the new lamp into the socket. Make sure that the lamp is
installed tightly into the lamp socket.
5. Close the lamp housing cover and fasten the 4 screws again.
NOTE: All bulbs have a maximum lifetime, check lifetime regularly to avoid exceeding lifetime,
otherwise it may result in deformation or explosion of the bulb, what may cause damage on the
reflector or other parts of the fixture.
5.2 Lamp Adjustment
The lamp holders of all QMAXZ fixtures are aligned at the factory. Due the difference between lamps,
fine adjustment may increase the light output.
QMAXZ advises to always re-adjust the lamp position when installing a new bulb
1. Strike the lamp and project an open white beam on a flat surface (wall).
2. Use the 2 screws (see picture) to centre the brightest part of the lamp (hot-spot).
3. Turn the screws one by one clockwise and/or counter clockwise until the hotspot is in the
centre of the beam. If you cannot detect the hotspot, adjust the lamp until the output is evenly
spread over the beam and the output is the brightest.
Never run the device without lamp!
Do not touch the quartz bulb with bare fingers. Wear safety glasses and gloves
when handling lamps.

QM series manual v3.06 ©QMAXZ 2009
- 7 -
6. POWER AND SIGNAL CONNECTION
6.1 AC Power
Do not connect the fixture to a dimmer system; doing so may damage the fixture.
Make sure the fixture is earthed (grounded). The AC mains supply must be fitted with a
circuit breaker and earth fault switch (ground fault).
Check that the power supply voltage and frequency are corresponding with the AC mains supply
needed by the fixture (check AC mains panel on the fixture).
Before switching on the fixture verify that the tilt lock is released.
Power requirements:
•QM575S 220V ~ 240V AC 50Hz ~ 60Hz 680Watts
•QM575W 220V ~ 240V AC 50Hz ~ 60Hz 680Watts
•QME575S 180V ~ 260V AC 50Hz ~ 60Hz 680Watts
•QME575W 180V ~ 260V AC 50Hz ~ 60Hz 680Watts
•QM700S 220V ~ 240V AC 50Hz ~ 60Hz 850Watts
•QM700W 220V ~ 240V AC 50Hz ~ 60Hz 850Watts
Power lead Connection.
Wire Colour Pin connection Symbol
Yellow / Green AC Earth (ground) ╧
Blue AC Neutral N
Brown AC Live L
6.2 Fuse replacement
When the fixtures main fuse is blown it can be replaced with a new 31x 6.35mm fuse, 10A/250v.
1. Disconnect the fixture from the mains supply.
2. Open the fuse holder on the fixture power panel by turning the cap counter clockwise using a
Philips head screwdriver.
3. Replace the defective fuse and close the fuse holder by putting the cap back in and turning it
clockwise until it is locked tightly.
4. Connect the mains power again and turn on the fixture to check proper operation.
There are also two fuses on the main PCB board inside the fixture, for how to replace this please
contact your dealer.

QM series manual v3.06 ©QMAXZ 2009
- 8 -
6.3 Signal Connection
Important! Never connect more than 1 data input and 1 data output.
The QMAXZ fixtures have both 3 and 5 pin XLR sockets. The sockets are wired parallel, both inputs
connect to both outputs. Never use 3 and 5 pin connectors at the same time. For the pin-layout see
the following table.
Pin-Layout
Pin 5 pin 3 pin
1 Earth Earth
2 Signal – (Cold) Signal – (Cold)
3 Signal + (Hot) Signal + (Hot)
4 No connection
5 No connection
Use a shielded twisted pair cable suitable for RS485 (120Ω) operation at 250 baud
Microphone type and other general purpose cabling such as two core audio or signal cables are not
suitable for use with DMX512.
Connect the DMX output from the controller to the closest fixture input and connect the fixture DMX
output to the next fixture DMX input until all fixtures are connected.
Do not overload the link. A maximum of 10 devices may be connected on a serial link.
Insert a male 120ΩXLR termination plug, in the last fixture. This to avoid signal reflection and
interference.
DMX Terminator DMX connection panel

QM series manual v3.06 ©QMAXZ 2009
- 9 -
6.4 Fixture Start-up
After finishing the above operations and making sure all the fixtures have been installed with suitable
bulbs and connected to a proper mains supply.
1. Release the tilt and pan locks.
2. Turn on the power switch.
3. The display on the fixture will show the fixture model number, the software version number
and then “RESET WAITING” and starts the reset procedure.
4. After the reset procedure the LCD display will show the DMX address and “DMX LINK” when
a DMX signal is detected or “NO SIGNAL” when no DMX signal is detected.
5. When DMX is detected the fixture is ready to use.
In default menu the lamp will strike automatically, this can be set in the function menu. See chapter 7.
Also check if DMX control is set to ON and “AUTO RUN OFF” is selected in the function menu.
7. FIXTURE FUNCTION MENU
7.1 Function Menu Navigation
To enter the function menu, press [MENU] twice, then press [UP] / [DOWN] to scroll, [MENU] to
select and [ESC] to return to Menu.
When no button on the control panel is touched for more then 15 seconds the display will turn off and
the menu will go back to the DMX start address, to turn it on simply press a button and repeat the
above steps to enter the menu.

QM series manual v3.06 ©QMAXZ 2009
- 10 -
7.2 Function Menu QM(E)575S/QM(E)700S.

QM series manual v3.06 ©QMAXZ 2009
- 11 -

QM series manual v3.06 ©QMAXZ 2009
- 12 -

QM series manual v3.06 ©QMAXZ 2009
- 13 -

QM series manual v3.06 ©QMAXZ 2009
- 14 -

QM series manual v3.06 ©QMAXZ 2009
- 15 -

QM series manual v3.06 ©QMAXZ 2009
- 16 -
F
DOWN
UP
AUTO-RUN OFF
MENU_N1
AUTO-RUN ON
SLAVE
AUTO-RUN ON
MASTER
MOTOR CAL.
CHANNEL ##
DMX MODE ##
RUN MODE
MENU 2
DOWN
UP
G
[ESC] > no change in setting
and return to menu 2
[UP] > to previous menu
[DOWN] > to next menu
MENU_N3
MENU_N2
CHANNEL ##
DMX MODE ##
RUN MODE
FAN MODE
FAN SPEED
AUTO
FAN SPEED
HIGH
FAN SPEED
TEST XX
DOWN
UP
MENU 2
[ESC] > no change in setting
and return to menu 2
[UP] > to previous menu
[DOWN] > to next menu
MENU_O1
MENU_O2
MENU_O3
FAN SPEED
TEST XX
[UP/DOWN] > increase/
decrease test speed 01 - 20
[MENU] > to enter test mode
[MENU] >select function
[MENU] > save new setting
and return to menu 2
[MENU] >select function
[MENU] > save new setting
and return to menu 2
QM(E)575S / QM(E)700S

QM series manual v3.06 ©QMAXZ 2009
- 17 -
DMX MODE ##
RUN MODE
FAN MODE
SERVICE
Back to top
G
DOWN
UP
H
DOWN
UP
MENU 2
ONLY FOR SERVICE
CENTER
QM(E)575S / QM(E)700S

QM series manual v3.06 ©QMAXZ 2009
- 18 -
7.3 Function Menu QM(E)575W/QM(E)700W
QMAXZ
QM575W
Version 3.06
DMX ADDRESS
DMX ADDRESS
DMX ADDRESS
MENU 1
POWER UP
A
MENU_A2
MENU 2
VERSION
PAN MOVE
TILT MOVE
P/T SPEED
MENU 2
VERSION
PAN MOVE
TILT MOVE
P/T SPEED
PAN
NORMAL
MENU_C1
PAN
REVERSE
MENU_C2
DOWN
UP
30 sec
DOWN
UP
QMAXZ
QM575W
Version 3.06
MENU_B
DMX ADDRESS
ADJUST DMX ADDRESS
ADJUST DMX ADDRESS
ADJUST DMX ADDRESS
[MENU] >select DMX window
[MENU] > save new setting
and return to menu 1
[ESC] > no change in setting
and return to menu 1
[UP] > increase DMX address
[DOWN] > decrease DMX
address
[MENU] >select function
[MENU] > save new setting
and return to menu 2
[ESC] > no change in setting
and return to menu 2
[UP/DOWN] > swop selection
[MENU] > select function
[ESC] > return to menu 2
H
MENU
ESC
MENU_A512
MENU_A1
Push Menu
twice
Menu Flowchart for
QM(E)575W / QM(E)700W
for software version 3.06

QM series manual v3.06 ©QMAXZ 2009
- 19 -
This manual suits for next models
6
Table of contents