QPR 6690 User manual

QPR$6690$10$Gallon$Melter$Applicator$
ASSEMBLY$INSTRUCTIONS
1$of$18
$7322$Bonnyshire$Drive
Chattanooga,$TN$37416
September$2015
!"#$%&'#%(')"")$*%+,-
If$there$is$exterior$damage$to$the$shipping$box,$please$call$your$sales$representative$to$report.
*Wear$appropriate$personal$proctective$equipment$when$opening$the$box.
*Unstrap$the$box$and$open$the$plywood$crating.
*There$will$be$sharp,$exposed$nails$on$the$box$when$opened.
*Uncrate$and$remove$the$unit$and$parts$from$the$box.
%
(')"")$*%+,-%./$%
'/0#%1'/2"%#3*#14%
#-",1#3%$/)51%/$3%
1"5)$Ø%%71#%%
"#21,$/5%"2,ͺ#%
#:;)"<#$&6%

QPR$6690$10$Gallon$Melter$Applicator$
ASSEMBLY$INSTRUCTIONS
2$of$18
$7322$Bonnyshire$Drive
Chattanooga,$TN$37416
September$2015
=>?@(%=A%>B?%+!C%D!E%F((?@+GH
The$parts$below$will$be$in$the$melter$kit
>/$I%J)&'%2#<,0/K5#%
%D5,J%E#1&2)89,$%(82##$%%=$1)3#%
E#/2%L'##51%
B/$35#%/$3%
B/$35#%?-&#$1),$%
M/50#%F11#<K5N%
O2,"/$#%>/$I%
>2/N%
>,28'%/$3%
E#*;5/&,2PQ/*#%
D2,$&%
L'##5%
.,$&2,5%E,31%
(',#%

QPR$6690$10$Gallon$Melter$Applicator$
ASSEMBLY$INSTRUCTIONS
3$of$18
$7322$Bonnyshire$Drive
Chattanooga,$TN$37416
September$2015
Prior$to$Assembly,$remove$the$flow$restriction$screen$from$the$inside$of$the$tank.
The$screen$can$be$easily$removed$from$its$holder$slot$inside$the$tank$and$saved
for$use$when$needed.
The$flow$screen$is$an%!O>=!AFG$part$that$helps$to$reduce$the$volume$of$liquid$that
can$enter$the$valve$dispenser.$$It$is$helpful$when$working$in$areas$that$require
precise$material$application$and$a$lower$volume$of$material$is$to$be$applied.
It$is$not$generally$used$for$normal$higher$volume$crack$sealing$applications$where
flow$of$material$is$to$be$maximized$out$of$the$tank$through$the$valve.
%%%E#<,0/K5#%D5,J%
%E#1&2)89,$%(82##$%
%%%=$1)3#%&'#%>/$I%

QPR$6690$10$Gallon$Melter$Applicator$
ASSEMBLY$INSTRUCTIONS
4$of$18
$7322$Bonnyshire$Drive
Chattanooga,$TN$37416
September$2015
(&#"%RS F11#<K5#%&'#%"2,"/$#%&/$I%&2/N%&,%&'#%K,3N%,T%&'#%&/$I6
*Lay$the$tank$body$flat$on$the$ground.
*Remove$the$three$attachment$bolts$from$the$tank$body.
*Align$the$three$tray$holes,$with$the$three$bolt$holes.
*Screw$in$bolts$and$tighten$firmly.
*Do$not$over[tighten$the$bolts.$$Check$carefully$for$firm$attachment.

QPR$6690$10$Gallon$Melter$Applicator$
ASSEMBLY$INSTRUCTIONS
5$of$18
$7322$Bonnyshire$Drive
Chattanooga,$TN$37416
September$2015
(&#"%US F11#<K5#%2#/2%J'##51%&,%&'#%/-5#
*Remove$the$cotter[pin$and$washer.
*Slide$wheel$on$to$the$axle.
*Place$washer$on$the$outside$of$the$wheel$between$the$wheel$
and$cotter[pin$slot.
*Re[insert$the$cotter$pin$and$bend$to$lock$in$position.
*Spin$wheel$several$times$to$set$it$and$confirm$ease$of$turning$on$the$axle.
A,&#S$If$the$wheel$does$not$turn$freely$enough,$remove$and$use$a$wire$brush
$or$torch$to$remove$excess$paint$from$the$axle.$
Remove$Cotter$Pin$and$Washer
Place$washer$between
the$cotter[pin$and$wheel

QPR$6690$10$Gallon$Melter$Applicator$
ASSEMBLY$INSTRUCTIONS
6$of$18
$7322$Bonnyshire$Drive
Chattanooga,$TN$37416
September$2015
(&#"%VS F&&/8'%T2,$&%J'##5%&,%&'#%K,&&,<%,T%&'#%&/$I
*Rotate$melter$on$the$ground$to$access$front$wheel$lip.
*$Attach$four$bolts$/$washers$/$nuts$through$the$four$holes$on$the$wheel$lip.
*$Tighten$until$firm$and$secure.
*$Check$that$wheel$axle$bolt$is$secure$and$nut$on$axle$bolt$is$not$loose.
*$Front$wheel$should$spin$easily$and$rotate$360$degrees.

QPR$6690$10$Gallon$Melter$Applicator$
ASSEMBLY$INSTRUCTIONS
7$of$18
$7322$Bonnyshire$Drive
Chattanooga,$TN$37416
September$2015
(&#"%WFX F&&/8'%3)1"#$1#2%0/50#%/$3%1',#%/11#<K5N%&,%&/$I%;$)&
*Screw$the$valve$assembly$pipe$into$the$tank.
*Approximately$10[12$rotations$are$needed$to$get$it$into$position.
*Do$not$cross$thread$when$screwing$it$in.
*When$screwed$in,$the$valve$receiver$pipe$does$not$have$to$be
absolutely$tight.$It$will$be$naturally$firm$after$10[12$rotations.$$
*The$final$turns$may$require$some$force$to$as$threads$begin$to$tighten$in.
=$1#2&%/$3%182#J%
0/50#%/11#<K5N%
)$&,%&'#%&/$I%
F5)*$<#$&%15,&%T,2%
/Y/8'<#$&%,T%&'#%1',#%
/11#<K5N%)$%1&#"%W+%

QPR$6690$10$Gallon$Melter$Applicator$
ASSEMBLY$INSTRUCTIONS
8$of$18
$7322$Bonnyshire$Drive
Chattanooga,$TN$37416
September$2015
(&#"%WFX Continued
(G!>%D!E%FG=QA@?A>%%
L=>B%>B?%(B!?%F((?@+GH%
=A%W+6%%(G!>%(B!7GZ%+?%=A%
FOOE!C=@F>?GH%>B=(%O!(=>=!A%
FD>?E%(.E?L=AQ%=A%(!%>B?%
(B!?%F((?@+GH%+!G>%.FA%
(G=Z?%=A>!%=>6%

QPR$6690$10$Gallon$Melter$Applicator$
ASSEMBLY$INSTRUCTIONS
9$of$18
$7322$Bonnyshire$Drive
Chattanooga,$TN$37416
September$2015
(&#"%W+X F5)*$%/$3%/&&/8'%1',#%/11#<K5#%&,%0/50#%/11#<K5N
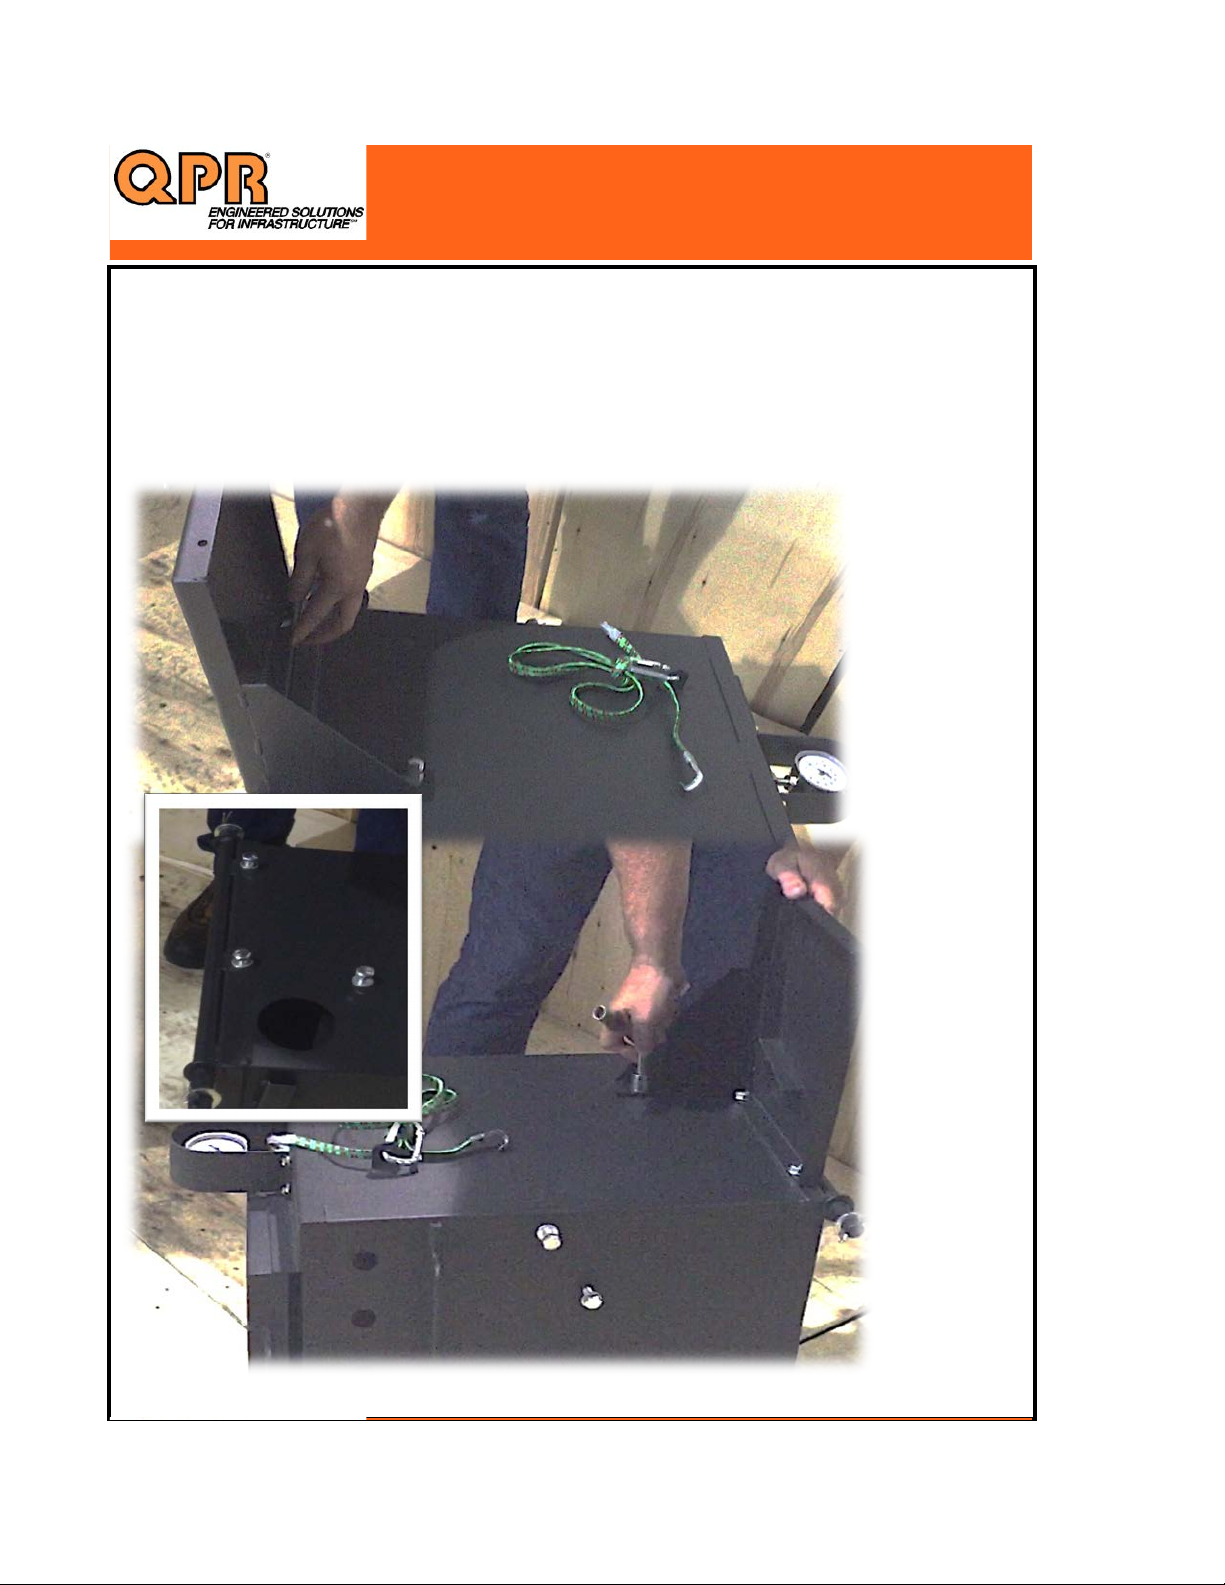
*Attach$shoe$to$bottom$of$the$tank$using$the$the$bolts.
*Do$not$fully$tighten$the$two$tank$bolts$until$assembly$is$completely$aligned.
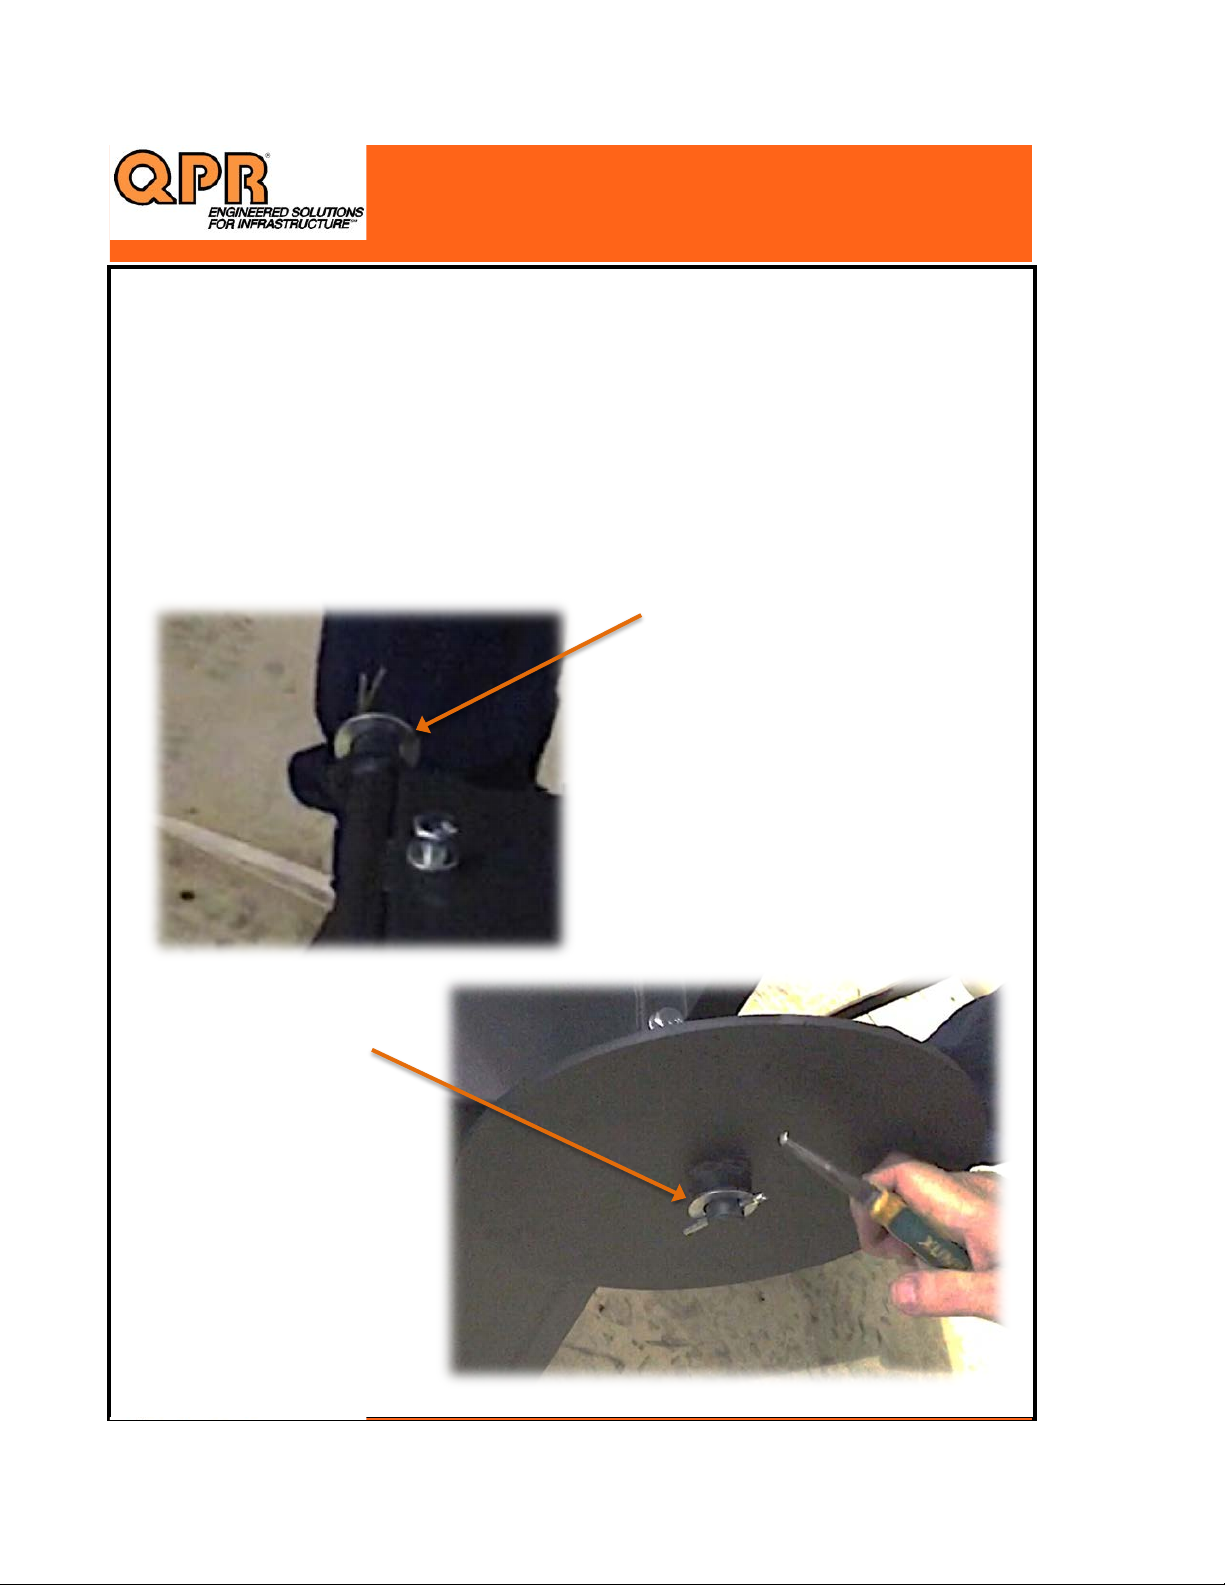
*Align$shoe$assembly$with$the$slot$on$the$valve$assembly$post.
*Correct$alignment$will$have$the$bolt$and$washer$in$full$contact$with
the$slot$plate$for$firm$and$secure$contact.
*If$the$slot$and$bolt$do$not$align$correctly:$$screw$in$or$screw$out$the$valve$
assembly$until$it$is$correctly$aligned.
F5)*$<#$&%K,5&%T,2%
/Y/8'<#$&%&,%&'#%
15,&%,$%&'#%0/50#%
/11#<K5N%",1&6%

QPR$6690$10$Gallon$Melter$Applicator$
ASSEMBLY$INSTRUCTIONS
10$of$18
$7322$Bonnyshire$Drive
Chattanooga,$TN$37416
September$2015
(&#"%W+X Attach$shoe$to$the$bottom$of$the$tank$with$the$two$bolts
Align$shoe$with$the$bolt$holes$and$hand$tighten$only$at$this$step

QPR$6690$10$Gallon$Melter$Applicator$
ASSEMBLY$INSTRUCTIONS
11$of$18
$7322$Bonnyshire$Drive
Chattanooga,$TN$37416
September$2015
(&#"%W+X With$the$bolts$hand$tight,$align$the$shoe$bolt$to$the$slot$on
the$valve$assembly$so$the$washer$has$full$contact$with$the$slot$plate

QPR$6690$10$Gallon$Melter$Applicator$
ASSEMBLY$INSTRUCTIONS
12$of$18
$7322$Bonnyshire$Drive
Chattanooga,$TN$37416
September$2015
(&#"%W+X With$the$alignment$of$the$bolt$and$slot$complete,$tighten$the$two
bolts$on$the$bottom$of$the$tank$and$then$tighten$the$bolt$on$the$slot.
Unit$should$be$very$firm$and$secure$now,$with$no$wiggle$or$movement.

QPR$6690$10$Gallon$Melter$Applicator$
ASSEMBLY$INSTRUCTIONS
13$of$18
$7322$Bonnyshire$Drive
Chattanooga,$TN$37416
September$2015
(&#"%[ F&&/8'%'/$35#%&,%&/$I%K,3N%
*Using$the$two$bolts$on$each$side$of$the$tank$body,$attach$the$handle.
*Tip:$Screw$in$bolt$nearest$the$edge$on$each$side,$then$screw$in$the
bolts$in$the$middle$of$the$body.$This$makes$it$easier$to$align$the$handle
to$the$holes.
*$Attach$the$handle$with$all$four$bolts$hand$tight$only$before$tightening$with
a$wrench$to$final$position.$Do$not$over$tighten$the$bolts.
Bolts$In$Position$for$Handle Attach$Handle$to$each$side$of$the$tank

QPR$6690$10$Gallon$Melter$Applicator$
ASSEMBLY$INSTRUCTIONS
14$of$18
$7322$Bonnyshire$Drive
Chattanooga,$TN$37416
September$2015
(&#"%[
Slide$Handle$extension$into$position$over$the$spring$lock
Depress$spring$lock$to$allow$handle$to$slide$over$into$final$position

QPR$6690$10$Gallon$Melter$Applicator$
ASSEMBLY$INSTRUCTIONS
15$of$18
$7322$Bonnyshire$Drive
Chattanooga,$TN$37416
September$2015
(&#"%\F F&&/8'%1',#%8,$&2,5%2,3%&,%1',#%/$3%'/$35#
*Slide$the$rod$handle$through$the$INSIDE$hole$of$the$main$handle$bar.
*This$rod$has$two$chain$links$and$no$spring.
*Place$at$a$right$angle$to$insert$and$then$flip$it$into$position.
*Bolt$the$base$of$the$rod$to$the$shoe.$The$nut$and$locking$nut$should$be
on$the$outside$of$the$unit$for$easy$adjustment.
*NOTE:$There$are$three$washers$for$this$piece:$One$for$the$bolt$head$and
two$for$the$nut$side.$$There$is$also$a$locking$nut$for$this$attachment.
Handle$in$final$position
Position$at$attachment$to$shoe.$$Inside$washer$1,$outside
washers$1$and$2,$outside$nut$1$and$outside$locking$nut$2.
=$1#2&%/1%1',J$%/&%/%]2)*'&%/$*5#"$

QPR$6690$10$Gallon$Melter$Applicator$
ASSEMBLY$INSTRUCTIONS
16$of$18
$7322$Bonnyshire$Drive
Chattanooga,$TN$37416
September$2015
(&#"%\+ F&&/8'%&'#%0/50#%8,$&2,5%2,3
*Slide$the$rod$handle$through$the$OUTSIDE$hole$of$the$main$handle$bar.
*This$rod$has$a$spring$at$the$top$of$the$handle.
*Bolt$the$base$of$the$rod$to$the$valve$plate.$The$nut$and$locking$nut$should$be
on$the$outside$of$the$unit$for$easy$adjustment.
*NOTE:$There$are$three$washers$for$this$piec:$One$for$the$bolt$head$and
two$for$the$nut$side.$$There$is$also$a$locking$nut$for$this$attachment.
Insert$valve$control$rod$through$
outside$hole$on$main$handle$bar.
Position$hole$attachment$point$on$the$valve$plate.$$Inside$washer$1,$outside
washers$1$and$2,$outside$nut$1$and$outside$locking$nut$2.

QPR$6690$10$Gallon$Melter$Applicator$
ASSEMBLY$INSTRUCTIONS
17$of$18
$7322$Bonnyshire$Drive
Chattanooga,$TN$37416
September$2015
(&#"%\+
Adjust$valve$tension$screw$to$where$there$is$no This$bolt$should$be$
lateral$movement$of$the$valve,$and$the$valve$is tight,$but$still$allow
is$well$pressed$into$the$receiver.$$However,$it$should the$rod$to$travel
not$be$so$tight$that$the$valve$cannot$open$and$close. up$and$down$on$pull
Once$positioned,$lock$in$place$with$the$lock$nut. of$the$control$rod.
The$tension$on$the$valve$will$need$to$be$adjusted
from$time$to$time$for$proper$operation$due$to$
heat,$vibration$and$wear.
>'#1#%&J,%K,5&1%1',;53%
K#%9*'&%/$3%1#8;2#%
G,8I)$*%$;&%

QPR$6690$10$Gallon$Melter$Applicator$
ASSEMBLY$INSTRUCTIONS
18$of$18
$7322$Bonnyshire$Drive
Chattanooga,$TN$37416
September$2015
(&#"%^ Check$torch$assembly$connections$for$tightness$and$secure$fit
*Read$the$torch$operation$and$safety$instruction$card.$If$your$unit
does$not$have$a$safety$card,$do$not$operate$the$unit.$$Call$your$sales
representative$to$receive$a$safety$and$torch$operation$card.
Check$joint$tightness$and$secure$fit$at$the$torch$head,$valve,$gage$
and$regulator.
?AZ
Table of contents
Popular Construction Equipment manuals by other brands

GÜDE
GÜDE GPR 800 E Translation of the original instructions

Z.I.P.P.ER MASCHINEN
Z.I.P.P.ER MASCHINEN ZI-BR160Y user manual

Blue Diamond
Blue Diamond HB 50 Operation and maintenance manual

Avantco
Avantco Dozer blade 1400 Operator's manual

Ditch Witch
Ditch Witch Groundbreaking SK5PAL Attachment Operator's Manual

EUROPRO
EUROPRO MINIJET 80 user manual

Bend-Pak
Bend-Pak Blue Bullet 1302-BAS Operation and service manual

Power Fist
Power Fist 8712937 user manual

Avantco
Avantco A36503 Original instructions

Putzmeister
Putzmeister BSA 1409 D4 operating instructions

Ennis-Flint
Ennis-Flint StreetHeat SR-60Hybrid Operation manual

Lumag
Lumag RP130HPC Operator's manual