QRS Music Technologies Chili User manual

Phone: 941-597-5888
Fax: 941-597-3936
QRS Music Technologies, Inc.
2011 Seward Ave
Naples, FL 34109
www.qrsmusic.com
For Technical Support Call 1-941-597-5888
Features
•Quick Practice, Record, Playback and
Performance
•Eight sources from which to play
•Built in General MIDI Sound Set
•"Whole house" audio outputs
•Piano only outputs
•Practice the way you want
•Plays Standard MIDI File formats type 1 & 0
and many other player system’s software
Revision :# 7.0
Manual Catalog #: 77020
QRS Music Introduces
Chili is a Dual Drive MIDI File Player unit that
includes a built -in CD Rom Drive & Floppy Disk
Drive .
Chili Manual -Advanced Guide
The next generation of advanced MIDI file
players and player piano controllers.

Page 2Owners Manual
This device complies with part 15 class B of FCC rules. Operation is subject to the following
two conditions. (1) This device may not cause harmful interference, and (2) This device must
not accept any interference received, including that may cause undesired operation.
For Technical Support Call 1-941-597-5888 Page 67

Page 66 Owners Manual
NOTES
For Technical Support Call 1-941-597-5888 Page 3
TABLE OFCONTENTS
FCC-----------------------------------------------------------------------2
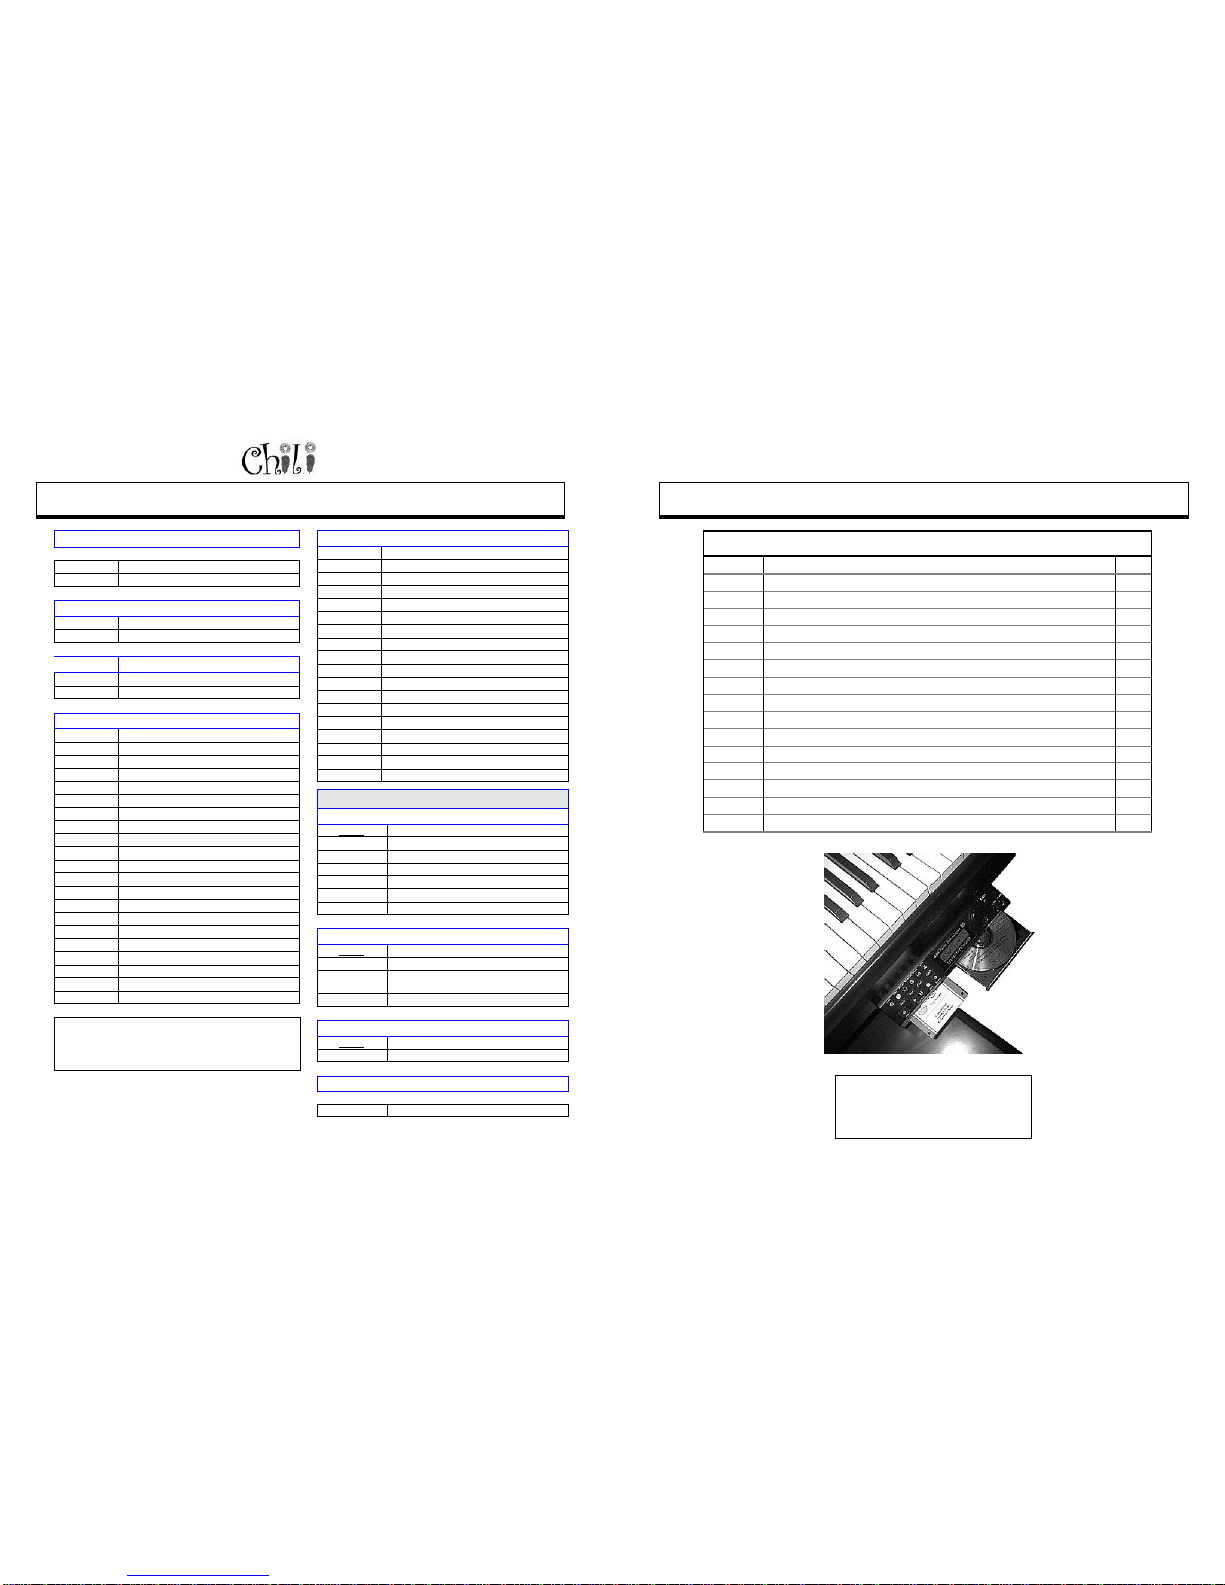
Parts Included ------------------------------------------------------5
Installing Chili On Your Piano-------------------------------6
Mounting Bracket Assembly ----------------------------------6
The Correct Pianomation MIDI EPROM -------------------6
When You First Turn The Unit On -------------------------7
Boot Sector--------------------------------------------------------7
Version Numbers------------------------------------------------7
Quick Start------------------------------------------------------------8
Auto Source Select ---------------------------------------------8
Playing One Track Or All Tracks----------------------------8
Understanding Basic Use-------------------------------------9
Screen View Basics---------------------------------------------9-11
Knobs And Button Basics -------------------------------------12
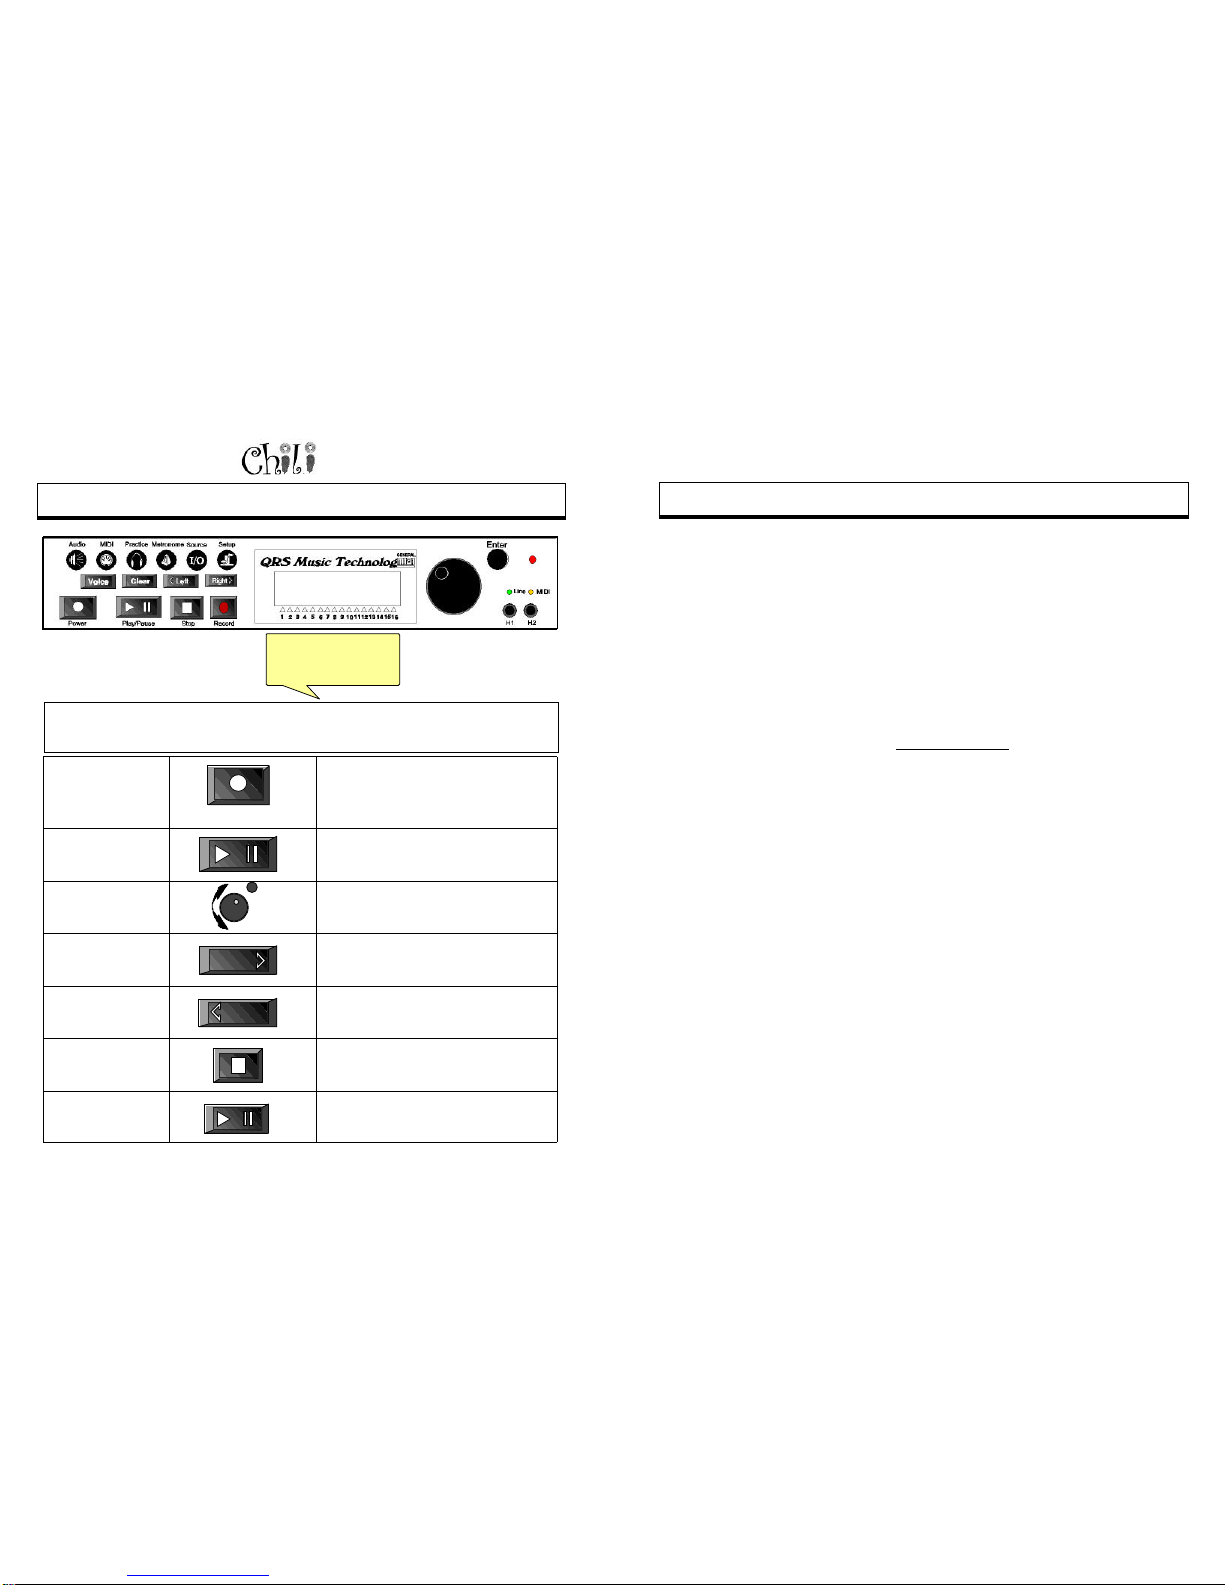
Front Panel Features --------------------------------------13, 14
Back Panel Features ---------------------------------------15, 16
Configurations And Hook Ups ------------------------17-20
Commercial Applications, Auto Start, Perform,
Mixed Outputs Piped Through Establishment --------17
Practice In Silence-----------------------------------------------17
Mounted At The Stereo-----------------------------------------18
As A Stand Alone Sequencer---------------------------------18
Basic Piano Hookup---------------------------------------------19
Basic Piano HookupWith Record---------------------------19
Adding A Wireless Connection From Your Stereo
To Add A VCR Or Multi Disc CD Player----------------18
Hard-wire a PC to play your piano---------------------------20
Wireless Signal from your PC to Play the Piano---------20
Adding A PC to A System with Record---------------------20
The Remote Control----------------------------------------------21
Setting Up The System—Menu Items
Descriptions and Functions----------------------------------22
Presets---------------------------------------------------------------23
Choose A Favorite Or Reset Chili Back To
Its Original Factory Settings-----------------------------23
Set A Current Setting As A Favorite ------------------23
Equalizing Relative Background Volumes From CD &
Sound Card-------------------------------------------------------- 24
Setting defaults for what you hear, and how you hear it
Setup The Mixed Piano & Background Balance --25
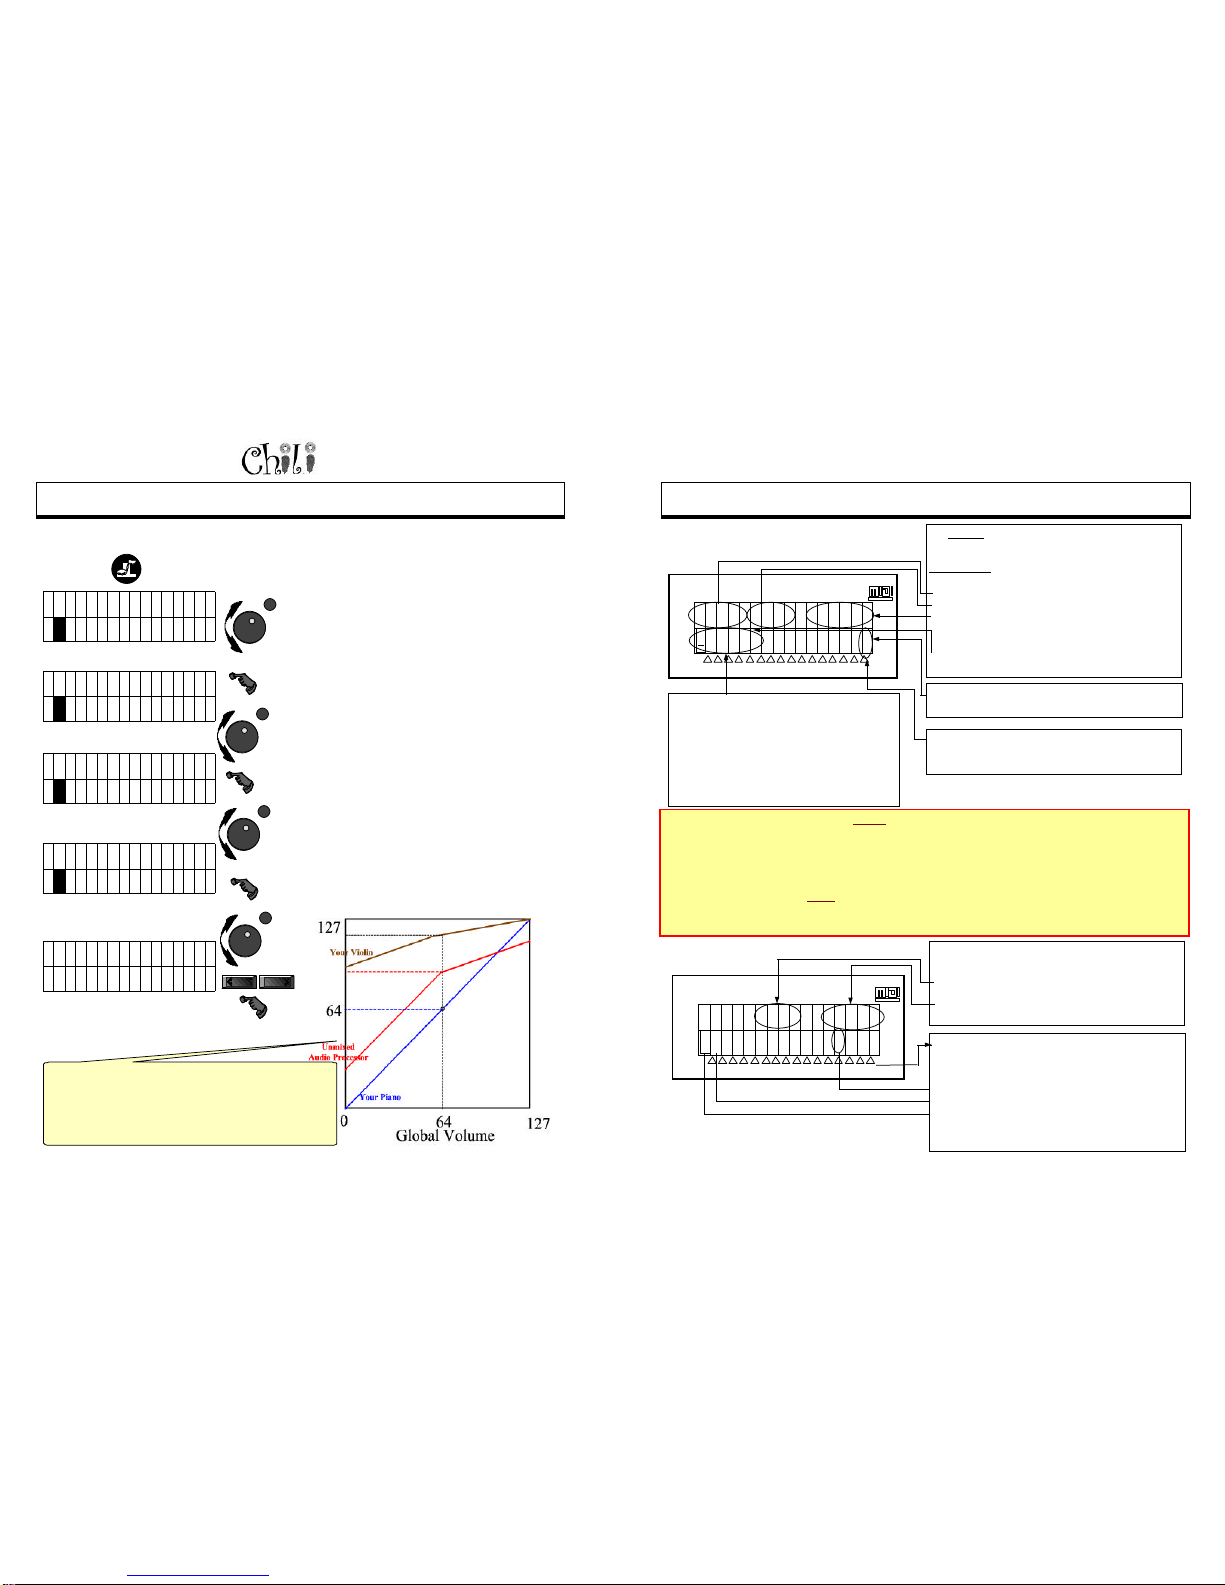
Tracking Piano Volume Relative To The
Background Volume Using Curves---------26
Mixed Output Volumes-----------------------------25
Understanding Your Mixed Outputs
Volume, Balance, & Levels------------------- 26
How Speaker volume Is Set To Match
The Volume Of The Player Piano---------- 27
Tweaking Your Piano’s Volume With.
The Background Volume (offsets)----------- 28
Setup The Headphone Output Volumes------------ 29
Setting Up Chili To Use A Mike------------------------ 30
What Version Of Code Do You Have?-------------- 30
MIDI Settings Menu Description----------------------- 31
Delays Between Piano and Background------ 32
Sync Speaker With Piano------------------------- 32
Changing The Dynamics Of A
Performance -Expression--------------------- 33
Changing The Dynamics Of A
Recorded Performance------------------------- 33
Starting and Stopping Playback from and
external MIDI source------------------------------- 33
Setting How Your Files Will Playback --------------- 34
Shuffle, Repeat, Loop------------------------------ 33
Auto—On—Start Playing On Power Up------- 33
Record Strip Setup----------------------------------------------- 35
Is The MIDI In Port Used For Your Record
Strip—Installed-------------------------------------------- 35
One Touch On Or Off------------------------------------ 35
Align Record with Playback What's Played In
Is What Comes Out--------------------------------------- 36
Start, View, Reset, Knee, Expression---------- 37
Layering More Than One Sound When You Play
And Record------------------------------------------------------ 37
MIDI Merge—To Merge Existing MIDI Data With
MIDI From The MIDI InPort.-------------------------------- 38
Analog MIDI Output Setup------------------------------------- 38
Changing Audio Volumes And Settings--------------- 39
Global—Controls All Audio Outputs----------------- 40
Unmixed Piano& Background offsets --------------- 40
Mixed, Unmixed, Headphones (bass, treble,
balance)----------------------------------------------------- 40
Changing How A MIDI File Plays Back ----------------- 41
Changing Tempo------------------------------------------ 41
Modifying The Key It Is Played In/Transpose------ 42
Tuning-------------------------------------------------------- 42
Bank---------------------------------------------------------- 42
Reverb Effects -------------------------------------------- 43
Chorus Effects--------------------------------------------- 43
Omni On----------------------------------------------------- 43
Practicing –Menu Item Descriptions ------------------- 44
Enabling Silent Practice--------------------------------- 44
Using Left And Right Hand Features----------------- 45
Setting The Left & Right HandSplit Point---------- 46
What Is Heard Out Of The Headphones------------ 46

Page 4Owners Manual
TABLE OFCONTENTS
Mark A Section Of Music For Use While
Practicing-------------------------------------------------47
Practicing, Performing Or Recording With
The Speakers On or Off----------------------------- 49-50
Taking Advantage Of The Metronome ------------------48
Enabling The Metronome For Use While
Practicing And Recording-----------------------------48
Adjusting The Time Signature--------------------------48
Adjusting Metronome “Beats Per Second”
While Recording-------------------------------------------49
Adjusting Metronome Volume--------------------------49
Adjusting Metronome Volume While Recording---49
How To Play The Many Sources---------------------------51
QRS_CD, Floppy, Demo, ECD (External
CD), Aux, MIDI, Audio_CD, MIDI_CD----------------51
Creating Your Own MIDI CD----------------------------51
Resetting Your System Using The Clear
Button -----------------------------------------------------------------50
Home Screen-----------------------------------------------50
Clear Memory-----------------------------------------------50
Reset The System-----------------------------------------50
Voice Button---------------------------------------------------------50
Layering, Assigning Or Setting Instruments
On A MIDI File----------------------------------------------52
Enabling 16 layered Voices-----------------------------37
Recording Menu Descriptions ------------------------------53
WhatAre The Differences Between One
Touch On and Off------------------------------------------53
Quick Record & Playback-------------------------------54
Recording a layered piece-------------------------------54
Adding A Drum Track-------------------------------------56
Saving Your Masterpiece--------------------------------54
Adding On To The End Of A Track Using
Append----------------------------------------------------55
Assigning Instrument Sounds To What Has
Been Recorded Or What Will Be Recorded-----55
Adding Another Track And Automatically
Assigning A Channel ----------------------------------55
How To Record Left & Right Hand Separately
Using Channel 1 And 2 -----------------------------56
Adding Tracks To An Existing File--------------------57
Virtuoso Violin -Setup And Adjustments ----------58-60
Cable Configuration---------------------------------------58
Setup the Equalizer---------------------------------------59
Setup the Volume Curves-------------------------------60
Accessories And Options-------------------------------------66
Upgrading Your Software-------------------------------------61
MIDI Implementation Table-----------------------------------67
Notes--------------------------------------------------------------- 62-63
Contact Information ---------------------------------------------68
For Technical Support Call 1-941-597-5888 Page 65
MIDI IMPLEMENTATION CHART
16
Dulcimer
32
Guitar
Harmonic
48
Timpani
64
Syn.
Brass 2
80
Ocarina
96
Sweep
112
Shanai
128
Gunshot
15
Tubuler
Bells
31
Distortion
Guitar
47
Harp
63
Syn. Brass
1
79
Whistle
95
Halo
111
Fiddle
127
Applause
14
Xylo -
phone
30
Overdrive
Guitar
46
Pizzicato
Strings
62
Brass
Section
78
Shaku -
hachi
94
Metallic
110
Bagpipe
126
Helicopter
13
Marimba
29
Elec. Mute
Guitar
45
Tremolo
Strings
61
French
Horn
77
Blown
Bottle
93
Bowed
109
Kalimba
125
Telephone
12
Vibra-
phone
28
Elec.
Clean
44
Contra -
bass
60
Muted
trumpet
76
Pan Flute
92
Choir
108
Koto
124
Bird
Tweet
11
Music Box
27
Elec. Jazz
Guitar
43
Cello
59
Tuba
75
Recorder
91
Polysynth
107
Shamisen
123
Seashore
10
Glocken -
spiel
26
Steel
Guitar
42
Viola
58
Trombone
74
Flute
90
Warm
106
Banjo
122
Breath
9
Celesta
25
Nylon
Guitar
41
Violin
57
Trumpet
73
Piccolo
89
New Age
105
Sitar
121
Guitar
Fret
8
Clavi
24
Tango
Accordian
40
Syn. Bass
2
56
Orch. Hit
72
Clarinet
88
Bass Lead
104
Sci-fi
120
Reverse
Cym.
7
Harps -
ichord
23
Harmonica
39
Syn. Bass 1
55
Synth Voice
71
Bassoon
87
Fifths
103
Echoes
119
Syn. Drum
6
Elec.
Piano 2
22
Accordian
38
Slap Bass
2
54
Voice
Oohs
70
English
Horn
86
Voice
102
Goblins
118
Melodic
Drum
5
Elec.
Piano 1
21
Reed
Organ
37
Slap
Bass 1
53
Choir
Aahs
69
Oboe
85
Charang
101
Brightnes
s
117
Taiko
Drum
4
Honky-
tonk
20
Church
Organ
36
Fretless
Bass
52
Syn.
Strings 2
68
Bari Sax
84
Chiff
100
Atmosph
ere
116
Wood
Block
3
Elec.
Grand
19
Rock
Organ
35
Elec.
Picked
51
Syn.
Strings 1
67
Tenor
Sax
83
Calliope
99
Crystal
115
Steel
Drums
2
Bright
Acoustic
18
Percussive
Organ
34
Elec.
Finger
50
Strings
Ens. 2
66
Alto Sax
82
Sawtooth
98
Soundtrack
114
Agogo
1
Acoustic
Grand
17
Hammond
Organ
33
Acoustic
Bass
49
Strings
Ens. 1
65
Soprano
Sax
81
Square
97
Ice Rain
113
Tinkle Bell

Page 64 Owners Manual
ACCESSORY OPTIONS
Wireless Systems
50288 Wireless V 169.445 (Piano)
50289 Wireless W 171.845 (Audio)
Record Strip
70484 MIDI Record Strip (Lite Switch)
70495 MIDI Record Strip (Opti-Scan)
Stop Rails
70470 Grand Stop Rail
70475 Upright Stop Rail
70250 Installer's Kit
71212 Nickelodeon Kit
70130 Pedal Solenoid
71220 220V Operation
70850 Universal Sostenuto Cable Trapwork
70897 Steinway Sostenuto Trapwork
70895 Push Type Sostenuto Trapwork
70896 Pull Type Sostenuto Trapwork
70387 Smart Switch
70396 External Keypad
70394 IR Sensor
70398 Spare Remote Control
50060 Analog to MIDI Interface
70381 CD Keyboard Player
50105 Sound Card MIDI Male Cable
80115 Sound Card MIDI Female Cable
50119 Wave Dock
50118 MIDI Dock 1x
50121 MIDI Dock 2x
50123 USB MIDI Interface Mac/PC
70530 Piano Audio Mixer
Misc. Accessories & Enhancements
70207 Orchestrated Cable Package for Home
70150 MIDI Cable 1 ft
70151 MIDI Cable 3 ft
70371 MIDI Cable 5 ft
70152 MIDI Cable 10 ft
70153 MIDI Cable 20 ft
70154 MIDI Cable 50 ft
70155 MIDI Cable 100 ft
70133 RCA to RCA Male Plugs 3 ft
70131 RCA to RCA Male Plugs 6 ft
70134 RCA to RCA Male Plugs 12 ft
70135 RCA to RCA Male Plugs 20 ft
70209 Twin RCA Plugs to Twin RCA Plugs
70213 Y RCA Connector
60018 Stereo Mini to L & R RCA Cable
Stereo Mini to L & R RCA Adapter
70158 MIDI Barrel Connector
70166 RCA Barrel Connector
Cables
Software
Series
400xxx Piano Solos Nostalgic Series
800xxx Piano Solos Performance Series
860xxx Concert Series CDs
860xxxM Nickelodeon CDs
875xxx Original Artists
810996 CD Organizer Zipper Case with (24) CDs
QRS Floppy Disks
Series
600,xxx Piano Solos
660,xxx Concert Series Floppies, Look for Floppy
Disk Icon
609981 Floppy Collection (10) in Zippered Case
QRS Pianomation VCR Tapes
Series
950,xxx Sing-Along Videos
Computer Programs
500105-500128 Pianist Programs for IBM or Mac
QRS Pianomation CDs
To Order Call 941-597-5888
or visit our website at
www.qrsmusic.com
For Technical Support Call 1-941-597-5888 Page 5
PARTS INCLUDED
Chili Box Pack Out
QRS # Description QTY
36362 4-40 Phillips Pan Head Screw 4
36366 Shoulder Washers 4
36363 Mounting Screws #6 .75 Philips Head Flat 8
70134 RCA to RCA Male Plugs 1
70371 MIDI Cable (5') 1
70388 Batteries AAA 4
71398 Remote Control 1
77020 Owners Manual 1
70214 Power Cable 1
669990 Sampler Disk 1
70570 1.5x EPROM (if required) 1
77006 Power Supply Mounting Bracket—Wrapped around power supply 1
36364 AMC mounting bracket 1
77034 Shipping Box 1
77002 Power Supply 1
Chili—Dual Drive Cat # 77500
Includes the pack out above and
both a CD drive and Floppy disk
drive.

Page 6Owners Manual
If you are upgrading from a previous version of Pianomation MIDI you will need to update the EPROM to version
1.51 or 1.61 . The version 1.51 EPROM requires a 256 processor, similar to the one shown below, and their
associated cables. Below are the QRS part numbers required. The EPROM version is written on the chip which is
located on the processor board.
INSTALLING ONYOUR PIANO
EPROM version 1.50 is required in an existing piano.
This goes into the processor located under the piano.
Test&Alignment
Cat.No.811435
NoteDriverSignalCable
Cat.No.70319
UserControlCable
Cat.No.70329 PowerSupplyCable
Cat.No.811434
Status
QRSProcessor
Cat.No.60100
•Mount the bracket to Chili before installing on the piano. It is important that the
shoulder washers have the same orientation as shown above.
•Place the unit under the front of the piano in a pulled out position.
•Use a screw gun to insert the rear screws.
•Pull the unit back all the way giving you access to the holes in the front of the
mounting bracket.
•Screw in the front 2 screws. Be sure they are fully inserted or you will scratch the
top of the unit.
UPDATINGTHE PIANOMATION ENGINE
Description QRS Part Number
EPROM 1.51 70570
Note: If Chili is mounted on the piano flip dip switch 3 up. Dip switches are located on the side of the Year 2000
processor and inside the enclosure on the previous years enclosures.
Be sure any powered speakers
plugged into Pianomation MIDI
are plugged into the
Pianomation system power
supply’s switched outlet.
To Driver Boards To Power Supply
MIDI In
To User Interface To Test Box
Year 2000 Release
PLAY.ASM©1993
Piano Automation
Ver1.30 SN:****
PLAY.ASM©1993
Piano Automation
Ver1.30 SN:****
1.51K
For Technical Support Call 1-941-597-5888 Page 63
The Yamaha concert
series floppy does not
sound right.
•Yamaha does not always adhere to the General MIDI specification
when asking for specific instruments. This may cause the sounds
out of the Chili unit to play differently.
Some piano keys are
playing louder than
others, or the sustain
pedal does not have
enough power to
energize our system.
•When this is noticeable give your technician a call, or give QRS a
call, there are routines built into Chili to adjust for this but some
instruction is necessary. This setup is typically done after a tuning
or when initially installed in the home.
The sustain event is not
recorded accurately. •The sustain switch must be accurately installed or it will effect the
entire performance. The sustain switch is located either under the
piano or inside the piano. If it is inside the piano call your
technician to come adjust it. If it is still not to your satisfaction do
not let them leave without calling us first.
The speaker on the piano
Pops when I turn the unit
on.
•This occurred on most of the first units built that did not have the
powered speaker plugged into the switched power supply of the
Pianomation MIDI system and version 1.51k EPROM is not
installed.
My disk is not recognized
when I upgrade. •Make sure you used a clean formatted floppy and make sure the
name of the file is QRSUpdat.bin.
The Metronome does not
stop when I start
recording.
•Check to make sure you are getting MIDI out from your record strip.
•Check the record strips power.
•Select MIDI as your source, choose an instrument, play the piano, if
you hear the instrument out of the speaker then the record strip is
working. Go back to record, record, stop and play. If it still does
not record. Call QRS.
The unit does not power
down. •This usually occurs when the system is writing to flash. Hold clear
for two seconds, this will interrupt what it is doing and shut down.
NOTES

Page 62 Owners Manual
Piano jumps to its loudest
setting. •The pianomation processor on the bottom of the piano has
dipswitch 3 set to off.
•Check the piano curves; Setup -Defaults -Audio -Curves -Piano if
these are set to 127 across the board high volume is all you will
receive.
I cant turn the volume
down on a piece I have
just recorded.
•That is by design, the intent is for the piano to play it back the way it
was played in. To adjust the volume you must save it first then play
it from the Floppy. The volume knob will then work for you.
•If it is the playback dynamics you are worried about try one of two
things 1. Doing a record alignment, or 2. Changing the expression
settings.
The song I recorded and
saved does not play back
at the same expression.
•Set the global volume at 64.
The unit locks up on start
up. •This issue occurred on several of the first units sold, it was related
to the IR control. Try upgrading to the latest code using the 4
button reset. If the unit locks up again -hold clear for 2 seconds -
this will interrupt what the processor is trying to do and keep you
moving.
•If this doesn't work give us a call.
The unit will not play the
CD sequentially. •There are four ways to play back a CD; Sequentially, Shuffle
(sticky), Shuffle (non-sticky) only one song then stop and
Programmed.
•If Shuffle (sticky) is set to on it will not play sequentially. To turn it
off go to Setup-Defaults -Playback -Shuffle and turn it off.
•If Shuffle (non-sticky) is on it will not play sequentially -to turn it
off go to the home screen (push clear once) select shuffle and turn
it off.
•If Programmed is set to only one song: go to the home screen
(push clear once) select program and reset the tracks you would
like to play.
•If Continuous is turned off. To turn it on go to Setup -Defaults -
Playback -Continuous and turn it off.
The MIDI file on my
Floppy does not load I
receive an error.
•The MIDI file may still be on the Floppy but the drive may not be
able to retrieve the data in the location specified. Try saving the
MIDI file to your hard drive on your PC, reformat your floppy disk
and then transfer the file back. This should work. If you do not
have another floppy and it is a QRS floppy call us.
•The songs loaded on the disk are buried in a file folder. Bring them
to the top level using your PC.
NOTES
For Technical Support Call 1-941-597-5888 Page 7
WHEN YOU FIRSTTURN CHILI ON
12 3 4 5 6 78 9 10111213 1415 16
QRS Music Technologies GENERAL
12345678910 11121314 15 16
PIANOMATIONMIDI
INITV6.10P1.51k
1234 5 6 7 8 9 1011121314 15 16
QRS Music Technologies GENERAL
12345678910 11121314 15 16
READING
FLASH
PLEAS
EWAIT
12 3 4 5 6 78 9 10111213 1415 16
QRS Music Technologies GENERAL
12345678910 11121314 15 16
C1D1STOP00:00
SELECTSHUFFLE
’
The second screen states the unit is initializing.
This screen indicates the version of the Pianomation MIDI
EPROM in the processor. The processor is typically
mounted under a grand piano or inside an upright. It also
tells us the version of the Chili software, and will perform
an internal check to ensure the stability of all the circuits.
The unit will now load up previous set-points.
Finally, the home screen appears. The unit is now ready
for operation.
12345678 9 10 1112 131415 16
QRS Music Technologies GENERAL
12345678910 11 121314 15 16
BOOTLOADER0.02
CODEPRESENT
12345678 9 10 1112 131415 16
QRS Music Technologies GENERAL
12345678910 11 121314 15 16
PIANOMATIONMIDI
Initializin
g
This screen indicates that Chili can be updated via a floppy
disk.
Note: If demo was your last source then the demo
loading screen will be next.
Note: If you miss the version numbers, you can view
them by pressing setup and choosing Version.

Page 8Owners Manual
QUICK START
To familiarize yourself with the basic functions of Chili, follow the six steps below. These steps will walk you
through the basic playback features that are commonly used for playback of a CD, Floppy or Internal Demo. Chili
utilizes the same buttons for other features. These features will be discussed in detail in the following sections.
Step 1.
Press Power
Press “Power” to turn the unit “ON” or “OFF”. The unit will
default to the last played source.
Step 2.
Press Play
Push play and the song begins. Push pause and the song
will pause.
Step 3.
AdjustVolume
To increase volume, turn the dial to the right, to decrease
volume turn the dial to the left.
Step 4.
Advance Song
To advance to the next song Press the “Right” button.
Step 5.
Previous Song
To return to the beginning of the song Press the “Left” but-
ton once . Press twice to go to the previous song.
Step 6.
Press Stop
To end playback Press “Stop”.
Play Once a track has been selected and “played” the unit will
then continue to the next track until it reaches the end of
the media.
Right
Left
Enter
So, to play a CD: Push the
Source button, Dial In
QRSCD, Push Enter.
For Technical Support Call 1-941-597-5888 Page 61
Downloading an update from the website
•Create a folder under you’re My Documents folder called QRS, and one called QRS Manu-
als. Go online to http://www.qrsmusic.com.
•Click on QRS Software Update link under the picture of Chili
•Click on the upgrade file QRS610.bin version x.xx.
•Your computer will ask you where you want to put it, send it to your QRS folder and push
enter.
•When it is done downloading, copy the QRS610.bin just downloaded to a blank floppy.
•Rename the file on the floppy QRSupdat.bin.
•While you are at the sight you can also download the latest manuals to the QRS manual
folder you created.
For units where the display reads Boot Loader 0.02
•Hold down the following 4 buttons at the same time-"audio", "metronome", "source",
"setup" and Power up the Chili (This will erase all existing presets you may have had).
•Holding the four buttons down should be done if you are jumping from one major revision to
another. For example from 3.xx to 4.xx. It is not required if you are jumping from say 4.45 to
4.48.
•If this is a minor update turn the unit on without holding the buttons.
•Insert the QRSUpdat disk and hold the clear button down for more than 6 seconds.
•The boot code will now flash QRSUPDAT.BIN, (about 8xxK).
•After the upgrade has finished, remove the disk. You are finished upgrading and the install-
ing latest code.
•Turn the unit off then on.
•If you have a record strip present be sure to go to "Setup-Record Strip -Present " .
•If you have any questions be sure to give us a call. 941-597-5888.
•If you get errors try it again, or make another copy ona reformatted disk.
UPGRADING

Page 60 Owners Manual
Setting Up The Volume Curves
•Select a Virtuoso Violin song.
•Push Play.
•Press Setup -Defaults -Audio -Curves -Violin.
•The Violin, Piano and Speaker will go down to
its lowest volume.
•Adjust the violin's volume so that it sounds good
with the lowest volume played by the piano and
background. You may want to also look at the
bow movement's speed. The lowest violin
volume should also coincide with an attractive
bow speed.
•Push the Right button.
•Adjust the violins volume to sound good with the
piano and background speaker.
•Push the Right button.
•Adjust the violins max volume to sound good
with the pianos and backgrounds max volume.
•Push Enter.
•By pushing enter the volume will revert to what
the global volume is set to.
SETUP
•
DEFA
U
LTRECORD
–
••••••••••••••••
SETUPDEFAULT
—
AUDI
O
MIDIPLA
–
••••••••••••••••
SETUPAUDIO
—
CURV
E
SOFFSETS
–
••••••••••••••••
SETUPCURVES
•
VIOL
I
NUNMIXED
–
••••••••••••••••
SETUPVIOLIN
001
064127
••••••••••••••••
Enter
Enter
Enter
Enter
Right
Left
VIRTUOSO VIOLIN -SETUP AND ADJUSTMENTS
The Y axis shows the volume settings for each instrument and the
audio processor. The X axis shows the corresponding Global
volume. So in this example when global volume is at say 1, the
piano is at 1 to play its softest the audio processor is at 30 to
sound good with the piano. And the violin sounds good with the
other two when its volume is at 85.
85
30
For Technical Support Call 1-941-597-5888 Page 9
1234 5 6 7 8 9 1011 12 13 14 15 16
QRS Music Technologies GENERAL
12345678910 11 121314 15 16
SCREEN VIEW BASICS
12345678910 1112 131415 16
QRS Music Technologies GENERAL
12345678910 11 121314 15 16
C1D1STOP00:00
SELECTSHUFFLE
’
The top row of the screen will always tell you where you
are within the operating system's logic tree, or what your
current operating status is.
In example 1: We are looking at the current operating
status.
•The first four characters tell us Chili's mode.
•The second spot tells us the unit is stopped.
•Here the elapsed time is displayed. If this were a
MIDI file you would see the measures being
counted. (See Example 2.)
•Push enter at Select and you can select the track
using the data dial.
The selection can only be made when the first letter
of the selection is highlighted in the first or second
spot of the LCD. If there is an arrow in the first spot
of the LCD it indicates there is a higher menu or
more selections to the left. Turning the data dial
knob to the right brings the first letter of the next
word into the highlighted selection area. Pushing
enter selects the option and brings up the next set
of possible selections or a set point to be adjusted.
The arrow pointing to the right (") indicates there are
more options to choose. They are located to the right of
the Shuffle option.
The bottom row indicates what options are available.
Example 1
The numbers 1—16 on the bottom of the screen point to
an indicator on the LCD that identifies the active
channels, the channels that will have activity, and those
where a piano channel is present.
(-) A dash indicates a channel that is present.
(?) A note indicates the present channel is active.
(v) The Piano shape indicates there is a piano on this
particular channel .
D1D1PLAY0002M
v
?
----------
In this example the D in the first space indicates that a demo
MIDI file is the source and PLAY indicates that it is playing.
•PLAY = file is playing, STOP = Stopped, PAUSE =
Paused
•The 0002M is the number of measures that have been
played.
Example 2
IMPORTANT PLEASE NOTE: EACH WORD (not set of words) on the second line is an option you can
select. Turning the dial simply shifts the words in the line left or right. When the word representing the
option you would like is the first word on the left, pushing enter will go to that word’s/option’s submenu.
NOTE ABOVE: YOU ARE NOT PUSHING ENTER FOR THE OPTION “SELECT SHUFFLE” YOU ARE
PUSHING ENTER FOR THE OPTION “SELECT”
IF YOU SEE THE WORD PLAY ON THE TOP ROW, THE KNOB WILL ACT AS A GLOBAL VOLUME
CONTROL. WHEN PLAY IS NOT PRESENT THE DATA DIAL ACTS SIMILAR TO A MOUSE TO NAVIGATE
SELECTIONS OR CHANGE SETPOINTS.

Page 10 Owners Manual
SCREEN VIEW BASICS
The status is always indicated by the Status Code (first four digits of the first line of the LCD’s Home page). To
return to the home page, at any time, press the clear button once.
C -Internal "QRS CD” is the
source
F -Internal “Floppy” is the
source
D -“Demo” is source
A -“Aux In" is the source
X -External CD (“ECD”) is
source
M -“MIDI In" is source
R -Recorded data is source
c -Internal Audio CD
_ -MIDI Data CD
1 -The source is manually selected & QRS or MIDI
content is present.
2 -The source was manually selected & a non-MIDI or
QRS content was detected.
3 -Auto source detect on & QRS or MIDI content is
present.
4 -Auto source detect on & an audio CD was detected.
12 3 4 5 6 78 9 10111213 1415 16
QRS Music Technologies GENERAL
12345678910 11121314 15 16
C1D1STOP00:00
SELECTSHUFFLE
"
The first digit on the
screen indicates what
the active source is. If
you want to play a
floppy and a C is
present, you must
change the source.
12 3 4 5 6 78 9 10111213 1415 16
QRS Music Technologies GENERAL
12345678910 11121314 15 16
C1D1SOURCE
#
CDFloppyDemo
"
Pushing the I/O (source) button or F1 key on
the remote will bring you directly to a screen
that allows you to change the source.
12 3 4 5 6 78 9 10111213 1415 16
QRS Music Technologies GENERAL
12345678910 11121314 15 16
C1D1STOPTRK:00
#
ShuffleRepeat
"
Source
I/O
Top Row -Position
Top Row -Position #2
Change the source, for example,
means if you want to play a
floppy instead of a CD, or vice
versa. This is where you tell the
unit to do it.
Looking at those first four characters will
always tell you what state Chili is in.
For Technical Support Call 1-941-597-5888 Page 59
VIRTUOSO VIOLIN -SETUP AND ADJUSTMENTS
Setting Up The Equalizer
Press Setup -Defaults -Audio -Equalizer -Violin -
and set the violin to zero. By doing this you will be
telling Chili several things.
That the sequencer should not produce any violin
sounds that are found on Channel 2.
•That the Chili unit should parse all MIDI files
for Virtuoso Violin events on Channel 2.
•That Chili should route the channel 2 Virtuoso
Violin events to the delayed MIDI out. ( The
violin plays in real time, the piano has a built in
500ms delay.)
SETUP
•
DEFA
U
LTRECORD
–
•
•
•
•
•
•
•
•
•
•
•
•
•
•
•
•
SETUPDEFAULT
—
AUDI
O
MIDIPLA
–
•
•
•
•
•
•
•
•
•
•
•
•
•
•
•
•
SETUPAUDIO
—
EQUA
L
IZERCURV
–
•
•
•
•
•
•
•
•
•
•
•
•
•
•
•
•
SETUPEQUILIZER
•
VIOL
I
NSYNTH
•
•
•
•
•
•
•
•
•
•
•
•
•
•
•
•
SETUPVIOLIN
•
VIOL
I
N000
•
•
•
•
•
•
•
•
•
•
•
•
•
•
•
•
Enter
Enter
Enter

Page 58 Owners Manual
The Chili unit is typically mounted in the pedestal
of the Virtuoso Violin. The Piano does not require
any control boxes, because it is controlled by the
Chili unit at the Violin Pedestal.
On the Pianomation MIDI processor Dip switch 9
and 3 are turned on.
The speaker is also located in the pedestal.
VIRTUOSO VIOLIN -SETUP AND ADJUSTMENTS
MIDI In MIDIOut
MIDI Thru
To Driver Boards To Power Supply
MIDI In
To User Interface To Test Box
The Back Of CHILI
Pianomation MIDI Processor
Unmixed OutMixed Out
Aux InCD In
AMI Out PMM Reset
IR Port
Mic In
To Pianomation
MIDI Through
MIDI Out Delayed
MIDI OutMIDI In
Power
For Technical Support Call 1-941-597-5888 Page 11
R -Right hand muted
L-Left hand muted
B -Both hands muted
E -The capability to push left or right is enabled
D -Auto left and right hand capabilities disabled
1 -In order
2 -In order repeat
3 -Shuffle
4 -Shuffle repeat
5 -not used
6 –not used
7 -Marked playback auto repeat
8 -Marked playback pause repeat
P -Practice Mode speakers are live
Q -Quiet Practice Mode
SCREEN VIEW BASICS
12345678910 1112 131415 16
QRS Music Technologies GENERAL
12345678910 11 121314 15 16
C1D1STOP00:00
SELECTSHUFFLE
’
The third position indicates that the left and right buttons can be used to mute or un-mute a particular hand. If the
L/R “hand” or channel has been enabled the screen will display an E, if the left hand is muted the L will be
displayed. A MIDI file must be playing in order to mute a channel.
If the solo piano performance has only one piano channel, and L/R has been enabled, the split point will determine
which keys are muted. If the MIDI file has piano on both Channel 1 and Channel 2 Chili will assume Channel 1 is
the left hand and Channel 2 is the right hand.
RightLeft
1234 5 6 7 8 9 1011121314 15 16
QRS Music Technologies GENERAL
12345678910 11121314 15 16
C1D1PRACTICE
‘
ENABLEL/RSPL
’
Practice To enable Left and Right Playback enter
the Practice Mode screen by pressing the
practice button. Choose L-R, press enter
and select enable.
12 3 4 5 6 78 9 10111213 1415 16
QRS Music Technologies GENERAL
12345678910 11121314 15 16
C1D1STOP00:00
SELECTSHUFFLE
’
The fourth digit represents the type of playback requested. In the example above Chili will play each title in the
same order as on the CD or Floppy.
Top Row -Position
Top Row -Position
If you want to practice with the metronome,
make sure you enable it first using the
menu under the metronome button.

Page 12 Owners Manual
KNOB & BUTTON BASICS
Round Buttons: These are directly linked to the
submenu associated with that button. For
example: The first button changes the audio output
settings. By pressing audio, a menu of the
different audio settings that can be changed are
displayed. The MIDI button changes the digital
settings such as tempo and key. Practice allows
you to establish routines to aid in learning to play
the piano. Metronome controls the built in
metronome and its timing. Source allows you to
select between the many sources available. Setup
is typically a one time operation, used when the
unit is first received.
The Data Dial: The largest knob on the unit has
several main functions:
•As a mouse, navigating between options.
•As a set point adjustment, where parameters
such as volume level, tempo and metronome
timing can be adjusted.
Turning the knob: When the knob is first turned it
will increment the set point one at a time. After the
7th increment it will jump several digits at a time,
allowing the unit to scan to a specific point much
faster.
The 'Enter' Button: Is similar to clicking a mouse. A
parameter is selected or a set point is adjusted then
set by pressing enter.
The 'Voice' button allows instruments to be
assigned to channels. During the play of a MIDI file
you can change the sound assigned to each
channel. To do so, press voice and then use the left
& right buttons to toggle between channel and
instrument. Toggle to instrument, use the data dial
to select an instrument, and then toggle back to
channel. This will save the instrument assignment
for that channel and you will hear that instrument thru
the speaker.
The 'Clear' button will bring the unit to the main
menu. If held for 2 seconds it will clear scratch pad
memory (a temporary storage area where MIDI files
reside while they are played, recorded or
manipulated), reset Pianomation and send your
volumes to a known state based on current global
volume and the curves in setup. If held for 6 seconds
it will reset the system.
The 'Left' and 'Right' Buttons can be used in place
of the data dial to make selections, advance the
track, rewind or mute the left or right hand. If needs
to be made, you can use the data dial or the left and
right buttons to select an option.
If the unit is playing, or no options are available, the
buttons can be used to advance or rewind the track.
'Play' starts playback. Pushing it while it is playing
will pause playback. Stop will stop playback and
reset to the beginning of the track.
'Record' displays the menu for recording or saving a
modified MIDI file. If you are in OneTouch Mode,
simply begin recording. A metronome click will
indicate you can record. If you are not in OneTouch
pushing record will present the record screen. From
there you can choose to record a new piece or add on
to an existing piece.
For Technical Support Call 1-941-597-5888 Page 57
RECORDING ADDITIONALTRACKS TOANEXISTING SONG
Turn "One Touch" Off and Load a File
•If "One Touch" is On -Turn "One Touch" Off by
pressing Setup.
•Select Record Strip, Press Enter.
•Select "One Touch" and Press Enter.
•Select Off and Press Enter -"One Touch" is now off
and advanced record mode is on.
•Load your file from floppy by pressing Source.
•Select Floppy and press Enter.
•Select File and press Enter The file will be loaded
into Scratch Pad Memory.
Enter
RECORDSTRIP
•
ONETOUCH
•
•
•
•
•
•
•
•
•
•
•
•
•
•
•
•
ONETOUCHRECORD
OFFON
•
•
•
•
•
•
•
•
•
•
•
•
•
•
•
•
R1D1RECORD
?RECORDNEW
AD
D?NEWTRADDDR
U
MTRAPPENDSAVE
•
•
•
•
•
•
•
••
•
•
•
•
•
•
•
D1D1SOURCE
—
CD
•
FLOPPYDEMOEC
–
DAUXMIDI
•
•
•
•
•
•
•
•
•
•
•
•
•
•
•
•
Red Light will signify that it is being
loaded.
R1D1RECRD0000M
?
v
?
---
?
---
?
-
-
•
•
•
•
•
•
•
•
•
•
•
•
•
•
•
•
•Press the Record Button -The R in Record will be
highlighted.
•Press Enter.
•There will be a two measure lead-in of the Metro-
nome, then the music from the file will begin to play.
•Record when you are ready.
•Press Stop.
•Press Play.
•The Piano Parts will play on the piano and the back-
ground will be heard from the speaker connected to
the piano.

Page 56 Owners Manual
RECORDING A LEFT AND RIGHT HAND FILE
•Push Record -The metronome will start to tick and Channel One track One is ready for
recording.
•Record with your left hand
•Push Stop
•Push Play if you want the unit to play back what was played in.
•You will hear the left hands performance out of the speaker and you will then play along.
•Push Stop
•Push Play
Enter •When done or after you push stop, turn the data dial to SAVE and push enter.
Enter •Name the tune.
•Insert a floppy disk.
•Push Enter.
•Red Light will signify that it is being saved.
•The tune will then be saved to floppy
•To take advantage of the left and right hand features of the unit refer to page 45.
Since Channel 1 represents the left hand and Channel two represents the right hand, you will record in that order.
•Push Enter -to add a new track. -By doing this you will be recording on track two but
also Channel two. There will be a two measure lead in prior to the other piece of music
starting.
R1D1RECORD
ADDNEWTRK
•
ADDDRUMTRKAP
–
PENDSAVE
ASSIGN
ppppppppppppppp
•To add a drum track to channel 10 without recording the first 9 channels and tracks.
Select AddDrumTr.
•The Metronome will give you a two measure lead in prior to playing a piece already
recorded.
•At this point each key is assigned a percussion instrument according to the MIDI standard.
ADD A DRUMTRACK
For Technical Support Call 1-941-597-5888 Page 13
FRONT PANEL FEATURES
Power Turns the unit on and off. Note: It does not require Pianomation to be
turned on, however the piano will not play unless Pianomation is on.
When power is applied to Chili, the unit will turn on. If auto start is on, the
unit will also begin to play (pg. 33).
Play/
Pause
Press play and the first song in the sequence will begin to play. Press
pause and the source will pause. If continuous play is turned off then
only one song will play.
STOP Stops recording, and/or stops playback or mutes the external source (i.e.,
Multi-Disc CD Player or PC).
RECORD Press record and the metronome will start, and Chili will wait for the first
MIDI event. When done recording, press stop. To hear what you just
recorded press Play. The performance now in scratch pad memory can
be cleared, played, saved or appended.
Voice Quickly change the sound you hear when you are performing or
recording. Each channel can be assigned an instrument.
Clear Clear will return to Chili’s home state. Hold the button down for 2
seconds and you will clear the scratch pad memory. Hold the button down
for 6 seconds and the system will reset.
Right/
Left
Left and Right control which hand is muted, as well as track advance or
rewind. While L/R is on, press left or right to mute the respective hand.
This is handy when using any of the readily available education software.
IR
Will accept an IR control signal from the hand held remote control.
STATUS These two LEDs will display the status of your audio inputs and MIDI
activity.
Voice
Clear
Right
Left
Line MIDI

Page 14 Owners Manual
FRONT PANEL FEATURES
Data Dial/
Enter
This dial is the main navigator and set point adjustor for the system.
The default function is to control global volume (piano & audio) of the
system. When the unit is stopped or a button is pushed it acts as a
mouse. When you arrive at an option, 'Enter' is used to go to its
submenu.
Audio
Direct access to the Audio control screen. Used to set the various
audio output levels (mixed/unmixed outputs, piano volumes, bass,
treble etc.).
MIDI
Direct access to the MIDI control screen used to set various MIDI set-
points, such as tempo and transpose.
Practice
This brings you to a list of ways you can practice using Chili. Left and
Right hand control, Quiet practice sessions and marking sections of
music to continuously repeat.
Metronome
Quickly activates the internal metronome sound. You can set the
metronome volume and adjust the timing. The metronome can be
disabled or enabled during practice or recording, depending on your
preference.
Source
Used to choose one of the many sources available for playback:
external input Aux, ECD( external CD), Floppy Drive, CD, Demo,
MIDI_CD, Audio_CD or MIDI In.
Setup
Advanced users can set defaults, store preferences and calibrate
volume curves.
Headphones
Two sets of headphone outputs are available. Helpful when both a
student and teacher want to hear the performance.
I/O
Enter
For Technical Support Call 1-941-597-5888 Page 55
RECORD: APPEND, ASSIGN & ADD A TRACK
R1D1ASSIGNM137
—
CHxx
GRNDPIANO1
•
•
•
•
•
•
•
•
•
•
•
•
•
•
•
•
Append -Adding on to the end of a track.
•Press Record.
•Play your first track.
•Press Stop.
•Select the A in Append by turning the data dial until
the A in Append is underlined.
•Press enter once the Metronome has ticked for two
measures then begin to play the piano.
•When recording is completed, press stop.
•The completed performance is added to the end of
the previous track.
•When you have finished the session, press stop.
This will bring you back to the Quick record home
screen.
Adding a new track
•Turn the Data Dial until the A in Add New Track is
underlined.
•Press Enter. The Metronome will tick for two
measures, then you will hear the previous tracks
from the speaker.
•If you are not in advanced mode, track 2 will be
automatically assigned to channel 2.
•Begin to Play the piano accompanying your
previous track.
•Press Stop when done.
•Press play to here your combined performance.
R1D1RECORD
•
APPENDSAVEAS
–
•
•
•
•
•
•
•
•
•
•
•
•
•
•
•
•
R1D1RECORD
•
ADDNEWTRKADDD
–
•
•
•
•
•
•
•
•
•
•
•
•
•
•
•
•
R1D1RECORD
ADDNEWTRKADDD
R
–
•
•
•
•
•
•
•
•
•
•
•
•
•
•
•
•
R1D1RECORD
•
ADDNEWTRKADDD
–
•
•
•
•
•
•
•
•
•
•
•
•
•
•
•
•
R1D1RECORD
ADDNEWTRKADDD
R
–
•
•
•
•
•
•
•
•
•
•
•
•
•
•
•
•
Enter
Enter
Enter
Enter
R1D1RECOR
D
ADDNEWTRKADDDRUMTRKAPPENDSAVE
•
ASSIGN
ppppppppppppppp
Assigning an instrument to your track
•Record Track.
•Turn the Data Dial until the A in assign is underlined.
•Press Enter.
•Select the sound you would like by turning the data dial,
until the name of the sound or instrument is highlighted.
•Press Enter.
•Push Play to hear it play with that sound.

Page 54 Owners Manual
QUICKLY RECORD, PLAYBACK & SAVE
One Touch Record allows for quick and easy recording a new track and channel. If the scratch pad memory is
empty pressing the record button will immediately start the Metronome ticking and the unit will be waiting for input
(or the first note event).
R1D1PLAY0005M
?
•
•
•
•
•
•
•
•
•
•
•
•
•
•
•
•
R1D1RECRD0000M
-
•
•
•
•
•
•
•
•
•
•
•
•
•
•
•
•
R1D1STOP
•
ADDNEWTRKADD
D
R
–
•
•
•
•
•
•
•
•
•
•
•
•
•
•
•
•
•
R1D1RECORD
•
SAVEASSIGN
•
•
•
•
•
•
•
•
•
•
•
•
•
•
•
•
SETSONGNAME:
A
.MID
•
•
•
•
•
•
•
•
•
•
•
•
•
•
•
•
SETSONGNAME:
A
B.MID
•
•
•
•
•
•
•
•
•
•
•
•
•
•
•
•
Saving -After the performance is done
•The Quick Record Home screen will
appear.
•Insert a floppy disk, (DOS formatted High
Density (HD), unprotected) .
•Select S by turning the Data Dial until the S
in Save is underlined.
•Press Enter.
•Name the song by turning the Data Dial to
the first letter of the songs name.
•Press Right to go to the next space.
Note: you must enter a letter in the first
space in order to continue. When
saved unused spaces will be ignored.
•Press Enter when you have finished
entering the name.
•The file will then be written to the Floppy
Disk.
Enter
Right
Enter
Red Light will signify that it is being
saved.
Recording
•Press the Record Button -The
metronome will begin to tick. The unit will
wait for the first note event before it begins
to record the first track.
•If the Metronome is disabled under the
metronome screen, when the first note
event is received the metronome will stop
playing.
•Play the piano.
•When you are done press stop.
Playback
•Press play to hear your performance.
Note: If channel 1 is assigned one of
the piano sounds 0 through 7 of the
General MIDI sound set then the piano
will play back. Any other assignment
will be heard from the speakers.
To record more than one sound at a time; go to
Setup -Layering -turn it on. Go to voice and
assign the channels to instruments. Now when you
push record you will hear what you are recording
and record each of the instruments on its own track.
For Technical Support Call 1-941-597-5888 Page 15
MIDI In
Used as an input for an external MIDI device (PC, record strips
etc.). This source will play the Pianomation system and/or the
built-in sounds.
MIDIThru
Used to daisy chain other external MIDI devices. This is a
duplicate of the MIDI-In signal.
MIDI Out
Used to drive an external MIDI device from an internal source.
MIDI Out
Delayed
Allows you to sync an external MIDI controlled device with the
Pianomation MIDI playback system.
DB15
This port is for connecting the Chili to the processor of the
Pianomation MIDI system.
IR Port External IR Sensor/External Remote connects to the optional
External IR Sensor. It is a standard headset phone jack.
Mic In
Used to mic your piano and mix it with the background music. If
you are using Chili as a stand-alone MIDI file player, you can use
the “MIC In” to merge your guitar with a MIDI file player or vocal
with a MIDI file.
BACK PANEL FEATURES
Unmixed OutMixed Out
Aux InCD In
AMI Out PMM Reset
IR Port
Mic In
To Pianomation
MIDI Through
MIDI Out Delayed
MIDI OutMIDI In
Power

Page 16 Owners Manual
Unmixed OutMixed Out
Aux InCD In
AMI Out PMM Reset
IR Port
Mic In
To Pianomation
MIDI Through
MIDI Out Delayed
MIDI OutMIDI In
Power
BACK PANEL FEATURES
Analog
MIDI Out
(AMI Out)
Allows you to record a MIDI signal into an analog format, ie. video
tape. It is also used for transmitting the MIDI signal to Pianomation
from a remote location.
External
CD Inputs
(CD IN)
Connects an external off-the-shelf audio CD player. The unit is
equipped to recognize the type of CD (QRS or audio) and
automatically switch the outputs to the speaker system if an audio CD
is played.
AUX IN
Since Pianomation can run from many sources, we have added an
additional input for a VCR, or a wireless signal from a PC, MP3 or
QRS media source.
Mixed
Outputs
(Mixed Out)
This output will mix background music with either the piano sound
from the built-in sound set or from the mike input, and distribute the
sound throughout the home/establishment in areas where the piano is
not located. This feature eliminates the need for a mixer, piano mic
and another set of inputs on the back of your stereo. The mixed
output will also be used when someone is performing.
Unmixed
Outputs
(Unmixed
Out)
This output will send only the background music to the speakers that
supplement the piano. When an audio CD is played, both left and
right channels play as they should, giving you another speaker with
your home entertainment system.
Power In Plug the power supply in here. This is a 5 pin locking Din on Rev C
boards.
For Technical Support Call 1-941-597-5888 Page 53
R1D1RECORD
•
ADDNEWTRKADDD
’
RUMTRKAPPENDSAVE
A
•
•
•
•
•
•
•
•
•
•
•
•
•
•
•
•
F1D1RECORD
RECORDNEWADDN
–
EWTRKADDDRUMTRKAPPENDSAVE
•
•
•
•
•
•
•
•
•
•
•
•
•
•
•
•
Under Record Chili has the ability to:
1. Record for extended periods of time.
2. Assign channels, and instruments to your tracks.
3. Load an ensemble and record your accompaniment from the piano playing.
4. Record left hand and right hand together or separately.
5. Record a video performance for playback.
ONE TOUCH RECORD MENU
Pressing the
Record button
erases any
existing file in
the scratch pad
memory, starts
the metronome
ticker and waits
for the first note
event to start
recording.
Selecting Add New
Track will increment
the track and
channel by one.
When this is selected
the Metronome ticker
will start and the
previously recorded
track(s) will be heard
from the speaker.
Add Drum
Track -Many
times when you
are recording it
helps to have
your drum track
in the back. This
allows you to
add it when you
want to.
Append
will allow
you to
add onto
the end
of the
active
track.
Save will
allow you
to name a
track in the
scratch
pad mem-
ory and
store it on
a floppy.
Will record a track without
automatically assigning a channel.
It will not automatically clear the
existing scratch pad memory. In
this advanced mode you will be
required to designate a channel
and assign an instrument to the
track. This option bypasses the
quick record capabilities.
New stands for clear. When this is
selected the current track is
cleared from scratch pad memory.
Any other tracks stored in the
scratch pad will be maintained In
order to clear all tracks hold the
Clear button down for 2 seconds.
Pressing
Stop after
recording
will bring
you to the
Quick
record
home
screen
shown
above.
ADVANCED RECORD MENU
Assign -
will all you
to change
the instru-
ment as-
signment on
each of the
channels.

Page 52 Owners Manual
Note: Pressing enter twice disables the instrument channel
CHANGING VOICES
Voice will assign the sound you hear or the sounds assigned to recorded music. The sound you hear out of your
headphones or the Mixed outputs, when MIDI is selected as the source and there is a record strip present, will be
the instrument assigned to channel 1. To change that sound push the voice button, turn the data dial to the sound
you would like and push enter. When listening to a MIDI file the sounds heard on each of the channels may be
modified by pushing the voice button and modifying the instruments.
Changing The Voice That Accompanies A Performance/Layering
Changing Voices on a Demo or Floppy MIDI File
•Load a File from Demo or from a Floppy.
•Press Voice.
•Select Instrument for Channel 1 (this is the
sound that is routed to the mixed output).
•Press Left.
•Turn the Data Dial to pick a channel.
•Press Right.
•Turn the Data Dial to assign an Instrument
sound that channel.
•Repeat 3 -6 until complete.
•Press Enter.
D1D1SOURCE
Ÿ
CDFLOPPYDEMOECDAUX
•
MIDI
•
•
•
•
•
•
•
•
•
•
•
•
•
•
•
•
•Press the Source Button.
•Select MIDI as the Source.
•Press Enter.
•Press the Voice button.
•Turn the Data Dial until the Instrument of
choice is highlighted.
•Press Enter.
•Begin to Play.
•To change the volume of the selected
instrument press audio.
•Press Enter.
•Turn the Data Dial to raise the Global Volume.
M1D1PLAY0001M
v
vv
v
v
v
v
v
v
v
v
v
v
v
v
v
•
•
•
•
•
•
•
•
•
•
•
•
•
•
•
•
M1D1VOICE
CHO1GRNDPIANO.1
•
•
•
•
•
•
•
•
•
•
•
•
•
•
•
•
Voice
Enter
Enter
I/O
Enter
F1D1STOP0001M
v
-
-
-
-
-
-
v
-
-
v
-
•
•
•
•
•
•
•
•
•
•
•
•
•
•
•
•
M1D1VOICE
CHO1GRNDPIANO.1
•
•
•
•
•
•
•
•
•
•
•
•
•
•
•
•
Left
Voice
Enter
Right
Enter
If Layering is on all notes, all channels, and instrument
sounds play.
For Technical Support Call 1-941-597-5888 Page 17
1 2 3 4 5 6 7 8 9 10 1112 13 14 15 16
QRS Music Technologies GENERAL
12345678910 11 12 13 14 15 16
COMMERCIAL APPLICATIONS—(A) RECORD (B)PLAYBACK
(C)PERFORMANCES, (D)AUTO ON/OFF, (E)PIPING THROUGH THE HOUSE
Add The Ability To Practice In Silence
Unmixed OutMixed Out
Aux InCD In
AMI Out PMM Reset
IR Port
Mic In
To Pianomation
MIDI Through
MIDI Out Delayed
MIDI OutMIDI In
Power
QRS Pianomation 2000
......................
......................
......................
......................
............................................
......................
......................
............................................
......................
............................................
......................
......................
......................
......................
......................
......................
......................
......................
......................
......................
......................
......................
......................
......................
......................
......................
......................
............................................
......................
......................
............................................
......................
............................................
......................
............................................
......................
......................
......................
......................
......................
......................
......................
......................
......................
............................................
......................
......................
............................................
......................
............................................
......................
......................
......................
......................
......................
......................
......................
......................
......................
......................
......................
......................
......................
......................
......................
......................
......................
............................................
......................
......................
............................................
......................
............................................
......................
............................................
......................
......................
......................
......................
......................
Dedicated to the
speakers located in the
same room as your
piano or see below.
To Home Entertainment
Center
Wireless from CD Player
or Direct from CD Player
Pianomation MIDI
Record Strip
Timer for auto on
Power Supply
Unmixed OutMixed Out
Aux InCD In
AMI Out PMM Reset
IR Port
Mic In
To Pianomation
MIDI Through
MIDI Out Delayed
MIDI OutMIDI In
Power
•Record Sensor Strip
•Timer to turn on power to the
system
•IR Sensor to aim at the
person who controls the
piano.
•Speakers for the piano
•Wireless or hardwired hook-
up from an External CD
Player
•Wireless or hardwired hook
up to the stereo
•Record Sensor Strip
•Head phones
•Mute Rail—Grand or Upright
External IR
Make
sure
these
speakers
are
plugged
into the
switched
outlet of
the
Piano-
mation
power
supply
Mute Rail
Optical Record
(A)
(B) (E)
(C)
(D)

Page 18 Owners Manual
BASIC PIANO HOOKUP
Basic Setup
Record
•Mounted on the piano
•Speaker under the Piano
•MIDI Record Sensor
Strip
Unmixed OutMixed Out
Aux InCD In
AMI Out PMM Reset
IR Port
Mic In
To Pianomation
MIDI Through
MIDI Out Delayed
MIDI Out
MIDI In
Power
......................
......................
......................
......................
............................................
......................
......................
......................
......................
......................
......................
......................
......................
......................
......................
......................
......................
......................
......................
......................
......................
......................
......................
......................
......................
......................
............................................
......................
............................................
......................
............................................
......................
............................................
......................
............................................
......................
............................................
......................
......................
......................
......................
......................
............................................
......................
............................................
......................
............................................
......................
............................................
......................
BASIC PIANO HOOKUP WITH RECORD
Record Strip
Basic Setup No Record
•Mounted on the piano
•Speaker under the Piano
Unmixed OutMixed Out
Aux InCD In
AMI Out PMM Reset
IR Port
Mic In
To Pianomation
MIDI Through
MIDI Out Delayed
MIDI Out
MIDI In
Power
......................
......................
......................
......................
............................................
......................
......................
......................
......................
......................
......................
......................
......................
......................
......................
......................
......................
......................
......................
......................
......................
......................
......................
......................
......................
......................
............................................
......................
............................................
......................
............................................
......................
............................................
......................
............................................
......................
............................................
......................
......................
......................
......................
......................
............................................
......................
............................................
......................
............................................
......................
............................................
......................
ADDING A WIRELESS CONNECTION FROM YOUR MULTIDISC CD PLAYER
Basic Setup No Record
•Mounted on the piano
•Speaker under the Piano
•Receiver under the Piano
•Transmitter at the Stereo
•Smart Switch or Cables at the
Stereo
Unmixed OutMixed Out
Aux InCD In
AMI Out PMM Reset
IR Port
Mic In
To Pianomation
MIDI Through
MIDI Out Delayed
MIDI Out
MIDI In
Power
......................
......................
......................
......................
............................................
......................
......................
............................................
......................
............................................
......................
......................
......................
......................
......................
......................
......................
......................
......................
......................
......................
......................
......................
......................
......................
......................
......................
............................................
......................
......................
............................................
......................
............................................
......................
............................................
......................
......................
......................
......................
......................
A quick way to know if your record strip is
working or turned on, is to push record. A
metronome will start to tick, press a key and the
metronome should stop. If it doesn’t, check the
record strip's cables and power.
For Technical Support Call 1-941-597-5888 Page 51
I/O
Enter
To Play a CD, Floppy,
Demo, Audio CD or MIDI CD
Press the I/O
button
Source
Select your
source Press Enter Press Play
SOURCE
F1D1SOURCE
Ÿ
QRSCDFLOPPYD
–
EMOECDAUXMIDIAUDIO_CDMIDI_CD
•
•
•
•
•
•
•
•
•
•
•
•
•
•
•
•
Tells Chili
that a
QRS CD is
the source
of music in
the
internal
CD tray.
Sets the
internal
Floppy
player as
the
source of
the
music.
Sets the
Demo
song files
as the
source of
the music.
Sets the
External
CD input
as the
source of
the
music.
Sets the
Aux
input on
the back
as the
source of
the
music.
If there is a record strip
present (set in setup)
the MIDI input will gen-
erate the sound as-
signed to channel 1 and
not play the piano. If
there is no record strip
present it will play the
MIDI file being re-
corded.
Note: At start up Chili will determine the last source played. If it was an external source such as ECD, Aux or MIDI
it will set the source to that selection. If the last played source was not an external source Chili will cue up the last
played source. If there is no content present, it will load the first Demo song.
Tells Chili
that an
Audio CD
is the
source of
music in
the
internal
CD Drive.
Tells
Chili that
a data
CD with
MIDI
Files is
the
source.
CREATING A MIDI DATA CD
A data CD can hold MIDI files, similar to the way a floppy disk does. The advantage of a Data CD is the amount of
data you are able to hold.
This leaves you with a lot of flexibility in how you structure play lists. A Data CD is a CD ROM similar to the one
you put in your PC. If you have a CD Burner you can burn your own CD's full of MIDI Files. You can put them in
file folders to classify them. A MIDI file is so small relative to the vast amount of room you have on a CD ROM that
you can put the same song on the disk several times under different classifications. For example, you may have a
category called classical, and one called Mozart. Then you have the option of playing either all of your classical
pieces or just the Mozart pieces without having to figure out how to program a sequence.
QRS is planning on making available their MIDI library on CD ROM. Until then you have the capability to do it
yourself if you have a CD Burner.

Page 50 Owners Manual
CLEAR
Holding the Clear button down for 6 seconds will reset the system. This is the same as turning the
unit off & on.
Clear Holding the Clear button down for 2 seconds will clear the scratch pad memory and wait for you to
continue.
Clear Pressing and releasing clear will bring you to a home page.
Clear
Use to practice with accompanying background music, you play the piano and your performance is Mixed output
source, when the speakers are set on. This is a good option when you want to perform accompanied by the
background music.
•Press Practice.
•Turn the Data Dial until the S in Speakers is
Underlined.
•Press Enter.
•Select On and Press Enter.
•Select Your Source and Press Enter.
•Select Your Song and Press Enter.
•Press Practice.
•Pres Enter to Enable.
•Press Play.
•Begin to play the piano.
Performing with the background
music of a CD or floppy being
heard from the speakers.
Piano solo performance or
layered performance.
A layered performance allows you to change the
performance heard thru the speakers from a piano
sound to another instrument. By doing this you
can turn your piano into a church organ. Create
sound effects etc.
•Press Source.
•Select MIDI and Press Enter.
•Press Voice.
•Turn Knob to the desired Instrument you want
and Press Enter.
•Begin to Play.
LIVE PRACTICE AND PERFORMING
For Technical Support Call 1-941-597-5888 Page 19
CHILI ISMOUNTED ATTHE STEREO AND TRANSMITTING TOTHE PIANO
Unmixed OutMixed Out
Aux InCD In
AMI Out PMM Reset
IR Port
Mic In
To Pianomation
MIDI Through
MIDI Out Delayed
MIDI Out
MIDI In
Power
Using Chili As A Stand-Alone Sequencer/Controller
Unmixed OutMixed Out
Aux InCD In
AMI Out PMM Reset
IR Port
Mic In
To Pianomation
MIDI Through
MIDI Out Delayed
MIDI Out
MIDI In
Power
•Wireless Transmitter and Receiver to send
signal to the piano (if hardwired not
required).
•Wireless Transmitter and Receiver to send
background music to the piano (optional if
you are not using your own stereos
speakers) (if hardwired not required).
•User Control Box mounted on the piano.
Here we show several
possible hook ups.
•A PC hardwired
requiring a MIDI Cable
and MIDI Adaptor
•The QRS Player Violin
attached
•AMike in for Sing A-
Longs or a guitar for
jam-a-longs
•Speakers hooked up to
the Mixed out

Page 20 Owners Manual
ADDING A HARD WIRED COMPUTER CONNECTION DIRECTLY
Unmixed OutMixed Out
Aux InCD In
AMI Out PMM Reset
IR Port
Mic In
To Pianomation
MIDI Through
MIDI Out Delayed
MIDI OutMIDI In
Power
•Sound Card To MIDI
interface
•Or Laptop to MIDI interface
•MIDI Cable
ADDING A WIRELESS COMPUTER CONNECTION
Unmixed OutMixed Out
Aux InCD In
AMI Out PMM Reset
IR Port
Mic In
To Pianomation
MIDI Through
MIDI Out Delayed
MIDI Out
MIDI In
Power
•Sound Card To MIDI
interface
•Or Laptop to MIDI interface
•2 MIDI Cables
•Analog To MIDI Interface
•Wireless Transmitter
ADDING A HARD WIRED COMPUTER CONNECTIONTOA SYSTEM WITH RECORD
Unmixed OutMixed Out
Aux InCD In
AMI Out PMM Reset
IR Port
Mic In
To Pianomation
MIDI Through
MIDI Out Delayed
MIDI Out
MIDI In
Power
•Sound Card To MIDI interface or Laptop to MIDI interface
•MIDI Cable (2)
•Output of Record goes to input on computer.
•Output of Computer goes to input on Chili.
•PC’s MIDI Through on PC needs to be off during playback,
and record to PC.
•If recording to Chili, PC’s MIDI Thru should be on.
•If there is no control of PC’s MIDI Through then under
setup on Chili state Record Strip present if you do not want
echo, and removed if you want to play PC as your source.
For Technical Support Call 1-941-597-5888 Page 49
CHANGING THE METRONOME’STIME SIGNATURE AND TEMPO
Changing the Beats Per Second and Volume While Recording
R1D1RECRD0000
-
•
•
•
•
•
•
•
•
•
•
•
•
•
•
•
•
MIDITEMPO
TEMPO=XXXBPS
•
•
•
•
•
•
•
•
•
•
•
•
•
•
•
•
•Press Record.
•You will hear the metronome.
•Turn the data dial and the metronomes
beat per second (BPS) will change.
•The record screen will come back after
about a second.
Enter
LIVE PRACTICE AND PERFORMING
F1D1PRACTICE
L-RSPLITPOINTMARKHEADPHONES
•
SPEAKERS
•
•
•
•
•
•
•
•
•
•
•
•
•
•
•
•
PRACTICESPEAKER
OFFON
•
•
•
•
•
•
•
•
•
•
•
•
•
•
•
•
Right
Left
Enter
•Press Practice.
•Turn Data Dial until S in
Speaker is underlined.
•Press Enter.
•The Current status will be
highlighted when selected.
•To turn on the speakers
press the right button.
•Press enter.
Table of contents
Other QRS Music Technologies Recording Equipment manuals