Quantum Data 780 User manual

780 Handheld Test Instrument
Quick Start Guide
780 Handheld Test Instrument
Quick Start Guide
780 Handheld Test Instrument
Quick Start Guide

780 Handheld Test Instrument Page 1
Quick Start Guide
Revision A19
Table of Contents
1Overview of the 780 Handheld Test Instrument...............................................2
2Physical Interfaces of the 780 Handheld Test Instrument for HDMI..............5
3General Operation...............................................................................................7
4Using the 780 to Run Video and Audio Pattern Tests on Sink Devices........9
5Using the 780 Test Instrument to Test HDMI Protocols on Sink Devices.....32
6Using the 780 Test Instrument to Test HDMI Source Devices........................46
7Using the 780 Test Instrument Installer Utility.................................................67

780 Handheld Test Instrument Page 2
Quick Start Guide
Revision A19
1 Overview of the 780 Handheld Test Instrument
This section provides an overview of the 780 Handheld Test Instrument.
Note: Please check the Quantum Data website for information and updates for the 780 software releases.
1.1 Scope of this Quick Start Guide
This Quick Start Guide provides basic instructions on how to use the 780 Handheld Test Instrument. The 780 User Guide
documents the complete operation of the 780 Handheld Test Instrument and contains additional details about each 780
function.
Certain features and functions are not addressed at all in this Quick Start Guide. These include the command line
interface, monitoring the DDC transactions and CEC messages, creating custom bitmap images and formats are not
covered in this Quick Start Guide.
Note: Please be sure to check the Quantum Data website for updates to the User Guide.
1.2 Introducing the 780 Handheld Test Instrument
The 780 Handheld Test Instrument is a battery-powered, portable multimedia pattern generator that enables you to
conduct quick, on-site verification testing of your HDMI system and analog video displays. The 780 is equipped with both
a reference source and a reference sink HDMI interface allowing you to test audio, video and protocols—HDCP, EDID,
CEC & infoframes—of any type of HDMI device: sources, repeaters and sinks. Its portability makes it ideal for your bench
and for use in the field. Because the 780 has both an HDMI output and an HDMI input, you can test your HDMI cables
and systems with splitters, extenders and switches as well with the optional pixel error rate test feature.
A color touch display makes the 780 easy and convenient to use. When testing an HDMI source device you can toggle
between operating the unit through the touch screen and viewing the incoming video from the HDMI source.
1.3 Overview of 780 features
The 780 Handheld Test Instrument for HDMI provides a rich set of features. The following is a list of available options
and the key features and benefits of each:
1.3.1 Standard features
The following features are standard with the 780:
Pattern testing for HDTVs - Enables you to conduct pattern testing for an HDTV through the HDMI and analog
component outputs. Provides dozens of patterns with variation options on most.
Custom bitmaps and pattern scrolling –The 780 enables you to import bitmaps for use in pattern testing. You can
initiate a scroll of these bitmaps with user control over the rate and extent of horizontal movement.
Create custom formats using the standalone Format Editor.
3D bitmap pattern testing –The 780 enables you to import 3D bitmaps for use in pattern testing. You can create
your own bitmaps from any stereoscopic images you have using the Quantum Data Bitmap Conversion Tool

780 Handheld Test Instrument Page 3
Quick Start Guide
Revision A19
available from the Quantum Data website: http://www.quantumdata.com/apps/3D/BMP_conv.asp. There are some
sample 3D bitmaps on this webpage as well.
Video confidence test of an HDMI source device –The 780 enables you to view the incoming video on the 780’s
LCD screen.
Audio testing for AVRs and HDTVs –The 780 provides multi-channel digital audio test patterns through the HDMI,
SPDIF and optical outputs. A variety of audio patterns and formats are provided at sampling rates from 32kHz up to
192kHz and bit depths of 16, 20 and 24. Format supported are Dolby Digital and DTS compressed formats and
lossless compressed or high bit rate HDMI formats.
Installer Utility –Provides simplified diagnostics of HDMI interoperability problems in an HDMI installation. The
Installer utility enables installers to connect the 780 into an HDMI network and quickly conduct diagnostics without
required detailed knowledge of HDMI protocols.
Command line interface for automated testing.
1.3.2 Network Analyzer features
The following features are available with the Network Analyzer option:
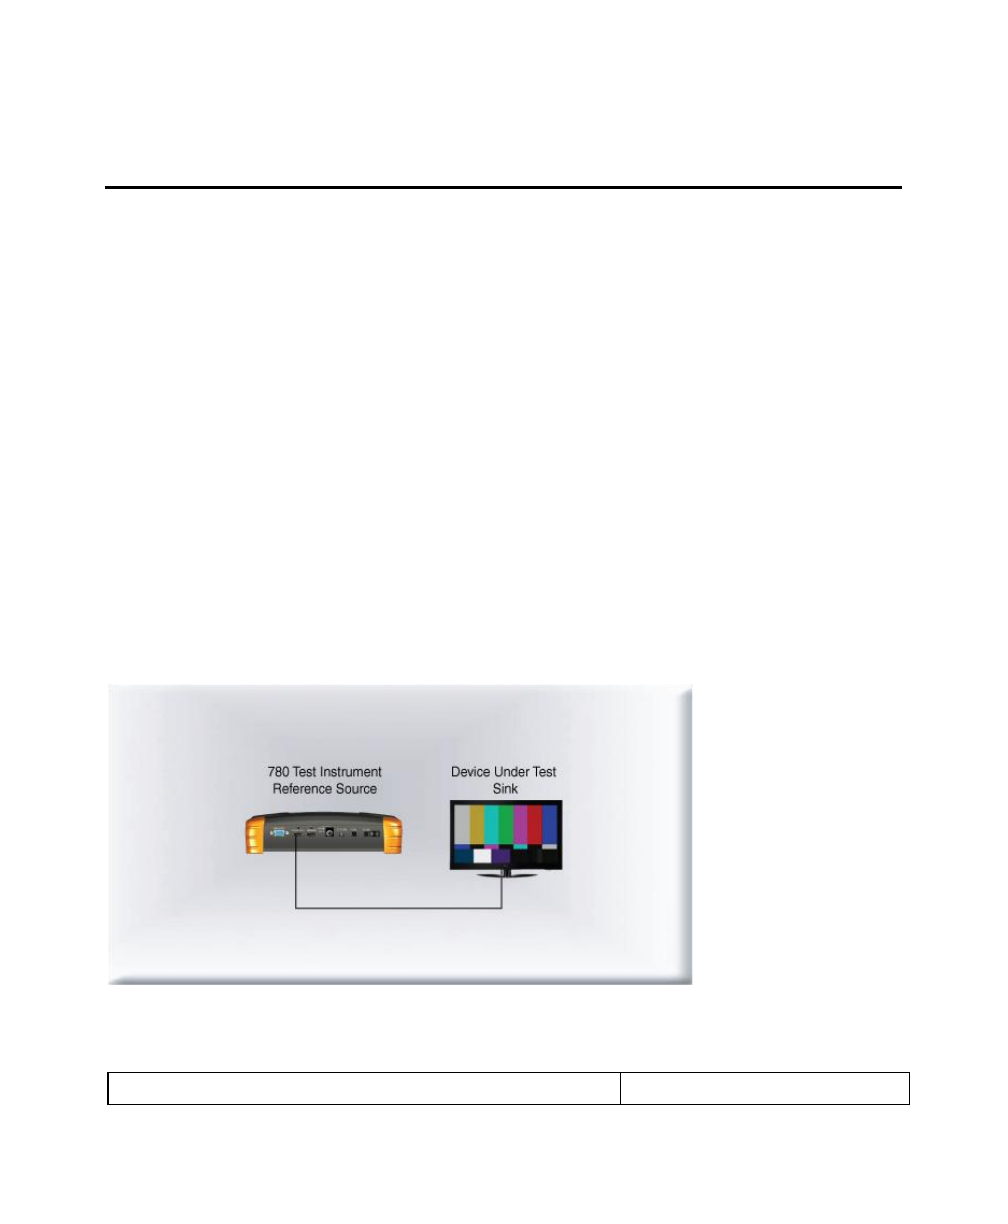
HDCP test of an HDMI sink or input to a repeater device –The 780 enables you to run an HDCP functional test on
an HDMI sink device directly or through a repeater device.
EDID test of an HDMI HDTV or input to a repeater device –The 780 enables you to run an EDID functional test on
an HDMI sink device directly or through a repeater device. You can view the entire EDID in human readable text.
You can also run a portion of EDID compliance test.
Video test of an HDMI source device –The 780 provides an HDMI input for testing HDMI source devices. You can
run a verification test of a video source which includes timing and format information and an indication of whether
the video is HDCP content protected.
Data Island test of an HDMI source device –The 780 provides an HDMI input for testing HDMI source devices. You
can view the infoframes and other data islands.
Audio test of an HDMI source device –The 780 provides an HDMI input for testing HDMI source devices. You can
run a verification test of an audio source which includes decoding of the audio IEC headers, audio infoframes and
audio sample packet headers including parsing out of the channel status bits.
EDID test of an HDMI source device –The 780’s HDMI input can be provisioned with any EDID you have access
to. You can verify that a source device responds properly to the provisioned EDID. The EDID could be a known-
good EDID or an EDID that you have created specifically for testing.
HDCP test of an HDMI source device –The 780 enables you to run a test to determine how many HDCP devices
an HDMI source can support during HDCP authentication.
CEC ping test of any HDMI device –The 780 enables you to run a CEC ping test on an HDMI device.
1.3.3 HDMI Cable and Repeater test features
The following features are available with the Cable and Repeater test option:
HDMI Cable & Repeater test –Because the 780 has both an HDMI input and an HDMI output, you can loop a cable
or entire HDMI distribution networks comprised of splitters, extenders, repeaters, switches, etc. from the 780’s

780 Handheld Test Instrument Page 4
Quick Start Guide
Revision A19
output to input and run a pseudo-random noise pattern test to determine pixel errors on the TMDS lines. The
feature also runs a continuity test on the DDC test pair, the +5V line and the hot plug lead. The Repeater test also
shows you the hot plug delay between the downstream side and the upstream side and the pulse width. The Cable
& Repeater Test enable you to test a cable, repeater or distribution network if the source and sink ends are
collocated. If the source and sink ends are not collocated then you need to use the Frame Compare test described
below.
HDMI Frame Compare test –Because the 780 has an HDMI input, you can emulate a sink and test a distribution
network at the sink end. The feature works by capturing a frame of video from the source and then comparing that
frame, pixel-by-pixel, to subsequent frames. Errors are shown along with the number of frames tested which 10
frames.
1.3.4 Auxiliary Channel Analyzer for DDC monitoring features
The following features are available with the Auxiliary Channel Analyzer test options:
DDC monitoring with Auxiliary Channel Analyzer (ACA) –The 780 ACA enables you to monitor CEC DDC
transactions such as HDCP and EDID as well as hot plug related events while emulating an HDMI source and/or an
HDMI sink device(s) in an HDMI system.
DDC passive monitoring with Auxiliary Channel Analyzer (ACA) –The 780 ACA enables you to monitor CEC and
DDC transactions throughout an HDMI systems comprised of a source, repeater and sink. You can monitor +5V,
hot plug events as well as the HDCP and EDID transactions.
1.3.5 What is in the 780 shipping box
The 780 instrument shipping container includes the items listed in Table 1-1 below:
Table 1-1: 780 Shipping Box Contents
Item Description
Part No.
780 Handheld Test Instrument for HDMI.
00-00226
12V DC (1.5 amp) Power Supply / Adapter / Charger.
25-00094
Line cord for 12V Power Supply.
30A00400A03
HDMI-to-HDMI Type A cable.
30-00146
Three (3) foot VGA to (3) RCA adaptor cable.
99-00503
Six (6) foot USB cable.
30-00163
Quick Start Guide.
68-00217

780 Handheld Test Instrument Page 5
Quick Start Guide
Revision A19
2 Physical Interfaces of the 780 Handheld Test Instrument for HDMI
This section describes the administration, video and audio interfaces on the 780 test instrument:
2.1 Video Interfaces
The following table describes the video interfaces on the 780 test instrument, these interfaces are used to render test
patterns for testing consumer electronic HDTVs and computer displays.
Table 2-1: 780 Video Interfaces
Video Interface
Description
HDMI (1) Output Type A
Single link HDMI output connector. Supports HDMI 1.3:
Bit Depth: 24/30/36 bit.
Colorimetry: RGB, YCbCr.
Sampling: 4:4:4 and 4:2:2.
Pixel rate: Timings up to 1080p60.
DVI support through HDMI to DVI adapter cable (RGB, 4:4:4,
24 bit).
Audio: LPCM, Dolby Digital and DTS (more details below).
Analog Output –Component and VGA
(HD15F)
Bit Depth: 24 bit color depth.
Colorimetry: RGB, YPbPr.
Pixel rate: 80MHz.
Sync types: separate and composite.
HDMI (1) Input Type A
(Optional Feature Package)
Single link HDMI input connector. Supports HDMI 1.3:
Colorimetry: RGB, YCbCr.
Sampling: 4:4:4 and 4:2:2.
Pixel rate: Timings up to 1080p60.

780 Handheld Test Instrument Page 6
Quick Start Guide
Revision A19
2.2 Audio interfaces
Table 2-2 below describes the audio interfaces supported on the 780 test instrument.
Table 2-2: 780 Audio Interfaces
Interface
Description
HDMI (1) Output Type A
Single link HDMI output connector. Supports HDMI 1.3:
Channels: 8.
Bits per sample: 16, 20, 24.
Sampling rates (kHz): 32.0, 44.1, 48.0, 88.2, 96.0, 176.4,
192.0.
Formats: LPCM, Dolby Digital (clips), DTS (clips)
SPDIF - RCA
SPDIF RCA audio connector:
Channels: 8 (clips)
Bits per sample: 16, 20, 24.
Sampling rates (kHz): 32.0, 44.1, 48.0, 96.0
Formats: LPCM, Dolby Digital (clips), DTS (clips)
Optical –JIS FOS
Optical audio connector:
Channels: 8 (clips)
Bits per sample: 16, 20, 24.
Sampling rates (kHz): 32.0, 44.1, 48.0
Formats: LPCM, Dolby Digital (clips), DTS (clips)
2.3 Administrative Interface
The 780 test instrument is equipped with a USB interface. This interface is used to download custom bitmaps and to
upgrade firmware and issue commands. The USB interface is a peripheral device. There are two modes:
COM - Command Mode. Used for sending basic commands to set the interface, select formats and patterns. This
feature will be available in a future release.
Disk - Mass Storage Mode. Used for downloading bitmaps, audio clips and upgrading firmware or gateware.

780 Handheld Test Instrument Page 7
Quick Start Guide
Revision A19
3 General Operation
This section describes power up, power usage and general operation.
3.1 Power Considerations
The 780 has a rocker style power switch on the back panel. Refer to the photo below.
The 780 is a portable battery powered test instrument. It is equipped with nickel metal hydride batteries. Typically, you
can use the 780 on batteries for about 4 hours. It requires an overnight charge. Quantum Data recommends that you set
the screen brightness to the minimum level required. Turn the unit off if you are not going to be using it for extended
periods.
The 780 is supplied with the Part No 25-00094 12V DC power supply and charger as well as a part number
30A00400A03 line cord. We recommend that you use the 780 with the charger and only use the batteries when
power is not available.
Important Notes about power usage and status:
Monitor the battery meter on the lower right.
The screen will automatically dim after 2 minutes of inactivity to save on battery life.
A green indication or partial green indication shows the battery is being charged.
A gold color indicates that the device is being powered through the wall charger.
Fully charge the 780 overnight.
You must touch an active portion of the LCD to update the battery indicator to show its power status.
Do not continue using the 780 from battery power when the battery meter indicates that the batteries are
exhausted. When you see a thin green line at the right most portion of the battery icon, turn the power off and
switch to line power using the AC Charger adapter; then reapply power.

780 Handheld Test Instrument Page 8
Quick Start Guide
Revision A19
3.2 Navigating through the 780 User Interface
The 780 user interface is a color touch screen display 480 by 272. A single touch will activate an item on the screen or
take you down to a lower level menu. A +indicates that you have to double touch to navigate down to a lower level
menu.
Note: The top level menu will appear differently depending on what options have been purchased.

780 Handheld Test Instrument Page 9
Quick Start Guide
Revision A19
4 Using the 780 to Run Video and Audio Pattern Tests on Sink
Devices
This chapter provides procedures for running audio and video pattern tests on high definition sink devices such as
HDTVs and projectors. The features and functions described in this chapter are provided with the standard 780; no
options are required. The following signal types are supported.
HDMI (via the HDMI physical connector)
DVI (via the HDMI physical connector)
YPbPr Component analog (via the HD VGA connector)
RGB Analog (via the HD VGA connector).
4.1 Making Physical Connections
The first step in testing a sink device is to make the physical connections between the 780 and the device(s) under test.
4.1.1 Connecting the 780 to the Display Device
Use the following procedures to make the physical connections from the 780 to the display device under test.
1. Make the cable connection between the appropriate the 780 video output connector (e.g. HDMI OUT or ANALOG)
connector and the input connector of the HDTV using the cables supplied.
2. Alternatively you may connect from the 780 video output connector to an HDTV through an HDMI repeater device
such as an A/V receiver. In this case make the HDMI connection between the HDMI OUT connector on the 780 and
the HDMI input of the HDMI repeater device using an HDMI-to-HDMI cable. Then connect the HDTV to an active
output on the repeater. The following illustrations depict the typical test configurations.

780 Handheld Test Instrument Page 10
Quick Start Guide
Revision A19
4.2 Selecting a Signal Type and Resolution
After making the physical connections between the 780 and the display device under test you will need to select the
signal type, Resolution and Frame Rate for the sink device under test.
4.2.1 Procedures for Selecting a Signal Type
The procedures below describe how to select the active signal type.
1. Power up the 780 using the rocker switch on the back panel. Review the guidelines for battery usage in the Power
Considerations section.
2. Touch select the Signal Type activation button on the panel on the left (see screen example below).
3. Touch select the desired signal type using the associated activation button.

780 Handheld Test Instrument Page 11
Quick Start Guide
Revision A19
4. Touch select the options for the Signal Type. Use the information in Table 4-1 below as a guide:
Table 4-1: Signal Type
Signal Type Name
Physical Connector
Option
Option Values
HDMI
HDMI OUT via HDMI to
HDMI cable (provided)
Color Space
YCbCr
YCbCr 4:2:2
RGB
Bit Depth
8
10
12
Format Type
TV
Computer
DVI
HDMI OUT via HDMI to DVI
cable (not provided)
Format Type
TV
Computer
YPbPr Analog
ANALOG HD-15 (VGA) via
HD to 3-RCA cable
(provided)
Sync Type
Sep[arate] Sync
Sync on Green
RGB Analog
ANALOG HD-15 (VGA) via
VGA cable (not provided)
Format Type
TV
Computer
Sync Type
Sep[arate] Sync
Sync on Green
5. Select the desired video signal.
4.2.2 Procedures for Selecting an HDMI Resolution and Frame Rate
The procedures below describe how to select the resolution in HDMI.
Note: You can create your own custom formats using the Quantum Data Format Editor. These procedures are described
in the User Guide.
When you make a physical connection to an HDMI HDTV, a hot plug event will occur. There are two modes the 780 can
be set in when testing HDMI sink devices that determine how the 780 responds to this hot plug event: 1) Hot plug formats
On; 2) Hot plug formats Off.
When hot plug formats are On and a hot plug event occurs, the 780 will read the EDID of the display device connected to
its output port. It will then automatically configure the list available signal types (resolutions and frame rates) to only those
supported by the HDMI sink device. The 780 will also be configured to output the signal indicated in the EDID as the
―preferred‖ timing. The preferred timing is highlighted in green following a hot plug event.

780 Handheld Test Instrument Page 12
Quick Start Guide
Revision A19
When hot plug formats are Off, the 780 will display all viable HDMI formats for the HDMI interface whether they are
supported by the display or not.
1. Select the Preferences from the 780 top level menu.
2. Select the Hot Plug Formats mode to On or Off as desired. Refer to the screen above.
3. Touch select the interface button (left button on the bottom panel). Refer to the figure below.
For the HDMI interface, you will set the Color Space, sampling mode, Bit Depth and Format Type.
4. Touch select the resolution and frame rate (middle button on the bottom panel). Refer to the figure below.

780 Handheld Test Instrument Page 13
Quick Start Guide
Revision A19
For the HDMI formats, there are color codes that are applied to the Resolution and Frame Rate selections. The following
is a summary of their meaning:
A Resolution or Frame Rate with white lettering but with no outline –a Resolution or Frame Rate that appears in
the EDID and has a short video descriptor associated with it.
A Frame Rate with green lettering and with white outline –The Frame Rate that is currently selected.
A Frame Rate with red lettering but with no outline –The Frame Rate is not supported by the EDID for that
Resolution.
A Frame Rate(s) with green lettering and with white outline –The Frame Rate along with the currently selected
Resolution that is the ―preferred‖ timing.
A Frame Rate with black lettering but with no outline –The Frame Rate is not supported by the standard for the
selected resolution.
Note: When you make a physical connection to an HDMI HDTV, a hot plug event will occur. If Hot Plug Formats is
enabled on the Preference menu, when the hot plug event occurs, the 780 will read the EDID of the display device
connected to its output port. The output is automatically set to the preferred timing which is highlighted in green
following a hot plug.
4.3 Rendering Test Patterns on an HDTV
This subsection describes how to render test patterns on an HDTV. You will first have to complete the previous
procedures for making physical connections and selecting the signal type.
4.3.1 Procedures for Rendering Test Patterns on an HDTV
The procedures below cover cases where there is a direct connection between the 780 and the HDTV and also where
the 780 is connected to an HDTV through a repeater device.
1. From the Home screen on the 780 display, touch select Video Pattern as shown below.
Note: Your Home screen may appear somewhat different depending on what options you have.

780 Handheld Test Instrument Page 14
Quick Start Guide
Revision A19
2. Touch select the desired test pattern from the menu shown below. You can select patterns that are standard with
the 780 or bitmaps that you have imported.
Note: A ―+‖ on the lower right portion of the pattern indicates that there are options related to the specific pattern. In
these cases you double touch select to access the lower level menu.
3. (If applicable) Specify the test pattern options.
4.4 Rendering 3D Test Patterns on an HDTV
This subsection describes how to render 3D test patterns and 3D bitmaps on an HDTV. The 780 supports Side-by-Side,
Top-and-Bottom and Frame Packing (for both interlaced and progressive timings) 3D format structures.
4.4.1 Configurations for Rendering 3D Bitmaps on an HDMI Sink Device
Typically you will render 3D bitmap images with the 780 directly connected to an HDTV. This configuration is shown
below:

780 Handheld Test Instrument Page 15
Quick Start Guide
Revision A19
4.4.2 Procedures for Rendering 3D Patterns on HDMI Sink Device
Use the procedures below to render 3D test patterns on an HDMI sink.
1. Follow the procedures provided in the Section entitled ―Selecting a Signal Type and Resolution for configuring the
proper HDMI format.
2. From the Home menu select 3D Output. The Home menu is shown in the screen example below:
The folowing screen appears:

780 Handheld Test Instrument Page 16
Quick Start Guide
Revision A19
3. Select the desired 3D mode or format.
4. Select the desired 3D test pattern from the list shown in the screen example below.
4.4.3 Procedures for Rendering 3D Bitmaps on HDMI Sink Device
Use the procedures below to render 3D bitmap images on an HDMI sink.
1. Follow the procedures provided above to enable the HDMI output as the Signal Type.
2. Obtain 3D bitmaps. You can obtain 3D bitmaps in three ways:
Develop your own 3D bitmaps.
Sample 3D bitmaps from the Quantum Data website (www.quantumdata.com/downloads).
Generate 3D bitmaps from your own stereoscopic image pairs using the Quantum Data 3D Bitmap
Conversion Tool available from the Quantum Data website (www.quantumdata.com/downloads).

780 Handheld Test Instrument Page 17
Quick Start Guide
Revision A19
3. Transfer your 3D bitmaps over to the 780 using the procedures described in the User Guide available on the
Quantum Data website.
4. Select a format that is suitable for rendering 3D images such as 720p60 and 1080. Use the procedures described in
Selecting an HDMI Resolution and Frame Rate.
If you have used the Quantum Data 3D Bitmap Conversion Tool, there is a naming convention for the 3D bitmaps
which also provides the required format for each specific bitmap.
5. Touch select 3D Output option from the menu shown above.
The following screen will appear:
6. Select the 3D mode (Side-by-Side, Top-and-Bottom or Frame Packing) and then select the subtype and Left/Right
options (if applicable).

780 Handheld Test Instrument Page 18
Quick Start Guide
Revision A19
7. Select the 3D bitmap image from the Test Pattern list.
Note: When selecting 3D bitmap images, you will have to make sure that the 3D bitmap you use matches your
selection of 3D formats and timing (resolution). In the example above, a 3D Frame Packing bitmap is selected for
1280 x 720. Therefore you have to make sure that you select that specific timing (i.e. 1280 x 720) and that specific
3D format structure (Frame Packing).
4.5 How to Scroll a Bitmap Pattern
This subsection describes how to scroll bitmaps on your 780
4.5.1 Guidelines for Scrolling Bitmaps
There are two ways you can animate (move) a bitmap image: 1) image shifting (scrolling); 2) panning. You can shift or
scroll a bitmap image that you have imported into the 780 by modifying the X and Y parameters or by dragging and
panning. When you use the X and Y parameters, you are limited to linear scrolling. With panning you can move the
image in non-linear motions.
You can only scroll bitmaps whose overall pixel resolution is smaller than the resolution of the active format and you can
only scroll them within the bounds of the resolution of the active format. You cannot scroll the standard test patterns in
the 780.
In order to scroll a bitmap the name of the bitmap has to be “zp.bmp.”But you can scroll any bitmap. You just have to
make sure that you have named it ―zp.bmp‖ (without the quotes). The zone plate bitmap is the only bitmap that comes
standard with the 780.
4.5.2 Procedures for Scrolling Bitmaps
Use the following procedure to scroll your bitmaps.
1. Touch select the desired bitmap image, e.g. Zone Plate image from the list of video patterns.
2. Double touch select on the Zone Plate bitmap to access its options.

780 Handheld Test Instrument Page 19
Quick Start Guide
Revision A19
The Zone Plate Options menu appears:
3. Specify the Horizontal Movement by touch selecting the appropriate setting Slow, Medium, Fast.
4. Specify the Vertical Movement by touch selecting the appropriate setting Slow, Medium, Fast.
The pattern will begin to move around the raster of the display in accordance with the horizontal and vertical
settings. To halt the motion, touch Stop for either or both of the Horizontal Movement and Vertical Movement.
4.6 How to Pan a Bitmap Image
This subsection describes how to pan bitmap test patterns on your 780
4.6.1 Guidelines for Panning Bitmaps
There are two ways you can animate a bitmap image: 1) image shifting (scrolling) 2) panning. Here are the rules and
capabilities:
You can pan bitmaps whose overall pixel resolution is greater than the resolution of the active format only to the
extent of the difference between the resolution of the bitmap and the resolution of the format you currently have
selected.
You can pan bitmaps whose resolution is lower than the active format but only within the range of the excess space
in the raster. You cannot pan the standard test patterns in the 780.
4.6.2 Procedures for Panning Bitmaps
Use the following procedure to pan your custom bitmaps.
1. Select by double touching, the desired bitmap image, e.g. Master 1920x1080 image from the list of video patterns
(shown below).
Table of contents
Other Quantum Data Test Equipment manuals
Popular Test Equipment manuals by other brands

Master cool
Master cool Black 55745 operating instructions

B+K precision
B+K precision 2530 instruction manual

Unit
Unit UT521 operating manual

AutoTest
AutoTest Euro Trailer Socket Tester user manual

Kyoritsu Electrical Instruments Works, Ltd.
Kyoritsu Electrical Instruments Works, Ltd. KEW MEG 3161A instruction manual

AOK
AOK CellMeter 8 User guide and manual