BALUN BL506 User manual

User Manual
Model BL506 Vacuum Deadweight Tester

Dear Customer,
We are delighted that you have decided to buy a BL506 vacuum deadweight tester. Please read
these operating instructions for the BL506 vacuum deadweight tester carefully before connecting
and configuring it, and operate the device in compliance with the instructions. Operational safety
and the function of the device can only be guaranteed if the generally applicable legal safety and
accident prevention regulations, plus the safety instructions provided in the operating instructions,
are complied with.
We do not accept liability for any damage caused by improper use or incorrect operation. Please
ensure that all persons operating the device have read and understood the operating instructions.
Keep these operating instructions in a safe place so that they are accessible at all times when
needed. If you require further information, please don’t hesitate to contact with us using the
following contact details:
1322, F/3, Bldg 1, 33 Zique Rd, Haidian, Beijing 100095, China
Phone: +86 (0) 10 6240 6768 [email protected] www.baluntech.com

TABLE OF CONTENTS
1. INTRODUCTION .................................................................................................................................................1
2. SPECIFICATION .................................................................................................................................................4
3. SAFETY REQUIREMENTS ..................................................................................................................................9
4. SETTING UP THE DEAD WEIGHT TESTER ...................................................................................................... 11
5. OPERATION .................................................................................................................................................... 16
5.1 PREPATATION .......................................................................................................................................... 16
5.2 VACUUM CALIBRATION OPERATION......................................................................................................... 16
5.3 PRESSURE CALIBRATION OPERATION .............................................................................................. 21
6. MAINTENANCE ............................................................................................................................................... 25
6.1 PISTON DISASSEMBLY ....................................................................................................................... 25
6.2 PISTON CLEANING ............................................................................................................................. 25
6.3 PISTON RE-ASSEMBLY ....................................................................................................................... 26
7. TROUBLESHOOTING ...................................................................................................................................... 27

Page 1
1. INTRODUCTION
1.1 DESCRIPTION
With high precision accuracy, the BL506 vacuum deadweight tester have dual vacuum and pressure modes. Pressure
and vacuum application can be operated by hand pump or external gas supply. To guarantee an excellent metrology-logic
characteristics, all pistons and cylinders are made of tungsten carbide. Because of the extreme hardness of this material,
the pressure distortion (expansion) coefficient is negligible. The low friction coefficient provides minutes of turning with just
a little swing of the masses.
1.2 OPERATING PRINCIPLE
A deadweight tester is based on a high accurate manufactured piston and cylinder assembly. This cylinder is mounted in
a column. The piston can rotate and freely move up and down. Accurately calibrated masses are loaded on top of the
vertically mounted piston. A pressure is applied on the bottom of the piston to lift the piston with masses. This creates a
balance between the downward force made by the masses and the upward force made by the pressure. With the known
effective area of the piston the pressure can be calculated. In formula: P=F/A, Where:
P = the pressure being derived
F = the force applied by the weights
A = the effective area of the piston cylinder

Page 2
1.3 DETERMINE OF THE PRESSURE
The reference level of the deadweight tester is at the top of the sealing of the pressure connection. If the weight set is
marked with a pressure unit (MPa; bar; psi or kg/cm²) the pressure can be determined by the formula:
P= m·g(1
-
ρ1
/
ρ2) .
So (1
+
λPo) [1
+
(α1
+
α2)(t
-
20)]
Where is:
P: Measurement pressure Pa (MPa)
m: Mass (kg)
g: Standard gravity 9.80665 m/s² or customized local gravity (m/s²)
ρ1: The density of the ambient air at the reference level, the typical air density value is 1.2 kg/m³
ρ2: The density of mass, ρ value of stainless steel =7.93x10³kg/m3 , ρ value of carbon steel =7.8x10³kg/m3
So: Effective area at zero pressure @ t=20℃ (m²)
λ: Pressure distortion coefficient piston cylinder system (MPa-¹)
Po: It is the pressure value when piston system doesn’t be deformed, can be instead by P (MPa)
α1: Thermal expansion coefficient of piston, the typical value is 4.5×10⁻⁶ ℃-1
α2: Thermal expansion coefficient of cylinder, the typical value is 4.5×10⁻⁶ ℃-1
T: The temperature of piston when the deadweight tester is in the status of measurement (℃)
1.4 PISTON CYLINDER ASSEMBLY

Page 3
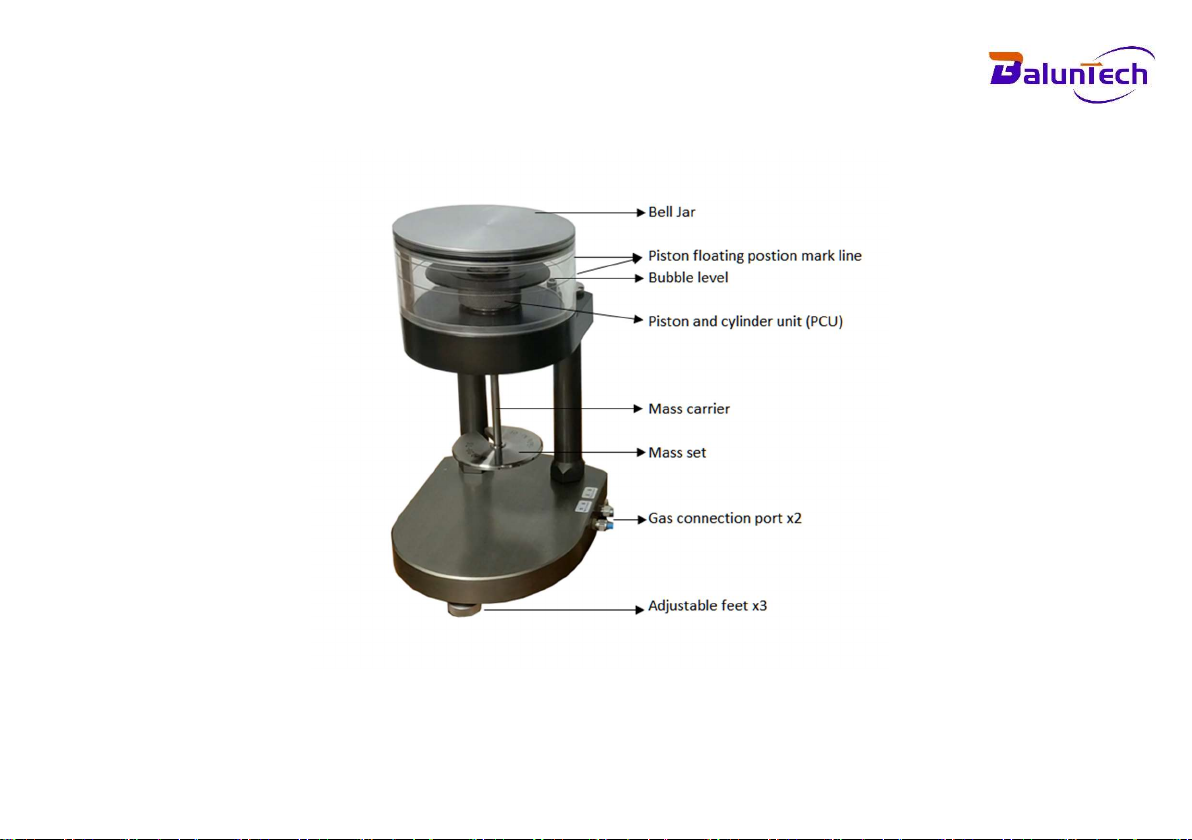
The piston cylinder assembly is the heart of the dead weight tester and responsible for its high accuracy. We
manufactures piston cylinder with accuracies from 0.05% up to 0.005% of reading. To give an idea of the manufacturing
skills, the space between the piston and the cylinder is in the um range and can only be measured in a climate room. To
guarantee an excellent metrology-logic characteristics, all pistons and cylinders are made of tungsten carbide. Because of
the extreme hardness of this material, the pressure distortion (expansion) coefficient is negligible. The low friction
coefficient provides minutes of turning with just a little swing of the masses.
1.5 EFFECTIVE AREA
For all dead weight testers, the effective area is determined by cross floating with a known reference primary standard
deadweight tester. The exact pressure can be calculated. As per the formula of the item 1.4, compensation factors are
listed for air buoyancy, local gravity, surface tension of the used oil and temperature and pressure expansion of the piston
cylinder assembly. All necessary data are listed in the calibration certificate provided with each dead weight testers.
1.6 MASS SET
The masses of the dead weight tester are made of carbon steel or nonmagnetic stainless steel. They are laser marked
with a serial number and mass or the equivalent pressure. The weights are tare out to add stainless steel to an internal
chamber. This is easy for recalibration or adjustments for gravity compensation. The mass of all weights are listed in the
certificate. For small pressure steps, a box with small weights is optionally available.

Page 4
2. SPECIFICATION
2.1 GENERAL SPECIFICATION
Accuracy: 0.05%rdg, 0.02%rdg, 0.01%rdg, 0.005%rdg
Piston and cylinder material: Tungsten carbide
Mass material: 304SS (Forged 316 stainless steel is optional)
Tester base and pump material: Stainless Steel
Medium: Dry and clean air, or nitrogen
Pressure connector: Metric, (NPT and BSP is optional)
Gravity: Standard 9.80665 m/s², or customize local gravity.
Tester dimension: 500mm(H) x 650mm(L) x 500mm(D) / Pump dimension: 225mm(H) x 455mm(L) x 380mm(D)
Tester weight: Appro.25kg / Pump weight: Appro.15kg
Recalibration: Every 2-5 years
2.2 PRESSURE RANGE SELECTABLE SHEET
P/N
Pressure
A
ccuracy
Area
K
n
. factor
Mass Set
KYQZ100
(
-
100~100) kPa
0.05, 0.02, 0.01, 0.005
10cm
2
10kPa / kg
10kg + 10kg
KYQZ160
(
-
100 ~ 160) kPa
0.05, 0.02, 0.01, 0.005
5 cm
2
20kPa / kg
5kg + 8kg
KYQZ250
(
-
100 ~ 250) kPa
0.05, 0.02, 0.01, 0.005
5 cm
2
20kPa / kg
5k
g + 12.5kg
KYQZ400
(
-
100 ~ 400) kPa
0.05, 0.02, 0.01, 0.005
5 cm
2
20kPa / kg
5kg + 20kg
KYQZ600
(
-
100 ~ 600) kPa
0.05, 0.02, 0.01, 0.005
2 cm
2
20kPa / kg
5kg + 30kg
KYQZ1M
(
-
100 ~ 1000) kPa
0.05, 0.02, 0.01
2 cm
2
20kPa / kg
5kg + 50kg

Page 5
2.3 MASS QUANTITY AND MEASURING RANGE
Part # Pressure
Piston
& Bell Pressure measure range and Mass Quantity
KYQZ100 (-100~100)kPa 5kPa
Pressure
-
10kPa
-
5kPa
5kPa
10kPa
Pieces
9
2
2
9
KYQZ160 (-100~160)kPa 5kPa
Pressure
-
10kPa
-
5
kPa
5kPa
10kPa
20kPa
Pi
eces
9
2
2
5
5
KYQZ250 (-100~250)kPa 5kPa
Pressure
-
10kPa
-
5
kPa
5kPa
10kPa
20kPa
50kPa
Pieces
9
2
2
2
1
4
KYQZ400 (-100~400)kPa 5kPa
Pressure
-
10kPa
-
5
kPa
5kPa
10kPa
20kPa
Pieces
9
2
2
15
12
KYQZ600 (-100~600)kPa 5kPa
Pressure
-
10kPa
-
5
k
Pa
5kPa
10kPa
20kPa
50kPa
100kPa
Pieces
9
2
2
2
1
1
5
KYQZ1M (-100~1000)kPa 5kPa
Pressure
-
10kPa
-
5
kPa
5kPa
10kPa
20kPa
50kPa
100kPa
Pieces
9
2
2
2
1
5
7

Page 6
2.4 SCOPE OF DELIVERY

Page 7
2.5 INSTRUMENT OUTLINE FOR VACUUM DEADWEIGHT TESTER BASE

Page 8
2.6 INSTRUMENT OUTLINE FOR MANUAL PUMP

Page 9
3. SAFETY REQUIREMENTS
WARNINGS:
Do not attempt to substitute common pipe fittings in place of original high pressure fittings used in the plumbing
systems on these instruments. Common pipe fittings are not rated for high operating pressure used in these
instruments, and the use of such fittings will void the warranty and may create a potentially dangerous condition.
Use any fittings, please contact with BALUNTECH in prior.
Always wear safety glasses when operating instrument. A high pressure gas leak can cause permanent eye
damage.
Do not attempt to operate the instrument in excess of the maximum pressure noted on the instrument.
"NO SMOKING" signs are to be displayed in laboratories and on laboratory doorways whenever testers are
being used for instrument calibration. Because a leak in the tester's high-pressure line can release an explosive
mist of oil, proper fire extinguishers should be immediately available.
Pre-load the tester's piston with weights before applying pressure to the gauge. Otherwise, shock from the
pressure can dislodge the piston retainer ring, allowing the piston to fly out of the tester at high velocity. The
operator could be seriously injured if standing directly over the instrument.
Spinning the table counterclockwise and failing to load the table with weights before introducing pressure into
the instrument can cause the Table to spin off on some models, and the pressure nut to blow off, allowing the
piston to become a dangerous projectile.
When a tester is used to test a gas or liquid line pressure, connecting tubing and fittings should be rated at a
pressure that is higher than the line pressure.

Page 10
CAUTIONS:
Use of compressed gas can create an environment of propelled foreign matter. Pressure system safety
precautions apply to all ranges of pressure. Care must be taken during testing to ensure that all connections are
properly and tightly made prior to applying pressure. Personnel must wear eye protection to prevent injury.
Lifting and movement of heavy weights can create an environment of strain and impact hazards. Care must be
taken during testing to ensure that weight masses are lifted in a manner that avoids over-reaching or twisting,
and that the masses are not dropped. Personnel must wear reinforced safety shoes to prevent injury.
Before bleeding pressure from the tester, the valve at the pressure source should be closed. The instrument's
pressure should then be slowly bled to atmosphere. If a vent valve is unavailable, the fitting at the tester should
be carefully and slowly loosened. This procedure is to create a small leak, minimizing the volume of oil that will
enter the interconnecting tubing.
Never touch the cleaned piston with your bare hands. The natural dermal grease can cause a jamming of the
piston cylinder system.
The weight should be handed with gloves. If fingerprints or other impurities are found on the weight pieces in
spite of this precaution, they can be removed with alcohol (spirit).
Never press the piston forcibly into the cylinder. Otherwise it is damaged.

Page 11
4. SETTING UP THE DEAD WEIGHT TESTER
4.1 Put the Vacuum deadweight tester base, piston cylinder unit and the manual pressure pump on a firm level base,
make the bubble level in the middle position by adjusting the three bottom feet of vacuum deadweight tester.
4.2 Remove the bell jar from the vacuum deadweight tester base, check whether the sealing ring in the groove. Make sure
the sealing ring is not aged or broken. If not, please replace it with new one.

Page 12
4.3 Hold the “big head” of piston and cylinder unit, carefully take out it from the vacuum base upside direction. DO NOT
USE YOUR FINGER TO TOUCH THE PISTON SUFACE! The natural dermal grease can cause a jamming of the piston
cylinder system.
4.4 Use hand to screw out the knurled pressure cap of piston cylinder unit, check whether if the internal seal ring is in
good condition. Make sure the sealing ring is not aged or broken. If not, please replace it with new one.

Page 13
4.4 Gently pull out the cylinder from the piston cylinder unit. DO NOT USE YOUR FINGERS TO TOUCH THE PISTON
SURFACE. The natural dermal grease can cause a jamming of the piston cylinder system.
4.5 Put the cylinder into the base with the lettered end facing up (as following left picture), hand tight the knurled pressure
cap to the mechanical stop on the outside of the cylinder (as following right picture)

Page 14
4.6 Loosen the three bottom dowel screws, way out 2/3 thread length around.
4.7 Holding the piston by the larger “head” end, carefully introduce the piston into the underside of the cylinder, and push
gently through (as following left picture). Never force the piston into its cylinder or damage will result. Fully tight and three
bottom dowel screws (as following right picture).

Page 15
4.8 Connect the positive pressure port, negative port with flexible connection hose between vacuum deadweight base and
manual pressure pump (as following left picture). Connect the electric vacuum pump with manual hand pump with flexible
connection hose (as following right picture).

Page 16
5. OPERATION
5.1 PREPATATION
Place the instrument on a firm level base. The deadweight tester should be placed on a rugged table which is
rated for at least 140 kg without deforming. The table should be horizontally leveled.
The room or onsite place in which the instrument is placed should have proper founding, no vibrations are
allowed during operation of the deadweight tester as this results in unpredictable errors.
Room temperature needs to be stable between 23 ± 2°C during the time the deadweight tester is used to avoid
uncertainties due to the thermal expansion coefficients of the piston cylinder and adiabatic effects in the
measuring system.
Air movement around the deadweight tester should be avoided.
Check if the bubble level is in the center; if not, level the instrument with the 3 adjustable feet.
5.2 VACUUM CALIBRATION OPERATION
1. Step 1: Calculate the weight’s vacuum value and related quantities.

Page 17
Step 2: Remove the bell jar from the vacuum deadweight tester base, check whether the sealing ring is in the
groove. Make sure it is not aged or broken. If not, please replace it with new one.
Step 3: Carefully take out the piston cylinder unit from the vacuum base, put it on the table carefully. DO NOT
USE YOUR FINGER TO TOUCH THE PISTON SUFACE!
Table of contents
Other BALUN Test Equipment manuals