Quark-Elec QK-A012 User manual

Quark-elec Manual
https://www.quark-elec.com 1of 11 2018
V1.0
QK-A012 Wireless GPS Receiver Manual
Features
50 Channels “All-In-View” Tracking
Position accuracy of 2.5 meters 2D RMS
Cold/Warm/Hot Start Time: 26/26/1 Seconds
Reacquisition Time: 1.5 second
Standard NMEA 0183 output through WiFi and USB
Supports WiFi in Ad-hoc and Station mode
Two LEDs indicate power and GPS activity
USB 2.0 powered (<50mA@5.0V)
BNC connector for 50 Ohm VHF antenna
Powered SMA connector for 50 Ohm GPS antenna
The internal WiFi access point connects up to 4 devices simultaneously
Compatible with Windows 7,8,10,Mac OS X, Linux systems, Android and iOS

Quark-elec Manual
https://www.quark-elec.com 2of 11 2018
V1.0
Contents
1. Set up overview.............................................................................................................................................3
2. Introduction.................................................................................................................................................... 4
3. Location.......................................................................................................................................................... 4
4. Connections................................................................................................................................................... 5
5. Mounting.........................................................................................................................................................5
6. Power up........................................................................................................................................................ 6
7. Connecting to USB port............................................................................................................................... 6
7.1. USB connection status................................................................................................................... 6
8. Connection through WIFI.............................................................................................................................8
8.1. Ad-hoc mode....................................................................................................................................8
8.2. Station mode.................................................................................................................................... 9
9. Specification................................................................................................................................................ 10
10. Limited Warranty and Notices..............................................................................................................10

Quark-elec Manual
https://www.quark-elec.com 3of 11 2018
V1.0
1. Set up overview
Before you leave your home:
If you will be connecting to the A012 through USB or ‘station mode’ WiFi?
Drivers: are needed if accessing your data through the USB connection. The drivers
usually install automatically to your computer if it is running an original Windows 10 version.
If not, it is included on the FREE CD and to download from our website.
Configuration Software: is optional and requires a Windows PC. It is used to configure
WiFi settings (unless connecting peer-to-peer, without an access point). The software is
included on the FREE CD and as a download from our website.
Consider if you have CD reader/ internet access onsite: ensure you can load the driver
and configuration software through the CD or through internet access (Download any
software to your Windows laptop before travelling to your boat if needed)
1. You will need:
GPS Antenna and wire with SMA connector
Correct length of wires to reach your location
5.0V power source via USB. If you do not have a stable 5.0V power source, consider the
Quark-elec certified low noise power converter. Link below.
https://www.quark-elec.com/product/qk-a013-12v-to-5v-low-interference-converter/
3. Choose your Location: Position in a stable, dry location 0.5m from other WiFi equipment. The
QK-A012 does not have mounting points to attach them to.
4. Connect to your GPS antenna
5. Connect to 5.0v power (through USB)
6. Check the LEDs:
Power: left LED flashes at 3 second intervals.
GPS: right LED Flashes every second while receiving a valid GPS message
7. Connect your QK-A012 to receive the GPS message:
Through WiFi, Set up on your phone, laptop etc. if desired: 15 seconds after the QK-A012
has powered up, you can scan for a WiFi network with an (SSID) which looks similar to ‘QK-
A012xxxx’. Connect the device to ‘QK-A012xxxx’ with the default password: ‘88888888’.
The QK-A012 is set to connect wirelessly in Ad-hoc mode (with no need for a router or access
point) If you want to change to station mode (to view data through a WiFi access point), see the
Station mode, chapter 8.2 of the manual.
Set up in you Chart software: set the protocol as ‘TCP’, IP address as ‘192.168.1.100’ and the
port number as ‘2000’ in the chart software.
(This is an overview only; familiarize you with the manual before installation.)

Quark-elec Manual
https://www.quark-elec.com 4of 11 2018
V1.0
2. Introduction
QK-A012 is a compact GPS receiver which receives information from GPS satellites. The QK-A012
was originally designed for accessing location data for use in marine technology. The QK-A012 can
be used for many different applications including automotive and recreational uses.
The QK-A012 receives and processes GPS signals from satellites, this means that with a power
supply (even a power bank) and GPS antenna, the QK-A012 can calculate its location anywhere in
the world. The antennas must have 4 out of a possible 33 satellites available in order to triangulate
the data and calculate the antenna’s location.
With added WiFi functionality, the GPS data can be accessed wirelessly through peer to peer (Ad-hoc)
or station mode WiFi connection.
3. Location
Although QK-A012 comes with an extruded aluminium enclosure to shield it from external RF
interference, it should not be fitted close to generators or compressors (e.g. refrigerators) as they can
generate substantial RF noise. It is designed to be installed in a protected indoor environment. So
generally a suitable placement of QK-A012 is together with other navigation equipment and the PC or
chart plotter that will be used to display the location data.
Figure 1: Overview of QK-A012

Quark-elec Manual
https://www.quark-elec.com 5of 11 2018
V1.0
4. Connections
Figure 2: Connections
The QK-A012 has the following electrical connections/indicators:
USB connector. A USB micro B connector provides the 5.0V power source for the product and
also outputs data.
LED lights. The QK-A012 features two LEDs which indicate power and GPS status. The two
LED’s turn on and then off after initialization. When operating, these LED’s flash as below:
Power LED: left LED flashes at 3 second intervals.
GPS LED: right LED Flashes every second while receiving a valid message
GPS connector. Standard SMA male 50 Ohm connector. (required a GPS antenna)
WiFi connection: WiFi connectivity in both Ad Hoc and Station modes.
5. Mounting
QK-A012 is designed to be securely positioned in an indoor environment and needs to be placed
where it is well protected from humidity and water.
QK-A012 is not supplied with GPS antenna. An active GPS antenna with a female SMA connector
should be mounted and ideally spaced 0.5 metres from other antenna.

Quark-elec Manual
https://www.quark-elec.com 6of 11 2018
V1.0
6. Power up
The QK-A012 is typically powered by PC, laptop, tablet or other devices with 5.0V USB micro B
connector. If USB data output isn’t required (if accessing GPS data through WiFi), a power bank or
other 5.0V supply (greater than 500mA current) power source can be used.
We recommend not using a cigarette lighter as they frequently provide an unstable current,
which could damage the QK-A012. Check that the power source is 5.0V volts only. Excess
power or power surges/fluctuations can damage the QK-A012.
If you have an unstable power source, we can recommend the QK-A012; this is a dedicated
12V to 5.0V power converter for marine and automotive purposes that will supply a stable
power source. See link below.
https://www.quark-elec.com/product/qk-a012-wireless-gps-receiver/
7. Connecting to USB port
QK-A012 is supplied with a USB connector. This connector provides power supply and the GPS data
output. This USB connector can be linked directly to a USB port on the PC or other mobile devices via
the supplied cable.
Windows: To enable the USB data connection of QK-A012 to other devices, related hardware drivers
may be needed dependent on system requirements.
Windows 7,8,10 the driver can be found on the CD in the packing box or can be downloaded from
the Quark-elec website at:
https://www.quark-elec.com/product/qk-a013-12v-to-5v-low-interference-converter/
Connect QK-A012 to the computer; follow the instructions to install the driver if required.
The QK-A012 registers itself to the computer as a virtual serial com port.
The drivers usually install automatically to your device if it is running an original Windows 10 version.
A new COM port will automatically show up in the device manager after plug in.
Mac: For Mac OS X, QK-A012 will be recognized and shown as a USB modem. The ID can be
checked with the following steps:
1. Plug the QK-A012 into a USB port and launch Terminal.app.
2. Type: less /dev/*sub*
3. The Mac system will return a list of USB devices. QK-A012 will display as -
“/dev/tty.usbmodemXYZ” where XYZ is a number. Nothing further needs to be done if it is
listed.
Linux: No driver is required for Linux. When plugged into the computer, QK-A012 will show up as a
USB CDC device on /dev/ttyACM0.
7.1. USB connection status
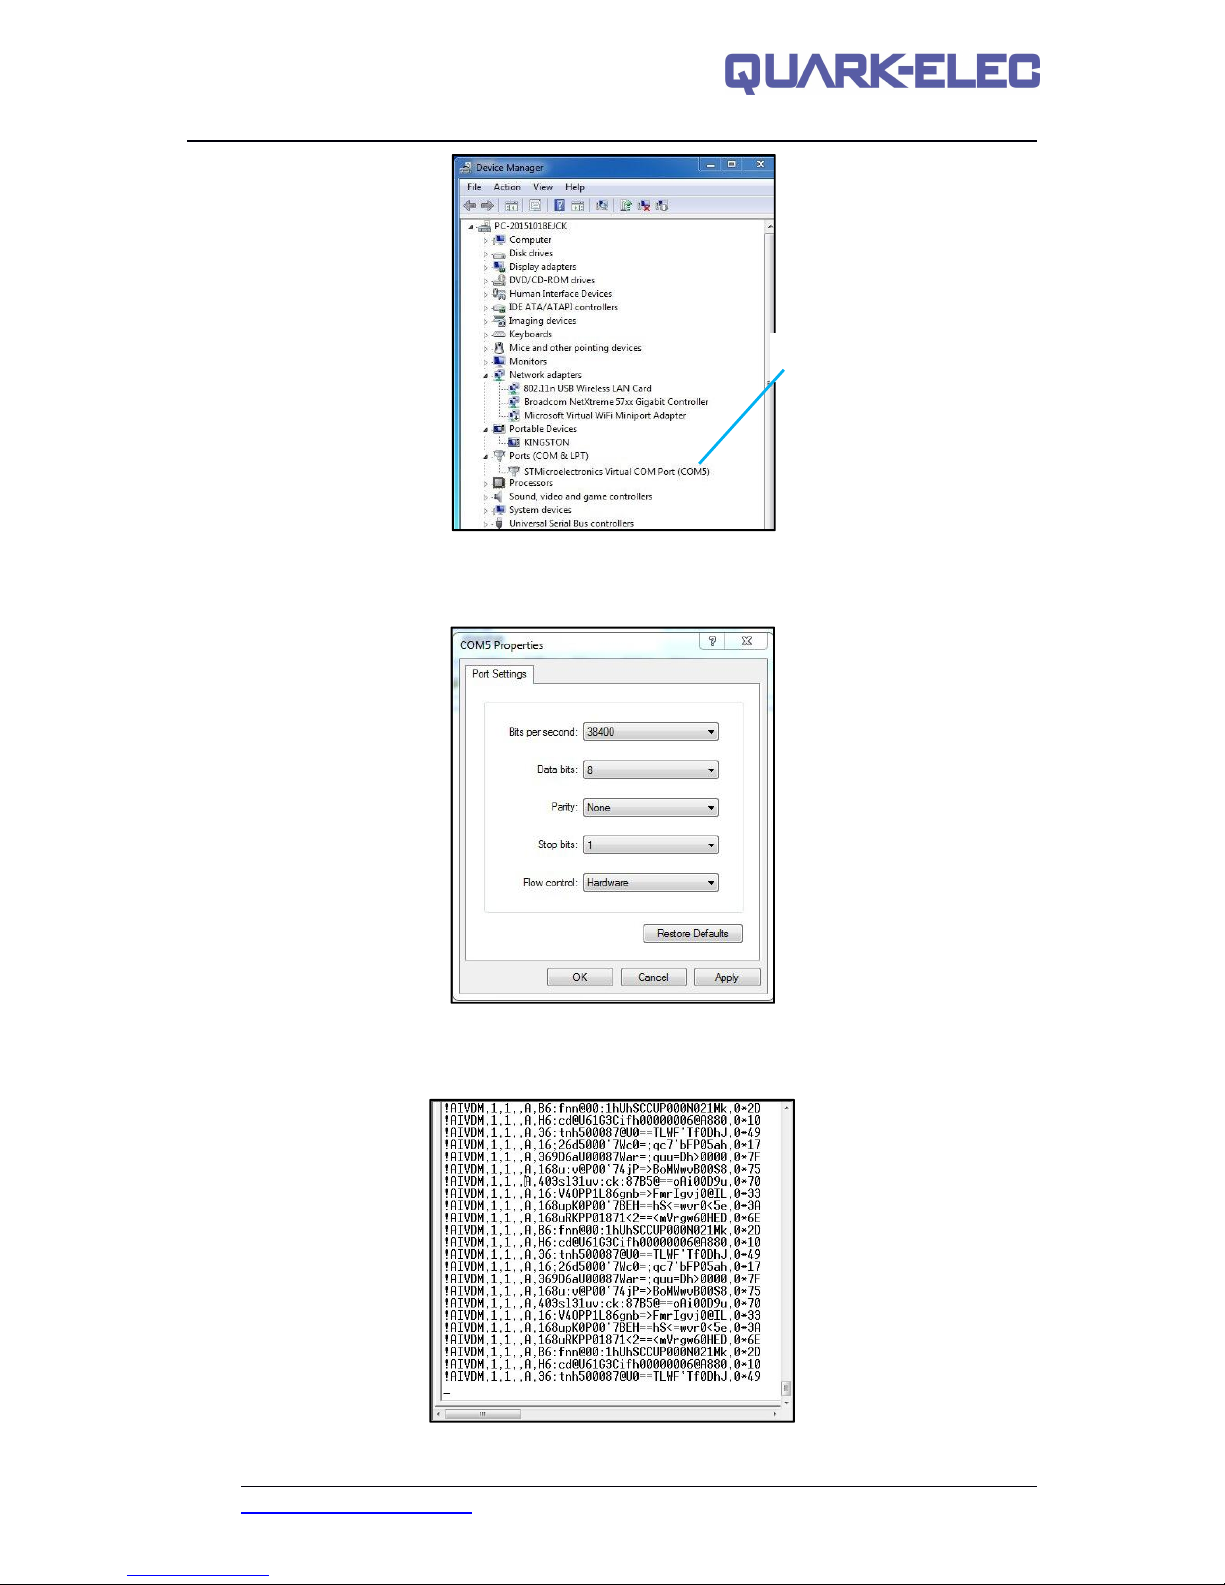
Checking the USB connection: After the driver is installed, run the Device Manager and check the
COM number (this is the number associated with the USB port you are using). Your chart software
may require your COM number in order to access the data.
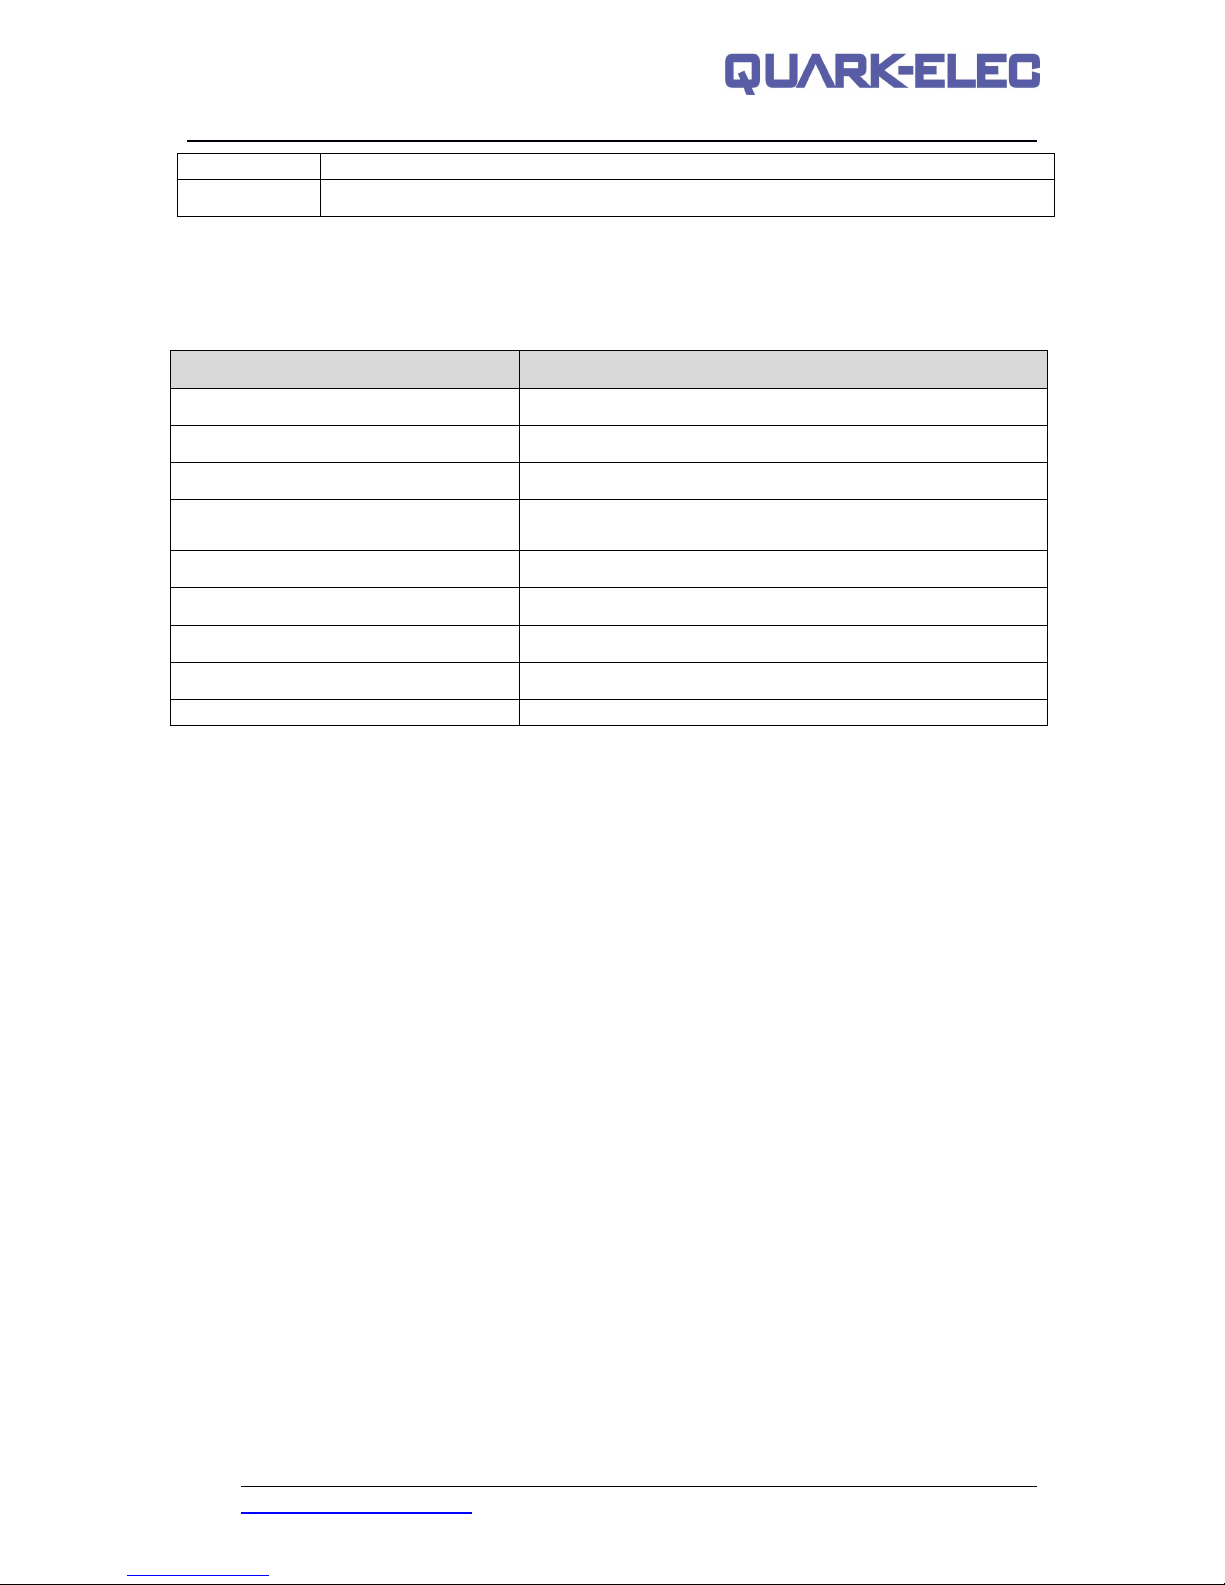
Checking the USB data flow: If desired, the USB data can always be checked with a terminal
monitor application, like Putty or HyperTerminal. To do this, enter the following into the COM port
settings: Bits per second: 38400bps,Data bits: 8,Parity: None, and Stop bits: 1 as shown below
using HyperTerminal on Windows as an example.

Quark-elec Manual
https://www.quark-elec.com 7of 11 2018
V1.0
Figure 3: Checking the COM port in Device Manager
Figure 4: Setting on HyperTerminal /Putty
If all the above is set up correctly, similar messages to the examples below should be shown.
Figure 5: Display on HyperTerminal
QK-A012 is in COM5

Quark-elec Manual
https://www.quark-elec.com 8of 11 2018
V1.0
8. Connection through WIFI
QK-A012 support both Ad-hoc mode and station mode.
1. Ad hoc mode. The module will work in Ad hoc mode by default but it can be easily setup
to station mode through the configuration tool. Ad hoc is a direct connection wirelessly to the
QK-A012 (peer to peer). Your laptop or mobile phone can search and connect to the WiFi
signal being emitted by the QK-A012.
2. Station mode works by opening a connection in your wireless router and then QK-A012
connects directly to that connection on the router. This allows your router to handle all the
traffic from the QK-A012. You can then access the data through the router from any device
that you can connect to your router. This also allows your wireless device to have access to
the internet whilst still receiving data from the QK-A012.
8.1. Ad-hoc mode
15 seconds after the QK-A012 has powered up, you will be able to scan for a WiFi network with an
(SSID) similar to ‘QK-A012xxxx’.
Connect the device to ‘QK-A012xxxx’ with the default password: ‘88888888’.
Device SSID
Similar to ‘QK-A012xxxx’
WiFi password
88888888
In your chart software:
Set the protocol as ‘TCP’, IP address as ‘192.168.1.100’ and the port number as ‘2000’ in the chart
software.
Protocol
TCP
IP address
192.168.1.100
Port
2000
With the above settings, wireless connection should be established and the user will be able to
receive the data through the chart software. Note: In Ad-hoc mode, the IP address should not be
changed and the password should be between 8 to 12 characters.
The user can always check the wireless connection with TCP/IP port monitoring software as shown
below:
Fig 7: TCP/IP setting check

Quark-elec Manual
https://www.quark-elec.com 9of 11 2018
V1.0
8.2. Station mode
Station mode allows for the QK-A012 to connect directly to your router. This allows the router to
handle the data and traffic from the QK-A012. This data can then be picked up through the router
anywhere on your local area network. Similar to plugging the QK-A012 directly into the router by wire
but instead using wireless technology.
To allow the QK-A012 to connect to the router you may have to open an access point. This can be
done in the router settings. Your router manufacturer will be able to give you instructions for adding
this.
Once an access point is opened up, open the Quark-elec configuration software. Copy the router
settings into the station mode section of the configuration tool.
Figure 8: Station Mode Settings
By changing these parameters to those of your wireless access point as illustrated below you will
connect the QK-A012 to the router. You will be able to see the GPS data coming through your regular
WiFi connection:
The Configuration Software (GUI) can be used to adjust these settings at any time. You can download
the software at https://www.quark-elec.com/downloads/configuration-tools/
Detailed instructions on how to use the Configuration software are available at https://www.quark-
elec.com/doc/QK-A0xx_GUI_application_note.pdf
IN YOUR CHART SOFTWARE:
Set the protocol as ‘TCP’, enter your device’s IP address and the port number as ‘2000’ in the chart
software.
Protocol
TCP
IP address
You can check the IP address through your router set-up page. Each router supplier

Quark-elec Manual
https://www.quark-elec.com 10 of 11 2018
V1.0
has a different layout. You can usually find the IP address under ‘device list’.
Port
2000
With the above settings, wireless connection should be established and the user will be able to
receive the data through the chart software.
9. Specification
Item
Specification
Operating temperature
-25°C to +80°C
Storage temperature
-25°C to +85°C
DC supply
5.0V(+/-0.2V)
Average supply current (typical
quiescent)
50mA
Maximum supply current (cold start)
80mA
GPS receiver sensitivity
-162dBm
WiFi mode
Ad Hoc and Station modes on 802.11 b/g/n
Security
WPA/WPA2
Network Protocols
TCP
For more technical information and other enquiries, please go to the Quark-elec forum at:
https://quark-elec.com/forum/
For sales and purchasing information, please email us: info@quark-elec.com
10. Limited Warranty and Notices
Quark-elec warrants this product to be free from defects in materials and manufacture for one year
from the date of purchase. Quark-elec will, at its sole option, repair or replace any components that
fail in normal use. Such repairs or replacement will be made at no charge to the customer for parts
and labour. The customer is, however, responsible for any transportation costs incurred in returning
the unit to Quark-Elec. This warranty does not cover failures due to abuse, misuse, accident or
unauthorized alteration or repairs. A returns number must be given before any unit is sent back for
repair. The above does not affect the statutory rights of the consumer.
Disclaimer
This product is designed to aid navigation and should be used to augment normal navigational
procedures and practices. It is the user’s responsibility to use this product prudently. Neither Quark-,
nor their distributors or dealers accept responsibility or liability either to the products user or their
estate for any accident, loss, injury or damage whatsoever arising out of the use or of liability to use
this product.
Accuracy of this manual
Quark- products may be upgraded from time to time and future versions may therefore not
correspond exactly with this manual. The manufacturer of this product disclaims any liability for
consequences arising from omissions or inaccuracies in this manual and any other documentation
provided with this product.

Quark-elec Manual
https://www.quark-elec.com 11 of 11 2018
V1.0
Document history
Issue
Date
Changes / Comments
1.0
14/08/2018
Release of product
Quark-elec (UK)
Unit 7, the Quadrant
Newark close
Royston, UK
SG8 5HL
Other manuals for QK-A012
1
Table of contents
Other Quark-Elec Receiver manuals

Quark-Elec
Quark-Elec QK-A027 User manual

Quark-Elec
Quark-Elec QK-A024 User manual

Quark-Elec
Quark-Elec QK-A028 User manual

Quark-Elec
Quark-Elec QK-A027-plus User manual

Quark-Elec
Quark-Elec A026+ NMEA 2000 User manual

Quark-Elec
Quark-Elec QK-A026 Technical manual

Quark-Elec
Quark-Elec QK-A027 User manual

Quark-Elec
Quark-Elec QK-A021 User manual

Quark-Elec
Quark-Elec QK-A026 Technical manual

Quark-Elec
Quark-Elec QK-A022 User manual