manuals.online logo
Brands
  1. Home
  2. •
  3. Brands
  4. •
  5. Quebic Industries
  6. •
  7. Smoker
  8. •
  9. Quebic Industries QueBQ User manual

Quebic Industries QueBQ User manual

Unleash Your Inner Pitmaster!
QUEBQ ASSEMBLY MANUAL
The QueBQ smoker firebox provides competition-style smoke flavor to your
kamado. The QueBQ is a stick-burner firebox designed in the same manner
as the firebox on competition-style smokers, and your kamado is the food
chamber. The smoke and hot air from the QueBQ firebox is directed through
ducts and a chimney with a unique air control valve system into the inlet hole
on the body of your kamado.
In this assembly, you'll put together the QueBQ and then readjust your
kamado so that the air inlet is connected to the chimney.
The User Manual has important information on how the QueBQ kamado
smoker works, and how it works with your kamado. The User Manual also
discusses smoking and using the QueBQ as a smoke source for your kamado
cook – an entirely new way to cook barbeque!
PARTS LIST
(1) Stick Burner Main Body
(4) Attachment Angles
(1) Door Latches
(1) Door Vent Slide Handle
(2) Door Vent Slide Brackets
(1) Hardware Pack
(x3) PULL, DULL, STAINLESS STEEL
(x4) CASTER, ½-13 STEM
(x8) DOOR SLIDE BOLT
1
(x1) DOOR LATCH BOLT
(x1) DOOR LATCH NUT, LOCKING
(x20) ¼-20 X ¾" SS CAP SCREW
(x4) CHIMNEY TOP/BOTTOM NUTS
(x5) DAMPER STOP SCREW NUT
(x11) 4-40 X ¼: SS PHILLIPS ROUND HEAD SCREW
(1) Chimney Top
(1) Blank Chimney Plate
(1) Door Catch
(2) Outer Damper Slide Plate
(1) Chimney Sandwich Plate
(1) Sliding Door Grate (Vent Slide Plate)
(1) Burn Pan Assembly
(1) Center Damper
(1) Chimney Bottom
(1) Logo Plate
(1) Gasket Set (4 pieces)
TOOLS NEEDED
7/16” Wrench
(Wrench for damper stop nuts)
#2 Phillips-head screwdriver
Allen wrench set
LOCATION
1. Plan the location of your QueBQ ahead of time. The firebox should be set
up on a secure, level surface. Avoid having to move it up stairs or steep
ramps if possible. Use appropriate handling equipment where necessary –
the QueBQ is HEAVY.
2
2. The QueBQ should only be used outdoors where good ventilation is
present.
3. Do not locate your QueBQ near combustible materials or flammable vapors
or liquids.
4. Do not locate under any overhead combustible construction.
5. Do not use on wooden structures without a fireproof mat.
WARNINGS
1. Improper assembly may be dangerous. Follow the assembly instructions in
this manual. Do not use unless all parts are in place. Make sure the fire
grate is properly installed within the firebox before lighting a fire.
3
ASSEMBLY
See Figure 1 -
When received, remove the parts boxes and the fire grate from
inside the QueBQ firebox. Do not take the QueBQ body off the
cardboard pallet base. Install the four casters on the QueBQ body.
On the cardboard base, pull loose the flaps holding the lip of the
cardboard. Fold the lip down, then carefully roll the body off of the
pallet base and upright. CAUTION: Two people are required for
safe removal of the body. The staples are sharp and can cut or
damage the coating system. Some parts may contain sharp
edges. Wear protective gloves if necessary. Be careful about
how the door swings when rolling the body off. The fire grate
can be re-inserted in bottom of the firebox once it is upright.
4
Figure 1
5
See Figure 2 -
Assemble the chimney. Insert 4 bolts (11) through the chimney
top (2), the center damper spacer plate (5), and the lower
chimney section (1). Install and tighten the nuts. NOTE: orient
the center damper spacer plate (5) so that the opening is
towards the front depending on which side of the firebox the
chimney is to be installed. The orientation shown in Figure 2 is
for the right-side installation.
Figure 2
Insert the dampers. Attach the handle (9) to each damper with
2 screws provided. Insert the center damper (only 1 screw hole)
6
through the damper slot on the side of the chimney. Using a
small phillips head screwdriver, install and tighten the stop
screw/nut on the damper. Insert the two outer dampers (2 holes
in each) in the guides on the chimney assembly. Install and
tighten 2 stop screws/nuts in each damper. NOTE: Be sure to
orient the dampers to open to the front based on which side of
the firebox the chimney is to be installed.
Install the chimney on the firebox. (See Figure 1) Bolt the
chimney to the firebox with (4) 1/4” x 3/4” SS Screws. Bolt the
face plate to the unused chimney connection on the opposite
side of the firebox.
Apply the gaskets. Mock up the gaskets so they create a
continuous ring around the adapter plate and not covering the
chimney throat. Use the included sealant to attach the gaskets
on the kamado inlet plate (and the front door). The gaskets have
been pre-cut.
7
See FIgure 3 -
Install the door vent. Place two small shoulder bolts (8) through the
top holes in the back of the firebox door (1), through the vent plate
(3), then started into the top glide bracket (7). Put shoulder bolts
through the bottom holes, vent plate holes, and started into the glide
brackets (6 and 7), as shown. Tighten the shoulder bolts.
Figure 3
Install door latch. Place large shoulder bolt (5) through the latch (2)
and door (1). Attach with the lock nut (4).
Kamado Disassembly
The base strap of your kamado can be left on the base. We first
recommend loosening the strap bolts on both the base and dome
straps to create enough space to cable-tie the straps
8
together.CAUTION: Straps can flip open quickly, causing injury if not
tied together. Remove the dome and inner liners from the kamado
base. Remove the air inlet damper on the kamado base. Re-insert
the bolts and washers from the damper into their holes to form plugs.
Place kamado base on QueBQ. Locate your QueBQ where you are
going to use it. Be careful not to damage the coating when installing
the base. Carefully place the kamado base on top of the QueBQ
firebox with the kamado air inlet oriented to the chimney adapter
plate and 90 degrees from the front. The air inlet on the base will be
either right or left, aligning with the chimney. Adjust the base so the
kamado air inlet is aligned and the gaskets are well sealed. Look
through the upper chimney chamber to check alignment.
Rotate Hinge. The hinge strap needs to be rotated 90 degrees on
the base when it is installed so the hinge is in back. (Kamado Joes
have an index tab inside the hinge straps that orients the tab to holes
in the rim of the base and dome. The tab in the front of the kamado
base hinge strap needs to be sawn or ground off before installation
of the dome. The tab in the dome strap still orients the dome to the
front.)
Install dome on kamado. Carefully lower the dome into the hinge
strap with the thermometer in front. Align the dome on the base so
that the gaskets seal well, remove the stap ties, then tighten the
straps per the manufacturer's recommendations.
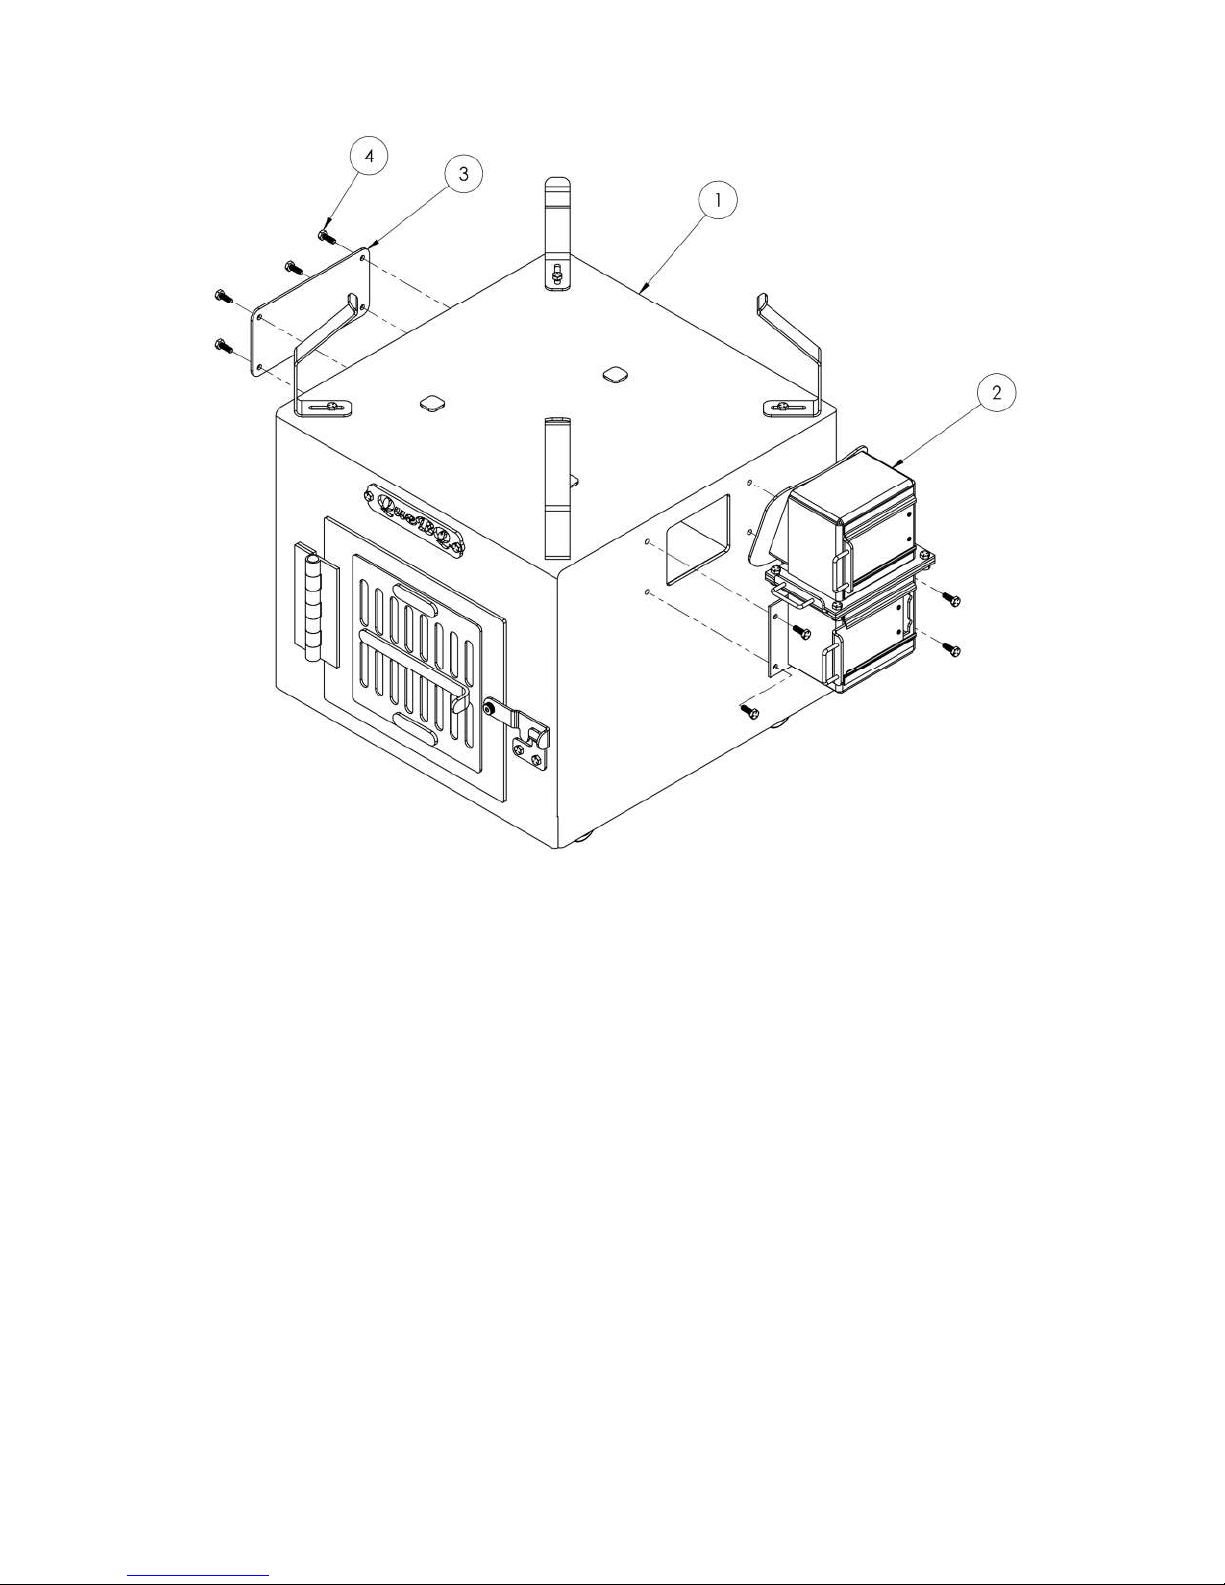
Install kamado braces. Bolt in the four support arms on as shown in
Figure 1 with (4) 1/4” x 3/4” SS Screws. Braces should be in contact
with the kamado body, but not stressed or tight.
Install logo. Congratulations! You may now christen your new
9
QueBQ by bolting on its logo.
And the journey begins . . .
Be sure to read the Users Manual before firing your new QueBQ up.
The QueBQ smoker system and a kamado create a cooking system
unlike any other you've cooked on. Not only do you have more air
and smoke control options, but the QueBQ features the ability to do
combo cooks. A cooking technique that only the QueBQ can do. All
of these things and more are there for you to learn in the Users
Manual.
10
Quebic Industries, Inc.
P. O. Box 5043
Zionsville, Indiana 46077
© 2017
11

Popular Smoker manuals by other brands

Mustang YH28014E quick start guide

Mustang

Mustang YH28014E quick start guide

Medina River Big Daddy Double Bar B Q Assembly instructions

Medina River

Medina River Big Daddy Double Bar B Q Assembly instructions

Bartscher 1160 Original instruction manual

Bartscher

Bartscher 1160 Original instruction manual

Wildfire LONGHORN owner's manual

Wildfire

Wildfire LONGHORN owner's manual

Sausace Maker 30 Lb. Country Smokehouse Assembly and operating manual

Sausace Maker

Sausace Maker 30 Lb. Country Smokehouse Assembly and operating manual

oklahoma joes Longhorn 12201747 Product guide

oklahoma joes

oklahoma joes Longhorn 12201747 Product guide

PRO SMOKER RESERVE 300 DRY AGER owner's manual

PRO SMOKER

PRO SMOKER RESERVE 300 DRY AGER owner's manual

Camp 4 Lars General Instructions for Use

Camp 4

Camp 4 Lars General Instructions for Use

Pur Line EFP69 manual

Pur Line

Pur Line EFP69 manual

Twin Eagles TEPG36R Installation, use & care manual

Twin Eagles

Twin Eagles TEPG36R Installation, use & care manual

VapoWesp 09142 Instructions for use

VapoWesp

VapoWesp 09142 Instructions for use

Southern Pride SPK-500-SL Specification sheet

Southern Pride

Southern Pride SPK-500-SL Specification sheet

Brinkmann Vertical Smoker Charcoal/Wood Smoker Grill owner's manual

Brinkmann

Brinkmann Vertical Smoker Charcoal/Wood Smoker Grill owner's manual

Dyna-Glo DGO1176BDC-D-1 manual

Dyna-Glo

Dyna-Glo DGO1176BDC-D-1 manual

Weber SMOKEY MOUNTAIN COOKER 63230 user manual

Weber

Weber SMOKEY MOUNTAIN COOKER 63230 user manual

Kalamazoo K-SMOKE-42-R-PW Use and care guide

Kalamazoo

Kalamazoo K-SMOKE-42-R-PW Use and care guide

Viking VCPS303SS Specifications

Viking

Viking VCPS303SS Specifications

BBQ 23669 owner's manual

BBQ

BBQ 23669 owner's manual

manuals.online logo
manuals.online logoBrands
  • About & Mission
  • Contact us
  • Privacy Policy
  • Terms and Conditions

Copyright 2025 Manuals.Online. All Rights Reserved.