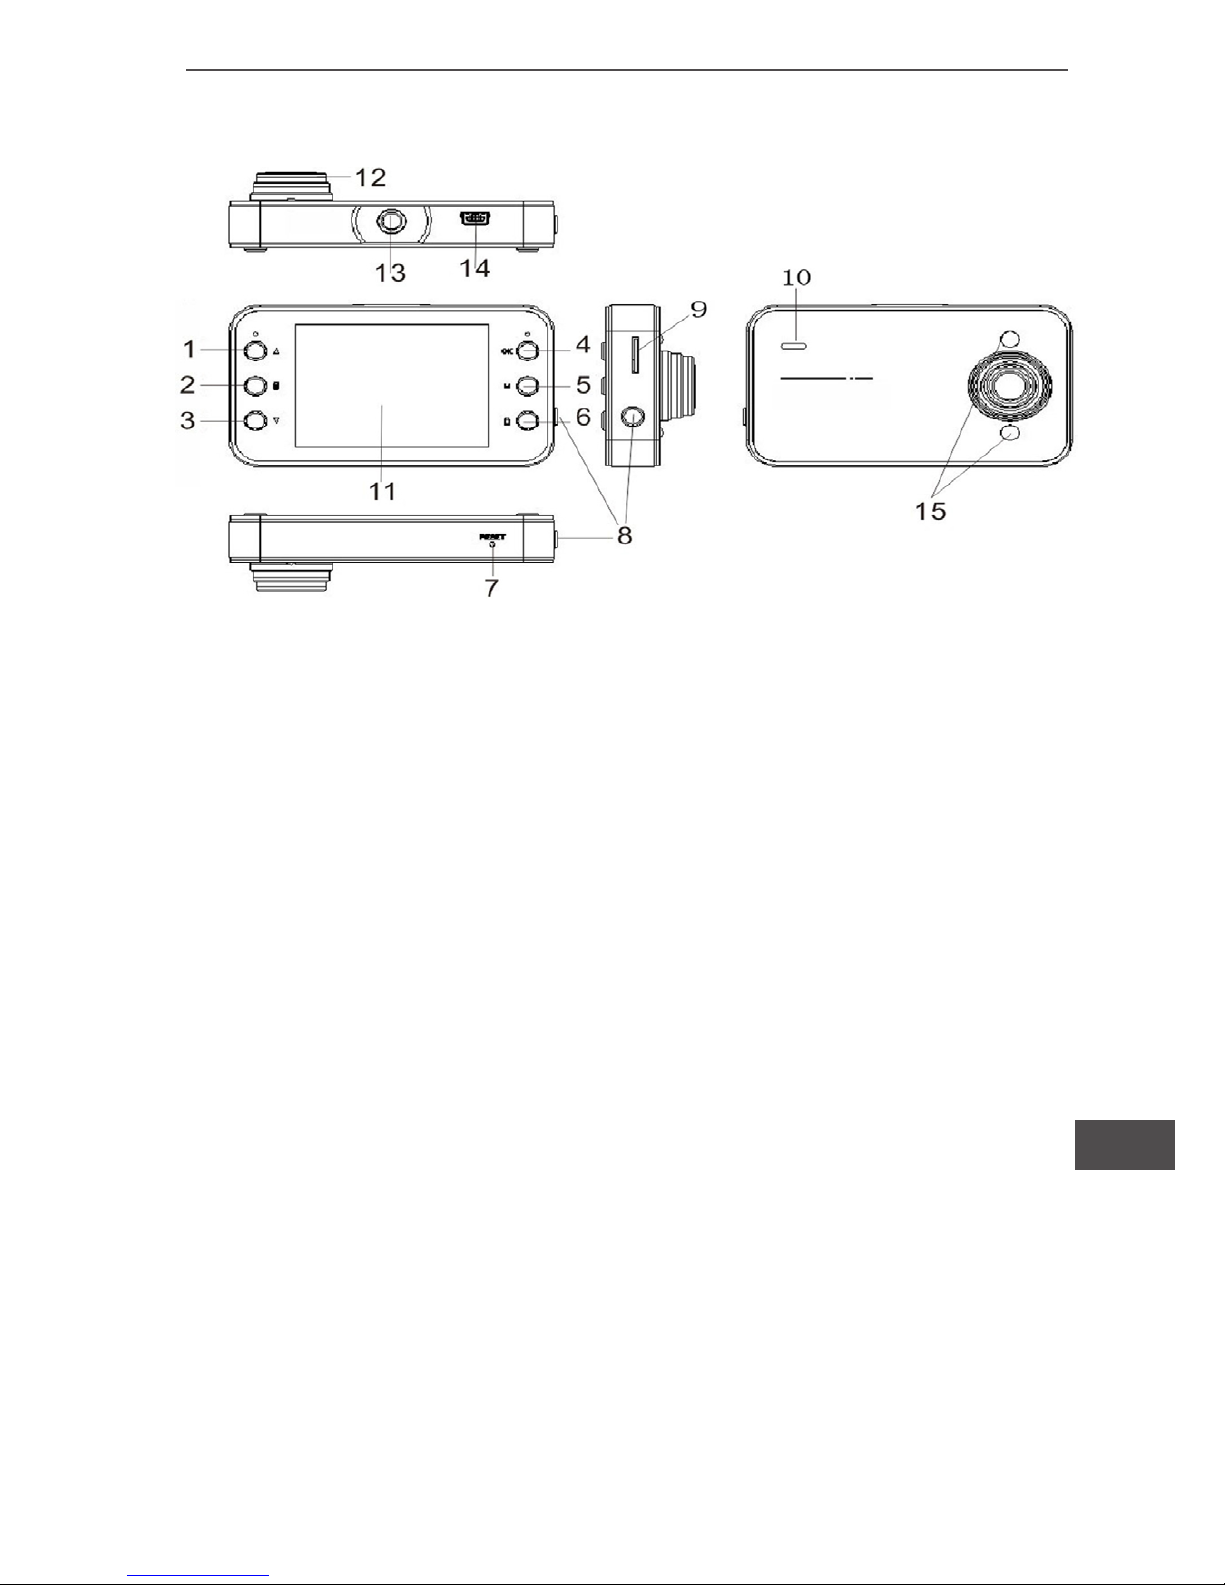
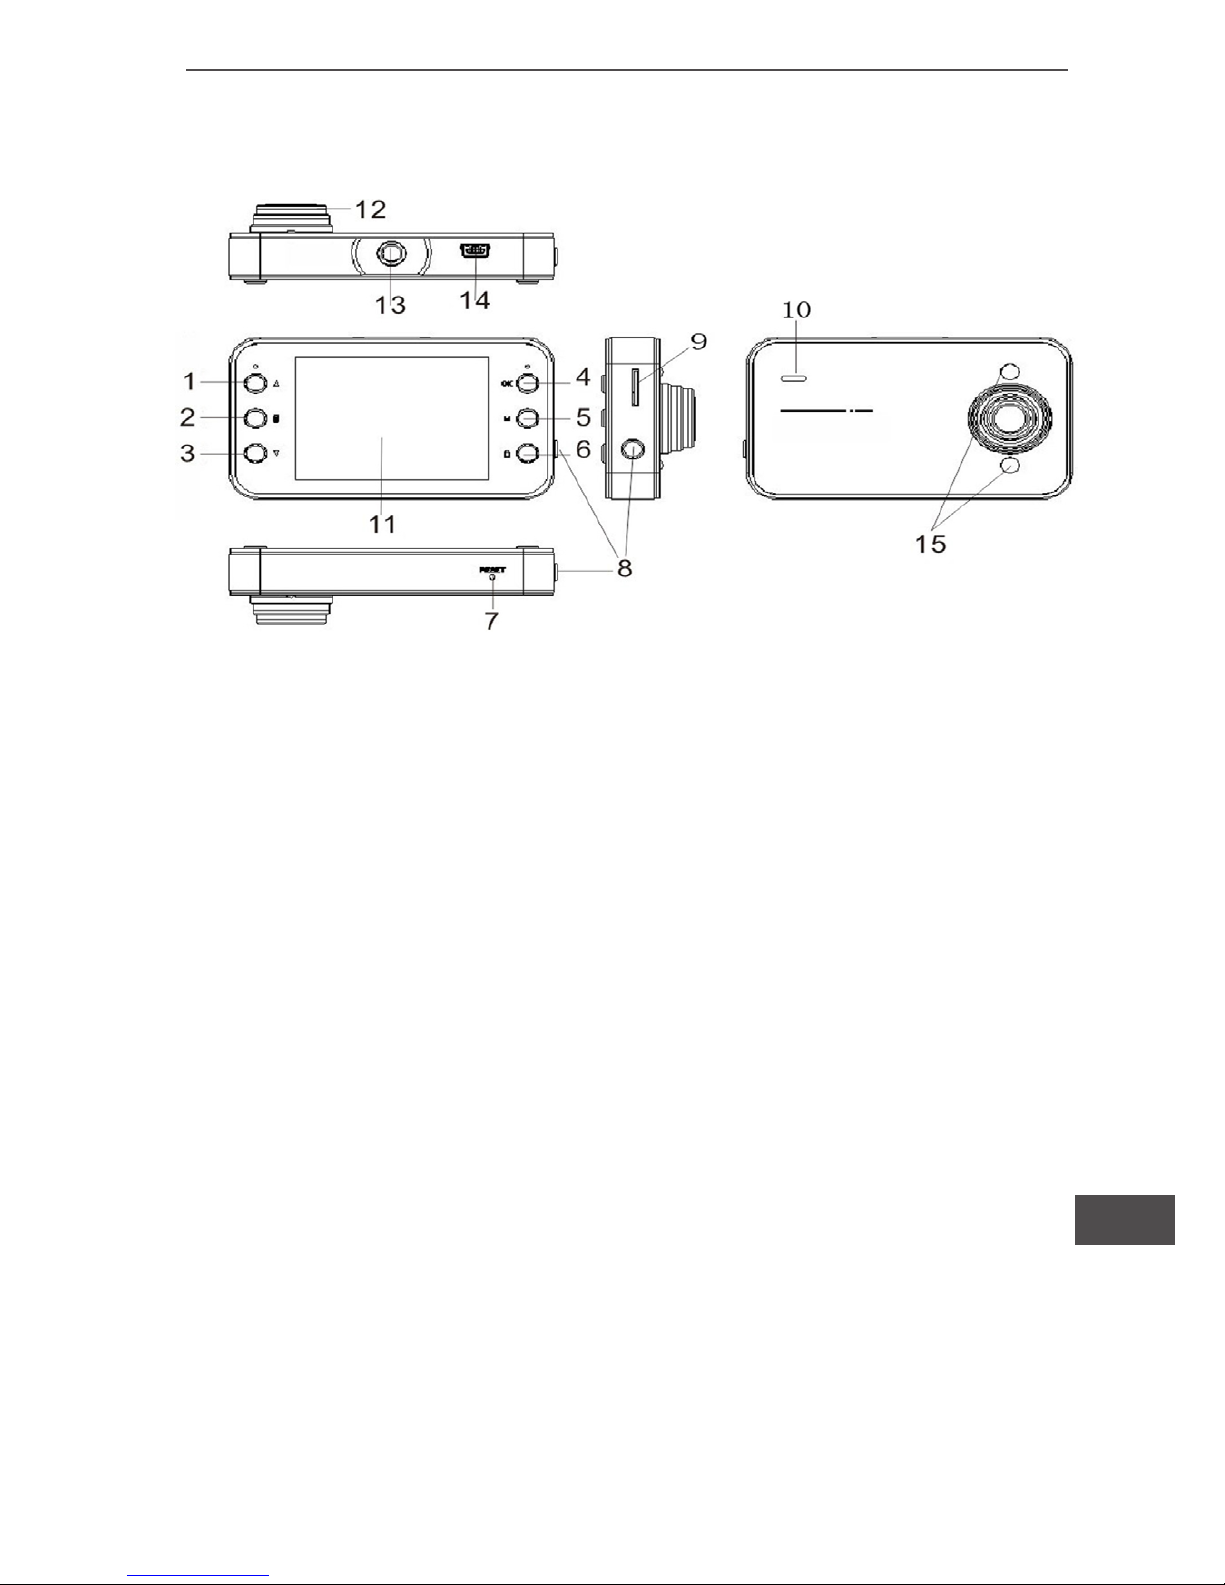
Quer KOM0673 User manual

Instrukcja obsługi PL
Manual de utilizare RO
Owner’s manual EN
Bedienungsanleitung DE
Car DVR
KOM0673


3
Bedienungsanleitung
DE
Beschreibung der Bedienungselemente
1. Taste Aufwärts
2. Taste Menü
3. Taste Abwärts
4. Taste OK
5. Taste Modus
6. Taste Sperren
7. Taste Reset/MIK
8. Taste Ein/Aus
9. TF Karte
10. Lautsprecher
11. Display
12. Kameraobjektiv
13. Halterungsbefestigung
14. USB
15. IR LED
Merkmale
Bevor Sie die Kamera benutzen, stecken Sie eine TF Karte ein,
da alle Bilder auf der TF Karte gespeichert werden
1. Ein/Aus Funktion
Gerät einschalten: Kurzes drücken der Taste “Ein/Aus” start;
Gerät ausschalten: Langes drücken, 3S, der Taste “Ein/Aus” aus-
schalten;
Andere: Beim anschließen des Autoladegerätes schaltet sich das
Gerät automatisch ein, beim entfernen des Ladegerätes schaltet
sich das Gerät aus, nach einer eingestellten Zeit;
2. Aufnahmefunktion
Video: Aufnehmen aus dem Bereitschaftsmodus, kurzes drücken
der Taste “OK” zum aufnehmen, erneutes drücken der Taste “OK”
beendet die Aufnehme und speichert die Videodatei.

Bedienungsanleitung
4
DE
3. Kameramodus
Foto: Fotograeren aus dem Bereitschaftsmodus, kurzes drücken
der Taste “OK” um ein Bild zu machen.
4. Wiedergabefunktion:
Wiedergabe: Wiedergabemodus, drücken der Taste “Aufwärts”
oder “Abwärts” um eine Datei auszuwählen und drücken die Taste
“OK” um die Datei abzuspielen.
5. Funktion Sperren/ Entsperren:
Sperren: Video, drücken Sie die Taste “Sperren”, das aktuelle
aufgenommen Video wird geschützt.
Entsperren: Im Wiedergabemodus entsperren durch die Menüop-
tionen.
6. Fokusfunktion
Fokus: Video- und Foto-Bereitschaftsmodus, drücken der Taste
“Aufwärts” und “Abwärts” in Fokus, Maximale Vergrößerung 4
Mal.
7. Lademodus
Beim anschließen des Autoladegerätes, Gerät manuell auss-
chalten, langes drücken, 3S, der Taste “Ein/Aus”.
Video Menü
Video Modus, drücken der Taste “Menü” zum Aufruf des Aufnah-
memenüs.
1. Auswählen des Videoformats: HD/D1/VGA
HD: Einstellen der Videoauösung 1280 * 720
D1: Einstellen der Videoauösung 848 * 480
VGA: Einstellen der Videoauösung 640 * 480
2. Einstellen der Schleifenaufnahme Zeiteinstellung:
2 Minuten / 5 Minuten / 15 Minuten
Schließen: Schließen der Schleifenaufnahme, wenn die
Speicherkarte nach der Aufnahme voll ist
2 Minuten: Jede Videodatei hat eine maximale Aufnahmelänge
von 2 Minuten;
5 Minuten: Jede Videodatei hat eine maximale Aufnahmelänge
von 5 Minuten;
10 Minuten: Jede Videodatei hat eine maximale Aufnahmelänge
von 10 Minuten;

5
Bedienungsanleitung
DE
3. Bewegungserkennung: Ein/Aus
Ein: Aufnahme-Bereitschaftsmodus, wenn sich ein Objekt vor der
Kamera bewegt, startet automatisch die Videoaufnahme
Aus: Aufnahme-Bereitschaftsmodus, DVR wird keine Maßnahme
ergreifen
4. Videoton: Ein/Aus
Ein: Video wird mit Ton abgespielt
Aus: Video wird ohne Ton abgespielt
5. Videozeitstempel: Aus/Ein
Aus: Videodatei wird keinen Zeitstempel anzeigen
Ein: Im rechten unteren Winkel des Videos wird der Zeitstempel
angezeigt
6. Verzögertes Ausschalten: Ausschalten / 10S/30S
Ausschalten: Video ist in Aufnahmebereitschaft oder entfernen
des USB-Kabel – sofortiges ausschalten
10S: Video ist in Aufnahmebereitschaft oder entfernen des USB-
Kabel – ausschalten nach 10S
30S: Video ist in Aufnahmebereitschaft oder entfernen des USB-
Kabel – ausschalten nach 30S
Bilderfassungsmenü
Kameramodus, drücken der Taste “Menü” zum Aufruf des Kam-
eramenüs.
1. Bilderfassungsmodus: Aus / Verzögerung- 2S / Verzöger-
ung - 10S / Kontinuierlich
Aus: Drücken der Taste “OK”: Bild wird sofort gemacht;
Verzögerung - 2S: Drücken der Taste “OK”: Bild wird nach einer
Verzögerung von 2S gemacht
Verzögerung - 10S: Drücken der Taste “OK”: Bild wird nach einer
Verzögerung von 10S gemacht
Kontinuierlich: Drücken der Taste “OK”, es werden kontinuierlich
drei Bilder gemacht
2. Bildgröße: 5M/3M/2M/1M
5M: Einstelen der Bildauösung auf 2592 * 1944
3M: Einstelen der Bildauösung auf 2048 * 1536
2M: Einstelen der Bildauösung auf 1600 * 1200
1M: Einstelen der Bildauösung auf 1280 * 1024

Bedienungsanleitung
6
DE
3. Bildqualität: Sehr gut/ gut / normal
4. Belichtung: -2,0 bis 2,0
Negativ, die Wirkung ist dunkel, positiv, teilweise Hell-Effekt
5. Datumsstempel: Ein/Aus
Aus: Der Datumsstempel wird nicht am Bild angezeigt
Ein: Im rechten unteren Winkel des Videos wird der Datumsstem-
pel angezeigt
Wiedergabemenü
1. Dateien sperren: Dateien sperren - entsperren / Alle sper-
ren / Alle entsperren
Dateien sperren - entsperren: Sie könne jede Videodatei sperren
und entsperren
Alle sperren: Alle Videodateien sperren
Alle entsperren: Alle Videodateien entsperren
2. Dateien löschen: Einzeln löschen / Alle löschen
Einzeln löschen: Löschen der aktuellen Datei
Alle löschen: Löschen aller Dateien
3. Diashow: Start / Intervall / Zyklisch (Nur Bilddateien)
Start: Drücken der Taste „OK” zum Begin der Diashow
Intervall: Der Zeitraum zwischen jeder Datei ist eingestellt zwi-
schen 1 und 10 Sekunden
Zyklisch: Die Diashow wird wiederholt
Systemmenü
Zuerst die Taste „Menu” drücken und danach die Taste „Modus”
zum Aufruf des Systemmenüs;
1. Datum und Zeit: Einstellen der aktuellen Zeit und Zeitfor-
matanzeige
2. Automatisches ausschalten: 1 Minute / 3 Minuten / 5 Minu-
ten / Aus
1 Minute: Aus dem Bereitschaftsmodus automatisches ausschal-
ten nach 1 Minute
3 Minuten: Aus dem Bereitschaftsmodus automatisches ausschal-
ten nach 3 Minuten

7
Bedienungsanleitung
DE
5 Minuten: Aus dem Bereitschaftsmodus automatisches ausschal-
ten nach 5 Minuten
Aus: Aus dem Bereitschaftsmodus wird nicht automatisch ausge-
schaltet
3. Toneinstellung: Verschluss / Einschalt-Ton / Tasten-Ton /
Lautstärke
Verschluss: Ein – Verschluss-Ton ertönt; Aus Verschluss-Ton
Tasten-Ton ein: Piepton ertönt beim drücken der Tasten; Ton aus
kein Piepton
4. Sprache: Unterstützt 13 Sprachen
5. TV: NTSC / PAL
6. Stromfrequenz: 50Hz/60Hz
7. Format : Löschen aller Dateien auf der Speicherkarte
8. IR LED : Aus / Ein / Automatisch
Aus: Infrarotlicht ist ausgeschaltet
Ein: Infrarotlicht ist eingeschaltet
Automatisch: Infrarotlicht wird bei schwachen Lichtverhältnissen
automatisch eingeschaltet
9. Auf Werkseinstellungen zurücksetzen: Zurücksetzen auf
die Werkseinstellungen
10. Versionsinformation: Anzeige der aktuellen Systemver-
sion
Dateiübertragung
1. Über USB-Kabel an den Computer anschließen, „HDD Modus”
auswählen.
2. In Meinen Computer Symbol „Wechselmedien” auswählen.
3. Im Ordner DCIM/100MEDIA Dateien auf dem Computer über-
tragen.

Bedienungsanleitung
8
DE
Technische Daten
LCD Bildschirmgröße 2,4 – Zoll Hochauösungsdi-
splay
Maximale Video-Auösung HD (1280*720)
Videoformat AVI
Maximale Bildauösung 5M (2592*1944)
Bildformat JPG
TF Karte Unterstützt 4G-32G
Infrarot Nachtsichtfunktion Unterstützt
Mikrofon / Lautsprecher Intern
Stromversorgungsanschluss 5VDC/1A
Batterie Eingebaute Batterie
Die Spezikationen können ohne Ankündigung geändert werden.

9
Owner’s manual
EN
Key denition description
1. On key
2. Menu key
3. Down key
4. OK key
5. Mode key
6. Lock key
7. Reset key/MIC
8. Power key
9. TF card
10. Speaker
11. Display
12. Shot
13. Bracket Interface
14. USB
15. IR LED
Features
Before using this product before inserting TF card, all the les will
be saved in the TF card.
1. On / off function
Power on: short press „power button” start.
Shutdown: boot, long press 3S „power button” shutdown.
Other: Insert car charger will automatically boot, unplug the car
charger off at set-up time, or an appointment time off.
2. Recording function
Video: recording standby mode, short press „OK key” to record,
again press „OK key” to stop and save video les.

Owner’s manual
10
EN
3. The camera features
Photo: photo standby mode, short press „OK key” to take pic-
tures.
4. Playback functions
Playback: Playback mode, press the „on key” or „under key”
select a le, then press „OK key” to play the le.
5. Plus/unlock functions
Lock: video, press „lock key” the current recording video will lock
protection.
Unlock: In playback mode to unlock through menu options.
6. Focusing function
Focus: video and photographs standby mode , press the „key”
and „down key” in focus, maximum magnication of 4 times.
7. The charging mode
When the access car charger, manually shut automatically into
charging mode, you need to press the „Power button” 3S to enter
the video mode.
Video menu
Video mode, press „Menu button” to enter the recording menu
interface.
1. The video format: HD/D1/VGA
HD: Set video resolution 1280 * 720
D1: Set video resolution 848 * 480
VGA: Set video resolution of 640 * 480
2. Loop recording time setting: 2 minutes / 5 minutes / 15
minutes
Close: Closes the loop recording, when the card is full after stop
recording.
2 minutes : Each video les longest recording time of 2 minutes
5 minutes : Each video les longest recording time is 5 minutes
10 minutes : Each video les longest recording time is 10 minutes
3. Motion detection: off/on
on: Recording standby, DVR will not take any action
off: recording standby, when an object moves in front of the cam-
era to automatically open the video
4. Video sound: on/off

11
Owner’s manual
EN
on: This segment video les to audio les
off: This segment is silent video le documents
5. Video time stamp: Off/On
Off: Video les will not display the current time watermark
On: lower right corner of the video le will display the current time
watermark
6. Delayed shutdown: Close/10s/30s
Close: Video is recording standby or unplug the USB immediately
shut down the state
10S: recording standby or recording status is being shut down
after disconnecting the USB 10S
30S: recording standby or recording status is being shut down
after disconnecting the USB 30S
Capture menu
Camera mode, press the “ Menu Button” to enter the camera
menu interface ;
1. Shooting mode: Off / Self- 2S / Self- 10S / Burst
Close : Press the “OK” key: Immediately take pictures
Self- 2S: press the “OK” key: Delay 2S photos
Self- 10S: press the “OK” key: Delay 10S photos
Continuous: press the “OK” key, continuous three photos
2. Image size : 5M/3M/2M/1M
5M: set the photo resolution is 2592 * 1944
3M: set the photo resolution is 2048 * 1536
2M: set the photo resolution is 1600 * 1200
1M: set the photo resolution is 1280 * 1024
3. The image quality : super good / good / normal
4. Exposure: -2.0 to 2.0
Negative, the effect is dim, positive, effect partial bright ;
5. Cds: Turn on / off
Close: photo watermark will not have the current time display
Open: photo watermark lower right corner will display the current
time

Owner’s manual
12
EN
Playback menu
1. File locks: Lock Unlock leaets / Lock All / Unlock all
Lock Unlock leaet: You can lock and unlock each video le
Lock all: Lock all video les
Unlock All: Unlock all video les
2. File Delete: Delete One / delete all
Delete One: Delete the current le
Delete all: Delete all the les
3. Slide Show: Start / Interval / cycle (only photo les)
Start: Press „OK button” to start the slide show
Interval: The interval between each le is set to 1 to 10 seconds
Cycle: Do I need to loop the slide show
System menu
First click „ Menu Button” then click the „Mode button” to enter the
system menu interface
1. The date and time: Set the current time and the time di-
splay format.
2. Automatic shutdown: 1 minute / 3 minutes / 5 minutes /
OFF.
1 minutes: standby mode automatically shut down after 1 minute
3 minutes: standby mode after 3 minutes automatic shutdown
5 minutes: standby mode after 5 minutes automatic shutdown
OFF: Standby does not automatically shut down
3. The sound: Shutter / start-up sound / key tone / volume
Shutter: Open the shutter sound is there, close to no shutter so-
und
Key Tone On: Turns the sound of a button, turn off the sound wi-
thout buttons
4. Language: Support 13 languages
5. TV: NTSC / PAL
6. Power frequency: 50Hz/60Hz
7. Format: Delete all les in the memory card
8. IR LED: OFF / ON / Automatic
Close: Closes the infrared light
Open: Open infrared light
Automatic: When detecting low light , automatically turn on infra-

13
Owner’s manual
EN
red light
9. Restore the factory settings: restore factory settings.
10. Version information: view the current system version.
Download le
1. Connected to the computer USB, the mode select „HDD”.
2. My computer in a „Removable Disk” symbol.
3. In the DCIM/100MEDIA folder download les.
Technical parameters
LCD screen size 2.4 -inch high-denition di-
splay
Video Max Resolution HD (1280*720)
Video format AVI
Picture Max Resolution 5M (2592*1944)
Photo Format JPG
TF card Support 4G-32G
Infrared night vision function Support
Microphone / Speaker Internal
Power Interface 5VDC/1A
Battery Built-in battery
Specications are subject to change without notice.

Owner’s manual
14
EN

15
Instrukcja obsługi
PL
Opis urządzenia
1. Przycisk w górę
2. Przycisk menu
3. Przycisk w dół
4. Przycisk OK
5. Przycisk trybu
6. Przycisk blokady
7. Przycisk Reset/Mikrofon
8. Przycisk zasilania
9. Gniazdo karty microSD
10. Głośnik
11. Wyświetlacz
12. Obiektyw
13. Gniazdo mocowania
14. Port USB
15. Dioda IR
Funkcje
Przed użyciem włóż kartę TF/microSD, wszystkie pliki będą zapi-
sywane na karcie.
1. Włączanie / wyłączanie
Włączanie: naciśnij przycisk zasilania.
Wyłączanie: przytrzymaj przycisk zasilania przez 3 sekundy.
Inne: Po podłączeniu ładowarki samochodowej urządzenie włączy
się automatycznie, po odłączeniu zasilania urządzenie wyłączy się
od razu lub po ustalonym czasie.
2. Funkcja nagrywania
Wideo: w trybie oczekiwania na nagrywanie, naciśnij przycisk OK
by nagrywać, naciśnij przycisk OK ponownie by zatrzymać nagry-
wanie i zapisać plik.

Instrukcja obsługi
16
PL
3. Funkcja aparatu
Aparat: w trybie aparatu, naciśnij przycisk OK by zrobić zdjęcie.
4. Funkcja odtwarzania
Odtwarzanie: w trybie odtwarzania naciśnij przycisk „w górę” lub
„w dół” by wybrać plik, po czym naciśnij przycisk OK by odtwo-
rzyć plik.
5. Funkcja blokady nagrań
Blokada: naciśnij przycisk blokady, bieżące nagranie będzie chro-
nione blokadą
Odblokowanie: w trybie odtwarzania, przez opcje menu.
6. Funkcja zbliżenia
Zbliżenie: w trybie oczekiwania wideo i aparatu, naciskaj przyci-
ski „w górę” i „w dół” by zmieniać przybliżenie; maksymalne przy-
bliżenie 4x.
7. Ładowanie
Po podłączeniu ładowarki urządzenie automatycznie się włączy i
zacznie nagrywanie wideo.
Menu Wideo
W trybie wideo naciśnij przycisk menu by otworzyć menu wideo.
1. Rozmiar lmu: 1920 x 1080 / 1280 x 720 / 848 x 480 / 640 x
480
Wybór rozdzielczości nagrywanych lmów.
2. Loop time / Czas nagrywania w pętli: Off / 2 minuty / 5 mi-
nut / 10 minut
Off: nagrywanie trwa do zapełnienia karty.
2 minuty: maksymalny czas trwania dla każdego nagrania to 2 mi-
nuty.
5 minut: maksymalny czas trwania dla każdego nagrania to 5 mi-
nut.
10 minut: maksymalny czas trwania dla każdego nagrania to 10
minut.
3. Motion detect / Wykrywanie ruchu: On / Off
On: w trybie nagrywania wideo, nagrywanie rozpocznie się auto-
matycznie gdy rejestrator wykryje ruch.
Off: nagrywanie nie rozpocznie się automatycznie.
4. Video sound / Dźwięk wideo: wł / wył

17
Instrukcja obsługi
PL
Wł: nagranie będzie zawierało dźwięk.
Wył: nagranie będzie bez dźwięku.
5. Zaznaczanie daty: wył / data/czas
Wył: na nagraniach nie będzie wyświetlana godzina.
Wł: w prawym dolnym rogu nagrania będzie wyświetlana bieżą-
ca godzina.
6. Continue / kontynuuj nagrywanie po odłączeniu zasilania:
wyłącz / 10 s. / 30 s.
Wyłącz: wyłącz nagrywanie i urządzenie natychmiast po odłącze-
niu zasilania
10S: wyłącz nagrywanie i urządzenie 10 s. po odłączeniu zasilania
30S: wyłącz nagrywanie i urządzenie 30 s. po odłączeniu zasilania
Menu aparatu
W trybie aparatu naciśnij przycisk menu by otworzyć menu aparatu
1. Samowyzwalacz: Wył / 2 s. / 10 s. / Sekwencja
Wył: gdy naciśniesz OK, zdjęcie zostanie zrobione natychmiast
2 s.: gdy naciśniesz OK, zdjęcie zostanie zrobione z opóźnieniem
2 s.
10 s.: gdy naciśniesz OK, zdjęcie zostanie zrobione z opóźnie-
niem 10 s.
Sekwencja: gdy naciśniesz OK, zostanie zrobiona seria 3 zdjęć
jedno po drugim
2. Rozdzielczość: 2592 x 1944 / 2048 x 1536 / 1600 x 1200 /
1280 x 1024
Wybór rozdzielczości zdjęć robionych w trybie aparatu.
3. Jakość: Bardzo dokładne / dokładne / normalne
4. Ekspozycja: -2.0 do 2.0
Przy ujemnej wartości, zdjęcia będą ciemniejsze; przy dodatniej,
jaśniejsze
5. Zaznaczanie daty: Wył. / Data/czas
Wył: na zdjęciach nie będzie umieszczona godzina
Data/czas: na zdjęciach będzie umieszczona godzina

Instrukcja obsługi
18
PL
Menu odtwarzania
1. Zabezpiecz: Zab./Us. zab / Zabl. Wszyst. / Odbl. wszyst
Zabezpiecz/usuń zabezpieczenia: możesz zablokować lub odblo-
kować każdy plik osobno
Zablokuj wszystkie: zablokuj dostęp do wszystkich plików
Odblokuj wszystkie: odblokuj dostęp do wszystkich plików
2. Usuń: pojedyncze / wszystkie
Usuń pojedyncze: usuń bieżący plik
Usuń wszystkie: usuń wszystkie pliki
3. Pokaz slajdów: Start / Odstęp / Powtarz. (tylko zdjęcia)
Start: naciśnij przycisk OK by rozpocząć pokaz slajdów
Odstęp: ustaw odstęp między kolejnymi zdjęciami od 1 do 10 s.
Powtarzaj: zapętlenie pokazu slajdów
Menu systemu
Naciśnij przycisk menu, a następnie przycisk trybu by wejść do
menu ustawień systemu
1. Data i czas: Ustaw datę, godzinę i format wyświetlania go-
dziny
2. Oszczędzanie energii: 1 minuta / 3 minuty / 5 minut / Off
1 minuta: w trybie oczekiwania wyłącz urządzenie automatycznie
po 1 minucie
3 minuty: w trybie oczekiwania wyłącz urządzenie automatycznie
po 3 minutach
5 minut: w trybie oczekiwania wyłącz urządzenie automatycznie
po 5 minutach
Off: w trybie oczekiwania nie wyłączaj urządzenia automatycznie
3. Dźwięki: migawka / sygnał
Migawka: włącz lub wyłącz dźwięk migawki przy robieniu zdjęć
Sygnał: włącz lub wyłącz dźwięk przy naciskaniu przycisków
4. Język: wybierz jeden z 13 języków
5. Wyjście TV: NTSC / PAL
6. Power frequency / Częstotliwość zasilania: 50Hz / 60Hz
7. Format: skasuj wszystkie pliki na karcie pamięci
8. IR LED: Wł / Wył / Automatycznie
Wył: dioda podczerwieni jest wyłączona

19
Instrukcja obsługi
PL
Wł: dioda podczerwieni jest włączona
Automatycznie: przy słabym świetle włącz automatycznie diodę
podczerwieni
9. Resetuj: przywraca ustawienia fabryczne
10. Version / Informacje o wersji: zobacz bieżące informacje
o systemie
Zgrywanie plików
1. Podłącz urządzenie do komputera przez USB, tryb MSDC
2. W oknie „Mój komputer” wybierz „dysk wymienny”
3. Pliki znajdziesz w folderze DCIM/100MEDIA
Specykacja techniczna
Rozmiar ekranu LCD 2.4 cala, wyświetlacz wysokiej
rozdzielczości
Maksymalna rozdzielczość wi-
deo
HD (1280*720)
Format wideo AVI
Maksymalna rozdzielczość
zdjęć
5M (2592*1944)
Format zdjęć JPG
Karta TF Obsługiwane od 4 GB do 32
GB
Funkcja widzenia w podczer-
wieni
Obsługiwana
Mikrofon / Głośnik Wbudowane
Zasilanie 5V DC / 1A
Bateria Wbudowana
Specykacja produktu może ulec zmianie bez powiadomienia.

Instrukcja obsługi
20
PL
Table of contents
Languages:
Other Quer Dashcam manuals