manuals.online logo
Brands
  1. Home
  2. •
  3. Brands
  4. •
  5. QUICK DAM
  6. •
  7. Outdoor Cart
  8. •
  9. QUICK DAM FLOODGATE CART User manual

QUICK DAM FLOODGATE CART User manual

THE NEXT GENERATION IN FLOOD PROTECTION TM
FLOOD GATE CART
ASSEMBLY INSTRUCTIONS
www.quickdams.com
Modular System
Modular components can be attached to an existing cart. Pin strips and rails (Fig. A) are required for Flood Gate storage
and sleeve drying. The Stanchion Plate (Fig. B) can be added to organize and store up to 4 stanchions.
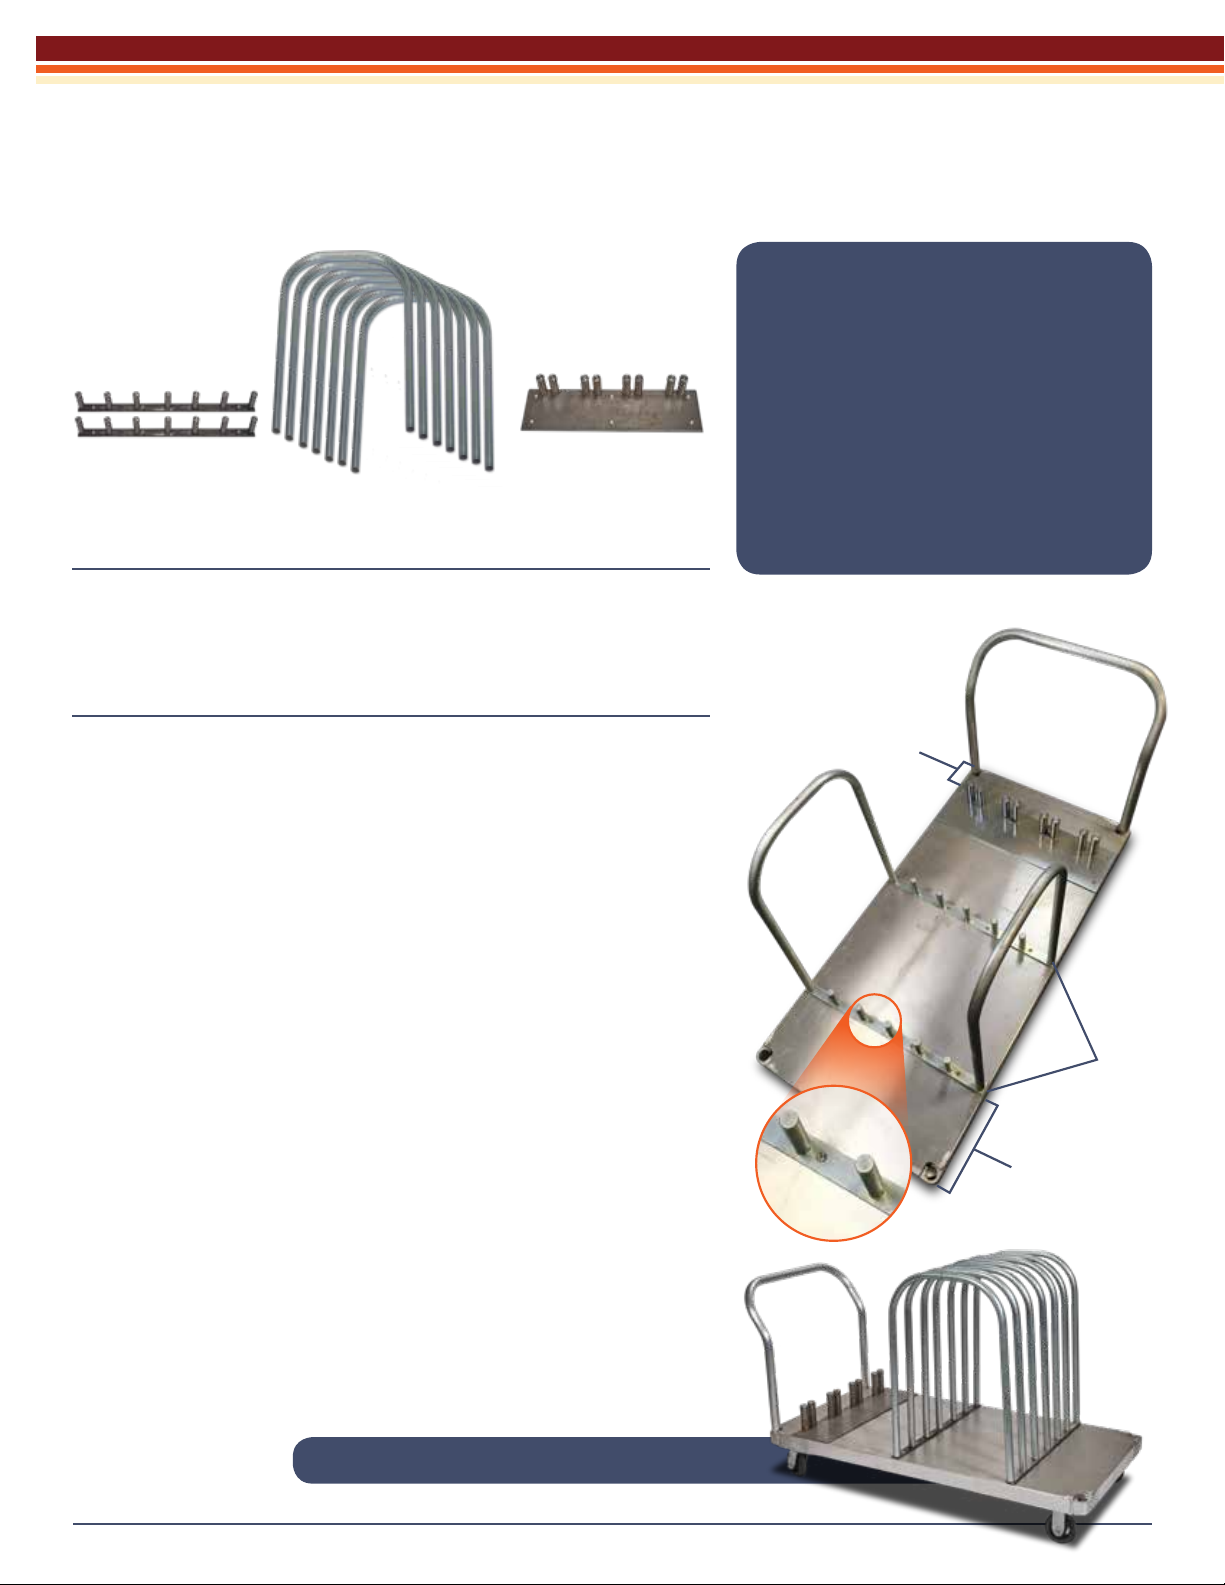
Refer to Illus. A for steps below:
Step 1 - Positioning the Flood Gate Support Base
Flood Gate Pin Strips should be positioned “X” amount of space from
the end of the cart. Position 2nd Flood Gate Pin Strips towards the
middle of the cart.
Step 2 - Setting Proper Distance for Flood Gate Pin Strips
Take 2 Flood Gate Rails and slide on supports to determine exact
width. Position at each end.
Step 3 - Attaching Supports to Cart
Once the correct distance apart has been determined, check the
underside of the cart and be sure the hole locations do not interfere
with anything in the undercarriage. If there is interference, adjust
components accordingly.
Step 4 - Securing Components to Cart
With the components in place, drill through with a 1/4in drill. Attach
with 1/4in at head screws & nuts.
Step 5 - Attaching Stanchion Plate
Align stanchion plate with the posts closest to the handle of cart “X”
distance from edge of cart. Make sure there is no interference with
placement when drilling. Drill through the cart with stanchion plate in
place and attach with 1/4in screws & nuts.
Step 6- Add Remaining Rails
Place remaining rails on Flood Gate Supports.
Fig. A
Flood Gate
Rails x7
Flood Gate Rail
Pin Strips x2
Fig. B
Stanchion Plate
What you need:
• Flathead screw driver
• 20x 1/4in wood screws for
wood cart
• 12x 1/4-20 at head screws
• 12x 1/4-20 hex nuts
• 12x washers
• 1/4in drill
• Cart - 30in x 60in
• Tape measure
What’s included:
Modular Cart completely assembled
Illus. A
Flood Gate Cart Manual
Specs of Cart:
• 30in x60in
• Capacity to hold a minimum of 300lbs
• Made of non-corrosive aluminum, stainless steel or wood
5.5in: Minimum
distance away from the
edge to accommodate
a 3 way stanchion &
prevent overhang.
11.5in:
Pin Strips
Placement
Distance can vary
to accommodate
structure underneath
Pin
Strips
What you get:
• Aluminum platform
(1,000 lbs. capacity)
• Polyurethane rubber wheels,
• Handle
What you need for
assembling wheels:
• Tools
• Flat surface
Complete Cart
The complete cart is a heavy-duty aluminum platform truck with a
1,000 lb capacity. It features polyurethane rubber wheels and an
aluminum push handle. The cart comes mostly assembled and only
requires the wheels, rails and handle to be installed.
Step 1: Attach the Wheels.
Start by securing the wheels to the cart with hardware provided (Illus. B).
Be sure that the 2 xed wheels go on one end, and the rotating
casters go on the opposite end.
Step 2: Install Rails.
Flip the cart over and install the rails by inserting the tubes over the
pins on the cart (Illus. C).
Step 3: Install Push Handle
The handle is installed by inserting the ends into the holes in the
corners of the cart (Fig D).
Congratulations - you have successfully built your cart!
Illus. B
Fixed Wheel
Rotating Wheel
Illus. C Illus. D
www.quickdams.com
> Have questions?
Call us at 888-761-4405
or email
[email protected]
Pin
Strips
Underside
of Cart
Using your completed cart
Place your Flood Gate and Stanchion on your Cart. This can now be used
for both storage & site deployment.
When placing away for storage, be sure to hang the sleeve to allow to dry & to prevent
compression when not in use.
THE NEXT GENERATION IN FLOOD PROTECTION TM
Visit us at www.quickdams.com or call 888-761-4405

Popular Outdoor Cart manuals by other brands

Bretford TCPUL23 user manual

Bretford

Bretford TCPUL23 user manual

Opti-Med JM025-022 user manual

Opti-Med

Opti-Med JM025-022 user manual

Oklahoma Sound PRC 400 Product handbook

Oklahoma Sound

Oklahoma Sound PRC 400 Product handbook

LE MARQUIER DMC80PPLTAD instructions

LE MARQUIER

LE MARQUIER DMC80PPLTAD instructions

Costway TP10051 user manual

Costway

Costway TP10051 user manual

Gorilla Carts GOR800B-COM quick start guide

Gorilla Carts

Gorilla Carts GOR800B-COM quick start guide

adeptus 10016 Assembly instructions

adeptus

adeptus 10016 Assembly instructions

EVOLT EG 2000 owner's manual

EVOLT

EVOLT EG 2000 owner's manual

Xo XOGSBCARTXLT Assembly instructions

Xo

Xo XOGSBCARTXLT Assembly instructions

EZTRUNK 1921 0084 manual

EZTRUNK

EZTRUNK 1921 0084 manual

Westfalia 87 49 55 Original instructions

Westfalia

Westfalia 87 49 55 Original instructions

Williams-Sonoma Truman Round Bar Cart Assembly instructions

Williams-Sonoma

Williams-Sonoma Truman Round Bar Cart Assembly instructions

Tarmo 304270 instruction manual

Tarmo

Tarmo 304270 instruction manual

Vestil ALL-T-D6W-1000 manual

Vestil

Vestil ALL-T-D6W-1000 manual

Honey Can Do CRT-01512 Assembly

Honey Can Do

Honey Can Do CRT-01512 Assembly

Cheyenne BURRO Step-By-Step Instructions

Cheyenne

Cheyenne BURRO Step-By-Step Instructions

Spectrum Industries 55465 owner's manual

Spectrum Industries

Spectrum Industries 55465 owner's manual

Trinity TXK-0802 owner's manual

Trinity

Trinity TXK-0802 owner's manual

manuals.online logo
manuals.online logoBrands
  • About & Mission
  • Contact us
  • Privacy Policy
  • Terms and Conditions

Copyright 2025 Manuals.Online. All Rights Reserved.