Quooker scale control User manual

Installation guide Scale Cont ol
Before installing read this guide first

Technical specifications
Height 420 mm
Base diameter 130 mm
Hand grip diameter 180 mm
Maximum pressure 10 bar
Mounting bracket optional yes
Int oduction
How the Quooker Scale Control works
The Scale Control reduces the hardness of the water, preventing limescale from
building up in the tank. The Scale Control considerably lengthens the lifespan of
your Quooker and improves the taste of Quooker water. The Scale Control
consists of a cartridge within a pressure resistant container. As water flows
through the cartridge, the hardness is reduced by an ion-exchange resin.
The hardness reducing level can be adjusted with the bypass dial, on top of the
Scale Control head. This is called the Scale Control setting.
The cartridge must be replaced after a certain period. This period depends on
the Scale Control setting, consumption of Quooker water and the water
hardness. For continuous optimum performance replace the cartridge at the end
of the lifespan.
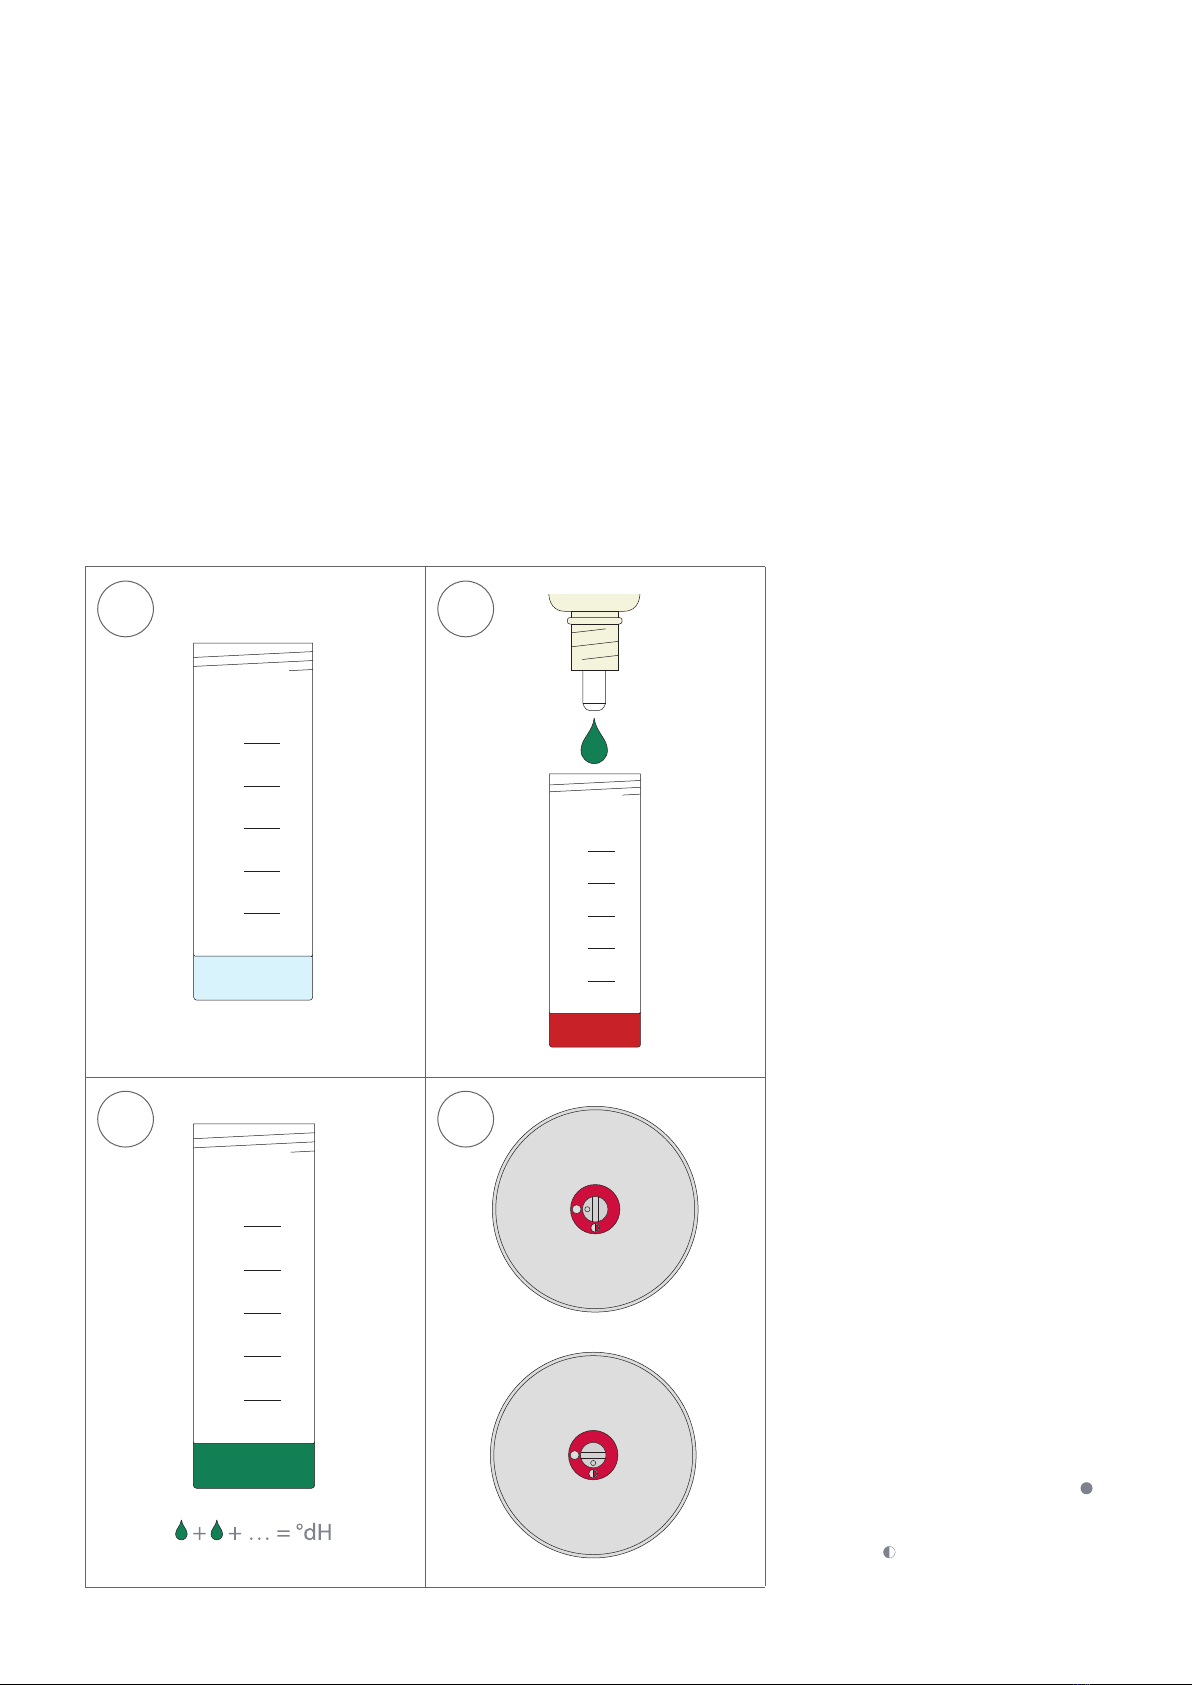
Testing the water hardness
Before installing the Scale Control, test the water hardness with the test kit
provided. Then use the enclosed hardness table to determine the desired Scale
Control setting. art A of this guide features detailed instructions on how to do
this. Once you have adjusted the Scale Control setting, you are ready to begin
the installation.
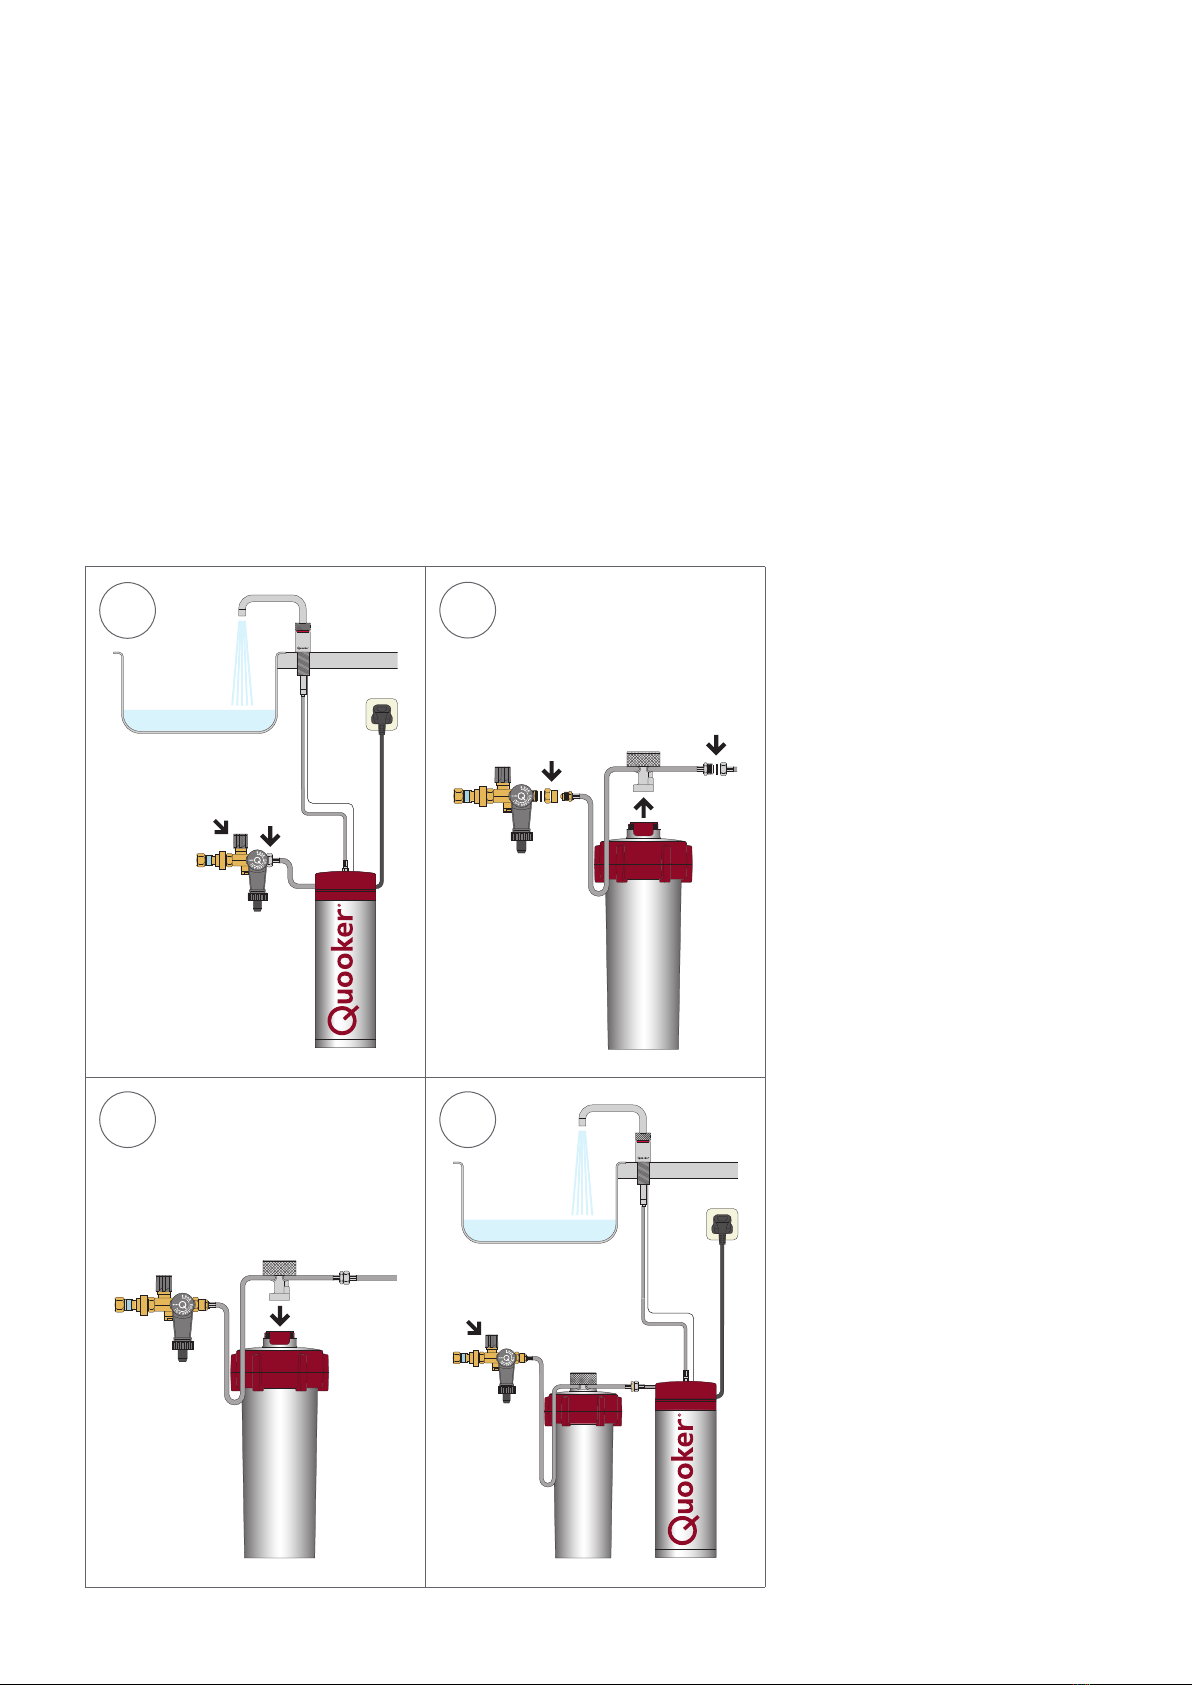
If no Quooker has previously been installed
To install the Scale Control, first follow part A through C of the Quooker tank
installation guide. roceed with steps 2 and 3 of part B1, B2 or B3 (corresponding
to the type of Quooker tank) of this guide. Finally, complete part D and E of the
Quooker tank installation guide.
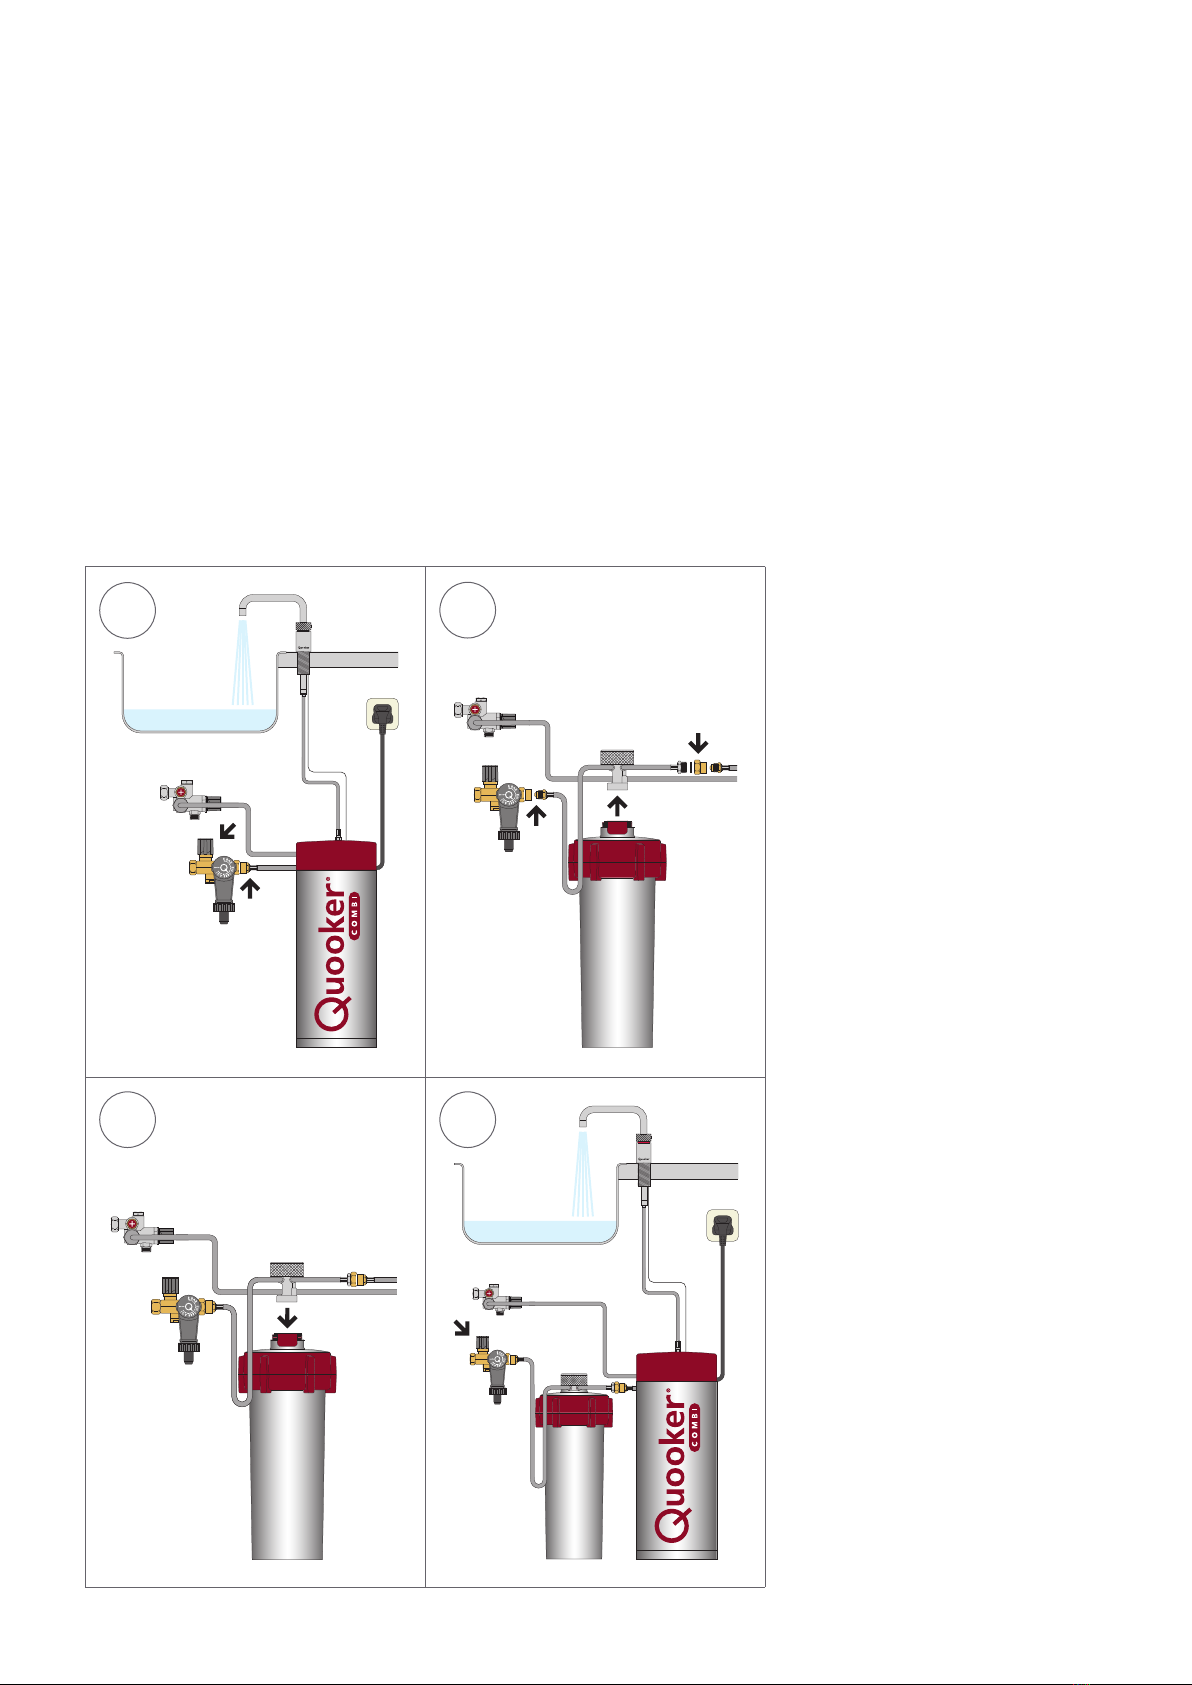
If a Quooker is already installed
To install the Scale Control, follow part B1, B2 or B3 (corresponding to the type
of Quooker tank) of this guide.

total hardness
test kit
Peteri b.v. Staalstraat 13 2984 AJ Ridderkerk (NL) www.quooker.com
1
3
2
1. Scale Control
2. Total hardness test kit
3. Reducing coupler and fibre washers
Contents of the package

Ha dness testing and setting
• There are two Scale Control settings: maximum (for 70% hardness reducing)
and minimum (for 50% hardness reducing). The required setting depends on
your water hardness.
• Test the water hardness with the test kit as described below to determine the
Scale Control setting and the cartridge lifespan.
• For use with a RO3-VAQ the Scale Control setting should always be maximum,
regardless of your water hardness.
• For all other types of Quooker tanks, the enclosed hardness table can be used
for determining the Scale Control setting. Adjust the setting on top of the
Scale Control head by using a flat head screwdriver as explained in step 4.
10
15
20
25
30
ml
5
10
15
20
25
30
ml
5
10
15
20
25
30
ml
5
1 Filling test tube
First rinse the test tube with tap water
and then fill it up to 5 ml.
2 Adding reagent
Hold the bottle ontaining the reagent
dire tly over the test tube and add
the solution one drop at a time. Shake
the test tube after adding ea h drop,
to ensure that the dye dissolves prop-
erly. Count how many drops are
required to hange the olour of the
water from red to green.
3 Determining
hardness
The number of drops added when the
olour of the water transitions indi-
ates the water hardness, expressed
as a grade of German hardness (°dH).
For instan e 10 drops indi ates a
water hardness of 10°dH. After ea h
test, rinse the test tube thoroughly
with water.
4 Setting
Choose the desired setting by using
the hardness table. Maximum: Align
the indi ator with the whole ir le ( ).
Medium: Align the indi ator with the
half ir le ( ).
1 2
4
3
A

Installation with PRO-VAQ (E)
• Follow the steps below for installing the Scale Control with a Quooker
RO3-VAQ, RO7-VAQ, RO3-VAQ E or RO7-VAQ E tank.
• The ‘Q’ on top of the tank is the on/off switch.
1 Disconnecting
Swit h off the tank. Leave the plug in
the so ket. Open the boiling-water
tap and let the water run old. Close
the stop valve on the inlet ombina-
tion. Close the tap. Dis onne t the tank
inlet hose from the inlet ombination.
2 Connecting
Dis onne t the head by uns rewing
the grooved knob on top of the S ale
Control. Conne t the redu ing oupler
to the inlet ombination with the fibre
washer. Conne t the S ale Control inlet
hose (long) to the redu ing oupler.
Conne t the S ale Control outlet hose
(short) to the tank inlet hose with the
fibre washer.
3 lacing
Pla e the S ale Control into the
kit hen upboard. Ensure that the
grips of the lid and the ontainer are
aligned. S rew the head firmly into
the lid of the S ale Control.
4 Flushing
Open the inlet ombination stop valve
and the boiling-water tap and leave the
water running until it is lear. Swit h on
the tank. The Quooker is ready for use
as soon as the water has heated up.
12
3 4
B1

Installation with COMBI (E)
• Follow the steps below for installing the Scale Control with a Quooker
COMBI or COMBI E tank.
• The ‘Q’ on top of the tank is the on/off switch.
1 Disconnecting
Swit h off the tank. Leave the plug in
the so ket. Open the boiling-water
tap and let the water run old. Close
the stop valve on the inlet ombina-
tion. Close the tap. Dis onne t the
tank inlet hose from the mixing valve.
2 Connecting
Dis onne t the head by uns rewing
the grooved knob on top of the S ale
Control. Conne t the S ale Control
inlet hose (long) to the mixing valve.
Conne t the S ale Control outlet hose
(short) to the tank inlet hose with the
redu ing oupler and the fibre washer.
3 lacing
Pla e the S ale Control into the
kit hen upboard. Ensure that the
grips of the lid and the ontainer are
aligned. S rew the head firmly into
the lid of the S ale Control.
4 Flushing
Open the stop valve on the inlet
ombination. Open the boiling-water
tap and leave the water running until
it is lear. Swit h on the tank. The
Quooker is ready for use as soon as
the water has heated up.
12
3 4
B2

Installation with COMBI+ (E)
• Follow the steps below for installing the Scale Control with a Quooker
COMBI+ or COMBI+ E tank.
• The ‘Q’ on top of the tank is the on/off switch.
1 Disconnecting
Swit h off the tank. Leave the plug in
the so ket. Open the boiling-water tap
and let the water run old. Close the
inlet ombination stop valve. Close the
tap. Dis onne t the tank inlet hose from
the redu ing oupler that has already
been fitted to the inlet ombination.
2 Connecting
Dis onne t the head by uns rewing the
grooved knob on top of the S ale
Control. Conne t the S ale Control
inlet hose (long) to the redu ing so ket
on the inlet ombination. Conne t the
S ale Control outlet hose (short) to the
tank inlet hose with the redu ing
oupler and the fibre washer.
3 lacing
Pla e the S ale Control into the
kit hen upboard. Ensure that the
grips of the lid and the ontainer are
aligned. S rew the head firmly into the
lid of the S ale Control.
4 Flushing
Open the inlet ombination stop valve
and the boiling-water tap and leave the
water running until it is lear. Swit h on
the tank. The Quooker is ready for use
as soon as the water has heated up.
12
3 4
B3

UK | 30.362.03 | V04
Q U O O K E R U K L T D 3 Waterpark Hall Montpellier Mews Salford M7 4ZY (UK)
P+44 (0)207 9233355 F+44 (0)207 9001590 E-mail info@quooker.co.uk Internet quooker.co.uk
www.quooke .co.uk
Table of contents
Other Quooker Water Dispenser manuals
Popular Water Dispenser manuals by other brands

Winterhalter
Winterhalter MonoMatik 3 operating instructions

Aqua To Go
Aqua To Go Argento Cleaning instructions

LifeStraw
LifeStraw LSPHF017 user manual

North Star
North Star NST30ED Installation and operation manual

BRIO
BRIO CLCTPOU720UVF3 Setup manual

Andrew James
Andrew James Chilled Drink Dispenser With Infuser user guide

Haier
Haier WDNS045 user manual

Elkay
Elkay VRCTL Series Installation, care & use manual

Eclipse
Eclipse BoilerMag Installation and servicing instructions

Bristan
Bristan Colonial Tap Series Installation instructions & user guide

SodaMagic
SodaMagic Maxi instruction manual

InSinkErator
InSinkErator Hot1 The installation, care and use