R/Evolution COOKING InstaGLO R270 User manual

2
EN
IT’S NOT JUST
A TOASTER.
IT’S A
REVOLUTION.

EN
.
TABLE OF CONTENTS
Important safeguards
Meet your Revolution InstaGLO™ Toaster
Usage instructions
How to personalize your toaster
Care and cleaning
Warranty
Consumer Care
04
07
08
11
13
14
15

4
EN
IMPORTANT SAFEGUARDS
When using electrical appliances, basic safety
precautions should always be followed, including
the following:
READ ALL
INSTRUCTIONS
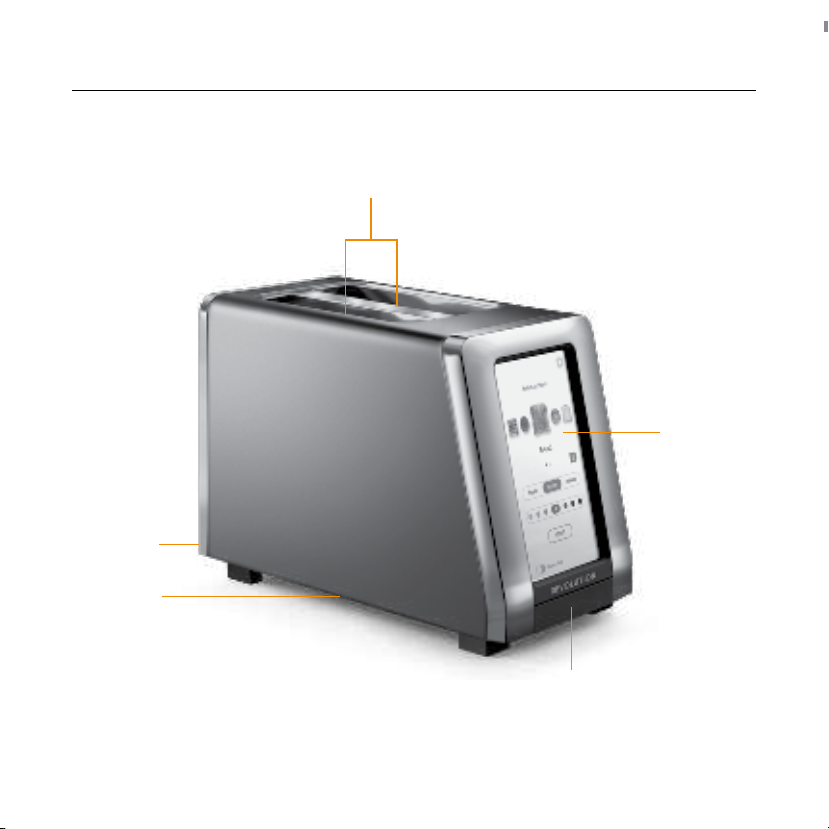
1. Do not touch hot surfaces. Do not insert body
parts into toaster slots. Use touchscreen
to operate toaster. Wait until toaster is cool
before touching or moving.
2. To protect against electrical shock, keep the
cord, plugs and appliance away from water or
other liquids.
3. Close supervision by an adult is necessary
when any appliance is used by or near
children.
4. Unplug from outlet when not in use and
before cleaning. Allow to cool before putting
on or taking o parts. Flashing START button
indicates ready to operate. Avoid any contact
with live parts.
5. Do not operate any appliance with a
damaged cord or plug or after the appliance
malfunctions or has been damaged in any
manner. Return appliance to the nearest
authorized service facility for examination,
repair, or adjustment.
6. The use of any accessory attachments
other than those specifically designed for
this appliance is not recommended by the
appliance manufacturer and may cause
injuries.
7. Do not use outdoors.
8. Do not let cord hang over edge of table
or counter or touch hot surfaces.
9. Do not place on or near a hot gas or electric
burner, or in a heated oven.
10. To disconnect the toaster, remove plug from
wall outlet.
11. Do not use the toaster for anything other than
its intended use.
12. Oversized foods, metal foil, packages, or
utensils must not be inserted in a toaster as
they may create a risk of fire or electric shock.
13. A fire may occur if toaster is covered or
touching flammable materials, including
curtains, draperies, walls, cabinets, and the
like, when in operation.
14. Do not attempt to dislodge food when toaster
is plugged in.
15. Do not operate unattended.
16. When heating toaster pastries, always use the
toaster pastry setting.
17. If for any reason the toaster interface freezes,
unplug, wait 30 seconds and plug back in to
reboot the toaster.
18. Do not use the toaster without the crumb tray
in place. Do not allow crumbs to build up in
the crumb tray. Failure to clean the crumb
tray regularly may result in a fire hazard and
damage to the toaster.
19. To protect the life of the toaster and screen,
do not spray directly or douse the toaster
with any type of cleaner or solution. Per the
care instructions, please only use a cloth
dampened by water to clean the toaster.

5
EN
IMPORTANT SAFEGUARDS
SAVE THESE
INSTRUCTIONS
HOUSEHOLD USE ONLY
WARNING! Shock Hazard
Your toaster is fitted with a short power supply cord
to reduce the risk resulting from becoming entangled
in or tripping over a longer cord. Longer detachable
power-supply cords or extension cords are available
and may be used if care is exercised.
If a longer cord is used, the electrical rating of the
extension cord must be equal to or greater than the
rating of the appliance. Care must also be taken to
arrange the extension cord so that it will not drape
over the countertop or tabletop where it can be
pulled on by children or pets, or accidentally tripped
over. If the appliance is of the grounded type, the
cord set of extension cord should be a
grounding-type 3-wire cord.
To avoid electrical circuit overload, do not use
another high-wattage appliance on the same circuit
with this appliance.
Note: This toaster is electronically controlled and can
only be used with at 120-volt power outlet.

6
EN
DO
•Always use toaster in the upright position.
•Before each use, make sure that the crumb tray is
in its proper location.
•Regularly remove crumbs from the crumb tray.
•If food jams in the toaster slots while toasting,
unplug from the outlet and wait for the toaster to
cool before removing the food.
•Unplug the toaster if it shows any working
abnormalities.
•Let the toaster cool completely after running up to
6 panini press cycles.
DO NOT
•Do not leave the toaster unattended during
operation.
•Do not immerse the toaster in water or run water
into the toaster.
•Do not place the toaster in the dishwasher.
•Do not touch hot surfaces of the toaster.
•Do not transport the toaster by grasping the
toaster slots.
•Do not put body parts in the toaster slots.
•Do not attempt to toast foods with ingredients
that melt or drip in the toaster.
•Do not toast torn slices of bread.
•Do not place buttered bread or wrapped food into
the toaster.
•Do not toast small-size breads, mini-baguettes,
breadsticks, etc. in this toaster.
ADDITIONAL SAFEGUARD INFORMATION
•Do not toast foods thicker than one inch in the
toasting slots.
•Do not cover this appliance while in use.
•Do not use this appliance as source of heating
or drying.
•Do not use this toaster near any flammable
materials such as curtains, under shelving or wall
cupboards, etc.
•Do not put paper, cardboard or plastic, or cloth in,
on or under the toaster.
•Do not operate toaster under or around any
flammable materials.
•Do not use the toaster for cooking, grilling or
defrosting frozen food other than recommended
food products (e.g. bread, bagel, wale, English
muin, toaster pastry, etc.).
•Do not unplug appliance by pulling on cord.
Instead grasp plug and pull to disconnect.
•Do not wrap cord around toaster.
•Do not insert non-food objects into the toaster.
•Do not toast food items that are not
recommended for this toaster. Recommended
food items are bread, bagels, wales, English
muins, toaster pastries and other items as listed
in the Settings on the toaster. Placing other food
items in the toaster can cause a fire.
•This product has been designed for household
use only. Any professional use, inappropriate use
or failure to comply with the instructions will void
the warranty.
•This product is only certified for use in the United
States and Canada. Any failure to comply with
these instructions will void the warranty.

7
EN
MEET YOUR REVOLUTION INSTAGLO™ TOASTER
Touchscreen
Power Cord
Rating Label
(underside of toaster)
Crumb Tray
Toaster Slots

8
EN
1 Unpack your toaster and remove any
packing materials, including the cardboard
insert in the toaster slots. Place the toaster
on a clutter-free countertop and plug it into a
grounded outlet. Please check locally to see
if materials are recyclable or save them for
long term storage.
Note: Before placing food in the toaster, we
recommend selecting “Bread” and level 4 and
running two toast cycles. This will prepare the
toaster for toasting (don’t forget to remove the
cardboard insert!). A mild odor is normal and
will subside.
Place your food in the toaster slots. For
bagels and English muins, insert the slices
so that the cut sides are facing inward, as
indicated on the top of your toaster.
2 Your R270 allows you to choose from an
extended toast library to customize your
Home Screen with your favorite 10 food
modes. See section “How to customize your
toaster” in this User Manual.
3 Select your food type: tap the image that
matches the food type you want to toast.
Your Home Screen will show up to ten
food types. To navigate between sets of
food types, press the arrow below the food
images. Be sure to select the food type that
matches the food you are toasting for the
best results.
The icons are for reference only and they
approximate the end toast shade result.
Note that food selection is required with each
toasting cycle to enable START button to begin
toasting. This two touch selection is a safety
measure.
1
2
4
3
USAGE INSTRUCTIONS

9
EN
Your Revolution InstaGLO™ toaster features
our InstaGLO™ rapid heating system. In
addition to heating instantly, it calculates
the optimal time to toast based on the food
you select and other qualities that can aect
how long your food should be toasted. So
no matter what you’re toasting, you’ll get
consistent toasting every time.
USAGE INSTRUCTIONS
1 Select your food setting: choose the setting
that matches the food you want to toast.
Fresh – for fresh foods or foods you keep on
the counter or fridge
Frozen – for foods you keep in the freezer
Reheat – for foods you just want to warm up
a bit without additional toasting or browning
1 Select your toasting shade. The picture will
show how dark or light your food will be toasted.
2 Note that images are for reference only. Shades
may vary slightly. Shade selections vary by food
type.
5
6
Gluten-Free Setting
Your toaster has a Gluten-Free setting that is
designed to optimize your toasting experience
with your favorite gluten-free breads.
When toasting a gluten-free item, select your
food type and turn on the Gluten-Free setting
by toggling the Gluten-Free button on the
bottom left corner of your Home Screen. An
icon should appear on your selected food
setting. To turn it o for your next toast cycle,
simply deselect the Gluten-Free button.
To turn the Gluten-Free setting o for your next
toast cycle, simply deselect the Gluten-Free
button.

10
EN
1 When the START button flashes, give it
a tap and get ready for your deliciously
toasted food!
USAGE INSTRUCTIONS
Note: This toaster is equipped with an automatic lift.
Pressing the START button will automatically lower
your food into the toaster. Based on food selection,
the toaster will position the food in the proper
position for the best quality toast. The toaster will
automatically move the food to the raised position
when toasting is complete. (The automatic lift does
not function when warming rack is selected.)
Note: You may see heating elements turn on and o
during the toasting process. This is normal operation
to ensure the food item is toasted according to
specific InstaGLO™ algorithms.
Note: Toasting can be cancelled at any time by
pressing the CANCEL button. This will cancel
the operation and the food will move to the
raised position.
7A countdown timer will appear with 10 seconds
remaining, once the “Crisping” cycle has started.

11
EN
Volume
Choose your desired volume level for the alert
notifying you when your food is done toasting.
Brightness
Select your desired level of brightness for your
touchscreen display.
Press the Gear icon in the top right corner
to access the Settings menu. From here, you
can select your ideal settings and functions to
completely personalize your toaster. Press the
gear icon to exit the Settings menu.
Show Time & Date
Move the toggle to the on position so that your
toaster will display the time and date when
in rest mode. Tap the orange bar with date
and time to set the correct date and time and
choose analog or digital clock.
HOW TO PERSONALIZE YOUR TOASTER

12
EN
HOW TO PERSONALIZE YOUR TOASTER
You can now customize your Home Screen with
your 10 favorite food types.
1 Select the page number of the Home Screen
that you want to customize.
2 Your selected items will appear in orange
with a minus symbol at the top of the menu
and appear faded in the bottom menu with
a checkmark. To remove a selected food,
press the button. That slot will now appear
as empty and the food will return to the full
menu as an option.
3 To add an item to your Home Screen, select
the food by pressing the button and your
selection will now appear in your top five at
the top of the page.
4 Repeat Steps 2 & 3 until your Top 5 for Page 1
are chosen and hit Save.
5 To make changes on Page 2 of your Home
Screen, press the toggle to move to Page 2
and repeat Steps 2-4.
6 After saving your selection preferences,
tap at the top left corner to return to the
home screen.
Note: Panini Press & Warming Rack modes
require accessories that are sold separately and
designed to work exclusively with Revolution
InstaGLO™ Toasters.
1
2
3
5
6
4

13
EN
CARE AND CLEANING
1 Remove the power plug from the power outlet
and allow the toaster to cool completely
before cleaning.
2 Your toaster will remind you when it’s time
to clean the crumb tray. To clean any crumbs
from the toaster, remove the crumb tray by
pushing it in to eject, then pull towards you.
Empty and replace the crumb tray before
using the toaster again. Replace the crumb
tray by sliding it inwards until it locks into
position.
3 Wipe the outside of the toaster with a soft
cloth, slightly dampened with water, then
polish with a soft dry cloth to dry completely.
Avoid spraying the toaster directly with any
type of cleaner when cleaning.
Storage
Remove the power plug from the power outlet
and allow the toaster to cool completely before
storing. Follow the directions for cleaning and
store in an upright position on a flat surface.
For long-term storage, we recommend returning
your toaster to its original packaging.
1
2
3

14
EN
WARRANTY
Revolution InstaGLO™ Toaster Limited One-Year Warranty
We are confident about the quality of our products. Should your Revolution InstaGLO™ Toaster have a
defect in product material or workmanship within the first year of ownership, Revolution Cooking™, will
arrange for the return of the original toaster and either deliver an identical or comparable replacement
free of charge or contact you for additional information. Replacement toasters will be covered under the
limited warranty for the remaining term of the warranty or 90 days, whichever is greater.
Please follow these instructions, subject to the terms of the Warranty, to receive faster service.
1. Have the original or a copy of the purchase sales receipt.
2. Contact Revolution Cooking™ at the following:
a. Website: www.revcook.com
b. Toll-free phone number: 888-301-REVO (7386)
Hours of operation: 8AM to 5PM (Eastern time), Monday through Friday, excluding holidays
Revolution Cooking™ will send a pre-paid shipping label via email so the product may be sent to
Revolution Cooking™ at no cost to you.
Once received, Revolution Cooking™ may ship a replacement product or contact you with further
information. Typical response time is up to 10 business days, plus shipping, depending upon your
geographical location.
For faster interactions with our consumer care team, we suggest you register your product on our
website at www.revcook.com/register.
Registering your product isn’t required to activate your warranty.
To review the full details of our product warranty, visit our website www.revcook.com/warranty.

15
EN
CONSUMER CARE
Have Questions?
We’re just a click or call away! Visit www.revcook.com/support for product information, frequently
asked questions, safety features, updates and more. Or give us a call at 888-301-REVO (7386) for any
additional questions you may have.

16
EN
C’EST PLUS QU’UN
GRILLE-PAIN.
C’EST UNE
RÉVOLUTION.

17
FR
N
Mesures de protection importantes
Découvrez votre grille-pain Revolution InstaGLOMC
Mode d’emploi
Comment personnaliser votre grille-pain
Entretien et nettoyage
Garantie limitée
Assistance à la clientèle
TABLE DES MATIÈRES
18
21
22
25
27
28
29

18
FR
MESURES DE PROTECTION IMPORTANTES
Lors de l’utilisation d’appareils électriques, des
précautions de sécurité de base doivent toujours
êtreprises, notamment les suivantes :
LIRE TOUTES LES
INSTRUCTIONS
AVANT D’UTILISER
1. Ne touchez pas les surfaces chaudes. N’insérez
pas de parties du corps dans les fentes du grille-
pain. Utilisez l’écran tactile pour faire fonctionner
le grille-pain. Attendez que le grille-pain soit froid
avant de le toucher ou de le déplacer.
2. Pour vous protéger des chocs électriques, tenez
le câble, les fiches et l’appareil à l’écart de l’eau
ou d’autres liquides.
3. Une surveillance étroite par un adulte est néces-
saire lorsque le grille-pain est utilisé par des
enfants ou à proximité de ceux-ci.
4. Débranchez votre grille-pain de la prise lorsque
vous ne l’utilisez pas et avant son nettoyage.
Laissez-le refroidir avant de le mettre en marche
ou avant de retirer ses pièces. Si le bouton
START clignote, cela signifie que l’appareil est
prêt à fonctionner. Évitez tout contact avec les
parties sous tension.
5. N’utilisez pas un appareil dont le câble d’ali-
mentation ou la fiche est endommagé(e), qui
fonctionne mal ou qui a été endommagé(e) de
quelque façon que ce soit. Renvoyez l’appareil au
centre de service agréé le plus proche pour un
examen, une réparation ou un ajustement.
6. L’utilisation de tout accessoire autre que ceux
spécialement conçus pour cet appareil n’est pas
recommandée par le fabricant de l’appareil et
peut causer des blessures.
7. Ne pas utiliser à l’extérieur.
8. Ne laissez pas le câble pendre au-dessus du
bord de la table ou d’un comptoir, ou toucher
des surfaces chaudes.
9. Ne placez pas sur ou près d’un brûleur à gaz
chaud ou électrique, ni dans un four chaué.
10. Pour débrancher le grille-pain, retirez la fiche
de la prise murale.
11. N’utilisez pas le grille-pain à d’autres fins que
celles auxquelles il est destiné.
12. Les aliments surdimensionnés, le papier alu-
minium, les emballages ou les ustensiles ne
doivent pas être insérés dans un grille-pain,
car ils peuvent être source d’incendie ou de
choc électrique.
13. Un incendie pourrait se produire si le grille-
pain est couvert ou touche des matériaux
inflammables, notamment des rideaux, des
draperies, des murs, des armoires et autres,
lorsqu’il fonctionne.
14. N’essayez pas de déloger les aliments lorsque
le grille-pain est branché.
15. N’utilisez pas sans surveillance.
16. Lorsque vous chauez des pâtisseries au
grille-pain, utilisez toujours le réglage grille-
pain à pâtisserie.

19
FR
MESURES DE PROTECTION IMPORTANTES
17. Si, pour une raison quelconque, l’interface du
grille-pain venait à être bloquée, débranchez
le grille-pain, attendez 30 secondes avant de
le rebrancher et ensuite redémarrez-le.
18. N’utilisez pas le grille-pain sans avoir mis en
place le plateau ramasse-miettes. Ne laissez
pas les miettes s’accumuler sur ce dernier. Si
vous ne le nettoyez pas régulièrement, vous
risquerez de provoquer un incendie et d’en-
dommager le grille-pain.
19. Pour protéger la durée de vie du grille-pain et
de l’écran, ne vaporisez pas directement sur
le grille-pain ou ne l’arrosez pas avec quelque
solution de nettoyage que ce soit. Con-formé-
ment aux instructions d’entretien, veuillez
n’utiliser qu’un chion hu-midifié d’eau pour
nettoyer le grille-pain.
CONSERVEZ CES
INSTRUCTIONS
USAGE MÉNAGER SEULEMENT
AVERTISSEMENT! Risque
de décharge électrique
Votre grille-pain est muni d’un cordon d’alimen-
tation court afin de réduire le risque de l’emmêler
ou de trébucher sur un cordon plus long. Des
cordons d’alimentation amovibles plus longs ou
des rallonges sont disponibles et peuvent être
utilisés avec précaution.
Si un câble plus long est utilisé, la capacité élec-
trique du câble doit être égale ou supérieure à la
capacité nominale de l’appareil. Il faut également
prendre soin de disposer le câble de manière à ce
qu’il ne se drape pas sur le comptoir ou la table,
où il peut être tiré par des enfants ou des animaux
domestiques, ou sur lequel on pourrait trébucher
accidentellement. Si l’appareil est de type mis à la
terre, la rallonge électrique doit être un câble à 3
fils de type mise à la terre.
Afin d’éviter toute surcharge du circuit électrique,
n’utilisez pas un autre appareil de forte puissance
sur le même circuit que cet appareil.
Remarque : Ce grille-pain est à commande élec-
tronique et devrait être utilisé avec une prise de
courant de 120 volts.

20
FR
À FAIRE
•Utilisez toujours le grille-pain en position verticale.
•Avant chaque utilisation, assurez-vous que le
plateau à miettes est à sa place.
•Retirez régulièrement les miettes du plateau à
miettes.
•Si des aliments se coincent dans les fentes du
grille-pain pendant le grillage, débranchez la prise
et attendez que le grille-pain refroidisse avant de
retirer les aliments.
•Débranchez le grille-pain s’il présente des
anomalies de fonctionnement.
•Laissez le grille-pain refroidir complètement
après avoir utilisé jusqu’à 6 cycles de pressage
du panini.
À NE PAS FAIRE
•Ne laissez pas le grille-pain sans surveillance
pendant son fonctionnement.
•N’immergez pas le grille-pain dans l’eau et ne
faites pas couler d’eau dans le grille-pain.
•Ne placez pas le grille-pain dans le lave-vaisselle.
•Ne touchez pas les surfaces chaudes du grille-
pain.
•Ne transportez pas le grille-pain en saisissant les
fentes de celui-ci.
•Ne placez pas de parties du corps dans les fentes
du grille-pain.
•N’essayez pas de griller des aliments avec des
ingrédients qui fondent ou s’égouttent dans le
grille-pain.
•Ne faites pas griller des tranches de pain
déchirées.
•Ne placez pas de pain beurré ou d’aliments
RENSEIGNEMENTS SUPPLÉMENTAIRES SUR LES
MESURES DE PROTECTION
emballés dans le grille-pain.
•Ne faites pas griller des petits pains, des mini-
baguettes, des gressins, etc. dans ce grille-pain.
•Ne faites pas griller des aliments plus épais qu’un
pouce dans les fentes de grillage.
•Ne recouvrez pas cet appareil pendant son utilisation.
•N’utilisez pas cet appareil comme source de
chauage ou de séchage.
•N’utilisez pas ce grille-pain à proximité de matériaux
inflammables tels que rideaux, étagères, placards, etc.
•Ne mettez pas de papier, de carton, de plastique
ou de tissu dans, sur ou sous le grille-pain.
•N’utilisez pas le grille-pain sous ou autour de
matériaux inflammables.
•N’utilisez pas le grille-pain pour cuire, griller
ou décongeler des aliments autres que ceux
recommandés (p. ex., pain, bagel, gaufres, muin
anglais, pâtisserie au grille-pain, etc.).
•Ne tirez pas sur le câble pour débrancher l’appareil.
Saisissez plutôt la fiche et tirez pour la débrancher.
•N’enroulez pas le cordon autour du grille-pain.
•N’insérez pas d’objets non alimentaires dans le
grille-pain.
•Ne faites pas griller des aliments qui ne sont pas
recommandés pour ce grille-pain. Les aliments
recommandés sont le pain, les bagels, les gaufres,
les muins anglais, les pâtisseries pour grille-pain
et d’autres aliments indiqués dans les réglages du
grille-pain. Placer d’autres aliments dans le
grille-pain peut causer un incendie.
•Ce produit a été conçu pour une utilisation domestique
seulement. Toute utilisation professionnelle, utilisation
inappropriée ou non conforme aux instructions
annulera la garantie.
Table of contents
Languages:
Other R/Evolution Toaster manuals
Popular Toaster manuals by other brands

cecotec
cecotec TOAST&TASTE 9000 DOUBLE instruction manual

Hamilton Beach
Hamilton Beach 24910 manual

Tower Hobbies
Tower Hobbies T20027 Safety and instruction manual

Hanseatic
Hanseatic T355SN manual

Rowlett
Rowlett Regent Retro Thick & Thin Instruction book

Westinghouse
Westinghouse WHTS2S09W instruction manual