manuals.online logo
Brands
  1. Home
  2. •
  3. Brands
  4. •
  5. Raccoon
  6. •
  7. Personal Care Product
  8. •
  9. Raccoon Raccoon.Recovery User manual

Raccoon Raccoon.Recovery User manual

Popular Personal Care Product manuals by other brands

DC-Connex DCX-L201 user manual

DC-Connex

DC-Connex DCX-L201 user manual

MPVTruma MicroDrop CalimeroJet instruction manual

MPVTruma

MPVTruma MicroDrop CalimeroJet instruction manual

Bosch PHA230 instruction manual

Bosch

Bosch PHA230 instruction manual

Beautify 4000001 care guide

Beautify

Beautify 4000001 care guide

MEIYATI Pro Spa quick start guide

MEIYATI

MEIYATI Pro Spa quick start guide

Blossom LED M3 R24 installation guide

Blossom

Blossom LED M3 R24 installation guide

Philips HB875/01 user manual

Philips

Philips HB875/01 user manual

Orliman SITLIVE OSL3120 INSTRUCTIONS FOR USE AND PRESERVATION

Orliman

Orliman SITLIVE OSL3120 INSTRUCTIONS FOR USE AND PRESERVATION

GE T8 Basic service manual

GE

GE T8 Basic service manual

Pretika ST102 Instructions for use & warranty information

Pretika

Pretika ST102 Instructions for use & warranty information

Beurer FC 76 Instructions for use

Beurer

Beurer FC 76 Instructions for use

Pebble Grey 500.40.70-75 manual

Pebble Grey

Pebble Grey 500.40.70-75 manual

PUSH ortho quick start guide

PUSH

PUSH ortho quick start guide

Dermlite DL3N instructions

Dermlite

Dermlite DL3N instructions

DERMAPEN SEMI user manual

DERMAPEN

DERMAPEN SEMI user manual

Carex SunLite user guide

Carex

Carex SunLite user guide

Roper Rhodes Intense Installation & Aftercare Instructions

Roper Rhodes

Roper Rhodes Intense Installation & Aftercare Instructions

Interacoustics Titan IMP440 Setup & installation

Interacoustics

Interacoustics Titan IMP440 Setup & installation

manuals.online logo
manuals.online logoBrands
  • About & Mission
  • Contact us
  • Privacy Policy
  • Terms and Conditions

Copyright 2025 Manuals.Online. All Rights Reserved.

User Manual for Devices


The User Manual for Devices contains the following information for using the Raccoon.Recovery:

1. Intended use and a short general description of the Raccoon.Recovery Solution;
2. Symbols in the User Manual;
3. Contraindication;
4. A short description of the Hardware Solution parts - Controller and Sensors (the Devices);
5. Instruction how to start working with the Devices (frequently used functions, power on            
procedure, normal workflow, power off procedure);
6. Information about the Charging of the Devices;
7. Information about the battery;
8. Information about the cleaning procedure;
9. Information about the Mode of Disposal;
10. Specifications to the Devices;
11. Troubleshooting;
12. Warranty terms;
13. Safety;
14. Warnings (general);
15. Maintenance ;
16. Contact information.


Intended use and general description
This user manual is intended for use by the Specialist (and/or other representative in the Clinic), as
well as by the Patient for using both in the rehabilitation centre and in any other location convenient
for the user (telerehabilitation), including at home settings.

A Specialist (and/or another representative of the Clinic) will be able to help the Patient in using the
Solution.

A Specialist (and/or another representative of the Clinic) is trained to use the Solution before starting
to use it and training Patients to use the Solution.

Raccoon.Recovery for hands and arms is a physical rehabilitation tool based on video gaming.The
tool is intended primarily for recovering fine motor skills of the hand and/or arm, as well as for
monitoring the general condition of the Patient. The product is used whenever physical exercises for
hand impairment are indicated, e.g. after stroke, trauma, etc.

The Raccoon.Recovery Solution includes:
1. Software (the Platform and Application);
2. Hardware (Controller and Sensor(s)).

PC App Raccoon.Recovery has 3 dashboards with different functionalities and access rights:

Clinic: settings of the Clinic account, adding and deleting accounts of Specialists, access to general
data from accounts of Specialists and Patients that are associated with the Clinic.


Specialist: settings of the Specialist account, adding and discharging Patients, seeing list of own
Patients, editing Patients’ profiles, executing digitized physiotherapy tests and seeing their results
according to the chosen period, recommending exercises, sending test results to own Patients,
adding comments and seeing log of Patient recovery story including tests, exercises and comments

Patient settings of the Patient account, seeing the list of games including their rules and overview,
playing games, settings of controls for games, adding games from PC, seeing achievements, seeing
the progress of recovery process sent by a Specialist).

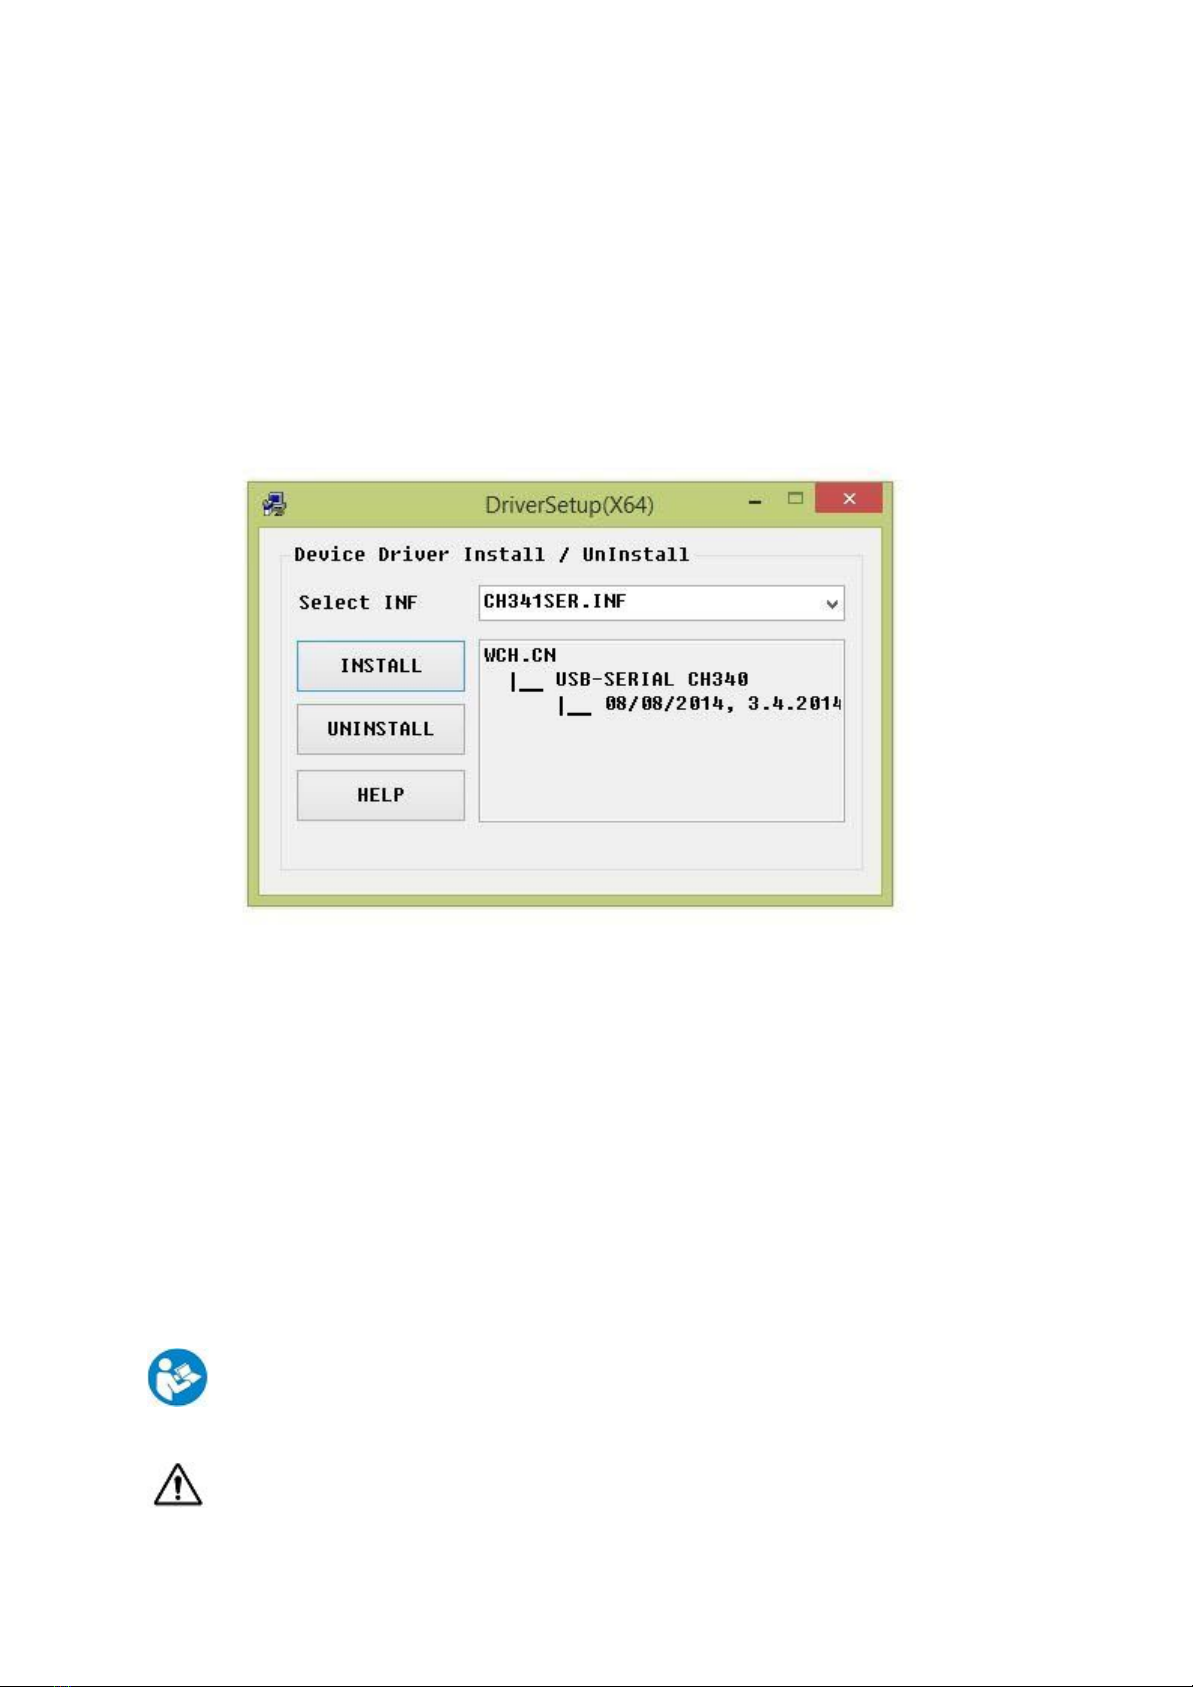
The customer receives an email with a link to download the PC App from the Internet. PC App should                  
be used with Access Keys – user’s email as a login and a unique personal password generated by the                  
Platform.

The Hardware connects to a PC via Bluetooth with the help of receiver and transmits data to the PC                  
and then – to the Platform via the Internet.

Symbols in the User Manual

Warning! Information requires your highest attention.


Information! Check the User Manual before use.

Contraindication

Warning! This Device serves to support rehabilitation but does not replace consultation with medical             
professional. If use of the Device causes discomfort or restrain your range of motion, consult your               
Specialist.

Warning! Using Raccoon.Recovery Solution in conjunction with Devices connected to a cardiac
stimulator and / or having direct contact with the heart and / or spinal cord is not recommended.

Warning! Please restrict the use of the Solution if you cannot read the User Manual or if you have
problems with the perception of colors.

Warning! The Solution is not intended for use by people with a lack of vision or lack of organs of                   
vision.


Warning! Please limit your use of the Solution if you have ever experienced epileptic seizures or if you                 
have noticed at least one of the following symptoms while working in front of the monitor: loss of                 
consciousness, loss of orientation, blurry vision, muscle twitching, any involuntary movements and/or           
convulsions.

Warning! Use with upper limbs prosthesis is not foreseen.

Devices of the Hardware Solution

Requires PC with USB 2.0 or compatibles.

The Hardware part of the Solution consists of the following components :

1. Controller (Pic.1);
2. Sensors(Pic.1);
3. Receivers (for Controller and Sensors individually)(Pic.1);
4. Wrist and arm straps (Pic.1);

5. USB charging cable;
6. User's Manual.


Pic.1.Raccoon.Recovery Devices.

1. “On/Off” button:
1.1. To turn on the Device, press and hold the button for 2-3 seconds until the indicator               
light on the Device turns on;
1.2. To turn off the Device, press and hold the button for 2-3 seconds until the indicator               
light on the Device turns out.

2. Button 1 (this button can be programmed in the Patient dashboard, for Controller only).

3. Button 2 (this button can be programmed in the Patient dashboard, for Controller only).

4. Indicator light:
4.1. “Green” indicates that the Device is more than 60% charged;
4.2. “Yellow” indicates that the Device is 30-60% charged;
4.3. Stable “Red” indicates that the Device is less than 30% charged and it is             
recommended to charge it, in this case vibro will not work;
4.4. Flashing “Red” indicates that the Device need charging. In this case, the operation of             
the Device will be impossible and it will turn off automatically;
4.5. Flashing “Blue” indicates that the Device is searching for a connection with the            
receiver, when the connection is established, the blue color stops blinking and turns            
off;
4.6. When charging, depending on the battery level, the indicator may blink red, yellow or             
green. When charging is complete, the indicator stops flashing and lights up in green.
4.7. USB port for charging the Device.

5. Receiver indicator light:
5.1. Blinks if there is no connection to the Device
5.2. Steady on if connection to the Device is established.

6. Wrist and arm straps for proper fixation on hand (x1 for Controller and x3 for Sensors - sizes                 
S, M, L).


Pic.2. Reset buttons.

7. Button for manual reset of the Device (Pic.2).
8. To remove button 2 for restarting the controller, you must first remove the “On/Off” button
(Pic. 1)
9. Allows to restart the Device manually in case it refuses to turn off with “On/Off” button.



Information! All the Devices contain a lithium-polymer battery.
Before using Devices, please, read all battery handling and charging instructions and           
carefully follow them.
Always dispose of used batteries in accordance with local laws and regulations.

Instruction how to start working with the Devices

1. A link to the PC App Raccoon.Recovery, as well as a login and password for authorization in it,                 
will be sent to the email address specified within registration.

2. Using the link you can download the archive of Raccoon.Recovery software together with            
software User Manual and necessary drivers for the devices. Please read the User Manual for              
the software before installing it.


3. Unzip the archive to any place convenient for you Install the program using the installer              
Raccoon.Recovery.exe.

4. After the installation is complete, a shortcut will appear on your desktop for quick access to               
the program.

5. Insert the receiver into any USB port of your computer directly or through certified USB hub by                
any other manufacturer.

6. Install the driver. In order to do this, switch to the drivers folder and run the setup.exe installer                 
(Pic.3).

Pic.3. Raccoon.Recovery Driver Setup popup.

7. Click on the install button and wait for the installation to complete.

8. Enter into the program using the role, username and password that were emailed to you              
earlier.

9. Turn on the Device and wait till connects to the receiver.

10. Put the Device on a flat surface and leave it motionless for 10-15 seconds. It is necessary to                 
calibrate the accuracy of the Device (this procedure starts automatically every time after            
turning on the device).

11. If you did everything properly, Raccoon.Recovery is ready to use. If you can’t connect - сontact               
your Specialist or manufacturer (for contact details: see bottom/last page of User Manual)


Information! A detailed description of the games’ options and settings for the Device can be found in                
the User Manual for Software.


Warning! If the device has not been active for more than 5 minutes, the connection procedure should                
be repeated.
Charging of the Devices (Controller & Sensors)
Use the USB cable to charge the Device.

You can connect the USB cable to a computer or power adapter.

Recommended specifications of the power adapter: DC 5V, 1000mA.


Warning! Do not use power adapters with other specifications, as this may damage the Device.

To connect, use a USB cable that conforms to USB standards (USB2.0 AM/micro USB BM).



Warning! Use extreme caution when handling the battery. Improper use can result in fire and burns.

Warning! Never attempt to open, crush, heat, or burn a battery.

Warning! Do not leave the battery charging for a prolonged period of time when the Device is not in                 
use.

Warning! Do not operate with a damaged or leaking battery.

Warning! If liquid leaks from the internal battery, stop using the Device immediately and contact             
Clients Support for assistance.

Warning! If liquid gets on your clothing, skin, or eyes, immediately rinse the affected area with clean               
water and consult a doctor.

Warning! Battery fluid may cause blindness.
Battery life and operation terms

Battery life is limited. The battery life of the Devices will be gradually reducing.

The life of the Devices depends on the method and conditions of its storage, charging, frequency of                
use and other factors.


Battery life of the Devices may vary depending on usage conditions and environmental factors.
Cleaning procedure
Cleaning can be done in a couple of steps:

1. Before cleaning, turn off the Device and unplug the power cable.

2. If there is dirt on the Devices, such dirt must be removed with a dry brush (from nylon                 
polypropylene) or gauze or cloth. If the buttons need to be removed to remove dirt, the               
buttons must be removed (Pic.4).

Pic.4. The way the buttons must be removed for cleaning.



3. Wipe the surface of the Devices with a napkin/cloth moistened (moist but not wet) with              
isopropyl alcohol up to 70% Solution (hydrogen peroxide up to 7% Solution, or chlorhexidine             
Solution).

4. Dry the product at room temperature.



Warning! Before turning on or charging the Controller, make sure that its surface is completely dry.


Warning! If the buttons were removed during the process, reinstall them.

Warning! Prevent liquid from entering the process holes.

Warning! Do not clean when charging is connected or the Devices is on.

Warning! Do not allow any direct contact of the Devices with water, as this may cause a malfunction.

Warning! Wipe the Devices from the outside with a damp cloth, making sure that moisture does not                
get inside the Devices.

To clean the strap, pull it out as shown on the scheme (Pic.5 and Pic.5.1). After that, it can be washed                    
either manual or in machine wash mode. After it finally dries, it can be returned back to its place.

Pic.5. Controller strap. Take the strap off.


Pic.5.1. Sensor strap.Take the strap off.
Mode of Disposal

Disposal of device is on manufacturer, please send it to manufacturer.

Proper disposal of the Devices will help to preserve harm to human health and the ecology.
Specification
Raccoon.Recovery Controller :

Weight 90g
Size 135X75X42 mm
Storage temperature −20 °C - +60 °C
Exploitation temperature  +5°C - +35°C
Power consumption  DC 5V 500mA (charging state)
Battery type Internal lithium-polymer battery
Battery capacity 650 mA
Voltage DC 3.7 V
Data transfer  Bluetooth 4.0 BLE
Sample rate 100 frame per sec
Sensors  Accelerometer, gyroscope
