manuals.online logo
Brands
  1. Home
  2. •
  3. Brands
  4. •
  5. Rack-Strap
  6. •
  7. Automobile Accessories
  8. •
  9. Rack-Strap RS-105 User manual

Rack-Strap RS-105 User manual

2750 Industrial Ave, Hubbard, OR 97032 Phone: 503-982-1920
U.S. Pat. No. 4,900,203 www.RackStrap.com
CAUTIONS (PRECAUCIONES)
The RS-105 adapter was designed to allow the use of Rack-
Straps on the Weather Guard 205 and 215 style van rack.
However, the use of Rack-Strap tie-downs and the RS-105
adapter does not guarantee a load against damage. To prevent
damage to loads, normal maintenace must be performed and
common sense must be used. The following is a partial list of
considerations which may help with your use of the RS-105
adapter and Rack-Strap Tie-Downs.
RS-105 adapter is intended for use with Rack-Strap® tie-downs only.
(El adaptador RS-105 está diseñado para utilizarse sólo con sistemas
de sujeción Rack-Strap®.)
Inspect entire system frequently. Check bolts and mouting surface
regularly. (Inspeccione el sistema completo con frecuencia.
Verifique los pernos y la superficie de montaje con regularidad.)
Always mount RS-105 bracket using all four bolt locations.
(Siempre monte la ménsula RS-105 con las cuatros ubicaciones de
pernos.)
Always mount adapter and Rack-Strap® unit toward the center of the
vehicle. (Siempre monte el adaptador y la unidad Rack-Strap® hacia
el centro del vehículo.)
Rack-Straps® and the mounting hardware are not designed to protect
loads from sudden stops or sharp turns. Always drive vehicle in safe
manner. (Los sistemas Rack-Strap® y las piezas de montaje no están
diseñados para proteger a las cargas contra paradas repentinas o
giros bruscos. Siempre conduzca el vehículo de manera segura.)
Never load rack above side rails or side posts. (Nunca cargue el
bastidor por encima de los rieles laterales o los postes laterales.)
Do not exceed rack weight limit. (No supere el límite de peso del
bastidor.)
May not meet inter- or intra-state and federal tie-down requirements.
(Es posible que no cumpla con los requisitos de sujeción federales,
interestatales o intraestatales.)
●
●
●
●
●
●
●
●
El adaptador RS-105 se diseñó para permitir el uso de sistemas
Rack-Strap® en el bastidor de camioneta estilo 205 y 215
Weather Guard. No obstante, el uso de sistemas de sujeción
Rack-Strap® y el adaptador RS-105 no garantiza que una
carga no sufrirá daños. Para evitar que las cargas sufran
daños, se requiere mantenimiento normal y uso de sentido
común. A continuación, se incluye una lista parcial de las
consideraciones que pueden brindarle ayuda para utilizar el
adaptador RS-105 y los sistemas de sujeción Rack-Strap®.
Mounting Instructions (Instrucciones De Montaje)
5/16” bolts of the proper length, Grade 8 (Pernos de 5/16” del
largo adecuado, grado 8)
5/16” cut washers (Arandelas de corte de 5/16”)
5/16” nuts (Tuercas de 5/16”)
Materials Needed (Materiales Necesarios):
Tools Required (Herramientas necesarias):
1 - Drill (Taladro)
1 - 21/64” Metal Drill Bit (Broca metálica de 21/64”)
2 - 5/16” Socket or Wrench (Tubos o llaves de 5/16”)
1 - Tape Measure (Cinta métrica)
POSITIONING (COLOCACIÓN):
Mount adapter on rack as illustrated in Figure 1. Always position
adapter so that the arm points toward the center of the vehicle as
illustrated in Figure 2. Adapter arm should be level, but never higher
than rack crossmember. Adapter legs should be positioned so that
adapter can be bolted to face plate of the rack without drilling through
the vertical, rectangular tubing of the rack.
MOUNTING (MONTAJE):
Place adapter in position and mark holes for drilling. Drill holes in
face place of rack and mount adapter as illustrated in Figure 1. Always
fasten adapter using all four bolt locations. Repeat until all adapters
have been securely attached.
For Instructions on mounting a Rack-Strap® RS-1 to the RS-105
adapter, see mounting instructions provided with RS-1 load binder.
RS-105 Adapter (Adaptador RS-105)
Figure (Figura) 1
Figure (Figura) 2
See Cautions on Reverse Side (Consulte las Precauciones al dorso)
Parts required to install one RS-105 Post Rack Adapter (Piezas
necesarias para instalar un Adaptador RS-105 para bastidor de postes):
4 -
8 -
4 -
Monte el adaptador en el bastidor tal como se indica en la figura 1.
Siempre coloque el adaptador de modo que el brazo apunte hacia el
centro del vehículo, tal como se indica en la figura 2. El brazo del
adaptador debe estar nivelado, pero nunca debe estar más alto que
el travesaño del bastidor. Los pies del adaptador deben colocarse de
modo que el adaptador pueda atornillarse a la placa frontal del bastidor
sin perforar el tubo vertical y rectangular del bastidor.
Coloque el adaptador en posición y marque los orificios para
perforarlos.Perfore orificios en la placa frontal del bastidor y monte el
adaptador tal como se indica en la figura 1. Siempre sujete el adaptador
con las cuatros ubicaciones de pernos. Repita este procedimiento hasta
que todos los adaptadores se hayan colocado de manera segura.
Para obtener instrucciones sobre el montaje de un sistema Rack-Strap®
RS-1 al adaptador RS-105, consulte las instrucciones de montaje
suministradas con el dispositivo de sujeción de cargas RS-1.
Parts required to install one RS-1 (Materiales Necesarios):
4 -
8 - 5/16” cut washers (arandelas de corte de 5/16”)
4 - 5/16” lock washers (arandelas de seguridad de 5/16”)
4 - 5/16” nuts (tuercas de 5/16”)
(grado 8 pernos de 5/16” del largo adecuado [1/4”+ancho del
estante de carga, tuercas y arandela] )
5/16” grade 8 bolts of the proper length [1/4” + width of
rack, nuts, and washer.]
Tools Required
(Herramientas necesarias:):
1-Drill (taladro)
1 - 21/64” metal drill bit
(broca metálica de 21/64”)
2 - 1/2” Socket or Wrench
(dados o llaves de 1/2”)
1 - Tape measure
(cinta métrica)
Tools Required
(Herramientas necesarias:):
1-Drill (taladro)
1 - 13/32” metal drill bit
(broca metálica de 21/64”)
2 - 9/16” Socket or Wrench
(dados o llaves de 5/16”)
1 - Tape measure
(cinta métrica)
● POSITIONING: Mount RACK-STRAPS® on rack rails in
position identifi ed in illustration #1 and #2. Manufacturer suggests
RACK-STRAPs® should be located on each side of vehicle rack.
Spacing RACK-STRAPs® evenly, front-center-back, will secure
your load more evenly.
COLOCACIÓN: Monte los sistemas RACK-STRAP® en
el estante de carga de rieles en las posiciones indicadas en la
ilustración #1 y #2. El fabricante sugiere colocar los sistemas
RACK-STRAP® a cada lado del estante de carga del vehículo. Al
colocar los sistemas RACK-STRAP® de manera uniforme (frente,
centro y atrás), la carga estará más distribuida y segura.
● MOUNTING: Place RACK-STRAP® in position and mark holes
for drilling. Drill holes in rail and mount RACK-STRAPs® as
illustrated. Repeat until all RACK-STRAPs® have been securely
attached. Manufacturer suggests RACK-STRAPs® may also be
welded into position, for added security.
MONTAJE: Coloque el sistema RACK-STRAP® en posición
y marque los orifi cios para perforarlos. Perfore orifi cios en el
riel y monte el sistema RACK-STRAP® tal como se indica en la
ilustración. Repita este procedimiento hasta que se hayan colocado
todas los sistemas RACK-STRAP® de manera segura. El fabricante
sugiere soldar los sistemas RACK-STRAP® en su lugar, para
proporcionar una mayor seguridad.)
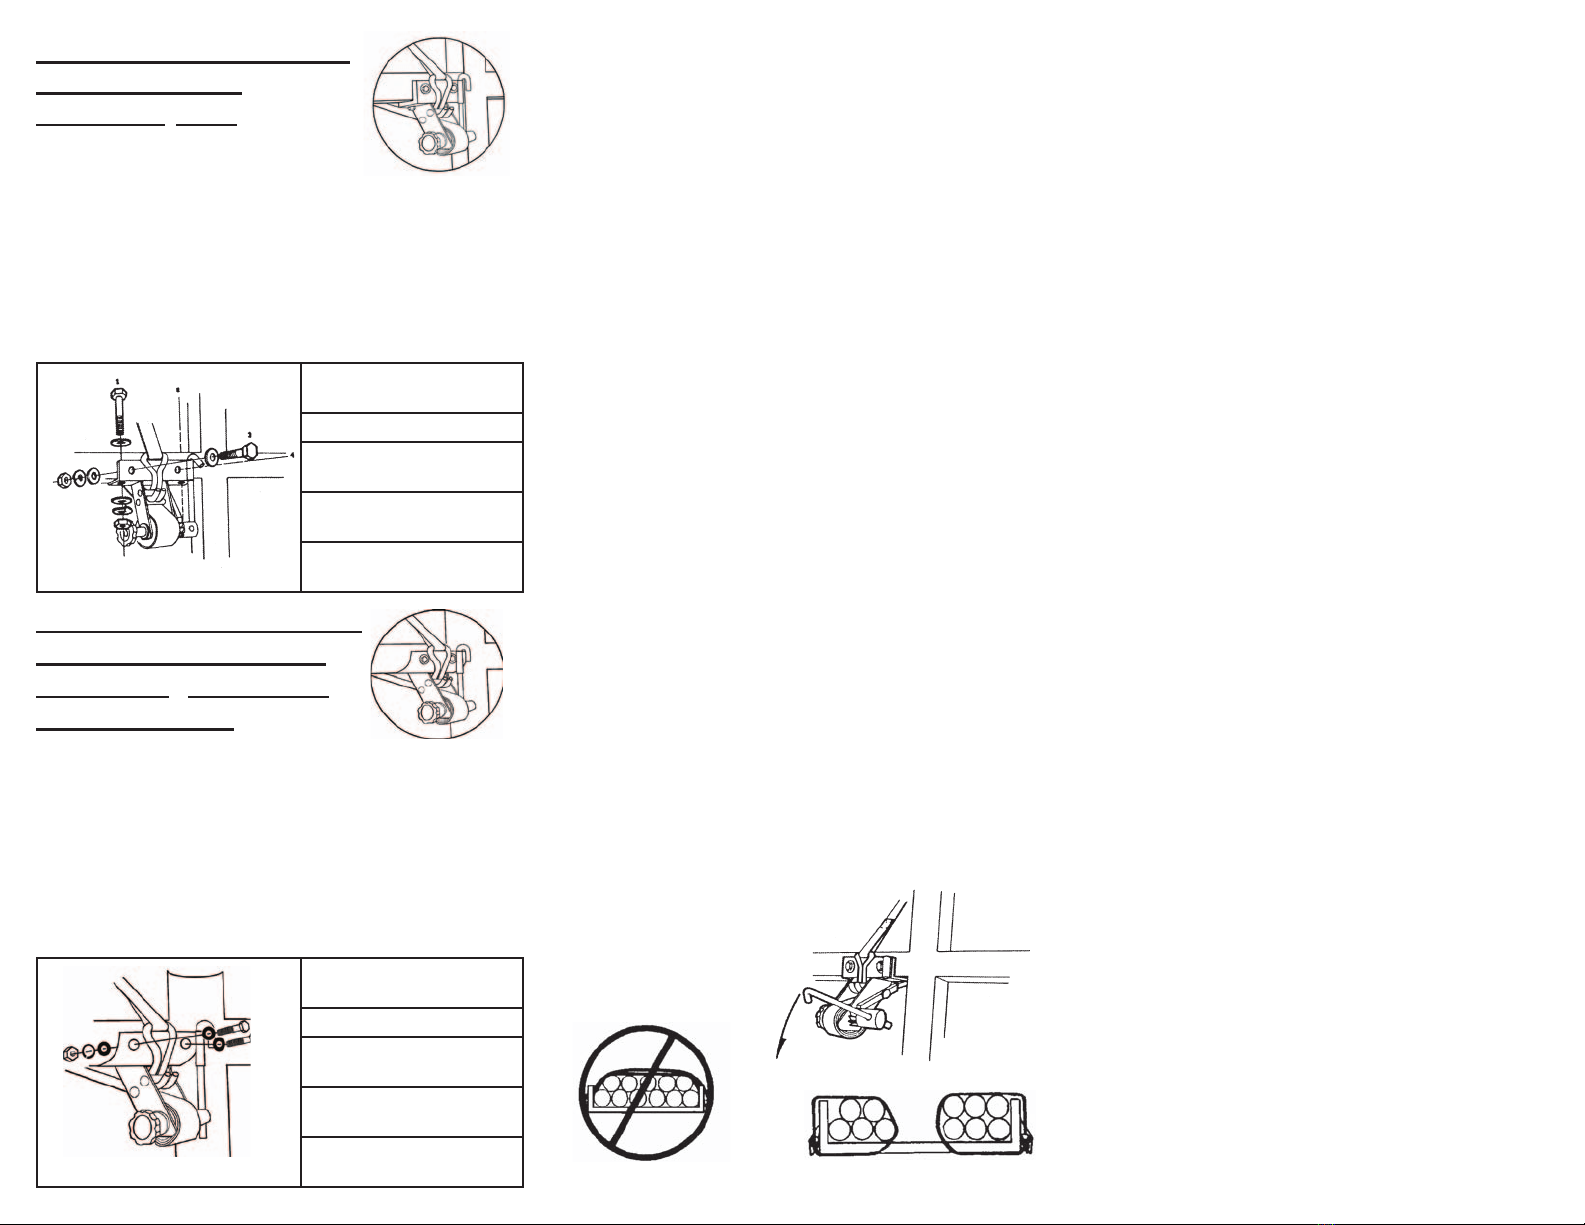
● SECURING LOAD: After the load is in place, position strap
around load and keeping strap 90° in relation to the spindle, lock
hook into position as shown. Using tightening rod, tighten strap to
secure load for travel. Check for gaps in load to prevent load shift
in transit.
ASEGURANDO LA CARGA: Una vez que se haya colocado
la carga, ubique la correa alrededor de la carga. Mantenga la
abrazadera a 90° en relación con el eje y asegure el gancho en la
posición tal como se muestra. Con la varilla de ajuste, ajuste la
correa para asegurar la carga durante el transporte. Verifi que que no
haya espacios vacíos en la carga, a fi n de evitar que ésta se mueva
durante el transporte.
Illustration #1 (ilustración #1)
Illustration #2 (ilustración #2)
Limited Warranty
We warrant to the original purchaser of the RACK-STRAP®
manufactured by us, to be free from defects in material and
workmanship under normal use and service. Our obligation under
this warranty shall be limited to the repair or exchange of any
part or parts which may thus prove defective under normal use
and service within thrity (30) days from date of purchase by the
original purchaser, and which our examination shall disclose, to our
satisfaction, to be thus defective.
Garantía limitada
Garantizamos al comprador original del sistema RACK-STRAP®
fabricado por nosotros, que este producto está libre de defectos en
los materiales y en la mano de obra, en condiciones normales de
uso y mantenimiento. Nuestra obligación conforme a esta garantía
estará limitada a la reparación o al cambio de cualquier pieza o pie-
zas que demuestren presentar defectos en condiciones normales de
uso y mantenimiento, dentro de los treinta (30) días posteriores a
la fecha de compra por parte del comprador original, y que nuestra
evaluación determine, según nuestro criterio, que presentan tales
defectos.
THIS WARRANTY IS EXPRESSLY IN LIEU OF ALL OTHER
WARRANTIES EXPRESSED OR IMPLIED, INCLUDING THE
WARRANTIES OF MERCHANTABILITY AND FITNESS FOR
USE AND OF ALL OTHER OBLIGATIONS OR LIABILITIES ON
OUR PART, AND WE NEITHER ASSUME NOR AUTHORIZE ANY
OTHER PERSON TO ASSUME FOR US, ANY OTHER LIABILITY
IN CONNECTION WITH THE SALE OF THIS RACK-STRAP® OR
ANY PART THEREOF WHICH HAS BEEN SUBJECT TO ACCIDENT,
NEGLIGENCE, ALTERATION, ABUSE OR MISUSE. WE MAKE NO
WARRANTIES WHATSOEVER IN RESPECT TO ACCESSORIES
OR PARTS NOT SUPPLIED BY US. THE TERM “ORIGINAL
PURCHASER”, AS USED IN THIS WARRANTY, SHALL BE DEEMED
TO MEAN THAT PERSON TO WHOM THE RACK-STRAP® WAS
ORIGINALLY SOLD. THIS WARRANTY SHALL APPLY ONLY
WITHIN THE BOUNDARIES OF THE CONTINENTAL UNITED
STATES.
ESTA GARANTÍA REEMPLAZA EXPRESAMENTE A TODAS LAS
OTRAS GARANTÍAS, EXPLÍCITAS O IMPLÍCITAS, ENTRE OTRAS,
LAS GARANTÍAS DE COMERCIABILIDAD Y CONDICIONES PARA
EL USO Y TODAS NUESTRAS OBLIGACIONES O RESPONSABI-
LIDADES. NO ASUMIMOS NI AUTORIZAMOS A NINGUNA OTRA
PERSONA A QUE ASUMA POR NOSOTROS RESPONSABILIDAD
ALGUNA EN CONECCIÓN CON LA VENTA DE ESTE SISTEMA
RACK-STRAP® NI CON NINGUNA PIEZA DEL PRODUCTO QUE
HAYA SUFRIDO UN ACCIDENTE O QUE HAYA SIDO SOMETIDA
A NEGLIGENCIA, ALTERACIÓN, ABUSO O MAL USO. NO OFREC-
EMOS GARANTÍA ALGUNA CON RESPECTO A LOS ACCESORIOS
O LAS PIEZAS QUE NO HAYAMOS SUMINISTRADO. EL TÉRMINO
“COMPRADOR ORIGINAL”, TAL COMO SE LO UTILIZA EN ESTA
GARANTÍA, HACE REFERENCIA A LA PERSONA A LA QUE SE LE
VENDIÓ EL SISTEMA RACKSTRAP® ORIGINALMENTE. ESTA GA-
RANTÍA SÓLO SE APLICARÁ DENTRO DE LOS LÍMITES DE LOS
ESTADOS UNIDOS CONTINENTALES.
Installation Instructions for
right angle mount
Rack-Strap® RS-1
(Instrucciones de Instalación para RS-1):
Parts required to install one Rack-Strap® (Materiales Necesarios):
2 -
4 - 3/8” cut washers (arandelas de corte de 3/8”)
2 - 3/8” lock washers (arandelas de seguridad de 3/8”)
2 - 3/8” nuts (tuercas de 3/8”)
(grado 8 pernos de 5/16” del largo adecuado [1/4”+ancho del
estante de carga, tuercas y arandela] )
3/8” grade 8 bolts of the proper length [1/4” + width of rack,
nuts, and washer.]
Installation Instructions for
round mounting bracket
Rack-Strap® RS-2, RS-3,
RS-4, RS-6, RS-7
(Instrucciones de Instalación para RS-2, RS-3, RS-4, RS-6, RS-7):
▲IMPORTANT (IMPORTANTE)▲
USE ONLY AS ILLUSTRATED
(Usar sólo tal como se indica en la
ilustración)
Correct (Correcto)Incorrect (Incorrecto)
▲Precautions:
RACK-STRAPs® were designed to provide a superior tie-
down system for professionals. However, their use does
not guarantee a load against damage. To prevent damage to
loads, normal maintenance must be performed and common
sense must be used. The following is a partial list of
considerations which may help with your use of the RACK-
STRAP® Tie-Down System.
▲Precauciones:
Los sistemas RACK-STRAP® se diseñaron con el fi n de pro-
porcionar un sistema de sujetación superior para profesio-
nales. No obstante, su utilización no garantiza que la carga
no sufrirá daños. Para evitar que las cargas sufran daños, se
requiere mantenimiento normal y uso de sentido común. A
continuación se incluye una lista parcial de las consideracio-
nes que pueden brindarle ayuda para utilizar el sistema de
sujetación RACK-STRAP®.
Inspect entire strap frequently. Replace straps annually
or when worn, torn, or damaged.
Keep straps away from hot surfaces or sharp objects.
Always leave 2 full wraps on spindle.
RACK-STRAP® is not designed to protect load from
sudden stops or sharp turns. Always drive vehicle in
safe manner.
Check load tension frequently.
Never load rack above side rails or side posts.
Check for gaps in load to prevent load shifts.
Lubricate moving parts as needed.
Use only tightening rod provided.
Do not exceed 500lb. (227 kg.) of static weight.
Do not exceed rack weight limit.
RACK-STRAP® was designed as a load tie-down on
pickups and vans with side rail racks. Do not use for
other purposes.
May not meet inter- or intrastate and federal tie-down
requirements.
Keep pawl free and clear of all debris and in good
working condition.
After securing load make sure pawl is fully engaged in
ratchet.
Keep strap 90º in relation to spindle around the load.
Hook as illustrated only.
Always replace RACK-STRAPs® that have been
involved in a vehicle accident.
All racks should have a front dam to prevent loads from
shifting forward.
●
●
●
●
●
●
●
●
●
●
●
●
●
●
●
●
●
●
●
Inspeccione la correa completa con frecuencia. Cambie
las correas anualmente o cuando estén desgastadas, rotas o
dañadas.
Mantenga las correas alejadas de superfi cies calientes o de
objetos fi losos.
Siempre deje al menos dos vueltas completas en el eje.
El sistema RACK-STRAP® no está diseñado para proteger a
la carga contra paradas repentinas o giros bruscos. Siempre
conduzca el vehículo de manera segura.
Verifi que la tensión de la carga con frecuencia.
Al estante nunca se le sobre carga por encima de los rieles o
postes laterales.
Verifi que que no haya espacios vacíos en la carga, a fi n de
evitar que ésta se mueva.
Lubrique las piezas móviles según sea necesario.
Sólo utilice la varilla de ajuste suministrada.
No utilice cargas de peso estático mayor de 227 kg. (500 lb.).
No supere el límite de peso del estante de carga.
El sistema RACK-STRAP® se diseñó como un sistema de
sujetación de cargas en camionetas y furgonetas con bastidores
de rieles laterales. No lo utilice con otros fi nes.
Es posible que no cumpla con los requisitos de sujetación
federales, interestatales o intraestatales.
Mantenga el seguro libre y limpio de suciedad y en buenas
condiciones de operación.
Luego de sujetar la carga, verifi que que el seguro esté
completamente enganchado en el engrane.
Mantenga la correa a 90° en relación con el eje alrededor de
la carga.
Haga el enganche únicamente como se indica en la ilustración.
Cambie siempre los sistemas RACK-STRAP® que hayan
estado en un accidente del vehículo.
Todos los estantes de carga deben contar con una presa frontal
para evitar que las cargas se muevan hacia adelante.
●
●
●
●
●
●
●
●
●
●
●
●
●
●
●
●
●
●
●
www.RackStrap.com U.S. PAT. NO 4,900,203
PAT. DE EE. UU. N.º 4900203
PROFESSIONAL TIE-DOWNS FOR TRUCK RACKS
AND VAN RACKS
RACK-STRAP®, INC.
2750 INDUSTRIAL AVE
HUBBARD, OR 97032
PH: 503-982-1920 T/F: 800-841-5790 FAX: 503-982-7022

This manual suits for next models

6

Popular Automobile Accessories manuals by other brands

DEFA 414899 Fitting instructions

DEFA

DEFA 414899 Fitting instructions

Prorack K104 Fitting instructions

Prorack

Prorack K104 Fitting instructions

Axxess ASWC-TOY-LEX installation instructions

Axxess

Axxess ASWC-TOY-LEX installation instructions

DEFA 420831 Fitting instructions

DEFA

DEFA 420831 Fitting instructions

Westin HLR installation instructions

Westin

Westin HLR installation instructions

Tactik Lock & Roll Soft Tonneau installation instructions

Tactik

Tactik Lock & Roll Soft Tonneau installation instructions

RBP RBP-510-RX7 quick start guide

RBP

RBP RBP-510-RX7 quick start guide

AUTOCHAIR SMART TRANSFER T-MPL User & installation manual

AUTOCHAIR

AUTOCHAIR SMART TRANSFER T-MPL User & installation manual

iDataLink ADS-TBSL-FM-EN install guide

iDataLink

iDataLink ADS-TBSL-FM-EN install guide

Dometic PerfectView CAM 360 AHD operating manual

Dometic

Dometic PerfectView CAM 360 AHD operating manual

Parrot Minikit+ user guide

Parrot

Parrot Minikit+ user guide

Thule 1230 instructions

Thule

Thule 1230 instructions

TIE DOWN LongRun 86295 installation instructions

TIE DOWN

TIE DOWN LongRun 86295 installation instructions

Eurotops SC871 instruction manual

Eurotops

Eurotops SC871 instruction manual

TJM T13 Fitting instructions

TJM

TJM T13 Fitting instructions

Rati Armster 2 user manual

Rati

Rati Armster 2 user manual

Curt Group Aries S225045-2 installation manual

Curt Group

Curt Group Aries S225045-2 installation manual

Thule 1261 instructions

Thule

Thule 1261 instructions

manuals.online logo
manuals.online logoBrands
  • About & Mission
  • Contact us
  • Privacy Policy
  • Terms and Conditions

Copyright 2025 Manuals.Online. All Rights Reserved.