Rain Bird C+ SERIES User manual

C+ SERIES
SELF CLEANING WATER FILTER
OPERATION & MAINTENANCE MANUAL

CONTENTS
Filter Basics 1
Installation Requirements 2
Couplings 2
Flush Line 2
Hydraulic Connections 3
Hydraulic Piston 3
Filter Performance 3
Normal Operation 3
Backwash Cycle 4
Flow & Pressure Requirements 5
Maintenance & Spare Parts 5
Startup 5
Shutdown 6
Periodic Maintenance 6
Spare Parts 7
Particle Remover 7
Hydraulic Piston 8
Installation & Wiring 9
C+ Series Filter 9
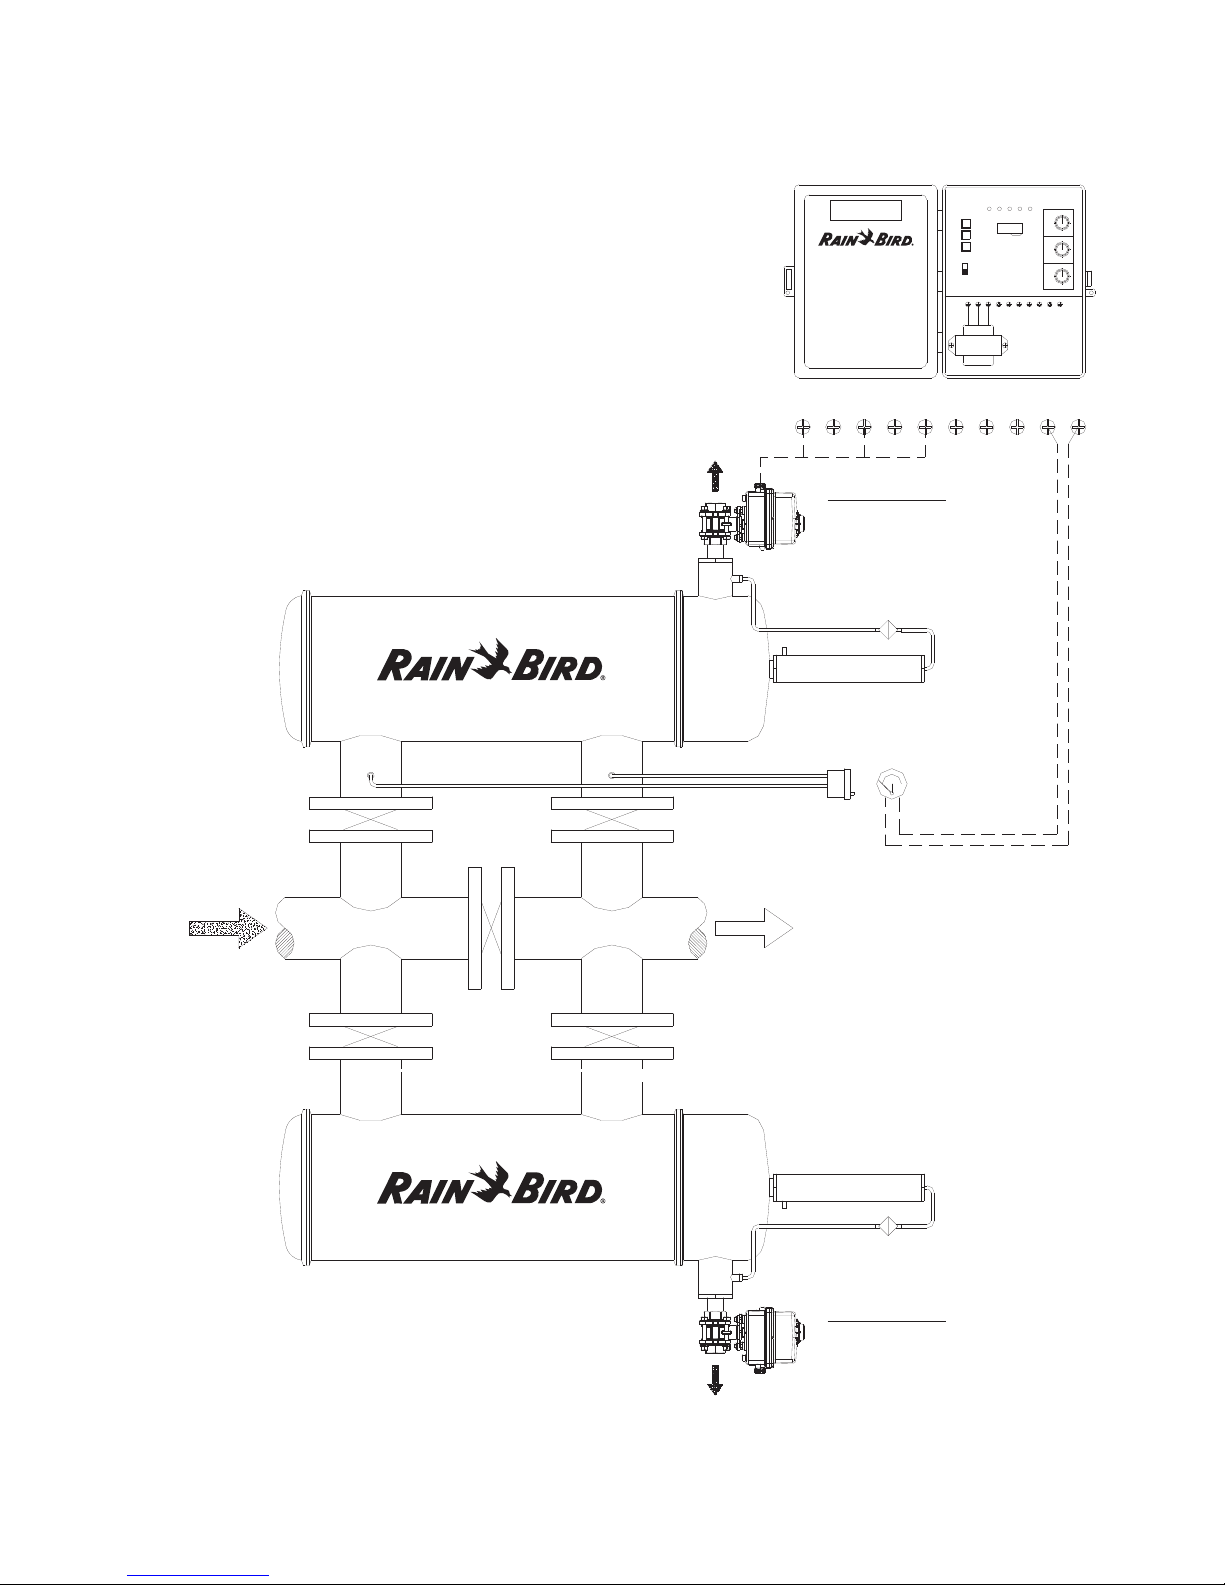
2x C+ Series Filters in Parallel 10
Warranty 11
1
Filter Basics
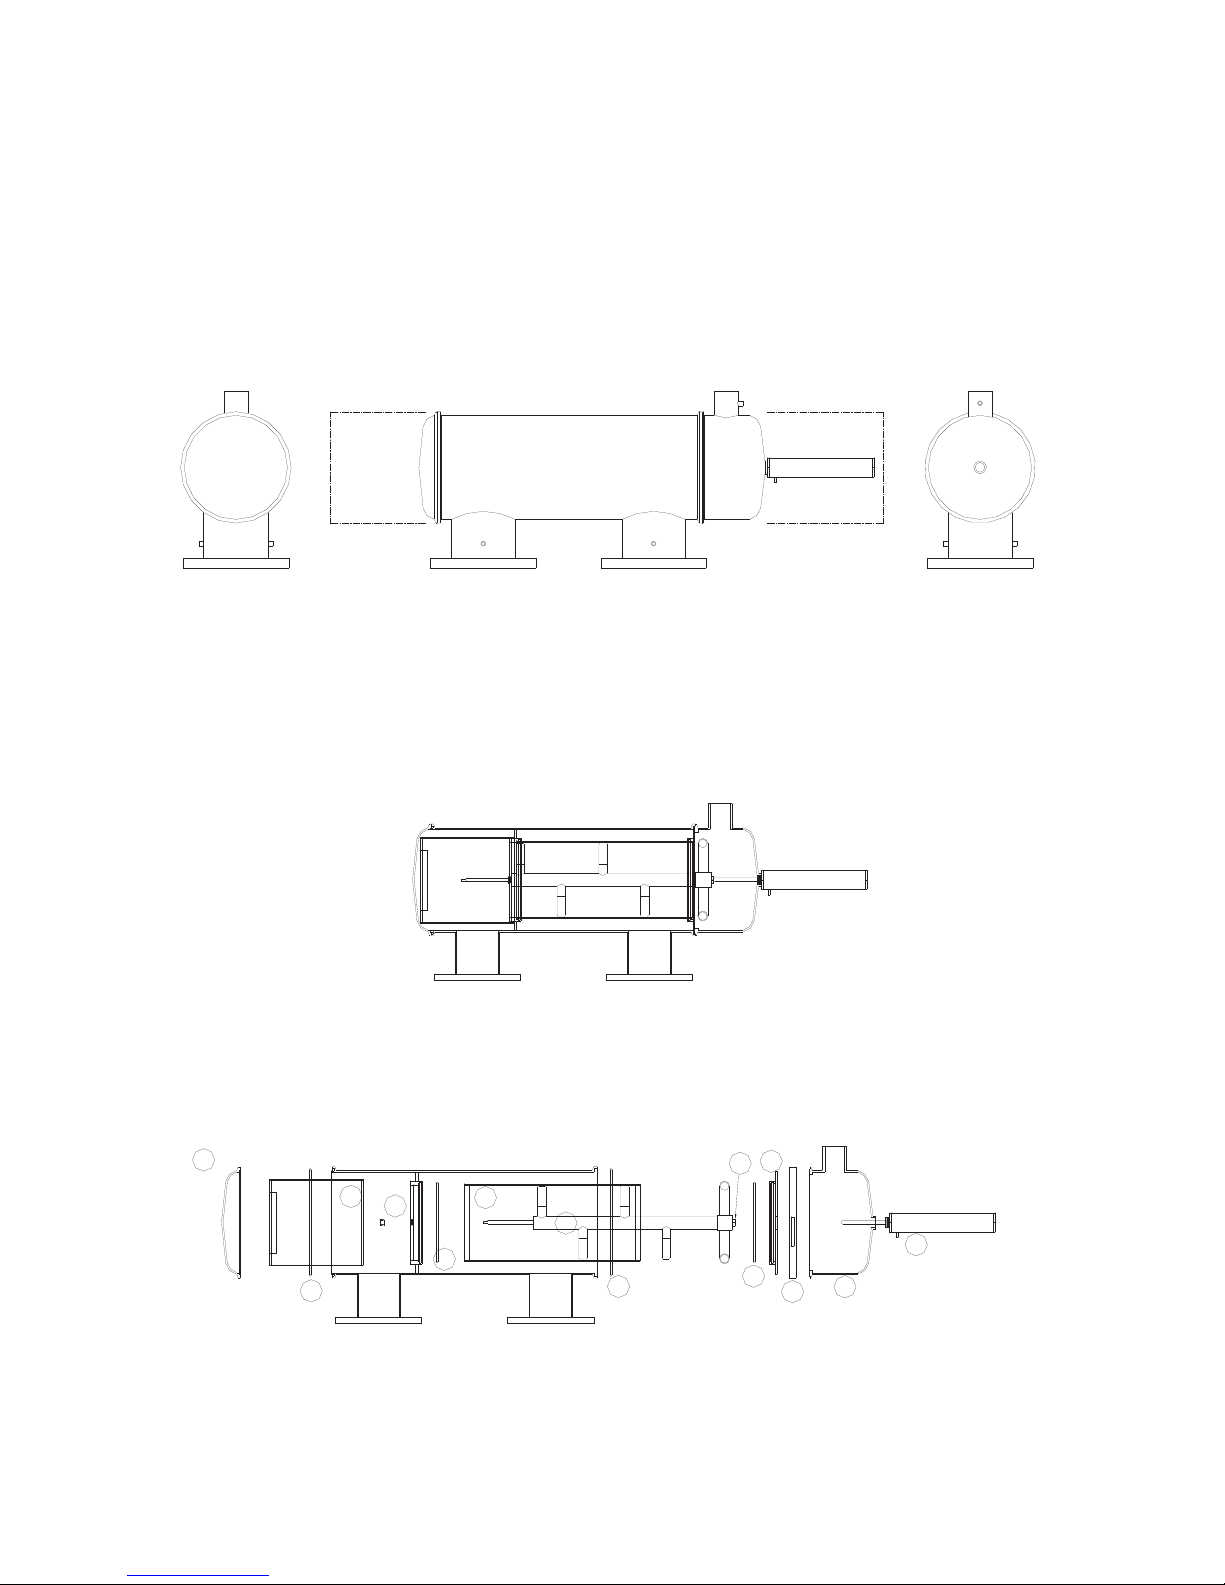
The Rain Bird C+ Series is a self cleaning screen water filter. The major components
include the Filter Housing (1), Coarse Screen Pre-Filter (11), Fine Screen Filter
Element (2), Particle Remover (3), Hydraulic Piston (8), and Backwash Valve
(12).
8
1
10
7
56
6
1
3
2
4
5
1
1. FILTER HOUSING
2. FINE SCREEN
3. PARTICLE REMOVER
4. BUSHING10. HOUSING CLAMP
6. SCREEN O-RING
7. SPACER
8. HYDRAULIC PISTON
C+ SERIES FILTER - EXPLODED VIEW
N1
N2
N3
K1
K2
K3
INLET
OUTLET
FLUSH OUTLET
HYD CONNECTION
HYD CONNECTION
HYD CONNECTION
C+ SERIES FILTER - ASSEMBLED VIEW
SCREEN
SERVICE AREA
10 x 11.5
N3
K3
K1
N1
K2
N2
SCREEN
SERVICE AREA
12 x 11.5
C+ SERIES FILTER - GENERAL LAYOUT
11
11. COARSE SCREEN
5. HOUSING SEAL
2
Installation Requirements
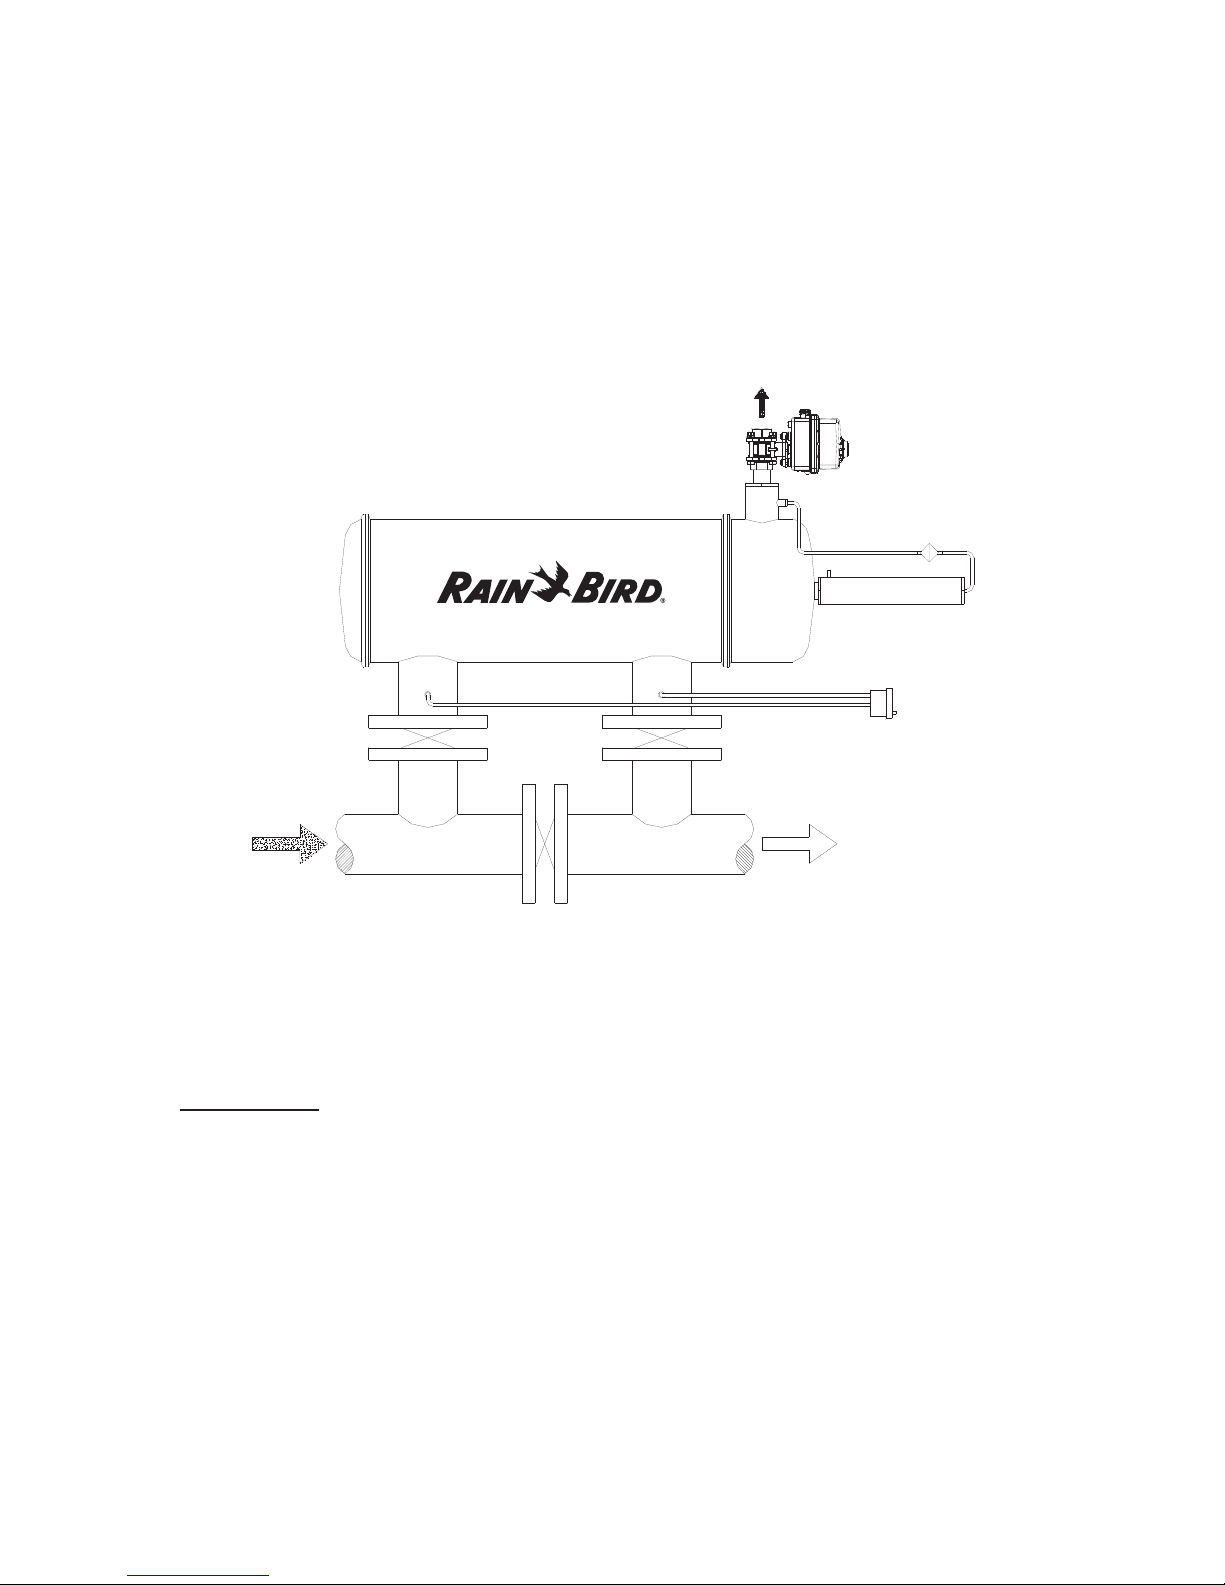
C+ Series filters may be mounted directly on the inlet (N1) and outlet (N2)
flanges, and positioned in any orientation. Isolation valves should be installed at
the inlet and outlet, and a bypass valve should be installed between the flanges.
This will allow the filter to be taken offline without disruption to water flow.
C+ SERIES FILTER - INSTALLATION LAYOUT
INLET OUTLET
Differential
Pressure
Gauge
Isolation
Valve
Filter
Isolation
Valve
FLUSH
Bypass
Valve
There should be adequate clearance around the filter to allow for easy
maintenance access, including a minimum of 24” from the back (piston side). The
minimum clearance on the front (cover) depends on the model. There must be
enough room to remove the coarse screen and fine screen periodically.
FLUSH LINE
The piping for the flush valve must have no backpressure. It is strongly
recommended to use oversized piping to accommodate this requirement. For a
1” valve, 1.5” or 2” pipe must be used.
To minimize backpressure on the flush line, it is also important to avoid elevation
gain in the flush line. Even a small elevation gain can reduce the filter’s ability to
perform an effective backwash cycle. If flush water must be transported to higher
elevation, it is recommended to pipe the flush line to a storage tank first, and then
pump out to higher elevation.
3
HYDRAULIC CONNECTIONS
Each flanged connection nozzle (N1 & N2) on the C+ filter has two ¼”
threaded couplings. One may be used to install a pressure gauge or other sensor
equipment. The other ¼” coupling will be used to connect hydraulic tubing from
the differential pressure switch to the filter. The high pressure line is fitted to the
inlet, and low pressure fitted to the outlet.
HYDRAULIC PISTON
The piston (8) is mounted on the flush end of the filter. ¼” tubing must be
installed from the fitting located on the back of the piston to the hydraulic
connection (K3) on the flush outlet (N3). A filter is installed on the hydraulic
tubing to protect the piston.
Filter Performance
NORMAL OPERATION
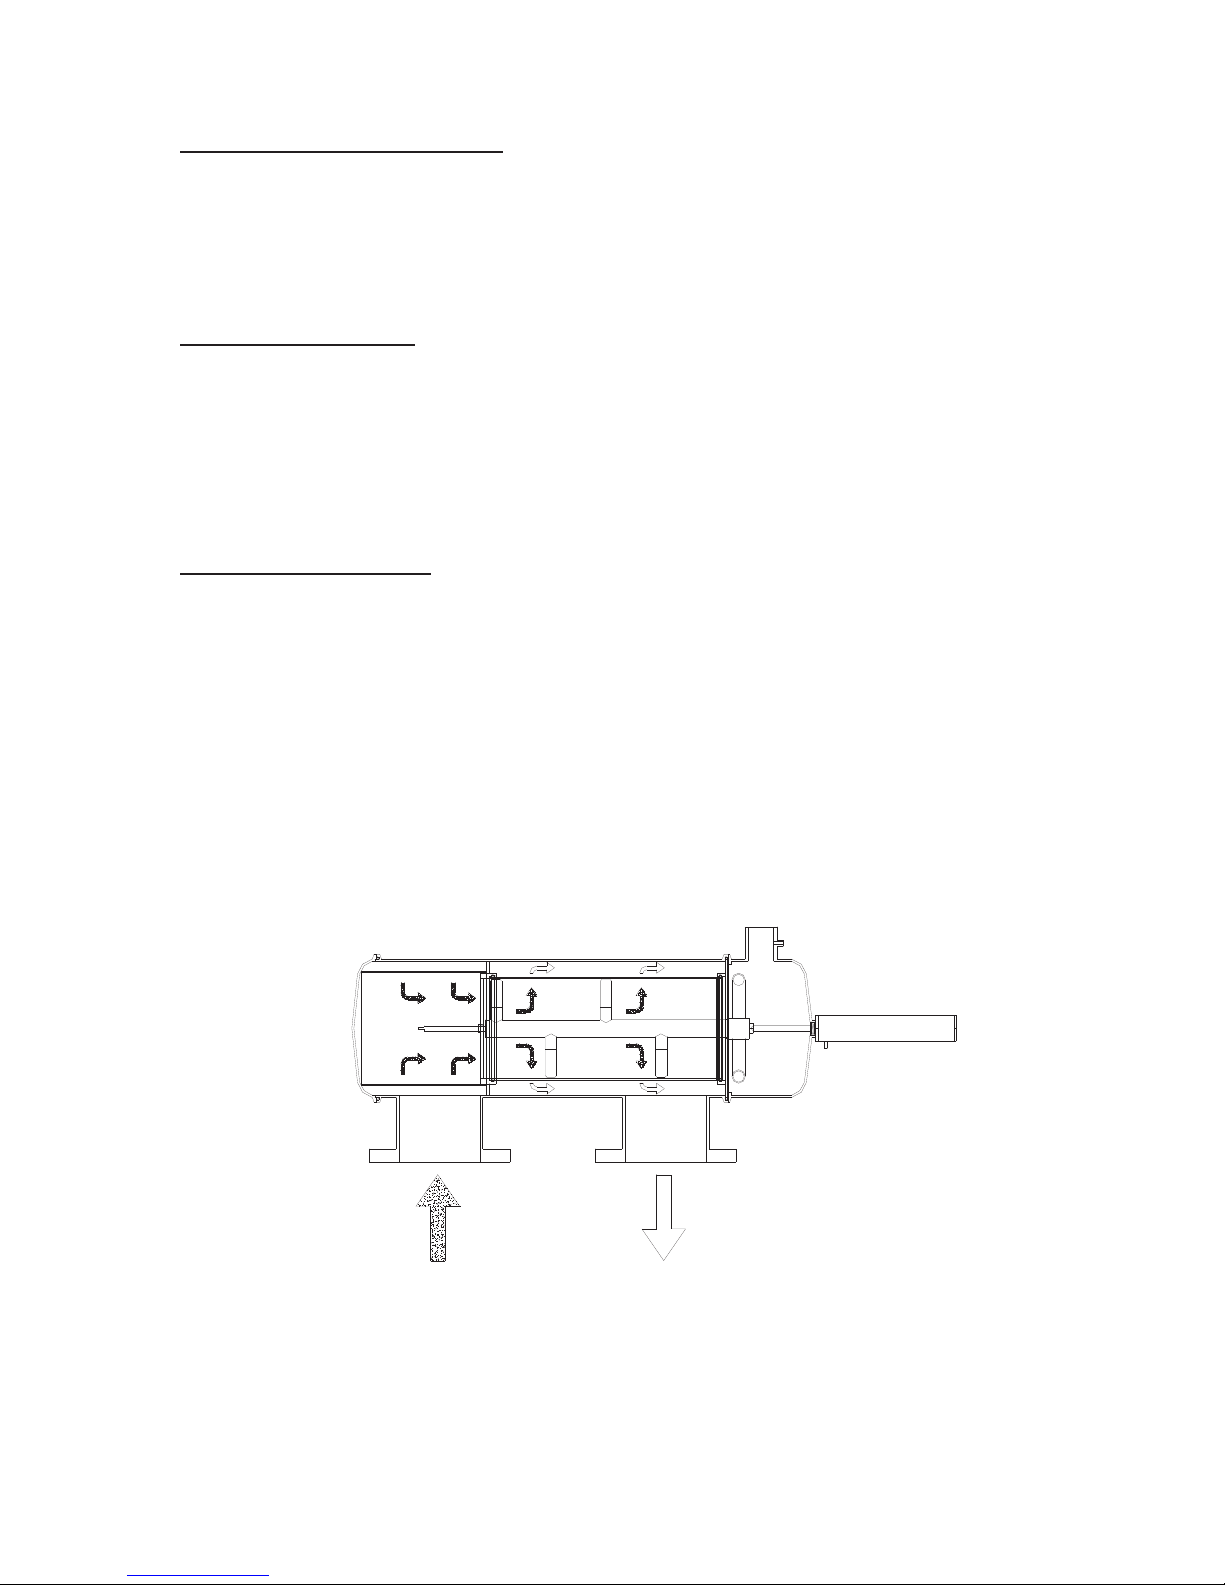
During normal operation of the filter, dirty water enters through the inlet and
passes through the coarse screen. Any abnormally large debris is caught here
and prevented from possibly damaging the fine screen or particle remover.
Water then travels down the center of the filter and is strained across the fine
screen. As water passes from inside the screen to outside, suspended particles
are trapped on the fine screen and continue to buildup, eventually creating a drop
in pressure at the outlet of the filter.
C+ SERIES FILTER - NORMAL OPERATION
This drop in outlet pressure is monitored by the differential pressure gauge,
which at seven PSID (pounds per square inch differential) sends a signal to the
controller to initiate a backwash cycle.

4
BACKWASH CYCLE
The controller opens the flush valve, which causes a drop in pressure in the
hydraulic motor chamber. This creates a low pressure path inside the particle
remover, which acts as a vacuum at the end of the suction nozzles, removing the
built up debris from the inside of the fine screen.
C+ SERIES FILTER - BACKWASH CYCLE
FLUSH
HYDRAULIC MOTOR CHAMBER
(LOW PRESSURE)
INTERIOR OF FILTER
(HIGH PRESSURE)
Water flows through the suction nozzles, down the interior of the particle
remover, and out the hydraulic motor. The motor rotates the particle remover,
enabling each suction nozzle to cover a radial strip of screen. The pressure
difference between the interior of the filter and the hydraulic motor chamber
drives the particle remover toward the hydraulic piston.
The piston depressurizes during the backwash cycle, and expels the volume of
water from its chamber. This acts as a timer, gradually allowing the particle
remover to drive the piston rod into the piston, assuring that the suction nozzles
cover the entire surface of the fine screen. When the piston reaches the end of
its stroke, the backwash cycle is complete, and the flush valve closes. Pressure
inside the hydraulic motor chamber normalizes, and the piston pushes the
particle remover back to its original position.
After the piston and particle remover move back to their original positions, the
filter returns to normal operation. During the entire backwash cycle, the main flow
through the filter is never disrupted.

5
Flow & Pressure Requirements
Rain Bird C+ Series filters have a minimumpressure requirement of 15 PSI. This
includes any pressure loss incurred during the backwash cycle. Therefore the
pump performance is a crucial component in determining whether the filter will
perform correctly.
Pump manufacturers will provide the performance data in the form of a pump
curve. This is a graph that plots pressure vs. flow rate. A pump is considered
adequate for an application if it can maintain a minimum of 15 PSI while pumping
the normal system flow AND the additional flow required during backwash. The
additional flow depends on the filter model and what valve is used.
C+ SERIES FILTERS
VALVE FLOW RATES
Valve Flow Rate
1" 40 gpm
1.5" 100 gpm
2" 220 gpm
Maintenance & Spare Parts
STARTUP
When pumping water through the Rain Bird C+ Series for the first time or after it
has been emptied, it is important to follow a correct sequence of valve actuation
in order to prevent damage to the filter components.
With both isolation valves closed and the bypass valve open, the correct
sequence is:
1. Slowly open the inlet isolation valve letting water flow into the filter. If
installed, bleed the air through a valve on the top of the filter body. Let the
entire filter fill with water before moving to the next step.
2. Close the bypass valve.
3. Open the outlet isolation valve.
If it is not possible to close the bypass valve momentarily before opening the
outlet valve, then both may be actuated simultaneously.
6
SHUTDOWN
To remove the filter from operation, reverse the steps used for startup.
1. Close the outlet valve.
2. Open the bypass valve
3. Close the inlet valve, and slowly open the drain valve on the bottom of the
filter housing. There will be residual pressure in the tank still, so use
caution when draining.
If it is not possible to close the outlet valve momentarily before opening the
bypass, then both may be actuated simultaneously.
PERIODIC MAINTENANCE
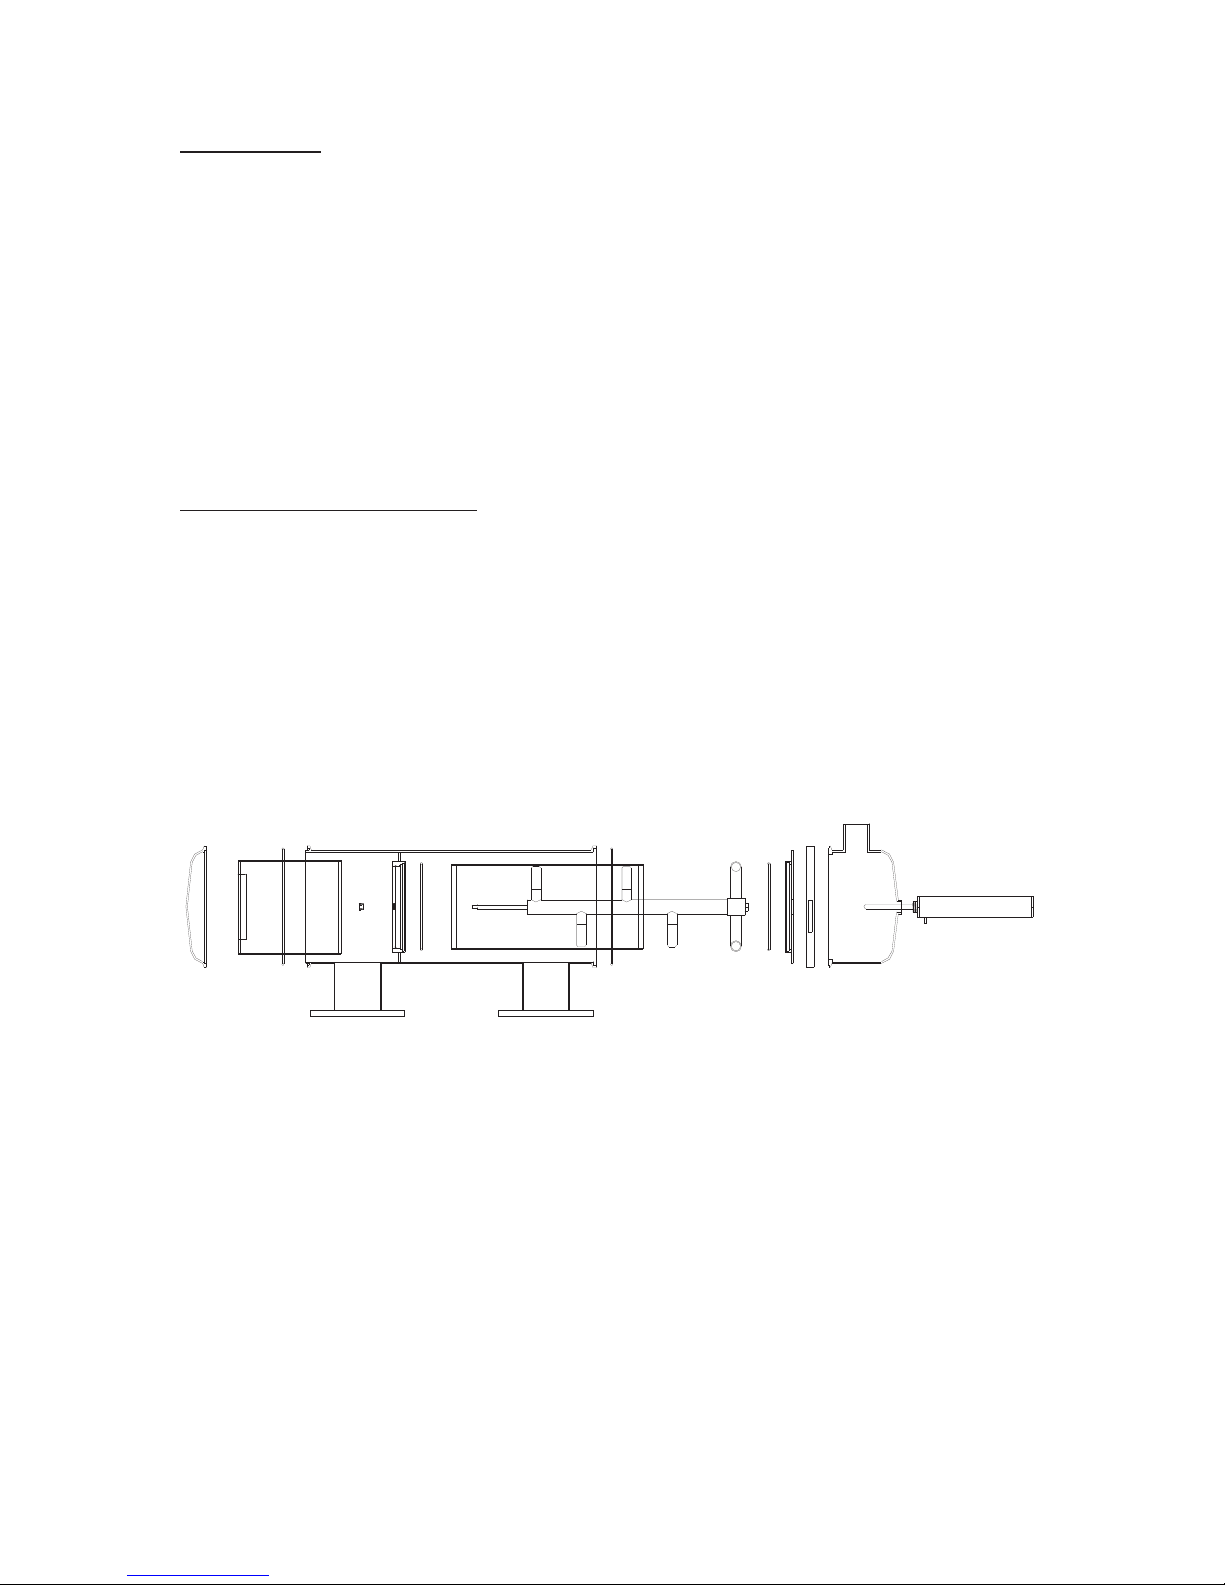
Every six months to a year, or during scheduled down-time it is recommended to
open the filter and inspect the components. Access to the internal components is
through the front cover and hydraulic motor chamber.
Remove the piston from the back filter and drain the water from the hydraulic
motor chamber. Verify that the piston rod is moving smoothly in and out, and
inspect the piston tip for wear.
C+ SERIES FILTER - PERIODIC INSECTION
Remove the hydraulic motor from the rest of the particle remover by accessing it
through the piston-side cover.
Remove the screen and particle remover, using the piston-side cover for access.
Separate the two items and inspect them carefully. The screen mesh and
bushing should be inspected for wear, as well as the particle remover rod and
suction nozzles.

7
SPARE PARTS
Spare parts for maintenance for two years include:
Screen O-rings (6)
Cover Seal (5)
Suction Nozzles (3.5)
Bushing (4)
Differential Pressure Gauge (18)
Piston Shaft Tip (8.9)
Piston Seal Kit (8K)
Mini-Filter (16)
Valve (p/n 12)
Fine Screen (2)
Particle Remover (3)
Spacer (7)
3.2
PARTICLE REMOVER - PART LIST
ITEM
Particle Remover
Counter-Nut
Rod
Casing
Rotating Sprinkler
PART NUMBER
3
3.1
3.2
3.3
3.4
3.4
3.3
3.1
Nozzles 3.5
Insert 3.6
3.6

8
C+ SERIES PISTON
8.08
8.15
8.02
8.03
8.16
8.01
8.12
ITEM
Hydraulic Piston
Snap Ring
Head Ring
Shaft U-cup
Head O-ring
Piston Pin
Shaft
U-cup Holder
Casing U-cup
Casing
Casing Cap
Piston Head
PART NUMBER
8-C+
8.01-C+
8.02-C+
8.03-C+
8.05-C+
8.08-C+
8.10-C+
8.11-C+
8.12-C+
8.14-C+
8.15-C+
8.16-C+
Shaft O-Ring8.06-C+
8.11
8.05
8.03
8.10

9
INLET OUTLET
Differential
Pressure
Gauge
Isolation
Valve
Filter
Isolation
Valve
Valve Connections
Red-----------W(left)
Black-------W(right)
White---------------1
Bypass
Valve
FLUSH
1
CPDAM2
W R W 1C PDAM2
PD DWELL 1 2 ALARM
MANUAL
START/
ADVANCE
COUNTER
RESET
ALARM
RESET
BACKWASH
COUNT
POWER
OFF
ON
OFF
1/4
1/2
1
2
3
4
6
8
12
18
24
2
180 5
20
15
10
30
45
60
90
120
150
2
5
10
15
20
30
40
50
60
75
90
0
P
E
R
I
O
D
I
C
(HOURS)
F
L
U
S
H
(SEC)
(SEC)
D
W
E
L
L
F2-110/220
W R W
01
Bypass
Valve
FLUSH
INLET OUTLET
Differential
Pressure
Gauge
Isolation
Valve
Filter
Isolation
Valve
Valve Connections
Red-----------W(left)
Black-------W(right)
White---------------1
YOR Y 1
CPDAM2
PD DWELL 1 2 ALARM
MANUAL
START/
ADVANCE
COUNTER
RESET
ALARM
RESET
BACKWASH
COUNT
POWER
OFF
ON
OFF 1/4
1/2
1
2
3
4
6
8
12
18
24
2
180 5
20
15
10
30
45
60
90
120
150
2
5
10
15
20
30
40
50
60
75
90
0
P
E
R
I
O
D
I
C
(HOURS)
F
L
U
S
H
(SEC)
(SEC)
D
W
E
L
L
W R W 1
CPDAM2
FLUSH
Isolation
Valve
Filter
Isolation
Valve
Valve Connections
Red-----------W(left)
Black-------W(right)
White---------------2
F2-110/220

11
WARRANTY
Rain Bird Corporation guarantees all self cleaning water filters, components, and
accessories free of defects for one year from the date of installation, or 18 months from
the date of original shipment. Rain Bird will replace any part found defective during the
warranty period, provided the equipment in question was handled, installed, and
operated in accordance with the operation and maintenance manual and sound
engineering practices. Rain Bird assumes no liability for incidental or consequential
damage resulting from the use of its products, services, or data. Liability is limited to
replacement or repair of products provide by Rain Bird , and no agent or sales
representative has authority to extend the warranty period without the express written
consent of Rain Bird . Shipping charges for returned equipment will be at the expense
of the purchaser, and all returned equipment must be sent to Rain Bird Corporation.
Rain Bird Corporation
6991 E. Southpoint Road
Tucson, AZ 85756
Phone: (520) 741-6100
Fax: (520) 741-6522
Filter Support
1-877-648-9532 (U.S. and Canada)
lters@rainbird.com
Rain Bird Corporation
970 West Sierra Madre Avenue
Azusa, CA 91702
Phone: (626) 812-3400
Fax: (626) 812-3411
www.rainbird.com
Rain Bird International, Inc.
1000 West Sierra Madre
Azusa, CA 91702
Phone: (626) 963-9311
Fax: (626) 852-7343
®Registered Trademark of Rain Bird Corporation
© 2016 Rain Bird Corporation 11/16
Table of contents
Other Rain Bird Water Filtration System manuals


