rainforest EMU User manual

www.rainforestautomation.com
EMU™
Energy Monitoring Unit
User Manual
Version 2.23
Sep 2012

www.rainforestautomation.com
EMU™
User Manual
2
Copyright © 2012 by RAINFOREST AUTOMATION, INC (“RFA”). All rights reserved.
No part of this manual may be reproduced or transmitted in any from without the expressed,
written permission of RFA.
Under copyright law, this manual or the software described within, cannot be copied, in whole or
part, without the written consent of the manufacturer, except in the normal use of the software to
make a backup copy. The same proprietary and copyright notices must be affixed to any
permitted copies as were affixed to the original. This exception does not allow copies to be
made for others, whether or not sold, but all of the material purchased (with all backup copies)
can be sold, given, or loaned to another person. Under the law, copying includes translating into
another language or format.
Rainforest Automation may have patents, patent applications, trademarks, copyrights, or other
intellectual property rights covering subject matter in this document. Except as expressly
provided in any written license agreement from Rainforest Automation, the furnishing of this
document does not give you any license to these patents, trademarks, copyrights, or other
intellectual property.
Trademarks
Third-party brands and company names mentioned herein may be trademarks and/or registered
trademarks of their respective companies and are the sole property of their respective
manufacturers.
Notice
The author(s) assumes no responsibility for any errors or omissions that may appear in this
document nor does it make a commitment to update the information contained herein.

www.rainforestautomation.com
EMU™
User Manual
3
EMU™–Energy Monitoring Unit
RFA-Z105
Version 2.23
User Manual
Table of Contents
Regulatory information .............................................................................................4
Quick Setup................................................................................................................5
Step 1: Check Contents of the box ....................................................................5
Step 2: Register your EMU™.............................................................................5
Step 3: Assemble your EMU™..........................................................................5
Step 4: Wait for your EMU™ to join the smart meter.........................................6
Features of Your EMU™............................................................................................9
How to Use Your EMU™.........................................................................................10
Screen Navigation Flowchart..................................................................................12
EMU™ Display Screens ..........................................................................................13
Startup.............................................................................................................13
Current Time....................................................................................................13
Meter Reading .................................................................................................13
Current Usage .................................................................................................14
Total to Date ....................................................................................................14
Previous Totals................................................................................................15
Current Price....................................................................................................15
Message..........................................................................................................16
Confirm Message.............................................................................................16
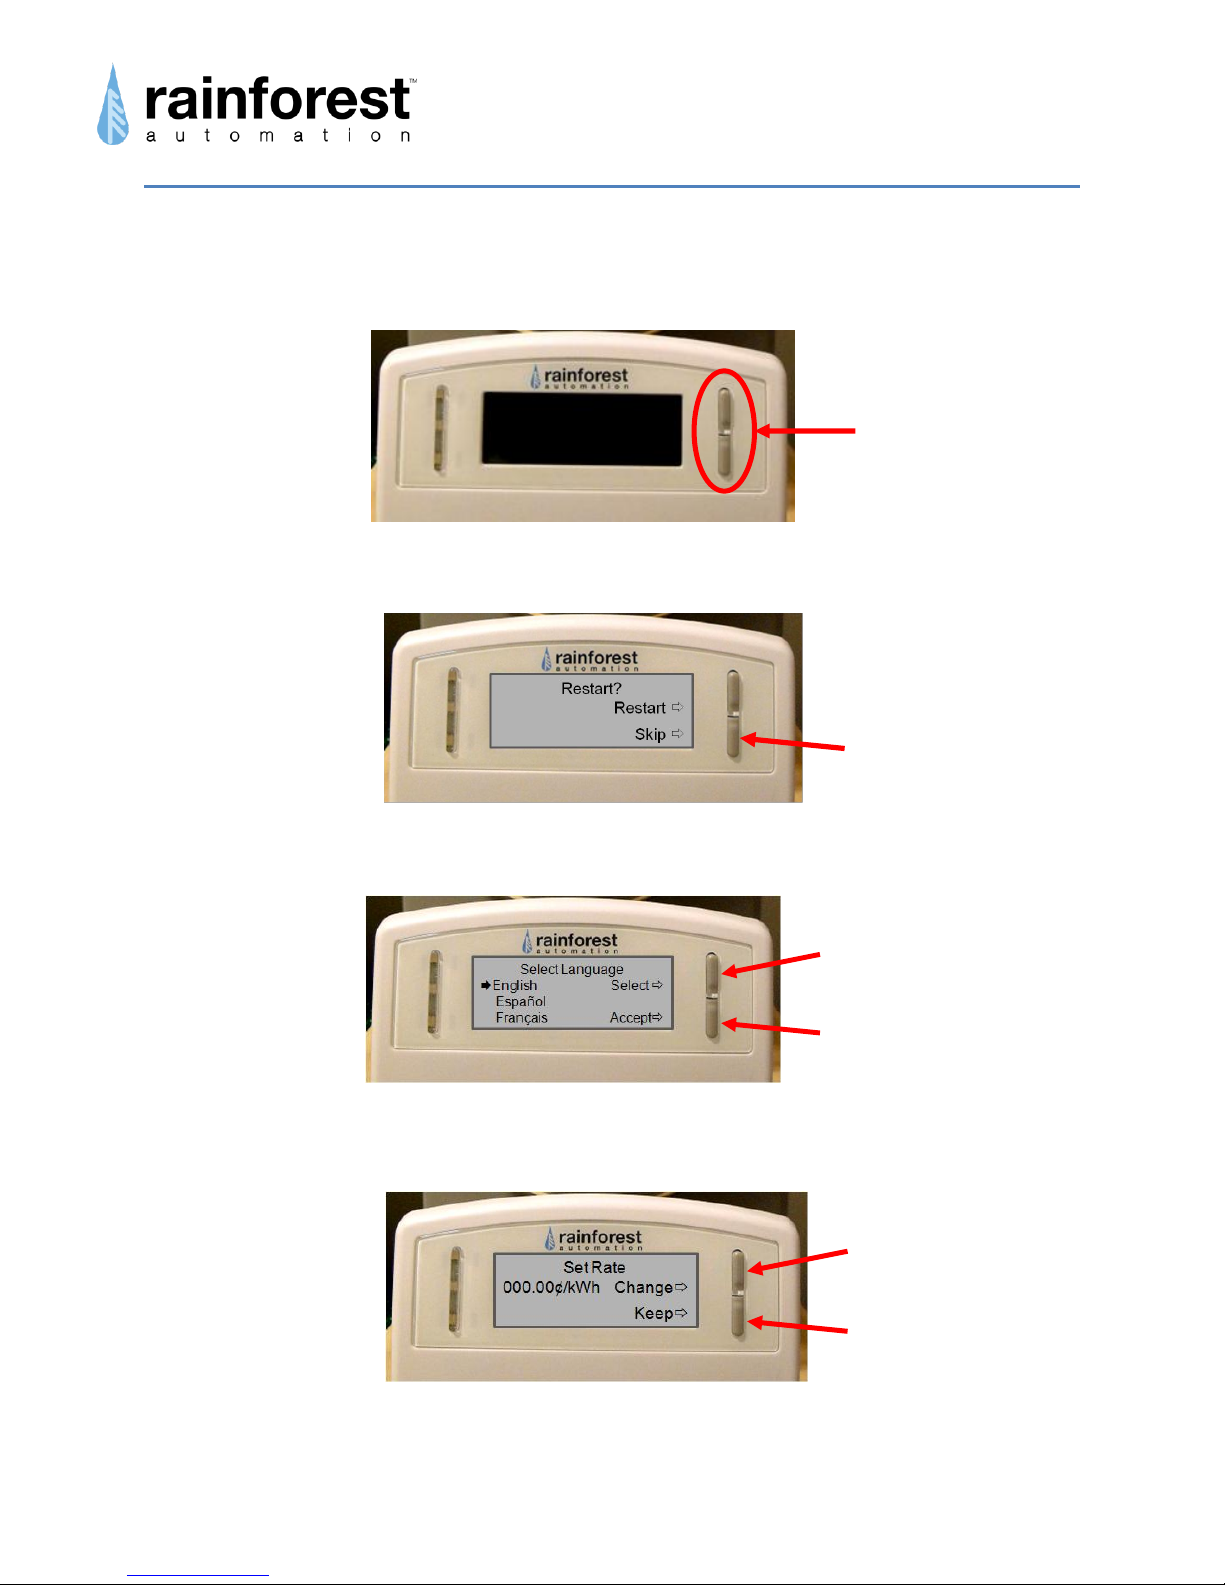
EMU™ Configuration Screens................................................................................17
Select Language..............................................................................................17
Set Rate...........................................................................................................17
Battery .............................................................................................................18
Troubleshooting Guide ...........................................................................................19
Step 1. Check the EMU™................................................................................19
Step 2. Check the Batteries .............................................................................19
Step 3. Check the Smart Meter Connection.....................................................20
Technical Support............................................................................................20

www.rainforestautomation.com
EMU™
User Manual
4
Regulatory information
FCC Notices
Changes or modifications not expressly approved by the manufacturer could void the user’s
authority to operate the equipment.
FCC/IC RF Exposure Statement
This equipment complies with FCC and Industry Canada radiation exposure limits set forth for
an uncontrolled environment. The antenna(s) used for this equipment must be installed to
provide a separation distance of at least 8 inches (20cm) from all persons.
ICES-003 Compliance
This Class B digital apparatus complies with Canadian ICES-003.
Note: This equipment has been tested and found to comply with the limits for a Class B digital
device, pursuant to part 15 of the FCC Rules. These limits are designed to provide reasonable
protection against harmful interference in a residential installation. This equipment generates,
uses and can radiate radio frequency energy and, if not installed and used in accordance with
the instructions, may cause harmful interference to radio communications. However, there is no
guarantee that interference will not occur in a particular installation. If this equipment does
cause harmful interference to radio or television reception, which can be determined by turning
the equipment off and on, the user is encouraged to try to correct the interference by one or
more of the following measures:
Reorient or relocate the receiving antenna.
Increase the separation between the equipment and receiver.
Connect the equipment into an outlet on a circuit different from that to which the receiver
is connected.
Consult the dealer or an experienced radio/TV technician for help.
Compliance Regulations For Australia and New Zealand
This equipment complies with the C-Tick labeling requirements for Australia and in New
Zealand. As a radio transmitter, this device complies with the requirements of AS/NZS
4268:2008 as designated in the Radiocommunications (Short Range Devices) Standard 2004
for Australia and as required by the Radiocommunications Regulations (General Users Radio
License for Short Range Devices) Notice 2011 for New Zealand. This device is a Category A
device as defined in the Radiocommunications (Compliance Labeling - Electromagnetic
Radiation) Notice 2003..

www.rainforestautomation.com
EMU™
User Manual
5
Quick Setup
Step 1: Check Contents of the box
The box should contain the following items:
a) 1 x EMU™Display unit
b) 4 x AA Batteries
Step 2: Register your EMU™
In order for your EMU™to connect to the smart meter, you will need to register
your EMU™with your utility. Please follow the procedure provided by your utility.
You will need the following information, which is found on the Information Label
on the back of your EMU™:
Note that it may take some time for your utility to enable the smart meter to
connect with your EMU™. You should be advised by your utility how long this
will take. You must wait until this process is complete before proceeding; your
EMU™will not function correctly until the smart meter is enabled.
Step 3: Assemble your EMU™
a. Open the battery cover on the back of your EMU™
by pushing down on the catch at top of the door.
b. Insert 4 AA batteries exactly as shown on inside of
the battery compartment. Note that putting a battery
in backwards can be hazardous, and may cause
extensive damage to your EMU™.Always use
alkaline batteries; never mix battery types. Replace
all batteries at the same time.
c. Replace the battery cover by inserting the bottom
tabs first, then snapping the catch closed.
2011 RAINF OREST AUTOMATION, INC.
©
MODEL: RFA –Z105
FCC ID: YCXRFA –Z105
IC: 8919A –RFAZ105
N27879
IN: 6E5D0732 8E2A6FB4
MAC:0015 8d00001a ab91
Install
Code
MAC
Address This device complies with part 15 of the FCC Rules. Operation is
Subject to the following two conditions: (1) This device may not cause
Harmful interference, and (2) this device must accept any interference
Received, including interference that may cause undesired operation.

www.rainforestautomation.com
EMU™
User Manual
6
Step 4: Wait for your EMU™ to join the smart meter
Your EMU™will attempt to connect to the smart meter. You will see these two
screens:
You may see these two screens a few times. This could take 1-2 minutes.
When your EMU™finds the smart meter and successfully communicates with it,
you will see this screen:
A short time later, the Current Time screen will appear, with dashes instead of
digits:
As soon as the dashes are replaced with the current time and date, it means that
your EMU™has successfully read the meter, and is ready for use.
Joined Network
Current Time
--- --, ----
--:-- --
Searchingfor
meters
Connectingto Meter
Please Wait...

www.rainforestautomation.com
EMU™
User Manual
7
Step 5: Configure your device
a. Press both of the buttons on your EMU™simultaneously and release.
b. Press the Bottom Button.
c. Select the language you would like your EMU™to use.
d. If your meter does not provide pricing (ask your utility), you will need to set
your energy price.
The digit to be modified will be flashing, starting on the right, and working left.
Top Button scrolls through
languagechoices
Bottom Button saves
languageselection
Top Button increments
digitvalue
Bottom Button saves
digitvalue

www.rainforestautomation.com
EMU™
User Manual
8
e. After you have entered all 5 digits of the energy price, you will see the battery
screen:
Press any button to return to regular monitor mode.
Battery

www.rainforestautomation.com
EMU™
User Manual
9
Features of Your EMU™
CurrentUsage
10.123kW
$ 3.50/hr
Red
Yellow
Green
Top Button
Bottom Button
Display
Battery
Cover
Information
Label
IndicatorLED
Lights:
Magnetic
Feet

www.rainforestautomation.com
EMU™
User Manual
10
How to Use Your EMU™
Most of the time, your EMU™will be in Sleep Mode. The Display screen will be blank,
but the Indicator LED Lights will flash as noted below in Table 1. To put the unit into
Active Mode, simply press one of the buttons. After 4 minutes of inactivity, your EMU™
will automatically return to Sleep Mode.
Your EMU™has two buttons that are used to make selections. By default, they are
used to scroll through the different Display screens. The Top Button pages up, and the
Bottom Button pages down. The screens are displayed in a circular sequence. Once
you cycle through to the end of the sequence, the first screen is displayed again.
On some screens, the EMU™may need a response from you. For these screens the
buttons will behave differently. The button functions will be indicated on the right side of
the screen. When the EMU™presents you with options to choose from, pressing the
Top Button cycles through the different options to select, and pressing the Bottom
Button saves the selected option and pages to the next screen.
Your EMU™communicates wirelessly with the smart meter to get price and usage
information, and presents this information on the Display. The accumulated usage
information is updated every minute while the unit is in Active Mode. You may have to
manually enter the price per unit (kWh for electricity, or cubic foot for gas), but it can
also be provided by the smart meter, and is checked every 2 minutes. The EMU™
automatically detects whether the data from the meter is for electricity or gas, and the
commodity type is indicated by an icon in the lower left corner: a lightning bolt icon
indicates electricity; a flame icon indicates gas.
Your EMU™checks every 2 minutes for a new text message from your utility. An
envelope icon is shown in the upper left hand corner of the screen if there is an active
message stored on your EMU™.
The quality of the wireless signal from the smart meter is indicated by the small bar
graph in the upper right hand corner of the Active Mode screens. Four bars are shown

www.rainforestautomation.com
EMU™
User Manual
11
for a good signal; fewer bars indicate a lower quality signal. If the connection to the
smart meter is lost, a large “X” will replace the bar graph.
There are also a number of configuration screens. These are accessed by pressing
and releasing both buttons simultaneously to put your EMU™into Configuration Mode.
Note that your EMU™should have successfully connected to the smart meter before
putting it into Configuration Mode.
There are Indicator LED Lights that show pricing status from your utility. These lights
flash in different sequences to alert you of the current pricing condition.
LED Light
Flash Sequence
Descriptions
Green LED
1 flash every 60 seconds
Price is normal
Yellow LED
1 flash every 10 seconds
Price increased; consider reducing usage
Red LED
1 flash every 5 seconds
Price is high; requested to reduce power usage
Red LED
2 flashes every 3 seconds
Price is critically high
Table 1: LED Flash Indications
If none of the Indicator LED Lights are flashing, this indicates that no price has been set,
either by the meter, or manually. The Indicator LED Lights also flash in a special red-
yellow sequence (which replaces the price sequence) when there is a new text
message waiting to be read.

www.rainforestautomation.com
EMU™
User Manual
12
Screen Navigation Flowchart
Configuration
Mode
Active
Mode
Sleep
Mode any button both buttons
Meter Reading
screen
Top Button
BottomButton SelectLanguage
screen
SetRate
screen
Any
Button
Message
screen
CurrentPrice
screen
Previous Totals
screen
CurrentUsage
screen
Total to Date
screen
Top Button
5seconds
Reset
Battery
screen
Top Button
BottomButton
Top Button
BottomButton
Top Button
BottomButton
Top Button
BottomButton
Top Button
BottomButton
CurrentTime
screen Top Button
BottomButton
BottomButton
BottomButton
4 minutes inactivity 1minute inactivity
Restart
screen
BottomButton

www.rainforestautomation.com
EMU™
User Manual
13
EMU™ Display Screens
Startup
The Startup screen is shown when your
EMU™is powering up for the first time.
Current Time
The Current Time screen shows the
present time and date, as read from the
smart meter. Your EMU™ synchronizes its
clock with the smart meter every 15
minutes.
Meter Reading
The Meter Reading screen shows the raw
total accumulated usage reading from the
smart meter. For an electricity meter, the
total shown is in kilowatt-hours, and a
lightning bolt icon is shown in the lower
left corner.
For a gas meter, the total shown is usually
in cubic feet, and a flame icon is shown in
the lower left corner.
Your EMU™ updates this data every 60
seconds while it is in Active Mode.
If you are generating your own electricity,
and have a Net Metering agreement with
your utility, then there may be times when
you will be producing more energy than
you are using, and electricity will flow out
to the grid. In this case, the Meter
Reading screen will show two totals: the
amount of electricity delivered from the
Current Time
Jun 11, 2009
3:25 pm
Meter Reading
21031.4 kWh
Meter Reading
2618031.4 cf
Meter Reading
IN: 21031.4 kWh
OUT: 342.6 kWh

www.rainforestautomation.com
EMU™
User Manual
14
grid into your home (labeled “IN”), and the amount of surplus electricity you have
delivered out to the grid (labeled “OUT”).
Current Usage
The Current Usage screen shows the rate
of energy consumption and the estimated
cost per hour in dollars (or cents, if it is
less than one dollar). The estimated cost
is calculated from the current price per
unit multiplied by the current rate of
energy consumption. The data is updated
from the meter every 8 seconds while this screen is shown.
This is like the speedometer in your car; it shows you how fast you are consuming
energy.
Total to Date
The Total to Date screen shows your
accumulated totals for energy consumption
and estimated cost for the current time
period. The start date of the current time
period is shown at the top of the screen.
The number of elapsed days so far in this
time period is shown in the upper right of
the screen. The number of days is shown
to the nearest one-tenth of a day. The cumulative energy consumption for the time
period is shown as recorded by the smart meter. The estimated cost for the recorded
energy consumption is shown in dollars (or cents, if it is less than one dollar), and is
based on the current price value during the period. The average cost per day for the
current time period is shown in the lower right of the screen.
This is like the odometer in your car; it shows you the total energy used so far.
The current time period can be restarted by pressing and holding the Top Button for 5
seconds. This will save all of the accumulated totals in the Previous Totals screen, and
restart all of the current counters to zero.
IMPORTANT: The EMU™displays the usage and cost
as recorded by the smart meter; these numbers may
differ from what is shown on your actual utility bill.
Since Dec 1
987kWh 14.5 days
$146.34 $10.09/day
Current Usage
10.123 kW
$ 1.2188/hr

www.rainforestautomation.com
EMU™
User Manual
15
Previous Totals
The Previous Totals screen shows your
accumulated totals for energy
consumption and estimated cost for the
previous time period. The start and end
dates of the previous time period are
shown at the top of the screen. The
number of days in the previous time period
(to the nearest one-tenth of a day) is shown in the upper right of the screen. The
average cost per pay for the previous time period is shown in the lower right of the
screen
This screen is overwritten with the values from the Total to Date screen each time the
current time period is restarted. If the current time period has not been restarted at
least once, then there will be no data values for this screen and it will not be displayed.
Current Price
The Current Price screen shows the price
for electricity or gas that is currently in
effect. The rate is shown in cents per unit.
The current price may be obtained from
the value you manually set in the Set Rate
screen. To manually set the current price
value, simply press and release both
buttons simultaneously. This will put you in Configuration Mode. Move through the
Restart screen and Select Language screen to get to the Set Rate screen, where you
can change the current price value. This new value will become the current price, and
the Rate Label will be displayed as “Set by User”. It is also possible to read the price
directly from the smart meter. If the meter supports this feature, then the EMU™ will
check the price with the meter every 2 minutes, and the current price value from the
meter will override any value that has been entered manually. If no price value has been
set –either by the smart meter or manually –then dashes are shown for the price digits.
For some utilities, the price can also be set by a special message sent to the meter by
the utility. This message will be displayed as a text message on the Message screen,
and the price will be automatically set. This will override any price value that has been
set manually.
Apr 27 to May 26
1987 kWh 30.0 days
$246.85 $8.23/day
Current Price
12.04¢/kWh
mid-peak

www.rainforestautomation.com
EMU™
User Manual
16
Message
The Message screen will display a text
message when there is a message from
your utility. Your EMU™ checks every
minute for a new message. When a new
message is received, the Indicator LED
Lights will flash in a special red-yellow
sequence to show that a new message is
waiting for you to see. The envelope icon will also appear in the upper left hand corner
of the screen to indicate that there is an active message. To see the message, use the
buttons to go to the Message screen, and the message will be displayed. A message
can be up to 100 characters long. If the message is longer than two lines, a
continuation character (“▼”) will be shown at the end of the bottom line, and the
message will automatically scroll up until the whole message has been displayed. Once
the end of the message is reached, it will start again after a short pause. If the
message requires an acknowledgment, you will automatically be sent to the Confirm
Message screen. Viewing the message resets the Indicator LED Lights back to the
usual flashing sequence for the current pricing status. However, the envelope icon will
remain on until the message has expired.
Confirm Message
The Confirm Message screen allows you
to send a confirmation to your utility, telling
them that you have read the latest text
message that they have sent to you. If you
wish to view the message again, press the
Top Button, and you will be sent back to
the Message screen. Once the message
has been displayed, you will be returned to the Confirm Message screen. To send your
confirmation, press the Bottom Button. You will then be sent to the Meter Reading
screen.
Confirm message
View message
Confirm
Message:
Your bill is past due.
Pleasecontact us at the ▼

www.rainforestautomation.com
EMU™
User Manual
17
EMU™ Configuration Screens
Restart
The Restart screen allows you to perform a
device restart by pressing the Top Button.
This will reboot your EMU™without losing
the connection to the smart meter. To
access this screen, press both buttons
simultaneously, then release.
Pressing the Bottom Button sends you to
the Select Language screen.
Select Language
The Select Language screen is used to
change the language displayed by your
EMU™. This screen can only be
accessed in Configuration Mode, after
going through the Restart screen. To
enter Configuration Mode, press and
release both buttons simultaneously.
Then press the Bottom Button to get to the
Select Language screen. The currently selected language will have an arrow beside it.
Press the Top Button to cycle between the different languages. Press the Bottom
Button to save the selected language. You will then be sent to the Set Rate screen.
Set Rate
The Set Rate screen allows you to
manually set the current price for electricity
or gas in cents per unit. This screen can
only be accessed in Configuration Mode,
after going through the Restart and Select
Language screens. The price shown will
zero, unless it has been previously set in
this screen. The rightmost digit of the price
will be flashing. To change this digit, press the Top Button and cycle through the
numbers 0-9 until the desired value is displayed. Then press the Bottom Button to save
SelectLanguage
English Select
Español
Français Accept
Set Rate
000.00¢/kWh Change
Keep
Restart?Restart
Skip

www.rainforestautomation.com
EMU™
User Manual
18
this digit. The next digit to the left will then be flashing. Repeat the process until all five
digits show the desired values. After the last digit is saved, your EMU™ will go to the
Battery screen.
The Green Indicator LED Light will flash once every 60 seconds, and the Rate Label will
read “Set by User”, while the manually set price is in effect. Note that using the Set
Rate screen to change the current price will have no effect if a current price value is set
by the smart meter.
Battery
The Battery screen indicates the charge level
of the batteries. Four bars indicates the
batteries have a good charge. Fewer bars
indicate the battery charge is reduced. The
batteries should be replaced if the Battery
screen shows only one bar.
Battery

www.rainforestautomation.com
EMU™
User Manual
19
Troubleshooting Guide
Generally, there are only 3 things that can go wrong with your EMU™:
1. The EMU™stops working, or
2. The batteries are depleted,
3. The EMU™cannot connect to the smart meter.
If the screen is dark and the unit does not respond to button presses, then either the
batteries are depleted (see Step 2 below) or the unit requires a restart (see Step 1).
If the bar graph in the upper right corner has been replaced by an “X”, then your EMU™
has lost connection to the smart meter (see Step 3).
Step 1. Check the EMU™
If the EMU™screen is not displaying anything, and the EMU™ does not respond to
button presses, then try restarting the unit.
To restart your EMU™:
a) Open the battery cover
b) Remove all of the batteries (removing just one battery is not sufficient)
c) Wait 10 seconds
d) Replace the batteries and cover
e) Check the display to verify EMU™is working
Step 2. Check the Batteries
If restarting the EMU™does not resolve the problem, confirm that the batteries are in
good working order and installed properly.
a) Check to make sure the batteries are installed in the same orientation as
indicated in the diagram of the battery compartment.
b) If the batteries are installed correctly and the EMU™is not functioning, get 4 new
AA alkaline batteries and install them as indicated.
c) Check that the EMU™is functioning correctly.

www.rainforestautomation.com
EMU™
User Manual
20
Battery Replacement
Your EMU™uses 4 AA batteries for power. To ensure a trouble-free experience
with your EMU™:
a) Replace the batteries when the battery indicator shows 1 bar.
b) Replace all batteries at the same time with new batteries.
c) Use new batteries with a current best before date.
d) Do not use rechargeable batteries unless they are marked as ‘rechargeable
alkaline’ and have a rating of 1.5V.
If your EMU™is still not working after replacing the batteries, contact Technical Support
(see below).
Step 3. Check the Smart Meter Connection
The wireless connection between your EMU™and the smart meter can be disrupted for
a variety of reasons.
Try the following:
a) Move the EMU™to a different location that is closer to the smart meter.
b) Move the EMU™away from wireless routers, cordless phones, microwave
ovens, or large metal objects.
c) Try different areas of your house and different orientations in each room until you
find one that works.
If there is a power outage in your neighborhood at the moment, please wait until power
is restored and try again.
Technical Support
Contact us at: 34 West 7th Avenue, Vancouver, BC, Canada V5Y 1L6
Web: www.rainforestautomation.com/emu_support
Other manuals for EMU
1
Table of contents
Other rainforest Household Appliance manuals