RainRider Softtop User manual

1
Use- and Assembly instructions
for your RainRider Softtop
Park position Drive position

2
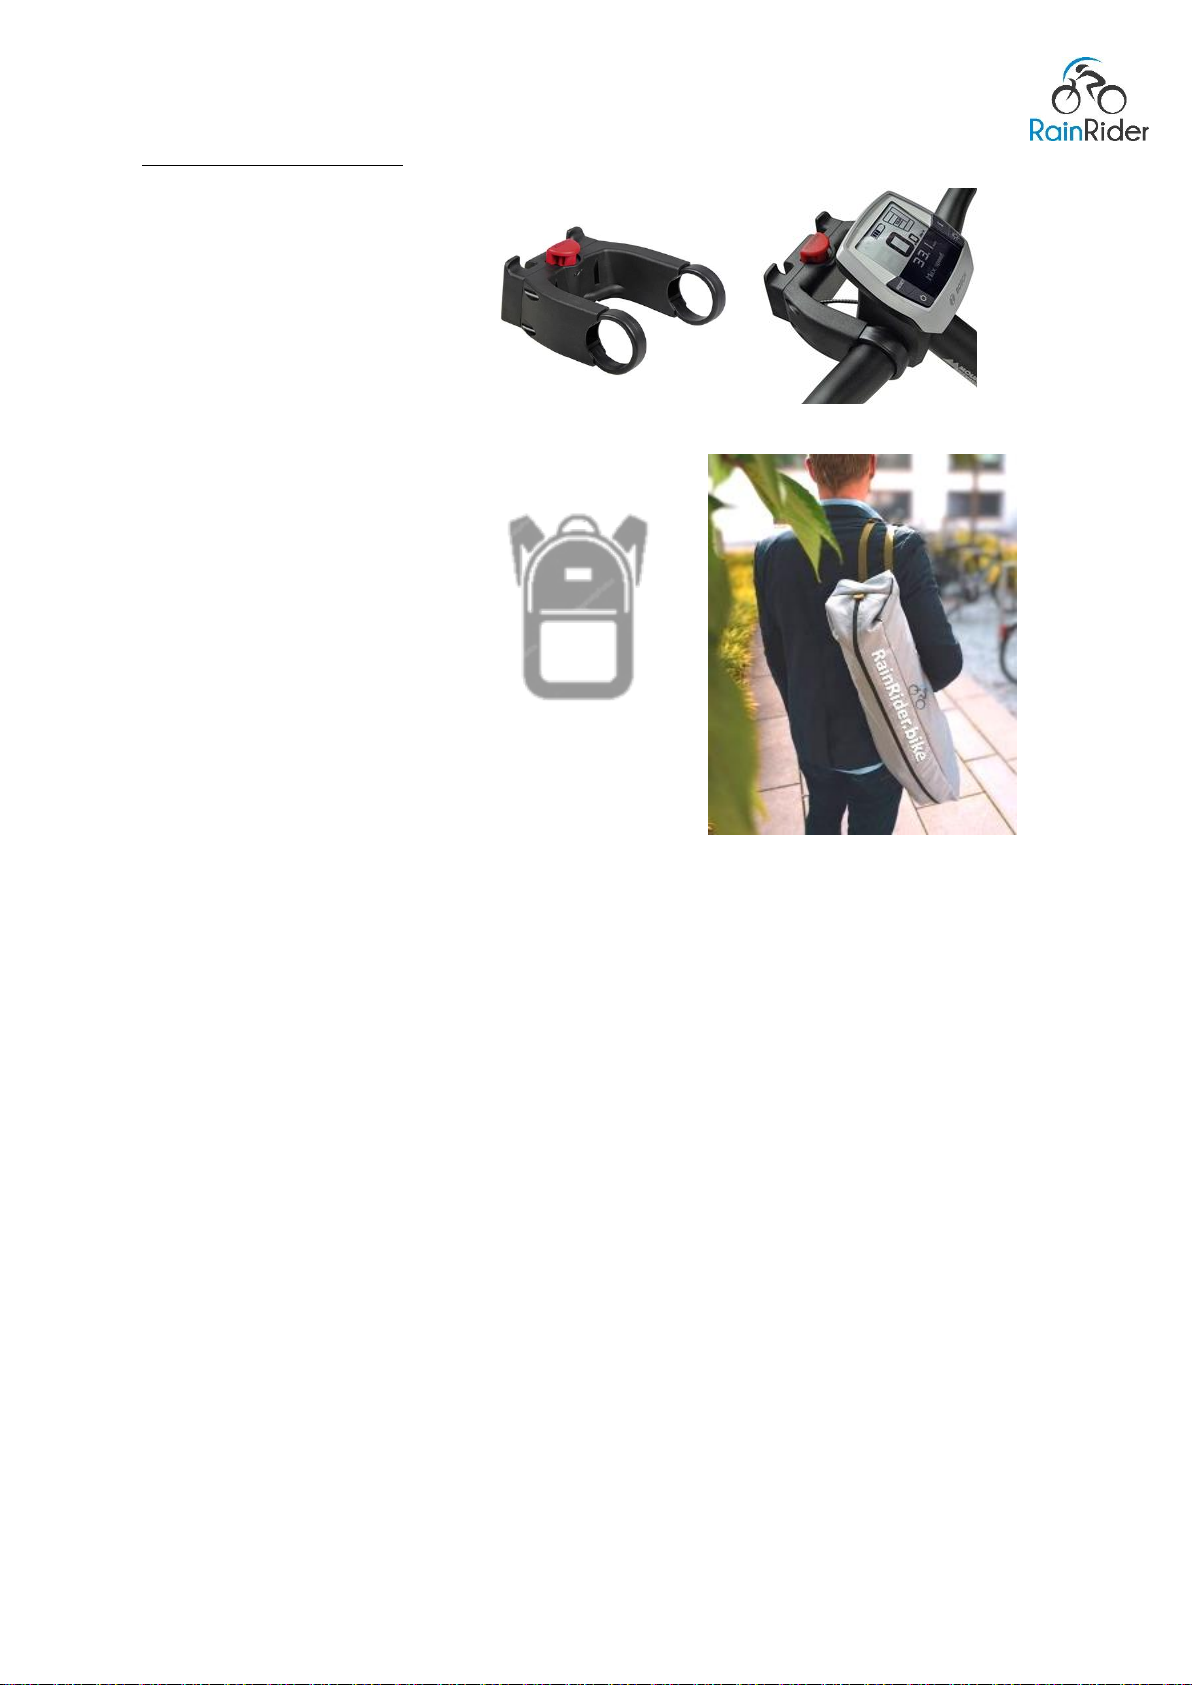
Klick Fix Adapter is needed :
Please buy a Klickfix Adapter fitting
for your Handlebar !
(Separate use instruction
in Original Packaging )
RainRider Backpack
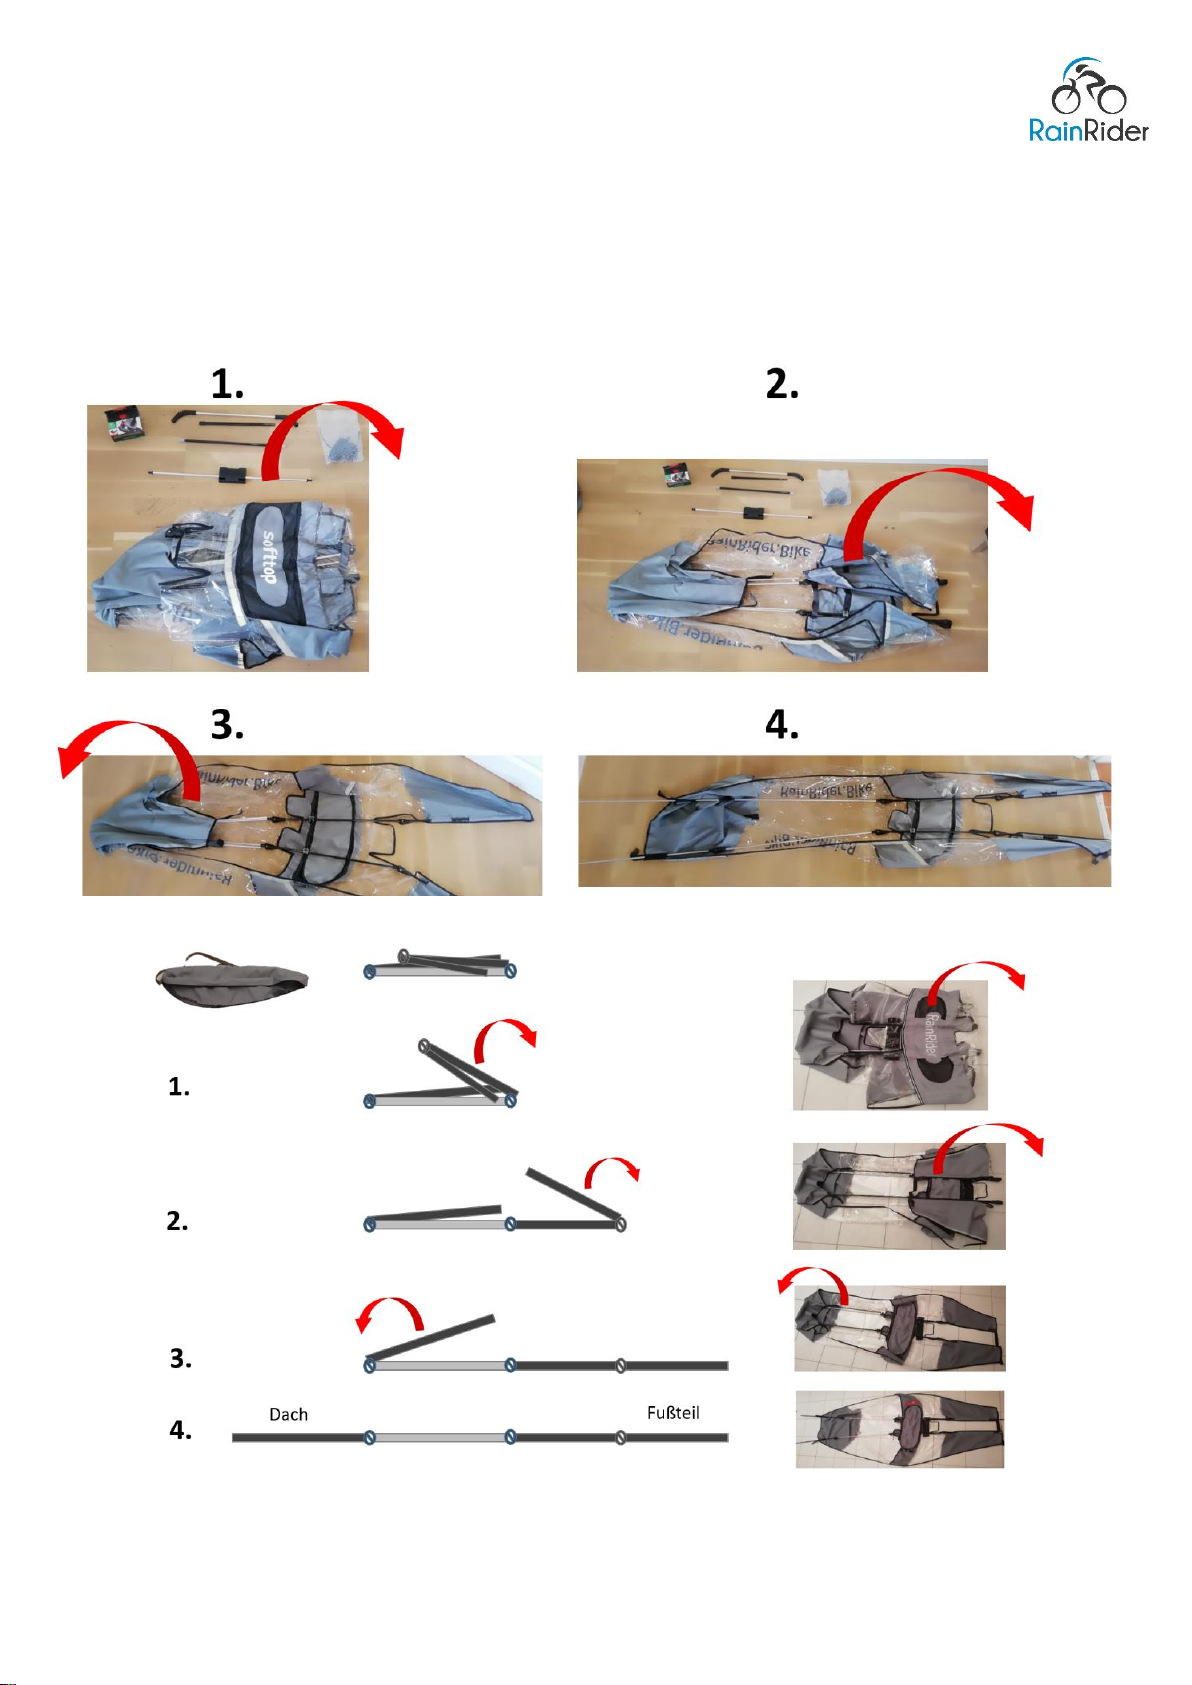
The first assembly takes about 5-10 minutes, then it is much faster, in a maximum of 1-2 minutes.
Alternatively, you can remove and put down your RainRider soft top completely assembled by
pressing the red button of your Klickfix Adapter.
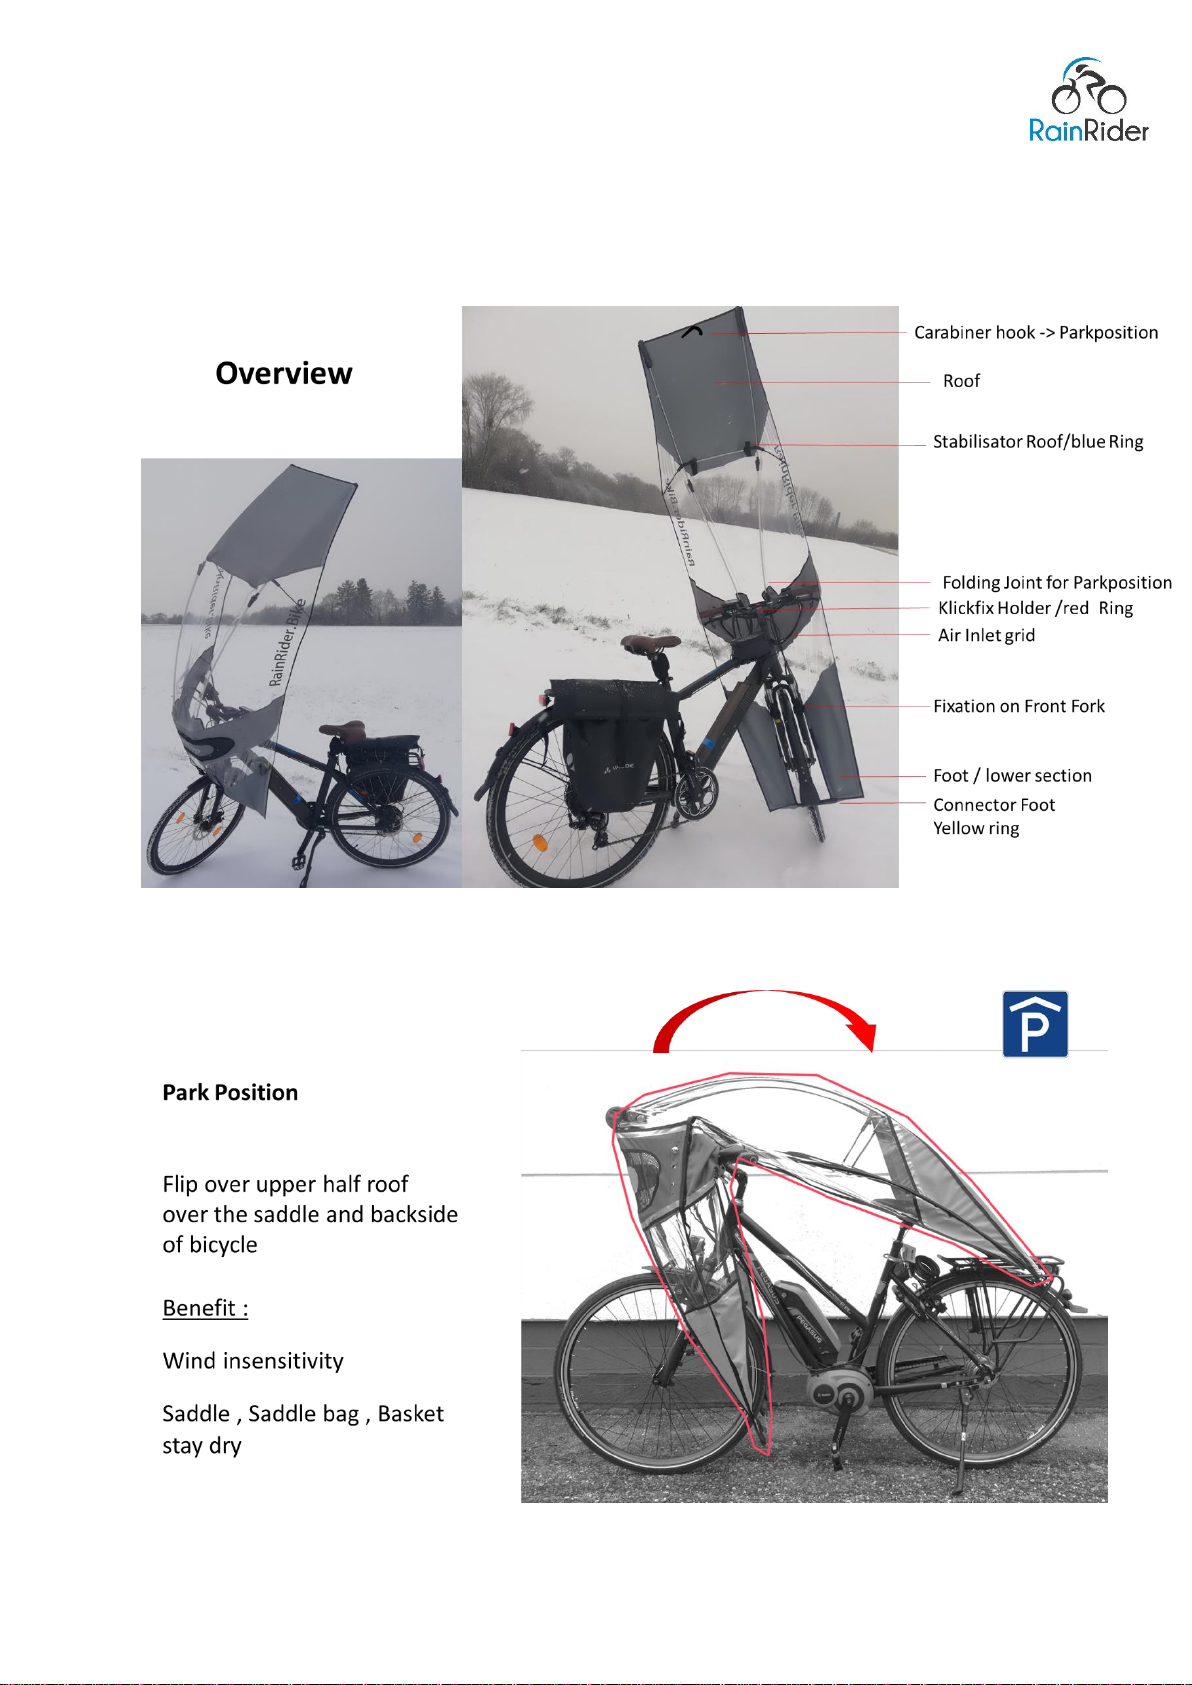
Or fold over / flip over your RainRider roof over your bike into the „parking position“ .
We congratulate you on your decision to purchase a RainRider soft top.
We are sure that you will have a lot of fun with this new to the world first in rain-/ weather
protection softtop shell for bicycle and that your expectations in terms of function, design and
quality will be more than met now and in the future.
In order to guarantee high satisfaction and long-term function of these accessories, the following
instructions for use should be carefully read prio to assembly. We would like to remind you that the
purpose of the RainRider for the user is to provide optimal protection in rain, cold and even in the
sunny conditions
It is a bicycle accessory that can be attached to almost any bike (26 "-28") with a handlebar diameter
of up to 31.8mm in its center. Its use is recommended for normal bikes and electric bikes of 0.25 kW
and 25 km/h of limited speed. RainRider must not be used for mountain bike rides, i.e. on unpaved
roads.
All of our products are equipped with the highest quality materials and the best components, taking
into account the latest manufacturing processes. Therefore, only use your RainRider according to the
associated area of application. See also chapters 8 and 9

3
Improper use can result in material damage and, under certain circumstances, serious accidents. We
would ask you to read these instructions carefully so that you can experience driving pleasure. For all
users it is necessary to have a basic knowledge of cycling and to exercise a healthy self-assessment.
Overconfidence can lead to serious injuries and accidents. Like any other sport, cycling is associated
with an increased risk of accidents. Always be aware of this.
If you have any questions, please contact our customer service / user support
Overview / Chapters :
1. Overview
2. Assembly Klickfix Handlebar-Adapter
3. Assembly and attachment of RainRider Softtop onto your bicycle
4. Parkposition RainRider
5. Quick STORAGE RainRider
6. Air Inletgrid / Anti Fog function
7. Stormstabilisator
8. Safety instructions
9. Warranty

4
1. Overview

5
2. Assembly Klickfix Handle Bar Adapter :
PLease order separately if not yet at your hands or already on your bicycle attached

6
3. Assembly instruction RainRider
Step 1
Open the backpack. Layout all the pieces on a clean floor
Following pieces should be available :
1) RainRider grey Textile skin with integrated Aluminium + carbon Fiber poles
2) Connector black pole for the Roof with blue ring
3) Adapterplate with 2 Aluminium poles für KlickFix Adapter
wtih red Ring on rigth side
4 ) Foot connector black pole in double T –shape with yellow ring
5 ) 2 cable ties / black for front fork fixation
6 ) 2 snap hook / grey, which will be connected with the 2 black cable ties on
your front fork
7 ) Stormstabilisator black

7
Step 2 : onfold the RainRider Softop Textile skin
Start to onfold in following sequence carefully :
Roof Foot

8
Step 3 : Assembly
We help you with a color marked-system
Connect Part No.4 connector foot double t-shape with yellow ring and put it into two
pockets of the textile skin outer left and right side bottom
Put first the black pole into the right pocket , connect with long pole with yellow ring ( so both yellow
ring come together -> fit with each other ) and then the other pole into the left pocket and connect
as wellt he long pole with t-shape connector.
The close the velcro at the lower back side and tie it firmly .

9
Step 4 : Move Metal handle in correct Position
This is an extremely important assembly step . If the handles are not in the right position
the next assembly steps can not be succesfully performed .

10
Step 5 : Assembly back pole conncetor No. 2 on roof with blue ring
Put the black pole with blue ring into the opening of the joints left and right on the roof.

11
Step 6 : Roof assembly and stretching of the overall skin structure of the softtop
This is a very important and challenging assembly step . The overall stretch of the structure
will be generated with the force of your hands.
Both of the long poles should be pre assembly in the factory and should look through the
velcro tunnels .
Stretch the skin with your right hand by pulling the black pole downwards with force .
Close the velcro with your left hand by maintaining the force of the black pole with your right hand
The skin shoud now have a stretched structure .
-> Repeat the same procedure on the left side

12
Step 7 : Adapterplate for Klick Fix ( No. 3 ) with red ring on right side
1. Assemble the aluminium pole with the black tips and red ring on the left red pocket /
metal hole in the outer skin.
2. Assemble the left side into the the black textile pocket / metal hole
There are two holes for your individual height adjustment in that metal pocket.
Now you can adjust as you like but on both sides always same position ( upper or lower ).
Smaller driver -> upper position
Taller driver -> lower position
There should be enough head space over your helmet

13
Your RainRider Softtop is now nearly ready to ride and should look like this .
Step 8 : Preparation to fix it at your front fork
Now we start to prepare the fixation at your front fork individually fitting to your bicycle.
Take Part No. 5 ( cable tie 2 pieces black ) and No. 6 ( 2 grey snap hooks ) out of the plastic bag.
Tie one grey hook together with the cable tie around your left front fork . But do not pull cable tie
tight to enable to adjust it later .
Do that also for the right front fork .
In the grey snap hooks both of your lower black carbon fiber poles of the RainRider softtop will be
snapped in and fixed in a secure way while driving and maintaining gap to front wheel.
FRONTFORK

14
Step 9 : Now you can attach your softtop onto your bicycle.
Take the softtop and drive it into your bicycle through the middle opening.
Lift the Softtop and click in into the KlickFix adapter

15
Step 11
Very important Saftey advice!
The grey hook opening should look to you when you sit on the saddle
Now snap in the black carbon fiber poles into the grey hooks

16
Now adjust the softtop for the right and sufficient distance between front wheel and Softtop lower
black pole . The front wheel should never touch the softtop. A gap of 2-3 cm is a good target
Now please check if all brake levers and such are able to move freely , working properly and are not
impacted by the softtop. Please check this by turning the handle into both sides fully left and fully
right. Also please assure that your front light and bell is working as usual.

17
IMPORTANT SAFETY ADVICE !
The lower joints left / right on both sides have to be in the right, oriented position !
Check if both joints left and right are in the right orientation . The fixation side has to look to
you when you are driving .
Both joints are so called „locked“ joints , means they are locked when a force pulls them
together . This is a saftey feature for you to ensure safe driving when locked
When you want to disassemble for storage then pull the poles on both side to enable
„unlocking“ of the joint . Then folding is possible
Ready to Go for a Rain ride

18
4. Parkposition Feature
Parkposition
You have to turn the two metal handle bars by 180 degrees toards the outside
WARNING INSTRUCTION
There a two modes for the metal handle
a ) DRIVING modus : both metall handles look to --> <-- each other
b) PARKING mode : both metal handles look to the outside <-- -->

19
To go into parking position mode, both metal handles need to be turned by 180 degress to
the outside . If you support the roof by one hand while turning the metal hanlde with the
other hand , this is much easier and needs less hand-turing-force . Now you can place the
folded roof over your saddle and your saddle and backpack will stay protected and dry .
To go back to driving mode, pull the roof up by hand and turn both metal handles back to the
„driving“ position.
Both metal handles look to each other -- > < --
The softtop is locked and firmly fixed to enable safe driving

20
WARNING INSTRUCTION
Both metal handles look to each other -- > < --
The softtop is locked and firmly fixed to enable safe driving
The lower joints are in the right „locked“ position
ADVICE :
Protection of your softtop skin textile when metal handles are in Parking mode
To ensure longevity of your textile skin we have designed the front grid velcro cover with two
protection ears . This second layer under the metal handle protects the textile as the metal
handle might put pressure towards the textile skin in Parking mode
You might need to adjust the front grid cover for the right postion / location so the ears are
below the metal handle :
Table of contents