Raz Zum-AP User manual

RQD032ENr02 Rev. Date: 2021-12-24
Mobile Shower
Commode Chairs
Züm-AP (Z111)
Züm-SP (Z222)
User and Dealer
Manual
BASIC UDI-DI: 628758RAZDESIGNINC2004V9

RQD032ENr02 Rev. Date: 2021-12-24
2
SAFETY PRECAUTIONS
Failure to comply may cause injury or damage!
It is important that the Züm-AP/SP Mobile Shower Commode Chair be properly
assembled and that all adjustments be made carefully. Please ensure that the
user(s), dealer(s) and attendant(s) have read this manual and thoroughly
understood the safe operation of the Züm-AP/SP Shower Chair. Up-to-date
manuals are available online at www.razdesigninc.com. For clarification of any
section of the manual, contact your distributor or the manufacturer.
MANUFACTURER
U.S.A. AND WORLDWIDE
Raz Design Inc.
135 Railside Rd. Toronto, ON, Canada, M3A 1B7
1.877.720.5678 / 416.751.5678
PRODUCT
MAXIMUM USER WEIGHT
Züm-AP/SP
160 kg (352 lbs)
SAFETY WARNINGS TO CONSIDER FOR RETAIL PURPOSES
THIS DEVICE IS SUITABLE FOR TYPE A; HIGH USAGE (e.g. INSTITUTIONS) AND SHOULD
NEVER BE USED FOR ANY PURPOSE OTHER THAN ORIGINALLY INTENDED
Forward Stability
The casters on all models are equipped with dual locks. The step-on lever
activates both the roll lock and the swivel lock. It is essential that all
casters on the shower commode chair be in an outward position
before engaging the locks, for optimal forward, rearward and lateral
stability.
USERS MUST NOT lean forward while sitting in the Züm-AP/SP as this
may cause the chair to tip forward.
USERS MUST NOT wheel up or down a ramp without an attendant who
can hold onto the Züm-AP/SP during the ascent or descent.
CASTER LOCKS AND WHEEL LOCKS ARE NOT BRAKES! Never
use the caster locks or wheel locks to slow down the Züm-AP/SP
when descending inclines as this could cause the chair to tip in the
direction of travel.
Lateral Stability
USERS MUST NOT lean over the edge of the Züm-AP/SP as this could
cause the chair to tip.
USERS MUST NOT attempt to pick up objects from the floor by leaning
over and reaching –a reacher or grabber tool should be used, or seek
assistance from an attendant.

RQD032ENr02 Rev. Date: 2021-12-24
3
USERS MUST NOT position the Züm-AP/SP on a side slope as this could
cause it to tip.
Rearward Stability
USERS MUST NOT wheel up an incline on a SP Model without ensuring
that the optional rear anti-tippers are in place. The optional anti-tippers
must be ordered with the Züm-SP and properly installed before wheeling
on uneven surfaces.
Anti-Tippers - SP Model
Anti-tippers are an option for the Züm-SP Shower Chairs. These are
recommended whenever the chairs are to be used on uneven surfaces
such as ramps or sloped floors, when used by lower-limb amputees, when
the rear wheels are moved forward from the factory-set position or for any
situations when rearward stability is compromised. If unsure, stability
should be checked with the assistance of an attendant.
Ramps and Other Inclines
Ramps or other surfaces that are not level (such as slopes into wheel-in
showers) must be tested with an attendant to ensure the stability of the
chair is not compromised. A qualified healthcare professional should be
consulted to assist with this process.
DO NOT push or pull the Züm-AP/SP up or down an incline or ramp
that exceeds a 1:12 grade (5° slope).
DO NOT allow any user to be propelled (pushed or pulled) in any other
manner than by an attendant in a Züm-AP or by the user in a Züm-SP.
IMPORTANT !
THE REARWARD STABILITY OF THE Züm-SP IS AFFECTED BY THE MOUNTING LOCATION OF
THE REAR WHEELS AND THE PHYSICAL AND CLINICAL CHARACTERISTICS OF THE USER. THE
NEED FOR ANTI-TIPPERS SHOULD HAVE BEEN DETERMINED AT THE TIME OF THE
PRESCRIPTION OF THE Züm-SP WITH CONSIDERATION FOR THE USER’S PHYSICAL
ATTRIBUTES AND ENVIRONMENT. ANTI-TIPPERS MAY BE ORDERED AS A RETROFIT AT ANY
TIME IF IT IS DETERMINED THAT THEY ARE REQUIRED.
Immersion
The Züm-AP/SP is not designed to be used as a pool chair. Do not immerse the shower chair in whole or in
part, in water or any other liquid. Damage to the shower chair components may result.
Transfers
The most dangerous part of using any shower chair is the transfer. Since every chair has different stability
characteristics, it is essential to carefully review and test the transfer technique to ensure that the procedure is
safe. Test transfers should be performed with an attendant who can prevent the chair from tipping or moving
during the transfer. If you feel that the transfers cannot be repeatedly performed safely, contact a healthcare
professional whois familiar with transfer techniques and options. Individuals who have notlearned safe transfer
skills must seeks assistance during transfers and may require the use of a mechanical lift.

RQD032ENr02 Rev. Date: 2021-12-24
4
Transferring onto the Züm-AP/SP Shower Chair
For the Züm-AP, always lock all four casters in their outward position
(front casters positioned in the forward position/rear casters positioned
to the rear) for maximum chair stability. For the Züm-SP, always lock the
rear wheels and front casters for maximum stability.
Transfers should never be attempted with the shower chair
positioned on slippery surfaces. It is recommended that transfers be
performed on clean, dry, non-slippery surfaces. Hard surface flooring
such as tile, wood or concrete may not provide sufficient grip to keep
locked castersfrom sliding. A fully-carpeted surface is optimal. Be aware
that area rugs and shower mats can slide on floors and thereby present
a hazardous surface.
DO NOT stand on any part of the frame of the Züm-AP/SP.
NEVER use the footplates to assist in transfers. This could cause the
chair to tip. The footrests should be swung to the side or removed
entirely during transfers to provide unobstructed access to the Züm-
AP/SP.
The Züm-AP/SP is NOT intended for use as a transportation device or
a long-term seating system.
IMPORTANT !
USERS SHOULD NEVER BE LEFT UNATTENDED IN A RAZ SHOWER CHAIR.
IMPORTANT !
DO NOT LIFT A RAZ SHOWER COMMODE CHAIR AND OCCUPANT BY THE ARMRESTS OR
FOOTRESTS.
IMPORTANT !
ALWAYS BE SURE THAT THE SEAT IS
PROPERLY INSTALLED AND LATCHED. THE
REAR HOOKS MUST BE FULLY ENGAGED AND
THE FRONT BRACKETS MUST BE LATCHED
AND LOCKED AROUND THE FRONT SEAT
SUPPORT TUBES.
BE SURE THAT WHENTHE CHAIR IS DELIVERED
TO THE CLIENT, SEAT INSTALLATION
INSTRUCTION IS GIVEN TO THE CLIENT AND/OR
CAREGIVERS.

RQD032ENr02 Rev. Date: 2021-12-24
5
IMPORTANT !____________
THE ZUM-AP AND ZUM-SP IS INTENDED FOR FOLLOWING USE:
•AS AN AID FOR SHOWERING/BATHING, GOING TO THE TOILET, AND FOR OTHER
ACTIVITIES ASSOCIATED WITH PERSONAL CARE AND PERSONAL HYGEINE;
•TO PROVIDE SUPPORT FOR THE BODY OF THE USER IN A SEATED POSITION;
•WITH OR WITHOUT THE ASSISTANCE FROM A CAREGIVER;
•OVER A STANDARD TOILET, OR AS A COMMODE WITH THE COMMODE PAN;
•IN INDOOR ENVIRONMENTS ONLY;
•IN BOTH TYPE A, HIGH USAGE (e.g. INSTITUTIONAL) ENVIRONMENTS AND IN HOME
ENVIRONMENTS
THE ZUM-AP AND ZUM-SP DOES NOT PERFORM ANY THERAPEUTIC OR DIAGNOSTIC
FUNCTIONS, AND ARE NOT INTENDED FOR USE FOR ANY THERAPEUTIC OR DIAGNOSTIC
PURPOSES. ALL PRODUCTS MANUFACTURED BY RAZ DESIGN ARE NON-STERILE,
REUSABLE, NON-INVASIVE, AND NON-IMPLANTABLE.
THE ZUM-AP AND ZUM-SP IS INTENDED TO BE USED BY PEOPLE WITH MOBILITY
IMPAIRMENTS, WHO MAY HAVE DIFFICULTY IN STANDING OR KEEPING THEIR BALANCE
WHILE COMPLETING ACTIVITIES SUCH AS SHOWERING, GOING TO THE TOILET, OR
PERSONAL HYGIENE. TYPICAL USERS HAVE LIMITED ENDURANCE AND POSTURAL
CONTROL, AND MAY REQUIRE ASSISTANCE FROM A CAREGIVER FOR ACTIVITIES SUCH
AS SHOWERING, GOING TO THE TOILET, OR PERSONAL HYGIENE.
CAUTION !__________
RISK OF BURNING YOUR SKIN
THE PRODUCT COMPONENTS CAN HEAT UP WHEN EXPOSED TO EXTERNAL
SOURCES OF HEAT.
•SURFACES MAY BECOME HOT WHEN USING THE SHOWER AND TOILET
CHAIR WHEN IT IS EXPOSED TO HOT WATER
•DO NOT EXPOSE THE PRODUCT TO DIRECT SUNLIGHT BEFORE USE

RQD032ENr02 Rev. Date: 2021-12-24
6
We have improved the design of our front seat brackets. Similar to the original design in its provision of
stability, this design also provides improved durability and functionality.
Please refer to the above image for the installation procedure.
Note: Please install the Phillips Pan Head Screws by hand. The use of power tools may cause the bracket to
deform.
After installation, ensure the brackets are secured onto the seat. Open and close the brackets to check for
proper functionality.
Always be sure that the seat is properly installed and latched. The rear hooks must be fully engaged and the
front brackets must be latched and locked around the front seat support tubes.
TORONTO, CANADA
FRONT SEAT BRACKET INSTALLATION (IF APPLICABLE)

RQD032ENr02 Rev. Date: 2021-12-24
7
Table of Contents
1.0 GENERAL INFORMATION............................................................................................................................................... 8
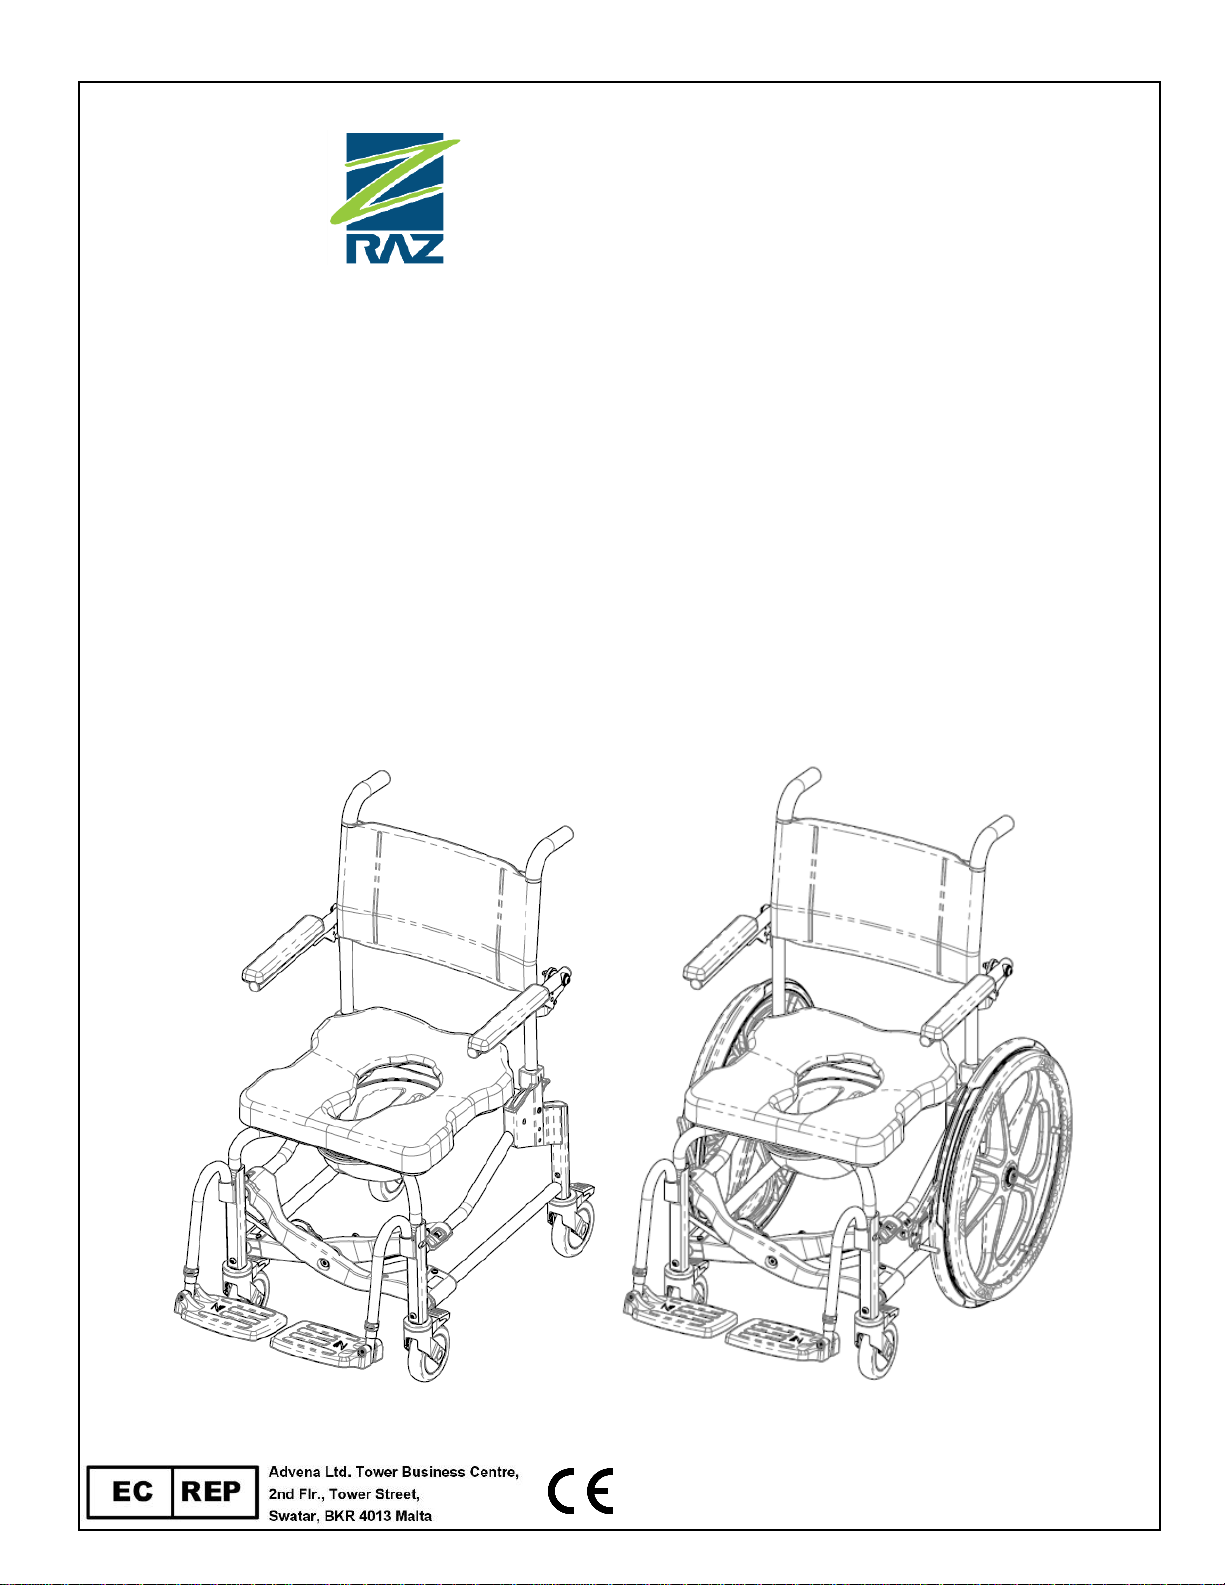
1.1 Züm-AP/SP Overview ................................................................................................................................................ 8
1.2 Züm-AP/SP Specifications.......................................................................................................................................... 8
2.0 SET-UP ........................................................................................................................................................................... 9
2.1 Base Frame Set-Up .................................................................................................................................................... 9
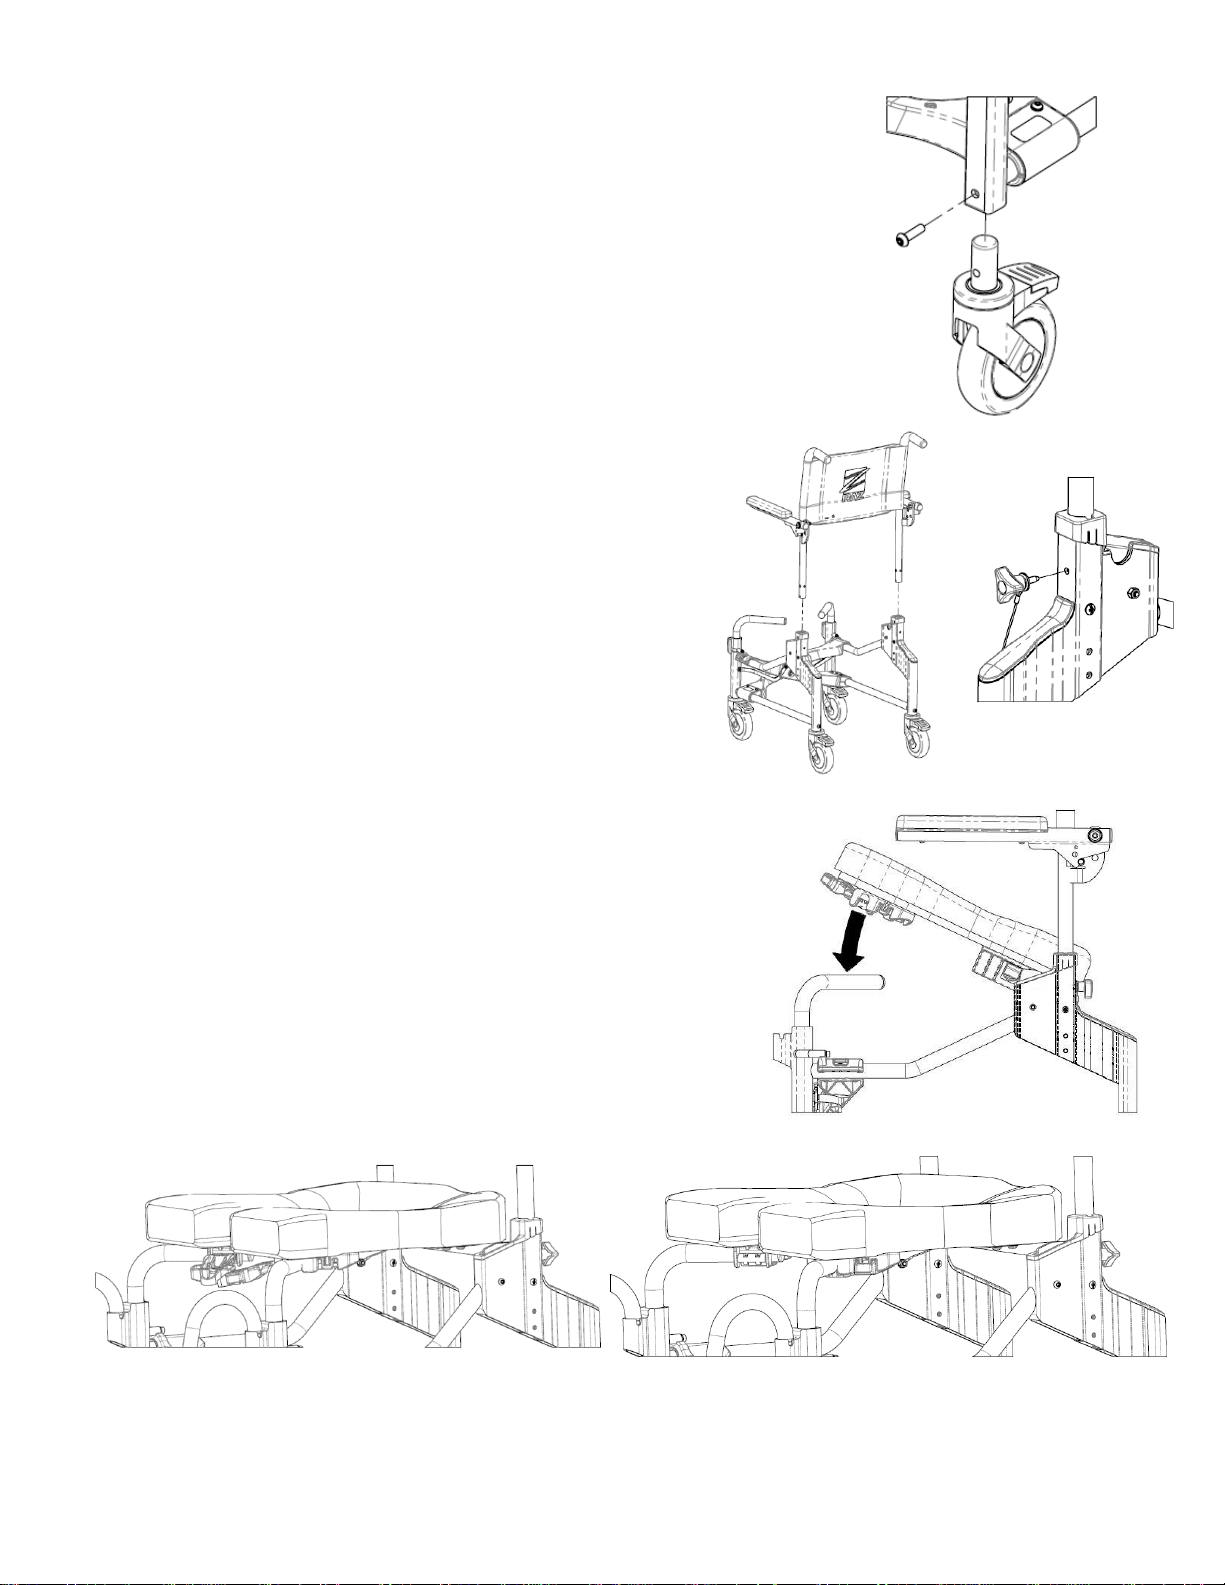
2.2 Caster Installation.................................................................................................................................................... 10
2.3 Backrest Installation................................................................................................................................................ 10
2.4 Seat Installation....................................................................................................................................................... 10
2.5 Adjustable Footrest Installation.............................................................................................................................. 11
2.6 Wheel Installation –Züm-SP ................................................................................................................................... 11
2.7 Fastener Installation................................................................................................................................................ 11
3.0 ADJUSTMENTS............................................................................................................................................................. 12
3.1 Ischial Pelvic Alignment System (IPAS) –Adjustment............................................................................................. 12
3.2 Footrest Adjustment ............................................................................................................................................... 13
3.3 Wheel Lock Adjustment –Züm-SP .......................................................................................................................... 13
3.4 Rear Wheel Adjustment –Züm-SP.......................................................................................................................... 13
4.0 USE AND OPERATION.................................................................................................................................................. 14
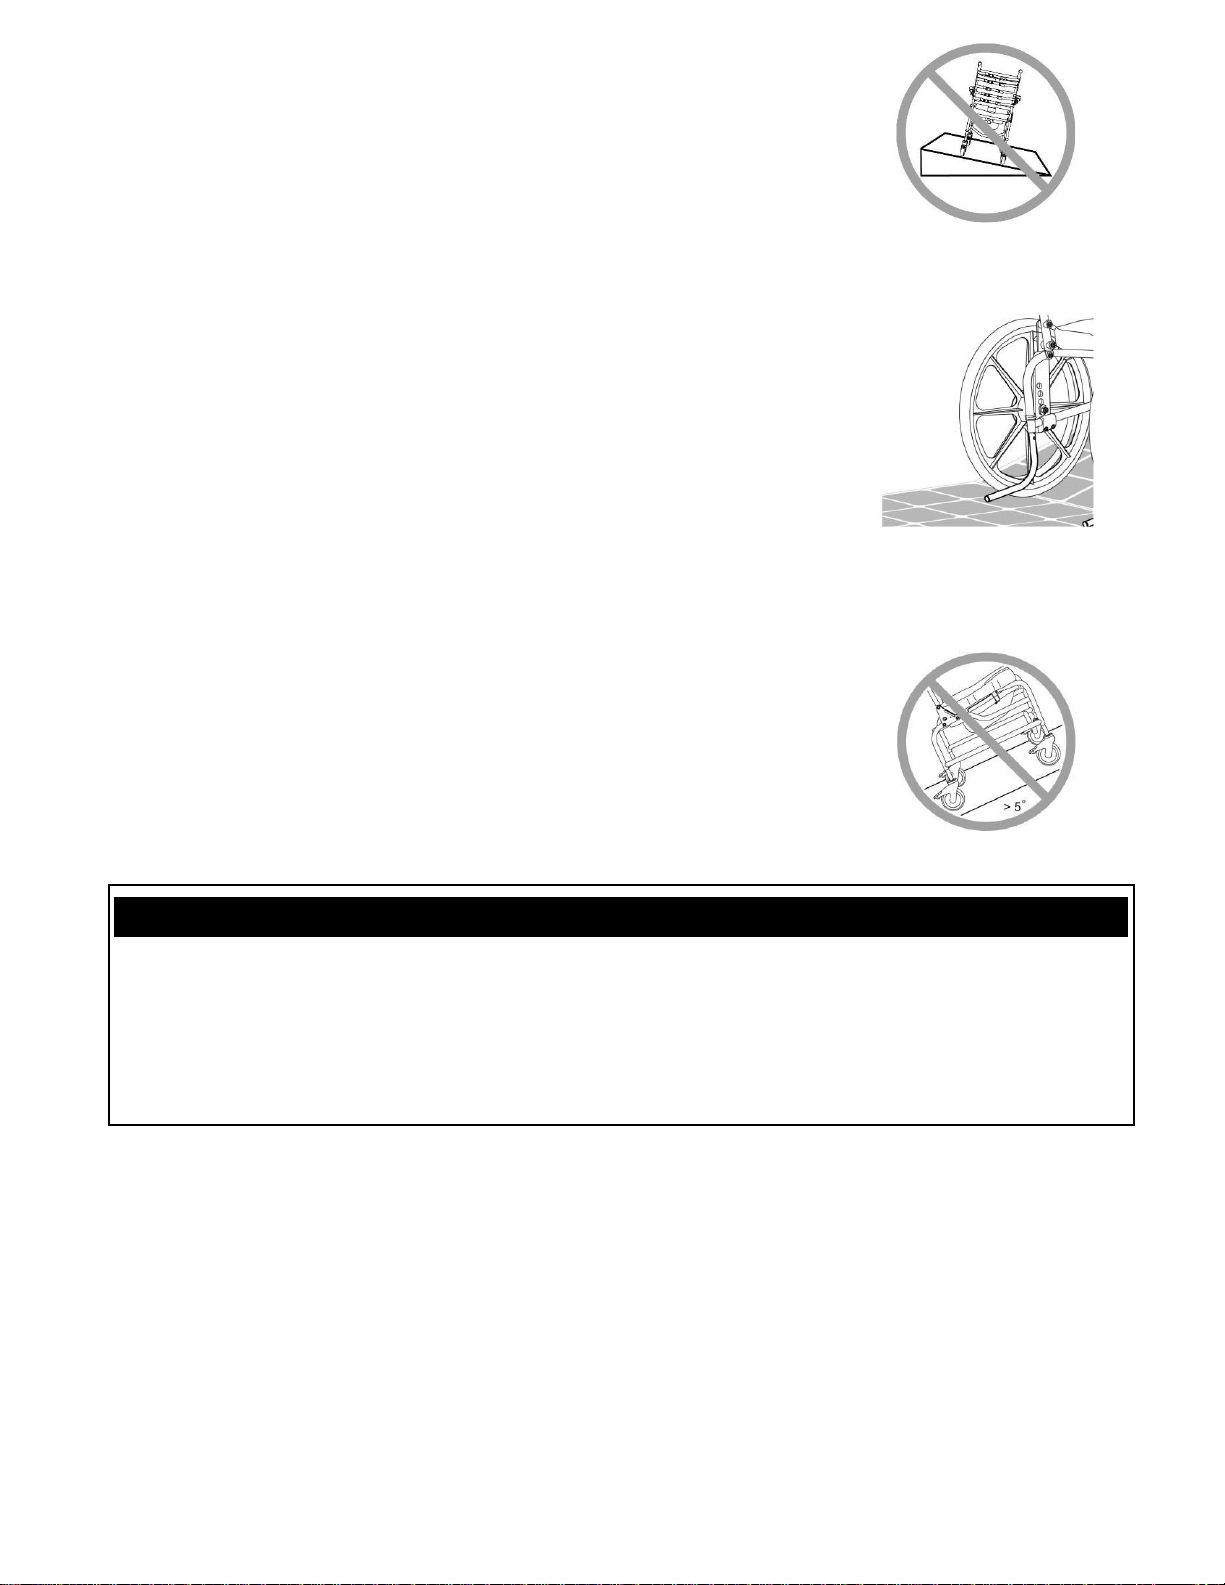
4.1 Casters..................................................................................................................................................................... 14
4.2 Wheel Locks............................................................................................................................................................. 14
4.3 Commode Pan ......................................................................................................................................................... 14
5.0 CLEANING AND MAINTENANCE .................................................................................................................................. 15
5.1 Cleaning After Each Use .................................................................................................................................... 15
5.1.1 Commode Pan ................................................................................................................................................ 15
5.1.2 Seat................................................................................................................................................................. 15
5.2 Cleaning As Needed........................................................................................................................................... 15
5.2.1 Frame, Armrests, Adjustable Footrests, and Other Components.................................................................. 15
5.3 Suggested Cleaning Products ............................................................................................................................ 15
6.0 LIMITED WARRANTY.................................................................................................................................................... 16
7.0 CONTACTS ................................................................................................................................................................... 17

RQD032ENr02 Rev. Date: 2021-12-24
8
1.0 GENERAL INFORMATION
1.1 Züm-AP/SP Overview
1.2 Züm-AP/SP Specifications
SPECIFICATIONS
Züm-AP
Züm-SP
WEIGHT CAPACITY
160 kg (352 lbs)
FRAME WIDTH
47 cm (18.5”)
OVERALL WIDTH
59 cm (23.25”)
64 cm (25.25”)
OVERALL LENGTH
(with footrests)
86 cm (34”)
100 cm (39.5)
SEAT WIDTH
46 cm (18”)
SEAT TO FLOOR HEIGHT
55 cm (21.5”)
CLEARANCE HEIGHT
With pan brackets:
Without pan brackets:
44 cm (17.25”)
45 cm (17.75”)
ARMREST HEIGHT ABOVE SEAT
20 cm (8”)
PRODUCT WEIGHT
(with footrests)
20 kg (44 lbs)
26 kg (57 lbs)
FRAME MATERIAL
POWER COATED ALUMINUM
MINIMUM TURNING CIRCLE
(with footrests)
97 cm (38”)
142 cm (56”)
Hand Grips
PVC Back
Upholstery
Seat
Dual-Lock
Casters
Adjustable
Footrests
Wheel-Locks
Rear Wheels
Foldable
Frame

RQD032ENr02 Rev. Date: 2021-12-24
9
Step 1
Step 2
Step 3
Step 1
Step 2
Step 3
Step 4
2.0 SET-UP
2.1 Base Frame Set-Up
Follow these steps to unfold the Züm:
1. Rotate front seat support tubes to their outward position.
2. Using your palms, unfold frame by gently pushing down and outward onthe upper portions of the cross-
braces until they hook onto the upper side frame tubes.
Be careful not to pinch your hands in the process.
3. Rotate front support tubes inward until the roller pin rides over the bump on the upper portion of each
cross-brace and prevents them from lifting.
An audible click should be felt and heard when the roller pin is securely in place.
Follow these steps to fold the Züm:
1. Rotate front seat support tubes to their outward position.
2. Lift both upper cross-braces at the same time.
3. Continue lifting until upper portions of cross-braces touch.
4. Rotate front seat support tubes until they are parallel to the side frames.

RQD032ENr02 Rev. Date: 2021-12-24
10
2.2 Caster Installation
Tool required: 5mm hex key
1. Insert the caster stem into the base frame.
2. Align the threaded hole in the caster stem with the hole in
the base frame.
3. Insert the M8 button head screw into the caster housing.
Ensure each screw has a thread-lock patch of medium strength
thread-locker solution on its threads before using.
4. Thread the M8 screw through the base frame and into the
caster stem.
5. Ensure the screw is tightened and caster is secure.
6. Repeat steps 1 to 5 until all casters are secured.
Note: Two front casters are required for Züm-SP and four casters are
required for Züm-AP.
2.3 Backrest Installation
1. Insert the back posts into the back frame receivers.
2. Align the threaded hole in the back post with the hole on the
back frame receiver.
3. Thread the tri-lobe into the receiver and back post.
4. Ensure the tri-lobe is tightened and back post secured.
5. Repeat steps 2-4 for the other side.
2.4 Seat Installation
1. Ensure that the front brackets are in the open position.
2. Position the seat at a ~25° angle with the rear of the seat
sloping downward.
3. Align the latch plates (located on both ends of the rear seat
tube) with the receiver slots in the base frame. The slots are
located immediately in front of the back posts.
4. Lower the front of the seat so the front seat brackets nestle
around the front support tubes.
5. Close the front seat brackets.
6. Pull upwards on the rear of the seat to ensure it is locked in
place.
SEAT INSTALLED (UNLATCHED)
SEAT INSTALLED (LATCHED)

RQD032ENr02 Rev. Date: 2021-12-24
11
2.5 Adjustable Footrest Installation
1. Place the footrest hanger tubes into thereceivers at thefront
of the frame.
If the foot supports are oriented forward, the pins on the foot
support hangers will engage with the grooves in the receivers
and lock in place.
2.6 Wheel Installation –Züm-SP
1. Remove the hub cap on the wheel and discard.
Hub caps are not compatible with quick-release axles.
2. Insert the quick-release axle through the wheel and axle
receiver.
3. Ensure the ball ends of the quick-release axle are fully
released and prevent the quick-release axle from
inadvertently sliding out.
To test that the quick-release axle is locked in place, release the
button and attempt to pull the wheel away from the chair. The wheel
should remain in place. If the wheel cannot be secured in place, do
not use the Züm-SP and contact your detailer immediately.
4. Repeat steps 1-3 for the other side.
2.7 Fastener Installation
All fasteners should be installed securely. Locknuts that are
removed for any reason may need to be replaced rather than
re-used. Check performance of locknuts when re-attaching to
screw. There should be significant, detectable resistance when
tightening. If not, replace the locknut with a new one. It is
advisable to check quarterly that all fasteners are secure.

RQD032ENr02 Rev. Date: 2021-12-24
12
3.0 ADJUSTMENTS
IMPORTANT !
ADJUSTMENTS SHOULD NEVER BE ATTEMPTED WITH THE USER IN THE CHAIR.
3.1 Ischial Pelvic Alignment System (IPAS) –Adjustment
The seat has approximately 5 cm (2”) of fore/aft adjustment which allows optimal positioning of the seat
aperture around user’s Ischial Tuberosities.
Tool Required: #2 Phillips screwdriver
1. Release the seat by opening the front seat brackets.
2. Lift the front of the seat and pull upward and then forward to remove the seat from the chair.
3. Loosen (but do not remove) the eight screws attaching the front seat brackets and rear seat brackets to
the underside of the seat. Note: Rear seat brackets shown below without commode pan brackets for clarity.
4. Place the seat back in position on the frame and close the front seat brackets around the front seat
support tubes.
5. Slide/wiggle the seat to the desired position.
6. Ensure rear seat brackets are firmly positioned against the rear seat support tube.
7. Tighten all eight screws attaching the front and rear seat brackets to the seat to prevent further
movement of the seat. Note: Ensure the front and rear seat brackets are securely latched around the front and
rear seat support tubes before allowing a user to transfer into the chair.
Front
Seat
Bracket
Rear
Seat
Bracket
Seat in rear position
Seat in forward position

RQD032ENr02 Rev. Date: 2021-12-24
13
3.2 Footrest Adjustment
1. Remove plastic snap-pin from the footrest hanger tube.
2. Adjust the footrest extension tube vertically to achieve the
desired position.
3. Insert the snap-pin back through the footrest hanger and
extension tubes.
4. Repeat steps 1-3 for the other side.
3.3 Wheel Lock Adjustment –Züm-SP
Tool Required: 4mm hex key
1. Loosen (do not remove) the two clamp screws.
2. Engage the wheel lock and shift it along the frame so it
engages with the wheel and stops all wheel movement.
3. Tighten the clamp screws.
3.4 Rear Wheel Adjustment –Züm-SP
Tools Required: 4mm hex key, 25mm open wrench, 30mm wrench
The Züm-SP can be ordered with either 22” or 24” rear wheels.
The axle mounts allow for two vertical mounting positions:
Lower position for 22” wheels
Upper position for 24” wheels
There are also three positions for fore/aft adjustment of the wheel:
In line with back post
As shipped
25 mm (1”) behind back post
Left and right receivers must be
switched to achieve this position.
25 mm (1”) in front of back post

RQD032ENr02 Rev. Date: 2021-12-24
14
4.0 USE AND OPERATION
4.1 Casters
Each caster is equipped with a dual-lock feature, which stops
the caster from swiveling and rolling simultaneously. To activate
the dual-lock, step on the end of the caster brake until it latches
in the “on” position. To deactivate the dual-lock, step on the
raised end of the dual-lock until it latches in the “off” position.
4.2 Wheel Locks
The wheel locks on a Züm-SP can be engaged by pushing the
handles forward. This stops the rear wheels from rotating. For
maximum stability, both wheel locks must be engaged. To
disengage the wheel locks, pull the handles backward.
4.3 Commode Pan
The Raz commode pan is designed with an elongated shape
that fits directly under the seat to minimize back splash. A
unique splash-reduction ridge is located at the center of the pan.
The high gloss surface facilitates cleaning and rinsing, while the
pouring spout and handle facilitate emptying. Removal of the
commode pan is achieved by sliding the pan rearward.
When re-inserting the pan, ensure that the pan is guided into the green
plastic brackets and pushed forward until it hits the stops.
IMPORTANT !
DO NOT USE ABRASIVE SCRUBBING POWDERS OR SCOURING PADS ON THE Züm-AP/SP.
DO NOT SUBMERGE THE Züm-AP/SP IN WATER.
RINSE THOROUGHLY AFTER CLEANING TO ENSURE THAT ANY SOAP OR DETERGENT
RESIDUE IS REMOVED.
DO NOT USE CLEANING PRODUCTS WITHOUT CONSULTING THE PRODUCT’S INSTRUCTIONS
AND TAKING APPROPRIATE PRECAUTIONS FOR HUMAN EXPOSURE TO CHEMICALS.
DO NOT USE CHLORINATED PRODUCTS ON THE Züm-AP/SP.

RQD032ENr02 Rev. Date: 2021-12-24
15
5.0 CLEANING AND MAINTENANCE
5.1Cleaning After Each Use
5.1.1 Commode Pan
1. Remove the commode pan and empty contents.
2. Wash the pan with a multi-purpose disinfectant cleaning solution. Use a soft brush if needed.
3. Rinse well before storage or re-use.
A soapy hot water wash followed by a disinfectant spray can be substituted for a multi-purpose disinfectant cleaning
solution.
5.1.2 Seat
1. Spray with a multi-purpose disinfectant cleaner and scrub with a soft brush as required.
2. Rinse with a water spray before storage or re-use. DO NOT IMMERSE the seat in water or cleaning
solutions.
3. For a more thorough cleaning, remove the seat from the shower chair to allow better access to the
underside of the seat and around the opening of the seat.
5.2Cleaning As Needed
5.2.1 Frame, Armrests, Adjustable Footrests, and Other Components
1. Spray the frame and components with a multi-purpose disinfectant cleaner, scrub with a soft
brush and rinse with water.
It is recommended to the user that a qualified Raz dealer check over all fasteners and subassemblies on
a continuing basis or if there is cause for concern to the shower chair’s performance.
To reduce the risk of mildew buildup, the entire shower chair should be wiped down with a soft dry cloth
after the final rinse and before storage or use.
The Züm-AP/SP must be stored in a dry and clean environment. Avoid exposure to chlorine (e.g.
pools and pool areas), which will deteriorate and discolor the chair over time.
5.3 Suggested Cleaning Products
Task
Recommended Products
General Cleaning
Antibacterial Detergent
Surface Disinfecting
Oxiver TB (Virox Technologies Inc.)

RQD032ENr02 Rev. Date: 2021-12-24
16
6.0 LIMITED WARRANTY
This warranty is extended only to the original purchaser/user of Züm-AP/SP that has been purchased
from a qualified Raz dealer.
This warranty gives you specific legal rights, but you may have additional legal rights depending on
your region and country.
This warranty shall be extended to comply with regional and national laws and requirements.
With regards to the original purchaser/user only, Raz Design Inc. warrants its base and back frame
components to be free of defects in materials and workmanship for a period of two (2) years from the
date of purchase. All other components on the Züm-AP/SP are covered for a period of one (1) year
and are subject to normal wear and tear exclusions. If within such warranty period any such product
shall be proven to be defective, the part will be repaired or replaced, at Raz Design’s discretion. This
warranty does not include any labor or shipping charges incurred in replacement, part installation, or
repair of any such product.
For warranty service, please contact the dealer from whom you purchased your Züm-AP/SP. In the
event that you do not received satisfactory warranty service, please contact Raz Design directly using
the contact information located in either the beginning or end of the manual. In your correspondence,
please provide your dealer’s name and address, the product type, the date of purchase, the chair’s
serial number (on a grey label located on the chair frame), as well as the nature of the product issue.
Do not return products to the manufacturer without prior authorization.
Limitations and Exclusions:
The foregoing warranty shall not apply to serial numbered products if the serial number has been
removed or defaced, and to products subjected to negligence or an accident. Improper operation,
maintenance, or storage may void the warranty coverage on the Züm-AP/SP. The warranty does not
apply to products modified without Raz Design’s express written consent. This includes, but is not
limited to, modification through the use of unauthorized parts or attachments, products damaged by
reason of repairs made to any component by an individual or individuals who are not employed by a
qualified Raz dealer, or to a product damaged by circumstances beyond Raz Design’s control. Only
Raz Design will have the authority to determine whether or not the circumstances are eligible for
warranty coverage. The warranty will not apply to problems arising from normal wear or failure to
adhere to the instructions contained in this manual.
The foregoing warranty is exclusive of any other warranties, whether expressed or implied, including
the implied warranties of merchantability and fitness for a particular purpose. The sole remedy for
violations of any warranty whatsoever will be limited to repair or replacement of the defective product
in compliance to the terms contained in this document.
The application of any implied warranty shall not extend beyond the duration of the express warranty
provided herein. Raz Design will not be liable for any consequential or incidental damages to part or
whole of a Züm-AP/SP.

RQD032ENr02 Rev. Date: 2021-12-24
17
7.0 CONTACTS
It is important that the Züm-AP/SP be properly assembled and all adjustments be made carefully. Up-
to-date manuals can be downloaded from www.razdesigninc.com. For clarification of any section of
the manual, please contact your dealer or the manufacturer.
MANUFACTURER
U.S.A. AND WORLDWIDE
Raz Design Inc.
135 Railside Rd. Toronto, ON, Canada, M3A 1B7
1.877.720.5678 / 416.751.5678
IMPORTANT !
IT IS IMPORTANT TO CHECK YOUR CHAIR PRIOR TO EACH USE. ALL COMPONENTS
INCLUDING THE BACKREST, ARMREST, SEAT, BASE FRAME AND WHEELS SHOULD BE
SECURED IN PLACE. IF IT IS EVER FELT THAT ANY ASPECT OF THE Züm-AP/SP IS IN NEED OF
MAINTENANCE, CONTACT YOUR DEALER. ANY PROBLEMS THAT COULD AFFECT THE SAFE
USAGE OF THE CHAIR MUST BE ATTENDED TO IMMEDIATELY. THE DEALER/DISTRIBUTOR
THAT PROVIDED THE SHOWER CHAIR MUST BE CONTACTED SO THAT REPAIRS CAN BE
MADE PRIOR TO USING THE CHAIR. IT MUST BE MADE CLEAR TO THE DEALER THAT THE
SHOWER CHAIR IS IN NEED OF MAINTENANCE AND IS UNAVAILABLE FOR USE UNTIL REPAIRS
HAVE BEEN UNDERTAKEN AND ALL PROBLEMS RESOLVED.
IF FOR ANY REASON YOUR DEALER DOES NOT RESPOND TO YOUR SATISFACTION, PLEASE
CONTACT RAZ DESIGN: BY EMAIL: info@razdesigninc.com
BY PHONE:1.877.720.5678 (North America)
1.416.751.5678 (Other)
PRODUCTS THAT CAN NO LONGER BE USED ARE TO BE DISPOSEDOF SEPARATELY FROM
HOUSEHOLD WASTE. THIS MUST BE DONE ACCORDING TO THE LOCAL AND NATIONAL
REGULATIONS FOR ENVIRONMENTAL PROTECTION AND RAW MATERIAL RECYCLING.
PLEASE REFER TO YOUR LOCAL GOVERNMENT WEBSITE FOR FURTHER INFORMATION
ON THE CORRECT DISPOSAL PROCESS.
This manual suits for next models
3
Table of contents
Popular Bathroom Aid manuals by other brands

Galvin Engineering
Galvin Engineering GalvinAssist 41992CP Installation guidelines

Mobiclinic
Mobiclinic ARRECIFE instructions

Timago
Timago MASTER-TIM user manual

Pressalit
Pressalit TL3 Operation and maintenance manual

Medline
Medline MDS89740KD Assembly instructions

DURAVIT
DURAVIT OpenSpace 791874 Mounting instructions