Rbioko R1 User manual

INSTRUCTION
MANUAL
·Please read this operating manual carefully before use for correct operation;
·Any technical improvements to the product will be incorporated into the new
version of the manual without further notice;
·Please keep this instruction manual properly for easy reference at any time;
·Unless otherwise specified, the contents of this manual are applicable to all
the above models.
Any technical improvements to the product will be
incorporated into the new version of the manual
without further notice; If there is any change in the
appearance and color of the product, the actual object
shall prevail.
Non-electric RO water purifier
Model:R1
Rone (Shenzhen) Technology Industry Co., Ltd
Add:CHK Corp No. 2045, Sightseeing Road, Baihua Community,
Guangming Street, Guangming New District, Shenzhen City,
Guangdong Province
Tel:0757-23272998 Web: http://www.chk.net.cn/

1
CONTENTS
Thank you for choosing Rbioko!
Before using this product, be sure to carefully read this instruction
manual.
You can understand about the configuration, installation steps, and
basic methods of daily maintenance of this product. We strongly
recommend that you read carefully before using this product, which will
help you better use this machine.
PRECAUTIONS ...............................................................
INTRODUCTION .............................................................
WATER PRODUCTION ....................................................
CONSTRUTION ..............................................................
INSTALLATION ...............................................................
BEFORE USING .............................................................
MAINTENANCE ..............................................................
TROUBLESHOOTING .....................................................
WARRANTY ...................................................................
2
4
5
5
6
8
9
11
13

23
PRECAUTIONS
All contents in this chapter are related to safety, users must
comply with it. All contents in this chapter are only for the
correct use of this product:
Do not store or expose the product to environments below 0 ° C.
Freeze-proofing
All contents in this chapter are related to safety, users must
comply with it. All contents in this chapter are only for the
correct use of this product:
This machine is designed to filter municipal tap water and should not be
used for any other purpose.
1.To ensure water quality, please use this product with municipal tap water
under a water pressure of 0.1~0.4M Pa. If the water pressure is higher
than this range, please install a pressure reducing valve.
Water source pressure
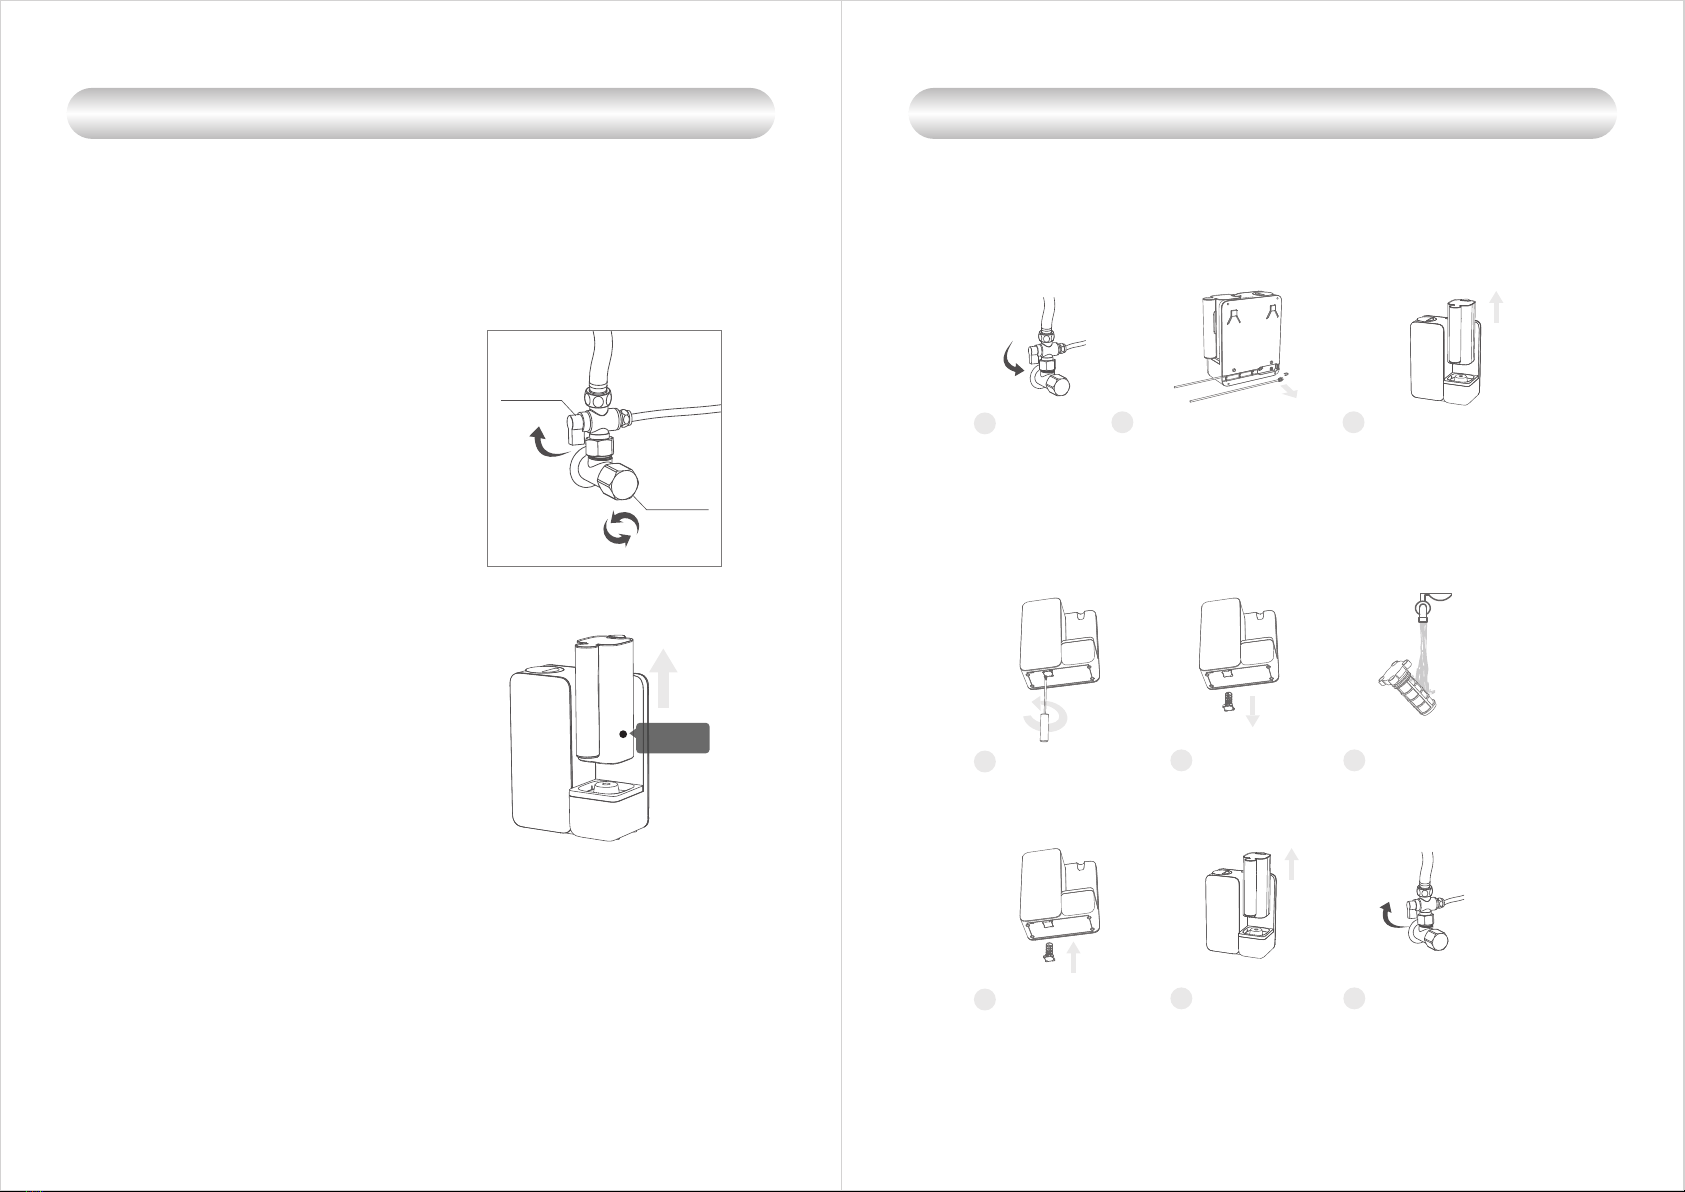
1.If the product malfunctions, please immediately cut off the water supply
and contact your local dealer or service center.
2.Do not disassemble the components on the product by yourself.
Maintenance
1.When the product is not in use for a long time, please turn off the water
source.
2.Please install the product in a place with a floor drain.
3.When the ambient temperature drops, the flow rate will decrease, which is
an inherent characteristic of the R0 membrane and is a normal
phenomenon.
4.When the water supply pipe is shut off, please cut off the water source.
When the water supply is restored, please first use other faucets to drain
water to prevent sediment from blocking the filter element and affecting the
filter element's service life.
Usage
1.Avoid using or storing the product in the following places:
--Places exposed to strong sunlight, which may cause aging of the
product components;
--Places below 4°C or above 40°C, which may damage the filter
cartridge;
--Places near high temperatures or strong magnetic appliances, which
may cause fires and damage to the product.
2.Do not place heavy objects on the product.
3.Install the product in a location that can drain water.
4.Do not immerse the product in water.
Storage:
To ensure normal operation of the product, please use accessories and
filter cartridges provided by our company.
Accessories and filter cartridges:
1.Please dispose of packaging materials promptly and do not let children
come into contact with them or swallow them.
2.Do not let children operate, touch, approach, or climb on the water
purifier.
3.Children and individuals with intellectual disabilities should use the
product under the supervision of a guardian. Other precautions (leakage,
electric shock, fire):
4.Please be cautious in areas with pets and pests (such as mice,
cockroaches, etc.) to prevent damage to the water pipes.
5.Do not let the product come into contact or close proximity to heat
sources/open flames (such as mosquito coils, candles, cigarettes, etc.).
6.Do not place flammable or volatile substances near the water purifier.
Other matters needing attention
PRECAUTIONS

45
LM-R1101
0.26L/min
3000L
316x206x392mm
Municipal tap water
5-38℃
0.1-0.4MPa
GB/T30307-2013
Oder
2
1
1
INTRODUCTION WATER PRODUCTION
CONSTRUTION
The product adopts the world's advanced reverse osmosis technology, and the reverse
osmosis membrane is a separation membrane that uses pressure to drive water molecules
to undergo reverse osmosis, with a surface pore size of about 0.0001 micrometers.
Therefore, it can effectively remove harmful substances such as fine impurities, soluble salts,
organic matter, heavy metal ions, calcium and magnesium ions, microorganisms, bacteria,
pesticide residues, etc. in water, while retaining water molecules and dissolved oxygen.
The water produced by this product is pure and free from impurities, making it sweet
and delicious, and can be consumed directly.
Product parameters
Product name
Model
Water flow
Water yield
Dimensions
Rbioko Non-electric RO water purifier
Water supply
Water temperature
water pressure
Production standards
Filter Hierarchy
PCR complex
filter element
Pre-filter
Function
Effectively remove large particle
impurities such as rust and sediment
Effectively remove particulate impurities,
residual heavy metals, calcium and
magnesium ions in water, pesticides,
fertilizers, and other harmful substances
Lifespan
12 Months
Note: The actual lifespan of the filter core may vary depending on the local water quality during installation and use.
Name
1
12 Months
Pre filter
Tap water
Waste wate
Mechanical float valve
PCR complex
filter element
Kettle
Waste water ratio
Filter cover
filter element
Face-plate
Shell
Pre filter
Kettle
Water purifier
Accessories List
Threading device
Installation accessories for the threading device (1 three-way
ball valve, 1 hanging rack, 3 nuts, 3 rubber plugs, 2 joint elbows,
4 clips, and 1 roll of PE pipes) instruction manual.
Accessories

67
①Installation of Three-Way Ball Valve:
· Turn off the cold water valve and unscrew the
cold water hose from the valve.
· Install the three-way ball valve onto the cold
water valve and tighten with an adjustable
wrench (do not forget to use the sealing gasket
on the valve during installation).
· Install the cold water hose onto the three-way
ball valve and tighten with an adjustable wrench
(do not forget to use the sealing gasket on the
hose during installation).
INTRODUCTION
②Installation of Pipe Sleeve
· Choose a suitable installation position on the
sink or countertop. The area within a radius of
3cm around the installation position must be flat.
Drill a hole with a diameter of 27mm (if there is
already a suitable installation hole on the sink,
skip this step).
· Install according to the diagram.
③Connection of Pipes
·Install the joint elbow onto the water outlet.
·Install the inlet pipe and waste pipe onto the
corresponding joint elbow.
·Secure each connection with a clip.
Cold water pipe
Gasket
Nut
Three-way
ball valve
Cold water valve
PE pipe
Inlet pipe
Waste pipe
Gasket
Connector
Lock nut
Gasket
Clip
Joint elbows
Waste pipe
Inlet pipe
④Installation Position Selection
· The machine can be placed directly on the
countertop or installed on the wall. If wall
installation is required, select the
installation position according to actual
needs. Installation is as shown in the diagram:
Wall
Hanging rack
Expansion bolt
Screw
⑤Connection Diagram
Cold water valve
PE pipe
PE pipe
Three-way ball valve
Connector
Kettle
Pure water
Waste water
Waste water
Tap water
Tap water
Floor
drain
*The pictures are for reference only, please refer to the actual product for details.

89
3
2
13
5
46
12
BEFORE USING MAINTENANCE
When using a new machine or new filter for the first time, an automatic cleaning process will
occur before drinking. To ensure taste quality, it is recommended to complete the cleaning
process before using the machine.
Follow the steps::
1. Switch on the cold water valve and the three-
way ball valve. The machine will automatically
perform water purification.
2.When the water kettle is full, pour out the water
and continue the cleaning process. It is
recommended to pour out the first four pitchers of
water and clean the kettle. After cleaning, the
machine can be used normally.
*Note: During cleaning, there may be discoloration and bubbles, which are normal phenomena due to
the discharge of food grade protective liquid and air from the filter element. After cleaning, it can be
used normally.
Three-way
ball valve
Cold water
valve
Kettle
Step 1: Close the three-way ball valve and unplug the concentrate water pipe to drain the
water inside the machine.
Step 2: Remove the filter for cleaning and re-install it.
Shut the three-way
ball valve. Pull out the clip on the waste pipe
before pulling it out(Press on the
interface before pulling out the pipe )
Repeat this process several times by
taking out the water kettle and pouring
out the water until the water in the
machine is empty and the kettle is filled
to the brim.
Use a cross screwdriver to
loosen the screw on the filter. Remove the Pre-filter. Take out the filter and clean it.
nstall the filter back into the
machine and tighten it. Put the kettle back on
its base. Turn on water supply and done.
CLEANING THE PRE-FILTER

10 11
2
13
2
3
1
Step1 Disconnect the water source and remove the old filter.
Step2 Install and turn on the water supply
Shut the three-way
ball valve. Open the filter cover. Refer to the direction guide and rotate
the filter element counterclockwise
until the filter element is rotated out.
Insert the new filter and tighten
it clockwise until it is secure. Align the filter cover slot with the filter
handle and attach the filter cover. Switch on the three-way
ball valve.
Step 3 Flush the filter element
Follow the steps of "Before Using" in this manual to clean the filter element
*Note: The expiration of the filter's lifespan will not restrict the machine's filtering or water intake operations. However, to maintain the
quality of your drinking water, it is recommended to replace the filter promptly when prompted.
FILTER REPLACEMENT
*Please refer to the instructions for the lifespan of the filter. The filter's lifespan is calculated based on filtering 2-5L of water per day
with a TDS value of less than 300mg/L. The actual lifespan of the filter may differ based on the product's usage location,
water quality, season, and amount of water used.
To replace the filter, follow these steps:
TROUBLESHOOTING
During use, the product may not operate normally for various reasons. Check the
following items and contact the after-sales service center if the issue persists.
Problem
The system does not
work after pressing the
water-making button
The sound of machine
water making is loud
and the water making
time is significantly
increased
Problem Reason
Pre-filter clogged
filter element clogged
Water outlet clogged
Pre-filter clogged
filter element clogged
Pipeline clogged
Low water temperature or freezing
What to do
Clean the Pre-filter
Replace the filter element
Check the clogged
Clean the Pre-filter
Replace the filter element
Check if there are foreign objects
blocking the water outlet
Turn off the water supply and temporarily
do not use the machine

13
12
WARRANTY
If the product malfunctions, please contact our local dealer service center or
customer service center. The water purifier has a one-year warranty for the
whole machine.
• The starting date of the warranty period is based on the product invoice date.
• The following situations are not covered by the warranty:
1.Damage caused by improper use, storage, or maintenance by the consumer.
2.Damage caused by self-installation, disassembly, or repair by non-
designated repair departments of our company.
3.The invoice model number does not match the repair product model or has
been altered.
4.No valid invoice.
5.Damage caused by force majeure.
6.If this product is used for non-residential purposes, it will not be covered by
the warranty.
7.Malfunctions caused by human factors or improper use are not covered by
the warranty.
• For products that are not covered by the warranty, our customer service
center will still provide enthusiastic service.
Table of contents