RCA RS32H2-EU User manual

RS32H2-EU
32 INCH LED HD LCD TV


PRECAUTIONS AND REMINDERS
IMPORTANT SAFETY INSTRUCTIONS
BUTTON CONTROL AND PERIPHERAL CONNECTION
OPERATING INSTRUCTIONS
SPECIFICATIONS
TROUBLESHOOTING
TABLE OF CONTENTS
1

IMPORTANT SAFETY INSTRUCTIONS
2
Manufactured under license from Dolby Laboratories. Dolby, Dolby Audio, and the double-D symbol are trademarks of
Dolby Laboratories.

PRECAUTIONS AND REMINDERS
If you are going to clean the product,Unplug the TV,use
soft fabric,no water,never chemicals.
3

BUTTON CONTROL AND PERIPHERAL CONNECTION
PERIPHERAL CONNECTION
BUTTON CONTR LO
OK/
/
In the non-menu page,Under the menu page, press the left and
right keys to adjust the volume addition and subtraction.
In the standby mode, press the to turn on the TV.
In the boot state, long press the to shut down.
In the non-menu page, you can adjust the TV channel under the
program addition and subtraction;
Under the menu page, you can move the cursor up and down.
Under the menu page , function equivalent to the OK key.
3. HDMI1(ARC) input terminal.
2. Coaxial out terminal.
1. RJ45
7. Earphone terminal.
5. HDMI3 input terminal.
4. HDMI2 input terminal.
9. RF antenna.
10. USB 1& 2: Connect USB device, such as flash disk.
8. LNB IN.
6. Audio&Video input terminal.
2 3 4 51 6 7 8 9 10 11 12
11. CI slot.
12. YPbPr(MINI) input terminal.
OK/
OK/
/
4

OPERATING INSTRUCTIONS
USING THE REMOTE CONTROL
Item Descriptions
Power
Google
Assistant
Prime video
0~9 number
Guide
Press to enter a TV channel number
Enter electronic program guide.
(Used for models with DTV function only)
Press to open or close the on-screen menu.
Press to navigate the on-screen menu.
CH+/CH - Press CH+ or CH- to change TV channels.
VOL+/VOL- Press VOL+ or VOL- to adjust volume level.
MENU
OK
BACK Return to the previous menu.
EXIT It depends on the actual function
disconnect power, unplug the power cord.
MUTE
(reverse) Press to reverse playback in multimedia &
Timeshift mode.
Press to play in multimedia mode &Timeshift
mode.
(play)
Press to fast forward in multimedia &Timeshift
mode.
(forward)
Press to pause in multimedia mode&Timeshift
mode.
(Pause)
Press to stop multimedia playback, REC&
Timeshift mode.
(stop)
SOURCE Press to open the input source list.
NETFLIX
YouTube
Press to open the NETFLIX.
Press to open the YouTube.
Press to open the prime video.
Google Play Press to open the Google Play.
Press to open the google assistant or start a
voice search.
HOME
INFO Press to display the channel information.
Press to open the Home Page.
Enter the selected option or perform the
selected operation.
Text Press to enter the Tele text mode.
SUBT Open or close subtitle.
AUDIO Press to select the DTV audio.
COLOR
BUTTONS
Press to access directly to the corresponding
function in APP service.
5

INITIAL SETUP
Please according to the Text Tip to First Time Setup.
This function is used for the remote control pair
code. After the code is successful, you can use
the Bluetooth remote control to operate the TV.
press and hold "HOME" button and" Left"
button Simultaneously for 5 seconds.Then press "OK"
button When the "TV_BLE_Remote" displays in the
upper right corner of the screen.
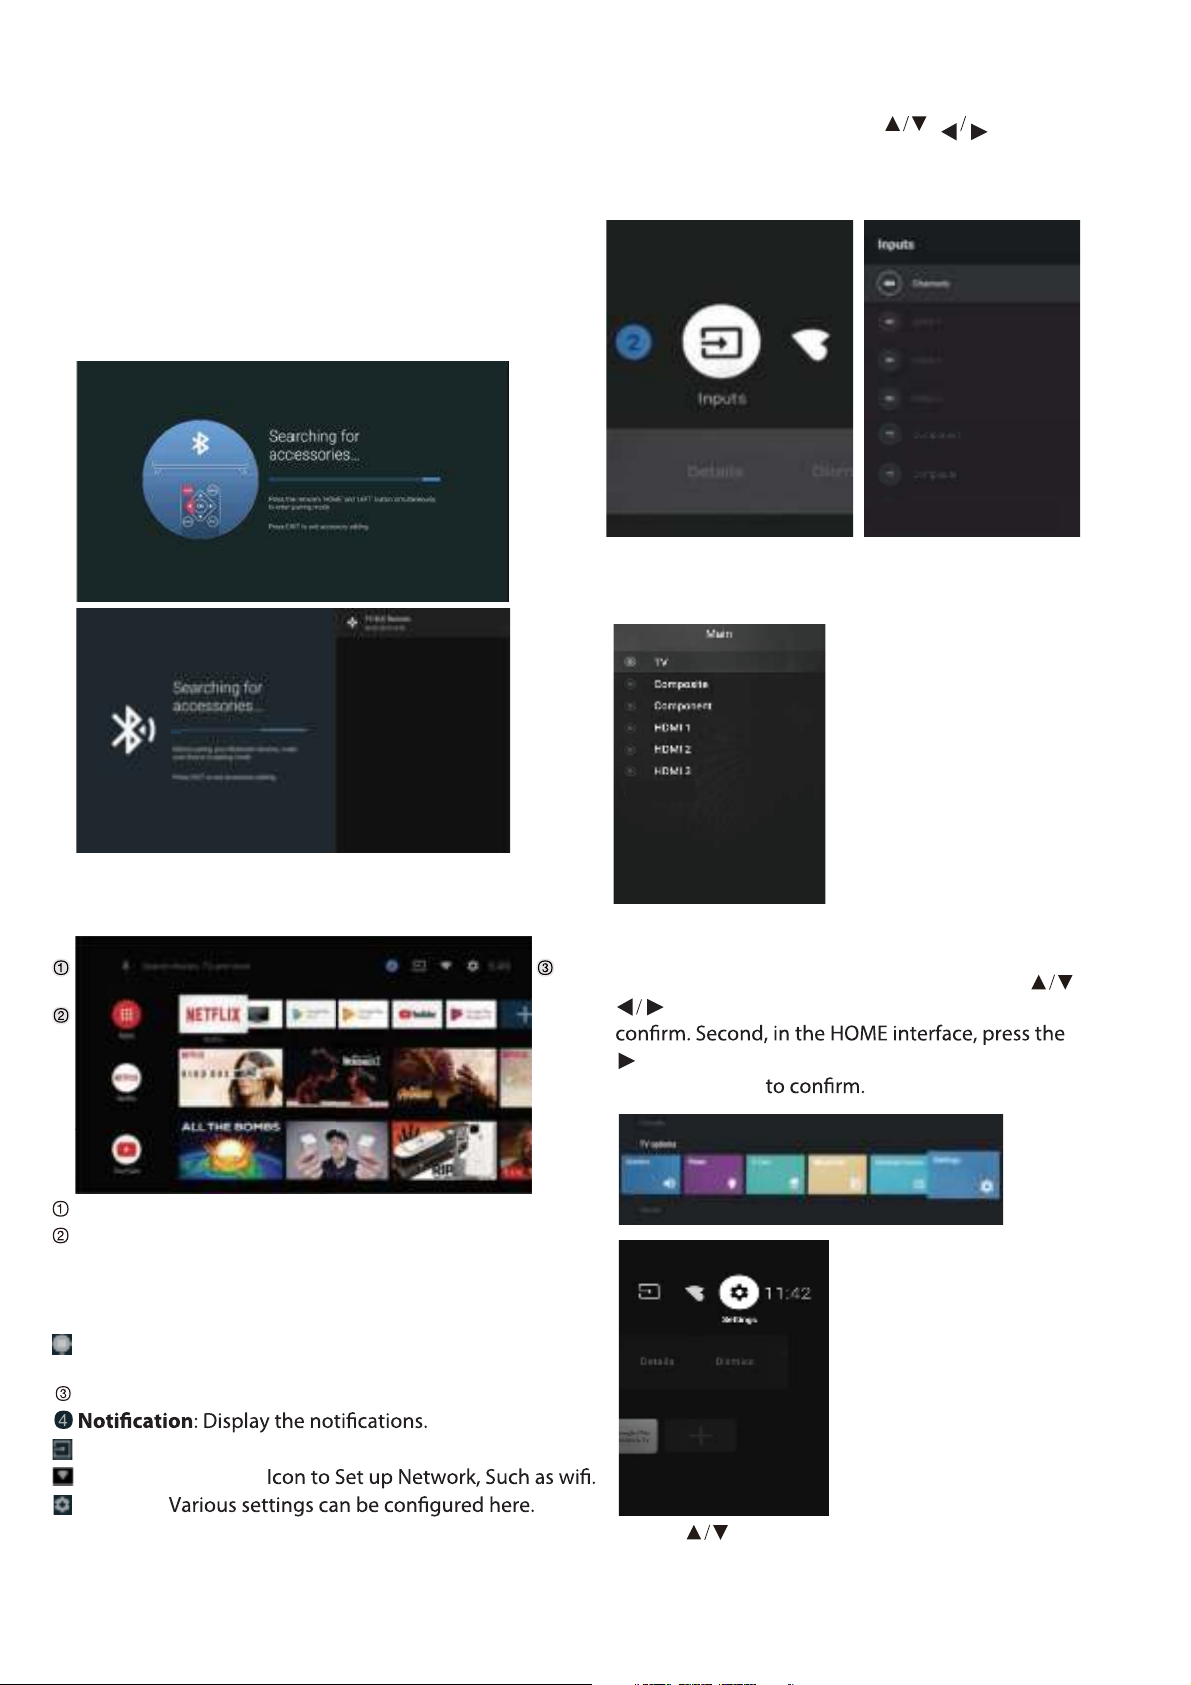
INPUT SOURCE
1. In the HOME interface, press to select
the “Inputs” icon, press OK to open the input source
list, then press up to highlight an input and press
OK to switch.
2. Under live TV, press the SOURCE button to display
the list of input sources. You can select the desired
source.
Open the google assistant or start a voice search.
Among the applications installed on the TV, the
icons for the favourite applications are shown inside
here. (Favourite applications can be added / deleted /
changed its order by users.)
Apps: Click to jump to Apps screen where all the
installed applications are listed.
Inputs: Icon to select an input source.
Network&Interent:
Settings:
For details on the settings, see the next explanation.
HOME SCREEN
During initial setup, press EXIT to exit the initial setup, and
enter the HOME screen. NAVIGATING THE ON-SCREEN MENU
1. There are two ways to enter. First, in live TV, press
the menu button to display TV options, press
to select the settings menu and press
OK to
key to select the icon of the circular settings
menu, press OK
2.Press button to select what you want set.
6

1. Press / button to select what you want set .
2. Press OK button to adjust.
OK button to
save and return to the previous menu.
3.Press OK to enter setting.
Press BACK to return to the previous menu. If the main
menu is displayed, pressing BACK will close the
onscreen menu.
Network
Channels –
Display the scan sub-menu based on
Channel installation mode – Select on-screen display
channel sources. You can select the signal type.
Antenna – Set the signal type to antenna. When set to
Antenna,the TV can receive analog and digital (DVBT/T2)
broadcasting signals.
Cable – Set the signal type to cable. When set to Cable,
the TV can receive analog and QAM broadcasting signals
CHANNEL
Preferred Satellite/General Satellite –Set the signal
type to Satellite. When set to Satellite, the TV can receive
Satellite broadcasting signals.
Auto Channel Update
Parental controls – Press button to select the
option then press OK button to enter the sub-menu.
Audio Channel – Press button to select the
option then press OK button to enter the sub-menu.
Open source licenses – Press button to select the
option then press OK button to enter the sub-menu.
Antenna
1.Menu->Settings->Channel->Channel Installation Mode
enter, choose Antenna.
2. Enter Menu->Settings->Channel->Channels.
3. Channel Scan directly enters the ATV+DTV
automatic search platform interface of Antenna.
Update Scan: Re-automatically search for frequency
points outside the station.
7

Analog Manual Scan: Manual ATV search station.
After input the frequency point, you can select up
or down search station.
Single RF Scan: DTV manual search, left and right
after selecting RF Channel, directly OK search.
Cable
1.Menu->Settings->Channel->Channel Installation
Mode, select Cable.
2. Enter Menu->Settings->Channel->Channels.
3. Enter Channel Scan, where Akado, Divan TV,
Online and Rostelecom (SPB) are the local
operators, and the default Scan Mode is
Advance;Others have Advance, Quick and Full
Scan modes.
Single RF Scan: manual search station.
Satellite
1.Menu->Settings->Channel->Channel Installation Mode,
select Preferred Satellite or General Satellite. Among them,
Preferred Satellite has been preset with corresponding
satellites of NTV+, Tricolor and Telekarta operators. I'm going
to go to General Satellite.
2.. Enter Menu->Settings-> channel-> Channels->Satelli
Re-scan.
8

3. Press OK to enter Satellite parameter Settings,
which include LNB POWER, LNB Frequency,
DiSEqC Set, 22K and other parameters. Then
return to Satellite re-scan and right click to enter
the search menu.Then return to Satellite re-scan
and right click to enter the search menu.
Satellite AddAdd a star broadcast signal.
Satellite Manual Tuning: manually search for
a certain TP, which can be added by Satellite
Add if needed.
In this menu, you can read the information and settings
of TV.
1. Press / button to select what you want set .
2. Press OK button to adjust.
return to the previous menu.
DEVICE PREFERENCES
ABOUT
DATE&TIME
button to select the
Use 24-hour format – Press
NOTE
Manually adjusting date & time settings will automaticall
change the Automatic date & time to OFF .
option then press OK button to enter the sub-menu.
Automatic date & time – Press button to select the
then press OK button to enter the sub-menu.
Set date – Press button to select the option
then press OK button to enter the sub-menu.
Set time – Press button to select the option
then press OK button to enter the sub-menu.
Set time zone – Press button to select the option
option then press OK button to choose ON/OFF.
9

Press / button to select the
option then press OKbutton to choose ON/OFF/ONCE.
Power On Timer Type –
Press / button to select the
option then press OKbutton to enter the sub-menu.
Power On Timer –
Press / button to select the
option then press OKbutton to enter the sub-menu.
P
Press / button to select
the option then press OKbutton to choose ON/OFF/
ONCE.
P
LANGUAGE
.
then press OK button to enter the select language.
– Press / button to select the option
Language
TIMER
KEYBOARD
Press / button to select theCurrent keyboard –
option then press OKbutton to enter the sub-menu.
Gboard Settings – Press / button to select the
option then press OKbutton to enter the sub-menu.
Press / button to select theManage keyboards –
option then press OKbutton to enter the sub-menu.
INPUTS
Inputs – Press / button to select the option then
press OKbutton to enter the sub-menu.
HDMI control – Press / button to select the
option then press OKbutton to choose ON/OFF.
Press / button to select
the option then press OKbutton to choose ON/OFF.
Press / button to select theTV auto power on –
option then press OKbutton to choose ON/OFF.
HDMI EDID Version – show EDID version.
CEC Device List – Press / button to select the
option then press OKbutton to enter the sub-menu.
POWER
Sleep Timer – Press button to select the
option then press OK button to enter the sub-menu.
40 minutes, 50 minutes, 60 minutes, 90 minutes,
120 minutes ).
10

option then press OK button to choose ON/OFF.
– Press button to select the
120 minutes, 150 minutes, 180 minutes, 210 minutes,
Press / button to
select the option then press OK button to enter the
15 minutes, 30 minutes, 60 minutes ).
240 minutes )
option then press OK button to enter the sub-menu.
– Press button to select the
PICTURE
button to enter the sub-menu. (Optional: user,Standard,
Press / button to select the option
Picture Mode –
Vivid, Sport, Movie, Game, Energy saving).
Sharpness –
Backlight/Brightness/Contrast/Saturation/HUE/
Press / button to select the option.
Press to decrease the parameter. Press t o increase
the parameter.
Press / button to select the option
OK
picture rormat –
Color Temperature – Press / button to select the
Gamma – Press / button to select the option then
press OK button to enter the sub-menu.(Optional: Dark,
middle,Bright).
option then press OK button to enter the sub-menu.
Reset to Default – Reset all settings to the factory
defaults.
Advanced Video – Press
Press
/
/
/
/
button to select the
option then press
option then press
OK
OK
button to enter the sub-menu.
enter the sub-menu.
the press Optional:
Automatic/Super zoom/4:3/Movie expand 14:9/Movie
expand 16:9/Wide screen/Full/Unscaled)
Color Tuner–
11 Point White Balance Correction–
Press button to select the option
then press OK button to enter the sub-menu.
button to
HDR
on
HDR -Press button to seletc the option the press
OK
SOUND
Speakers – Press / button to select the option
then press OK button to enter the sub-menu.
(Optional:TV Speaker,External Audio System).
Digital Output – Press / button to select the
option then press OK button to enter the sub-menu.
(Optional:Auto,Bypass,PCM ,Dolby Digital Plus,Dolby
Digital).
SPDIF Delay – Press / button to select the
option. Press to decrease the parameter.
Press to increase the parameter.
Balance/ Bass/ Treble – Press /button to select
the option. Press to decrease the parameter.
Press to increase the parameter.
Sound Surround – Press / button to select the
option then press OK button to choose ON/OFF.
Equalizer Detail – Press / button to select the
option then press OK button to enter the sub-menu.
Sound style – Press / button to select the
option then press OK button to enter the sub-menu.
(Optional: user,Standard,Vivid,Sports,M ovie,M usic,
News).
Auto Volume Control – Press / button to select
the option then press OK button to choose ON/OFF.
Downmix Mode– Press / button to select the
option then press OK button to enter the sub-menu.
(Optional:Stereo,Surround).
Reset to Default –Reset all set t ings to the factory
default
s.
STORAGE
11

Removable Storage –Press /button to
select the option then press OK button to enter
the sub-menu.( Note:Show external devices if
available)
select the option then press OK button to enter the
sub-menu.
– Press button to
Internal shared storage
HOME SCREEN
3. After nishing your adjustment, Press BACK
button return to the previous menu.
In this menu, you can set channels, apps, open
source licenses.
1. Press / button to select what you want set.
2. Press OK button to adjust.
STORE MODE
option then press OK button to choose ON/OFF.
– Press button to select the
Store mode
In this menu, you can set searchable apps, safe
source
licenses.
1. Press /button to select what you want set.
2. Press OK button to adjust.
button return to the previous menu.
1. Press /button to select what you want set.
2. Press OK button to adjust.
button return to the previous menu.
In this menu,you can read the information and
settings of Chromecast
CHROMECASTBUILT-IN
GOOGLE
SCREEN SAVER
Screen saver – Press button to select the
option then press OK button to enter the sub-menu.
When to Start – Press /button to select the
option then press OK button to enter the sub-menu.
(Optional:5 minutes, 15 minutes, 30 minutes,1 hour,
2hours,).
Put device to sleep – Press /button to select
the option then press OK button to enter the
sub-menu. (Optional:30 minutes, 1 hour, 3 hours,
6 hours,12 hours, Never).
Start now – Press / button to select the option
then press OK button to enter screen saver.
12

option then press OK button to enter the sub-menu.
– Press button to select the
Location status
the option then press OK button to choose ON/OFF.
– Press button to select
Usage & diagnostics
USAGE & DIAGNOSTICS
LOCATION
Reset-Erase everything.
the option then press OK button to choose ON/OFF.
– Press button to select
High contrast text
option then press OK button to enter the sub-menu.
– Press button to select the
Captions
Press OK button to enter the sub-menu.
RESET
ACCESSIBILITY
13

ADD AND USE OF MULTI MEDIA PLAYER
1. In the HOME interface, select the + icon in the APP
column to add the application, and click OK. Press up
and down to select the MultiMediaPlayerapplication,
and click OK to add it to the HOME interface.
2. Select OK key to enter MultiMediaPlayerand display
purchased the TV.
NOTE
Text
In this menu,you can pair Bluetooth devices.
1.Press the "HOME" and "LEFT" buttons at the
bottom of the remote control for 5 seconds.
2.When the LED
3.
5.
send the pairing signal to the TV and
display the information of the remote control on
the right side of the screen.
Press the OK button to display the pairing.
If the paired is displayed, the connection is
successful.
4.If the couldn't pair appears, the connection fails.
Wait 30 seconds and then press the "HOME" and
"LEFT" buttons at the bottom of the remote control
for 5 seconds to repeat the previous steps.
Press BACK or EXIT button return to the previous
menu.
REMOTE&ACCESSORIES
14

SPECIFICATIONS
HDMI INPUT
Mode Resolution Horizontal Frequency
(KHz)
Vertical Frequency
(Hz)
480i 720 x480i 15.73 59.94/60
576i 720 x 576i 15.63 50
480p 720 x480p 31.47 59.94/60
576p 720 x 576p 31.26 50
720p 1280 x 720p 37.50
44.96
50
59.94/60
COMPONENT VIDEO (YPbPr) INPUT
Mode Resolution Horizontal Frequency
(KHz)
Vertical Frequency
(Hz)
480i 720 x480i 15.73 59.94/60
576i 720 x 576i 15.63 50
480p 720 x480p 31.47 59.94/60
576p 720 x 576p 31.26 50
720p 1280 x 720p 37.50
44.96
50
59.94/60
Due to continuous product development, specifications are subject to change without prior notice.
15

TROUBLESHOOTING
Please make these simple checks before calling service. These tips may save you time and money since charges for
receiver installation and adjustments of customer controls are not covered under your warranty.
wolloFo
tsnoitcAdnakcehCotsmetIsmotpmyS
“Ghost” or double image This may be caused by obstruction to the antenna due to high rise
buildings or hills. Using a highly directional antenna may improve the
picture.
No power Check if the TV’s AC power cord is plugged into the outlet.
Unplug the TV, wait for 60 seconds. Then reinsert plug into the outlet
and turn on the TV again.
No picture Check antenna connections at the rear of the TV to see if it is properly
connected to the TV.
Possible broadcast station trouble. Try another channel.
Adjust the contrast and brightness settings.
Check the Closed Captions control. Some TEXT modes could block the
screen.
Good picture but no sound Increase the volume level by pressing the VOL+ button on the remote
control or on the TV side control panel.
Press the MUTE
Good sound but poor color Adjust the contrast, color and brightness settings.
Poor picture Poor picture quality may occur when an activated S-VHS camera or
camcorder is connected to your TV and other peripherals at the
Snowy picture and noise Check the antenna connection.
Horizontal dotted line This may be caused by electrical interference (e.g. hair dryer, nearby
Television not responding to
remote control
Check whether the batteries are working. Replace if necessary.
Clean the remote control sensor lens on the TV.
You can still use the buttons on the side of your TV.
Pixels (dots) that are always
dark or always lit
Your TV is precision-manufactured using an extremely high level of
technology. However, sometimes pixels may not display correctly.
These types of occurrences are inherent to this type of product and do
not constitute a defective product.
16


Table of contents
Other RCA LCD TV manuals

RCA
RCA RLC2685A User manual

RCA
RCA L52FHD38 - 52" 1080P LCD HDtv User manual

RCA
RCA RLC1909 User manual

RCA
RCA L26WD23 User manual

RCA
RCA LED55G55R120Q User manual

RCA
RCA LED32B30RQD User manual

RCA
RCA RTAU7004 User manual

RCA
RCA LED32A30RQ User manual

RCA
RCA 46LB45RQ User manual

RCA
RCA L19WD20 - 19" LCD TV Quick start guide