manuals.online logo
Brands
  1. Home
  2. •
  3. Brands
  4. •
  5. RCA
  6. •
  7. TV
  8. •
  9. RCA E13319F11 User manual

RCA E13319F11 User manual

This manual suits for next models

3

Other RCA TV manuals

RCA 20F511T User manual

RCA

RCA 20F511T User manual

RCA J24F635 User manual

RCA

RCA J24F635 User manual

RCA F27650 User manual

RCA

RCA F27650 User manual

RCA RLDED2952A User manual

RCA

RCA RLDED2952A User manual

RCA P52921YX3-G User manual

RCA

RCA P52921YX3-G User manual

RCA Scenium D32TF20 User manual

RCA

RCA Scenium D32TF20 User manual

RCA G27666 User manual

RCA

RCA G27666 User manual

RCA S12100CL User manual

RCA

RCA S12100CL User manual

RCA M21500 User manual

RCA

RCA M21500 User manual

RCA 24V412T User manual

RCA

RCA 24V412T User manual

RCA F32444 User manual

RCA

RCA F32444 User manual

RCA DRD222RD User manual

RCA

RCA DRD222RD User manual

RCA F27730EMJX1 User manual

RCA

RCA F27730EMJX1 User manual

RCA P52151WK User manual

RCA

RCA P52151WK User manual

RCA F32685YX2CN1 User manual

RCA

RCA F32685YX2CN1 User manual

RCA P50830 User manual

RCA

RCA P50830 User manual

RCA G27648 User manual

RCA

RCA G27648 User manual

RCA hd52w59 User manual

RCA

RCA hd52w59 User manual

RCA G27750 User manual

RCA

RCA G27750 User manual

RCA F19424TX1T User manual

RCA

RCA F19424TX1T User manual

RCA F20251 User manual

RCA

RCA F20251 User manual

RCA LRK28G30RQD User manual

RCA

RCA LRK28G30RQD User manual

RCA F26432TX41AD8 User manual

RCA

RCA F26432TX41AD8 User manual

RCA RTRU5828-CA User manual

RCA

RCA RTRU5828-CA User manual

Popular TV manuals by other brands

IKEA UPPLEVA user manual

IKEA

IKEA UPPLEVA user manual

Toshiba 19A20 Service manual

Toshiba

Toshiba 19A20 Service manual

Sony XBR-100Z9D reference guide

Sony

Sony XBR-100Z9D reference guide

Sony Trinitron KV-HR36M90 Service manual

Sony

Sony Trinitron KV-HR36M90 Service manual

JVC AV-14AG16 instructions

JVC

JVC AV-14AG16 instructions

Loewe Table Stand Reference 55 user guide

Loewe

Loewe Table Stand Reference 55 user guide

Panasonic Genus TX-G10 operating instructions

Panasonic

Panasonic Genus TX-G10 operating instructions

Samsung LN26C350D1D Service manual

Samsung

Samsung LN26C350D1D Service manual

BBK LT1516D Service manual

BBK

BBK LT1516D Service manual

Samsung 55S9 B Series Quick setup guide

Samsung

Samsung 55S9 B Series Quick setup guide

Sharp LC-40FI5012E user manual

Sharp

Sharp LC-40FI5012E user manual

Evervue BN185 Operation manual

Evervue

Evervue BN185 Operation manual

North State TV2GO user guide

North State

North State TV2GO user guide

Toshiba CX35F70 owner's manual

Toshiba

Toshiba CX35F70 owner's manual

Magnavox PS1980 owner's manual

Magnavox

Magnavox PS1980 owner's manual

Philips 20HF5335D manual

Philips

Philips 20HF5335D manual

Panasonic QuintrixF TX-29AS1D operating instructions

Panasonic

Panasonic QuintrixF TX-29AS1D operating instructions

Samsung 4 Series Quick setup guide

Samsung

Samsung 4 Series Quick setup guide

manuals.online logo
manuals.online logoBrands
  • About & Mission
  • Contact us
  • Privacy Policy
  • Terms and Conditions

Copyright 2025 Manuals.Online. All Rights Reserved.

WARNING
To reduce the risk of fire or
electric shock, do not expose
this TV to rain or moisture.
To reduce the risk of electric shock, do not remove
RiSKOF ELECTRIC cover (or back). No user serviceable parts inside.
_HOCK.DO NOT OPEN Refer servicing to qualified service personnel.
This symbol indicates
"dangerous voltage" inside
the product that presents a
risk of electric shock or
personal injury.
_This symbol indicates
important instructions
accompanying the product.
Caution: To prevent electric shock, match wide blade of plug to wide slot, fully insert.
Attention: Pour _viter les chocs electriques, introduire la lame la plus large de la fiche dans la borne correspondante
de la prise et pousser jusq0 au fond.
Refer to the identification/rating label located on the back panel of your product for its proper operating voltage.
FCCRegulations state that unauthorized changes or modifications to this equipment may void the user's authority to
operate it.
If fixed (non-moving) images are left on the screen for long periods, they may be permanently
imprinted on the screen. Such images include network Iogos, phone numbers, and video games. This
damage is not covered by your warranty. Extended viewing of channels displaying these images should
be avoided.
Cable TV Installer: This reminder is provided to call your attention to Article 820-40 of the National Electrical Code
(Section 54 of the Canadian Electrical Code, Part 1) which provides guidelines for proper grounding and, in
particular, specifies that the cable ground shall be connected to the grounding system of the building as close to the
point of cable entry as practical.
TABLE OF CONTENTS
GETTING STARTED ...................................................... 1
Setup and Connection .................................................... 1
Dipole Antenna Connection .......................................... 1
Channel Marker .............................................................. 2
Front Panel Controls ....................................................... 2
Tour of the Remote ........................................................ 3
THE MENU SYSTEM ................................................... 4
TV Main Menu ................................................................ 4
The Picture Quality Menu .............................................. 4
The Screen Menu ............................................................ 4
The Channel Menu ......................................................... 5
V-Chip and Parental Controls ......................................... 5
V-Chip Movie Rating Limit ........................................... 6
Blocking Movie Ratings ............................................... 6
Viewing Movie Ratings ................................................ 6
V-Chip TV Rating Limit ................................................. 6
The TV Rating Limit Screen .......................................... 7
Blocking Age_BasedRatings and Content Themes ........ 8
Viewing Age-Based Ratings and Content Themes......... 8
V-Chip Unrated Program Block .................................... 9
Lock/Unlock Parental Controls ..................................... 9
The Time menu ............................................................... 9
TROUBLESHOOTING ............................................... 10
ACCESSORI ES ........................................................ 11-12
LIMITED WARRANTY ............................................... 13
SETUP AND CONNECTION
Step 1: Connect Your TV
Connect the cable from your cable system or off-air antenna to the cable in-
jack on the back of the TV, as shown.
Step 2: Plug In Your TV
Plug the end of the power cord into the wall outlet, matching the wide
blade of the plug with the wide slot in the outlet. Be sure to insert the plug
completely.
Step 3: Put Batteries in the Remote Control
1. Remove the battery compartment cover from the back of the
remote.
2. Insert batteries as shown, matching the + and - ends of each battery
in the compartment.
3. Replace the cover.
Step 4: Turn on the TV
Pressthe POWER button on the remote or front panel.
Step 5: Auto Channel Search
Perform an Auto Channel Search (described in the Channel menu section).
ANTENNA, CABLE, CABLEBOXORVCR
TV (Back Panel) I
DI POLE ANTENNA CONNECTION
Follow the steps to connect the indoor antenna supplied with your TV (only
if you do not connect an outdoor antenna or a cable-TV system).
Insert the antenna base into the pocketed slot on the back of your set.
Stand at the back of your set with the antenna twin-lead facing you, and
press the base of the antenna into the slot until it locks in place.
Connect the ends of the twin-lead to the Antenna Adapter (supplied).
Connect the Antenna Adapter to the ANTENNA connector on the back of
the TV.
Later, after you've turned on the TV, adjust the length and position of the
antenna rods for best reception.
• For viewing VHF channels, extend the rods fully.
• For viewing UHF channels, shorten the rods for best reception.
Antenna Adapter
(Supplied)
Dipole Antenna (Supplied)
1
CHANNEL MARKER
The Channel Marker comes up when you first turn on the TV, change
channels, or press the DISPLAY button.
01:30 Displayed to count down time left on the commercial skip timer.
13 Displays the current channel.
7:17 Displays the current time.
CC Displayed when Closed Captioning is available.
Mute Displayed when you mute the audio.
Sleep Displayed when the Sleep Timer has been set.
FRONT PANEL CONTROLS
CHAN ^ Scans up through the channel list. When a menu is displayed,
CHAN ^ points up to items and adjusts menu controls.
CHAN v Scans down through the channel list. When a menu is displayed,
CHANv points down to items and adjusts menu controls.
MENU Brings up the Main menu. When in the menu system, it selects
highlighted items. Also returns you to the previous menu.
POWER Turns the TV on and off.
VOL - Decreases the volume. When in the menu system, VOL - is used
to point left to items and adjust menu controls.
VOL +increases the volume. When in the menu system, VOL + is used
to point right to items and adjust menu controls.
The Channel Marker shown is just an example
of what your screen may look like.
You can press MENU or CLEAR to |
make the Channel Marker disappear, J
or it will disappear automatically
after a short time.
FRONT PANEL JACKS
Audio IN and Video IN Jacks
Receives audio signals from another component, like aVCR or camcorder
when it is connected to these jacks. You may have to purchase audio and
video cables from your local electronics store.
To select these front panel jacks, press INPUT on your remote control.
FRONT PANEL LOCK
This feature allows you to lock the buttons on the front of the TM Even
when the front panel lock feature is ON, the TV operates with the remote
control.
• To lock the buttons on the front of the TV, make sure the TV is turned
ON, then press and hold the POWER button on the remote for
approximately 5 seconds.
• To turn off the front panel lock, make sure the TV is OFF,then press
and hold the POWER button on the remote for approximately 5
seconds. Now the buttons will operate properly.
Caution
If you choose to use a stand with
your TV, take precautions that the
stand or other furniture the TV is
placed on is properly located and of
adequate size and strength to
prevent the TV from accidentally
being pushed off, pulled off, or
tipped over. This could cause damage
to the TV and/or personal injury.
2
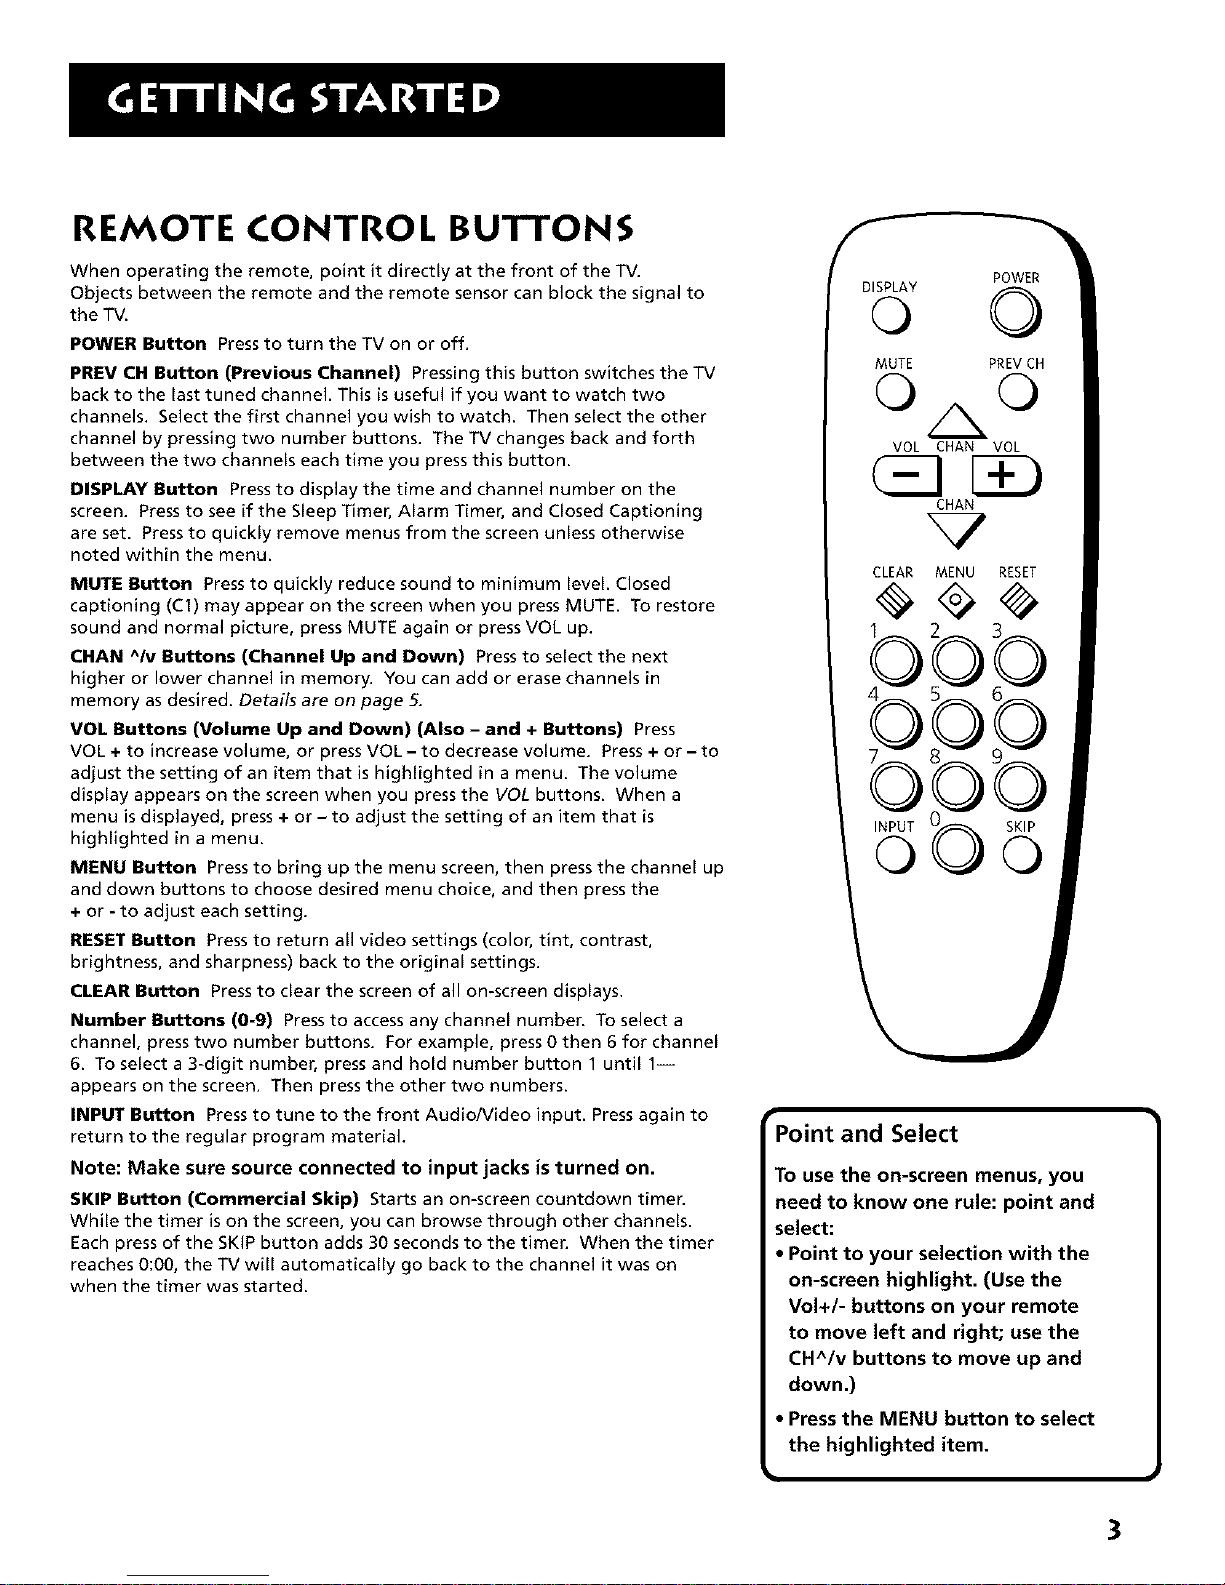
REMOTE CONTROL BUTTONS
When operating the remote, point it directly at the front of the TV.
Objects between the remote and the remote sensor can block the signal to
the TV.
POWER Button Press to turn the TV on or off.
PREV CH Button (Previous Channel) Pressing this button switches the TV
back to the last tuned channel. This is useful if you want to watch two
channels. Select the first channel you wish to watch. Then select the other
channel by pressing two number buttons. The TV changes back and forth
between the two channels each time you press this button.
DISPLAY Button Press to display the time and channel number on the
screen, Pressto see if the Sleep Timer, Alarm Timer, and Closed Captioning
are set. Pressto quickly remove menus from the screen unless otherwise
noted within the menu.
MUTE Button Press to quickly reduce sound to minimum level. Closed
captioning (Cl) may appear on the screen when you press MUTE. To restore
sound and normal picture, press MUTE again or press VOL up.
CHAN ^Iv Buttons (Channel Up and Down) Press to select the next
higher or lower channel in memory, You can add or erase channels in
memory as desired. Details are on page 5.
VOL Buttons (Volume Up and Down) (Also -and + Buttons) Press
VOL + to increase volume, or press VOL -to decrease volume, Press+or - to
adjust the setting of an item that ishighlighted in a menu. The volume
display appears on the screen when you press the VOL buttons. When a
menu is displayed, press + or -to adjust the setting of an item that is
highlighted in a menu.
MENU Button Press to bring up the menu screen, then press the channel up
and down buttons to choose desired menu choice, and then press the
+or -to adjust each setting.
RESET Button Press to return all video settings (color, tint, contrast,
brightness, and sharpness) back to the original settings.
CLEAR Button Press to clear the screen of all on-screen displays.
Number Buttons (0-9) Press to access any channel number. To select a
channel, press two number buttons, For example, press 0then 6 for channel
6. To select a3-digit number, press and hold number button 1 until 1-
appears on the screen, Then press the other two numbers.
INPUT Button Press to tune to the front Audio/Video input. Press again to
return to the regular program material.
Note: Make sure source connected to input jacks isturned on.
SKIP Button (Commercial Skip) Starts an on-screen countdown timer.
While the timer ison the screen, you can browse through other channels.
Each press of the SKIP button adds 30 seconds to the timer, When the timer
reaches 0:00, the TV will automatically go back to the channel it was on
when the timer was started.
POWER
MUTE PREV CH
© ©
VOL CHAN VOL
CHAN
%7
CLEAR MENU RESET
INPUT _ SKIP
© ©
Point and Select
To use the on-screen menus, you
need to know one rule: point and
select:
• Point to your selection with the
on-screen highlight. (Use the
Vol+/- buttons on your remote
to move left and right; use the
CH^/v buttons to move up and
down.)
•Pressthe MENU button to select
the highlighted item.
3
TV MAIN MENU
The TVMain Menu isyour gateway to controlling the TV. it lets you adjust
the TV's picture quality, screen, channel settings, parental controls, and time
functions.
To select a menu item:
1. Press MENU to bring up the TV Main Menu.
2. Use the CHAN ^Iv on the remote or front of TV to highlight an item
and press MENU to select it; or you can also press the corresponding
number on the remote.
3. To exit any menu screen, highlight Exit and press MENU, or press
CLEAR on the remote.
THE PICTURE QUALITY MENU
The Picture Quality Menu contains five controls that adjust the TV's picture.
Use the VOL +/- and CH +/- buttons to adjust the controls.
Contrast Adjusts the difference between light and dark areas of
the picture.
Color Adjusts the richness of the color.
Tint Adjusts the balance between the red and green levels allowing
you to get the correct fleshtones.
Black Level Adjusts the brightness of the picture.
Sharpness Adjusts the crispness of edges in the picture.
Reset Picture Controls Resets the picture controls to their
original settings.
THE SCREEN MENU
The Screen menu contains the controls that let you adjust the Closed-
Caption display, Closed-Caption mode, and Menu Language.
CC (Closed-Caption) Display Lets you choose the way closed captioning
information is shown on the screen. Use the MENU button to toggle
between the following:
Off No captioning information displayed.
On Captioning information shown always, when available.
On When Muted Displays captioning information, when available
whenever you press the MUTE button. The captioning information
not displayed when the sound is not muted.
CC (Closed-Caption) Mode Lets you choose which captioning mode is used
for displaying captioning information. Use the MENU button to toggle
between the choices: CC1 and CC2.
Not all programs are encoded with closed-captioning information. When a
program is closed captioned, the letters CC are displayed under the Channel
Marker.
Menu Language Lets you select the language of your choice: English,
French, or Spanish. Use the MENU button to toggle between the choices.
TV Main Menu
The TV Main Menu
Picture Quality Menu
i
The Picture Quality Menu
Tip
You can also use the RESET button
on the remote at any time to reset
the picture controls to their original
settings.
Screen 1
The Screen menu
Closed Caption Modes |
CCI: full translation of the primary
language in your area
CC2: secondary language translation,
simplified English, or whatever is
being broadcast in your area
4
THE CHANNEL MENU
The Channel menu contains all the commands used to control your channels,
including custom-building your channel list.
Signal Type Displays a toggle that lets you select the current antenna type:
Antenna Choose this if you are currently using an off-air antenna
for UHF/VHF TV signals.
Cable "IV Choose this if you are currently using cable or acable
box for TV signals.
Auto Channel Search Selecting this option tells the TV to search
automatically for all the channels available through the antenna input.
When the TV finds an active channel, it places it in the channel list. inactive
channels (weak stations or channels with no signal at all) will be removed
from the channel list. (You may interrupt this process by pressing the MENU
button.)
List Displays a control panel that lets you customize your channel scan list
by adding or removing channels. Use the VOL +/- buttons to move left and
right between fields; use the CH ^Iv buttons to enter settings. Press MENU to
exit.
Channel Number Use the CH^/v buttons to scroll through the
channel scan list. You can also enter the channel number directly
using the number buttons.
Scan List Indicates whether the channel number is included (YES) or
is not included (NO) in the channel scan list.
Channel
The Channel menu
List
List menu
V-CH I P PARENTAL CONTROLS
The V-Chip Parental Controls menu allows you to program your TV so that
children cannot see certain programs. When you select V-Chip Parental
Controls, you will be prompted to enter your password if controls are locked,
or to remember to lock controls if unlocked.
The first three choices in the Parental Controls menu involve software inside
your TV (dubbed V-Chip) which allows you to block TV programs and movies
based on violence, sex, or other content you believe children should not
view. Once you block programs, you or other adults can unblock programs
with a password.
When turned "on," the software reads a code that most broadcasters send
with programs. That code tells the V-Chip the program's age-based rating
and content themes, if you have blocked the rating or content themes that
the program contains, you will receive the message, "This program is
blocked. Change channel or press DISPLAY to enter password." When you
tune to that program.
Broadcasters are not required to provide content themes or age-based
ratings. Rated programs received with no content themes will only be
blocked if you block their age-based rating. You can also block movies with a
rating of "Not Rated" and "unrated" TV programs.
TV Main Menu
Setting V-Chip Parental Controls
he V-Chip software inside your TV 1
omes turned "off," so if you choose to
mplement it, you must turn it on.
VICHIP MOVIE RATING LIMIT
With the Movie Rating Limit you can set movie-viewing limits.
Blocking Movie Ratings
You can automatically block all movie ratings above a specified rating using
Movie Ratings Limit in the Parental Controls menu.
• To block all movies above a certain rating: In the Rating field,
use CH^/v to highlight the lowest unacceptable rating. Then highlight
the Rating Status field and press the CH ^Iv buttons to change the
status from Viewto Block. All higher ratings will automatically change
to Block.
• To lock your selection(s): Select Parental Controls from the
Parental Controls menu. Pressthe Vol + to select LOCKED. Enter your
password (if you have not already set your password, you will be
prompted to enter it again to confirm). The word UNLOCKED will flash
to remind you that the Parental Controls are not LOCKED.
Viewing Movie Ratings
After you block movie ratings, you have the option of changing some of the
ratings back to View.
• To view movie ratings: Highlight the Rating field and use the
CHA/v buttons to find the rating you want to view. Then use VOL+ to
highlight the Rating Status field, and use CHA/v to change the status to
View.
V-Chip Parental Controls
Selecting Movie Rating Limit
Rating
field Rating Status field
Movie Rating limit
Viewing movie ratings
V-Chip Parental Controls
VICHIP TV RATING LIMIT
The V-Chip TV Rating Limit lets you decide which TV programs can be
viewed. To set TV programming limits:
1. Choose V-Chip Parental Controls from the Main menu. If Parental
Controls have previously been locked, you must enter your
password. If they are not locked, you will get a message reminding
you that your limits will not be effective until you lock Parental
Controls.
2. PressMENU to continue.
3. Highlight and select TVRating Limit.
4. Once you get to the TV Rating Limit screen, use the CHAN ^Iv and
VOL +/- on your remote to change the status of a TV program rating
or content theme from Viewto Block.
The following sections give you more details about how to change the status
of TV program limits.
Selecting TV Rating Limit
TIP
When you change the status of an
age-based rating to Block, the
system will automatically block that
rating and all of its content themes
and all higher ratings and their
content themes. When you change
the status of a Content Theme to B,
the system will automatically block
that content theme in the current
rating and in all higher ratings.
Only the content theme status
corresponding to the current age-
based rating changes to View (V).
Higher rated content themes do not
change.
6
The TV Rating Limit Screen
Below is an example of where items are located within the TV Rating
Limits screen. Tip
You can always press MENU to exit
back to the previous screen while in
the Rating Limit menus.
Rating field
Lets you select from a list of
age-based ratings you can
block or view. TV Rating Limit
Content Themes
Liststhe content themes you
or view.
Pointer Highlight
Lets you see the position of
the cursor on the screen.
Content Status fields
Letsyou select which content
and whether the status
View (V) or Block (B).
The TV age-based ratings and content themes you can block are listed in the
table below.
Rating Status field
Lets you select whether the status of the
age-based rating limit to the left is View or
Block.
Age-Based
Rating Description and Content Themes for Age-Based Ratings
TV-MA Mature Audience Only. Specifically designed to be viewed by adults and may be unsuitable for children
under 17. It contains one or more of the following content themes: graphic violence (V), explicit
sexual activity (S), or crude indecent language (L).
TV-14 Parents Strongly Cautioned. Contains some material that many parents would find unsuitable for children
under 14. Parents are strongly urged to exercise greater care in monitoring this program and are cautioned
against letting children under the age of 14 watch unattended. This program contains one or more of the
following content themes: intense violence (V), intense sexual situations (S), strong coarse language
(L), or intensely suggestive dialogue (D).
TV-PG Parental Guidance Suggested. Contains material that parents may find unsuitable for younger children. Many
parents may want to watch it with their younger children. The program contains one or more of the
following content themes: moderate violence (V), some sexual situations (S), infrequent coarse
language (L), or some suggestive dialogue (D).
TV-G General Audience. Most parents would find this program suitable for all ages. It contains little or no
violence (V), sexual situations (S) no strong language, (L) and little or no sexual dialogue (D).
TV-Y7 Directed to Children 7years and older. Designed for children ages 7 and above. It may be more appropriate
for children who have acquired the developmental skills needed to distinguish between make-believe and
reality. Themes and elements in this program may include mild fantasy violence (FV) or comedic violence,
or may frighten children under the age of 7.
TV-Y All Children. Themes and elements in this program are designed for a young audience, including children frolT
ages 2-6. It is not expected to frighten younger children.
7
Blocking Age-Based Ratings and Content Themes
You can automatically block all program ratings or content above a
specified age-based rating level using the V-Chip TV Rating Limit screen.
Refer to the chart at the beginning of this section to learn about each age-
based rating and its associated content ratings.
• To block all programs above a certain rating level: Highlight
the Rating field, then scroll through the ratings using the CH^/v
buttons until the lowest unacceptable rating is highlighted. Then use
the VOL + button to highlight the Rating Status field and select Block.
•To block all programs with specific content above a certain
rating level: Content Themes are specific to the rating level.
Therefore, you must first highlight the Rating field and scroll through
the ratings using the CH^/v buttons until the lowest rating associated
with the type of content you want to block is highlighted. Then
highlight the Content Theme Status field and change the V to B under
the appropriate Content Theme.
Viewing Age-Based Ratings and Content Themes
After you have blocked age-based ratings and content themes, you have the
option of selectively changing some of the ratings and themes back to View.
•To view ratings: Use the VOL +/- buttons to highlight the Rating
Field, then use CH^/v to change its status from Block to View. When
you change a specific rating to View, the Content Status fields
corresponding to the unblocked rating become View as well.
•To view content: Highlight the Rating field, then use CH^/v to find
the rating whose Content Theme settings you want to change. Next,
highlight the Content Theme Status that you want to change using
the VOL + button; then use CH^/v to change it to V.
Rating field Content Themes
Rating Status fi Content Themes
Status field
Blocking age-based ratings and content themes
Rating field Content Themes
Rating Status field Content Themes
Status field
Viewing age-based ratings and content themes
While within the Rating Limit screens, 1
pressing RESETon the remote will
reset all ratings to View and V.
Overriding Limits
When you override a blocked
program by entering your password,
the Parental Controls option on the
V-Chip Parental Controls menu will
read Disabled. In this state, access to
the Parental Controls menu is still
locked and all controls will be in
effect the next time the TV is turned
on,
8