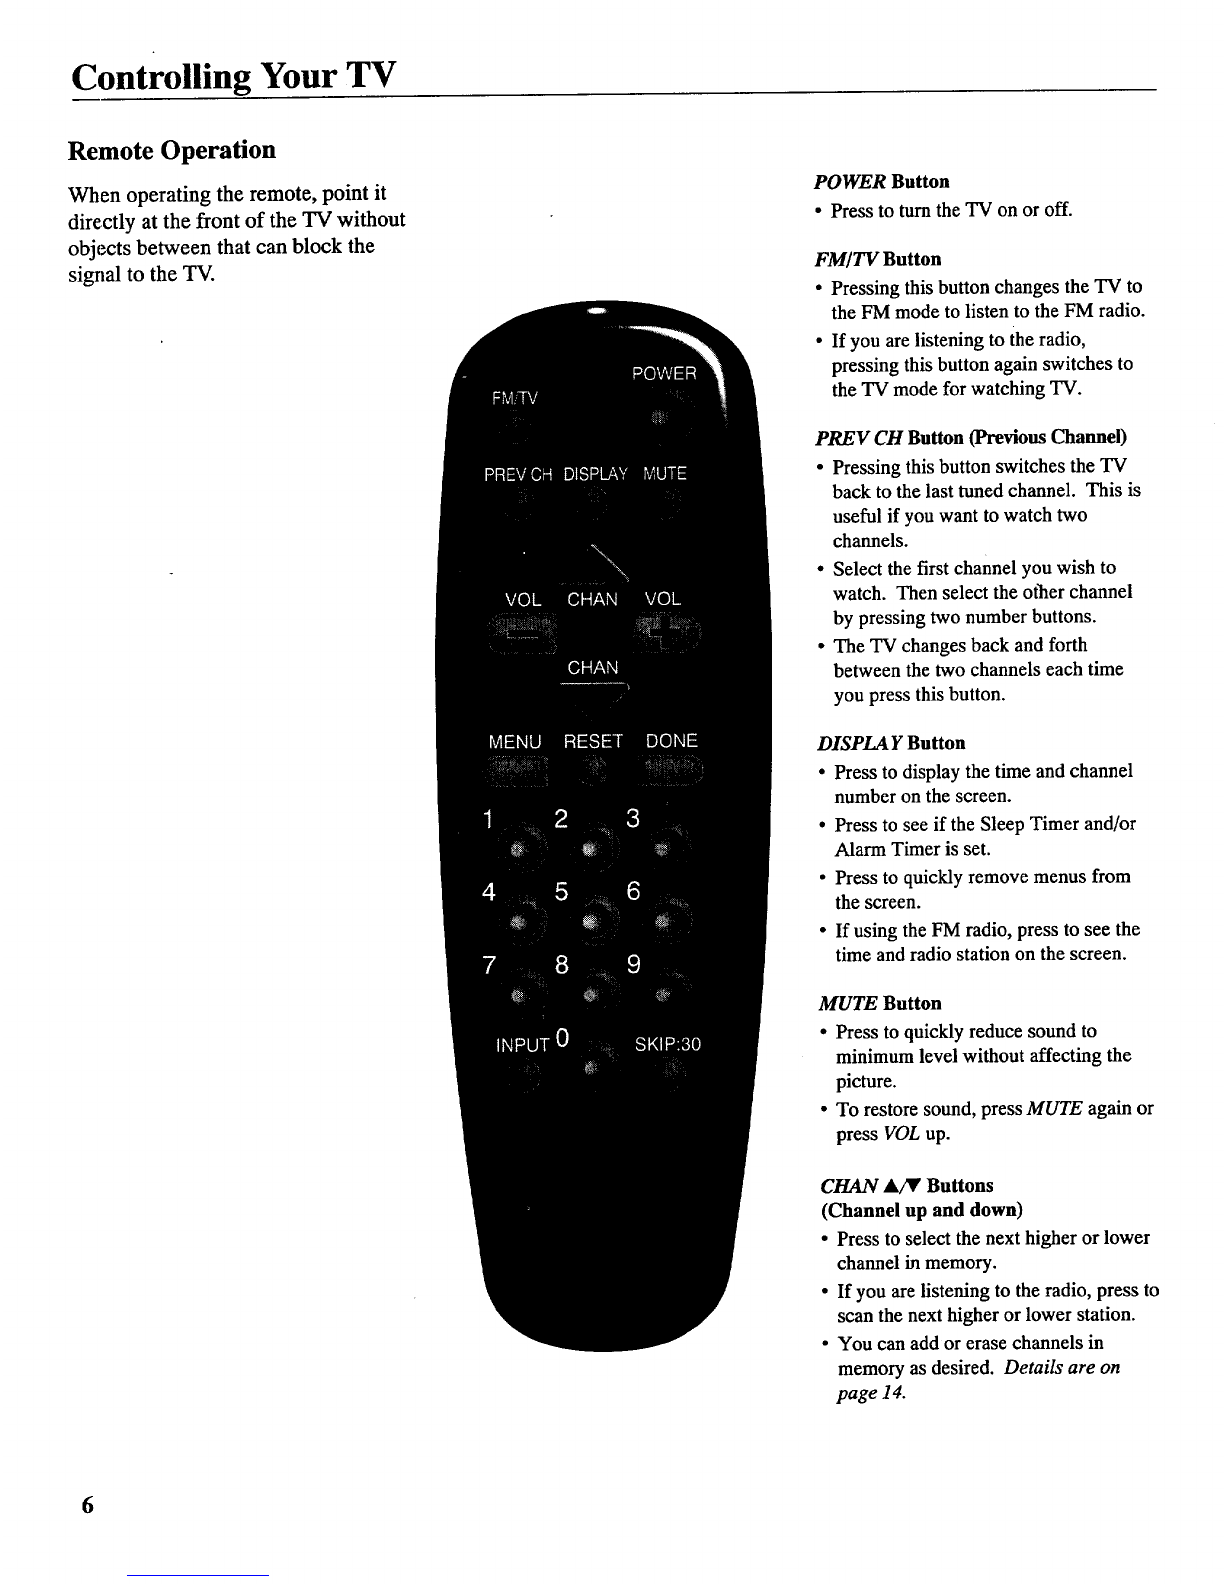
RCA E13327 User manual

USER'S
GUIDE
ImportantInformation..........i
TableofContents..................1
GettingStarted..................2-3
ControllingYour1!/............4-7
OperatingFeatures..........8-14
ConnectingYour1!/........15-20
Accessories....................21-22
CaringForYour11/..............23
CO
TroubleChecks..............24-25 ""
LimitedWarranty...BackCover _ ""
•I

Important Information
I
I WARNING: To reduce fire or shock hazard, do not [
expose this TV to rain or moisture.
This symbol"
Indicates
"dangerous
voltage" inside the
product that
presents a risk of
electric shock or
personal injury.
TO REDUCE THE RISK
OF ELECTRIC SHOCK,
DO NOT REMOVE
COVER (OR BACK).
NO USER SERVICEABLE
PARTS INSIDE
REFER SERVICING TO
QUALIFIED SERVICE
PERSONNEL
This symbol
indicates important
instructions
accompanying the
product.
CAUTIONS:
Do not defeat the safety feature of this plug. The wide blade fits
into the wall socket only one way. If you need an extension
cord, make sure it matches the plug of the TV.
Operate TV only on 120 volts, 60 Hz AC power (normal house
power), or 12 volts DC power.
For safety reasons, make sure any equipment or accessories
connected to this product bears the UL listing mark or if
purchased and used in Canada, the CSA certification mark. If in
doubt, contact qualified service personnel.
FCC Regulations state unauthorized changes or modifications to
this equipment may void the user's authority to operate it.
To prevent electric shock, match wide blade of plug
to wide slot, fully insert.
Pour 6viter les chocs 61ectriques, introduire la lame
la plus large de la fiche dans la borne correspondante
de la prise et pousser jusqtl an fond.
Note to Cable TV Installer:
This reminder is provided to call your attention to Article 820-40
of the National Electrical Code (Section 54 of the Canadian
Electrical Code, Part 1) which provides guidelines for proper
grounding and, in particular, specifies that the cable ground shall
be connected to the grounding system of the building as close to
the point of cable entry as practical.
Product Registration
Please fill out the product registration card and return it
immediately. Returning this card allows us to contact
you if needed.
MODEL NO.
SERIAL NO.
Keep your sales receipt to obtain warranty parts and
service and for proof of purchase. Attach it here and
record the serial and model numbers in case you need
them. The numbers are located on the back of the TV.
PURCHASE DATE:
PURCHASED FROM:

Introduction
Thank you for choosing RCA
Your television is designed for long
life and superior operation. Despite
its sophistication, your new TV is
amazingly simple to operate because
it has so many automatic features.
Table of Contents
Getting Started
First-Time Operation ................................................................... 2-3
Controlling Your TV
Front Panel and Headphone Jack .................................................... 4
On-Screen Displays ........................................................................ 5
Remote Operation ........................................................................ 6-7
Operating Features
FM Radio Operation ........................................................................ 8
VIDEO Menu .................................................................................. 9
Languages (English, French, Spanish) ........................................... 10
Closed Captioning .......................................................................... 10
SETUP Menu ................................................................................ 11
Sleep Timer Operation .................................................................. 12
Alarm Timer Operation ................................................................. 13
Autoprogramming Channel Memory ............................................ 14
Editing Channel Memory ............................................................... 14
Connecting Your TV
Antenna/Cable Information .......................................................... 15
Dipole Antenna Connection ........................................................... 16
Home Antenna Connections ......................................................... 17
Cable-TV Connections .................................................................. 18
Cable-TV Operation ...................................................................... 19
Using DC Power Cord .................................................................. 20
Accessories
Accessories ................................................................................... 21
Order Form .............................................................................. 21-22
Caring for Your TV
Cleaning & Care ........................................................................... 23
Trouble Checks ..................................................................... 24-25
Limited Warranty ......................................................Back Cover

Getting Started
First-Time Operation
The steps below will help you get your TV connected and working quickly.
Page numbers are also listed for more details.
1. Unpack TV and accessories.
Shown below are the accessories that
came packed with your TV.
2. Place batteries in remote.
1. Turn the remote control face down.
2. Press down on the ridged area of the
battery cover and slide it off.
Remote Control and
Two Batteries 3. Place two "AAA" batteries as shown
matching the + and -end of each
battery in the compartment.
4. Replace the cover.
3. Connect antenna or cable-TV
system.
Most antenna or cable-TV systems can
be connected as shown here.
:'_ Back
of "rv
Incoming Cable from Antenna or
Cable-TV System
• Details for connecting a home antenna
to your TV are onpage IZ
• Details for connecting a cable-TV
system to your TV are onpages 18o19
4. Attach power cord.
First attach the flat end of the power cord
completely into the connector on the back
of your TV, and then plug the other end
into a wall outlet.
d-"
®
Back of'rv
2rid
Do This Not Thls
2

Getting Started
First-Time Operation
5. Turn on TV and place channels
in memory.
Your TV is designed to place active
channels into your TV's memory the first
time you turn it on.
'obb
'obb
bbb
•Press POWER on the TV or remote to
turn on the TV.
•The TV automatically cycles through
all channel numbers and places active
channels into the channel memory.
When your TV is finished, it tunes to
the lowest channel number in its
channel memory.
6. Edit the channel memory.
You can add and erase channels from
memory as desired.
•Press MENU repeatedly to highlight
SETUP. Then press + to select the
SETUP menu.
•Press MENU repeatedly to highlight
EDIT CHANNELS.
Press MENU
repeatedly to
see 2rid setup
menu.
Press ÷ to select EDIT CHANNELS.
Select the desired channel number by
pressing the CHANNEL up or down
button or by pressing two number
buttons.
7. Set the clock.
•Press MENU repeatedly until SETUP is
highlighted. Then press + to select the
SETUP menu.
•Repeatedly press MENU to select
CLOCK.
• Press and hold - to set the correct hour.
Then press and hold + to set the correct
minutes.
•Press DONE to remove the menu from
the screen.
•Then press +to add a channel, or
press -to erase a channel. Details
are on page 14.
•Press DONE to remove the menu from
the screen.
3

Controlling Your TV
Front Panel and Headphone Jack
Shown here are the front-panel buttons and the headphone jack.
Headphone Jack
Remote
Sensor
Remote Sensor
• When using the remote control, point it toward this sensor.
Headphone Jack
• You can plug anoptional set of headphones into this jack for
private listening. When headphones are attached, the sound
comes through the headphones instead of the TV speaker.
•If the plug on your headphones does not fit the jack, adapters
are available atyour local electronics supply store.
CH A and x/Buttons (Channel Up and Down)
• Press Channel up to see the next higher channel in memory.
•Press Channel down to see the next lower channel in
memory.
•You can add or erase channels in memory as desired.
Details are onpage 14.
VOL Buttons (Volume Up and Down)
(Also + and - Buttons)
• Press VOL + to increase volume, or press VOL - to decrease
volume.
•Press +or - to adjust the setting of an item that is
highlighted in the menu.
• '/'he volume display will automatically appear on the screen
when you press the VOL buttons.
MENU Button
•Press repeatedly until the item you want is highlighted, then
press +or - to enter the menu.
• Press repeatedly to move down each menu screen and then
press +or - to adjust each setting.
• To mute the TV, press once and then press +.
RESET Button
• Press to return all video settings (color, tint, contrast,
brightness, and sharpness) back to the original settings.
POWER Button
• Press to turnthe TV on or off.
TV •FM Button
• Pressing this button changes the TV to the FM mode to listen
to the FM radio.
• If you are listening to the radio, pressing this button again
switches to the TV mode for watching TV.
4

Controlling Your TV
On-Screen Displays
(_ Slee_
Q Alarm Timer
FM Radio Channel Number
_Time
MUTE
_) Sleep Timer
This display appears when the sleep timer has been set.
Details are on page 12.
(_) Time
This display appears after the clock is set whenever you
change channels or press DISPLAYon the remote.
_) Alarm Timer
This display appears when the alarm timer has been set.
Details are on page 13.
QChannel Number
This display appears whenever you change channels or
press DISPLAYon the remote.
®MUTE
This display appears when the TV's sound is muted. Press
MUTE on the remote. Details are on pages 4 and 6.
Q FM Radio
This display appears whenever you change stations or
press DISPLAY while in the FM radio mode. Details are
on page 8.
5

Controlling Your TV
Remote Operation
When operating the remote, point it
directly at the front of the TV without
objects between that can block the
signal to the TV.
6
POWER Button
• Press to turnthe TV on or off.
FM/TV Button
•Pressing this button changes the TV to
the FM mode to listen to the FM radio.
•If you arelistening to the radio,
pressing this button again switches to
the TV mode for watching TV.
PREV CH Button (Previous Channel)
•Pressing this button switches the TV
back to the last tuned channel. This is
useful if you want towatch two
channels.
• Select the first channel you wish to
watch. Then select the ot]ler channel
by pressing two number buttons.
•The TV changes back and forth
between the two channels each time
you press this button.
DISPLA Y Button
• Press to display the time and channel
number on the screen.
•Press to see if the Sleep Timer and/or
Alarm Timer is set.
• Press to quickly remove menus from
the screen.
• If using the FM radio, press to see the
time and radio station on the screen.
MUTE Button
• Press to quickly reduce sound to
minimum level without affecting the
picture.
• To restore sound, press MUTE again or
press VOL up.
CHAN A,/_' Buttons
(Channel up and down)
• Press to select the next higher or lower
channel inmemory.
•If you are listening to the radio, press to
scan the next higher or lower station.
• You can add or erase channels in
memory as desired. Details are on
page 14.

Controlling Your TV
Remote Operation
When operating the remote, point it
directly at the front of the TV without
objects between that can block the
signal to the TV.
VOL Buttons (Volume up and down)
(Also - and + Buttons)
• Press VOL + to increase volume, or
press VOL - to decrease volume.
• Press + or -to adjust the setting of an
item highlighted in a menu.
• The volume display appears on the
screen when you press the VOL
buttons.
MENU Button
•Press repeatedly until the item you
want is highlighted, then press + or - to
enter the menu.
•Press repeatedly to move down each
menu screen and then press + or - to
adjust each setting.
• To mute the TV, press once and then
press +.
RESET Button
• Press to return all video settings
(color, tint, contrast, brightness, and
sharpness) back to the original settings.
DONE Button
• Press to clear the screen of all
on-screen displays except MUTE.
Number Buttons (0-9)
• Press to access any channel number.
•To select achannel, press two number
buttons. For example, press 0 then 6
for channel 6.
•To select a 3-digit number, press and
hold numberbutton 1 until 1-- appears
on the screen. Then press the other
two numbers.
INPUT Button
•Switches the TV to channel 03. This is
useful if you have a VCR connected to
your TV.
SKIP:30 Button (Commercial Skip)
•Allows you to look at other channels
during commercials by using the
CHANNEL buttons.
• Each press adds 30 seconds. The TV
switches back to original channel when
time runsout.
7

Operating Features
FM Radio Operation
The FM radio is designed to work
on either cable-TV or a home
antenna. If your TV is connected to
cable-TV, the radio will only work
if your cable company broadcasts
the FM radio signals. If your TV is
connected to a home antenna
sysllem, you will be able to receive
tho:_e channels broadcast in your
area.
The radio can be used along with
the sleep timer and alarm timer.
Listen to music before going to
sleep or wake up to music. Details
for "Setting the Sleep Timer" are
on page 12 and "Setting the
Alarm" are on page 13.
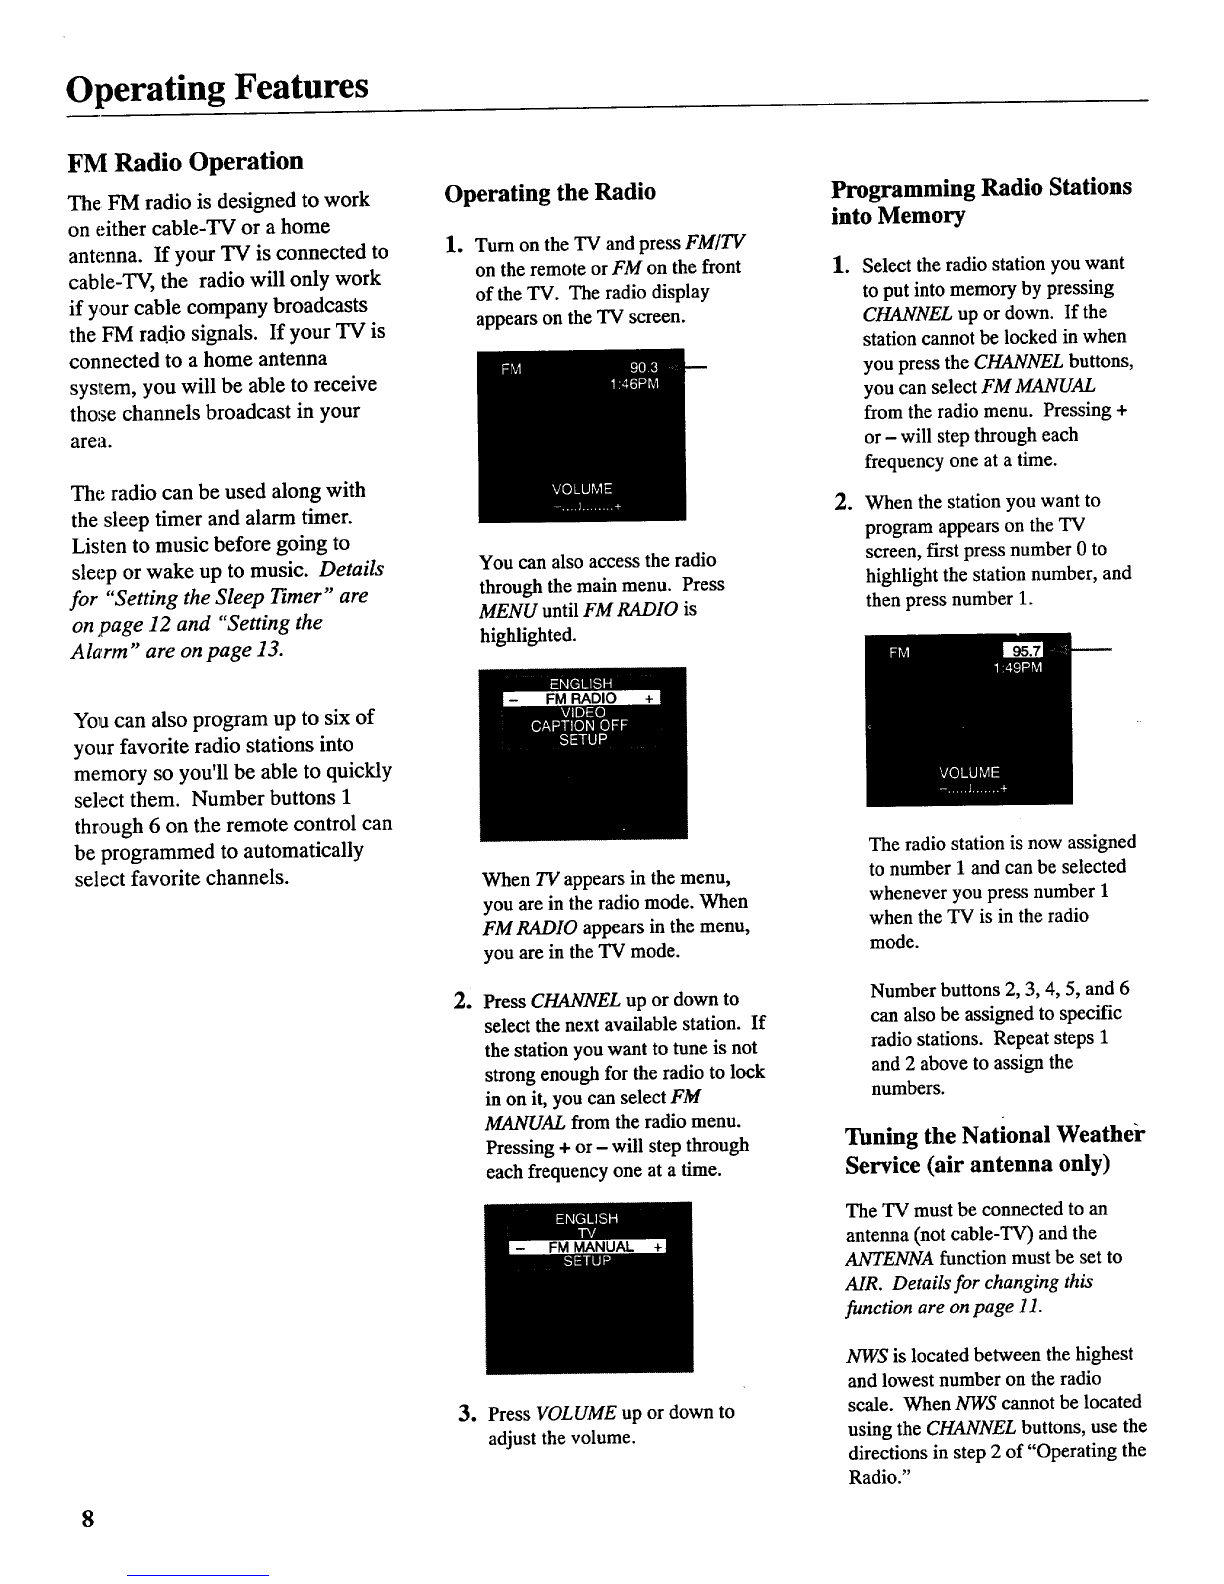
Operating the Radio
1. Turn on the TV and press FM/TV
on the remote orFM on the front
of the TV. The radio display
appears on the TV screen.
You can also access the radio
through the main menu. Press
MENU until FM RADIO is
highlighted.
Programming Radio Stations
into Memory
.
o
Select the radio station you want
to put into memory by pressing
CHANNEL up or down. If the
station cannot be locked in when
you press the CHANNEL buttons,
you can select FM MANUAL
from the radio menu. Pressing +
or - will step through each
frequency one at a time.
When the station you want to
program appears on the TV
screen, first press number 0 to
highlight the station number, and
then press number 1.
You can also program up to six of
your favorite radio stations into
memory so you'll be able to quickly
select them. Number buttons 1
through 6 on the remote control can
be programmed to automatically
select favorite channels.
e
o
When TV appears in the menu,
you are in the radio mode. When
FM RADIO appears in the menu,
you are in the TV mode.
Press CHANNEL up or down to
select the next available station. If
the station you want to tune is not
strong enough for the radio to lock
in on it, you can select FM
MANUAL from the radio menu.
Pressing + or- will step through
each frequency one at a time.
Press VOLUME up or down to
adjust the volume.
The radio station is now assigned
to number I and can be selected
whenever you press number 1
when the TV is in the radio
mode.
Number buttons 2, 3, 4, 5, and 6
can also be assigned to specific
radio stations. Repeat steps 1
and 2 above to assign the
numbers.
Tuning the National Weathei"
Service (air antenna only)
The TV must be connected to an
antenna (not cable-TV) and the
ANTENNA function must be set to
AIR. Details for changing this
function are on page 11.
NWS is located between the highest
and lowest number on the radio
scale. When NWS cannot be located
using the CHANNEL buttons, use the
directions in step 2 of "Operating the
Radio."

Operating Features
VIDEO Menu
Press MENU until VIDEO is highlighted. Then press + to
select the VIDEO menu. Press MENU to move down the
menu and + and -to adjust each function.
Press
M/_:NU
to select
VIDEO
Press +
for 1st
VIDEO
Menu
Screen
The VIDEORESETfunction changesall thevideo functions (color,tint,
contrast, brightness, sharpness) back to the factory settings. Press +or - to
reset the videofunctions. RESETappears on the TV screen momentarily
whilethe functions arebeing adjusted.
Press
MENU
until the
second
VIDEO
Menu
appears
The COLOR function adjusts the amount of color in the picture. Press +or -
to select COLOR, then press + to increase or press - to decrease color.
The TINT function adjusts the color of flesh tones. Press + or- to select
TINT. Press + to add more green tint or press - to add more.red tint.
The CONTRAST function adjusts the overall brightness and contrast of the
picture. Press + or-to select CONTRASZ Press + to increase or press - to
decrease contrast.
The BRIGHTNESS function adjusts the brightness of the dark portions of the
picture. Press +or-to select BRIGHTNESS. Press + to increase or
press - to decrease brightness.
The SHARPNESS function adjusts picture sharpness. Press +or -to select
SHARPNESS. Press + to increase or press - to decrease.
Adjustment
Displays These functions are displayed individually at the bottom of the screen once
they have been selected. The setting can be adjusted at that time by pressing
either the +or - button.
9

Operating Features
Languages
The on-screen displays in this TV can
be displayed in three languages:
Engl£sh, French, and Spanish. When
you select a language, most of the
displays will be shown on the screen
in your preferred language.
Selecting a language
1. Press MENU once to bring up the
main menu and highlight
ENGLISH.
.Press +or- to select FRANCAIS
(French), ESPANOL (Spanish),
or ENGLISH.
Closed Captioning
Closed captioning lets you display the
audio portion of a program as text on
the TV screen. This is useful to the
hearing impaired or anyone who
wants to watch a program without the
sound.
There are two types of closed
captioning available: C1 (Caption 1)
and C2 (Caption 2). C1 displays the
full translation of the primary
lan_;uage in your area. C2 may be
used as a source for secondary
languages, simplified English, or
othe,r translations transmitted in your
area..
The closed captioning feature in this
TV does not support a Text Mode.
Typically, the Text Mode consists of
program information, weather
bulletins, local activities, etc.
Closed captioning is not available on
all channels or at all times. Only
specific programs are encoded with
closed captioning information (CC).
Setting Closed Captioning
1. Press MENU until CAPTION
OFF is highlighted.
2. Press 4-or -to select OFF, C1,
or C2.
3. When finished, the display
disappears from the screen.
1The screen displays the TV
program's audio portion as text if
the program has closed
captioning.
10

Operating Features
SETUP Menu
Press MENU until SETUP is highlighted. Then press +to select the SETUP
menu. Press MENU to move down the menu and + and - to adjust each
function. When using the FM radio, only the first Setup menu appears.
Press
MENU
to select
SETZIP SETUP
By setting the Sleep function, you program your TV or radio to turn itself
off after a certain period of time. This is useful whenever you want to watch
TV or listen to the radio for an hour or so before going to sleep. Press the +
or - button to select the length of time you want the TV or radio to stay on.
Details are on page 12.
1st
SETUP
Menu
Screen
You can program your TV or radio to turn itself on at a specific time by
setting the ALARM time function and turning the ALARM:ON/OFF function
ON. Details are on page 13.
Thee, ARM:ON/OFF function lets you turn the alarm on or off by pressing
the ÷ or - button. Details are on page 13.
After setting the CLOCK function, the time is displayed on the 'IV screen
whenever you change channels or press DISPLAY on the remote control.
Press and hold - to set the correct hours and + to set the correct minutes.
are on page 3.
Press
MENU
until the
second
SETUP
Menu
appears
AUTOPROGRAM
When you press +or -to start theAUTOPROGRAM function, the TV cycles
through all channels and places only the active channels for your area in its
channel memory. The channel memory is the list of channels the TV stops
on when you press CHANNEL up or down. Details are onpage 14.
The EDIT CHANNELS function allows you to edit the channel memory by
adding or erasing channels. Details are on page 14.
The ANTENNA:CABLE/AIR function tells your TV whether you have cable
or a home antenna connected to it. The TV adjusts this function for you
when you start theAUTOPROGRAM function. If you wish to adjust it
manually, press + or - to switch between the CABLE andA/R setting.
The LIST FEATURES function activates your TV to automatically list a
variety of its special features. When this display is selected, start this feature
by pressing the + button. The feature list continues until it is stopped by
pressing any button on the front of the TV or DONE on the remote.
11

Operating Features
Sleep Timer Operation
By setting the Sleep Timer, you can
program your TV or FM radio to turn
itself off after a certain period of time
(up to four hours). This is useful
whenever you want to watch TV or
listen to the radio for an hour or so
before going to sleep.
Setting the Sleep Timer
1. Press MENU until SETUP is
highlighted. Then press + to select
the SETUP menu.
SETUP
4. When the Sleep Timer is turned on,
the letters SLP appear on the screen
whenever you change channels or
stations or press DISPLAY.
2. Press +to select the length of time
you want the TV to stay on. Each
press of the + button adds 30
minutes. Each press of the - button
subtracts 30 minutes.
5. Repeat step 1 to see the amount of
time remaining before the TV shuts
itself off.
32 minutes
remaining
3. When finished, the display
disappears from the screen in a few
seconds. To make it disappear
more quickly, press DONE on the
remote.
6. When the Sleep Timer counts down
to one minute, the Sleep Timer
display appears on the screen.
When this display appears, press
DONE to cancel the Sleep Timer if
you want the TV or radio to remain
on.
Cancelling Sleep Timer
Press MENU until SETUP is highlighted.
Then press + to select the SETUP menu.
Press the - button until the screen
shows" • "
-.-- .
12

Operating Features
Alarm Timer Operation
The TV or radio can be
programmed to turn itself on at a
specific time within a 24-hour
period by setting the Alarm Tuner.
This is useful for using the TV as
an :alarm clock. Instead of waking
up to a buzz, wake up to a favorite
TV program. You may also set the
timer for a special program that
you might otherwise forget.
Setting the Alarm Timer
1. Press MENU until SETUP is
highlighted. Then press + to select
the SETUP menu.
4. When the Alarm Timer is turned
on, the letters ALM appear on the
screen whenever you change
channels or press DISPLAY.
Once you set the Alarm Timer, the
TV or radio turns on at the preset
time, stays on for one hour, and
then shuts_off. You may need to
adjust the channel and volume
level before activating the Alarm
Timer. The Alarm Timer turns on
the TV to the TV channel or radio
station and the volume level that
was selected the last time the TV
or radio was on.
2. Press MENU until ALARM is
highlighted. Press -to select the
correct hour and press + to select
the correct minutes.
3. After you set the ALARM time,
press MENU to select
ALARM:ON/OFF. Press + or- to
switch this setting to the ON
position.
.
.
The TV turns on at the preset time
and automatically sets the Sleep
Timer to 1 hour (60 minutes). It
operates for 60 minutes then shuts
off.
To turn the TV off before the 60
minutes is up, just press POWER
on the TV or the remote. If you
wish to watch TV longer than 60
minutes, then cancel the Sleep
Timer by setting it to "-:--'.
Details are on page 12.
Turning the Alarm On and Off
1. PressMENU until the ALARM:
ON/OFF function is selected. 2. Press +or -to switch between ON
and OFF.
13

Operating Features
AutoProgramming Channel Memory
The Channel Memory is the list of
TV channel numbers your "IV will
stop on when you press the
CHANNEL up or down button. You
can program any list of channels into
the channel memory although your
TV i,; so at_tomatic that you will
probably never need to manually
operate this feature. If you do,
follow the instructions at the right.
The first time you turn on the TV, it
cycles through all channels and
plac_:s active channels into the
channel me mol-y. You can then add
or erase channels as desired by
following the instructions in the
"Editing Channel Memory" section
at the fight.
Notes:
• Signals from scrambled cable channels
and some cable channels having unusual
signal conditions may not be
autoprogrammed.
• To prevent the "IV from losing its
channel memory, make sure the outlet
you plug your TV into is "on" all the
time. Do not plug the TV into an outlet
that can be turned on and off by a wall
switch. Also do not plug the TV into an
o_ttlet on the back of another device
(such as a cable-TV converter box) that
is turned off when the device is turned
off.
• If there is an extended power failure,
your TV will automatically reprogram
active channels the first time you turn it
on after the power failure.
1. Connect home antenna(s) or cable
to your set,
2. Press MENU until SETUP is
highlighted. Press ÷ to select the
SETUP menu.
SETUP
3. Repeatedly press MENU until
AUTOPROGRAM is highlighted.
2rid
SETUP
Menu
4. Press +to begin AutoProgramming.
The TV cycles through all channels
and places only active channels into
memory.
Editing Channel Memory
Follow these instructions to erase and
add channels.
1. Press MENU until SETUP is
highlighted. Press + to select the
SETUP menu.
2. Repeatedly press MENU until EDIT
CHANNELS is highlighted. Press
÷ to select EDIT CHANNELS.
2nd
SETUP
Menu
°Select the channel number by
pressing CHANNEL up or down or
two number buttons on the remote.
When "+" appears next to the
channel number, the channel is in
the channel list. Press - to erase the
channel.
When "-" appears next to the
channel number, the channel is not
in the channel list. Press + to add
the channel.
5. When the TV finishes cycling, you
can check the channels in memory
by pressing CHANNEL up or down.
4. Press- to erase or press the + to
add.
14

Connecting Your TV
Antenna/Cable Information
Most modem TV antennas receive both
VH_ (Very High Frequency) and UHF
(Ultra High Frequency) channels.
Channels 2-13 are VHF channels, and
cheaanels 14-69 are UHF channels.
Typical
Indoor
Antenna
__ Typical
Outdoor
Antenna
In most situations you will get better
picture quality if you use an outdoor
an_tennaor connect your TV to a cable-
TV system. If this is not possible,
connect the indoor antenna supplied with
your TV.
Cable-TV delivers both VHF and UHF
channels and other channels not available
from your antenna.
Shown below are two basic types of
antenna cables. Signals from a home
antenna may be conducted through either
type. Cable-TV signals, however, are
always conducted through round, 75-ohm
coaxial cable.
Types of Antenna Cables
Flat 300-ohm
twin-leadcable
1_1_<1---_- Slip-onEnd
-,_----.---_ Screw-on End
Round75-ohm
coaxial cable
Use the connector shown below to
connect your antenna or cable-TV system
to the back of the TV.
Washer
Antenna
Conne_or__._.._ _ Nut
IMPORTANT NOTE: Antenna
connector, nut, and washer must be
in place when TV is in use.
•Follow the instructions onpage 16 if
you intend to connect the indoor
antenna supplied with your TV.
-or-
"Follow the instructions on page 17 if
you intend to connect an indoor or
outdoor antenna to your TV.
-or-
"Follow the instructions onpage 18 if
you intend to connect a cable- TV
system to your TV.
15

Connecting Your TV
Dipole Antenna Connection
Follow the steps to connect the indoor
antenna supplied with your TV (only if
you do not connect an outdoor antenna or
a cable-TV system).
O
®
Insert the antenna base into the
pocketed slot on the back of your
set. Stand at the back of your set
with the antenna twin-lead facing
you, and press the base of the
antenna into the slot until it locks in
place.
Connect the ends of the twin-lead to
the Antenna Adapter (supplied).
Connect the Antenna Adapter to the
ANTENNA connector on the back of
the TV.
Later, after you've turned on the
TV, adjust the length and position
of the antenna rods for best
reception.
•For viewing VHF channels, extend
the rods fully.
• For viewing UHF channels,
shorten the rods for best reception.
•For listening to the radio, adjust
the antenna rods for best reception
if necessary.
Dipole Antenna (Supplied)
/,,,,
Slot
Antenna Adapter Q
(Supplied)
ANTENNA
0
Base
Lead
16

Connecting Your TV
Home Antenna Connections
Follow one of the steps below to connect an indoor or outdoor antenna to your TV (not a cable-TV system).
AIf the antenna cable coming from your home antenna is a 75-ohm round coaxial cable thatcarries only VHF (channels 2-13),
only UHF (channels 14-69), or VHF and UHF channels, connect it to your set like this:
Cable ANTENNA
From [_ _Back
Home _of
TV
Antenna VHF or UHF Only
or
VHF/UHF Combination
B"--OR-
If the antenna cable coming from your home antenna is a 300-ohm flat twin lead that carries only VHF (channels 2-13),
only UHF (channels 14-69), or VHF and UHF channels, connect it to your set like this:
Cable _rrE.NA
From Push on _Back
Home _ _ of
Antenna TV
VHF or UHF Only
or Adapter
VHF/UHFCombination (supplied)
--OR-
C If the antenna canes coming from your home antenna(s) are a 75-ohm round coaxial cable that carries VHF (channels 2-13)
and a 300-ohm flat twin-lead cable for UHF (channels 14-69), connect them to your set like this:
Cables UHF _ ...... Push on
From
Home _-!_ and "Back
Antenna(s) of
Transformer** Antenna Mixer*
Note: Be sure to connect the UHF antenna cable to (such as #AH011) (use only #193984)
the UHF screws on the Antenna Mixer and the VHF
antenna cabletothescrews markedVHF. -OR-
DIf the antenna wires coming from your home antenna(s) are two 300-ohm flat twin-lead cables as shown here, connect them
to your set like this:
Push on
Cables UHF
From
Home >and
Antenna(s)
VHF
Note: Be sure to connect the UHF antenna cable to the UHF screws on the Antenna
Mixer and the VHF antenna cable to the screws marked VHF.
Antenna Mixer*
(use only #193984)
ANTENNA Back
of
TV
* _ Optional accessory available from your dealer. Only use Antenna Mixer (Stock #193984). 17

Connecting Your TV
Cable-TV Connections
Follow one of these steps to connect a cable-TV system to your TV instead of a home antenna.
vary,, you may wish to consult your local cable-TV company for additional information.
Since cable-TV systems
A Follow this diagram if your cable company does not require a cable box (no scrambled channels):
Incoming [_Cable _'
ANTENNA Back
°'
"Iv
BFollow-this diagram if your cable company requires acable box thatcan be controlled by remote control:
Cable [_
RemembertotuneyourTV tothe
outputchannelofthecablebox
our channels via the cable box.
CABLE BOX
Back
of
TV
CFollow this diagram if your cable company requires a cable box that cannot be controlled by remote control:
Incoming
Cable
®©
Note: These optional accessories (2-way
splitter(_), A/B switch(_), and three coaxial
cables @) are available as a kit under
#,M-I041BL.*
©
CABLE BOX
©®ANTENNA Back
of
TV
The "A" position on the A/B switch lets you select all
non-scrambled channels by the TV's remote. The "B" position allows you to select scrambled channels
via the cable box. Remember to tune your TV to the
output channel of the cable box (usually 2, 3, or 4)
when selecting channels via the cable box.
*Optional accessories are available from most dealers or electronics supply stores.
18
Table of contents
Other RCA TV manuals