RCA 32V430TYX1GYN User manual

Television
User's Guide
ging Entertainment. lain.

Important Information
-_1 his symbol indicates that this product incorporates double
insulation between hazardous mains voltage and user
accessible parts. When servicing use only identical
replacement parts.
Caution: To reduce the risk of electric shock, do not remove cover {or back). No user serviceable
parts inside. Refer servicing to qualified service personnel.
This symbol indicates important _ This symbol indicates "dangerous voltage" inside the
instructions accompanying the _1_ product that presents a risk of electric shock or
product, personal injury.
WARNING
To reduce the risk of fire or electric shock,
do not expose this product to rain or
moisture.
The apparatus shall not be exposed to
dripping or splashing and that no objects
filled with liquids, such as vases, shall be
placed on the apparatus.
Refer to the identification/rating label located on the
back panel of your product for its proper operating
voltage.
FCC Regulations state that unauthorized changes or
modifications to this equipment may void the user's
authority to operate it.
Caution: Using video games or any external accessory
with fixed images for extended periods of time can
cause them to be permanently imprinted on the
picture tube {or projection TV picture tubes). ALSO,
some network/program Iogos, phone numbers, etc.
may cause similar damage. This damage is not covered
by your warranty.
Cable TV Installer: This reminder is provided to call your
attention to Article 820-40 of the National Electrical
Code {Section 54 of the Canadian Electrical Code, Part
1) which provides guidelines for proper grounding and,
in particular, specifies that the cable ground shall be
connected to the grounding system of the building as
close to the point of cable entry as practical.
Product Registration
Please fill out the product registration card (packed separately) and return it immediately. For U.S.
customers: Your RCAConsumer Electronics product may also be registered at www.rea.eom/
productregistration. Registering this product allows us to contact you if needed.
Product Information
Keep your sales receipt to obtain warranty parts and service and for proof of purchase. Attach it here
and record the serial and model numbers. These numbers are located on the product.
Model No. Serial No. Purchase Date:
Dealer/Address/Phone:

Table of CoHtents
Chapter 1" Connections & Setup
Things to Consider Before You Connect ....................................................................... 3
Protect Against Power Surges ........................................................................... 3
Protect Components from Overheating ........................................................... 3
Position Cables Properly to Avoid Audio Interference .................................... 3
Important Stand and Base Safety Information ................................................ 3
Use Indirect Light ............................................................................................... 3
Cables Needed to Connect Components to Your TV ....................................... 3
TV + DVD + VCR.............................................................................................................. 4
Explanation of Jacks ....................................................................................................... 5
The Front of Your TV ...................................................................................................... 6
Front Input Jacks ................................................................................................ 6
Front Panel Buttons ........................................................................................... 6
Plug in the TV .................................................................................................................. 7
Put batteries in the remote ........................................................................................... 7
How to Use the Remote Control to Complete the Initial Setup ................................ 7
Turn on the TV................................................................................................................. 7
Complete the Initial Setup ............................................................................................. 7
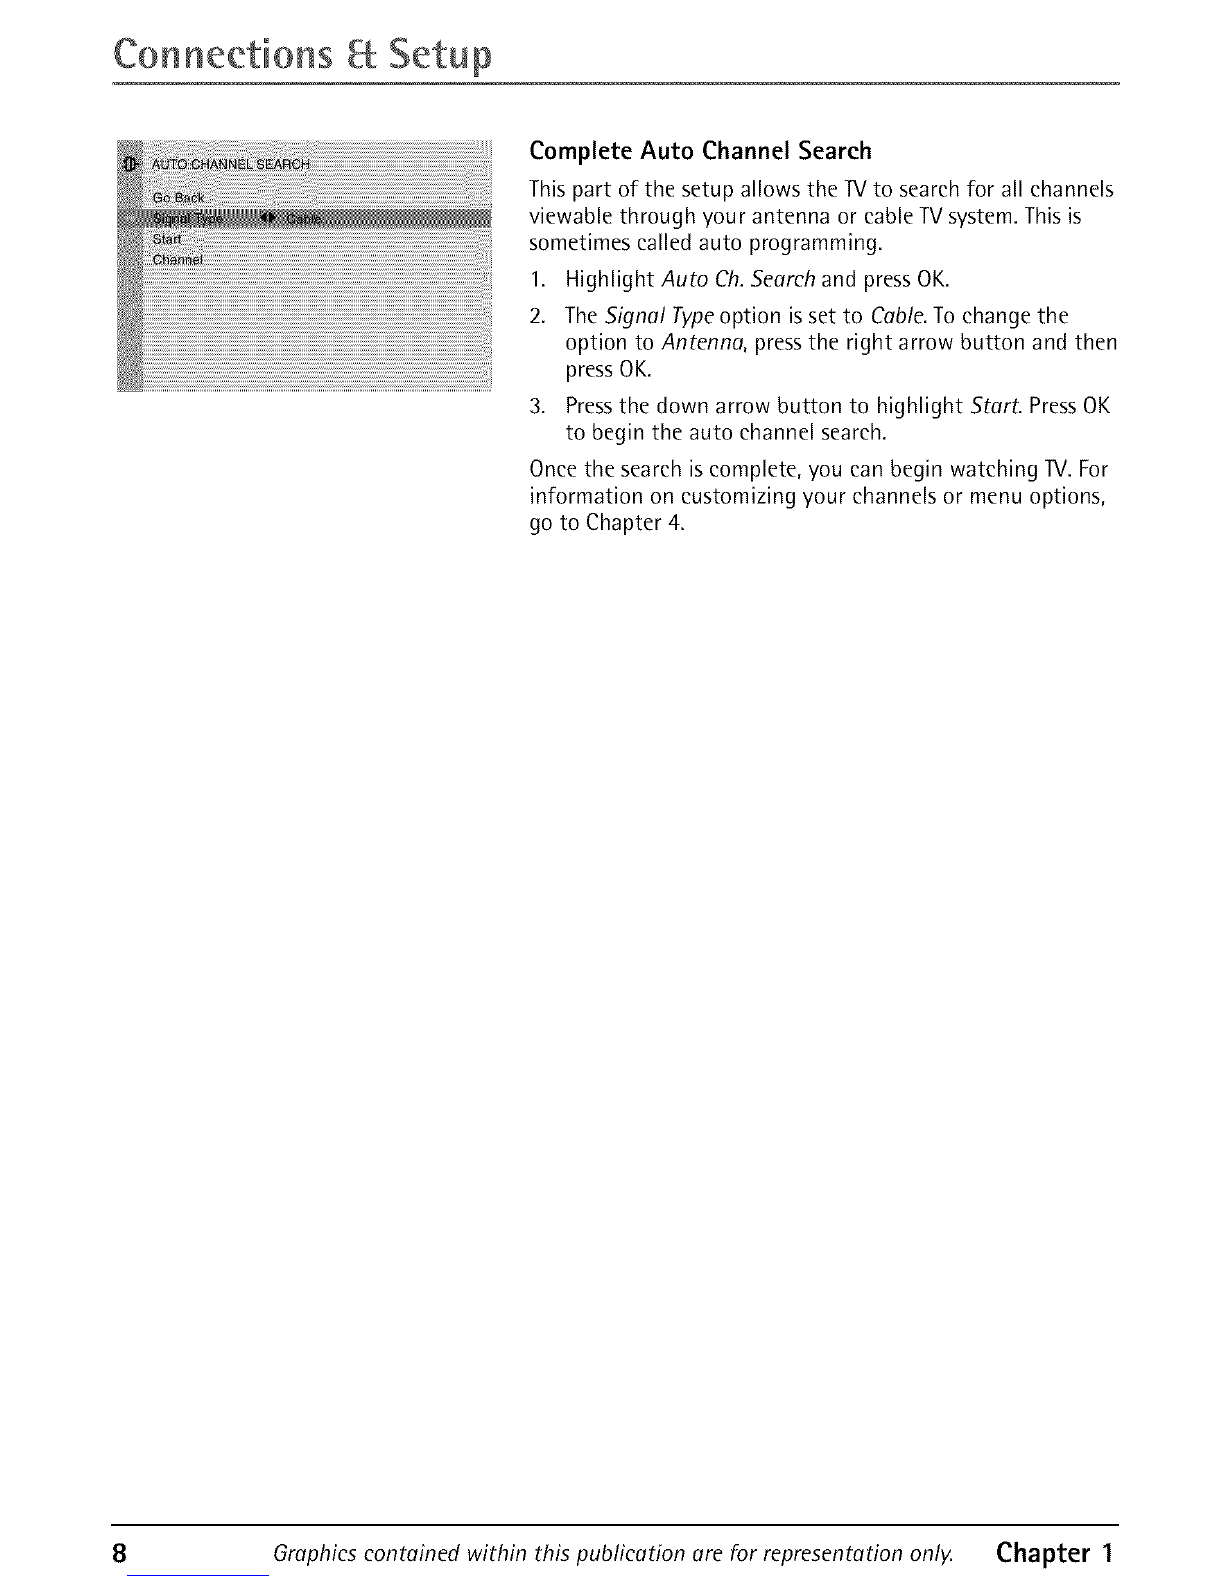
Complete Auto Channel Search ........................................................................ 8
Chapter 2: Using the Remote Control
Button Descriptions for TV Mode .................................................................................. 9
Button Descriptions for DVD and VCR Modes.............................................................. 9
Using the INPUT Button ................................................................................... 10
Programming the Remote to Operate Other Components....................................... 10
Find Out If You Need to Program the Remote ............................................... 10
Programming the Remote ............................................................................... 10
How to Use the Remote After You've Programmed It .................................. 12
Remote Control Codes................................................................................................. 12
Chapter 3: Using the TV's Features
Channel Banner ............................................................................................................ 14
Why You Should Use the Auto Tuning Feature ........................................................ 14
How to Set Up the Auto Tuning Feature ........................................................ 14
Parental Controls and V-Chip ..................................................................................... 15
How V-Chip Works ........................................................................................... 16
USA V-Chip Rating System ............................................................................... 16
Canadian English V-Chip Rating System ......................................................... 16
Canadian French V-Chip Rating System .......................................................... 17

Table of Contents
USA V-Chip TV Rating Limit ............................................................................. 18
Blocking Specific Content Themes .................................................................. 19
Viewing Specific Content Themes ................................................................... 19
Blocking Canadian V-Chip Ratings .................................................................. 20
V-Chip Movie Rating Limit ............................................................................... 20
V-Chip Exempt Program Block ......................................................................... 21
V-Chip Active .................................................................................................... 21
Front Panel Lock ............................................................................................... 21
Change Password ............................................................................................. 21
Chapter 4: Using the TV's Menu System
Sound Menu .................................................................................................................. 22
Picture Menu ................................................................................................................ 22
Setup Menu .................................................................................................................. 23
Parental Control Menu ................................................................................................ 24
Time Menu .................................................................................................................... 24
Chapter 5: Other Information
Troubleshooting ............................................................................................................ 25
Care and Cleaning ........................................................................................................ 27
Limited Warranty ......................................................................................................... 27
2

Things to Consider Before You Connect
Protect Against Power Surges
•Connect all components before you plug any of their power cords into the wall outlet.
• Turn off the TV and/or component before you connect or disconnect any cables.
• Make sure all antennas and cables are properly grounded. Refer to the Important Safety Instructions
packed separately.
Protect Components from Overheating
• Don't block ventilation holes on any of the components. Arrange the components so that air can
circulate freely.
• Don't stack components.
• Ifyou place components in a stand, make sure you allow adequate ventilation.
• If you connect an audio receiver or amplifier, place it on the top shelf so the heated air from it won't
flow around other components.
Position Cables Properly to Avoid Audio Interference
• Insert each cable firmly into the designated jack.
• If you place components above the TV, route all cables down the side of the back of the IV instead
of straight down the middle of the IV.
• If your antenna uses 300-ohm twin lead cables, do not coil the cables. Also, keep the twin lead
cables away from audio/video cables.
Important Stand and Base Safety Information
Choose the location for your TV carefully. Place the TV on a stand or base that is of adequate size and
strength to prevent the TV from being accidentally tipped over, pushed off, or pulled off. This could
cause personal injury and/or damage the IV. Refer to the Important Safety Instructions packed
separately.
Use Indirect Light
Don't place the TV where sunlight or room lighting will be directed toward the screen. Use soft or
indirect lighting.
Cables Needed to Connect Components to Your TV
The pictures below show the cables needed for the connections represented in this book.
Coaxial cable S-Video cable Audio/Video cables Component Video (Y,Pb, Pr)cables
Chapter 1 Graphics contained within this publication are for representation only. 3

Connections Setup
VCR TV(backpanel)
VmEO Aumo [_
p_ Y
orAntenna
DVD
RLVIDEO Pr Pb Y
S-VIDEO
TV +DVD +VCR
Connect your DVD Player to your TV.
A. Connect the audio {white and red) cables to the R and L/MONO AUDIO jacks on the back of the
Ivand to the Audio Output jacks on the DVD player.
B. If your DVD player has Component Output Jacks [Y, Pb, Pr), connect three video grade cables to
the Y, Pb, Prjacks on the DVD player and to the Y, Pb, Pr jacks on the back of the IV. If your DVD
player doesn't have Y, Pb, Pr jacks, go to C.
-OR-
C. If your DVD player has an S-Video jack, connect an S-Video cable to the S-Video jack on the DVD
player and to the S-VIDEO IN jack on the back of the IV. If your DVD player doesn't have an
S-Video jack, go to D.
-OR-
D. Connect a video cable (yellow) to the Video Output Jack on the DVD player and to the VIDEO jack
on the back of the TV.
2. Connect your TV to your VCR
Connect a coaxial cable to the IV ANTjack on your IV and to the Output Jack on your VCR
{sometimes labeled OUT TOIV).
Note:tf your VCRhasA/V outputjacks,you canconnect your TVto yourVCRusingaudio/videocablesfor better quality.
3. Make sure cable or antenna is connected to your VCR.
Connect the coaxial cable from your cable outlet or antenna to the antenna input on the VCR.
6o to page 7
4Graphics contained within this publication are for representation only. Chapter 1

ConHections Setup
Explanation of Jacks
This section describes the jacks you can use to make connections. There are several
ways to connect components to your IV.
TV ANT Lets you connect a coaxial cable to receive the signal from the antenna,
cable, cable box, or if using the example on page 4, a VCR.
Pr Pb Y
RL/IVlONO
AUDIO VIDEOS-VIDEOIN
VIDEO 1
Lets you connect a component such as a VCR, DVD player, or
laserdise player.
•Y, Pb, Pr Provides optimum picture quality because the
video is separated into three signals. Use three video-
grade cables for the connection. When using VIDEO 2
Y, Pb, Pr, make sure to connect left and right audio cables
to the VIDEO 2 AUDIO Input jacks.
• R {RIGHT) AUDIO Provides right audio connection. The
right audio connector is usually red.
• L/MONO AUDIO Provides left audio connection. The
left audio connector is usually white.
• VIDEO Provides composite video connection. The video
connector is usually yellow.
• S-VIDEO IN Provides better picture quality than the
video jacks because the color part of the signal is
separated from the black and white part of the picture.
When using S-VIDEO IN, make sure to connect left and
right audio cables to the L/MONO and R AUDIO Input
jacks.
AUDIO OUTPUT {Not available on model 27R430T) Lets
you connect an amplifier or audio receiver for improved
sound quality.
Chapter 1 Graphics contained within this publication are for representation only. 5

Connections Setup
The Front of Your W
Front Input Jacks
The TV has front input jacks for your convenience: one set of audio/video inputs.
To access the component you connected to the front of the TV, press the INPUT
button on your remote until FRNTappears on the screen. The jacks are ideal for
connecting a video game console or a eameorder.
Note:kl/henconnecting acomponent that hasonlyoneaudiojack, suchassome eameorders,
usetheTV'sAUDIOL/MONOjaek tohear theaudio.
VIDEO Receives video from another component such as a VCR,eameorder, or
video game console.
L/MONO and R AUDIO Receives audio from another component such as a VCR,
eameorder, or video game console.
Front Panel Buttons
If you cannot locate your remote, you can use the front panel buttons of your TV
to operate many of the TV's features.
MENU Brings up the Main menu.
CH v Scans down through the current channel list. In the menu system, acts like
the down arrow button on the remote control and adjusts menu controls.
CH ^ Scans up through the channel list. In the menu system, acts like the up
arrow button on the remote control and adjusts menu controls.
VOL - Decreases the volume. In the menu system, acts like the left arrow button
on the remote control and adjusts menu controls.
VOL + Increases the volume. In the menu system, acts like the right arrow button
on the remote control and adjusts menu controls.
POWER Turns the TV on and off.
6Graphics contained within this publication are for representation only. Chapter 1

ConHections Setup
Plug in the TV
Plug the end of the power cord into a grounded wall outlet. Insert the plug
completely into the outlet.
Put batteries in the remote
• Remove the battery compartment cover from the back of the remote by
pushing down on and sliding off the cover.
• Insert 2 fresh "AAA"batteries. Make sure the polarities (+ and -) are aligned
correctly.
• Replace the cover.
vo
A rro ws
OK
button
How to Use the Remote Control to Complete
the Initial Setup
The technical term is"Navigation"- how you move through
the on-semen menus. The method is the same throughout
the menu screens: highlight your choice and select it.
To highlight a menu item, press the arrow buttons on the
remote to highlight one of the items listed on the screen. Use
the up or down arrow button to move up or down. Use the
right or left arrow button to move right or left.
To select the item that you've highlighted, press OK.
Note:Highligh ted meansthat the menu itemstands out fromother
menu itemson the h_t{appearsdarker,brighter,or a different color).
Turn on the TV
Press TV on the remote, or press POWER on the 1V's front
panel.
Note: Pressing the IV button not only turns on the IV, but puts the
remote into IV mode. "IV mode" means that the buttons on the
remote control operate the IV's functions.
Complete the Initial Setup
The menu system in your TV allows the TV's features to work
properly. The first time you turn on your TV,the SETUPsereen
appears with Language highlighted. The default language is
English. To choose another language, press the right arrow
button on the remote.
Chapter 1 Graphics contained within this publication are for representation only. 7

ConHeetions Setup
Complete Auto Channel Search
This part of the setup allows the TV to search for all channels
viewable through your antenna or cable TV system. This is
sometimes called auto programming.
1. Highlight Auto Ch. Search and press OK.
2. The Signal Typeoption is set to Cable. To change the
option to Antenna, press the right arrow button and then
press OK.
3. Press the down arrow button to highlight Start. Press OK
to begin the auto channel search.
Once the search is complete, you can begin watching TV. For
information on customizing your channels or menu options,
go to Chapter 4.
8Graphics contained within this publication are for representation only. Chapter 1

Indicator Button Descriptions for TV Mode
GO,DE
Arrows Used to highlight different items in the IV menu and to adjust the menu
controls.
Indicator Indicates the programming mode when programming the remote to
control components. Lights when you press a valid button on the remote. Flickers
when a button is pressed and the batteries are low.
(0-9) Number Buttons Enter channel numbers and time settings directly
through the remote control.
To enter a one-digit channel, enter a zero first. To enter a two-digit channel, press
the two digits and expect a few seconds delay. This is if you want to enter a third
digit.
CC Toggles closed captioning on and off.
CH+orCH- Seans up or down through the current channel list. Pressonce to
change the channel up or down; press and hold to continue changing channels.
CLEAR Removes any menu or display from the screen and returns you to normal
viewing.
GO BACK Returns you to the previous channel.
INFO Brings up the channel banner.
INPUT Toggles through the available input sources (VlD1/SVlD1/CVID1, FRNT,and
current channel).
MENU Brings up the Main menu.
MUTE Reduces the Iv's volume to its minimum level. Pressagain to restore the
volume.
OK When in the menu system, selects highlighted items.
ONeOFF When in IV mode, turns the 1V on and off. If in another mode {VCR,
DVD, etc.) and programmed, will turn the component on and off.
PRESETS Picture options are reset to original factory settings.
SKIP Pressonce before changing channels and the IV will wait 30 seconds before
returning to the original channel. Press repeatedly to add more time.
TV Turns on the IV and puts the remote in TV mode. Also displays current status.
VOL - or VOL + Decreases or increases the IV's volume.
Button Descriptions for DVD and VCR Modes
AGAIN In DVD mode, replays the last several seconds of the title you're playing.
ANTENNA In VCR mode, functions as a IV/VCR button.
DVD Puts the remote in DVD mode and, if auto tuning is enabled, will turn on
the TV and tune to the correct video input channel. Also used with the ONoOFF
button to turn on other compatible DVD players.
GUIDE If you're operating another component that has an on-screen program
guide, this button accesses the on-screen guide.
Chapter 2 Graphics contained within this publication are for representation only. 9

Using the Remote Controm
OPEN.CLOSE In DVD mode, opens or closes the DVD disc tray.
REVERSE, PLAY, FORWARD, RECORD, STOP, PAUSE If programmed, provides
transport control for some remote-controllable VCRs or DVD players.
SEARCH In VCR mode, accesses Index Search feature.
SPEED In VCR mode, selects a recording speed.
VCR Puts the remote in VCR mode and, if auto tuning is enabled, will turn on the
1V and tune to the correct video input channel.
ZOOM In DVD mode, zooms in on the picture.
Using the INPUT Button
Use the INPUT button to scroll through the available video input channels and
view components you have connected to the TV.
1. Make sure the component you want to view is turned ON.
2. Press INPUT to tune to an available video input source and view the
component.
3. To return to the previous channel, continue pressing INPUT.
DVD and
VCR buttons
CLEAR /
button
f
REVERSE
and PLAY
buttons
Gum_
A_Am
_NoOFF
button
,. STOP
button
You'll usethese buttons when
programming the remote.
Programming the Remote to Operate Other
Components
The universal remote can be programmed to operate most
brands of remote controllable components. The remote is
already programmed to operate most RCA, GE, and Proscan
components.
Notes.TheTVbutton can't beprogrammedon thisremote.
Theremotemay notbecompatible with allbrands andmodelsof
components,tt alsomay not operateall functions of theremotethat
camewith yourcomponent.
Find Out If You Need to Program the Remote
To determine whether the universal remote needs to be
programmed for your component, turn the component ON.
For example, to program the remote for a VCR, turn on the
VCR. Point the remote at the VCR, and press the VCR button.
Then press ONoOFF or CH + (channel up) or CH - (channel
down) to see if the VCR responds to the remote commands. If
the component does not respond, the remote needs to be
programmed.
Programming the Remote
There are two ways to program the remote control:
• automatic code search
• direct entry
10 Graphics contained within this publication are for representation only. Chapter 2

Osin 0 the Remote Contro
UsingAutomatic Code Search
The following instructions can be used to program the remote to operate each of
your components, if you want to stop the automatic code search without
programming any of your components, press CLEAR until the indicator light on the
remote turns off.
1. Turn on the component you want to operate (VCR or DVD player)
2. Press and hold the component button you want to program (VCR or DVD).
While holding the component button, press and hold ONoOFF until the
indicator light on the remote turns on, then release both buttons.
3. Point the remote at the component. Press and release PLAY(the indicator light
on the remote flashes).
The remote is searching for the correct code to program. When the indicator
stops flashing (after about 5 seconds), press PLAY again to tell the remote to
search the next set of codes.
Continue pressing PLAY until the component turns off or the indicator light on
the remote turns off. If the indicator light turns off, then all the codes for that
particular component have been tested once. If the component does not turn
off, then the remote can't be programmed to operate that component.
Note:Eachtime you pressPLAY,theremotesendsabout lOsetsof codes.Therefore,you
might havetopressthePLAYbutton upto 20times.
If the component you want to operate does turn off:
1. Press and release REVERSE,then wait 2 seconds. Repeat this step until the
device turns back ON.
2. To finish, press and hold STOP until the indicator on the remote turns off.
Using Direct Entry
1. Turn on the component to be programmed.
2. Look up the brand and code number(s) for the component on the code list in
this section.
3. Press and hold the component button you want to program on the remote.
4. Enter the code from the remote control code list on the following pages. If the
indicator flashes, you have either entered an invalid code or the button isn't
programmable.
5. Release the component button.
6. Point the remote at the component. Press ONoOFF to see if the component
responds to the command. If it doesn't, try pressing the component button and
then ONoOFF again.
• If you get no response, repeat these steps using the next code listed for your
brand, until the component responds to the remote commands.
• If you try all the codes for your component brand and none work, try the
automatic code search method. If automatic code search doesn't find the code,
the remote is not compatible with your component.
Chapter 2 Graphics contained within this publication are for representation only. 1 1

Using the Remote Controm
How to Use the Remote After You've Programmed It
Because this universal remote can operate several different components it uses
operational modes triggered by the component buttons. For example, if you want
the remote to operate the IV, you would press the TV button to put the remote
into IV mode before you could operate the IV.
1. Press the appropriate component button (DVD, TV, VCR) to set the remote to
operate the component.
2. Press ONoOFF to turn the component ON or OFF.
3. Use the remote buttons that apply to that component.
Note: tf you keep pressing buttons and nothing happens, the remote is probably in the
wrong mode. You must press the component button that matches the component you
want to operate (i.e., if you want to operate the VCR, press VCR on the remote control to
put the remote in VCR mode.)
Remote Control Codes
VCR Codes
Programmable for VCR button.
Admiral .................................................................................... 2132 Garrard .................................................................................... 2026
Adventura ................................................................................ 2026 GE ...................................................................... 2000, 2001, 2013,
Aiko .......................................................................................... 2027 ............................................ 2021, 2022, 2053, 2115, 2120, 2131
Aiwa ......................................................................................... 2026
Akai ................. 2003, 2004, 2005, 2007, 2008, 2111, 2112, 2113
American High ........................................................................ 2021
Asha ......................................................................................... 2013
Audio Dynamics ........................................................... 2009, 2010
Audiovox ................................................................................. 2014
Bel! a Howell ........................................................................... 2011
Beaumark ................................................................................. 2013
Broksonic ...................................................................... 2012, 2025
Calix ......................................................................................... 2014
Candle ..................................................... 2013, 2014, 2015, 2016,
............................................................................. 2017, 2018, 2019
Canon .................................................................. 2021, 2022, 2114
Capehar_ ......................................................................... 2020, 2110
Carver ....................................................................................... 2062
CCE ................................................................................ 2027, 2061
Citizen ........................................................................... 2013, 2014,
............................................. 2015, 2016, 2017, 2018, 2019, 2027
Colortyme ................................................................................ 2009
Cok ........................................................................................... 2061
Craig ......................................................... 2013, 2014, 2023, 2061
Curtis-Mathes .................................................... 2000, 2009, 2013,
................................... 2016, 2018, 2021, 2022, 2024, 2115, 2131
Cyhernex ................................................................................. 2013
Daewoo .......... 2015, 2017, 2019, 2025, 2026, 2027, 2028, 2110
Daytron ..................................................................................... 2110
DBX ................................................................................ 2009, 2010
Dimensia ........................................................................ 2000, 2131
Dynatech .................................................................................. 2026
Electrohome ................................................................. 2014, 2029
Electrophonic .......................................................................... 2014
Emerson ............................. 2012, 2014, 2015, 2021, 2024, 2025,
.......... 2026, 2029, 2030, 2031, 2032, 2033, 2034,2035, 2036,
.......... 2037, 2038, 2039, 2040, 2041, 2042,2044, 2045, 2046,
............................................ 2047, 2065, 2113, 2116, 2117, 2130
Fisher ............. 2011, 2023, 2048, 2049, 2050, 2051, 2052, 2118
Fuji ................................................................................. 2021, 2119
Funai ........................................................................................ 2026
Goldstar .................................................. 2009, 2014, 2018, 2054
Gradiente ................................................................................ 2026
Harley Davidson .................................................................... 2026
Harman Kardon ..................................................................... 2009
Harwood ................................................................................. 2061
Headquarter ............................................................................. 2011
Hitachi ........................................................................ 2055, 2056,
........................................................ 2057, 2107, 2111, 2120, 2122
Hi-Q ......................................................................................... 2023
instant Replay ........................................................................ 2021
JCL ........................................................................................... 2021
JC Penney ............................................... 2009, 2010, 2011, 2013,
..................................................... 2014, 2021, 2022, 2055, 2056,
....................................................... 2058, 2059, 2060, 2107, 2118
Jensen ................................................................ 2055, 2056, 2111
JVC ...................................... 2009, 2010, 2011, 2018, 2111, 2123
Kenwood ................... 2009, 2010, 2011, 2016, 2018, 2111, 2123
KLH .......................................................................................... 2061
Kodak ............................................................................ 2014, 2021
Lloyd ....................................................................................... 2026
Logik ....................................................................................... 2061
LXI ........................................................................................... 2014
Magnavox ....................................................... 2021, 2022, 2062,
....................................................... 2063, 2104, 2105, 2108, 2124
Magnin .................................................................................... 2013
Marantz ......... 2009, 2010, 2011, 2016, 2018, 2021, 2062, 2064
Marta ....................................................................................... 2014
Masushita ............................................................................... 2021
Mei .......................................................................................... 2021
Memorex ....... 2011, 2013, 2014, 2021, 2023, 2026, 2104, 2132
MGA ................................................................... 2029, 2065, 2113
MGN "I_2chnology ................................................................... 2013
Midland ................................................................................... 2053
Minolta .............................................................. 2055, 2056, 2107
Mitsubishi ............. 2029, 2055, 2056, 2065, 2066, 2067, 2068,
............ 2069, 2070, 2071, 2072, 2073, 2074, 2106, 2113, 2123
Montgomery Ward ...................................................... 2075, 2132
Motorola ...................................................................... 2021, 2132
12 Graphics contained within this publication are for representation only. Chapter 2

Osin 0 the Remote Contro
VCR Codes continued
MTC ............................................................................. 2013, 2126
Multitech .................................... 2013, 2016, 2026, 2053, 2061
NEC ............................................... 2009, 2010, 2011,2016, 2018,
............................................ 2064, 2076, 2078, 2079, 2111, 2123
Nikko ...................................................................................... 2014
Noblex .................................................................................... 2013
Olympus ................................................................................. 2021
Optimus ....................................................................... 2014, 2132
Optonica ................................................................................ 2096
Panasonic ......................... 2021, 2022, 2109, 2125, 2126, 2127
Pentax .......................................... 2016, 2055, 2056, 2107, 2120
Pentex Research .................................................................... 2018
Philco ..................................................... 2021, 2022, 2062, 2063
Philips .................................................... 2021, 2062, 2096, 2124
Pi!ot ........................................................................................ 2014
Pioneer ........................................ 2010, 2055, 2080, 2081, 2123
Portland .................................................. 2016, 2017, 2019, 2110
Proscan ............................................................. 2000, 2001, 2131
Protec ..................................................................................... 2061
Pulsar ..................................................................................... 2104
Quarter .................................................................................... 2011
Quartz ..................................................................................... 2011
Quasar ............................................................... 2021, 2022, 2125
RCA ...................... 2000, 2001, 2003, 2013, 2021, 2055, 2056,
.................. 2082, 2083, 2084, 2085, 2086, 2087, 2088, 2089,
....................... 2090, 2091, 2107, 2115, 2120, 2125, 2131, 2133
Radioshack/Realistic ............................ 2011, 2013, 2014, 2021,
.................... 2022, 2023, 2026, 2029, 2049, 2050, 2096, 2132
Radix ...................................................................................... 2014
Randex ................................................................................... 2014
Ricoh ...................................................................................... 2128
Runeo ..................................................................................... 2104
Samsung ........................... 2005, 2013, 2015, 2033, 2053, 2112
Sanky ........................................................................... 2104, 2132
Sansui ..................................................... 2010, 2092, 2111, 2123
Sanyo ................................................................ 2011, 2013, 2023
Scott ............ 2012, 2015, 2025, 2032, 2038, 2065, 2093, 2116
Sears ............................................ 2011, 2014, 2021, 2023, 2048,
............................... 2049, 2050, 2051, 2055, 2056, 2107, 2118
Sharp ..................... 2017, 2029, 2094, 2095, 2096, 2097, 2132
Shintom ................................................. 2004, 2056, 2061, 2098
Shogun ................................................................................... 2013
Signature ............................................................................... 2132
Singer ................................................................ 2021, 2061, 2128
Sony ....................................................... 2004, 2098, 2099, 2119
STS ............................................................................... 2021, 2107
Sylvania ................ 2021, 2022, 2026, 2062, 2063, 2065, 2124
Symphonic ............................................................................ 2026
"randy ...................................................................................... 2011
Tashiko ................................................................................... 2014
Tatung ..................................................................................... 2111
TEAC ................................................................. 2026, 2085, 2111
"I_'chnics ....................................................................... 2021, 2109
"I_knika ........................................ 2014, 2021, 2026, 2100, 2129
TMK .................................................................. 2013, 2024, 2047
"Ik)shiba ................... 2015, 2049, 2051, 2055, 2065, 2093, 2116
"[k)tevsion .................................................................... 2013, 2014
Unitech ................................................................................... 2013
Vector Research .................................... 2009, 2010, 2015, 2016
Victor ..................................................................................... 2010
Video Concepts ........................... 2009, 2010, 2015, 2016, 2113
Videosonic ............................................................................. 2013
Wards .................................................... 2013, 2014, 2015, 2021,
........................................ 2023, 2026, 2029, 2055, 2056, 2061,
................................. 2096, 2101, 2102, 2103, 2107, 2116, 2132
XR-1000 .............................................................. 2021, 2026, 2061
Yamaha ............................................. 2009, 2010, 201I, 2018, 2111
Zenith ............................................... 2004, 2098, 2104, 2119, 2128
DVDcodes
Programmable for DVD button.
Aiwa ........................................................................................... 3009
Apex ................................................................................ 3023, 3024
GE ............................................................................................... 3000
Hitachi ....................................................................................... 3008
JVC .................................................................................. 3002, 3010
Konka ............................................................................... 3011, 3012
Magnavox ................................................................................. 3003
Mitsubishi .................................................................................. 3004
Panasonic .................................................................................. 3013
Philips ....................................................... 3003, 3019, 3021, 3022
Pioneer ....................................................................................... 3005
Proscan ...................................................................................... 3000
RCA ................................................................................. 3000, 3001
Samsung .................................................................................... 3025
Sanyo ......................................................................................... 3014
Sony ..................................................................... 3006, 3015, 3016
"Ik)shiba ................................................................. 3007, 3017, 3020
Zenith ......................................................................................... 3018
Chapter 2 Graphics contained within this publication are for representation only. 13

Channel Banner
There are several items that might appear on-screen when
you press the TV or INFO button on the remote. This display is
called the Channel Banner. The following list describes the
items on the Channel Banner screen {left to right and top to
bottom).
SAP Displayed when the current channel
CC
Stereo or Mono
Skip: 0:30
07:18 am
06 ABCDEF
_X
isbroadcasting SAP(SecondAudio
Program)information.
Displayedwhen V-Chip hasbeen
activated.
Displayedwhen ClosedCaptioning is
available on the current channel.
Stereo displayedwhen the current
channel is broadcasting in stereo.
Mono displayedwhen the current
channel is broadcasting in mono.
Correspondsto the SKIPbutton.
Showsthe amount of time left before
the -IVswitches back to the previous
channel.
Displaysthe current time.
Displaysthe current channel and
label assignedto the channel.
Displayedwhen you mute the sound.
Why You Should Use the Auto Tuning Feature
The auto tuning feature tunes the TV to the correct channel for different
components you have connected to your TV (like a VCR, DVD Player, etc.). When
you set up auto tuning in the menu system you don't have to remember to change
your TVto channel 3, for example, when you want to watch the tape in your VCR.
How to Set Up the Auto Tuning Feature
The way you set up the auto tuning feature in the 1V's menu corresponds to the
component buttons on the remote and the way you have each component
connected to your TV. When you set up auto tuning, you're telling the TV what
channel to tune to when you press theVCR or DVD button on the remote control.
1. Press MENU (the MAIN MENU appears).
2. Highlight Setupand press OK on your remote control.
3. Highlight Auto Tuning and press OK.
14 Graphics contained within this publication are for representation only. Chapter 3

Using the Features
4. Choose which channel you want to set:
Set VCR1 Lets you set up the channel the TV tunes to when you press the VCR
button.
Set VCR2 Not available with your remote control.
Set SAT/CABLE Not available with your remote control.
Set DVD Lets you set up the channel the TV tunes to when you press the DVD
button.
5. Press the right arrow button to select the choice that matches the way you
have the component connected to this TV.
The choices and a brief explanation follow:
N/A Choose this if you don't have this particular component
connected to the TV, or if you don't want the TV to
automatically tune to the correct channel when you're using
this component.
CH02 (SAT/CABLE only- Not available with your remote
control).
CH03 or04 Component is connected to the TV ANT jack on
the back of the TV, and you want the TVto tune to channel 3
or 4 when you press the corresponding button on the
remote. Reminder: make sure the eomponent's Channel 3/4
switch is set to the appropriate channel.
VlD1 Component is connected to the VIDEO, S-VIDEO IN, or
Y, Pb, Prjack on the back of the TV and you want the ]V to
tune to a video or component input channel when you press
the corresponding button.
FRNT(Front Video Input) Component is connected to the
VIDEO jack on the front of the TV and you want the TVto
tune to the front video input channel when you press the
corresponding button.
Parental Controls and V-Chip
The choices in the USA V-CHIP menu involve software inside your TV (referred to as
V-Chip) which allows you to block TV programs and movies based on violence, sex,
or other content you may believe children should not view.
Once you block programs, you can unbloek programs by entering a password.
By default, the software inside your TV is turned "off." For instructions to turn on
V-Chip, go to page 21.
Chapter 3Graphics contained within this publication are for representation only. 15

Using the Features
How V-Chip Works
V-Chip reads the program's age-based rating (TV-MA, TV-14, etc.} and content themes
[{Violence {V), Adult Language (L), etc.)]. If you have blocked the rating and/or content
themes that the program contains, you will receive the message This channel has not
been approved for viewing. Change channel or press OK to enter password and
temporarily deactivate the Parental ControL
Broadcasters are not required to provide content themes, so programs received with
no content themes will only be blocked if you block their age-based rating. You can
also block out programs that have been given a rating of Not Rated, and programs
that are considered unrated. The 1V age-based ratings and content themes you can
block follow:
USA V-Chip Rating System
TV-MA {Mature Audience Only] Specifically designed to be viewed by adults and may
be unsuitable for children under 17. It contains one or more of the following content
themes: crude indecent language (L), explicit sexual activity (S), or graphic violence
IV).
TV-14 [Parents Strongly Cautioned] Contains some material that many parents would
find unsuitable for children under 14. Parents are strongly urged to exercise greater
care in monitoring this program and are cautioned against letting children under the
age of 14 watch unattended. This program contains one or more of the following
content themes: intensely suggestive dialogue (D), strong coarse language (L), intense
sexual situations (S), or intense violence {V).
TV-PG {Parental Guidance Suggested] Contains material that parents may find
unsuitable for younger children. Many parents may want to watch it with their
younger children. The program contains one or more of the following content
themes: some suggestive dialogue (D), infrequent coarse language (L), some sexual
situations (S), or moderate violence (V).
TV-G (General Audience] Most parents would find this program suitable for all ages.
It contains little or no sexual dialogue (D) or situations (S), no strong language (L),and
little or no violence (V).
TV-Y7 {Directed to Children 7 years and older] Designed for children ages 7 and
above. It may be more appropriate for children who have acquired the developmental
skills needed to distinguish between make-believe and reality. Themes and elements
in this program may include mild fantasy violence {FV)or comedic violence, or may
frighten children under the age of 7.
TV-Y (All Children] Themes and elements in this program are designed for a young
audience, including children from ages 2-6. It is not expected to frighten younger
children.
Canadian English V-Chip Rating System
18+ {Adults] Programming intended for adults 18 and older. It may contain elements
of violence, language, and sexual content which could make it unsuitable for viewers
under 18. Violence Guidelines: May contain violence integral to the development of
the plot, character or theme, intended for adult audiences. Other Content Guidelines:
May contain graphic language and explicit portrayals of nudity and/or sex.
16 Graphics contained within this publication are for representation only. Chapter 3

Using the Features
14+ (Viewers 14 and over) Programming contains themes or content which may not be
suitable for viewers under the age of 14. Parents are strongly cautioned to exercise
discretion in permitting viewing by pre-teens and early teens. Violence Guidelines: May
contain intense scenes of violence. Could deal with mature themes and societal issues in a
realistic fashion. Other Content Guidelines: May contain scenes of nudity and/or sexual
activity. There could be frequent use of profanity.
PG {Parental Guidance) Programming intended for a general audience but which may not
be suitable for younger children {under the age of 8). Parents may consider some content
inappropriate for unsupervised viewing by children aged 8-13. Violence Guidelines:
Depictions of conflict and/or aggression will be limited and moderate; may include physical,
fantasy, or supernatural violence. Other Content Guidelines: May contain infrequent mild
profanity, or mildly suggestive language. Could also contain brief scenes of nudity.
G {General Audience) Programming considered acceptable for all ages groups. While not
designed specifically for children, it is understood younger viewers may be part of the
audience. Violence Guidelines: Will contain very little violence, either physical or verbal or
emotional. Will be sensitive to themes which could frighten a younger child, will not depict
realistic scenes of violence which minimize or gloss over the effects of violent acts. Other
Content Guidelines: There may be some inoffensive slang, no profanity and no nudity.
C8+ {Children 8 and Older) Programming generally considered acceptable for children 8
years and over to watch on their own. Violence Guidelines: Violence will not be portrayed
as the preferred, acceptable, or only way to resolve conflict or encourage children to
imitate dangerous acts which they may see on television. Any realistic depictions of
violence will be infrequent, discreet, of low intensity and will show the consequences of the
acts. Other Content Guidelines: There will be no profanity, nudity or sexual content.
C (Children) Programming intended for children under age 8. Violence Guidelines: Careful
attention is paid to themes which could threaten children's sense of security and well
being. There will be no realistic scenes of violence. Depictions of aggressive behaviour will
be infrequent and limited to portrayals that are clearly imaginary, comedic or unrealistic in
nature. Other Content Guidelines: There will be no offensive language, nudity or sexual
content.
Canadian French V-Chip Rating System
18+ {Adults) Programming is for adults only. This program contains sustained violence or
extremely violent scenes.
16+ {Viewers 16 and over) Programming is not suitable for those under age 16. This
program contains frequent scenes of violence or intensely violent scenes.
13+ {Viewers 13 and over) Programming may not be suitable for children under the age of
13. This program either contains several violent scenes or one or more scenes that are
violent enough to affect them. Viewing in the company of an adult is therefore strongly
recommended for children under the age of 13.
8+ {Viewers 8 and over) Not recommended for young children. This program is suitable for
most audiences, but it contains mild or occasional violence that could upset young
children. Viewing in the company of an adult is therefore recommended for young children
{under the age of 8) who do not distinguish between reality and imagination.
G{General Audience) This program is suitable for audiences of all ages. It contains no
violence, or any violence that it does contain is either minimal or is presented in a
humorous manner, as a caricature, or in an unrealistic way.
Chapter 3 Graphics contained within this publication are for representation only. 17

Usin 9 the W°s Features
USA V-Chip TV Rating Limit
The V-Chip TV Rating Limit lets you decide whieh 1V
programs ean and cannot be viewed.
To set 1V programming limits:
1. Choose ParentalControlfrom the MAIN MENU (the
PASSWORDsereen appears the first time you enter the
Parental Control menu). Create your password using the
number buttons on the remote.
2. Highlight and select USA V-Chip. Then select g/Ratings.
3. Onee you get to the g/RATINGLIMITsereen, use the
arrow buttons and OK on your remote to change the
status of a IV program rating or eontent theme from
View to Block.
4. For IV rating limits to take effect, turn on V-Chip active
in the PARENTALCONTROLmenu (box has eheck mark).
The following sections give you more details about how to
ehange the status of IV program limits.
Note:tf you forgetyourpasswordyou can resetit. Makesure the
TV_off. Simultaneouslypressandhold VOL-onthe TV'sfront
panel andCLEARon theremotefor approximately5seconds.Enter
anewpasswordnext time you accessthePARENTALCONTROL
menu.
The V-Chip Rating Screen
The following is an example of where items are located within the g/RATING LIMIT
screen.
Rating Status Field
Lets you select whether the status of the age-based rating limit
to the left is View or Block.
Rating Field
Lets you select from
a list of age-based
ratings you can
block or view.
Content Themes
Lists the content themes
you can block or view.
Content Status Fields
Lets you select which
content themes to view
for the selected rating,
and whether the status of
the content theme is
currently View (V) or Block
(B).
Rating Settings Area
Lets you see the current block/view state of age-based ratings and
associated content.
18 Graphics contained within this publication are for representation only. Chapter 3
This manual suits for next models
3
Table of contents
Other RCA TV manuals