RCA MR27310 User manual

Changing Entertainment. lin.
Please read this manual before
!this for the
first time.
TOCOM 15695640

WARNING
To reduce the risk of fire or
electric shock, do not expose
this TV to rain or moisture.
To reduce the risk of electric shock, do not remove
cover (or back). No user serviceable parts inside.
Refer servicing to qualified service personnel.
This symbol indicates
"dangerous voltage" inside
the product that presents a
risk of electric shock or
personal injury.
_, This symbol indicates
important instructions
accompanying the product.
Caution: To prevent electric shock, match wide blade of
plug to wide slot, fully insert.
Power Consumption: 120V -_ 60 Hz A,C,
125 W (models MR27310 and
MR29310)
If fixed (non.moving) images are left on the screen for long periods,
they may be permanently imprinted on the picture tube. Such
images include network Iogos, phone numbers, and video games.
This damage is not covered by your warranty. Extended viewing of
channels displaying these images should be avoided.
Cable TV Installer: This reminder is provided to call your attention to
Article 820-40 of the National Electrical Code which provides guidelines for
proper grounding and, in particular, specifies that the cable ground shall be
connected to the grounding system of the building as close to the point of
cable entry as practical.

Chapter 1: Connections & Setup
Things to Consider Before You Connect ......................................................................... 4
Protect Against Power Surges ................................................................................... 4
Protect Components from Overheating ................................................................... 4
Position Cables Properly to Avoid Audio Interference ............................................ 4
Important Stand and Base Safety Information ........................................................ 4
Use Indirect Light ....................................................................................................... 4
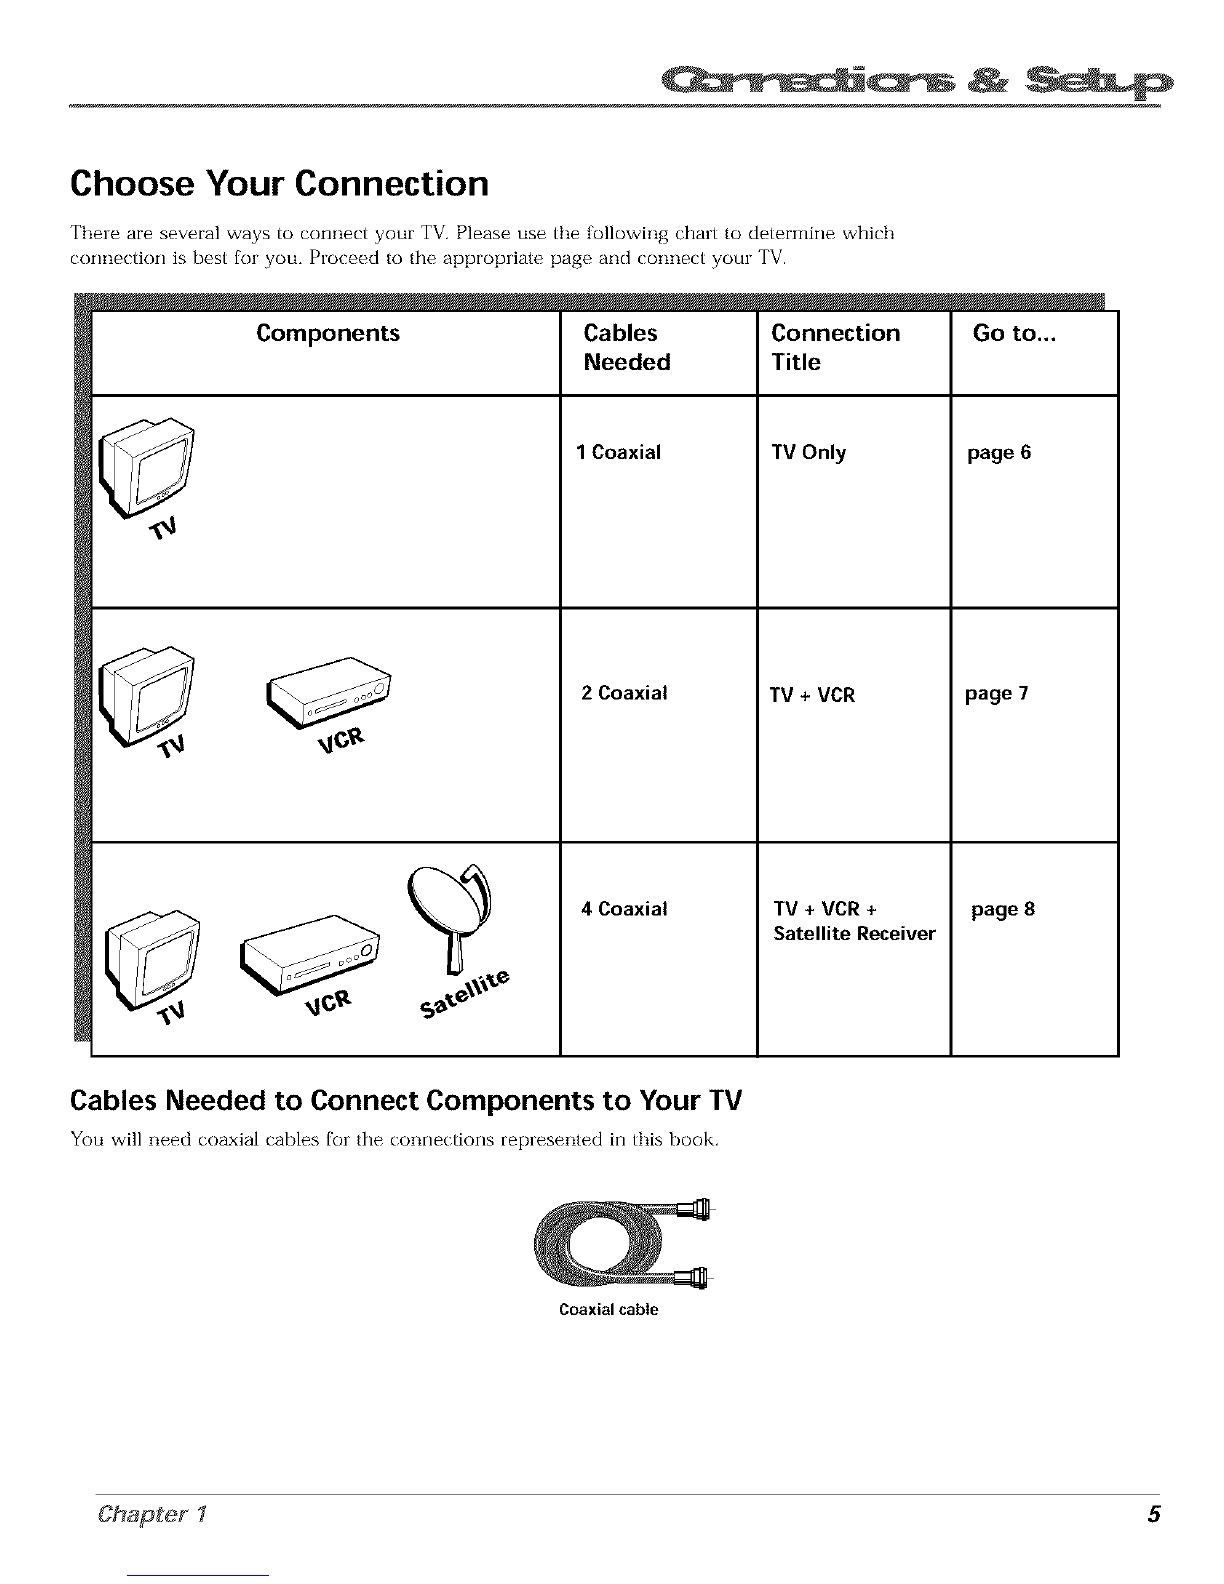
Choose Your Connection .................................................................................................. 5
Connection: TV Only .................................................................................................. 6
Connection: TV + VCR ................................................................................................ 7
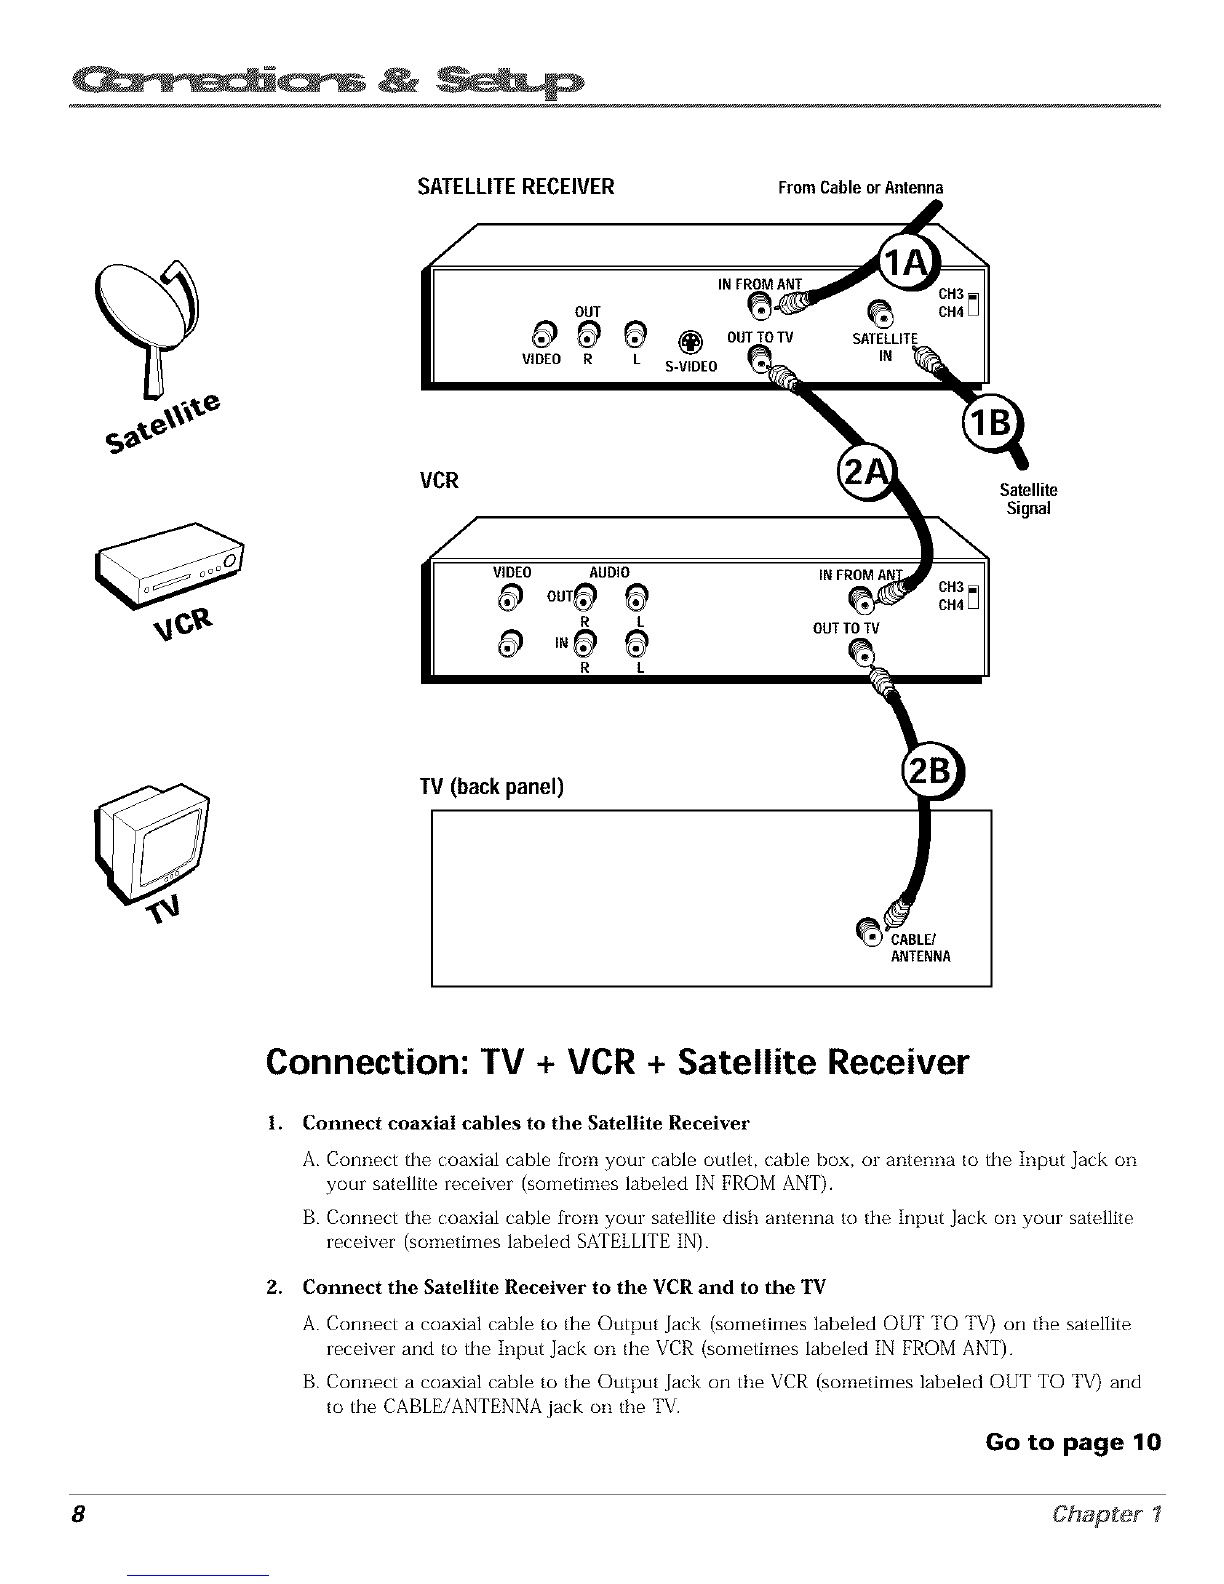
Connection: TV + VCR + Satellite Receiver ............................................................... 8
The Front of Your TV ........................................................................................................ 9
Complete the Interactive Setup ..................................................................................... 11
Set the Menu Language .......................................................................................... 11
Complete Auto Channel Search .............................................................................. 11
The Buttons on the Remote Control ............................................................................. 12
Chapter 2: Using the TV's Features
Channel Banner .............................................................................................................. 14
Parental Controls and V-Chip ......................................................................................... 14
Channel Block ........................................................................................................... 15
Front Panel Block ..................................................................................................... 15
Lock/Unlock Parental Controls ................................................................................ 15
Chapter 3: Using the TV's Menu System
How to Use the Different Types of Menus and Control Panels .................................. 18
Menus ....................................................................................................................... 18
Control Panels .......................................................................................................... 18
Audio Menu .................................................................................................................... 20
Picture Quality Menu ..................................................................................................... 21
Screen Menu ................................................................................................................... 22
Using Closed Captioning .......................................................................................... 22
Closed-Caption Modes ............................................................................................. 22
Channel Menu ................................................................................................................. 23
Time Menu ...................................................................................................................... 23
Chapter 4: Other Information
Troubleshooting .............................................................................................................. 26
Care and Cleaning .......................................................................................................... 28
Index ................................................................................................................................ 29
1

This page left blank intentionally

1
I
Chapter Overview:
&Seep
•Things to Consider Before You Connect
•Choose Your Connection
•The Front of Your TV
•Put Batteries in the Remote
How to Use the Remote Control to Complete the
Interactive Setup
Buttons on the Remote Control
NOTE: Illustrations are for representation only. Your product and on-
screen displays might differ.
Changing Entertainment. Again.
3

Things to Consider Before You Connect
Protect Against Power Surges
Connect all components befble you _:)lug any of their power cords into the wall outlet.
Turn off the TV and/or component before you cormect or disconnect any cables.
Make sure all antennas and cables are prol)erly grounded. Refer to tile Important
Safeguards sheet packed with your TV.
Protect Components from Overheating
Don't block ventilation boles on any of the cornponents. Anange tile components so that
air carl circulate I_reely.
Don't stack components,
When you place components in a stand, make sine you allow adequate ventilation.
If you connect an audio receive] oK amplifier, place it on ttle top shelf so ttle heated ai]
from it won't flow around ()tile] corrlporlents.
Position Cables Properly to Avoid Audio Interference
Insert each cable firmly into tile designated jack.
If you place components above the TV, route all cables down the side of tile back of the
TV instead of suaigbt down tile middle of tile back of the TV,
If your antenna uses 300 ohm twirl lead cables, do not (toil tile (tables. Also, keep the twirl
lead cables away from audio/video cables,
Important Stand and Base Safety Information
Choose tile location fox you] TV (arefully. Place tile TV on a stand or base that is of adequate
size and strength to Devent tile TV flora being accidentally tipped over, pushed off, o] pulled
off. This could cause 13e]sonal injury and/o] damage ttle TV. Refer to tile Impo]tant Safegua]ds
sheet packed with you] TV,
Use Indirect Light
Don't place tile TV wbe]e sunlight o] room lighting will be dire(ted toward tile screen. Use soft
or indirect lighting.
4 Chapter I

Choose Your Connection
Thele are several ways to connect your TV. Please use the following chart to determine which
_onnection is best fol you, Ploceed to the appropliate page and _onned yore TV.
Components Cables
Needed
1 Coaxial
2 Coaxial
Connection
Title
TV Only
TV + VCR
4 Coaxial TV + VCR +
Satellite Receiver
Go to...
page 6
page 7
page 8
Cables Needed to Connect Components to Your TV
You will need _oaxial _ables fol the _onnedions replesented in this book,
Coaxialcable
Chapter 1 5

TV (backpanel)
Connection: TV Only
1. Connect the TV to your cable or antenna
Connect the coaxial (able fiorn your (able ol antenna to the CABLE/ANTENNA jack on tl_e back
of your TV.
Go to page 10
6Chapter I

Cb-v di
TV (back panel)
CABLE/
ANTENNA
VCR \
VIDEO AUDIO iNFROMANT
R L
RL
FromCable,
CableBox,
Connection: TV + VCR
1.
2.
Connect your TV to your VCR
Connect a coaxial cable to the CABLE/ANTENNA jack on your TV and to the Output Jack on your
VCR (sometimes labeled OUT TO TV).
Connect cable or antenna to your VCR
Connect the coaxial cable florn your cable outlet, cable box, ol antenna to tbe In,3ut Jack on your
VCR (sornetimes labeled IN FROM ANTENNA ol IN FROM ANT).
Go to page 10
Chapter1 7

SATELLITE RECEIVER FromCableorAntenna
VCR
OUT
VIDEO R
IN FROM ANT
¢
@ O°,TO,V
LS-VIDEO
SATELLITE
IN
CH4
Satellite
Signal
VIDEO AUDIO
R L
R L
OUT TO TV
TV (backpanel)
_)CABLE/
ANTENNA
Connection: TV + VCR + Satellite Receiver
1. Connect coaxial cables to the Satellite Receiver
A. Connect the coaxial cable frorn yore (:able outlet, (:able box, ol antenna to the Input Jack on
yore satellite le(eivel (sometimes labeled IN FROM ANT).
B. Connect the (:()axial cable frorn yore satellite dish antenna to the Input Jack on yore satellite
le(eiver (sornetiTnes labeled SATELLITE IN).
2. Connect the Satellite Receiver to the VCR and to the TV
A. Connect a coaxial cable to the Output Jack (sometimes labeled OUT TO TV) on the satellite
leceiver and to the Input Jack on the VCR (sometirnes labeled IN FROM AN_I).
B. Connect a coaxial cable to the Output Jack on the VCR (sornetimes labeled OUT TO TV) and
to the CABLE/ANTENNA jack on the TV.
Go to page 10
8Chapter 1

The Front of Your TV
Front Panel
If you cannot locate your remote you can use the buttons of your TV to operate
many of the TV's features.
MENU Brings up the Main menu. When in the menu system, it selects
highligl'lted items, Also returns you to the previous menu,
CH vScans down through the current channel list, When you're using the TV's
menu system, it acts like the arrow down button on the remote control.
CH ^ Scans up through the channel list. When you're using the TV's menu
system, it acts like the arrow up button on the remote control.
VOL Decreases the volume. When you're using the TV's menu system, it acts
like the left arrow button on the remote control.
VOL + Increases the volume. When you're using the TV's menu system, it acts
like the right arrow button on the remote control.
POWER Turns the TV on and off,
IVIDEO UMONO RI
Front Panel Jacks
You can access the component you connected by plessing the INPUT button on
your remote (FRNT appears on the screen).
VIDEO (in) Allows you to connect a component such as a VCR, camcorder or
Internet access device,
L/MONO (left audio) and R flight audio) Receives audio signals from
another component such as a VCR, cflmcolder or Irlte]net access device,
Chapter1 9

Plug in the TV
Plug tile end of tile powel cord into the wall outlet. Match the wide Made of tile
plug with tile wide slot in the outlet. Insert tile ,:)lug com,31etely into
the outlet.
Put Batteries in the Remote
1. Remove the batte_iy compartmerlt cover oil tile remote,
2. Insert new batteries. Match the polarities (+ and ) on tile batteries witb tile
diagram on the remote.
3. Put tile battei_y compartrnent cover back on the remote.
%/
Use the arrow buttons and the OK
button to move through the menu
system.
How to Use the Remote Control to
Complete the Interactive Setup
Tile technical term is "Navigation" bow you move througb tile on scleen
menus. Tile theory is tile same tbrougbout the menu screens: l'lighligbt your
cboice and select it.
To highligbt a menu itern, press tile alrow buttons on the lernote to bighlight
one of tile items listed on the s_reen. Use the up or down arrow button to rnove
up or down. Use the rigbt or left alrow button to move light el left.
To select tile itern that you've bigblighted, ,:)less OK.
Note: Highlighted means that the menu item stands out fi'om
other menu items on the list (appears darker; brighter; or a
different color).
Turn on the TV
Press tile POWER button on tile rernote control or the TV (the first screen of the
Interactive Setup appears). Tile menu screens "time out" after a period of time if
you don't rnake a selection. The tips in tbis section tell you how to access the
Setup rnenu screens marmally.
10 Chapter 1

Complete the Interactive Setup
Tbe menu system in your TV allows the TV's features to work 131operly. In this
Tip book, we call it tbe "intelactive setup" because tbe TV asks you questions, you
Toaccessthe setup menus manually, answer, and the TV makes the appropriate adjustments. Ttle filst time you tmn
pressMENUand choose Setup, o[1 your TV, tbe setup screens appear automatically.
Set the Menu Language
The first part of tbe SFTUPasks you to select your preferred language for the
menu system.
1. Higblight yam preferred language fol the rnenu system.
2. Press OK to select tbat language.
Complete Auto Channel Search
Tbe next part of the SETUP asks you if you want tbe TV to searcb for all
channels viewable tbrough your antenrla or table TV system, This is sometimes
called "auto programming."
1. Press OK to tell tbe TV to begin searcbing lbl cbannels. A progress leport
appears or1 the screen.
2. Wben tbe screen on the TV tells you the searcb is complete, press OK.
Note: [['you skip Auto Channel Seaz'ch now, .you can access it later
through the Channel menu. See Chapter 3 Ibr more details,
Chapter1 11

pOI_VER
The Buttons on the Remote Control
0-9 (Number buttons) Enter channel rlumbers and time settings directly
througl'l the remote control.
To enter a two digit chanrlel, press the two digits. _lk)enter a three digit cl'lannel,
press and hold the first digit for two seconds until two dashes appear to the
right of the number, therl add the second two, Example: to tune to channel 123,
press and hold 1 for two seconds, press 2, then press 3,
Arrow buttons (up, down, left, right) Press the arrow buttons to move
through the or1screen menu system,
CHAN (up and down) buttons Scan up or down througl'l the current chanrlel
list. Press once to change the charmel up or down; press and boM to continue
charlging charmels.
CLEAR Removes any rnenu or display flora the screen and returns you to
TV viewing.
GO BACK Returns you to the previous channel.
GUIDE This button is for a leature that is not available on the MR27310 or
MR29310,
INFO Displays channel informatkm.
INPUT Changes your TV to its video input channel, The Video Input Channel
is the channel your TV must tune to in order for you to access a component
tha(s connected to your TV's VIDEO IN and AUDIO IN jacks, Example: to view
a tape liom your camcorder, connect the camcorder to the TV's AUDIO and
VIDEO jacks with the audio/video cables,
MENU Displays the TV's Main menu.
MUTE Lowers the volume to its minirnum level, Press again to restore volume,
OK When a rnenu is on the screen, press OK to select the itern that
is highlighted.
POWER Turns the TV on and off.
SKIP If you press this button before you ct_ange tl'le cl'larmel, tl'le TV waits 30
seconds and autornatically goes back to the original channel, Each time you
press SKIP, you add 30 seconds (Le, if you press SKIP two tirnes before you
change the channel, the TV waits 60 seconds and automatically turns back to the
original channel),
VOL (up and down) buttons Decrease or increase the TV's volurne.
12 Chapter 1

2
!.Iron3
Chapter Overview:
•The Channel Banner
•Parental Controls and V-Chip
NOTE: Illustrations are for representation only. Your product and on-screen
displays might differ.
Changing Entertainment.
13

Sample displays on a Channel Banner.
Channel Banner
There are several indicators that might appear when you press the TV or INFO
buttons on the remote, This display is called the Channel Banner, The following
list describes the items on the Channel Banner screen (left to right and top to
bottom).
12:01 Displays the cmrent time.
The lock is displayed to indicate when Parental Controls are
locked or unlocked.
Displayed when Closed Captioning is available on the
current cbarmel.
ESPN
60
t13 l
Displays the label assigned to the current channel,
Displays the current channel or input channel (FRNT),
Mute is displayed when you mute tbe audio.
Stereo is displayed when the current channel is broadcasting
in Stereo,
SAP
0&O0
Displayed when the cmrent channel is broadcasting SAP
(Second Audio Ploglam) irfformation.
Displayed when the Sleep Timel has been set.
Displayed to count down time left on the commemial ski[)
(SKIP) timeL
Parental Controls and V-Chip
The ParentaI Conrr'ols rnenu allows you to program your TV so that chiMren
carmot see certain programs, cbarmels, or use the fiont panel controls.
The first tbree choices in the ParenraI Controls menu involve software inside
your TV (relerred to as V Chip). These three V Cbip functions may not work on
your TV because the features depend upon special additkms to tbe broadcast
signal, which may not be available in your market. Please disregard these three
V Cbip functions (by default, the software inside your TV is turned "off," so if
you don't want to use tbis feature, you can just ignore it).
You carl boweveL use the lernaining leatures in the Parental Controls menu:
Charmel Block, Front Panel Block and Lock Parental Controls.
14 Chapter 2

Channel Block
Selecting tbis option lets you decide wbat channels can be viewed.
View Makes the selected channel viewable.
Block Tbe front panel and remote control CH (channel) buttons will tune
only to channels that you have marked as Vlem The remote will still tune
to the blocked cbannel if you use the digits to access tbe cbannel, but tbe
cbannel will be blocked.
Don't lorget to lock parental controls after you cbange the status of Channel
Block. If you do not, the channel block will not take effect.
Note: Ifyou have a digital cable box channels 126 999 can be blocked
but will not be removable from your scan list.
Front Panel Block
Selecting tbis option lets you block (disable) el unblock (enable) tbe TV's front
panel. The remote still tunes to any cbannel. Front Panel Block can:
Keep cbildren from watcbing TV wben tbe parent is not present.
Keep young cbildren flora playing witb tbe buttons.
(Wben using this as a Parental Control method, you sbould remove access to
any remote tbat is capable of operating tbe television wbile you bave tbe front
panel blocked.)
Don't R_rget to lock parental controls after you cbange tbe status. If you do not,
tbe front panel Mock will not take effect.
Lock/Unlock Parental Controls
Selecting tbis option lets you lock and unlock parental controls settings using a
password.
If you do not lock parental controls, none of the settings for V-Chip,
Channel Block, or Front Panel Block will take effect.
If you forget your password, simultaneously press and bold MENU on tbe
television and volume down on the remote for 3 seconds. Notbing appears on
tbe screen, Parental Controls simply unlock and you can re enter a password
via [ock Parental Controls,
15

This page left blank intentionally

Chapter Overview:
•How to Use the Different Types of Menus and Control Panels
•Audio Menu
•Picture Quality Menu
•Screen Menu
•Channel Menu
•Time Menu
NOTE: Illustrations are for representation only. Your product and on-screen
displays might differ.
Changing Entertainment. Again
17

How to Use the Different Types of Menus and
Control Panels
The TV's menu system has three types of screens: menus, contlol panels, and choice lists. You use
tile buttons on the remote or the florlt panel to access the menu systern and make changes to the
settings,
Tile following pages explain how to use the different types of menus to adjust the featmes of
yore TV,
Menus
Tile first rnenu is called the Main rnenu. Pless MENU on tile remote or on tile
front panel to bring up tile Main menu.
Menus take you to anothe] merlu or a cent]el panel, There are two ways to
select a choice irl a merlu:
rip
Fee! free to explore the menu system,
If you're ever unsure where you are in
the menu system, or you'rejust plain
tired of exploring, press CLEAR to
remove the menus from the screen
and start over again.
Use your alrow buttons on your lemote contlol to highlight yore choice,
and press OK.
Press a number button on tile lemote, Fo] example, in tile Main menu p_ess
3 to go straight to tile Screen menu.
Exiting a menu
There are ttnee ways to exit a menu:
Highlight Exitand press OK_
Press 0 on tile remote,
Press CLEAR. Tile on screen displays are cleared liom the screen and you
return to TV viewing.
Control Panels
Control panels allow you to adjust tile default settings on many features of your
TV. You can choose a setting, enter a number, or adjust a level such as tint or
brightness, There are three types of control panels: sliders, numeric eat1T and
choice lists,
18
This manual suits for next models
1
Table of contents
Other RCA TV manuals