Reach CL4000 Beyonsys User manual

Copyright © Shenzhen Reach IT Co., Ltd.
REACH
Media Master
CL4000 (Beyonsys™)
User Manual
V2.1
2012-01

REACH CL4000(Beyonsys™)
ser Manual
Copyright © Shenzhen Reach IT Co., Ltd.
Shenzhen Reach IT Co., Ltd provides full technical supports for the custo ers. If you
have any inquiries, please contact the local Reach office or directly contact the
headquarters of the co pany.
Shenzhen Reach IT Co., Ltd
Address: Unit 601, Block B, Kingdee Software Park, No. 2,
Technology Southern No. 12 Rd. South District of
Hi-Tech Industrial Park, Nanshan District, Shenzhen
Postal code:
518057
Website: http://www.szreach.co
Tel.: 0755-86073600
Custo er
service hotline:
4007-160-868
Custo er
service fax:
0755-86073689
Copyright © Shenzhen Reach IT Co., Ltd. 2012. All rights reserved.
Any part of this docu ent, including the text, i age and graph, is the property of
Shenzhen Reach IT Co., Ltd. No part of this docu ent shall be copied in any
eans without the prior written consent of Reach. Reach reserves the right to revise this
docu ent without any prior notice.
Reach provides warranty of li ited liabilities for the software and hardware product.
For any loss of the users caused by the design defect of the software and hardware,
Reach will co pensate the user with the a ount up to the price specified in the product
purchase contract.
Trade ark State ent
, Reach, REACH, , Beyonsys™, Powolive™ and Reach
Software are the trade arks of Shenzhen Reach IT Co., Ltd. Windows, Windows 95,
Windows 98, Windows NT, Windows 2000, Windows 2003, Windows XP and Windows 7
are the trade arks of Microsoft. Other trade arks are the properties of their respective
owners
Note:
This user anual is co piled to ensure easy installation and configuration of the

REACH CL4000(Beyonsys™)
ser Manual
Copyright © Shenzhen Reach IT Co., Ltd.
product. Please read this anual carefully before using the product, so that you can ake
best use of all its functions.
This anual is subject to update fro ti e to ti e without prior notice. If you co e
across any proble that cannot be solved according to the anual, please contact Reach
for solutions. Thank you.

REACH CL4000(Beyonsys™)
ser Manual
Copyright © Shenzhen Reach IT Co., Ltd.
Contents
CHAPTER 1 OVERVIEW .......................................................................................................... 6
CHAPTER 2 INSTALLATION ................................................................................................... 7
2.1 PRODUCT INTRODUCTION ................................................................................................... 7
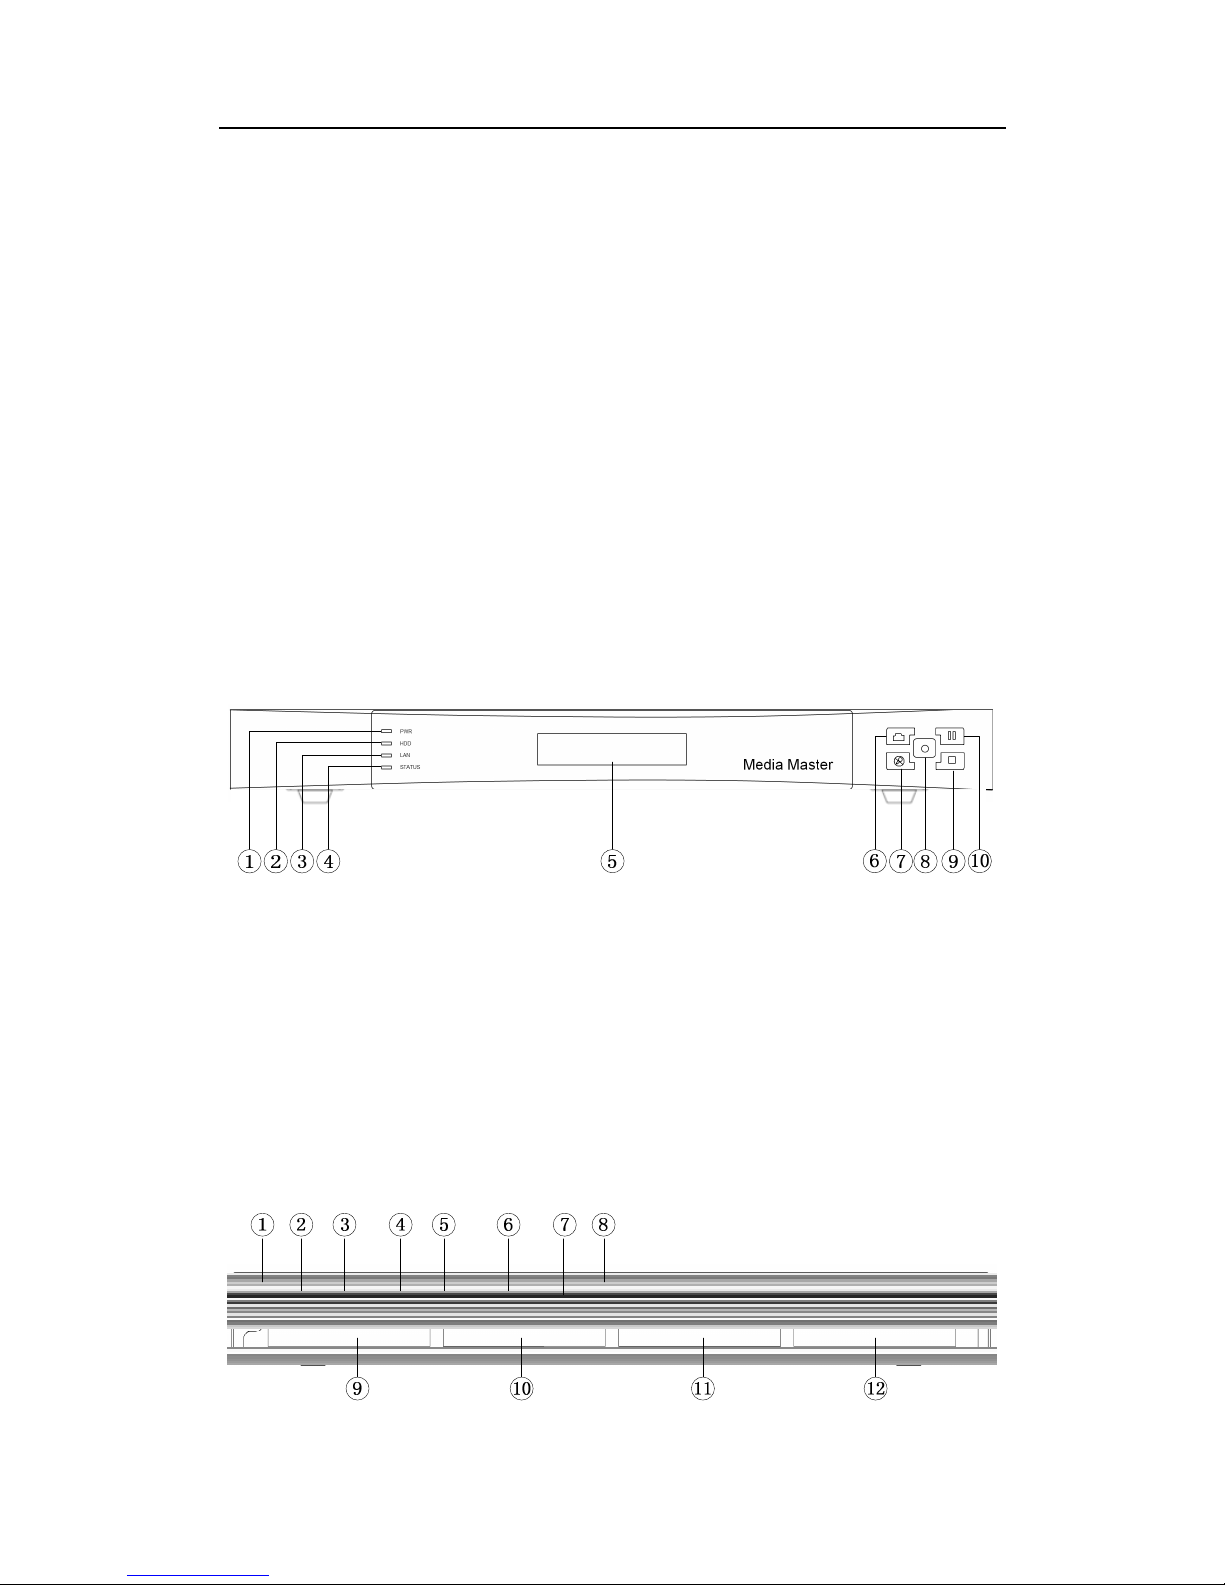
2.2.1 Product front view ..................................................................................................... 7
2.2.2 Back view of the basic system .................................................................................. 7
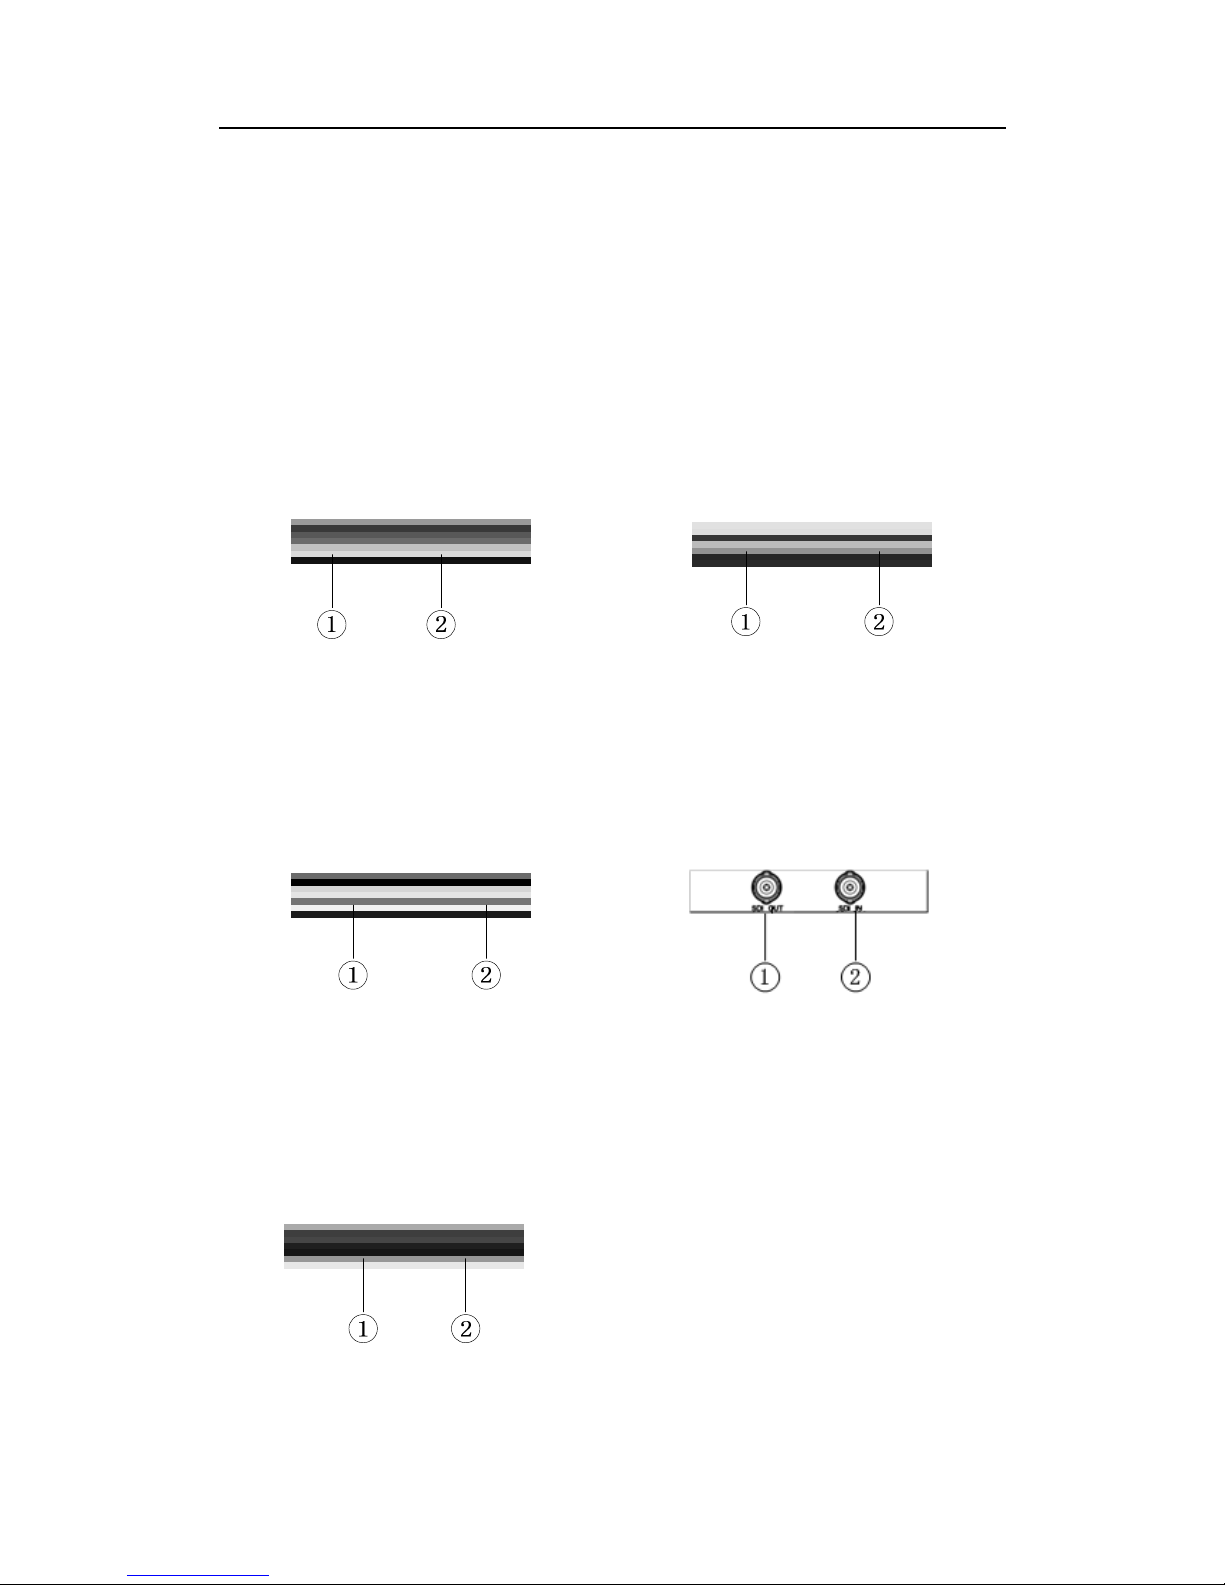
2.2.3 Back view of the interface modules .......................................................................... 8
2.2 CONNECTION CABLE ........................................................................................................ 10
CHAPTER 3 START GUIDE ................................................................................................... 10
3.1 STARTUP AND SHUTDOWN ................................................................................................ 10
3.2 LCD PANEL ...................................................................................................................... 11
3.3 BUTTONS ON THE FRONT PANEL......................................................................................... 11
3.4 NETWORK ......................................................................................................................... 11
3.5 INSTALL AND DOWNLOAD PLUG-INS ................................................................................... 13
CHAPTER 4 LIVE STREAMING ................................................................. 错误!未定义书签。
4.1 WATCH LIVE STREAMING AS A SUPER ADMINISTRATOR ........................................................ 14
4.2 WATCH LIVE STREAMING AS A COMMON USER .................................................................... 14
4.3 INTRODUCTION TO THE LIVE STREAMING PLAYER ............................................................... 15
CHAPTER 5 RECORD ............................................................................................................ 16
5.1 QUICK RECORD ON WEB INTERFACE ................................................................................. 16
5.2 ADVANCED RECORD ON WEB INTERFACE ........................................................................... 17
5.3 SCHEDULED RECORD ....................................................................................................... 18
5.3.1 Add scheduled record ............................................................................................. 18
5.3.2 odify scheduled record ......................................................................................... 19
5.3.3 Delete scheduled record ......................................................................................... 19
5.3.4 Record immediately ................................................................................................ 20
5.4 STOP RECORD ON WEB INTERFACE ................................................................................... 20
5.5 RECORD WITH BUTTONS ON THE FRONT PANEL ................................................................. 21
CHAPTER 6 VOD.................................................................................................................... 21
6.1 VOD AS SUPER ADMINISTRATOR ....................................................................................... 21
6.2 VOD AS COMMON USER ................................................................................................... 22
6.3 SEARCH FILES ................................................................................................................. 23
6.4 MODIFY FILES .................................................................................................................. 23
6.5 DELETE FILES ................................................................................................................... 24
6.6 SYNCHRONIZE FILES ........................................................................................................ 25
6.7 INTRODUCTION TO VOD PLAYER ....................................................................................... 25
CHAPTER 7 DOWNLOAD ...................................................................................................... 27
CHAPTER 8 SERVER BASED EDITING ................................................... 错误!未定义书签。

REACH CL4000(Beyonsys™)
ser Manual
Copyright © Shenzhen Reach IT Co., Ltd.
8.1 SEARCH COURSES ........................................................................................................... 29
8.2 EDIT COURSES ................................................................................................................. 30
8.2.1 Edit the index .......................................................................................................... 31
8.2.2 Edit the opening and ending ................................................................................... 31
8.2.3 Cut videos ............................................................................................................... 32
8.2.4 Replace videos ....................................................................................................... 33
8.2.5 Edit the course information ..................................................................................... 35
8.3 MERGE COURSES ............................................................................................................ 35
CHAPTER 9 USER MANAGEMENT ...................................................................................... 36
9.1 ADD NEW USER ............................................................................................................... 36
9.2 MODIFY USER ATTRIBUTES ............................................................................................... 37
9.3 EDIT THE VOD AUTHORITY OF USER ................................................................................. 38
9.4 DELETE USERS ................................................................................................................ 38
9.5 LDAP USER AND USER ROUP MANAGEMENT .................................................................. 39
CHAPTER 10 SETTING .......................................................................................................... 40
10.1 SET VOD AND RECORD PARAMETERS ............................................................................. 40
10.1.1 Set Live code rate ................................................................................................. 40
10.1.2 Adjust the position of screen ................................................................................. 40
10.1.3 Adjust the screen color ......................................................................................... 41
10.1.4 Control the camera PTZ ........................................................................................ 41
10.2 SET SYSTEM PARAMETERS ............................................................................................. 42
10.2.1 Upgrade the system .............................................................................................. 42
10.2.2 odify the language .............................................................................................. 43
10.2.3 Restart the system and synchronize the time ....................................................... 43
10.2.4 Set IP .................................................................................................................... 44
10.2.5 Configure the network storage .............................................................................. 44
10.2.6 odify the device name ........................................................................................ 45
10.2.7 Configure the system ............................................................................................ 45
10.2.8 anage the FTP server ........................................................................................ 46
10.2.9 Configure the LDAP Sever .................................................................................... 46
CHAPTER 11 LOG MANAGEMENT ...................................................................................... 47
CHAPTER 12 MODI YING PASSWORD, SIGN OUT AND LOGOUT .................................. 48
CHAPTER 13 TROUBLESHOOTING..................................................................................... 48

REACH CL4000(Beyonsys™)
ser Manual
Copyright © Shenzhen Reach IT Co., Ltd.
Chapter 1 Overview
As new generation visual infor ation recorder and propagation equip ent, REACH
CL4000 Series Media Master is developed by Shenzhen Reach IT Co., Ltd. for recording
and strea ing eetings for large and ediu -sized organizations. Its odular design
allows up to 4 odules to be put into the unit. It supports the recording, live strea ing and
VOD of 4 ways visual signals in free co binations. There are optional SD odule, VGA
odule, HD DVI odule, HD SDI odule, decoding odule for users to configure flexibly
according to their needs. Different odules support different signal inputs. These signals
include SD video signals (such as co posite video), VGA, HD video signals (such as
aberration, DVI, HDMI and HD-SDI) and one-way audio signal. The structure of CL4000 is
1U and 19-inch, which is applicable for engineering use. As a highly flexible recording and
strea ing platfor , CL4000 is configurable, expandable and ovable, satisfying the
needs for recording and strea ing the visual infor ation in eeting, training and teaching
of large and ediu -sized organizations.
The Beyondsys™ platfor supports ultiple operating syste s (such as Windows
OS and Mac OS) and ultiple browsers (such as Internet Explorer, Safari and Chro e).
Adopted the play buffer ode, it is applicable for WAN, supporting synchronous recording,
live strea ing and VOD of up to 3 pictures, as well as i age index and server based
editing.
The Powolive™ platfor supports Recplayer, 1080p@60Hz video, and synchronous
recording, live strea ing and VOD of up to 4 pictures. The live strea ing delay is less
than 0.5s and is applicable for WAN.
This anual introduces the CL4000 series using Beyondsys™ platfor . For better
explanation, two-way HD and one-way VGA are adopted as the typical configuration.

REACH CL4000(Beyonsys™)
ser Manual
Copyright © Shenzhen Reach IT Co., Ltd.
Fig. Product appearance
Chapter 2 Installation
2.1 Product Introduction
2.2.1 Product front view
Fig. Product front view
1. Power LED
2. Hard disk LED
3. Network LED
4. Status LED
5. LCD
6. Camera button
7. ute button
8. Start recording button
9. Pause button
10. Stop recording button
2.2.2 Back view of the basic system
Fig. Back view of the basic syste

REACH CL4000(Beyonsys™)
ser Manual
Copyright © Shenzhen Reach IT Co., Ltd.
1. Power switch
2. Power in
3. RS232 serial port
4. Network interface
5. Line in
6. Line out
7. MIC in
8. 2 USB ports
9. Interface position of Module 1
10. Interface position of Module 2
11. Interface position of Module 3
12. Interface position of Module 4
2.2.3 Back view of the interface modules
SD module
Back view of SD odule
1. Co posite video loop out BNC
2. Co posite video input BNC
DVI module
Back view of DVI odule
1. DVI loop out port
2. DVI input port
VGA module
Back view of VGA odule
1. VGA loop out port
2. VGA input port
HD SDI module
Back view of HD SDI odule
1. HD-SDI loop out port
2. HD-SDI input port
Decoding module
Back view of decoding odule
1. HDMI output port

REACH CL4000(Beyonsys™)
ser Manual
Copyright © Shenzhen Reach IT Co., Ltd.
2. VGA output port

REACH CL4000(Beyonsys™)
ser Manual
Copyright © Shenzhen Reach IT Co., Ltd.
2.2 Connection Cable
1. Put the device at the flat position.
2. Connect the SD video source, HD video source or co puter signal source to the
corresponding odule input ports with the corresponding video cables according
to the actual odular configuration of the device. To loop out the signals, connect
the device loop out port to the display equip ent or atrix with the corresponding
video cables.
3. Connect the audio source to the audio input port Line In with the stereo audio
cable. If there is icrophone input, connect the icrophone cable to the port Mic
In.
4. To control the ca era PTZ, connect the ca era PTZ control port with the device
serial port with the serial port cable.
5. Connect the network cable to the device’s network port, so that the device will be
connected to the network planned by the network ad inistrator.
6. Connect the power of adaptor to the power interface and plug the adaptor to the
power socket.
Chapter 3 Start Guide
3.1 Startup and Shutdown
Before starting the syste , please ake sure that the cables are properly connected,
and then turn on the power switch on the rear panel of the device. The power LED of the
device will be constantly on after the startup. The hard disk LED will continually flash fast
until the syste is started.
To protect the hard disk and prevent data loss, before shutting down, please ake
sure that the device has stopped recording and the para eters have been stored, and
then turn off the power switch on the rear panel of the device.

REACH CL4000(Beyonsys™)
ser Manual
Copyright © Shenzhen Reach IT Co., Ltd.
3.2 LCD Panel
After the startup, so e infor ation about the device’s status will be displayed on the
LCD panel, such as operating status, device odel, IP address, subnet ask, gateway,
etc.. The device odel will be displayed as “CL4000xxxxxx”, and the IP address, subnet
ask and gateway will be displayed in turn as “xxx.xxx.xxx.xxx”.
3.3 Buttons on the Front Panel
The users can use the buttons on the front panel to control the quick record, after the
device runs nor ally. The button’s LED indicates the current operating status of the
device.
Mute button: The LED is off by default. It will be on after the button is pressed,
indicating that the sound is disabled during live strea ing. Press it again, the LED will be
off and the syste will recover to the nor al live strea ing.
Start recording button: The LED is off by default. When it is in stop record or pause
ode, the LED will be on and the syste will start to record after this button is pressed.
Meanwhile, the Stop Recording LED or Pause LED will be off. It will start to record all the
audio, video and co puter screen signals connected with the device.
Stop recording button: The LED is on by default. When it is in recording ode, the
syste will stop recording and the Stop Recording LED will be on after this button is
pressed. Meanwhile, the Start Recording LED will be off.
Pause button: The LED is off by default. When it is in recording ode, the syste will
pause recording and the Pause LED will be on after this button is pressed. Meanwhile, the
Start Recording LED or Pause LED will be off. Press the “Start Recording” button to
recover to the recording ode.
Ca era button: Not available yet.
3.4 Networ
Set the network para eters properly according to the require ents of the network
ad inistrator, aking sure that the control co puter can fully access the device through
network.
Enter the IP address of the device in the IE browser, and then press Enter key to visit

REACH CL4000(Beyonsys™)
ser Manual
Copyright © Shenzhen Reach IT Co., Ltd.
the Web interface.
Fig. Login interface
The user na e and default password of the super ad inistrator are both “ad in”.
The ad inistrator can set the user na e and password for the co on users. Please
refer to the user setting section for detailed infor ation.
After logging on as the super ad inistrator, you will see the following interface.
Fig. Interface after logging on as the ad inistrator
The input infor ation of the device is hidden by default. You ay click “Signals” to
view it.

REACH CL4000(Beyonsys™)
ser Manual
Copyright © Shenzhen Reach IT Co., Ltd.
Fig. Device input infor ation anage ent
After logging on as the co on user, you will see the following interface.
Fig. Interface after logging on as the co on user
3.5 Install and Download Plug-ins
For easy downloading the recorded ulti edia docu ents in the future, you ay
click the link of “Download ReachFtpClient” when first logging on to download and install
the ReachDownload tool, and then click the link of “Download Silverlight” to download
Microsoft Silverlight plug-in. You ay also download the latest version of Silverlight plug-in
fro the Microsoft official website.
Fig. Download plug-ins

REACH CL4000(Beyonsys™)
ser Manual
Copyright © Shenzhen Reach IT Co., Ltd.
Chapter 4 Live streaming
4.1 Watch Live streaming as a Super Administrator
Sign in the device with the na e of ad in.
You will see the ho e page by default or you ay click the “Live” enu on the left.
Fig. Syste anage ent interface
Click “Play” button, the browser will open a new page of the live strea ing player for
you to watch the live strea ing.
If “Low Quality Strea ” is selected, you can play strea ing with low quality while HD
live strea ing.
Fig. Play strea ing with high/low quality
4.2 Watch Live streaming as a Common User
Sign in the device with the na e of a co on user that has the authority of live
strea ing.

REACH CL4000(Beyonsys™)
ser Manual
Copyright © Shenzhen Reach IT Co., Ltd.
Click “Play”, the browser will open a new page of the live strea ing player for you
to watch the live strea ing.
Fig. Play strea ing as a Co on User
4.3 Introduction to the Live streaming Player
The live strea ing player on the webpage will be started when you watch the live
strea ing.
Fig. Live strea ing player
1. Video window 1
2. Video window 2
3. Video window 3
4. Play button
5. Stop button
6. Progress bar
7. Volu e control field
8. Picture control field
You ay double click the video window to zoo in, or change its position by dragging.
The nu ber of video window depends on that of the video source.
You ay drag the progress bar, which indicating the current play ti e and total
length, when you are playing the file on de and.
Icon Definition

REACH CL4000(Beyonsys™)
ser Manual
Copyright © Shenzhen Reach IT Co., Ltd.
Play button
Stop button
It is in playing state and you ay click the button to enter into the
ute state.
It is in ute state and you ay click the button to play the sound.
To adjust the volu e
You ay click the button to get a layout where the left pictures are
s all and the right picture is big.
You ay click the button to get a layout where the left picture is
big and the right pictures are s all.
You ay click the button to get a single picture layout.
Full screen button
Table Definitions of the icons in the live strea ing player
Chapter 5 Record
5.1 Quic Record on Web Interface
Sign in the device with the na e of ad in.
Click “Live” enu to enter the device Live anage ent interface.
Select the desired audio and video source fro “Signals”.
Click “Quick Record”, and the device will start to record in a few seconds. The
recorded ulti edia file is na ed as “yyyydd hh ss_H”, which is for ed with the
recording year, onth, date, hour, inute and second, and “_H” eans high strea
recording and “_L” eans low strea recording. You cannot change the audio and video
sources as well as their attributes while recording.

REACH CL4000(Beyonsys™)
ser Manual
Copyright © Shenzhen Reach IT Co., Ltd.
Fig. Device in recording ode
5.2 Advanced Record on Web Interface
Sign in the device with the na e of ad in.
Click “Live” enu to enter the device Live anage ent interface.
Click “Advanced Record” to pro pt the “Advanced Record” window.
Fig. Advanced record window
You can define the record attributes on the advanced record page.
Name Definition
File na e The na e of the recorded ulti edia file
Description The description of the recorded ulti edia file
Content
Select the audio and video signal sources you want to record, or
skip this operation.
Snapshot Index
When it is selected, it will auto atically generate an i age index

REACH CL4000(Beyonsys™)
ser Manual
Copyright © Shenzhen Reach IT Co., Ltd.
for the tested VGA picture and the ulti edia file.
Course The na e of the recorded course
Teacher The na e of the teacher for this course
Copyright Copyright infor ation
File Group Dividing the files into groups for easy search and classification
Record Now Click “OK” button to start recording
Schedule
Record
Record by schedule
5.3 Scheduled Record
The scheduled record tasks can be set on the advanced record page. You can define
the ti ing for the scheduled record and set the ti ing cycle record task for every day,
every week and every onth.
Fig. Scheduled record
5.3.1 Add scheduled record
Click the “New” button on the “Scheduled Record” page, a new scheduled record
dialog box will pop up for you to set the file na e, file group and other infor ation. After
select the “Scheduled Record”, you can set the scheduled period and ti e, the record
ti e of every day, every week and every onth, and then click “OK” button to save the

REACH CL4000(Beyonsys™)
ser Manual
Copyright © Shenzhen Reach IT Co., Ltd.
settings.
Fig. Add new scheduled record task
5.3.2 Modify scheduled record
Select the scheduled record task on the “Scheduled Record” page and click the
“Modify” button, the odification dialog will pop up. You can click “OK” button to save the
settings or click “Cancel” button to cancel the odification.
Fig. Modify scheduled record task
5.3.3 elete scheduled record
Select the scheduled record task to be deleted and click the “Delete” button, a
dialog will appear to pro pt the user to delete. You can click “OK” button to delete or click
“Cancel” button to cancel the deletion.

REACH CL4000(Beyonsys™)
ser Manual
Copyright © Shenzhen Reach IT Co., Ltd.
Fig. Delete scheduled record task
5.3.4 Record immediately
If the device has not started recording, it will start to record i ediately once you
click “Record Now” after selecting a recording task on the “Schedule Record” page. If the
device is recording, a dialog box will appear to provide the conflict pro pt. Clicking
“Record I ediately” will not change the attribute settings of original scheduled record
task.
Fig. Record i ediately
5.4 Stop Record on Web Interface
Sign in the device with the na e of ad in.
Click “Live” enu to enter the device Live anage ent interface.
The “Quick Record” button will beco e “Stop Recording” button in recording ode.
Click “Stop Recording”, and then it will stop in a few seconds.
Table of contents
Other Reach Recording Equipment manuals