Reaim 2 in 1 Machine User manual

1
2 IN 1 Machine
High pressure washer and Vacuum cleaner
INSTRUCTION MANUAL
WARNING: Do not use the appliance without reading the instruction manual.

2
Thank you for choosing the
2 in 1 Machine
High Pressure Washer and vacuum cleaner
Chapter Page
High pressure washer
1. Safety instructions……………………………………………………………………….……….6
2. First time instructions…………………………………………………………………….…….6
3. Operating instructions……………………………………………………………….………….6
4. After use instructions……………………………………………………………….…………..9
5. Environmental protection……………………………………………………….…………….10
6. Maintenance, cleaning, repair…………………………………………….……….……..10
7. Trouble shooting…………………………………………………………………………….…….11
Vacuum cleaner
1.Features…………………………………………………………………………………….…………..13
2. How to operate…………………………………………………………………………….……….14
3. General maintenance…………………………………………………….…………….……….15
4. Trouble shooting……………………………………………………………….…………………..16
Content
EN

3
Pressure washer
Vacuum cleaner
vacuum degree
15 kpa
Current
6 A
Voltage
120V/ 60Hz
1. Pressure gun
2. Pressure hose
3. Outlet connector
4. Main switch
5. Inlet hose
6. Inlet connector
7. Soap bottle switch
8. Vacuum cleaner
9. Machine body
10. Plug
11. Power cable
12. Soap bottle
13. Water tap
14. Wheel
15. Round suction nozzle
16. Flat suction nozzle
17. Sofa suction nozzle
18. Vocuum hose
Product Overview
Technical Data
EN
Motor
1450psi
Max. pressure
2300psi
Max. Flow
1.60GPM
Current
13 A
Voltage
120V/ 60Hz

4
IMPORTANT SAFEGUARD
INSTRUCTIONS:
SAFETY WARNINGS AND
PRECAUTIONS
When using this product basic
precautions should always be followed,
including thefollowing:
·Read all the instructions before using
this products.
·To reduce the risk of injury, close
supervision is necessary when a product
is used near children.
·Know how to stop the product and bleed
pressures quickly. Be thoroughly
familiar with the controls
·Stay alert-watch what you are doing.
·Do not operate the product when
fatigued or under the influence of alcohol
or drugs.
·Keep operating area clear of all persons.
·Do not over reach or stand on unstable
support. Keep good footing and balance
at all time.
·Follow the maintenance instructions
specified in themanual.
· If replacement of the plug or cord is
needed. Use only identical
replacement parts.
·Warning-Risk of injection or injury-Do not
direct discharge stream atpersons.
·Keep all connections dry and off the
ground;
SAVE THESEINSTRUCTIONS
SERVICING OF ADOUBLE-
INSULATED APPLIANCE
In a double-insulated product, two
systems of insulation are provided
instead of grounding. No grounding
means is provided on a double-insulated
product, nor should a means for
grounding be added to the product.
Servicing a double-insulated product
requires extreme care and knowledge of
the system, and should be done only by
qualified service personnel. Replacement
parts for a double-insulated product must
be identical to the parts theyreplace.
A double-insulated product is marked
with the words “DOUBLE INSULATION”
or “DOUBLE INSULATED.” The symbol
“ “may also be marked on the product.
EXTENSION CORDS
Use only extension cords that are
intended for outdoor use. These
extension cords are identified by a
marking “Acceptable for use with outdoor
appliances; store indoors while not in
use.” Use only extension cords having an
electrical rating not less than the rating of
the product. Do not use damaged
extension cords. Examine extension cord
before using and replace if damaged. Do
not abuse extension cord and do not
yank on any cord to disconnect. Keep
cord away from heat and sharp edges.
Always disconnect the extension cord
from the
receptacle before disconnecting the
product from the extension cord.
WARNING –To reduce the risk of
HIGH PRESSURE WASHER
EN

5
electrocution, keep all connections dry
and off the ground. Do not touch plug
with wet hands.
GENERAL SAFETYREGULATIONS
WARNING: Keep operating area clear off
all persons
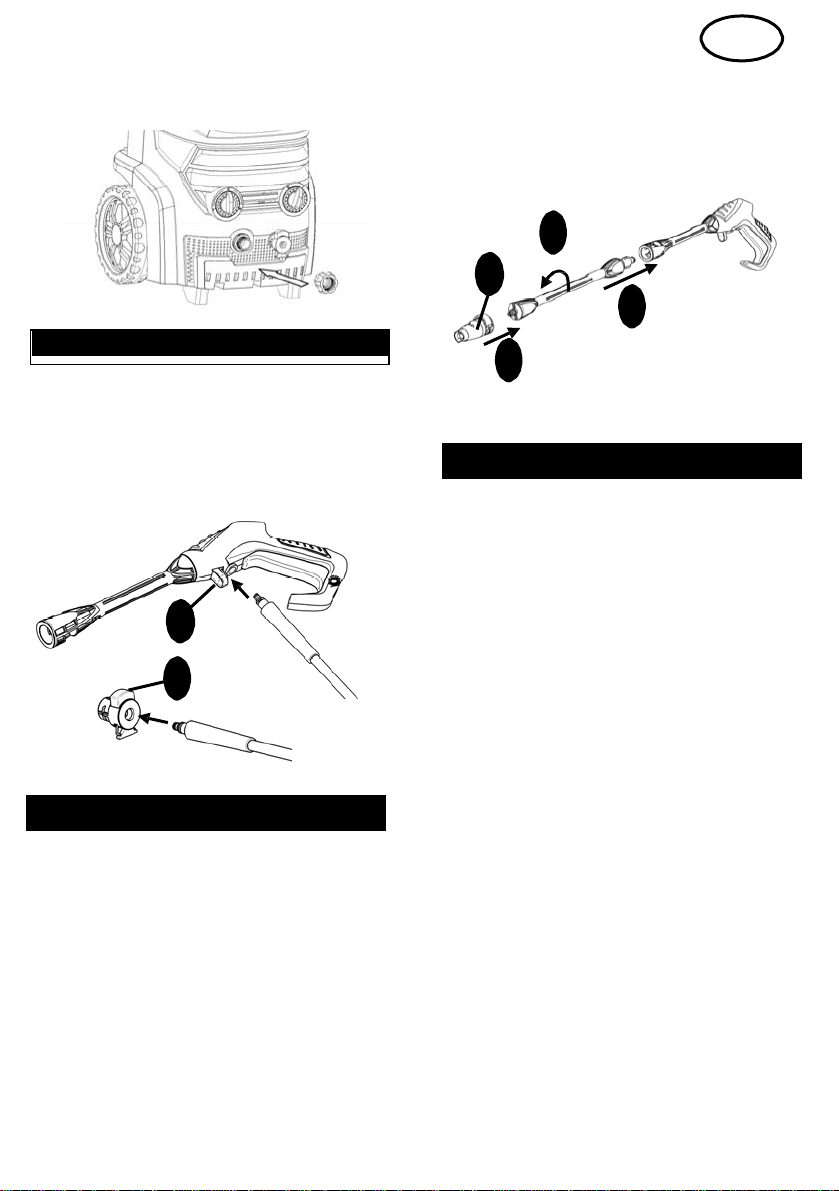
WARNING: Before each use pressure
must be released! Trigger on wand then
start the washer
WARNING: Do not over reach or stand
on unstable support. Keep good footing
and balance at all times.
WARNING: Follow the maintenance
instructions specified in themanual.
WARNING: To reduce the risk of
electrocution, don’t start and run the
machine in the rain or storm. Keep all
connections dry and off the ground. Do
not touch plug with wet hands. It is strictly
prohibited to let water leak into the
machine.
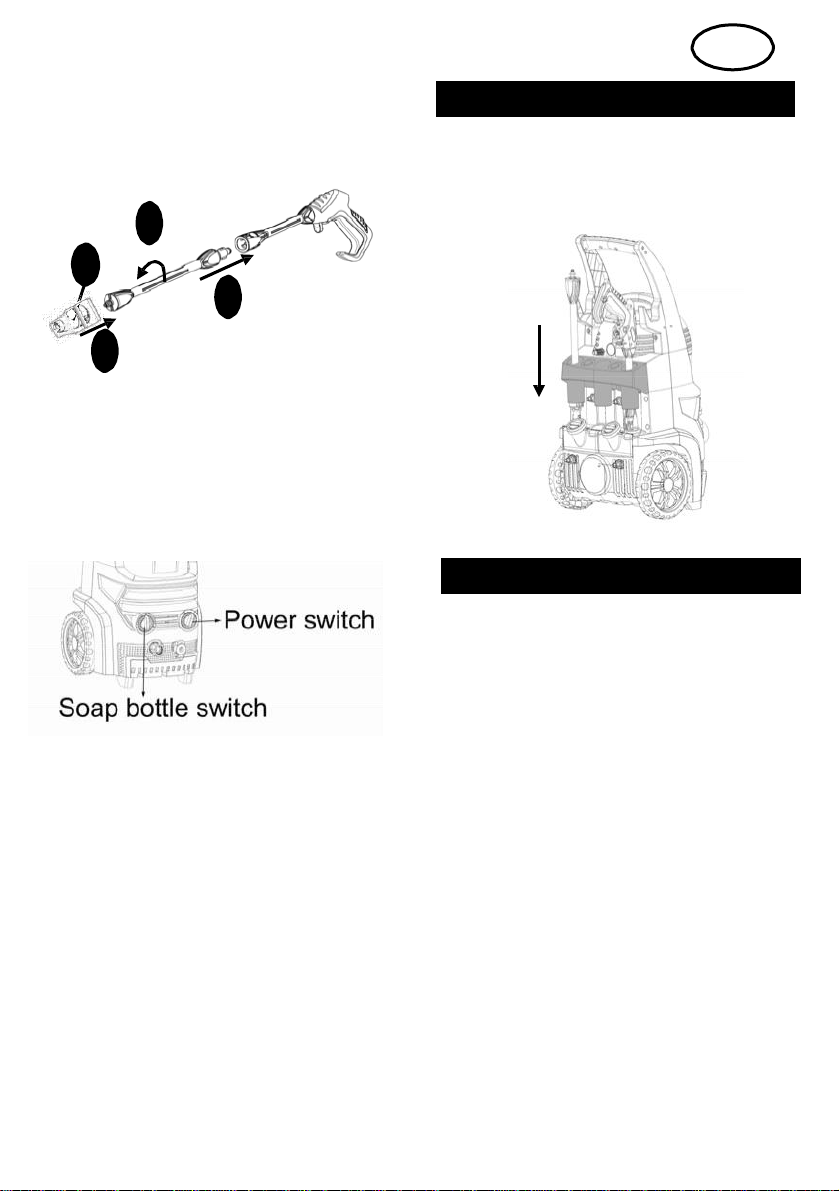
WARNING: When the machine is turned
on, the interior pumps start and continue
to run even if the pressure wand trigger
has not been depressed. Running the
machine for more than 3 minutes without
depressing the pressure wand trigger
could cause heat damage to the motor
and pumps. Please do not leave the
machine running unattended or unused
for more than 3minutes.
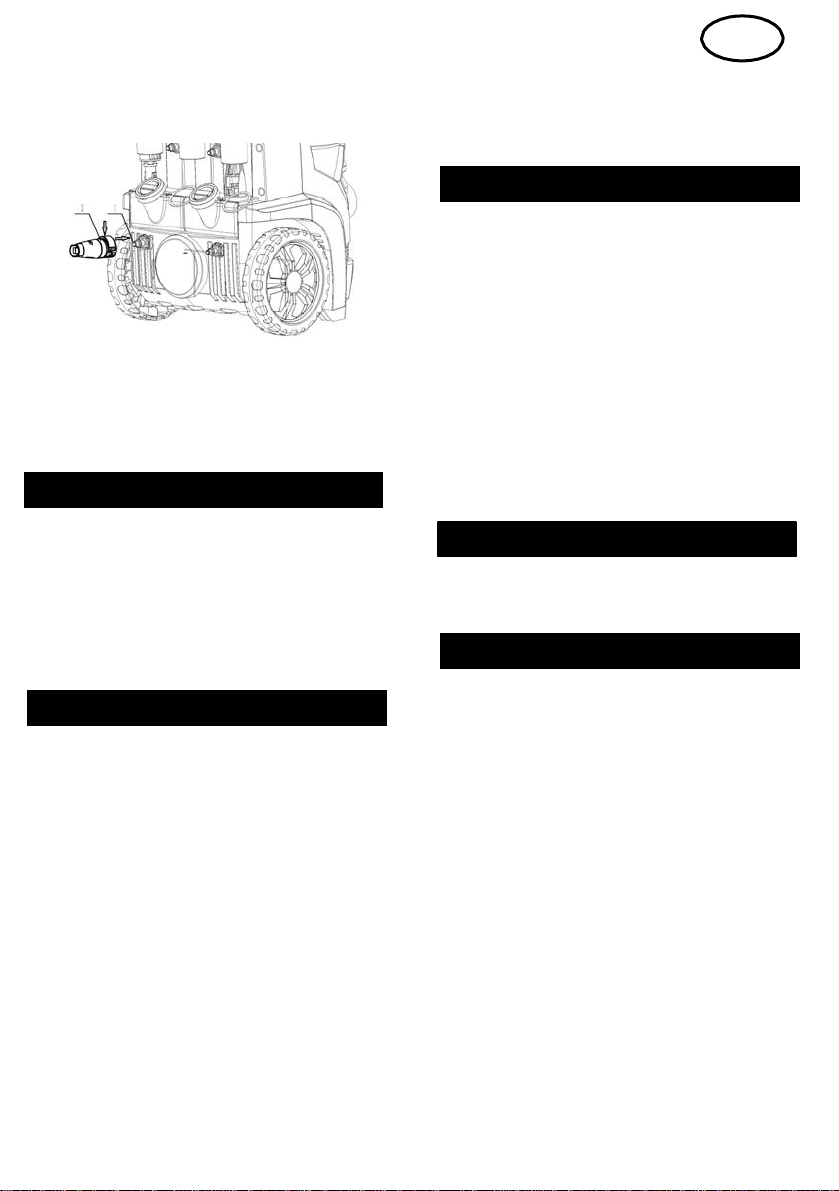
WARNING: When the machine is running,
please maintain a constant
water supply. Without water circulation
the sealing rings of the machine will be
damaged.
WARNING: It is necessary to turn on the
spray lance within one or two minutes
after the machine has been started.
Otherwise, the temperature of the
circulating water within the machine will
soon rise to a critical point, which will
cause damage to the sealing rings inside
the machine.
WARNING: Don’t start and run the
machine in a place excessively cold so
as to prevent the machine from the
freezingcurrent.
WARNING: This appliance has been
designed for only using cleaning water,
do not use corrosive chemicals.
WARNING: Do not use the appliance
within the range of persons unless they
wear protective clothing.
WARNING: Do not direct the jet against
yourself or others in order to clean
clothes or footwear.
WARNING: Disconnect from the
electrical power supply before carrying
out usermaintenance.
WARNING: To ensure the appliance
safety to please use only original spare
parts from the manufacturer or approved
by the manufacturer. Do not use the
machine before you change them if they
are damaged.
EN

6
The finished handle should be:
SAFETY DEVICES
The unloader valve can reduce
pressure if it exceeds pre-set values.
Locking device on trigger gun (see
illustration at the beginning of this
manual): The trigger gun features a
locking device. When the knob is
activated, the trigger gun cannot be
operated.
THERMAL SENSOR
A thermal sensor protects the motor
against overloading. The machine will
restart after a few minutes when the
thermal sensor has cooled.
This section will explain in details how
to make high pressure washer ready for
use.
Install the handle as following
instruction.
Install the finish handle into the
machine as following
1. Screw the water inlet coupling tight
on to the water inlet Note: The inlet
filter must always be fitted in the
water inlet pipe to filter out sand,
lime stone and other impurities as
these will damage the pump valves.
Caution: Failure to fit the filter will
invalidate the guarantee.
3.1 Connection of garden hose
3. Operation instructions
2.1 Mounting of handle
2. First time instructions
E
E
EN
N
N
2.2 Handle installing
1. Safety instructions

7
2. Connect the garden hose with a
standard quick coupling
1. Attach the high pressure hose to the
trigger gun and machine.
Detach the high pressure hose by
pressing the pawl (A) or button (B)
1. Push the lance into the trigger gun
2. When inserted turn it. Caution: Make
sure the lance is properly fixed to the
gun
3. Attach the nozzles.
Caution: When attaching the nozzle the
button (A) on the nozzle should come
out again. Check before activating the
trigger that the nozzle is properlyfixed.
An ordinary 1/2" garden hose of min. 10
m and max. 25 m will be suitable.
IMPORTANT! Only use water without any
impurities. If there is a risk of sand
particles in the inlet water (i.e. from
your own well), an additional filter
should be mounted.
1. Let the water run through the water
hose before connecting it to the
machine to prevent sand and dirt
from penetrating the machine. Note:
Check that the filter is fitted in the
water inlet pipe and that it is not
clogged up.
2. Connect the water hose to the water
supply by means of the quick
connector (inlet water, max.
pressure: 10 bar, max. temperature:
40°C).
3. Turn on the water.
3.4 Water connection
2
A
1
3
3.3 Mounting of lance and nozzle
A
B
3.2 Mounting of high pressure hose
EN

8
The trigger gun and lance is affected by
a thrust during operation - therefore
always hold it firmly with both hands.
IMPORTANT: Point the nozzle at the
ground.
1. Check that the machine is in upright
position. NOTE: Do not place the
machine in high grass!
2. Release the trigger lock.
3. Activate the trigger of the trigger gun
and let the water run until all air has
escaped from the water hose.
4. Press the Start/stop switch.
5. Activate the trigger of the trigger gun.
6. Always adjust the distance and thus
the pressure of the nozzle to the
surface, which is to be cleaned.
Do not cover the machine during
operation or use it in a room without
adequate ventilation!
NOTE: If the machine is left or not used
for 5 minutes, it must be switched off on
the start/stop switch "O":
1. Press the start/stop switch "O".
2. Disconnect the electrical plug from
the socket.
3. Shut off the water supply and
activate the trigger of the trigger gun
to relieve the machine of pressure.
4. Lock the trigger gun .
When releasing the trigger of the trigger
gun, the machine automatically stops.
The machine will start again when you
re- activate the trigger gun.
The pressure can for the multi nozzle
be adjusted by tuning it. WARNING: Do
not do this under operation to avoid that
the hand hits the jet.
1, If you want to use soap or cleaning
agents to clean a surface, unscrew
the soap cap on the back of the
washer.
2, Fill the soap tank with the cleaning
agent.
3, Screw the soap cap back onto the
washer and use as normal.
3.7 Foam Sprayer
3.6 Multi Nozzle
3.5 Start/stop of the machine
EN

9
4, Finally, attach the detergent nozzle
to the lance and you begin using the
soap dispenser.
Pay attention:
There are two soap bottle can be
chosen . You can add two kinds
detergent in the two soap bottle
separately. Then transfer the soap
bottle you want with the swtich in front.
Caution: Please distinguish the switch
during your operation.
The trigger gun and lance can be stored
during and after operation in the parking
holder Click the trigger gun into the
parking holder
The machine should be stored in a frost-
free room!
Pump, hose and accessories should
always be emptied of water prior to
storing as follows:
1. Stop the machine (press the
start/stop switch “O” and detach
water hose, high pressure hoseand
nozzle
2. Restart the machine and activate the
trigger of the trigger gun Let the
machine run until no more water runs
through the trigger gun
3. Stop the machine, unplug and wind
up hose and cable.
4. Place trigger gun, lance, nozzles and
other accessories in the holders of
the machine. The hook can be used
for storage of the hose and cord.
4. After use instructions
2
A
1
3
EN
3.8 Parking holder

10
5, All accessories can be stored in the
washer after using.
WARNING: Never start up a frozen
machine. Frost damages are not covered
by the guarantee!
Old appliances contain valuable
materials that can be recycled. Please
arrange for the proper recycling of old
appliances. Please dispose your old
appliances using appropriate collection
systems.
WARNING! Always disconnect the
electrical plug from the socket prior to
maintenance or cleaning.
To ensure a long and problem free
working life, please take the following
advice:
Wash out water hose, high
pressure hose, spray lance and
accessories before mounting.
Clean the connectors of dust and
sand.
Rinse the detergent spraying
attachment after use.
Clean the nozzles.
Any repair should always be made in an
authorized workshop with original spare
parts.
Clean the water inlet filter regularly
once a month or more frequently
according to use.
Carefully loosen the filter with a
screwdriver and clean it (see section
3.1). Check that it is intact before re-
mounting it.
The inlet filter must always be fitted
inside the water inlet pipe to filter out
sand, limestone and other impurities, as
they will damage the pump valves.
CAUTION: Failure to fit the filter will
invalidate the warranty
6.2 Cleaning of air vents
The machine should be kept clean so as
to let cooling air pass freely through the
machine vents.
To ensure an easy connection and that
o-rings do not dry up; the couplings
should be greased regularly.
6.3 Greasing of couplings
6.1 Cleaning of inlet filter
6. Maintenance, cleaner and repair
5. Environmental protection
EN

11
Symptom
Cause
Recommended action
Machine refuses to
start
Machine not plugged in
Plug inmachine.
Defectivesocket
Try another socket.
Fuse has blown
Replace fuse. Switch off othermachines.
Defective extensioncable
Try without the extensioncable.
Fluctuating
pressure
Pump is sucking air
Check that hoses and connectionsare
airtight.
Valves dirty, worn out or
stuck
Contact your nearest servicecentre
Water supply notsufficient
Increase water pressure, check for
blockage of garden hose and/or changeto
bigger hose.
Pump seals worn
Contact your nearest servicecentre
Machinestops
Fuse has blown
Replace fuse. Switch off othermachines.
Incorrect mainsvoltage
Check that the mains voltagecorresponds
to specification on the nameplate
Thermal sensor activated
Leave the machine for 5 minutes tocool
down
Nozzle partially blocked
Clean the nozzle with a needle and by
spraying water backwards through the
nozzle
Fuse blows
Fuse too small
Change to an installation higher thanthe
amperage consumption of themachine.
Amperageincrease
Try without the extensioncable.
Machinepulsating
Air in inlet hose/pump
Allow machine to run with open triggeruntil
regular working pressureresumes.
Inadequate supply of mains
water specificationsrequired
Increase water pressure, check for
blockage of garden hose and/or changeto
bigger hose.
Nozzle partially blocked
Clean the nozzle with a needle and by
spraying water backwards through the
nozzle
Water filter blocked
Clean thefilter
Hosekinked
Straighten out hose.
Machine often
starts and stops by
itself
Pump and/or trigger gunis
leaking
Contact your nearest servicecentre
No water supply
Connect inlet water.
Machine starts but
no water comes out
Water filter blocked
Clean thefilter
Nozzleblocked
Clean the nozzle with a needle and by
spraying water backwards through the
nozzle
EN
7. Trouble shooting

12
IMPORTANT SAFETY
INSTRUCTIONS
When using an electrical appliance,
basic precautions should always be
followed, including the following:
READ ALL INSTRUCTIONS BEFORE
USING (THISAPPLIANCE)
WARNING–To reduce the risk of fire,
electric shock, or injury:
1. Do not leave appliance when plugged
in. Unplug from outlet when not in use
and before servicing.
2. Do not expose to rain. Store indoors.
3. Do not allow to be used as a toy.
Close attention is necessary when used
by or near children, pets or plants.
4. Use only as described in this manual.
Use only manufacturer’s recommended
attachments
5. Do not use with damaged cord or plug.
If appliance is not working as it should,
has been dropped, damaged, left
outdoors, or dropped into water, returnit
to a service center.
6. Do not pull or carry by cord, use cord
as a handle, close a door on cord, or pull
cord around sharp edges or corners. Do
not run appliance over cord. Keep cord
away from heated surfaces.
7. Do not unplug by pulling on cord. To
unplug, grasp the plug, not the cord.
8. Do not handle plug or appliance with
wet hands.
9. Do not put any object into openings.
Do not use with any opening blocked;
keep free of dust, lint, hair, and
anything that may reduce air flow.
10. Keep hair, loose clothing, fingers,
and all parts of body away from
openings and moving parts.
11. Turn off all controls before
unplugging.
12. Use extra care when cleaning on
stairs.
13. Do not use to pick up flammable or
combustible liquids, such as gasoline, or
use in areas where they may be present.
14. This appliance is provided with
double insulation. Use only identical
replacement parts. See instructions for
Servicing of Double-Insulated Appliances.
15. Unplug before connecting the
accessories.
16. Do not pick up anything that is
burning or smoking, such as cigarettes,
matches, or hot ashes.
17. Do not use without dust bag.
SAVE THESE INSTRUCTIONS
Household use only.
Vacuum cleaner
EN

13
SERVICING OF DOUBLE-INSULATED
APPLIANCES
A double-insulated appliance is marked
with DOUBLE INSULATED
This appliance is provided with double
insulation. Use only identical
replacement parts. See instructionsfor
Servicing of Double-Insulated Appliances.
In a double-insulated appliance, two
systems of insulation are provided
instead of grounding. No grounding
means is provided on a double-insulated
appliance, nor should a means for
grounding be added to the appliance.
Servicing a double-insulated appliance
requires extreme care and knowledge of
the system, and should be done only by
qualified service personnel.
Replacement parts for a double-
insulated appliance must be identical to
the parts they replace.
To reduce the risk of electric shock,
this appliance has a polarized plug (one
blade is wider than the other). This plug
will fit in a polarized outlet only one
way. If the plug does not fit fully in the
outlet, reverse the plug. If it still does
not fit, contact a qualified electrician to
install the proper outlet. Do not change
the plug in any way.
1.1 Connection of the hose with the
vacuum cleaner
Insert one end of the hose into the air
inlet of the vacuum cleaner for
vacuuming. To use the unit as a blower
instead insert one end of the hose into
the blower port. If you want to take the
hose off, pull to move it from the air
inlet or blower port.
1.2 Connection of hose with accessories
First connect the hose to the unit, next
attached the desired accessory to the
available hose end.
1.3 Assembling and dismantling of the
tank
1.3.1 Dismantling
1. Features
EN
2
1
1

14
1.3.2 Assembling
1.4 Assembly or removal of the filter
Fit the filter over the float cage & secure
with the retainer band. To remove, first
remove the retainer band, then remove
the filter from covering the filtercage.
IMPORTANT: Make sure the filter is
completely covering the filter cage, there
are no gaps between the filter & thelid.
It's very important to assembly filter
properly to reduce the risks of leaks and
possible damage to the vacuum.
2.1 Vacuuming Dry Materials
2.1.1 The filter must always be in
correct position to reduce the risk of
leaks and possible damage to vacuum.
Make sure that the filter is completely
covering the filter cage and that
retainer band is as close to the lid as
possible. Make sure there are no gaps
between the filter and the lid. It’s very
important to assemble the filter to the
cage without allowing any possible leaks
or tears. Any leaks will allow the pick up
media to be blown out the blower port
and back into the surrounding
environment.
2.1.2 To maintain peak performance of
your vacuum when picking up small dirty
such as sawdust, it may be helpful to
empty the dust drum and clean or
replace the filter at more frequent
intervals.
Note: The filter should be dry to pick up
dry material. If you use your vacuum to
pick up dry dirty when the filter is wet,
the filter will clog quickly and be very
difficult to clean. In case the filter gets
wet, replace it before continuing dry
pickup.
2.2 Vacuuming Liquids
2.2.1 Removal of the filter is highly
recommended for wet pickups.
2.2.2 This wet/dry vacuum is equipped
with a float mechanism which will rise
automatically to cut off the airflow
when the liquid in the drum reaches a
predetermined level. When this happens,
turn off vacuum, unplug the power cord,
and the empty the dust drum. You will
know that the float has shut the airflow
off because the suction ceases and the
motor noise becomes higher in pitch,
due to increased motor speed. The
liquid capacity may vary with the rate of
pick up.
2.2.3 Be sure to replace filter after wet
pick up. Never pick up dry dirty without
the filter properly installed.
IMPORTANT: To reduce the risk of
damage to the vacuum, do not run
motor with float in raised position.
WARNING: Never leave vacuum running
while unattended.
1
2
2
EN
2. How to operate

15
2.3 Emptying the tank
2.3.1 Place vacuum squarely on a stable
surface, such as ground, floor, bench,
etc.
2.3.2 Remove the power head assembly
of the wet/dry vacuum by pulling
outward on the latches located on each
side of the vacuum. Lift off the motor
housing assembly.
2.3.3 Dump the tank connects into the
proper waste disposal container.
WARNING: To reduce the risk of injury
from accidental starting, unplug power
cord before emptying the tank.
3.1 Filter
Your filter should be cleaned often to
maintain peak vacuum performance.
NOTE: The filter is made of high quality
material designed to stop small particles
such as sawdust. Handle the filter
carefully when removing to clean or
installing a new filter. Do not tear the
filter during removal or installation if
your intent is to reuse the filter.
3.2 Easy to replace Filter
1. Extend the retainer band around the
plastic posts on the lid.
2. Remove filter bag off the filter cage.
3. Place the replacement filter on the
filter cage until open end touches
bottom of lid.
4. Release the retainer band from the
plastic post on the lid, holding the filter
bag secure to the lid.
5. Make sure the retainer band is
positioned on the filter bag.
IMPORTANT: To avoid damage to the fan
and motor, always reinstall the filter
before using the vacuum for dry material
pick-up.
Take the dirty filter to a disposal
container and gently brush away small
dirt particles that may be adhering to
the filter material.
IMPORTANT: After cleaning, check the
filter for tears or small holes. Do not use
a filter with holes or tears in it. Even a
small hole can allow a lot of dust to
come out of your vacuum. Replace it
immediately.
3.3 Installation
Before installing the filter on the
vacuum, clean the area of the lid so that
the retainer band will seal the bag
against the lid and stop small particles
from bypassing the filter bag.
If the filter is not clean or damaged,
replace it on the filter cage. If it can’t
be reused, place a new filter over the
filter cage.
Replace the retainer band around the
filter. Make sure the retainer band is
positioned on the filter, and the filter
completely covers the filter cage. Also
make sure the edges of the filter are
EN
3. General Maintenance

16
completely secured under the retainer
band.
WARNING: Do not remove the filter cage
and float. The float prevents liquid from
entering the impeller and damaging the
motor. The cage prevents fingers from
touching the moving impeller.
3.4 Cleaning
To clean the tank:
1. Dump debris out.
2. Wash tank thoroughly with warm
water and mild-soap.
3. Wipe out with dry cloth.
3.5 Storage
Before storing your vacuum, the dust
tank should be emptied and cleaned.
4. Trouble shooting
EN

17
2 EN 1 Machien
Aspirateur avale-tout et nettoyeur haute
pression
INSTRUCTION MANUEL
MISE EN GARDE : Ne pas utiliser cet appareil avant d’avoir lu le mode d’emploi.

18
Merci d’avoir choisi le
2 en 1 Machien
Aspirateur avale-tout et nettoyeur haute pression
Chapitre Page
Nettoyeur haute pression
1. Consignes de sécurité.................................................................22
2. Consignes de mise en service........................................................22
3. Consignes d’utilisation................................................................ 23
4. Consignes après usage................................................................ 26
5. Protection de l’environnement. ..................................................... 26
6. Entretien, nettoyage, réparation.....................................................27
7. Dépannage............................................................................... 28
Aspirateur avale-tout
1. Caractéristiques. ........................................................................31
2. Mode d’emploi...........................................................................31
3. Entretien general. ...................................................................... 32
4.GUIDE DE DÉPANNAGE...................................................................34
Table
des
matières
FR

19
Nettoyeur haute pression
Aspirateur avale-tout
degré de vide
15 Kpa
Courant
6 A
Tension
120 V/60 Hz
1.Pistolet à pression
2.Tuyau de refoulement
3.Connecteur Outlet
4.Interrupteur principal
5.Le tuyau d'entrée
6.Connecteur d'entrée
7.Interrupteur de bouteille de savon
8.Aspirateur
9.Le corps de machine
10.Fiche
11.Câble électrique
12.Bouteille de savon
13.Robinet d'eau
14.Roue
15. Cercle d'aspiration
16. D'aspiration plat
17. Canapé d'aspiration
18. Tube d'aspirateur
Aperçu du produit
Fiche technique
FR
Pression nominale
1450 lb/po2
Pression maximum
2000 lb/po2
Débit
1.35 GPM
Courant
13 A
Tension
120 V/60 Hz

20
IMPORTANTES CONSIGNES DE
SÉCURITÉ :
MISES EN GARDE ET PRÉCAUTIONS
DE SÉCURITÉ
Prendre les précautions suivantes au
moment d’utiliser ce produit :
·Lire le mode d’emploi en totalité avant
d’utiliser ce produit.
·Pour atténuer le risque de blessure,
surveiller attentivement les enfants
lorsque ce produit est utilisé à proximité
de ceux-ci.
·Savoir comment arrêter l’appareil et
évacuer la pression rapidement. Bien
connaître les commandes.
·Demeurer alerte en étant toujours
conscient de ses gestes.
·Ne pas faire fonctionner l’appareil
lorsqu’on est fatigué ou sous l’influence
de l’alcool ou de drogues.
·Interdire l’accès à la zone où l’appareil
est utilisé.
·Ne pas s’étirer ou se tenir sur une
surface instable. Se tenir sur une base
solide et en équilibre en touttemps.
·Suivre les consignes d’entretien du
fabricant énoncées dans cemanuel.
·Si la fiche ou le cordon doit être
remplacé, utiliser seulement des
pièces de rechange identiques.
·Mise en garde : Risque d’injection ou
de blessure –ne pas pointer le jet vers
les gens.
·Garder tous les raccordements secs et
au-dessus du sol.
CONSERVER CESCONSIGNES
ENTRETIEN D’UN APPAREIL À
DOUBLE ISOLATION
Un appareil à double isolation comporte
deux systèmes d’isolation plutôt qu’une
mise à la terre. Aucune mise à la terre
n’est fournie dans un appareil à double
isolation, et ne doit pas être ajoutée.
L’entretien d’un appareil à double
isolation nécessite une prudence
extrême et une bonne connaissance du
système, et ne doit être effectué que
par un technicien compétent. Les
pièces de rechange d’un appareil à
double isolation doivent être identiques
aux pièces qu’elles remplacent.
La mention « DOUBLE ISOLATION »
est apposée sur un appareil à double
isolation. Le symbole « » peut
également être apposé sur l’appareil.
RALLONGES
Utiliser des rallonges conçues pour
l’usage extérieur uniquement. Ces
rallonges sont identifiées par
l’inscription « Convient à l’usage avec
des appareils de plein air; ranger à
l’intérieur lorsqu’elle n’est pas utilisée. »
Utiliser seulement des rallonges dont la
tension nominale est égale ou
supérieure à celle de l’appareil. Ne pas
utiliser de rallonges endommagées.
Examiner la rallonge avant de l’utiliser,
et la remplacer si elle est endommagée.
Ne pas malmener la rallonge, et ne
jamais tirer sur une rallonge pour la
débrancher. Garder la rallonge loin de
la chaleur et des rebords tranchants.
Toujours débrancher la rallonge de la
prise de courant avant de débrancher
l’appareil de la rallonge.
Nettoyeur haute pression
FR
Table of contents
Languages:
Other Reaim Pressure Washer manuals

Reaim
Reaim BY02-VBW-WT User manual

Reaim
Reaim BY-PW02-B2Z-060-02 User manual

Reaim
Reaim BY01-HBE User manual

Reaim
Reaim BY01-VBS-WTR User manual

Reaim
Reaim BCO-H User manual

Reaim
Reaim HPI-1100 User manual

Reaim
Reaim BY-PW01-B2Z-050 User manual

Reaim
Reaim BIMK User manual

Reaim
Reaim BY02-VBS-WT User manual

Reaim
Reaim BY02-VBW User manual
Popular Pressure Washer manuals by other brands

Pumptec
Pumptec 356U Series instructions

Generac Power Systems
Generac Power Systems 2700PSI 1676-0 owner's manual

Streamline
Streamline HIGHLINE HP-T12150PHR instruction manual

Craftsman
Craftsman CMXGWAS020734 Operator's manual

Kärcher
Kärcher K 2.02 manual

Kärcher
Kärcher K 7 Premium eco!ogic operating instructions