Reaim BIMK User manual

Model BIMK
CAUTION :All Operators Must Read These Instructions Before Use.
ELECTRIC PRESSURE WASHER


1
IMPORTANT!
Safety Instructions
The appliance has been designed solely for
private use outdoors and not for commercial
use. Keep this appliance away from heat,
direct sunlight, moisture and rain, ice and
sharp edges.
Do not allow anybody that has not been
trained to use a pressure washer to operate
the machine without first reading the
instruction manual.
WARNING! High-pressure washers must
not be used by children or untrained persons.
Before starting your machine, carefully check
for defects. If you find any, do not start your
machine and contact your local distributor.
In particular, ensure that the electric cable
insulation is in perfect condition and free of
cracks. If the electric cable is damaged, an
approved local service center must replace it.
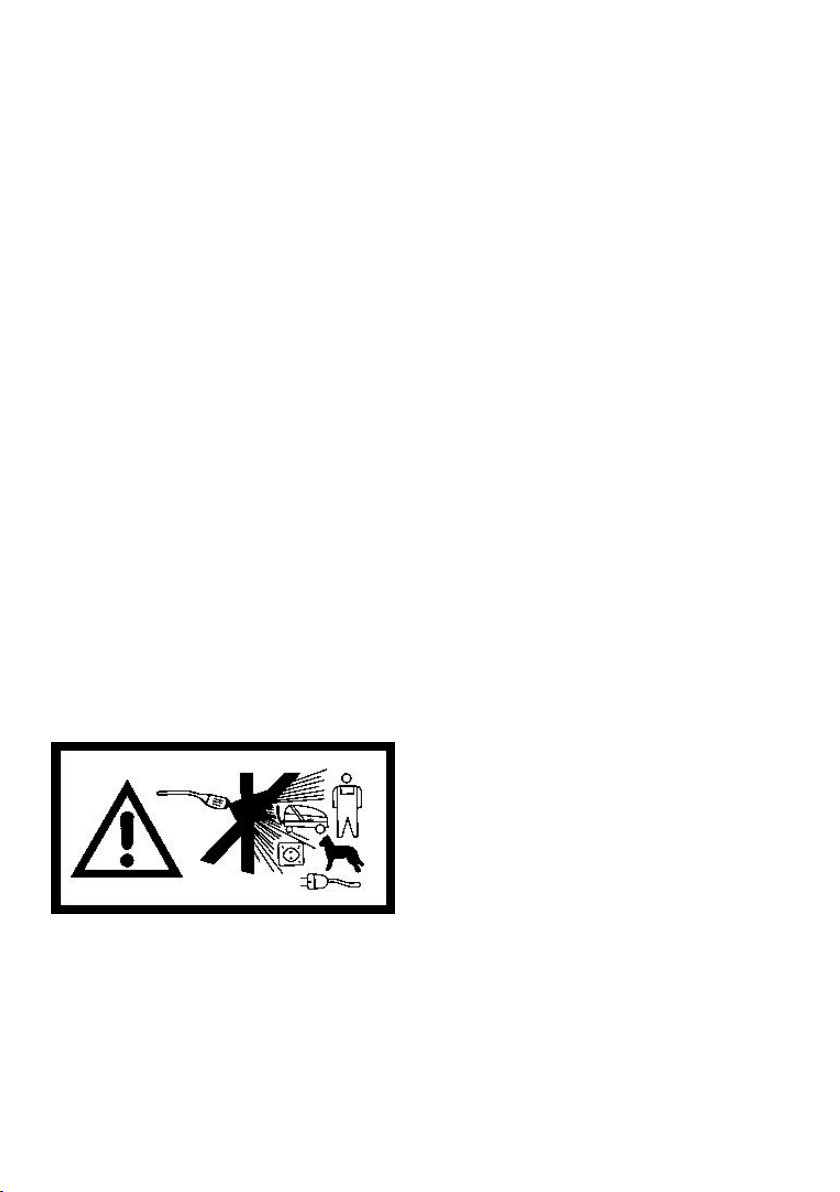
WARNING!High pressure jets can be
dangerous if they are used incorrectly. The
jet must not be directed towards persons,
electrical equipment connected to the mains
or the appliance itself.
WARNING! Do not use the appliance
close to other people unless they are
wearing protective clothing.
CAUTION! Do not direct the jet towards
yourself or other persons to clean clothing
or shoes.
Hold the lance firmly in your hands.
The operator and persons within close
proximity to the cleaning area must take
necessary measures to protect themselves
from dislodged debris when in use.
Wear protective gloves and clothing during
use.
WARNING!The appliance has been
designed for use with pressure washer
detergent. Using other cleaning products or
chemical products may affect the safety of
the appliance.
WARNING! Disconnect the appliance
from the power supply before carrying out
any maintenance.
CAUTION!To ensure the safety of the
appliance, only use spare parts supplied or
approved by the manufacturer.
Do not use the appliance if the power cable
or important parts of the appliance are
damaged, for example, the safety device,
high pressure hose and handgun.
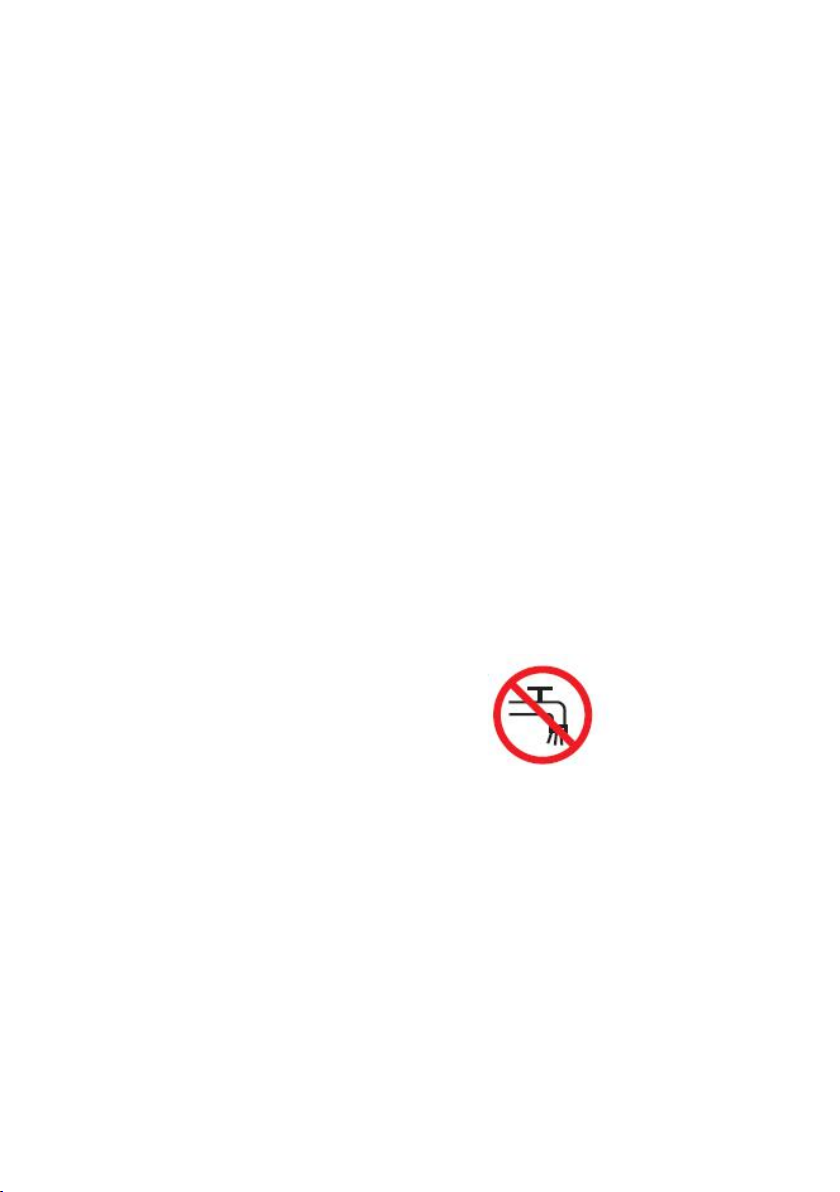
Do not use the appliance with wet hands. If
the appliance is damp or wet, unplug it
immediately. Do not place it in water.
The tyres and valves on the tyres can be
damaged by the high pressure jet and could
burst.
Never use the machine in an environment
where there is a danger of explosion.
It is forbidden to clean surfaces containing
asbestos at high pressure.
This high-pressure washer must not be
used in temperatures below 0 ° C.
CAUTION!The hoses, accessories and
high pressure couplings are important for
the safety of the machine. Only use hoses,
accessories and couplings recommended
by the manufacturer.
WARNING! Inadequate extension cables
may be dangerous. Cables and spools must
always be completely unwound to avoid
letting the cable overheat.

2
If an extension cable is used, the plug and
socket must be waterproof and conform to
the requirements below regarding the
length and dimensions of the cable.
1,0 mm ² max. 12,5 m
1,5mm²max.20 m
If the power cable is damaged, it must be
replaced by the manufacturer, their service
agent or a qualified professional in order to
avoid any danger.
WARNING! This machine is not
designed to be used by persons (including
children) with reduced physical, sensory or
mental capacities or whose lack
experience or knowledge.
WARNING! It is advisable that you
supervise children to ensure that they do
not play with the appliance.
CAUTION – Risk of explosion – do not
spray flammable liquids, do not direct the
jet towards flammable liquids.
WARNING! Water that has circulated in
the anti-back flow system is not
considered drinkable.
WARNING! Do not use the appliance if
the power cable or important parts of the
appliance are damaged, for example, the
safety devices, high pressure hoses and
handgun.
WARNING! If you have an extension
cable, it must be waterproof.
WARNING! When you switch on the
machine, a recoil movement is produced
due to the force of the water jet. Use two
hands to control the lance. Wear safety
gloves when using the appliance. Wear
suitable protective clothing.
In case of accidental contact with
detergent, wash with water. If the liquid
comes into contact with the eyes, also
seek medical assistance (the detergent
can cause irritations or burns).
In the event that the appliance breaks
down, do not attempt to repair it yourself
but contact a professional technician to
avoid any danger.
Main power connection
The following must be observed when
connecting the high pressure washer to the
power supply:
Connecting the electrical connection should
be done by a qualified electrician
conforming to 60364-1 CEI.
It is recommended that the electrical
supply to this machine should comprise a
residual current device which interrupts
the current if the leakage current exceeds
30 ma for 30ms.
CONNECTING TO THE
WATER NETWORK
WARNING
According to current guidelines, the unit
must never be operated without a system
separator on the potable water system.
Use a EN 12729 type BA system separator.
Water that passes through a system
separator is classified as non-potable.
WARNING! Always connect the system
separator to the water supply and never
directly to the device!

3
Know Your Electric Pressure Washer
Read the operator’s manual and safety instructions carefully before operating the electric
pressure washer. Compare the illustration below to the electric pressure washer in order to
familiarize yourself with the location of the various controls and adjustments. Save this manual
for future reference.
1. High pressure hose
2. Trigger(with safety lock)
3. High pressure hose
connection
4. Button(for high pressure
hose connection)
5. Trigger gun
6. Extension spray lance
7. Power cord holder
8. On/Off switch
9. Transportation handle
10. Hose holder
11. Extension spray lance
holder
12. Trigger gun holder
13. Plug
14. Detergent bottle cap
15. Built-in detergent bottle
16. Power cord
17. Fittings storage
18. Wheel
19. Onboard storage for Quick-
Connect nozzles
20.Water outlet (high pressure hose
connection)
21.0ºQuick-Connect nozzle (red)
22.15ºQuick-Connect nozzle (yellow)
23.25ºQuick-Connect nozzle (green)
24.40ºQuick-Connect nozzle (white)
25. Soap Quick-Connect nozzle
(black)
26.Needle cleaning out tool
27.Wrench
28. Water inlet pipe
29. Water inlet (garden hose
connection)
3

4
Unpacking
Carton Contents
• Pressure washer unit
• High pressure hose
• Handle
• Trigger gun
• Spray lance
• Five Quick-Connect nozzles (0º, 15º, 25º,
40º and Soap)
• Built-in detergent bottle
• Water inlet pipe
• Power cord
• Trigger gun holder
• Hose holder
• Needle clean out tool
• Two small screws
• Wrench
• Garden hose adaptor (female coupler) with
two sealing rings
• Manual with registration card
1. Carefully remove the pressure washer
and check to see that all of the above
items are supplied.
2. Inspect the product carefully to make
sure no breakage or damage occurred
during shipping. If you find damaged or
missing parts, DO NOT return the unit to
the store. Please call the Realm®
customer service center (1-888-899-
1688).
NOTE! Do not discard the shipping carton
and packaging material until you are ready to
use your new electric pressure washer. The
packaging is made of recyclable materials.
Properly dispose of these materials in
accordance with local regulations.
IMPORTANT!
The equipment and packaging material are
not toys. Do not let children play with plastic
bags, foils,or small parts. These items can be
swallowed and pose a suffocation risk!
WARNING! Do not connect to power
supply until assembly is complete. Failure to
comply could result in accidental starting and
possible serious personal injury.
Product Description
Purpose
This high-pressure electric power washer
is intended for residential use to clean
vehicles, machines, buildings, facades,
etc.
Areas of application
Never use the machine in potentially
explosive areas under any circumstances!
The operating temperature must be
between 32ºF (0ºC) and 104ºF (40ºC).
The machine consists of an assembly with
a pump, which is encased in a shock-
absorbing housing. To provide the
operator with an optimal working position,
the machine is equipped with a spray
lance and a non-slip handle grip, whose
shape and configuration comply with
applicable regulations.
Do not cover or modify the spray lance or
the spray nozzles in any way.
The high-pressure electric power washer
is designed to be used with cold water;
higher temperatures can damage the
pump.
Do not use water that is dirty, gritty, or
contains any chemical products, as these
could impair operation and shorten the life
of the machine.

5
Technical data
The Circuitry
SAFETY DEVICES
The unloader valve can reduce pressure if it
exceeds pre-set values.
Locking device on trigger gun (see illustration at
the beginning of this manual)! The trigger gun
features a locking device. When the knob is
activated, the trigger gun cannot be operated.
THERMAL SENSOR
A thermal sensor protects the motor against
overloading. The machine will restart after a few
minutes when the thermal sensor has cooled.
Assembly
1. Position the washer as CLOSE as possible
to the water supply.
2. The washer must be used on a secure and
stable surface in a standing, upright position
(Fig. 1).
3. Screw the transaction handle to the electric
pressure washer unit(Fig. 2).
Motor
Induction
Max. pressure
2600PSI
Max flow
1.75GPM
Current
14.5A
Voltage
120V~/60Hz
Vibration gun
Max 1.90 m/s2
Max. Water Inlet
Temperature
104ºF/40ºC

6
4. Insert the power cord holder(Fig. 3) and
trigger gun holder (Fig. 4) into its position.
5. Screw the spray lance into the trigger gun
and rotate it until the two parts are completely
locked. (Fig. 5)
6. Connect the high-pressure hose to the trigger
gun and the water outlet (Fig. 6).
WARNING! Keep hose away from sharp
objects. Bursting hoses may cause injury.
Examine hoses regularly and replace if
damaged. Do not attempt to mend a damaged
hose.
7. Connect the garden hose adapter (female
coupler) to the water inlet of the pressure
washer, then thread your garden hose (male
end) into the garden hose adaptor (Fig. 7).
The water supply must be at least
equal to the washer delivery
capacity.
NOTE: The machine is not suitable for
connection to a potable water main.
Fig.3
Fig.4
Fig.5
Fig.6
High pressure hose

7
8. Attach garden hose to water supply (Fig. 8).
WARNING! The intake water temperature
must not exceed 104ºF/40ºC.
CAUTION! The washer must only be used
with clean water; use of unfiltered water
containing corrosive chemicals will damage
the washer.
Let the water run through the water hose before
connecting it to the machine to prevent sand
and dirt from penetrating the machine.
NOTE: Check that the filter is fitted in the
garden hose adaptor and that it is not clogged
up.
9. Make sure the motor switch is pushed to the
OFF position before plugging the unit into the
power outlet(Fig.9).
10. Check that the electrical supply voltage and
frequency(Volt/Hz) correspond to those
specified on the pressurewasher rating plate. If
the power supply is correct, youmay now plug
the pressure washer into the power outlet (Fig.
10).
NOTE: The GFCI may need to be reset when
first plugged into the electric outlet. Press the
"Reset" button until thepower light indicator
on the GFCI illuminates.
Fig.7
Garden hose
Water
inlet
Garden hose
Connect to water
supply
Fig.8
Fig.9
Reset
Power light indicator
GFCI
Fig.10

8
Operation
IMPORTANT! This pressure washer is
equipped with a micro-switch sensitive to
water flow. This Total Stop System (TSS)
senses water flow in the pump. When the
trigger is released, water stops flowing
through the pump. The TSS then
automatically turns the motor off to protect the
pump from overheating, thus saving energy
and prolonging pump life.
CAUTION! The trigger gun and lance is
affected by a thrust during operation,
therefore always hold it firmly with both hands.
Point the spray gun at the ground.
Check that the machine is in upright position.
Do not place the machine in high grass!
1. Turn the water supply tap on completely.
2. Release the trigger lock.(Fig.11) .Press the
trigger for a few seconds until water flow is
steady. This will allow air to escape and
discharge any residual pressure in the hose.
3. Turn the switch to the ON position to start
the pressure washer (Fig. 12).
Using the nozzles
Before beginning any cleaning task, determine
the best nozzle for the job. Each of the
nozzles has a different spray pattern.
The nozzle patterns are 40˚ (for gentle
cleaning), 25˚ (for all-purpose cleaning), 15˚
(for tough jobs), 0˚ (for spot cleaning or hard-
to-reach areas) and the Soap nozzle (for
detergent application).
CAUTION! NEVER change nozzles without
locking the safety lock on the trigger handle.
WARNING! High-pressure jets can be
dangerous if subject to misuse. The jet must
not be directed at persons, pets, live electrical
equipment, or the appliance itself.
This electric pressure washer is equipped with
five (5) Quick-Connect nozzles that easily
connect to the spray lance.
To connect a nozzle to the spray lance:
1. Turn off the pressure washer and shut off the
water supply. Pull the trigger to release water
pressure.
2. Engage the safety lock on the trigger handle
by pushing right on the safety lock(Fig.11).
Fig.12
Fig.11

9
3. Snap the desired nozzle into the spray
lance tight (Fig. 13).
To disconnect a nozzle from the spray lance
once the cleaning job is complete:
4. Turn off the pressure washer and shut off
the water supply.Pull the trigger to release
water pressure.
5. Engage the safety lock on the trigger
handle by pushing right on the safety
lock(Fig.11).
6. Remove the nozzle from the spray lance.
WARNING! Do not make changes to the
nozzle while the trigger is engaged. Doing
so could result in damage to the pressure
washer or injury to the user.
Working with detergents
When cleaning with the pressure washer,
some cleaning tasks can be solved with
water alone, but for most tasks cleaning with
detergent allows for more effective dirt
removal.
WARNING! Use only detergents designed
for Pressure Washers. DO NOT USE
household detergents, acids, alkaline
solutions, bleaches, solvents, flammable
material, or industrial grade solutions.
These could damage the pressure washer.
Many detergents may require mixing prior
to use. Prepare the cleaning solution as
instructed on the solution bottle.
1.Remove the cap from the detergent
bottle and fill it with detergent designed
specifically for use with pressure washers
(Fig. 14).
2. Install the Soap nozzle (black) on the spray
lance (Fig. 13).
CAUTION! Always test the detergent in an
inconspicuous area before use.
3. Turn on the pressure washer. Pull the trigger
to operate the unit. The liquid detergent will
automatically mix with water and be discharged
through the nozzle.
4. Apply detergent from the bottom to the top of
the dry surface to be cleaned.
NOTE: Wetting the surface first is not
recommended as it dilutes the detergent and
reduces its cleaning ability.
5. Allow the detergent to remain on the surface
for a short time before rinsing. Do not allow the
detergent to dry on the surface.
CAUTION! Damage may occur to painted
surfaces if the detergent is allowed to dry on the
surface. Wash and rinse a small section at a
time. Avoid working on hot surfaces or in direct
sunlight.
Fig.13
Nozzle
snap
Spray lance
Pressure washer
detergent
Detergent bottle
Fig.14

10
6. When you have finished using the
detergent injection system, insert the bottle
detergent with fresh water. Siphon water at
low-pressure for one minute to rinse the
bottle until it is thoroughly cleaned.
CAUTION! Failure to follow these cleaning
instructions will cause the injection system to
become clogged and inoperable.
Working with Patio
Cleaner and
Brush(optional)
The patio cleaner and brush is a powerful
accessory for cleaning patio, driveways, car,
etc.
A quick-connect adaptor is required when
working with patio cleaner and brush.
To connect a patio cleaner to the spray lance:
1. Turn off the pressure washer and shut off
the water supply. Pull the trigger to release
water pressure.
2. Engage the safety lock on the trigger
handle by pushing right on the safety
lock(Fig.11).
3. Remove the nozzle from the spray lance.
4. Snap the quick-connect adaptor into the
spray lance tight, then connect the patio
cleaner or brush to the another end of
adaptor tight. (Fig.15)
To disconnect the patio cleaner or brush
from the spray lance once the cleaning job is
complete:
5. Turn off the pressure washer and shut off
the water supply.Pull the trigger to release
water pressure.
6. Engage the safety lock on the trigger
handle by pushing right on the safety
lock(Fig.11).
7. Remove the patio cleaner or brush from
the spray lance.
NOTE: Do not use the patio cleaner and
brush as a broom but let it surf smoothly over
the surface.
Rinsing with the pressure
washer
1. Turn off the pressure washer and shut off
the water supply.
2.Pull the trigger to release water pressure.
3.Engage the safety lock on the trigger
handle by pushing right on the safety
lock(Fig.11)
4. Remove the nozzle from the spray
lance and storage them on the washer unit
(19).
5. Select the right nozzle for the job (Fig. 16).
Patio Cleaner
Quick-Connect
Adaptor
High Pressure Gun
Brush
Fig.15

11
i) The 0º intense-jet nozzle (red) is an
extremely powerful nozzle that delivers a
high-pressure, pencil- point jet stream. It is
used to cut heavy dirt deposits in a small,
concentrated area. It is ideal for dissolving
stubborn substances, like tar and grease
spots on concrete, or for removing caked
mud from equipment. Use this nozzle to
clean hard-to-reach areas including the
facades of 2-story buildings or the
undersides of lawn mowers and tractors.
NOTE: Care should be used when choosing
the right nozzle to avoid permanently gouging
wood or damaging fragile surfaces.
ii) Use the 15º fan-tip nozzle (yellow) for
intense cleaning jobs on hard surfaces.
Applications include stripping paint,
removing oil stains, grease, heavy mildew
stains, and rust from steel. This nozzle
should only be used in areas that can
withstand the high-pressure from this nozzle.
iii) Use the 25º fan-tip nozzle (green) to clean
home siding, brick patios, wood decks,
driveways, or sidewalks. When using this
nozzle, test a small area first to avoid surface
damage.
iv) Use the 40º wide-spray tip nozzle (white) to
clean items such as cars, trucks, boats, patio
furniture, or lawn equipment.
v) Use the Soap nozzle (black) for low-pressure
detergent application to clean equipment,
remove mildew and oxidation stains from
houses, clean bricks or degrease grimy
surfaces.
NOTE: When using detergent, make sure
that the correct Soap nozzle (black) is
installed. All of the other colored nozzles will
not work for detergent application.
6. Start at the top of the area to be rinsed
and work down, making sure to overlap the
strokes.
IMPORTANT! NEVER USE:
• Bleach, chlorine products, and other
corrosive chemicals
• Liquids containing solvents (e.g. paint
thinners, gasoline, oils)
• Tri-sodium phosphate products
• Ammonia products
• Acid-based products
These chemicals will harm the unit and will
damage the cleaning surface.
Shutting down
1.
Turn the switch to the OFF position
and unplug the power cord from the
outlet.
2. Turn off the water source.
3. Hold the trigger to release water
pressure.
4. Disconnect the garden hose from the
water inlet on the unit.
5. Disconnect the high pressure hose
connection on the trigger gun handle.
6. Release the trigger and engage the
gun safety lock.
WARNING! Turn off the water supply and
squeeze the trigger to depressurize the unit.
Failure to do so could result in personal
injury due to discharge of high-pressure
water.
Fig.16

12
Storage
1. Storage the trigger gun and spray
lance on the holders(Fig.17).
2. Hang the power cord on (7) and
high pressure hose on (10).
3. Storage the nozzles onto the (19).
CAUTION! Always store your pressure
washer in a location where the temperature
will not fall below 32ºF (0ºC). The pump in this
machine is susceptible to permanent damage
if it freezes. FREEZE DAMAGE IS NOT
COVERED BY THE WARRANTY.
• Store the pressure washer indoors in a dry,
covered area where it is not subject to
adverse weather conditions.
• It is important to store this product in a
frost-free area.
• Always empty water from all hoses, the
pump, and the detergent bottle before
storing.
Winterizing and long-term
storage
• If you must store your pressure washer in a
location where the temperature falls below
32ºF (0ºC), you can minimize the chance of
damage to your machine by utilizing the
following procedure:
• Disconnect all water connections.
• Turn on the machine for a few seconds until
the remaining water in the pump exits. Turn
off immediately.
• Do not allow the high-pressure hose to
become kinked.
• Store the machine and accessories in a
room that does not reach freezing
temperatures.
• Do not store near a furnace or other
sources of heat that may dry out the pump
seals.
• Operate the pressure washer with non-
corrosive/non-toxic anti-freeze, a pump
saver, or a pump protector before storing
for the winter.
WARNING! Before reusing, completely flush
the unit out with clear water. Anti-freeze
products can damage paintwork, so you
must ensure there is no anti-freeze left in the
system before using it again.
Fig.17
Fig.18

13
Maintenance
CAUTION! Before working on the pressure
washer, disconnect the plug from the power
supply socket.
1. To ensure good performance, check and
clean the water inlet filter (Fig. 19).
Remove the filter and rinse with water to
prevent any foreign matter from clogging the
pump (Fig. 20).
2. Clean the nozzle with the needle clean out
tool provided (Fig. 21). Remove the spray
lance from the gun; remove any dirt from the
nozzle hole and rinse.
3. Remove additional debris by back flushing
water through the nozzle and spray lance. To
do this, place the end of your garden hose (with
water running) to the tip of the nozzle, pushing
water and debris out of the back opening of the
nozzle and spray lance.
4. Keep the machine clean and let cooling air
pass freely through the machine vents.
5. To ensure an easy connection and that o-
rings do not dry up; the couplings should be
greased regularly.
Environmental protection
Old appliances contain valuable materials that
can be recycled. Please arrange for the proper
recycling of old appliances. Please dispose
your old appliances using appropriate collection
systems.
Fig.21
Fig.19
water inlet
filter
Garden hose
adaptor
water inlet
filter
Fig.20

14
Troubleshooting
Problems
Possible Cause
Possible Solution
Machine
refuses to start
The machine is not plugged-in
Plug the machine in
Faulty receptacle
Try another receptacle
The fuse has blown
Replace the fuse Unplug other appliances
Faulty extension cable
Try without the extension cable
Fluctuating
pressure
The pump is drawing in air
Check that hoses and connections are
airtight.
Valves dirty, worn or sticking
Contact your service center
The water supply is not
sufficient
Increase water pressure, check for
blockages and / or change the large pipe.
Pump seals worn
Contact your nearest service center
Machine stops
The fuse has blown
Replace the fuse
Incorrect mains voltage
Unplug other appliances
Check that the mains voltage corresponds
to the specifications on the nameplate
Thermal sensor activated
Leave the machine to cool for 5 mins
Partially blocked jet
Clean the jet with a needle and by spraying
water rearwardly through the jet
Fuse blows
Fuse too small
Replace it with a fuse with higher amp
consumption than the washer.
Increase in the amperage
Try without the extension cable
Machine
pulsating
Air in inlet hose / pump
Allow machine to run with open trigger until
regular working pressure resumes.
Inadequate supply of water
generated
Increase water pressure, check for
blockages and / or change the large pipe.
Partially blocked jet
Clean the jet with a needle and by spraying
water rearwardly through the jet.
Water filter blocked
Clean the filter
Folded pipe
Unfold the pipe
Machine turns
on and off by
itself
Pump fuse and/or trigger out
of order
Contact your nearest service center
No water supply
Connect the inflow water.
Machine is on
but no water
comes out
Water filter blocked
Clean the filter
Blocked jet
Clean the jet with a needle and by spraying
water rearwardly through the jet

15
This Realm® product is warranted by Realm Import And Export (USA) INC. to the original
purchaser for two years against defects in workmanship and materials when used for normal
residential purposes. The defective product will be replaced or repaired at no charge in either
of two ways, and subject to the conditions, limitations, and exclusions noted below.
Limitations
·Electric motors and pumps carry a two (2) year warranty.
·Frames, handles and other structural components carry a two (2) year warranty.
·Electrical components, switches,etc. will be warranted for two (2) yea warranty.
·Standard accessories and attachments are warranted for a ninety (90) day period.
·Any commercial, industrial or rental use of this equipment will reduce the warranty to thirty
(30) days.
The warranty period is calculated from the date of original purchase.
Exclusions
·Damages caused by misuse, neglect, accident, abuse, improper handling, freezing,
normal wear and tear or non-compliance with operator’s manual.
·Damage caused by water sediment, contaminated water supply or use of chemicals and
detergents improperly.
·Damage caused by acts of nature such as floods, fires, earthquakes, lightning strikes,etc.
·Devices or accessories not distributed or approved by Realm are not covered by this
warranty.
This warranty is non-transferable and applies only to products purchases through a Realm®
authorized reseller. This warranty gives you specific legal rights in the United States. You
may have other rights, which vary by country and state/province.
If you wish to contact Realm, please direct inquiries to the Realm USA Office:
101 wales avenue,Avon,MA 02322,United States
Service Hotline: 1-888-899-1688
Email: info@realmimportexport.com
Limited 2 year warranty
Electric pressure washer

16
The symbol on the product or on its packing indicates that this product may not be
treated as household waste. Instead it shall be handed over. To the applicable collection
point for the recycling of electrical and electronic equipment. By ensuring this product is
disposed of correctly, you will help prevent potential negative consequences for the
environment and human health, which could otherwise be caused by inappropriate
waste handling of this product. For more detailed information about recycling of this
product, please contact your local city office, your household waste disposal service or
the shop where you purchased the product.
WEEE - Waste of Electric and Electronic Equipment

Table of contents
Other Reaim Pressure Washer manuals

Reaim
Reaim BY-PW02-B2Z-060-02 User manual

Reaim
Reaim BY02-VBS-WT User manual

Reaim
Reaim BY01-VBS-WTR User manual

Reaim
Reaim BY02-VBW User manual

Reaim
Reaim HPI-1100 User manual

Reaim
Reaim BYO1-VBJ-W User manual

Reaim
Reaim BY-PW01-B2Z-050 User manual

Reaim
Reaim 2 in 1 Machine User manual

Reaim
Reaim BY01-HBE User manual

Reaim
Reaim BY02-VBW-WT User manual