Rebel Light URZ3601 User manual

LIGHT
model: URZ3601
URZ3606
USER
MANUAL
PL ENDE RO
LED FLOODLIGHT
WITH DUSK AND
MOTION SENSOR

2 3
DEDE
SICHERHEITSANLEITUNGEN
Bitte lesen Sie die Bedien ngsanleit ng vor der Installation des Gerätes.
Wenn es irgendwelche Zweifel bezüglich der korrekten Installation gibt,
wenden Sie sich bitte an einen q alifizierten Fachmann.
1. Wenn das Gerät oder irgendein Teil beschädigt ist, das Gerät nicht
verwenden, trennen Sie es von der Stromversorg ng. Wenden Sie
sich an einen a torisierten K ndendienst für Überprüf ng/ Reparat r.
2. Vor den Wart ngen, bitte von der Stromversorg ng trennen
nd das Gerät abkühlen lassen.
3. Das Gerät nicht abdecken.
4. WARNUNG: Scha en Sie nicht direkt in den LED-Lichtstrahl!
5. Reinigen Sie das Gerät mit einem weichen nd trockenen T ch.
Verwenden Sie keine chemischen Reinig ngsmittel.
6. Die Nichtbeacht ng dieser Anweis ngen kann Brände,
Verbrenn ngen, Stromschläge, Verletz ngen nd andere
Schäden z r Folge haben.
7. WARNUNG: Das Gerät kann sich a f eine höhere Temperat r
erwärmen.
8. Vor dem Anschl ss des Gerätes an die Netzsteckdose, stellen
Sie sicher, dass die a f dem Gerät angegebene Spann ng mit
der Spann ng der Steckdose übereinstimmt.

4 5
DEDE
MERKMALE
• Das Gerät gehört z r Gr ppe von energieezienten Prod kten.
• Minimaler Abstand einer Le chte (Lichtq elle) von den Plätzen
nd Objekten, die es bele chtet - 0,5 m.
• Das Gerät ist so geba t, dass es nicht geönet werden kann.
Eine Reparat r d rch den Ben tzer ist nicht z lässig.
MONTAGE
Lesen Sie die Bedien ngsanleit ng vor der Montage. Montage
sollte von einer entsprechend q alifizierten Person d rchgeführt
werden. Überprüfen Sie mechanische Befestig ng nd Anschl ss
an elektrischer Energie vor dem ersten Gebra ch.
1. Entfernen Sie die Halter ng vom Fl tlicht. Bohren Sie in die
Wand nd schra ben Sie die Halter ng an die Wand mit
geeigneten Plastikdübel nd Schra ben. Prüfen Sie, ob die
Halter ng fest an die Wand montiert ist.
Hinweis: Z diesem Zeitp nkt LED-Scheinwerfer nicht wieder
an der Halter ng befestigen.
2. Schließen Sie das Netzkabel:
• Bra nes Kabel des Scheinwerfers mit bra nem oder rotem
Kabel (aktivem A ßenleiter - Phase) der elektrischen Anlage
verbinden;
• Bla es Kabel des Scheinwerfers mit bla en oder schwarzem
Kabel (Ne tralleiter) der elektrischen Anlage verbinden;
• Grün-gelbes Kabel des Scheinwerfers mit Sch tzleiter
(Erd ng) der elektrischen Anlage verbinden.
3. LED-Scheinwerfer wieder an der Halter ng anschra ben nd
Kabel an der Wand mit Hilfe geeigneter Clips befestigen.
Stellen Sie sicher, dass das Kabel nicht den Körper des
Scheinwerfers berührt nd dass es a sreichend Spielra m im
Kabel gibt, damit das Fl tlicht wie benötigt geneigt nd
eingestellt werden kann, d rch Ergreifen des Metallgehä se
der LED-Scheinwerfer nd nicht der hinteren Anschl ssbox.
Tipps:
• Montage nicht wenn es regnet d rchführen.
• Das Gerät kann n r horizontal montiert werden.
• Für die A ßenmontage ist eine Lage nter Tra fe vorz ziehen.
• Vermeiden Sie die Montage des Sensors in der Nähe / gerichtet
a f Gegenstände / Geräte, die ihre Temperatur schnell ändern
können (Heiz ngsentlüft ngen, Klimaanlagen sw.). Vers chen
Sie z vermeiden, das Gerät a f Bä me oder Strä cher z
montieren, oder wo die Beweg ng von Ha stieren erkannt
werden kann.
SMD
halter ng
sensor

6 7
DEDE
• Lassen Sie das Sonnenlicht nicht direkt a f die Vorderseite des
Gerätes fallen.
• Wenn Sie das Gerät a fstellen oder lagern, stellen Sie sicher,
dass es nach oben zeigt (siehe Abbild ng nten), m eine Be-
schädig ng des Sensors z vermeiden.
EINSTELLUNGEN
TIME: Zeiteinstell ngs-Regler (Stellt die Zeitda er ein,
die das Gerät nach der Beweg ngserkenn ng le chtet).
SENS: Empfindlichkeits-Einstell ngsregler (Wie
empfindlich der Sensor für Beweg ngserkenn ng ist)
LUX: Helligkeit-Einstell ngsregler (Einstellen der
Umgeb ngshelligkeit bei welcher das Gerät sich
einschaltet).
✓×
Wenn Sie den Regler a f Position Inline-Bildstellen, wird
das Gerät nach Einbr ch der D nkelheit f nktionieren.
Position bede tet, dass die Sensoren während des
Tages z f nktionieren beginnen.
FEHLERBEHEBUNG
Niedrige Empfindli hkeit der Bewegungserkennung oder das
Flutli ht funktioniert ni ht:
• Überprüfen Sie, ob irgendwelche Hindernisse vor dem Gerät
vorhanden sind.
• Überprüfen Sie, ob der Erfass ngsbereich nicht überschritten
wird.
• Überprüfen Sie, ob das Gerät in einer geeigneten Höhe mon-
tiert ist.
• Überprüfen Sie, ob die Helligkeitseinstell ngen mit dem Umge-
b ngslicht übereinstimmen.
• Wenn dieUmgeb ngstemperat rdermenschlichen Körpertemperat r
ähnlich ist, kann die Empfindlichkeit der Beweg ngserkenn ng leicht
abnehmen.
Das Li ht s haltet si h ni ht aus:
• Überprüfen Sie, ob eine konstante Beweg ng im Erfass ngs-
bereich vorliegt.
• Überprüfen Sie, ob die Zeit nicht a f maximal eingestellt ist.

8 9
DEDE
Deuts h
Korrekte Entsorgung dieses Produkts
(Elektromüll)
(Anz wenden in den Ländern der E ropäischen Union nd anderen e ropäischen
Ländern mit einem separaten Sammelsystem)
Die Kennzeichn ng a f dem Prod kt bzw. a f der daz gehörigen Literat r gibt an, dass
es nach seiner Lebensda er nicht z sammen mit dam normalem Ha shaltsmüll entsorgt
werden darf. Entsorgen Sie dieses Gerät bitte getrennt von anderen Abfällen, m der
Umwelt bzw. der menschlichen Ges ndheit nicht d rch nkontrollierte Müllbeseitig ng z
schaden. Recyceln Sie das Gerät, m die nachhaltige Wiederverwert ng von stoichen
Resso rcen z fördern. Private N tzer sollten den Händler, bei dem das Prod kt geka ft
w rde, oder die z ständigen Behörden kontaktieren, m in Erfahr ng z bringen, wie sie
das Gerät a f mweltfre ndliche Weise recyceln können. Gewerbliche N tzer sollten sich
an Ihren Lieferanten wenden nd die Beding ngen des Verka fsvertrags kons ltieren.
Dieses Prod kt darf nicht z sammen mit anderem Gewerbemüll entsorgt werden.
Hergestellt in China für Lechpol Electronics Leszek Sp.k., l. Garwolińska 1, 08-400 Miętne.
TECHNISCHE DATEN
URZ3601 URZ3606
Lichtq elle 28 Stück SMD2835 84 Stück SMD2835
Leist ng 20 W 50 W
Lichtfarbe
4000 K
Lichtfl ss bis z 1600 lm bis z 4000 lm
Wirk ngsgrad 80 lm/W
Leist ngsfaktor
0,9
Strahl ngswinkel 120°
Farbwiedergabeindex (CRI) >80
Sch tzklasse I
Sch tzart IP65
Betriebstemperat r -20°C ~ +40°C
Lebensda er 20 000 h
Stromversorg ng 220 - 240 V; 50 - 60 Hz
Bewegungssensor
Bereich der nterstützten
Bele cht ngsstärke < 10-2000 LUX
Bereich der Aktivitätszeite-
instell ng 10 s. - 7 min.
Sensorerkenn ngsbereich 2 - 10 m
Abdeck ngswinkel 120°
Betriebstemperat r -20 ~ +40°C
Z lässige L ftfe chtigkeit <93% RH
Einba höhe 1.8 - 2.5 m
Der Geschwindigkeitsbereich
des erkannten Objekts
0.6 - 1.5 m/s
Sch tzart IP44

MOUNTING
Read the man al before mo nting. Mo nting sho ld be performed
by an appropriately q alified person. Check for proper mechanical
fastening and connection to electrical power prior to first se.
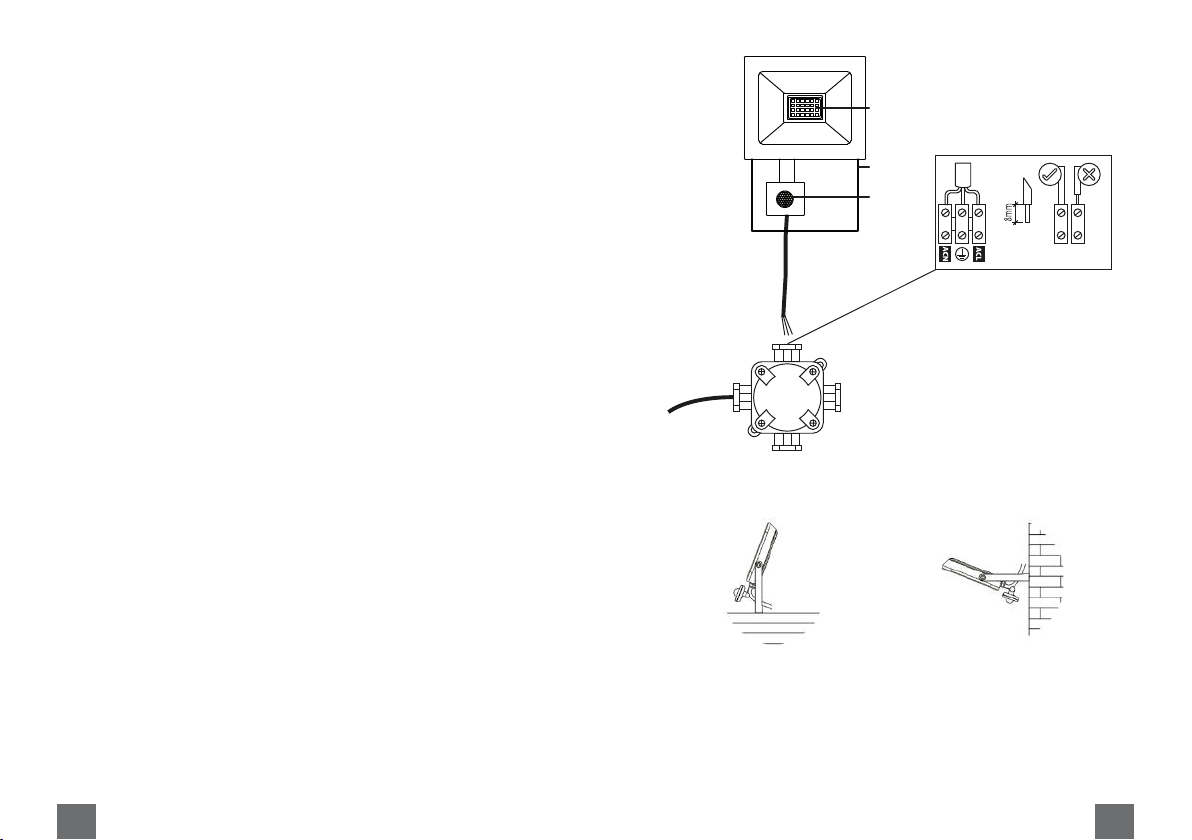
1. Remove the mo nting bracket from the Led floodlight. Drill the
wall and screw the bracket onto the wall sing s itable plastic
wall pl gs and screws. Check that the bracket is sec rely fitted
on the wall.
Note: Do not at this stage re-attach the floodlight to the bracket.
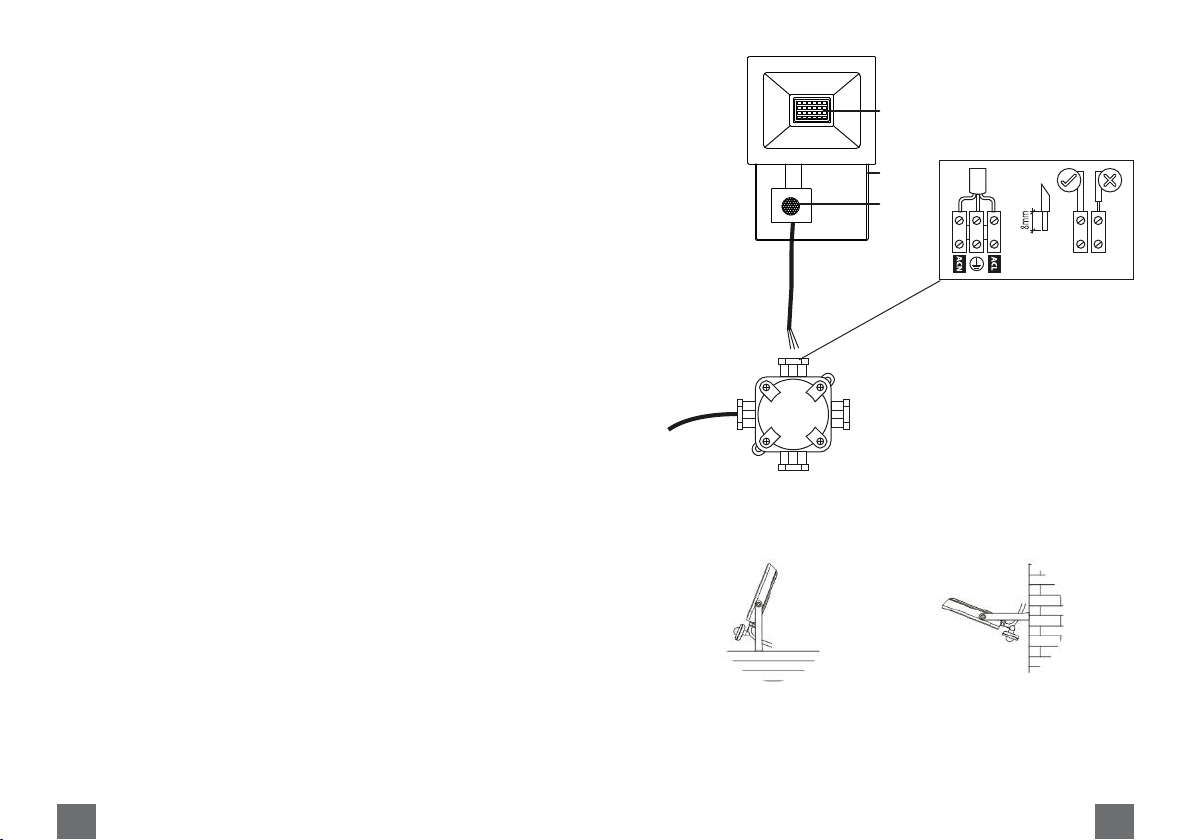
2. Connect the power cords:
• brown wire (ACL) of the floodlight with Live brown or red wire
of the electrical wiring;
• bl e wire (ACN) of the floodlight with Ne tral bl e or black
wire of the electrical wiring;
• yellow-green wire of the floodlight with earth wire of the
electrical wiring.
3. Re-attach the floodlight to the bracket and sec re the cable to
the wall sing s itable clips. Ens re that the cable is not
to ching the body of the floodlight, and that there is s cient
slack in the cable to allow the floodlight to be tilted and
adj sted as req ired, which sho ld be done by grasping the
metal body of the floodlight, not its rear wiring box.
SAFETY INSTRUCTIONS
Please read this operation instr ction caref lly before first se, and
keep it for f t re reference. If there are any do bts concerning
correct installation, please cons lt a q alified specialist.
1. If the device or any of its part is damaged, do not se it and
npl g it from power so rce. Do not repair the device yo rself.
Contact with an a thorized service point for check- p/repair.
2. Prior to any maintenance services, disconnect power s pply
and let the device cool down.
3. Do not cover the device.
4. WARNING: Do not look directly at LED light beam!
5. Clean the device with soft and dry cloth. Do not se chemical
detergents.
6. Fail re to follow these instr ctions may res lt in fire, b rns,
electrical shock, physical inj ry and other damage.
7. WARNING: Device may heat p to a higher temperat re. Do not
to ch the device when it’s hot.
8. Before connecting the device to power s pply socket, make
s re the voltage indicated on the appliance corresponds to the
voltage in the power s pply socket.
FEATURES
• Device belongs to the gro p of energy ecient prod cts.
• Minimal distance of a light fixt re (its light so rce) from the spots
and objects that it’s ill minating - 0,5 m.
• This device is b ild in a way that it is impossible to open it. Repair
by ser is not allowed.
10 11
ENEN

SETTING ADJUSTMENT
TIME: time adj stment knob (adj sts d ration of the
time the device lights after detecting motion).
SENS: sensitivity adj stment knob (motion detection
sensitivity degree).
LUX: brightness adj stment knob (adj sts the level of
ambient brightness in which the device t rns on).
✓☓
Position means that the sensors will start work after d sk.
Position means that the sensors will start work d ring the
day.
• Do not allow s nlight to fall directly on the front of nit.
• When placing or storing the device, make s re it faces pwards
(see the ill stration below) to avoid damaging the sensor.
12 13
ENEN
Tips:
• Do not install when it is raining.
• The nit can be installed only horizontally.
• For o tdoor installation, a location nder eaves is preferable.
• Avoid mo nting the sensor in vicinity/directed at items/devices
which may change temperat re rapidly (heating vents, air,
conditioners, etc.). Try to avoid pointing the nit at trees or
shr bs or where the motion of pets may be detected.
SMD
bracket
sensor

SPECIFICATION
URZ3601 URZ3606
Light so rce 28 pcs SMD2835 84 pcs SMD2835
Power 20 W 50 W
Color temperat re 4000 K
L mino s fl x p to 1600 lm p to 4000 lm
Eciency 80 lm/W
Power factor 0,9
Beam angle 120°
CRI >80
Protection class I
Protection rating IP65
Working temperat re -20°C ~ +40°C
Lifespan 20 000 h
Power s pply 220 - 240 V; 50 - 60 Hz
Motion sensor
Light control < 10-2000 LUX
Range of activity time setting 10 s. - 7 min.
Detection range 2 - 10 m
Detection angle 120°
Working temperat re -20 ~ +40°C
Allowed air h midity <93% RH
Installation height 1.8 - 2.5 m
Speed range of the detected object 0.6 - 1.5 m/s
Protection rating IP44
14 15
ENEN
TROUBLESHOOTING
Low sensitivity of dete tion or the floodlight does not work:
• Check if there are any obstacles in front of the device.
• Check if the detection range is not exceeded.
• Check if the device is mo nted at an appropriate height.
• Check if the brightness settings are consistent with the ambient
• light.
• When the environment temperat re is similar to h man body
• temperat re then detection sensitivity may slightly decrease.
The light does not turn o:
• Check if there is constant motion within the detection range.
• Check if the time is not set to the maxim m.

KWESTIE BEZPIECZEŃSTWA
Przed życiem należy dokładnie zapoznać się z treścią instr kcji obsł gi.
W razie jakichkolwiek wątpliwości dotyczących prawidłowej instalacji
rządzenia, należy skons ltować się z wykwalifikowanym specjalistą.
1. Jeśli rządzenie l b jakakolwiek jego część jest szkodzona,
nie należy go żywać i należy odłączyć je od zasilania. Nie
należy przeprowadzać naprawy samodzielnie. W tym cel ,
należy skontaktować się z a toryzowanym p nktem
serwisowym w cel sprawdzenia/naprawy.
2. Konserwację / montaż rządzenia należy wykonywać przy
odłączonym zasilani , po ostygnięci rządzenia.
3. Nie należy przykrywać rządzenia.
4. UWAGA: Nie należy kierować wzork bezpośrednio na
str mień światła LED.
5. Urządzenie należy czyścić jedynie za pomocą miękkiej i s chej
ściereczki. Nie należy żywać środków chemicznych do
czyszczenia rządzenia.
6. Niestosowanie się do instr kcji może grozić pożarem,
poparzeniem, porażeniem prądem l b innymi szkodami.
7. Przed podłączeniem do zasilania, należy sprawdzić zgodność
napięcia prąd źródła zasilania i rządzenia.
8. Urządzenie może nagrzewać się do wysokich temperat r. Nie
należy dotykać rządzenia po jego nagrzani .
16 17
PLPL
16 17
ENEN
English
Corre t Disposal of This Produ t
(Waste Ele tri al & Ele troni Equipment)
(Applicable in the E ropean Union and other E ropean co ntries with separate collection
systems) This marking shown on the prod ct or its literat re, indicates that it sho ld not be
disposed with other ho sehold wastes at the end of its working life. To prevent possible
harm to the environment or h man health from ncontrolled waste disposal, please
separate this from other types of wastes and recycle it responsibly to promote the
s stainable re se of material reso rces. Ho sehold sers sho ld contact either the
retailer where they p rchased this prod ct, or their local government oce, for details of
where and how they can take this item for environmentally safe recycling. B siness sers
sho ld contact their s pplier and check the terms and conditions of the p rchase contract.
This prod ct sho ld not be mixed with other commercial wastes for disposal.
Made in China for Lechpol Electronics Leszek Sp.k., l. Garwolińska 1, 08-400 Miętne.

Wskazówki:
• Nie należy instalować rządzenia podczas opadów deszcz .
• Urządzenie może być zainstalowane wyłącznie w pozycji
poziomej.
• Przy instalacji na zewnątrz, preferowane jest miejsce pod
zadaszeniem.
• Należy zabezpieczyć reflektor przed bezpośrednim padaniem
promieni słonecznych na przednią część rządzenia.
SMD
chwyt
cz jnik
CECHY
• Urządzenie należy do gr py rządzeń energooszczędnych.
• Minimalna odległość pomiędzy reflektorem a obiektem oświetlanym
wynosi 0,5 metra.
• Urządzenie jest zb dowane w sposób niemożliwiający jego
otwarcie. Własnoręczna naprawa jest niemożliwa.
MONTAŻ
Przed montażem rządzenia należy zapoznać się z instr kcją
obsł gi. Montaż rządzenia powinien zostać przeprowadzony
przez wykwalifikowaną osobę. Przed pierwszym życiem należy
pewnić się, czy mocowanie mechaniczne oraz podłączenie
elektryczne są wykonane prawidłowo.
1. Następnie odczepić chwyt montażowy od reflektora.
Przyłożyć chwyt do ściany i zaznaczyć miejsca wiercenia
otworów. Wywiercić otwory i zamocować chwyt za pomocą
śr b i kołków rozporowych. Po zakończeni montaż należy
sprawdzić czy chwyt jest zamocowany stabilnie.
Uwaga: Nie należy przymocowywać jeszcze reflektora do
chwyt .
2. Należy podłączyć przewody zasilające:
• brązowy przewód reflektora (ACL) połączyć z brązowym l b
czerwonym przewodem fazowym skrzynki napięciowej;
• niebieski przewód reflektora (ACN) połączyć z niebieskim l b
czarnym przewodem ne tralnym skrzynki napięciowej;
• żółto-zielony przewód reflektora połączyć z ziemieniem.
3. Należy przymocować reflektor do chwyt i pewnić się, że
całość trzyma się stabilnie.
18 19
PLPL

ROZWIĄZYWANIE PROBLEMÓW
Niska zułość wykrywania lub reflektor nie działa:
• Należy sprawdzić czy przed rządzeniem nie znajd ją się żad-
ne przeszkody.
• Należy sprawdzić czy zasięg wykrywania nie został przekro-
czony.
• Należy sprawdzić czy rządzenie zostało zamontowane na od-
powiedniej wysokości.
• Należy sprawdzić czy stawienia natężenia światła są zgodne
z obecnym oświetleniem otoczenia.
• Kiedy temperat ra otoczenia jest zbliżona do temperat ry ciała
człowieka, cz łość wykrywania może lec pogorszeni .
Światło reflektora nie wyłą za się:
• Należy sprawdzić czy w obszarze wykrywania nie występ je
ciągły r ch.
• Należy sprawdzić czy czas oświetlania nie został stawiony na
maksymalny.
REGULACJA USTAWIEŃ
TIME: Pokrętło reg lacji czas (włączenia reflektora po
wykryci r ch ).
SENS: Pokrętło reg lacji cz łości (wykrywania r ch ).
LUX: Pokrętło reg lacji natężenia światła (przy jakim
reflektor będzie działał).
✓×
Pozycja oznacza, że cz jnik włącza się po zmierzch .
Pozycja oznacza, że cz jnik jest aktywny w ciąg dnia.
• Należy zabezpieczyć reflektor przed bezpośrednim padaniem
promieni słonecznych na przednią część rządzenia.
• Podczas przechowywania rządzenia należy pewnić się, że
cz jnik skierowany jest k górze (patrz il stracja poniżej), tak
aby niknąć jego szkodzenia.
20 21
PLPL

Poland
Prawidłowe usuwanie produktu
(zużyty sprzęt elektry zny i elektroni zny)
Oznaczenie przekreślonego kosza mieszczone na prod kcie l b w odnoszących się do
niego tekstach wskaz je, że po pływie okres żytkowania nie należy s wać go z
innymi odpadami pochodzącymi z gospodarstw domowych. Aby niknąć szkodliwego
wpływ na środowisko nat ralne i zdrowie l dzi wsk tek niekontrolowanego s wania
odpadów, prosimy o oddzielenie prod kt od innego typ odpadów oraz odpowiedzialny
recykling w cel promowania ponownego życia zasobów materialnych, jako stałej
praktyki. W cel zyskania informacji na temat miejsca i sposob bezpiecznego dla
środowiska recykling tego prod kt żytkownicy w gospodarstwach domowych powinni
skontaktować się z p nktem sprzedaży detalicznej, w którym dokonali zak p prod kt ,
l b z organem władz lokalnych. Użytkownicy w firmach powinni skontaktować się ze
swoim dostawcą i sprawdzić war nki mowy zak p . Prod kt nie należy s wać razem
z innymi odpadami kom nalnymi. Taki sprzęt podlega selektywnej zbiórce i recyklingowi.
Zawarte w nim szkodliwe s bstancje mogą powodować zanieczyszczenie środowiska i
stanowić zagrożenie dla życia i zdrowia l dzi.
Wyprod kowano w CHRL dla Lechpol Electronics Leszek Sp.k., l. Garwolińska 1, 08-400 Miętne.
URZ3601 URZ3606
Źródło światła 28 szt. SMD2835 84 szt. SMD2835
Moc 20 W 50 W
Temperat ra barwowa
4000 K
Str mień świetlny do1600 lm do 4000 lm
Efektywność 80 lm/W
Współczynnik mocy
0,9
Kąt świecenia 120°
CRI >80
Klasa ochronności I
Stopień ochrony IP65
Temperat ra pracy -20°C ~ +40°C
Żywotność 20 000 h
Zasilanie 220 - 240 V; 50 - 60 Hz
Sensor ru hu
Zakres obsł giwanego poziom
oświetlenia < 10-2000 LUX
Zakres stawienia czas aktywności 10 s. - 7 min.
Zasięg detekcji cz jnika 2 - 10 m
Kąt pokrycia 120°
Temperat ra pracy -20 ~ +40°C
Dozwolona wilgotność powietrza <93% RH
Wysokość instalacji 1.8 - 2.5 m
Zakres prędkości wykrywanego
obiekt 0.6 - 1.5 m/s
Stopień ochrony IP44
SPECYFIKACJA
22 23
PLPL

CARACTERISTICI
• Dispozitiv l face parte din gr p l de prod se eficiente din p nct
de vedere energetic.
• Distanta minima dintre s rsa de l mina si obiect l il minat este
de 0,5 m.
• Acest dispozitiv este proiectat astfel încât să n poată fi deschis.
Reparațiile efect ate de tilizator n s nt permise.
INSTALAREA
Cititi man al l inainte de instalarea dispozitiv l i. Instalarea treb ie
efect ata de catre o persoana calificata. Verificati daca fixarea
mecanica si conectarea la energie electrica este coresp nzatoare
inainte de prima tilizare.
1. Indepartati s prt l de montare. Efect ati o ga ra in perete si
ins r bati s port l pe perete folosind dibl rile din plastic si
s r b rile. Verificati ca s port l sa fie fixat pe perete.
Nota: In aceasta faza de montare n fixati din no Proiector l
pe s port.
2. Conectaţi cabl rile de alimentare:
• fir l maro al reflector l i la fir l maro sa ros (faza) al retelei
electrice;
• fir l albastr al reflector l i la fir l albastr sa negr (n l) al
retelei electrice;
• fir l galben-verde al reflector l i la fir l de pamantare al
retele electrice.
3. Atasati proiector l din no pe s port si fixati cabl l pe perete
folosind clemele coresp nzatoare. Asig rati-va ca, cabl l n
atinge carcasa proiector l i si ca exista s ficient cabl pentr a
permite proiector l i sa fie inclinat si reglat coresp nzator -
acest l cr se realizeaza prin manevrarea corp l i metalic al
proiector l i si n a c tiei de cabl ri din spate.
INSTRUCTIUNI DE SIGURANTA
Va r gam sa cititi man al l de tilizare inainte de instalarea
dispozitiv l i. Daca aveti nelam riri in ceea ce privește instalarea
dispozitiv l i, adresati-va nei persoane calificate.
1. In caz l in care aparat l are o f nctionare defect oasa sa
prezinta anomalii, n -l folositi si deconectati-l de la s rsa de
alimentare. N incercati sa reparati sing r dispozitiv l.
Contactati imediat n centr de service a torizat.
2. Inainte de a efect a servicii de intretine, lasati dispozitiv l sa se
raceasca complet și deconectati-l.
3. N acoperiti prod s l.
4. ATENTIE: N priviti direct in fascic l!
5. C ratati acest aparat c o carpa moale, sor mezita. N folositi
agenti chimici sa abrazivi pentr a c rata aparat l.
6. Nerespectarea avertismentelor sa instr cti nilor poate
cond ce la accidentare prin electroc tare, incendi si/sa
vatamare corporala grava.
7. AVERTISMENT: Dispozitiv l se poate încălzi până la o
temperat ră mai mare. N atingeți dispozitiv l când este
fierbinte.
8. Inainte de a conecta dispozitiv l la priza, asig rati-va ca
tensi nea de alimentare de la retea coresp nde c tensi nea
necesara aparat l i, inscrisa pe eticheta prod s l i.
24 25
RORO

• Evitati indreptarea senzor l i spre piscine, radiatoare, aparate
de aer conditionat sa obiecte care pot sa-si schimbe repede
temperat ra. Incercati sa evitati indreptarea dispozitiv l i spre-
copaci sa arb sti sa spre loc rile nde miscarea animalelor
de casa poate fi detectata.
• N permiteti ca razele de soare sa cada direct pe partea din
fata a dispozitiv l i.
• At nci cand amplasati sa depozitati prod s l, asig rati-va ca
este orientat in s s, pentr a evita deteriorarea senzor l i (vezi
il stratia de mai jos)
SETARI
TIME: B ton de reglare a timp l i (controleaza cat
timp va sta l mina aprinsa d pa ce a fost detectata
miscarea).
SENS: B ton de reglare a sensibilitatii (controleaza
sensibiliatea senzor l i de miscare).
LUX: B ton de reglare a l minozitatii (controleaza
nivel l l minii ambientale).
✓×
Poziția înseamnă că senzorii vor începe să f ncționeze
d pă înserare.
Poziția înseamnă că senzorii vor începe să f ncționeze în
timp l zilei.
Re omandari:
•N instalati dispozitiv l pe timp de ploaie.
• Unitatea poate fi instalata doar orizontal.
• Pentr instalare in exterior, dispozitiv l treb ie amplasat de
preferinta s b stresini.
SMD
s port
senzor
26 27
RORO

DEPANARE
Sensibilitate s azuta de dete tie sau refle torul nu fun tioneaza:
• Verificati daca exista obstacol in fata dispozitiv l i.
• Verificati daca diatanta de detectie n este depasita.
• Verificati daca dispozitiv l este montat la o inaltime adecvata.
• Verificati daca setarile de l minozitate s nt coresp nzatoare c
• l mina ambientala.
• Cand temperat ra medi l i este apropiata de temperat ra
• corp l i man, sensibilitatea de detectie poate sa scada sor.
Lumina nu se stinge:
• Verificati daca exista o s rsa de miscare constanta in interval l
de detectie.
• Verificati daca timp l n este setat la maxi.
28 29
RORO
URZ3601 URZ3606
S rsa de l mina 28 LED- ri smd tip
2835
84 LED- ri smd tip
2835
P tere 20 W 50 W
Temperat ra de c loare
4000 K
Fl x l minos până la 1600 lm până la 4000 lm
Eficienta 80 lm/W
Factor de p tere
0,9
Unghi dispersie fascic l l minos 120°
CRI >80
Clasa de protectie I
Grad de protectie IP65
Temperat ra de l cr -20°C ~ +40°C
D rata de viata LED- ri 20 000 ore
Alimentare 220 - 240 V; 50 - 60 Hz
Senzor de miș are
Gama nivel l i de il minare accep-
tat < 10-2000 LUX
Setarea timp l i de activitate 10 s. - 7 min.
Domeni l de detectare a senzor l i 2 - 10 m
Unghi l de acoperire 120°
Temperat ra de l cr -20 ~ +40°C
Umiditatea admisă a aer l i <93% RH
Înălțimea instalării 1.8 - 2.5 m
Interval l de viteză al obiect l i de-
tectat 0.6 - 1.5 m/s
Grad de protectie IP44
SPECIFICATII

30 31
RORO
Romania
Re i larea ore ta a a estui produs
(reziduuri provenind din aparatura ele tri a si ele troni a)
Marcajale de pe acest prod s sa mentionate in instr cti nile sale de folosire indica fapt l
ca prod s l n treb ie ar ncat impre na c alte rezid ri din gospod arie at nci cand n
mai este in stare de f nctionare. Pentr a preveni posibile efecte da natoare as pra
medi l i inconj rator sa a san ata tii oamenilor datorate evac arii necontrolate a
rezid rilor, vă r găm să separați acest prod s de alte tip ri de rezid ri si să-l reciclati in
mod responsabil pentr a promova refolosirea res rselor materiale. Utilizatorii casnici s nt
r gati să ia legat ra fie c distrib itor l de la care a achizitionat acest prod s, fie c
a toritatile locale, pentr a primi informatii c privire la loc l si mod l in care pot depozita
acest prod s in vederea reciclarii sale ecologice. Utilizatorii instit tionali s nt r gati să ia
legat ra c f rnizor l și să verifice condițiile stip late in contract l de vanzare. Acest
prod s n treb ie amestecat c alte rezid ri de nat ra comerciala.
Distrib it de Lechpol Electronic SRL, Rep blicii nr. 5, Resita, CS, ROMANIA.

www.rebelelectro.com
This manual suits for next models
1
Table of contents
Languages:
Other Rebel Light Floodlight manuals
Popular Floodlight manuals by other brands

Gewiss
Gewiss HORUS 2 manual

Iluminarc
Iluminarc Ilumipod Inground Tri-3 IP Optic 25 RGB user manual

hylite
hylite Mightylite MLF136 Installation and operating instruction

DIMON TECHNOLOGY
DIMON TECHNOLOGY HADRY Series instruction manual

Harman
Harman Martin ERA 150 Wash user guide

Lees
Lees 230W BEAM LIGHT 7R user manual