Rebel URZ3484 User manual

LIGHT
LED FLOODLIGHT
WITH DUSK AND
MOTION SENSOR
USER
MANUAL
PL ENDE RO
model: URZ3484


3DE
SICHERHEITSANLEITUNGEN
Bitte lesen Sie die Bedienungsanleitung vor der Installation des Gerätes.
Wenn es irgendwelche Zweifel bezüglich der korrekten Installation gibt,
wenden Sie sich bitte an einen qualifizierten Fachmann.
1. Wenn das Gerät oder irgendein Teil beschädigt ist, das Gerät nicht
verwenden, trennen Sie es von der Stromversorgung. Wenden Sie
sich an einen autorisierten Kundendienst für Überprüfung/ Reparatur.
2. Vor den Wartungen, bitte von der Stromversorgung trennen
und das Gerät abkühlen lassen.
3. Das Gerät nicht abdecken.
4. WARNUNG: Schauen Sie nicht direkt in den LED-Lichtstrahl!
5. Reinigen Sie das Gerät mit einem weichen und trockenen Tuch.
Verwenden Sie keine chemischen Reinigungsmittel.
6. Die Nichtbeachtung dieser Anweisungen kann Brände,
Verbrennungen, Stromschläge, Verletzungen und andere
Schäden zur Folge haben.
7. WICHTIG: Die Lampe und der Sensor erfüllt die Kriterien der
Schutzart IP44.
8. WARNUNG: Das Gerät kann sich auf eine höhere Temperatur
erwärmen. Berühren Sie nicht das Gerät, wenn es heiß ist.
9. Vor dem Anschluss des Gerätes an die Netzsteckdose, stellen
Sie sicher, dass die auf dem Gerät angegebene Spannung mit
der Spannung der Steckdose übereinstimmt.

4
DE
MERKMALE
•Das Gerät gehört zur Gruppe von energieezienten Produkten.
•Dieses Gerät ist so gebaut, dass es nicht geönet werden kann.
Eine Reparatur durch den Benutzer ist nicht zulässig.
•Minimaler Abstand einer Leuchte (Lichtquelle) von den Plätzen
und Objekten, die es beleuchtet - 0,5 m.
•Montieren Sie das Gerät auf einer Höhe zwischen 1,7 und 3,5 m.
MONTAGE
Lesen Sie die Bedienungsanleitung vor der Montage. Montage
sollte von einer entsprechend qualifizierten Person durchgeführt
werden. Überprüfen Sie mechanische Befestigung und Anschluss
an elektrischer Energie vor dem ersten Gebrauch.
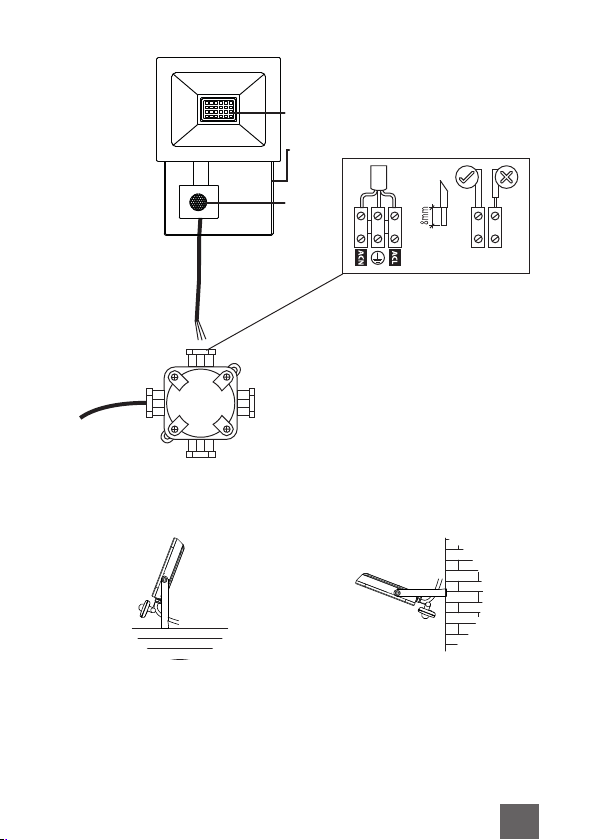
1. Entfernen Sie die Halterung vom Flutlicht. Bohren Sie in
die Wand und schrauben Sie die Halterung an die Wand mit
geeigneten Plastikdübel und Schrauben. Prüfen Sie, ob die
Halterung fest an die Wand montiert ist.
Hinweis: Zu diesem Zeitpunkt LED-Scheinwerfer nicht wieder
an der Halterung befestigen.
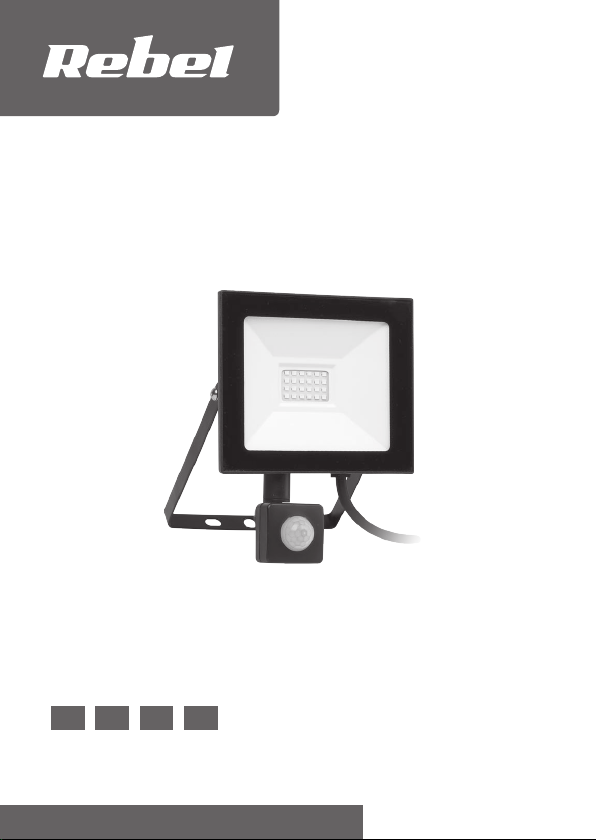
2. Schließen Sie das Netzkabel:
• Braunes Kabel des Scheinwerfers mit braunem oder rotem
Kabel (aktivem Außenleiter - Phase) der elektrischen Anlage
verbinden;
• Blaues Kabel des Scheinwerfers mit blauen oder schwarzem
Kabel (Neutralleiter) der elektrischen Anlage verbinden;
• Grün-gelbes Kabel des Scheinwerfers mit Schutzleiter
(Erdung) der elektrischen Anlage verbinden.
3. LED-Scheinwerfer wieder an der Halterung anschrauben und
Kabel an der Wand mit Hilfe geeigneter Clips befestigen. Stellen
Sie sicher, dass das Kabel nicht den Körper des Scheinwerfers
berührt und dass es ausreichend Spielraum im Kabel gibt, damit
das Flutlicht wie benötigt geneigt und eingestellt werden kann,
durch Ergreifen des Metallgehäuse der LED-Scheinwerfer und
nicht der hinteren Anschlussbox

5DE
Tipps:
•Montage nicht wenn es regnet durchführen.
•Das Gerät kann nur horizontal montiert werden.
•Für die Außenmontage ist eine Lage unter Traufe vorzuziehen.
• Vermeiden Sie die Montage des Sensors in der Nähe / gerichtet auf
Gegenstände / Geräte, die ihre Temperatur schnell ändern können
(Heizungsentlüftungen, Klimaanlagen usw.). Versuchen Sie zu
vermeiden, das Gerät auf Bäume oder Sträucher zu montieren, oder
SMD
Halterung
Sensor

6
DE
wo die Bewegung von Haustieren erkannt werden kann.
•Lassen Sie das Sonnenlicht nicht direkt auf die Vorderseite des
Gerätes fallen.
•Wenn Sie das Gerät aufstellen oder lagern, stellen Sie sicher,
dass es nach oben zeigt (siehe Abbildung unten), um eine
Beschädigung des Sensors zu vermeiden.
EINSTELLUNGEN
TIME: Zeiteinstellungs-Regler (Stellt die Zeitdauer ein,
die das Gerät nach der Bewegungserkennung leuchtet).
SENS: Empfindlichkeits-Einstellungsregler (Wie
empfindlich der Sensor für Bewegungserkennung ist)
LUX: Helligkeit-Einstellungsregler (Einstellen der
Umgebungshelligkeit bei welcher das Gerät sich
einschaltet).
√×
Wenn Sie den Regler auf Position Inline-Bildstellen, wird das
Gerät nach Einbruch der Dunkelheit funktionieren.
Position bedeutet, dass die Sensoren während des Tages zu
funktionieren beginnen.

7DE
FEHLERBEHEBUNG
Niedrige Empfindlichkeit der Bewegungserkennung oder das
Flutlicht funktioniert nicht:
• Überprüfen Sie, ob irgendwelche Hindernisse vor dem Gerät
vorhanden sind.
• Überprüfen Sie, ob der Erfassungsbereich nicht überschritten wird.
• Überprüfen Sie, ob das Gerät in einer geeigneten Höhe montiert ist.
• Überprüfen Sie, ob die Helligkeitseinstellungen mit dem
Umgebungslicht übereinstimmen.
• Wenn die Umgebungstemperatur der menschlichen
Körpertemperatur ähnlich ist, kann die Empfindlichkeit der
Bewegungserkennung leicht abnehmen.
Das Licht schaltet sich nicht aus:
• Überprüfen Sie, ob eine konstante Bewegung im Erfassungsbereich
vorliegt.
• Überprüfen Sie, ob die Zeit nicht auf maximal eingestellt ist.
TECHNISCHE DATEN
• Lichtquelle: 24 Stück 2835 SMD
• Leistung: 20 W
• Farbtemperatur: 6500 K
• Lichtstrom: bis zu 1600 lm
• Ezienz: 80 lm/W
• Leistungsfaktor: 0,9
• Lichtstrahl: 120°
• Erfassungswinkel: 120°
• Erfassungsabstand: 0,5 – 11 m
• Beleuchtungsintervall: 3 Sekunden - 7 Minuten
• CRI: > 80
• Schutzklasse: I
• Schutzart: IP44
• Betriebstemperatur: -20°C - +40°C
• Lebensdauer: 20 000 h
• Montagehöhe: 1,7 - 3,5 m
• Stromversorgung: 220-240 V; 50/60 Hz
• Abmessungen: 209x140x30 mm

8
DE
Deutsch
Korrekte Entsorgung dieses Produkts
(Elektromüll)
(Anzuwenden in den Ländern der Europäischen Union und anderen europäischen
Ländern mit einem separaten Sammelsystem)
Die Kennzeichnung auf dem Produkt bzw. auf der dazugehörigen Literatur gibt an, dass
es nach seiner Lebensdauer nicht zusammen mit dam normalen Haushaltsmüll entsorgt
werden darf. Entsorgen Sie dieses Gerät bitte getrennt von anderen Abfällen, um der
Umwelt bzw. der menschilchen Gesundheit nicht durch unkontrollierte Müllbeseitigung zu
schaden. Recyceln Sie das Gerät, um die nachhaltige Wiederverwertung von stoichen
Ressourcen zu fördern. Private Nutzer sollten den Händler, bei dem das Produkt gekauft
wurde, oder die zuständigen Behörden kontaktieren, um in Erfahrung zu bringen, wie sie
das Gerät auf umweltfreundliche Weise recyceln können. Gewerbliche Nutzer sollten sich
an Ihren Lieferanten wenden und die Bedingungen des Verkaufsvertrags konsultieren.
Dieses Produkt darf nicht zusammen mit anderem Gewerbemüll entsorgt werden.
Hergestellt in China für LECHPOL ELECTRONICS Sp. z o.o. Sp.k., ul. Garwolińska 1,
08-400 Miętne.

9EN
SAFETY INSTRUCTIONS
Please read this operation instruction carefully before first use, and
keep it for future reference. If there are any doubts concerning
correct installation, please consult a qualified specialist.
1. If the device or any of its part is damaged, do not use it and
unplug it from power source. Do not repair the device yourself.
Contact with an authorized service point for check-up/repair.
2. Prior to any maintenance services, disconnect power supply
and let the device cool down.
3. Do not cover the device.
4. WARNING: Do not look directly at LED light beam!
5. Clean the device with soft and dry cloth. Do not use chemical
detergents.
6. Failure to follow these instructions may result in fire, burns,
electrical shock, physical injury and other damage.
7. IMPORTANT: The lamp and the sensor meet criteria of IP44 rating.
8. WARNING: Device may heat up to a higher temperature. Do not
touch the device when it’s hot.
9. Before connecting the device to power supply socket, make
sure the voltage indicated on the appliance corresponds to the
voltage in the power supply socket.

10
EN
FEATURES
•Device belongs to the group of energy ecient products.
•Minimal distance of a light fixture (its light source) from the spots
and objects that it’s illuminating - 0,5 m.
•This device is build in a way that it is impossible to open it. Repair
by user is not allowed.
•Mount the device on height between 1,7 and 3,5 m.
MOUNTING
Read the manual before mounting. Mounting should be performed
by an appropriately qualified person. Check for proper mechanical
fastening and connection to electrical power prior to first use.
1. Remove the mounting bracket from the Led floodlight. Drill the
wall and screw the bracket onto the wall using suitable plastic
wall plugs and screws. Check that the bracket is securely fitted
on the wall.
Note: Do not at this stage re-attach the floodlight to the bracket.
2. Connect the power cords:
• brown wire (ACL) of the floodlight with Live brown or red wire
of the electrical wiring;
• blue wire (ACN) of the floodlight with Neutral blue or black
wire of the electrical wiring;
• yellow-green wire of the floodlight with earth wire of the
electrical wiring.
3. Re-attach the floodlight to the bracket and secure the cable
to the wall using suitable clips. Ensure that the cable is not
touching the body of the floodlight, and that there is sucient
slack in the cable to allow the floodlight to be tilted and adjusted
as required, which should be done by grasping the metal body
of the floodlight, not its rear wiring box.

11 EN
Tips:
•Do not install when it is raining.
•The unit can be installed only horizontally.
•For outdoor installation, a location under eaves is preferable.
•Avoid mounting the sensor in vicinity/directed at items/devices
which may change temperature rapidly (heating vents, air
SMD
bracket
sensor

12
EN
SETTING ADJUSTMENT
TIME: time adjustment knob (adjusts duration of the
time the device lights after detecting motion).
SENS: sensitivity adjustment knob (motion detection
sensitivity degree).
LUX: brightness adjustment knob (adjusts the level of
ambient brightness in which the device turns on).
conditioners, etc.). Try to avoid pointing the unit at trees or shrubs
or where the motion of pets may be detected.
•Do not allow sunlight to fall directly on the front of unit.
•When placing or storing the device, make sure it faces upwards
(see the illustration below) to avoid damaging the sensor.
√×
Position means that the sensors will start work after dusk.
Position means that the sensors will start work during the day.

13 EN
TROUBLESHOOTING
Low sensitivity of detection or the floodlight does not work:
• Check if there are any obstacles in front of the device.
• Check if the detection range is not exceeded.
• Check if the device is mounted at an appropriate height.
• Check if the brightness settings are consistent with the ambient
light.
• When the environment temperature is similar to human body
temperature then detection sensitivity may slightly decrease.
The light does not turn o:
• Check if there is constant motion within the detection range.
• Check if the time is not set to the maximum.
SPECIFICATION
• Light source: 24 pcs 2835 SMD
• Power: 20 W
• Color temperature: 6500 K
• Luminous flux: up to 1600 lm
• Eciency: 80 lm/W
• Power factor: 0,9
• Light beam: 120°
• Detection angle: 120°
• Detection distance: 0,5 – 11 m
• Light time range: 3 seconds – 7 minutes
• CRI: > 80
• Protection class: I
• Protection rating: IP44
• Working temperature: -20°C - +40°C
• Lifespan: 20 000 h
• Mounting height: 1,7 – 3,5 m
• Power supply: 220-240 V; 50/60 Hz
• Dimensions: 209x140x30 mm

14
EN
English
Correct Disposal of This Product
(Waste Electrical & Electronic Equipment)
(Applicable in the European Union and other European countries with separate collection
systems) This marking shown on the product or Its literature, indicates that It should
not be disposed with other household wastes at the end of its working life. To prevent
possible harm lo the environment or human health from uncontrolled waste disposal,
please separate this from other types of wastes and recycle it responsibly to promote
the sustainable reuse of material resources. Household users should contact either the
retailer where they purchased this product, or their local government oce, for details of
where and how they can take this item for environmentally safe recycling. Business users
should contact their supplier and check the terms and conditions of the purchase contract
This product should not be mixed with other commercial wastes for disposal.
Made in China for LECHPOL ELECTRONICS Sp. z o.o. Sp.k., ul. Garwolińska 1,
08-400 Miętne.

15 PL
KWESTIE BEZPIECZEŃSTWA
Przed użyciem należy dokładnie zapoznać się z treścią instrukcji obsługi.
W razie jakichkolwiek wątpliwości dotyczących prawidłowej instalacji
urządzenia, należy skonsultować się z wykwalifikowanym specjalistą.
1. Jeśli urządzenie lub jakakolwiek jego część jest uszkodzona, nie
należy go używać i należy odłączyć je od zasilania. Nie należy
przeprowadzać naprawy samodzielnie. W tym celu, należy
skontaktować się z autoryzowanym punktem serwisowym w
celu sprawdzenia/naprawy.
2. Konserwację/montaż urządzenia należy wykonywać przy
odłączonym zasilaniu, po ostygnięciu urządzenia.
3. Nie należy przykrywać urządzenia.
4. Nie należy kierować wzorku bezpośrednio na strumień światła LED.
5. Urządzenie należy czyścić jedynie za pomocą miękkiej i
suchej ściereczki. Nie należy używać środków chemicznych do
czyszczenia urządzenia.
6. Niestosowanie się do instrukcji może grozić pożarem,
poparzeniem, porażeniem prądem lub innymi szkodami.
7. Reflektor oraz czujnik zmierzchu i ruchu spełniają warunki
standardu IP44.
8. Urządzenie może nagrzewać się do wysokich temperatur. Nie
należy dotykać urządzenia po jego nagrzaniu.
9. Przed podłączeniem do zasilania, należy sprawdzić zgodność
napięcia prądu źródła zasilania i urządzenia.

16
PL
CECHY
• Urządzenie należy do grupy urządzeń energooszczędnych.
• Minimalna odległość pomiędzy reflektorem a obiektem oświetlanym
wynosi 0,5 metra.
• Urządzenie jest zbudowane w sposób uniemożliwiający jego
otwarcie. Własnoręczna naprawa jest niemożliwa.
• Urządzenie należy zamontować na wysokości w przedziale 1,7 - 3,5 m.
MONTAŻ
Przed montażem urządzenia należy zapoznać się z instrukcją
obsługi. Montaż urządzenia powinien zostać przeprowadzony przez
wykwalifikowaną osobę. Przed pierwszym użyciem należy upewnić
się, czy mocowanie mechaniczne oraz podłączenie elektryczne są
wykonane prawidłowo.
1. Następnie odczepić uchwyt montażowy od reflektora.
Przyłożyć uchwyt do ściany i zaznaczyć miejsca wiercenia
otworów. Wywiercić otwory i zamocować uchwyt za pomocą
śrub i kołków rozporowych. Po zakończeniu montażu należy
sprawdzić czy uchwyt jest zamocowany stabilnie.
Uwaga: Nie należy przymocowywać jeszcze reflektora do uchwytu.
2. Należy podłączyć przewody zasilające:
• brązowy przewód reflektora połączyć z brązowym lub
czerwonym przewodem fazowym (ACL) skrzynki napięciowej;
• niebieski przewód reflektora połączyć z niebieskim lub
czarnym przewodem neutralnym (ACN) skrzynki napięciowej;
• żółto-zielony przewód reflektora połączyć z uziemieniem.
3. Należy przymocować reflektor do uchwytu i upewnić się, że
całość trzyma się stabilnie.

17 PL
Wskazówki:
• Nie należy instalować urządzenia podczas opadów deszczu.
• Urządzenie może być zainstalowane wyłącznie w pozycji
poziomej.
• Przy instalacji na zewnątrz, preferowane jest miejsce pod
zadaszeniem.
SMD
uchwyt
czujnik

18
PL
• Zaleca się unikać montowania urządzenia w kierunku przedmiotów/
urządzeń mogących szybko zmieniać temperaturę (otworów
wentylacyjnych i klimatyzacyjnych, itp.). Należy unikać kierowania
czujnika w kierunku drzew i krzewów oraz miejsc przebywania
zwierząt.
• Należy zabezpieczyć reflektor przed bezpośrednim padaniem
promieni słonecznych na przednią część urządzenia.
• Podczas przechowywania urządzenia należy upewnić się, że
czujnik skierowany jest ku górze (patrz ilustracja poniżej), tak
aby uniknąć jego uszkodzenia.
REGULACJA USTAWIEŃ
TIME: Pokrętło regulacji czasu (włączenia reflektora po
wykryciu ruchu).
SENS: Pokrętło regulacji czułości (wykrywania ruchu).
LUX: Pokrętło regulacji natężenia światła (przy jakim
reflektor będzie działał).
√×
Pozycja oznacza, że czujnik włącza się po zmierzchu.
Pozycja oznacza, że czujnik jest aktywny w ciągu dnia.

19 PL
ROZWIĄZYWANIE PROBLEMÓW
Niska czułość wykrywania lub reflektor nie działa:
• Należy sprawdzić czy przed urządzeniem nie znajdują się
żadne przeszkody.
• Należy sprawdzić czy zasięg wykrywania nie został przekroczony.
• Należy sprawdzić czy urządzenie zostało zamontowane na
odpowiedniej wysokości.
• Należy sprawdzić czy ustawienia natężenia światła są zgodne z
obecnym oświetleniem otoczenia.
• Kiedy temperatura otoczenia jest zbliżona do temperatury ciała
człowieka, czułość wykrywania może ulec pogorszeniu.
Światło reflektora nie wyłącza się:
• Należy sprawdzić czy w obszarze wykrywania nie występuje
ciągły ruch.
• Należy sprawdzić czy czas oświetlania nie został ustawiony na
maksymalny.
SPECYFIKACJA
• Źródło światła: 24 szt. 2835 SMD
• Moc: 20 W
• Temperatura barwowa: 6500 K
• Strumień świetlny: 1600 lm
• Efektywność: 80 lm/W
• Współczynnik mocy: 0,9
• Kąt świecenia: 120°
• Kąt wykrywania ruchu: 120°
• Odległość wykrywania ruchu: 0,5 - 11 m
• Zakres czasu świecenia: 3 sekundy – 7 minut
• CRI: > 80
• Klasa ochronności: I
• Stopień ochrony: IP44
• Temperatura pracy: -20°C - +40°C
• Żywotność: 20 000 godz
• Wysokość montażu: 1,7 – 3,5 m
• Zasilanie: 220-240 V; 50/60 Hz
• Wymiary: 209x140x30 mm

20
PL
Poland
Prawidłowe usuwanie produktu
(zużyty sprzęt elektryczny i elektroniczny)
Oznaczenie umieszczone na produkcie lub w odnoszących się do niego tekstach
wskazuje, że po upływie okresu użytkowania nie należy usuwać z innymi odpadami
pochodzącymi z gospodarstw domowych. Aby uniknąć szkodliwego wpływu na
środowisko naturalne i zdrowie ludzi wskutek niekontrolowanego usuwania odpadów,
prosimy o oddzielenie produktu od innego typu odpadów oraz odpowiedzialny recykling
w celu promowania ponownego użycia zasobów materialnych jako stałej praktyki. W celu
uzyskania informacji na temat miejsca i sposobu bezpiecznego dla środowiska recyklingu
tego produktu użytkownicy w gospodarstwach domowych powinni skontaktować się
z punktem sprzedaży detalicznej, w którym dokonali zakupu produktu, lub z organem
władz lokalnych. Użytkownicy w firmach powinni skontaktować się ze swoim dostawcą i
sprawdzić warunki umowy zakupu. Produktu nie należy usuwać razem z innymi odpadami
komercyjnymi.
Wyprodukowano w CHRL dla LECHPOL ELECTRONICS Sp. z o.o. Sp.k., ul. Garwolińska 1,
08-400 Miętne.
Table of contents
Languages:
Other Rebel Floodlight manuals