manuals.online logo
Brands
  1. Home
  2. •
  3. Brands
  4. •
  5. Rebel
  6. •
  7. Indoor Furnishing
  8. •
  9. Rebel RB-0200 User manual

Rebel RB-0200 User manual

HEIGHT ADJUSTABLE
PNEUMATIC
STANDING DESK
OFFICE
ASSEMBLY
MANUAL
model: RB-0200
ENDE PL RO
A (x 1) B (x 1)
C (x 1) D (x 1)
E (x 1) F (x 18)
(M6x10)
H (x 1)
(4 mm)
G (x 8)
(M6x14)
I II
A
C
1
2
H
F
III IV
F
E
3
≥5mm
B
F
VVI
D
G
1
G
2
min740~max1150mm
4 5
Safety instruction
Read the entire instruction manual before you start installation and
assembly and keep it for future reference.
• Do not exceed the maximum load capacity!
• Producer does not claim liability for any damages/injuries caused by
inappropriate installation and handling.
• Make sure the screws are properly tightened but not overtightened. Do
not over tighten mounting screws as this may lead to damaging the screw
thread.
• This product contains small items that could be a choking hazard if
swallowed - keep away from children this product is not a toy.
• Product for indoor use only.
• Ensure that you have received all parts according to the component
checklist prior to installation/usage. If any parts are missing or faulty
contact your distributor for a replacement.
• The device may be operated by children over 8 years of age and people
with reduced physical sensory or mental abilities or without experience
and knowledge provided that they are under supervision or have been
instructed in the safe use of the device and understand the dangers of
related. Children should not play with this device. Cleaning and user
maintenance shall not be made by children without supervision
• Do not sit on the desk.
• Before lifting or lowering the table top remove oce chairs from the desk.
• Do not use the height adjustment levers during assembly.
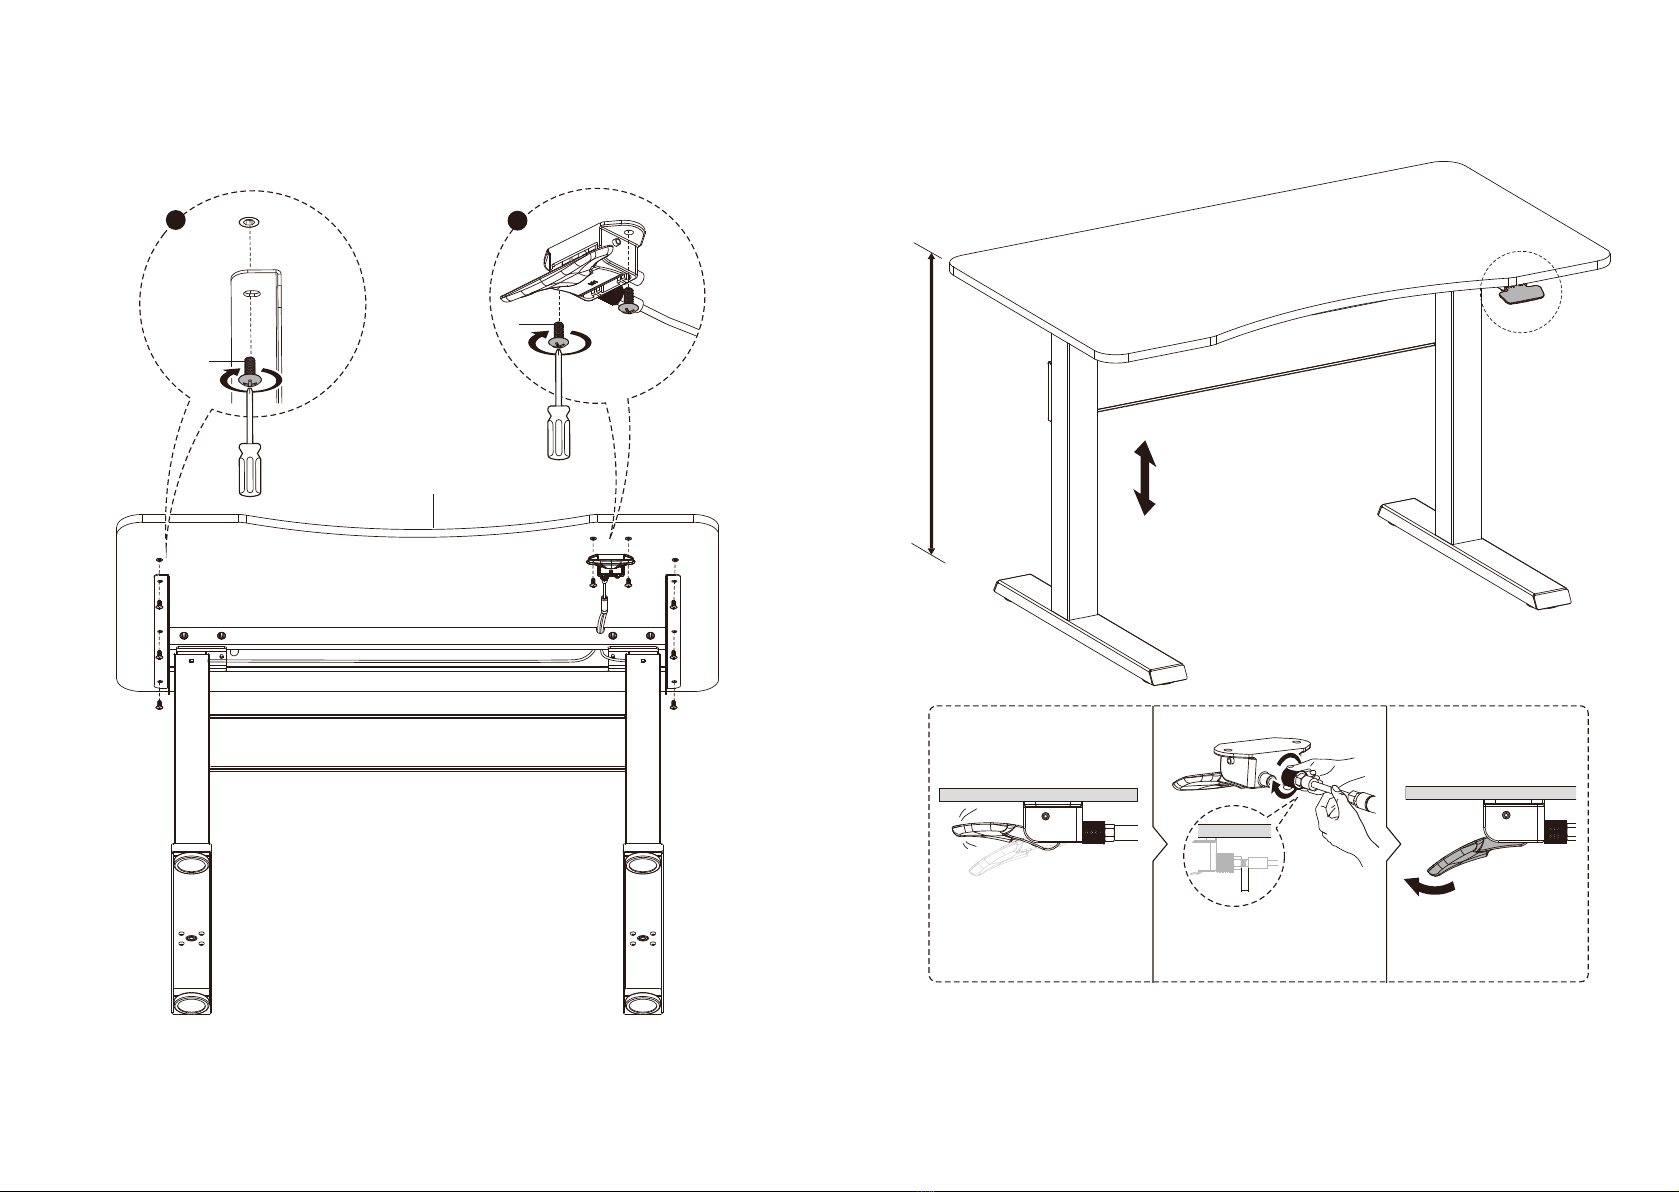
Additional information on assembly (marked with numbers in the
diagram):
1. (Page II) Make sure that the longer part of the side bracket is pointing
towards the front of the desk.
2. (Page II) Shorter cable.
3. (Page III) Make sure that the longer part of the base points towards the
front of the desk.
4. (Page VI) At the time of shipment the height adjustment lever will be
loosened.
5. (Page VI) Tighten the screw that secures the height adjustment lever.
Sicherheitsanleitungen
Lesen Sie die gesamte Bedienungsanleitung bevor Sie mit der Installation
und Montage beginnen und bewahren diese auf zum späteren
Nachschlagen.
• Überschreiten Sie nicht die maximale Tragfähigkeit!
• Der Hersteller übernimmt keine Haftung für Schäden / Verletzungen die
durch unsachgemäße Installation und Handhabung verursacht wurden.
• Stellen Sie sicher dass die Schrauben richtig angezogen aber nicht zu fest
angezogen sind. Ziehen Sie die Befestigungsschrauben nicht zu fest an da
dies zu einer Beschädigung des Schraubengewindes führen kann.
• Dieses Produkt enthält kleine Gegenstände die beim Verschlucken eine
Erstickungsgefahr darstellen können. Halten Sie diese von Kindern fern.
Dieses Produkt ist kein Spielzeug.
• Produkt nur für den Innenbereich.
• Stellen Sie sicher dass Sie vor der Installation / Verwendung alle Teile
gemäß der Packungsliste erhalten haben. Wenn Teile fehlen oder
fehlerhaft sind wenden Sie sich an Ihren Händler um einen Ersatz zu
erhalten.
• Das Gerät kann von Kindern benutzt werden die älter als 8 Jahre alt sind
und von Personen mit eingeschränkten physischen sensorischen oder
geistigen Fähigkeiten oder Mangel an Erfahrung und Wissen wenn sie
von einer Person beaufsichtigt und geleitet werden die für ihre Sicherheit
zuständig ist in einer vorsichtigen Art und Weise und die alle Sicherheits-
Vorkehrungen verstanden hat und befolgen wird. Kinder sollten nicht mit
diesem Gerät spielen. Kinder sollten nicht die Reinigung und Wartung des
Gerätes ohne Aufsicht durchführen.
• Setzen Sie sich nicht auf den Schreibpult.
• Entfernen Sie vor dem Anheben oder Absenken der Tischplatte die
Bürostühle vom Schreibpult.
• Verwenden Sie während der Montage keine Höhenverstellhebel.
Zusätzliche Informationen zur Montage (Markiert mit Nummern im
iagramm):
1. (Seite II) Stellen Sie sicher dass der längere Teil der Seitenhalterung zur
Vorderseite des Schreibpultes zeigt.
2. (Seite II) Kürzeres Kabel.
3. (Seite III) Stellen Sie sicher dass der längere Teil der Basis zur Vorderseite
des Schreibpultes zeigt.
4. (Seite VI) Zum Zeitpunkt des Versands wird der Höhenverstellhebel gelöst.
5. (Seite VI) Ziehen Sie die Schraube an mit der der Höhenverstellhebel
befestigt ist.
E EN
Instrucțiuni privind siguranța
Citiți întreg manualul de instrucțiuni înainte de a începe instalarea și
asamblarea produsului și păstrați-l pentru consultări ulterioare.
• Nu depășiți sarcina maximă de încărcare!
• Producătorul nu își asumă responsabilitatea pentru daunele/accidentările
cauzate de manipularea și utilizarea necorespunzătoare.
• Asigurați-vă că șuruburile sunt strânse bine dar nu prea tare. Nu strângeți
prea tare șuruburile de montare deoarece acest lucru poate duce la
deteriorarea letului șurubului.
• Acest produs conține obiecte mici care ar putea reprezenta un pericol de
sufocare în caz de înghițire – păstrați-le departe de copii acest produs nu
este o jucărie.
• Produsul este doar pentru utilizare în interior.
• Asigurați-vă că ați primit toate piesele conform listei de vericare a
componentelor înainte de instalare/utilizare. Dacă piesele lipsesc sau sunt
defecte contactați distribuitorul prentu înlocuire.
• Dispozitivul poate  utilizat de către copii cu vârsta de peste 8 ani și de
persoane cu capacități zice senzoriale sau mentale reduse sau cu lipsă de
experiență sau cunoștințe doar dacă sunt supravegheați sau instruiți cu
privire la utilizarea în siguranță a dispozitivului și dacă înțeleg pericolele
legate de acest produs. Copiii nu trebuie să se joace cu acest dispozitiv.
Curățarea și întreținerea produsului nu trebuie efectuate de către copii
fără supraveghere.
• Nu vă așezați pe birou.
• Înainte de a ridica sau coborî blatul mesei scoateți scaunele de sub birou.
• Nu utilizați manetele de reglare a înășțimii în timpul asamblării.
Informații suplimentare despre asamblare (marcate cu numere în
diagramă):
1. (Pagina II) Asigurați-vă că partea mai lungă a suportului lateral este
îndreptată spre partea din față a biroului.
2. (Pagina II) Cablu mai scurt.
3. (Pagina III) Asigurați-vă că partea mai lungă a bazei este îndreptată spre
partea din față a biroului.
4. (Pagina IV) În momentul expedierii maneta de reglare a înălțimii va 
slăbită.
5. (Pagina VI) Strângeți șurubul care xează maneta de reglare a înălțimii.
Kwestie bezpieczeństwa
Przed przystąpieniem do montażu uchwytu należy zapoznać się z instrukcją
obsługi i zachować ją w celu późniejszego wykorzystania.
• Nie należy przekraczać maksymalnego dopuszczalnego obciążenia.
• Producent nie ponosi odpowiedzialności za jakiekolwiek szkody/
obrażenia powstałe w skutek niepoprawnego montażu i użytkowania.
• Śruby należy dokręcić mocno lecz nie za mocno. Zbyt mocne dokręcenie
może doprowadzić do osłabienia lub zerwania gwintu.
• Uchwyt posiada małe elementy które mogą stwarzać ryzyko uduszenia w
razie połknięcia – należy trzymać z dala od dzieci produkt nie jest
zabawką.
• Produkt przeznaczony jest do użytku wewnątrz pomieszczeń.
• Należy się upewnić że w zestawie są wszystkie elementy wymienione na
liście. Jeżeli brakuje jakiejkolwiek części lub jest ona uszkodzona należy
skontaktować się ze sprzedawcą.
• Urządzenie może być obsługiwane przez dzieci w wieku powyżej 8 lat oraz
osoby o ograniczonej sprawności zycznej sensorycznej lub umysłowej
lub nie mające doświadczenia i wiedzy pod warunkiem że przebywają
one pod nadzorem lub zostały poinstruowane odnośnie korzystania z
urządzenia w sposób bezpieczny i rozumieją zagrożenia z tym związane.
Dzieci nie powinny bawić się urządzeniem. Czyszczenie i konserwacja
urządzenia nie mogą być wykonane przez dzieci bez nadzoru
• Zabrania się siadania na biurku.
• Przed podnoszeniem lub opuszczeniem blatu należy odsunąć od biurka
krzesła biurowe.
• W trakcie montażu nie należy używać dźwigni regulacji wysokości.
odatkowe informacje dotyczace montażu (oznaczone cyframi na
schemacie):
1. (Str. II) Należy upewnić się że dłuższa część wspornika bocznego
skierowana jest w kierunku frontu biurka.
2. (Str. II) Krótszy przewód.
3. (Str. III) Należy upewnić się że dłuższa część podstawy skierowana jest w
kierunku frontu biurka.
4. (Str. VI) Na czas przesyłki dźwignia regulacji wysokości będzie
poluzowana.
5. (Str. VI) Należy dokręcić śrubę mocującą dźwignię regulacji wysokości.
PL RO
www.rebelelectro.com

Other Rebel Indoor Furnishing manuals

Rebel RENEGADE User manual

Rebel

Rebel RENEGADE User manual

Rebel WRAITH User manual

Rebel

Rebel WRAITH User manual

Popular Indoor Furnishing manuals by other brands

INTER LINK SAS NEW YORK 1 20 90 00 15 Assembling Instruction

INTER LINK SAS

INTER LINK SAS NEW YORK 1 20 90 00 15 Assembling Instruction

Costway KC55224 user manual

Costway

Costway KC55224 user manual

Desert S188-LAW/4/11 Assembly instructions

Desert

Desert S188-LAW/4/11 Assembly instructions

SEI CK982000TX Assembly instruction

SEI

SEI CK982000TX Assembly instruction

Julian Bowen COTBED CAM020 Assembly instructions

Julian Bowen

Julian Bowen COTBED CAM020 Assembly instructions

SSI SCHAEFER VSR 3000 Assembly and operating manual

SSI SCHAEFER

SSI SCHAEFER VSR 3000 Assembly and operating manual

Green Furniture Concept Nova C Recliner Table manual

Green Furniture Concept

Green Furniture Concept Nova C Recliner Table manual

Trasman 8390 ARIA Assembly manual

Trasman

Trasman 8390 ARIA Assembly manual

Rauch M2307 Assembly instructions

Rauch

Rauch M2307 Assembly instructions

Lifetime 60245 Assembly instructions

Lifetime

Lifetime 60245 Assembly instructions

SIT&MORE ZM2 CLYDE Hocker Assembly Instructions Instruction Manual

SIT&MORE

SIT&MORE ZM2 CLYDE Hocker Assembly Instructions Instruction Manual

Assmann EASY STS instruction sheet

Assmann

Assmann EASY STS instruction sheet

Craftsman 706.149280 Operator's manual

Craftsman

Craftsman 706.149280 Operator's manual

Pinolino Light 14 00 61 G Assembly plan

Pinolino

Pinolino Light 14 00 61 G Assembly plan

Zaor ET114E-N installation guide

Zaor

Zaor ET114E-N installation guide

Rauch M2433 Assembly instructions

Rauch

Rauch M2433 Assembly instructions

Living Spaces NICO 7058 2.5EL Assembly instructions

Living Spaces

Living Spaces NICO 7058 2.5EL Assembly instructions

Next JEFFERSON U08746 Assembly instructions

Next

Next JEFFERSON U08746 Assembly instructions

manuals.online logo
manuals.online logoBrands
  • About & Mission
  • Contact us
  • Privacy Policy
  • Terms and Conditions

Copyright 2025 Manuals.Online. All Rights Reserved.