RED CAT TEAL Golden Eagle User manual

GOLDEN EAGLE (GE)
Small Unmanned Aircraft System (sUAS)
&
TEAL AIR CONTROL (TAC)
Ground Station
Teal Part # 60056
Revision A
15 July 2022

1
This manual covers the following Teal products:
Teal Golden Eagle (GE) Small Unmanned Aircraft System (sUAS)
Teal Air Control (TAC) Ground Station
TAC Software and Applications
◦Teal QGroundControl (Teal QGC) Software App
◦Teal TAC Settings Software App
◦Teal Updater Software App
◦Teal Documentation Software App
Teal Performance Battery Pack
Teal Battery Charger and Power Supply
TAC 4-Point Harness
A quick start guide for the Golden Eagle and the TAC are included in Golden Eagle hard case
and also available electronically at:
https://tealdrones.com/support/documents/
or by scanning this QR code:
Please ensure that you observe identified warnings and cautions for operating procedures
before attempting to operate any equipment toprevent any potential personal injury, damage
to equipment, or Federal Aviation Administration (FAA) violations:
WARNING: An operating procedure or practice which, if not correctly followed,
could result in personal injury or loss of life.
CAUTION: An operating procedure or practice which, if not strictly observed,
could result in damage to, loss of, or destruction of equipment, data, or
surrounding property.
NOTE: An operating procedure, condition, etc., which is important or helpful to
highlight.
SECURITY: An operating procedure, condition, etc., which is important or helpful
to highlight for cyber security best practices.

2
TABLE OF CONTENTS ..................................................2
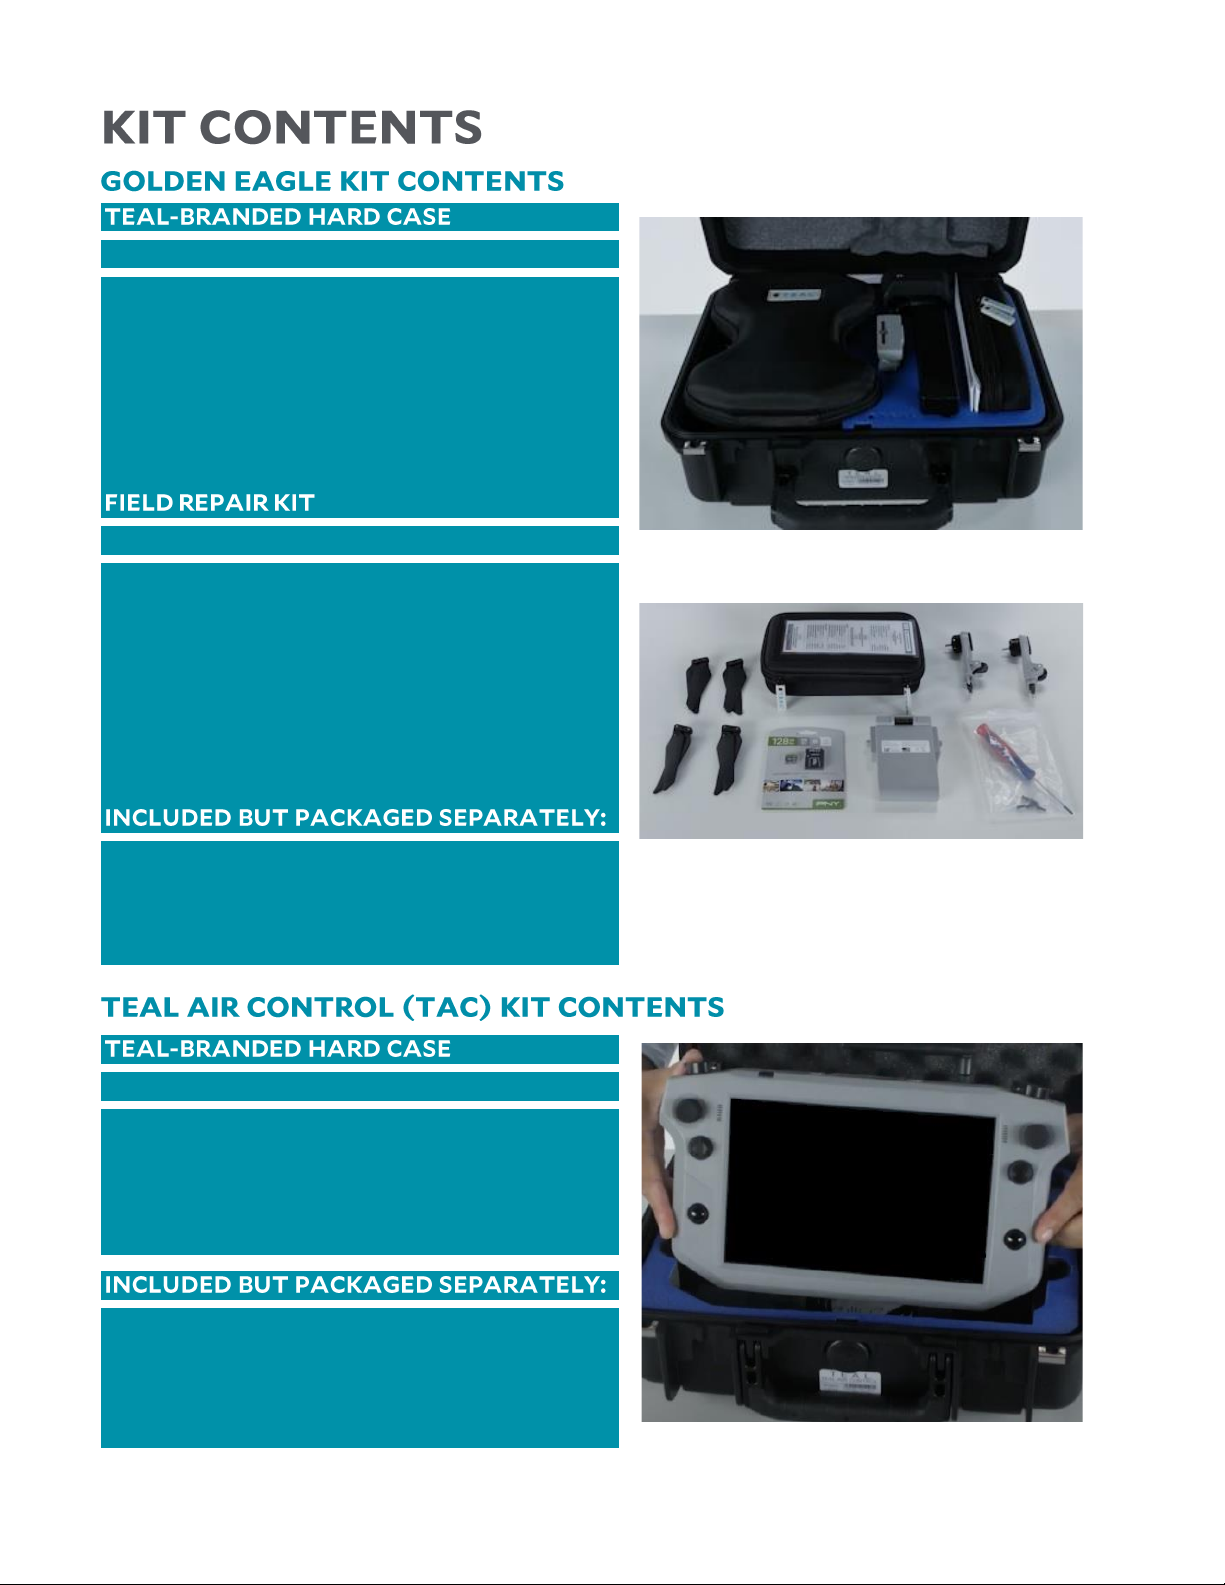
KIT CONTENTS ...............................................................4
GOLDEN EAGLE KIT CONTENTS............................4
TEAL AIR CONTROL (TAC) KIT CONTENTS....4
GOLDEN EAGLE sUAS OVERVIEW ..........................5
TAC CONTROLS OVERVIEW.....................................6
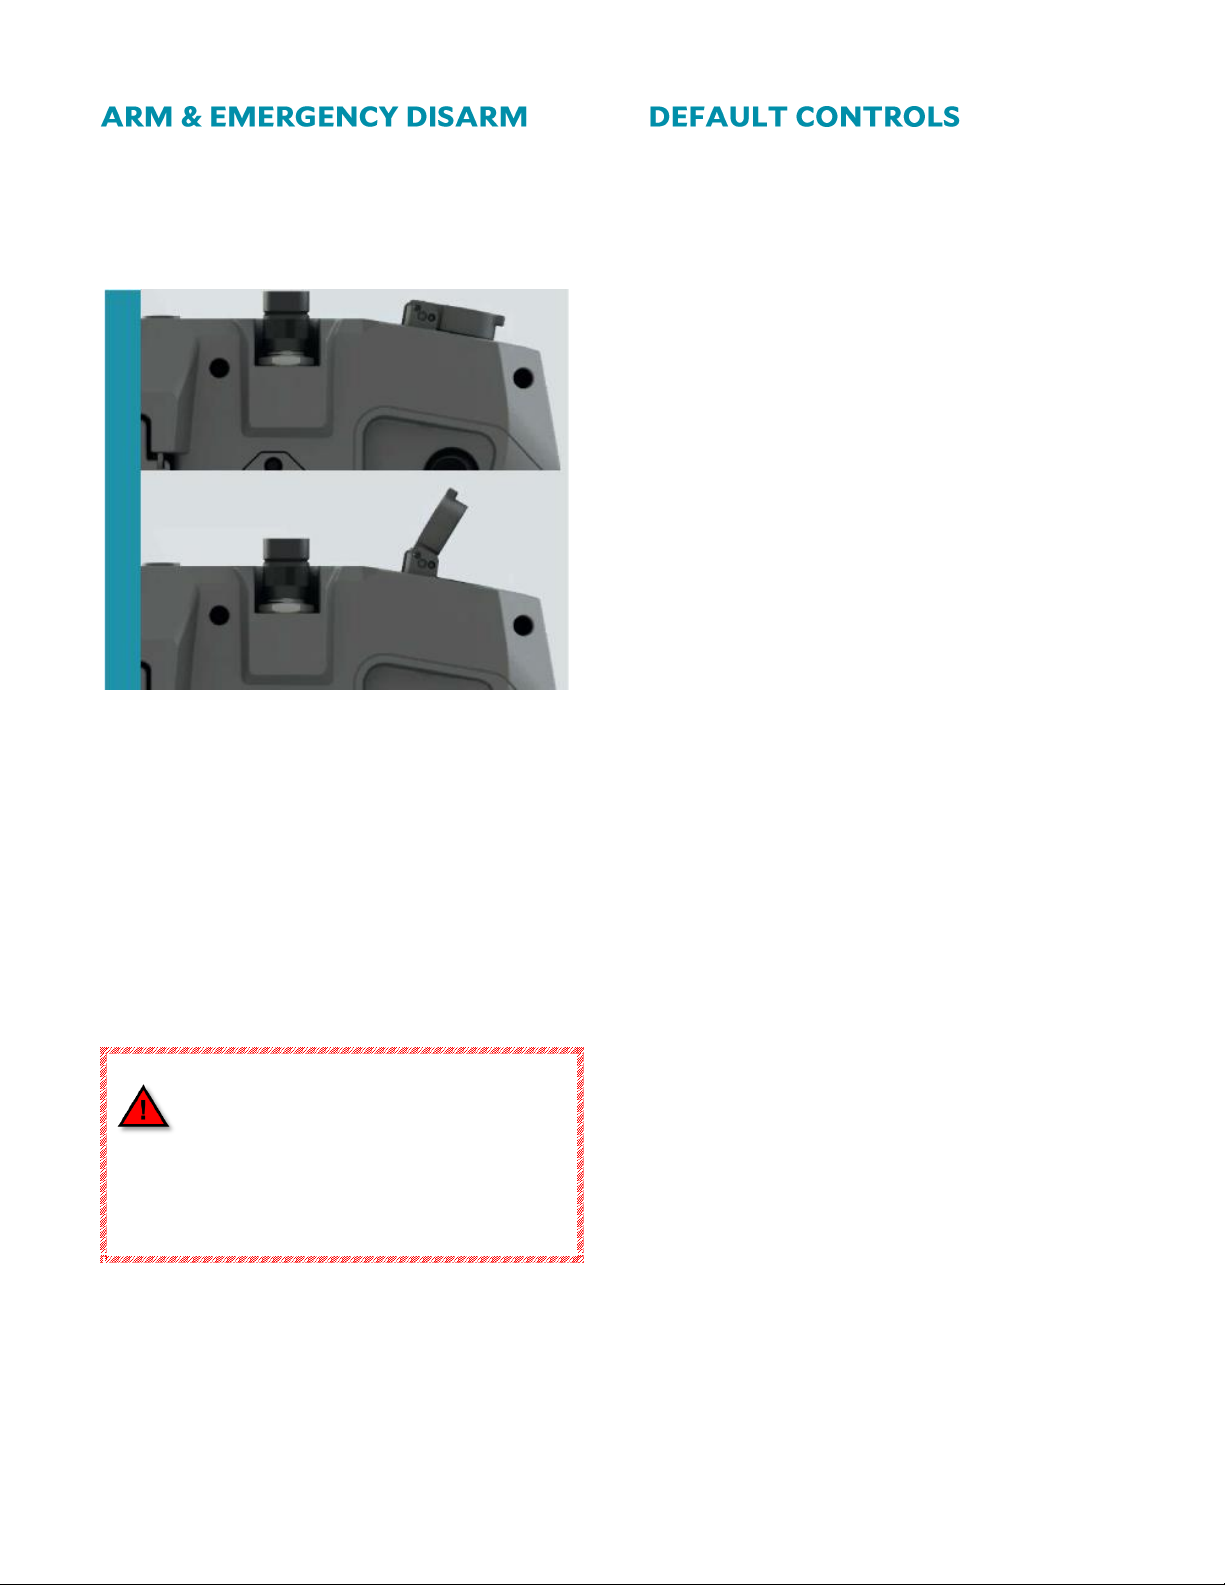
ARM & EMERGENCY DISARM...................................7
DEFAULT CONTROLS....................................................7
GETTING STARTED.......................................................8
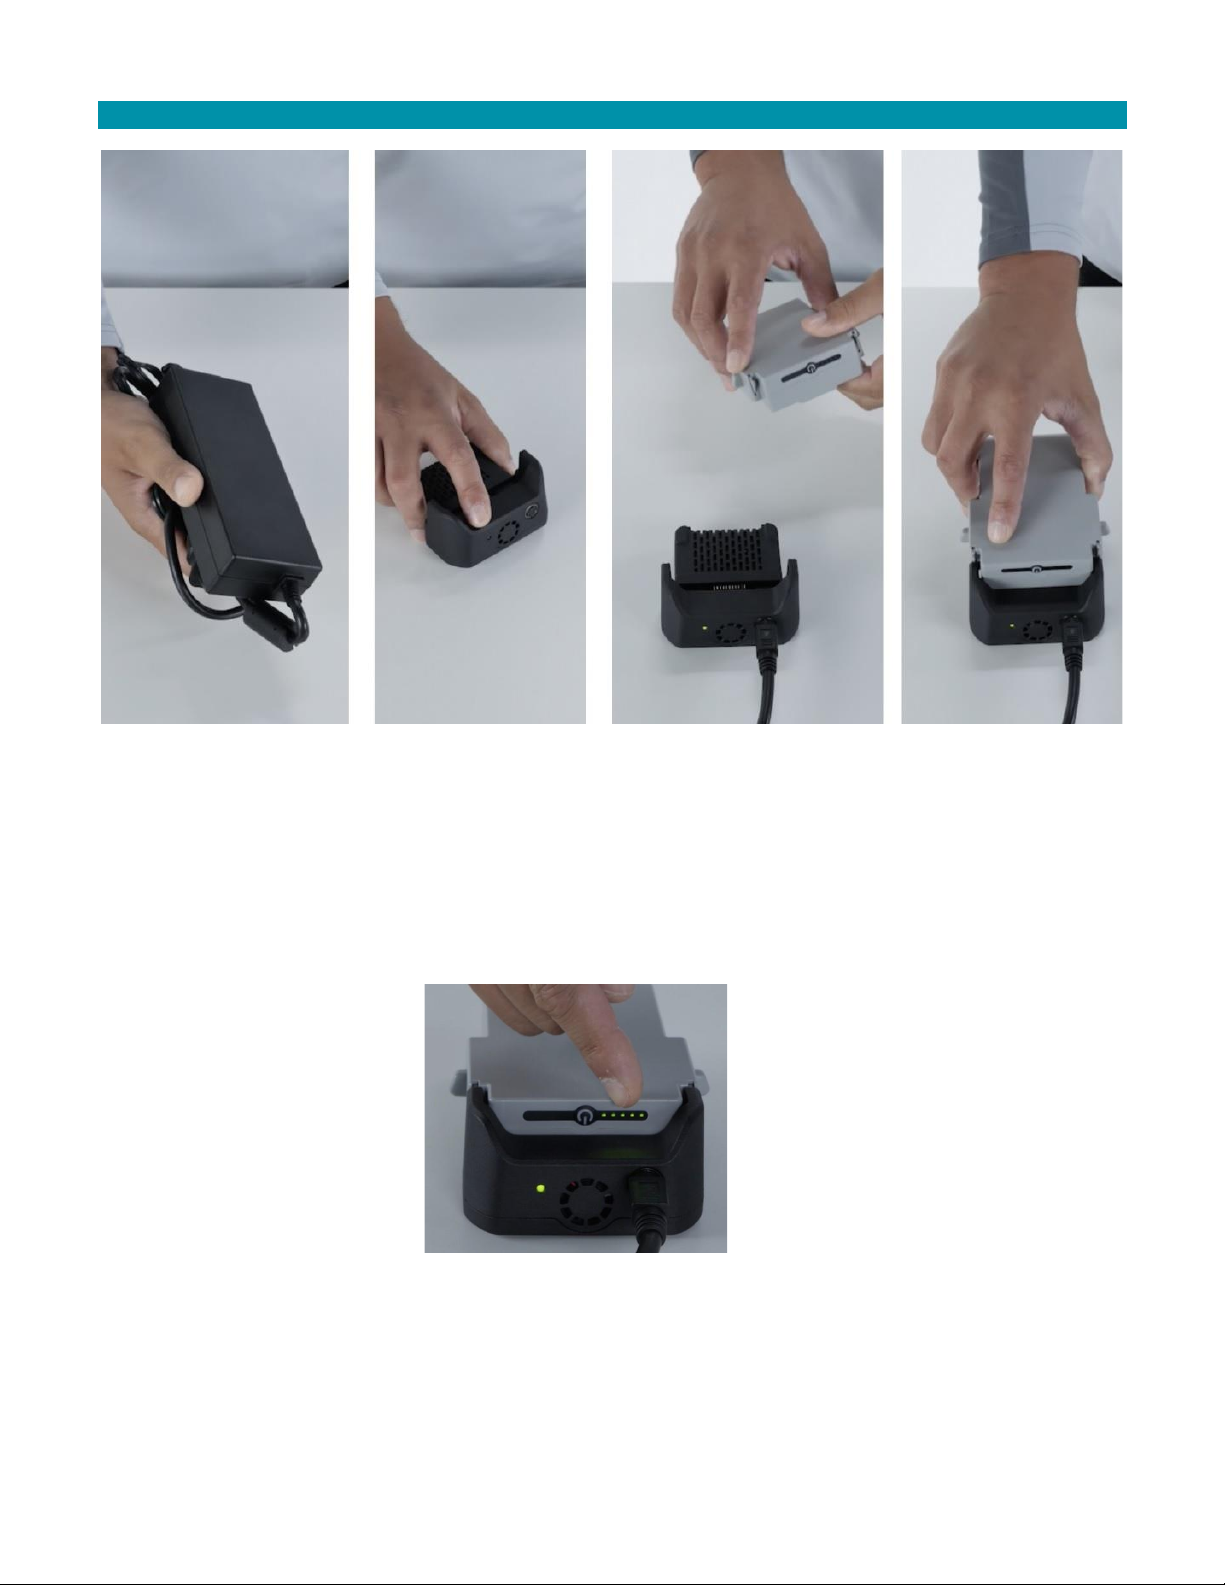
CHARGE THE BATTERY PACKS...............................8
PREPARE THE GOLDEN EAGLE ..............................10
PREPARE THE TAC..........................................................11
POWER UP THE TAC....................................................12
POWER UP THE GOLDEN EAGLE..........................12
ACCESS THE APPS .........................................................12
PAIR/CONNECT THE TAC WITH THE
GOLDEN EAGLE...............................................................13
FLIGHT MODES ...............................................................13
POSITION MODE............................................................14
MANUAL MODE.............................................................14
ALTITUDE MODE...........................................................14
MISSION MODE...............................................................14
FLY SCREEN OVERVIEW.............................................15
FLY SCREEN MAP OVERVIEW.................................15
FLY SCREEN MAIN TOOLBAR .................................16
FLY TOOLS OVERVIEW...............................................17
CUSTOMIZING PERSONAL SETTINGS..............18
DOWNLOADING MAPS.............................................19
MISSION PLANNING...................................................20
VEHICLE SETUP.............................................................. 22
PRE-FLIGHT.................................................................... 24
FLIGHT SAFETY ..............................................................24
SYSTEM CAPABILITIES / OPERATING
LIMITATIONS ..................................................................25
PRE-FLIGHT CHECKLIST............................................26
ARMING & TAKEOFF.................................................. 29
ARMING THE DRONE .................................................29
TAKEOFF.............................................................................29
IN-FLIGHT....................................................................... 29
DEFAULT CONTROLS.................................................29
FLY SCREEN DETAILS...................................................30
INSTRUMENT PANEL OVERVIEW........................31
CAMERA CONTROL PANEL .....................................31
GIMBAL CONTROL PANEL.......................................32
PHOTOS SCREEN...........................................................34
LANDING & DISARMING ...........................................36
LAND.....................................................................................36
RETURN TO LAUNCH (RTL)....................................36
EMERGENCY STOP (E-STOP) / DISARM ..........36
POST-FLIGHT.................................................................37
FLIGHT LOGS....................................................................37
DOWNLOAD FLIGHT LOGS: GOLDEN EAGLE
→TAC...................................................................................37
TRANSFER LOG FILES: TAC →REMOVEABLE
USB-C DEVICE..................................................................38
TRANSFER LOG FILES: TAC →PC .........................38
TRANSFER MEDIA: SD CARD DRONE →PC ...39
TRANSFER PHOTOS: TAC →REMOVEABLE
USB-C DEVICE................................................................. 40
TRANSFER PHOTOS: TAC →PC........................... 40
CLEARING MEDIA......................................................... 41

3
POST-INCIDENT REPORT PROCEDURES............ 42
IMMEDIATE POST-INCIDENT PROCEDURES42
DOCUMENTING YOUR INCIDENT REPORT..43
FILING YOUR ACCIDENT REPORT ...................... 43
GOLDEN EAGLE sUAS DETAILS............................. 44
ARCHITECTURE & RATIONALE............................45
GOLDEN EAGLE / TAC PAIRING...........................48
CALIBRATING THE DRONE......................................51
TEAL AIR CONTROL (TAC) DETAILS....................52
ARCHITECTURE & RATIONALE............................ 52
SYSTEM SOFTWARE DETAILS ................................53
ACCESSING THE APPS................................................ 53
TEAL QGC APP................................................................54
TEAL TAC SETTINGS APP........................................ 57
TEAL DOCUMENTATION APP..............................57
TEAL UPDATER APP.....................................................57
BATTERY PACK & CHARGER DETAILS................ 59
ARCHITECTURE & RATIONALE ............................59
TEAL BATTERY CHARGER ...................................... 60
CHARGER EXTERNAL POWER SUPPLY ........... 60
MISCELLANEOUS ........................................................ 62
PACKAGING, SHIPPING & LABELING
SPECIFICATIONS............................................................62
PATENTS & TRADEMARKS......................................62
ELECTRONIC VERSION...............................................62
APPENDICES
APPENDIX A: TROUBLESHOOTING GUIDE
APPENDIX B: FIELD MAINTENANCE &
SCHEDULE

4
CONTENTS:
1x TAC & INTERNAL RADIO PER TAC SKU (1800 MHZ
OR 2400 MHZ)
1X USB3 DATA CABLE
1X TAC 4-POINT HARNESS KIT
1X TAC HARNESS INSTRUCTION CARD
2X TEAL PERFORMANCE BATTERY PACKS
1X BATTERY CHARGER POWER SUPPLY w/ AC
POWER CORD
1X BATTERY CHARGE ADAPTER
CONTENTS:
1x TACTICAL DRONE CASE
1x GOLDEN EAGLE sUAS
2x CLOCKWISE PROPELLERS
2x COUNTERCLOCKWISE PROPELLERS
1x GIMBALLED FLIR HADRON EO / IR CAMERA
1x GIMBAL / CAMERA PROTECTIVE COVER
1x QUICK START GUIDE
CONTENTS:
1x 128 GB MICRO SD CARD
1x TORX T8 SCREWDRIVER
6x TORX ARM ATTACHMENT SCREWS
1x CLOCKWISE ROTOR ARM
1x COUNTERCLOCKWISE ROTOR ARM
2x CLOCKWISE PROPELLER ASSEMBLIES
2x COUNTERCLOCKWISE PROPELLER ASSEMBLIES
1x QUICK REFERENCE CHECKLIST
2X TEAL PERFORMANCE BATTERY PACKS
1X BATTERY CHARGER POWER SUPPLY w/ AC
POWER CORD
1X BATTERY CHARGE ADAPTER

5
The following diagram illustrates the major components of the Golden Eagle:

6
The TAC has a mirrored set of left/right buttons, controls, and ports on the front and rear panels and
along the narrow top panel. The left and right-hand sets on the front panel each include a joystick, a 4-
position switch, and a momentary button. The left and right-hand sets on the rear panel each include
two momentary buttons. e top panel includes a left and right-hand momentary button, each protected
with a spring-loaded flip-guard door to prevent accidental actuation. These controls are use-
programmable. The out-of-the-box default programmed functions shown here:

7
The top panel includes a left and right-hand
momentary button, each protected with a
spring-loaded flip-guard door to prevent
accidental actuation.
The default (and recommended) function for
the left top button arms the drone, which
automatically starts the motors.
The default (and recommended) function for
the right top button disarms the drone (also
known as the Emergency Stop (E-stop)), which
automatically kills the motor electrical
connections.
The arm and disarm/E-Stop functions are also
found in a confirmation window on the TAC.
WARNING!
Disarming the Golden Eagle while in
flight will cause it to free-fall,
possibly causing property damage,
air vehicle damage, and/or serious
injury or death to people or objects
below.
Please refer to the TAC CONTROLS OVERVIEW
screen for joystick/button locations.
THROTTLE UP / ASCEND
To ascend, move the left joystick straight up.
The farther the joystick is moved from its
centered position, the faster the drone ascends
in its fixed vertical axis.
THROTTLE DOWN / DESCEND
To descend, move the left joystick straight
down.
YAW LEFT / CCW
To rotate the drone counterclockwise (CCW)
around its vertical axis, move the left joystick to
the left.
YAW RIGHT / CW
To rotate the drone clockwise (CW) around its
vertical axis, move the left joystick to the right.
PITCH FORWARD
To accelerate in a forward direction, move the
right joystick up.
PITCH BACK
To accelerate in a reverse direction, move the
right joystick down.
ROLL LEFT
To roll the vehicle toward the left, move the
right joystick left.
ROLL RIGHT
To roll the vehicle toward the right, move the
right joystick right.

8
ESTIMATED TIME: 75-95 Minutes
Follow along with our instructional videos on
our website at:
https://tealdrones.com/support/video/
•Getting Started: Teal Golden Eagle
Drone
•TAC Hardware: Teal Golden Eagle
•Linking Components: Teal Eagle Drone
Both the Golden Eagle sUAS and the Teal Air
Control (TAC) ground station each require one
Teal Performance Battery Pack.
Each battery pack must be charged on the Teal
Battery Charger before commencing any flight.
NOTE: Battery packs are shipped
from the factory in a “shipping mode”
and will not charge in this state. Tap
the Power Button once, then connect
the battery pack to the charger.
Battery packs fully charge in 65 minutes, and
charge from 10% to 80% in 35 minutes if
immediately needed. Battery packs that have
been exposed to low temperatures (32 °F (0 °C)
or lower) for more than one hour must be pre-
heated on the charger before flight. The
amount of time this takes will vary upon the
starting temperature of the battery pack.
The battery may be removed from the charger
at any time.
The Charger Power Supply may be operated
from AC voltages ranging from 100-240 VAC.
The removeable AC cord can be replaced with
an appropriate cord for that particular region.
NOTE: A battery pack that is not
connected to either a Golden Eagle
or a TAC will shut itself off after
three (3) seconds after an attempt
to power itself on. This is normal
behavior.
WARNING!
If improperly stored, lithium-ion
batteries such as the Teal
Performance Battery Pack may
become unstable, overheat,
damage cells, and potentially catch
on fire.
Store batteries between
-4 °F to 113 °F (-20 °C to 45 °C).
Do not keep batteries in hot
vehicles!
CAUTION!
Remove the battery pack from the
charger once it is fully charged to
prevent damage from prolonged
heating.
Charge within the limits of 32 °F to
113 °F (0 °C to 45 °C). Do not
operate charger in direct sunlight
to avoid exceeding temperature
limits.
Unplug the charger power supply
when not in use to prevent
unnecessary heating and wear on
electrical components.
Always power down the Golden
Eagle and TAC before removing
and replacing battery packs.

9
CHARGING INSTRUCTIONS
Insert the DC charger power cable into the charger.
Plug the AC power cord into an AC outlet. The green LED is illuminated when power is applied.
Tap the power button once. This activates the battery and it can now be charged.
Insert the battery pack onto the charger, fully engaging the side latches with the charger.
The battery pack is at 100% charge when all five (5) LEDs are lit.
Remove the battery pack from the charger by pulling back the two (2) side latch release buttons and
then pull the battery pack vertically off the charger.

10
Unfold all four (4) arms and securely lock each
into their fully extended position.
Attach the propeller (prop) assemblies to the
motors by matching up the hardware:
The two (2) clockwise (CW) prop assemblies
have black rivets securing their blades, and the
two (2) CW propeller motors have a black ring
below the spring.
The two (2) counterclockwise (CCW) prop
assemblies have silver rivets securing their
blades, and the two (2) CCW propeller motors
have a silver ring below the spring.
NOTE: CW prop assemblies lock
into place by turning it in a CCW
direction, and CCW prop
assemblies lock into place by
turning it in a CW direction.
To attach a prop assembly
to a motor, line up and insert
the three (3) bent legs on the
underside of the prop
assembly into the three (3)
slots on the motor.
Push down to compress the spring on the shaft,
then rotate a quarter turn until it hits its
mechanical limit. Allow the spring to push the
hub up into its locked position.
WARNING!
Replace the arm if the arm lock
mechanism is worn and does not
securely lock.
Replace any propellers if they are
nicked or cracked.
Remove the gimbal protective cover by pulling
it directly away from the drone.
Insert and securely latch a fully charged battery
pack into the battery compartment of the
drone, located on the bottom of the drone
airframe.
Verify that both battery pack latches are fully
engaged with the drone airframe to securely
capture the battery pack.
Insert the optional SD Card into the card slot in
the airframe.
NOTE: The SD Card MUST be inserted
with the gold pads up (this is normally
considered “upside-down”)!

11
You will need to attach the antenna(s), insert a
fully charged battery pack, and secure the
optional 4-point harness before operating the
TAC.
TAC ANTENNA(S)
If not already installed, attach the antenna(s) by
securely screwing the end in a clockwise
direction onto the TNC connector(s) on the
TAC.
Teal TAC 2.4GHz ISM Band
MIMO
Teal TAC 1.8GHz
Antenna
TAC BATTERY PACK
Insert and securely latch a fully charged Teal
Performance Battery Pack into the TAC battery
compartment.
Verify that both battery pack side latches are
fully engaged with the TAC housing to securely
capture the battery.
TAC OPTIONAL 4-POINT HARNESS
A 4-point adjustable harness is included with
the TAC kit is that can be attached to the TAC.
This is optional but may help prevent operator
fatigue by supporting the weight of the TAC
and to help maintain the TAC in an optimal
operating position.
Unbuckle the four (4) loop ends from the
harness.
Feed each buckle cord loop through an
attachment point at each corner of the TAC.
Feed each buckle through its own cord loop and
pull it tight.
Reattach the four (4) loop-end buckles to the
harness.
Make sure that the two (2) harness straps with
the plastic loops are the ones attached to the
top two (2) attachment points.

12
Press and hold the TAC battery pack power
button for four (4) seconds, then release. Verify
that the center LED is lit, indicating that the
battery power is on.
Press and hold the TAC tablet power button for
two (2) seconds, then release. The tablet will
then display an animated Teal logo, indicating a
successful start-up.
Swipe up to start the Teal QGroundControl
(Teal QGC) application when prompted.
At this time, you can upload maps, create
missions, define safety parameters, and all
other user setting preferences, such as units of
measurement. Please see the TAC DETAILS
section for more information.
Press and hold the drone battery power button
for four (4) seconds, then release.
Verify that the center LED is lit, indicating that
the battery pack power is on.
Listen for exhaust fan start-up.
Verify that the illuminating side panel lights
turn on, indicating successful system start-up.
This will take approximately 15 seconds.
Verify gimbal start-up, indicated by its
movement to a properly centered level and
forward-facing position.
The TAC is built around a Samsung Galaxy Tab
Active Pro tablet PC running the Android
operating system. A number of Android
applications are installed on the TAC.
The Teal QGroundControl (Teal
QGC) app is launched upon
system bootup.
Touch anywhere along the top edge of the
screen and swipe downward.
A very narrow vertical gray side-bar menu tab
appears in the right edge of the screen.
Touch and slide this gray side-bar menu tab to
the left. This opens a vertical sidebar menu that
show the most recently used apps.
Touch this icon at the bottom right of
the sidebar menu to see all available
apps.
Touch the icon for the app that you would like
to launch.

13
NOTE: Most GE/TAC kits come
already paired and only need to
be reconnected. The system
remembers the relationship and
re-establishes link upon Teal
QGC launch.
The icon to initiate both the pairing and
connecting functions is the same and following
these instructions will result in a successful
connection between the Golden Eagle and TAC.
Please see the PAIRING section in GOLDEN
EAGLE sUAS DETAILS for more details/options.
Stand at least 25 feet away from the drone.
Ensure the GPS lock is acquired. This ensures
the correct flight mode.
NOTE: GPS lock is indicated by a
three-tone chime from the drone,
as well as indicated on the TAC
screen at the top satellite icon.
Open the Teal QGC application on the TAC.
Touch the SHIELD icon in the top-right
corner of the FLY SCREEN to
connect/pair the TAC with the drone.
Select CONNECT.
When the pairing is complete, a CONNECTION
SUCCESSFUL status will appear.
Click DONE to exit and return to the FLY
SCREEN. The vehicle ID should now be visible at
the top of the TAC screen.
Out-of-the-box,the Golden Eagle automatically
defaults to either Position Mode or Manual
Mode. Position Mode is the safest manual mode
for new pilots.
It will also default to Altitude Mode if it loses
GPS signal while in flight.
If the Golden Eagle acquires GPS before it is
paired with the TAC, the system will
automatically be set to Position Mode.
If the Golden Eagle is paired with the TAC
before it acquires the GPS, the system will
automatically be set to Manual Mode, but can
then be set to Position Mode by moving the left
castle switch up. The system can be set to
Position Mode both before and during flight.
The flight mode will be announced audibly from
the TAC as well as visibly at the top of the TAC
screen.
CAUTION!
Ensure that you are in the desired
flight mode before arming the
drone.
NOTE: GPS lock is indicated by a
three-tone chime from the drone,
as well as indicated at the top of
the TAC screen on the satellite
icon.
Additional flight modes can be programmed
but are recommended for only experienced
drone pilots. A brief description of each mode is
provided here.

14
Position Mode is an easy-to-fly mode and is the
safest manual mode for new pilots. Position
Mode controls the attitude, altitude, heading,
and horizontal position of the drone.
Position Mode requires GPS. All the joysticks,
switches, and buttons are the default functions
are detailed in the TAC CONTROLS
OVERVIEW.
The roll and pitch joystick controls speed over
ground in the left-right and forward-back
directions.
The throttle and yaw joystick controls speed of
ascent-descent and the rate of rotation on the
horizontal plane.
When the joysticks are released and centered,
the Golden Eagle will actively brake, level, and
be locked to a position in 3D space,
compensating for wind and other forces.
Instructions on how to program the joysticks,
switches, and button functions are found in
SETTINGS section of this manual.
Manual Mode is the most difficult flight mode
to operate in, as only the attitude and heading
are stabilized. Manual Mode is NOT pre-
assigned by default to any control on the TAC.
The roll and pitch joystick controls speed over
ground in the left-right and forward-back
directions.
The throttle and yaw joystick controls speed of
ascent-descent and the rate of rotation on the
horizontal plane.
When the joysticks are released and centered,
the Golden Eagle will NOT stop rotating around
the axis, nor be stabilized in any way.
Altitude mode is the safest non-GPS manual
mode for new pilots. Altitude mode controls
the attitude, altitude, and heading. The pilot
must control the horizontal position and the
drone is prone drifting with the wind if
uncorrected.
The roll and pitch joystick controls speed over
ground in the left-right and forward-back
directions.
The throttle and yaw joystick controls speed of
ascent-descent and the rate of rotation on the
horizontal plane.
When the joysticks are released and centered,
the Golden Eagle will level and be locked into
the current altitude and will continue to move
along with any wind currents.
RTL is not available in this flight mode.
Mission Mode will execute a predefined
autonomous flight plan that is created on or
uploaded to the TAC. The flight plans may be
uploaded before or during flight. Mission Mode
requires GPS. No user intervention is required in
Mission Mode.
CAUTION!
Any TAC stick movement will change
the drone from Mission Mode to
Position Mode.
WARNING!
The Golden Eagle sUAS is not
intended to perform acrobatic
maneuvers, such as flips, rolls, and
loops. Intentional aerobatics may
result in an unrecoverable loss of
control of flight, and all warranties
are void if attempted.

15
The fly screen automatically starts up when the
TAC is powered on. The fly screen is used to
command and monitor the drone and includes
the following functions:
•Run the automated pre-flight checklist,
if enabled
•Control missions
•Arm / disarm the drone, to include the E-
stop function
•Takeoff / land / Return to Launch (RTL)
•Go to or orbit a particular location
•Switch between the map view and video
view
•Display video, mission, telemetry, and
other information for the drone
The entire background of the fly screen can be
either map view or the video view. Tapping the
smaller screen in the left bottom corner will
swap the screens.
The map displays the position of the TAC, the
drone when paired, and the mission (when
programmed). The map can be repositioned
with a finger. The map automatically re-centers
after ten (10) seconds if the position of the
drone is moved off the screen.
To zoom in on the map, touch the screen with
two fingers and slide them apart. To zoom out
on the map, touch the screen with two fingers
and slide them together.
More in-depth information is in the FLY SCREEN
DETAILS section for guidance on what
functions are available in-flight.

16
The Main Toolbar horizontally spans the width
of the screen at the top of the Fly screen and
displays system information.
Status icons are displayed when Teal QGC is
connected to a vehicle. Some can be clicked on
to show detailed information.
These icons/indicators are:
VIEW-SELECT MENU
Touch the Teal logo at the far left
of the MAIN TOOLBAR to reveal a
vertical VIEW-SELECT MENU. This
menu allows the user to access the following
features, which are discussed more in detail
throughout the manual:
FLY: Control and monitor the drone and view
streaming video while in flight.
PLAN: Create autonomous missions.
ANALYZE: Download logs and access the
MAVLink console.
VEHICLE SETUP: Configure and tune the
vehicle.
PHOTOS: Manage downloaded photos, and
view photo metadata.
SETTINGS: Configure the Teal QGC app.
PAIRED VEHICLE IDENTIFIER
This icon displays the UID
(Unique Identifier) of the paired
vehicle. If a vehicle is showing
here, then the telemetry link between the TAC
and drone is established.
FLIGHT MODE INDICATOR
The flight mode indicator displays which flight
mode the system is in. Touch this icon to display
a drop-down menu to select either Altitude
Mode or the Position Mode.
This is an alternative to selecting the flight
mode via the left castle switch.
ARMED / DISARMED STATUS
Centered on the Main Toolbar is an indicator of
whether the vehicle is currently armed or
disarmed. Touch this icon to display a
confirmation slider box to arm (if currently
disarmed) or disarm (if currently armed) the
drone.
This is an alternative to the left top button
which arms the drone, and the right top button
which disarms the drone (also known as the
Emergency Stop or E-stop).
PAIRING ICON / SHIELD ICON
Touch the shield icon to view
information about the connected
vehicle. Touch the shield icon to
connect/pair the Golden Eagle and the TAC, or
to unpair/disconnect the TAC from the drone.
NOTE: Loss of link between the drone
and TAC will result in an “SOS” tone
from the drone.
REGION OF INTEREST ICON
This is currently under development.
GPS STATUS ICON
The upper number of the icon
indicatesthe satellite count, and the
lower number indicates the current
horizontal dilution of precision (HDOP) value. A
very good HDOP value is below 1, and an
acceptable HDOP value is below 2.
Touch this icon to view details of GPS Count,
GPS Lock, HDOP, the Vertical Dilution of
Precision (VDOP), and Course Over Ground
(COG).
GPS LOCK: Indicates the type or level of GPS
lock currently.
COG: Indicates the compass direction the
vehicle is traveling. Note that this may or may
not be the same as the “heading” which is the
compass direction the vehicle is pointed. Wind
may cause the COG to differ from the vehicle’s
actual heading.

17
CAUTION!
It is critical for Golden Eagle to be
connected to a sufficient number
of satellites to be able to
triangulate the position of the
vehicle. It is critical to have at least
eight (8) but recommended that
ten (10) satellites are indicated on
the GPS icon prior to takeoff.
TELEMETRY RSSI ICON
This is currently under development.
RC RSSI ICON
This icon indicates the radio signal
strength as is common on
consumer cell phones.
Touch this icon to view the RSSI values for the
TAC signal strength at the vehicle (MK1 RSSI),
and the vehicle signal strength at the TAC (TAC
RSSI).
BATTERY ICON
This icon conveniently shows the
battery charge level of the drone
(the TAC’s battery charge level is
checked by tapping the battery
power button on the back of the TAC).
Touch this icon to view the vehicle
battery’s current voltage level and the
accumulated amount of power
consumed by the vehicle (in mAh) in
this session.
CAUTION!
The drone will not arm
when the battery pack
charge level is 20% or less.
VEHICLE MESSAGES ICONS
This icon notifies the use of any
operator messages. It is grayed-out
until there is an operator message at
which point it turns to blue, or changes to a
warning icon in the case of a critical message.
Touch the icon to view the messages.
Closing (X) this window turns the warning icon
back into the gray horn icon.
Old messages can be reviewed by touching the
gray icon. All messages will remain until the
user permanently deletes them by touching the
trash can symbol in the lower right-hand corner
of this window.
CAUTION!
Messages cannot be individually
deleted. All messages will be
deleted if this function is selected.
The FLY TOOLS box is fixed vertically near the
upper left-hand corner of the FLY SCREEN.
These functions found in the Fly Tools are the
Pre-flight checklist, Takeoff, Land, and
Return/Return to Launch (RTL).
The Pause function causes the drone to hover
and can be used in most operations, to include
takeoff, land, orbiting, etc.
The Action button offers additional options, to
include changing the altitude, and starting and
resuming a mission.
More detailed information can be found in the
PRE-FLIGHT, IN-FLIGHT, LANDING, and TAC
DETAILS sections, depending on the function.

18
Use the GENERAL SETTINGS screen to
customize user preferences. The most
commonly used ones are referenced here. For a
more complete list, please see the TEAL QGC
APP section.
Touch the MENU icon in the top left
of the screen.
Select GENERAL.
A list of several settings will appear.
UNITS: Allows selection between feet and
meters, imperial and metric, and Celsius and
Fahrenheit.
MISCELLANEOUS: Select your language,
dark/light mode, map provider and map type,
etc.
NOTE: As of the publication of
this manual, a software bug has
made selecting a different
language not an option at this
time and is being investigated.
DATA PERSISTENCE: Disabling this option will
result in telemetry logging and map tile caching
to not be written to disk. This can be useful for
security reasons but can also result in
unintentional data loss.
TELEMETRY LOGS FROM VEHICLE: Saves
telemetry logs in different formats to the
vehicle which can later be downloaded to the
TAC, to include logs in a CSV format for
importing data into other programs for data
analysis, such as spreadsheets.
FLY VIEW: These user preferences include using
the pre-flight checklist, centering the map on
vehicle, setting gimbal joystick and slider
speeds.
PLAN VIEW: Entering the DEFAULT MISSION
ALTITUDE value here sets the altitude in the
Plan screen at which missions fly by default,
unless otherwise specified.
VIDEO & VIDEO RECORDING: These
preferences are still under development.
PICTURE SETTINGS: Configures full-resolution
images whenever a snapshot is taken. Check
the DOWNLOAD FULL RES IMAGE IN FLIGHT
box.
CAUTION!
Enable all photo functions before
flight or else they will not be stored
locally on the TAC and will not be
transferrable after the mission.
TEAL QGC SOFTWARE VERSION: The current
version of the Teal QGC software version that
has been downloaded onto the TAC is shown
here. See the TEAL UPDATER APP section for
instructions to update the software/firmware.

19
Maps need to be downloaded for each area only
once. We recommend you download maps
before going into the field. This can be done
while in the field as long as there is a wi-fi
connection.
Follow along with our instructional video,
Downloading Offline Maps: Teal Golden Eagle
Drone on our website at:
https://tealdrones.com/support/video/
NOTE: “Offline maps” is the name
given to the maps on the TAC.
There are no “online” maps.
Different map areas are called
“Tile Sets”.
INSTRUCTIONS
Touch the TEAL SETTINGS icon to launch the
app.
Change the Active network from DRONE to
WIFI.
Login into the WIFI system with the
appropriate login credentials.
Open/Enlarge the QGC app by sliding the
SETTINGS screen all the way to the right.
Touch the MENU icon in the top left
of the screen.
Select SETTINGS at the bottom left of the
screen.
Select OFFLINE MAPS.
Select ADD NEW SET.
Set and zoom to the area that you would like to
save.
Create a name for map set in
the ADD NEW SET field.
Set the desired map type.
Check the FETCH
ELEVATION DATA box to
include elevation data with
the tile set.
Select DOWNLOAD when
finished.
NOTE: The TOO MANY TILES
error appears and the download
button is grayed out if the
estimated memory usage is too
large. Zoom out to reduce the tile
size. We recommend keeping the
tiles between 50-80 MB.
Touch the MENU icon in the top left
of the screen.
Select the FLY button.
Reconnect to the drone by going back into the
TEAL SETTINGS app and switching back to
DRONE from WIFI.
Once the TAC acquires the GPS signal, the map
screen will automatically load that tile set, so
long as the map provider in the general settings
match your tile set.
File sets are downloaded for
planning and running missions in
specific geographic areas.
Depending on the mission type
and location, cyber security best
practice dictates that these prior
tile sets should be deleted from
the TAC.
Other RED CAT Drone manuals
Popular Drone manuals by other brands

Parrot
Parrot Disco FPV user guide

Propel Trampolines
Propel Trampolines SNAP 2.0 Instruction booklet

Carrera RC
Carrera RC Micro Quadrocopter II Assembly and operating instructions

dji
dji INSPIRE 2 Disclaimer and safety guidelines

Sharper Image
Sharper Image 205092 quick start guide

Potensic
Potensic Dreamer 1 user manual