Redrock Micro DIGIBOOM User manual

Redrockmicro.com/digiBoom
R
USED BY
• Get Impossible shots– DigiBoom reaches any target,
moves quickly, and gets angles and shots only now
possible
• Elevate your game - Extend the pole up to 8 feet to get
shots of the tallest on the court, a crowded field and even
places where stationary cameras aren’t practical
• Operate above the crowd – Get in front of, above, below,
or around any obstacles with total control of angle and
position
• Perfect new moves– Create dynamic and premium
cinema-style shots with smooth gimbal stabilization that
will have people saying
“How did they do that?“
• Complete Control– of camera settings, gimbal
operation, and monitoring all in your hands
• Minimal training - enables broadcast quality and
delivery of totally unique content from day one
• Modular for many different setups – Jib, drone-like,
Steadicam, and handheld all with one rig
• Broadcast workflow and quality– Whether live or
pre-recorded it provides industry-standard video,
audio and wireless with connectors and accessories
ENERGIZE YOUR LOCATION SHOTS,
BREAKING NEWS, AND SPORTS FOOTAGE
With even shorter attention
spans and intense competition
for viewers, how can you
differentiate your news or sports
broadcast when location footage
all looks the same?
All logos, trademarks and product images
are owned by respective owners
DigiBoom is protected by patents 9,311,214
9,454,064 and patents pending 14/172,442
14/934,043 15/275,604 15/429,666
15/639,362 china patent 201610096276.3
EP16183612,7
DigiBoom easily integrates with existing broadcast
workflow, whether plugging in live to the production
truck or recording b-roll. All the codecs, resolutions,
and connectivity is there so DigiBoom is up and
running on day one.
DigiBoom can be used with any supported camera
and display. To get the most from DigiBoom we
recommend Blackmagic Video Assist and Micro
Studio Camera 4K, the world’s smallest broadcast
quality live production camera.
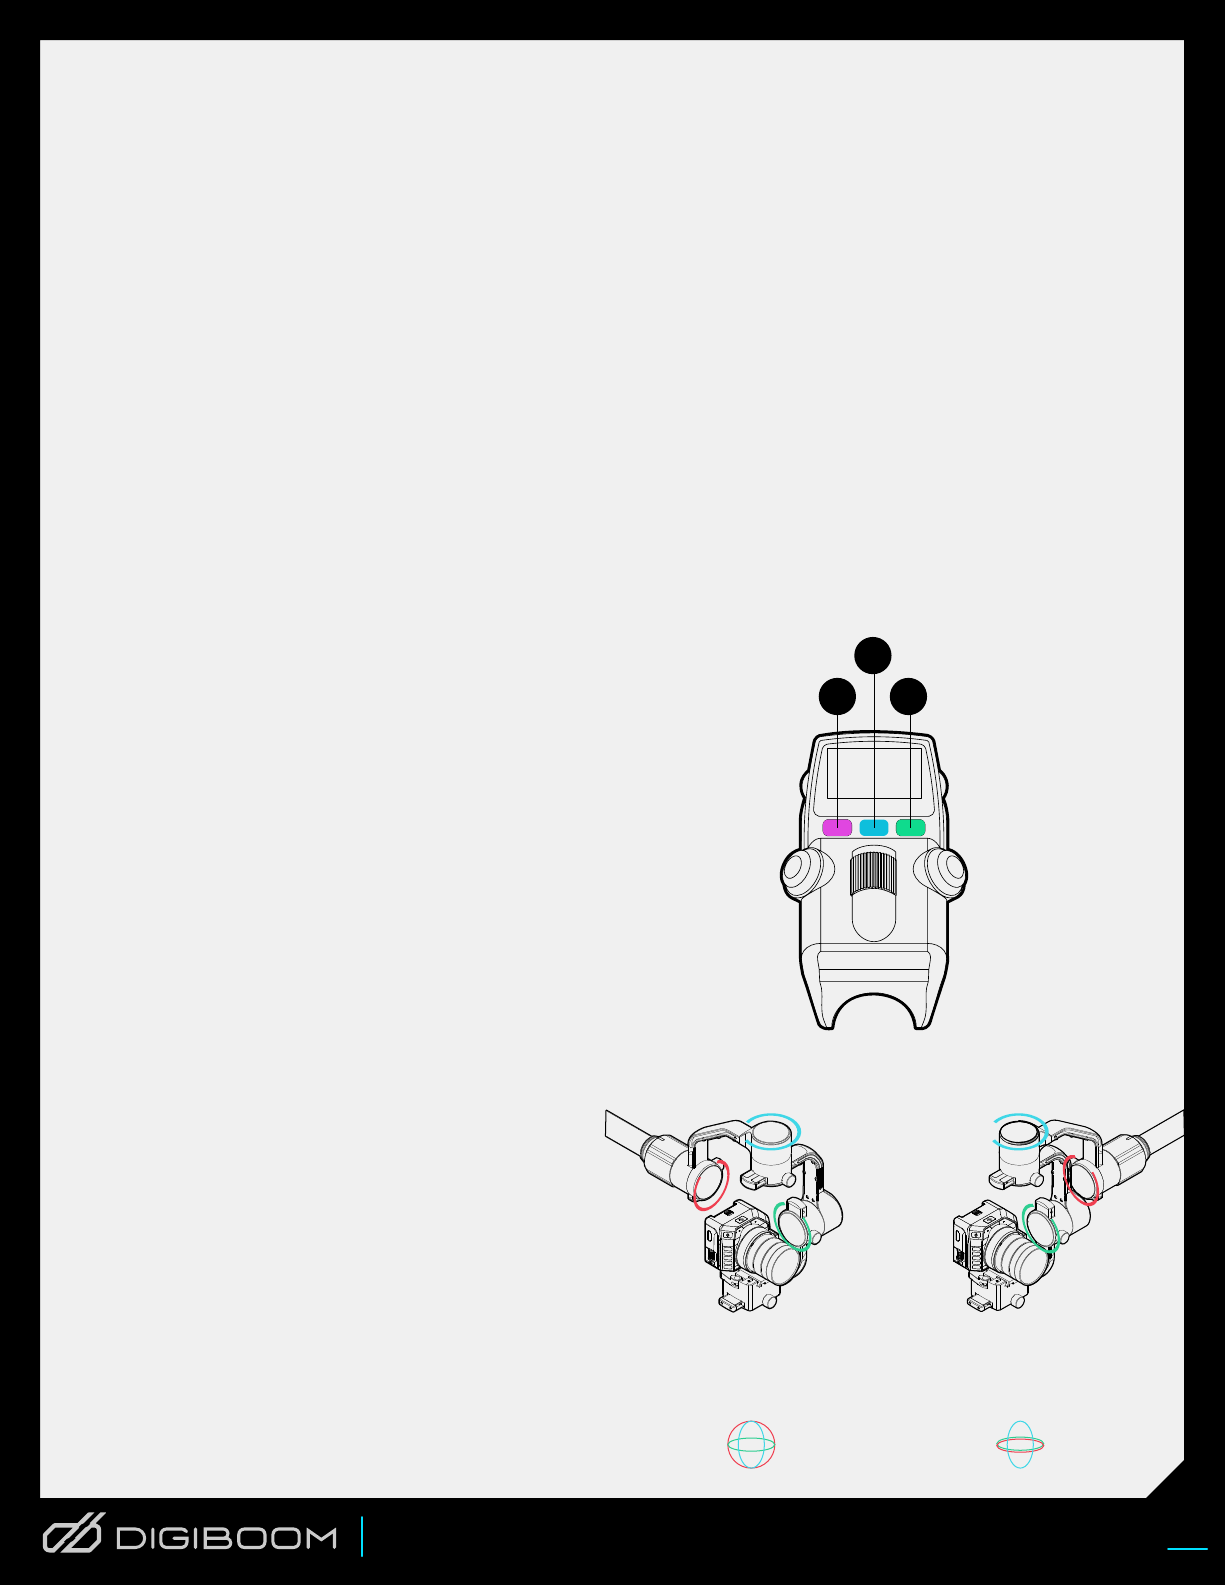
The unique connectivity of the microStudio gives
DigiBoom operators control over all camera
functions directly from the handgrips. The Video
Assist offers operator monitoring, recording to
internal SD cards and SDI pass through for live
broadcast.
DIGIBOOM WORKS WITH
YOUR CURRENT WORKFLOW
DESIGNED FOR FAST-MOVING
PRODUCTIONS AND SMALL CREWS
DIGIBOOM BENEFITS:
DigiBoom doesn’t require additional crew or
specialized skills, and can be learned in a few hours
of practice. Familiar camera controls and functions
are similar to traditional ENG cameras, and gimbal
controls are intuitive and responsive.
Solo camera operators are more productive and
creative, still getting the key shots, but now with
options for unique dynamic footage. The highly
mobile rig means shots and angles can be easily
improvised for fast-moving news or on-the-spot
creative choices.
BETA USER GUIDE
v 1.1 2019

2
Before powering on, make sure there is plenty
of free space around the gimbal. Digiboom
enters a 3-part homing phase on power up
USER GUIDE
QUICK START
BALANCE GIMBAL
ATTACH GIMBAL HEAD
CONNECT BATTERIES
AND POWER ON
4
Attach gimbal head to Digiboom.
More info page 4.
- Mount camera to gimbal
- Mount microphone and cables
- Mount monitor to Digiboom
- Plug in hand controllers
MOUNT CAMERA, MONITOR,
AUDIO, AND ACCESSORIES
Your Digiboom should
already be balanced.
After all your accessories
have been mounted,
confirm that gimbal is
still in good balance.
Sony BP style batteries
run in parallel so you need
both to operate. They are
not hot-swappable.
To insert face the battery’s power
connections downwards - slide in to the
battery box, and press down until the
lever clicks. Repeat for second battery.
To remove push the lever in, lift up on the
battery to dismount, then pull out.
Or if you prefer an external power, you
can use the XLR port and our
XLR-to-p-tap adapter cable to power the
unit from your existing standard 14.4v
p-tap batteries.

3
USER GUIDE
OVERVIEW
BOTTOM CONTROL
CONTROL PANEL
EXTENDABLE POLE
TOP CONTROL
J1
J2
J3
3 AXIS GIMBAL
Digiboom is made up of four main sections:
1) Detachable 3 axis gimbal, 2) Hand
Controllers, or UI-1 and UI-2, 3) Extendable
carbon fiber pole, and 4) the battery box.
In addition, Digiboom can be expanded with
the Audio Expansion Kit, Live Broadcast SDI
cable pack, XLR p-tap power cable, Micro
Shock Mount, and Digiboom pole extension
This grip controls gimbal
pan/tilt/roll, pause/resume
gimbal, camera
record/stop. More details
page 6.
Lightweight carbon fiber pole can be
extended or retracted at any time, even
when Digiboom is running. Release the
pole segment lever, slide the pole in or
out, and re-tighten lever. Ensure pole
levers are always tight.
This guide refers to each motor joint in order
of distance from the pole. The roll axis is
closest, so it is J1. The pan axis is next, J2,
followed by the tilt axis, J3.
This grip controls Focus,
Iris, camera gain, camera
menus, and more. More
details page 6.
Use the OLED screen to
monitor battery levels,
change modes (high/low
etc.) and more.
1. Power Switch
2. Batteries (Sony BP style)
3. Battery Release Switch
4. External Power In
5. Fuse
6. Audio OUT (Channel 1 and 2)
7. Audio IN (Channel 1 and 2)
45 6 7
SPORT low vv
RL
14.0v 14.0v
The
gimbal
detaches
from the
pole for
storage.

USER GUIDE 4
INITIAL SETUP
Line up the LED indicator on
the top of the gimbal with the
top of the Digiboom.
Push in to click, then tighten
the knurled ring until its tight.
Push up the rubber gasket
ATTACH GIMBAL
HEAD
Connect hand units and battery box using the
included cables (A & B). Cables are locking
push-pull style cables, and are keyed to
prevent incorrectly plugging them in.
Rotate cable until the connectors match up,
and push in until it clicks. To remove cables,
pull outwards on the jacket while removing.
Only attach and remove by holding the metal
jacket, never from the cable itself
The 2 hand controls are designed to be moved
anytime without being locked down, but stay
in place when gripped. There is no lock on
handgrip position, this is normal.
CONNECT COMPONENTS
A
B
Before powering on, make sure there is plenty
of free space around the gimbal. Digiboom
enters a 3-part homing phase on power up

USER GUIDE 5
TURNING ON DIGIBOOM
TURNING ON MONITOR
POWERING ON
The blackmagic monitor does not power on
automatically and needs to be powered on by
pushing the power button on the right side of the
monitor.
EXTENDING/RETRACTING
THE POLE
Once digiboom is running, you can extend or retract
the pole by releasing the pole segment lever, sliding
the pole in our out, and re-tightening the lever.
Ensure the pole levers are always tight.
Make sure everything is connected and batteries are
inserted and fully charged.
On power up the gimbal will go through a 3-part homing
phase by turning each axis. Make sure there is plenty of
free space around the gimbal so that it can perform this
function unobstructed. Note: each axis will not necessarily
turn the full extent it’s capable of: this is normal
Press the power button on the battery box. Blue light
indicates Digiboom is on.
Once the homing phase is done, the gimbal should go to
home position, with the camera facing forward and straight
Note: Before use, let the gyros warm up for about a minute
after startup. The horizon may be a little off at first, it takes
DigiBoom a few minutes to orient itself and establish the
horizon. This is normal.
Before powering on, make sure there is plenty
of free space around the gimbal. Digiboom
enters a 3-part homing phase on power up

USER GUIDE 6
ACCESSING
CAMERA MENU
*
Press the menu button (A) to
enter camera menu. Then use the
Joystick (J) to navigate the
menu. Press UP/DOWN to scroll,
and LEFT/RIGHT to set.
Note: If Digiboom isn’t speaking to
camera functions as it should,
make sure ‘Generic Command’ is
set to S.Bus 16 in the camera
menuing.
HAND CONTROLS
TOP
BOTTOM
CD
F
I
Z
J
A
B
C
D
F
I
Z
J
Camera Menu *
Gain
Gimbal Standby
Camera run/stop
Focus
Iris
Zoom
Gimbal Pan/Tilt/Roll
AB

USER GUIDE 7
HIGH/LOW
ORIENTATION
Orientation determines if the gimbal sits above or
below the camera. In either High or Low, DigiBoom
has tremendous range of motion and height, so in
many situations either mode works just fine. There
are some circumstances where one mode would be
preferable.
On the top grip, press the middle soft key to toggle
between High and Low modes. The current mode will
be displayed on the screen directly above the softkey.
High Orientation - The gimbal sits above the
camera, and is ideal for higher-angled
shots and birds-eye views, particularly
when the camera is angled downwards. In
many circumstances, DigiBoom is used to
‘get above the action’ so high orientation is
the typical use.
When the softkey is pressed, Digiboom will
automatically spin the gimbal into place.
Make sure you have enough room around
the gimbal head before switching modes.
HIGH ORIENTATION
Low Orientation - The gimbal sits below the
camera, and is better suited for low-angle
shots or grounds-eye views, particularly if
the camera is pointed upwards
In either orientation, the gimbal joystick can be used in conjunction to
fine tune the camera’s position or take more control over pans and tilts
LOW ORIENTATION
SPORT low world
RL
14.0v 14.0v

USER GUIDE 8
DigiBoom offers great options for audio,
whether you are recording ambient for
B-roll, or live broadcast with multiple
microphone inputs.
DigiBoom features a unique 2 channel
audio bus built into the DigiBoom’s pole.
This ensures all audio travels with the
video, eliminating any a/v sync issues.
Common Audio Setups
below and next page.
Ambient Audio Using In-camera Mics
Using the Blackmagic micro studio 4k camera’s built in
stereo mics is the simplest way to include ambient
audio with your video. The camera’s built-in
microphones are surprisingly good quality and
acceptable for background audio on b-roll type footage.
Leave the DigiBoom’s audio bus completely unplugged,
and have nothing plugged in to the camera’s microphone
port.
You can set audio levels and microphone sensitivity in
the camera audio menus
Ambient Audio Using On-camera Mic
If you prefer to use an on-camera external microphone,
attach the Rode videomicro mic to the DigiBoom’s third
gimbal arm using the DigiBoom ultra low profile shock
mount.
Plug in the microphone directly to the camera’s mic
input, bypassing the DigiBoom audio bus.
You can set audio levels and microphone sensitivity in
the camera audio menus
DIGIBOOM AUDIO
Audio Setups Continued Next Page
RODE MIC
(mounted) Camera Audio Settings
Automatic Gain Control
Audio Input
Microphone Level
Input Levels
Ch 1 Input
Ch 2 Uses Ch 1 Input
Ch 2 Input
*Adjust levels as needed
Off
Inputs
50%*
Mic High
50%*
Yes
50%*
Camera Audio Settings
Automatic Gain Control
Audio Input
Microphone Level
Input Levels
Ch 1 Input
Ch 2 Uses Ch 1 Input
Ch 2 Input
*Adjust levels as needed
Off
Camera
50%*
Line
50%*
Yes
50%*

USER GUIDE 9
AUDIO
IN
AUDIO
OUT
AUDIO
IN
AUDIO
OUT
External Reporter ‘Stick Mic’ Only
A common setup for news and interviews is to have a
(typically wireless) stick mic the reporter holds, and
uses to interview people or give live updates.
To set this up, take the XLR output of the wireless
receiver and route it into Input 1 of the DigiBoom’s XLR
inputs. Flip the channel’s XLR switch to “EXT” so the
external input will be routed into the camera
Attach an audio cable from the DigiBoom audio bus
output (beneath the camera) to the camera’s mic
input.
Adjust the camera settings so input 2 mirrors input
1, so the audio will not be limited to left or right
channel.
CAM EXT
STICK MIC
WIRELESS
RECEIVER
(mounted)
2 Channel: Ambient Audio + Reporter ‘Stick Mic’
This is the best setup when DigiBoom is primarily used
for reporters/interviews. Adding a field mixer to your
DigiBoom enables you to balance ambient mic with the
reporter’s stick mic. Although it’s not required, we
highly recommend using a mixer.
To set this up, first attach a compatible field mixer to
the Digiboom’s pole using the attachment clamps from
the Audio Expansion Pack. Attach the XLR outputs 1 and
2 from the mixer to the DigiBoom’s audio bus. Flip each
channel‘s’ XLR switch to ‘EXT.’
Attach the Rode videomicro mic to the DigiBoom’s third
gimbal arm using the DigiBoom ultra low profile shock
mount. Plug in the mic’s output to the Audio IN beneath
the camera. Plug in the camera mic input to the Audio
OUT beneath the camera.
Attach the wireless receiver to the DigiBoom’s audio
bracket. Take the XLR output of the wireless receiver
and plug it to the mixer’s input channel 1.
Plug XLR cable from DigiBoom output channel 2 into
the mixer’s second XLR input.
Use the mixer’s levels to adjust the balance between
reporter microphone and ambient on-camera
microphone.
Now both the ambient on-camera mic and the
reporter mic stick are both set up, and are routed
back to the camera. Video and audio now travel
together, and eliminate sync issues.
CAM EXT
CAM EXT
STICK
MIC
WIRELESS
RECEIVER
(mounted)
MIXER
(mounted)
OUT IN
RODE MIC
(mounted)
Camera Audio Settings
Automatic Gain Control
Audio Input
Microphone Level
Input Levels
Ch 1 Input
Ch 2 Uses Ch 1 Input
Ch 2 Input
*Adjust levels as needed
Off
Inputs
50%*
Line
50%*
No
50%*
Camera Audio Settings
Automatic Gain Control
Audio Input
Microphone Level
Input Levels
Ch 1 Input
Ch 2 Uses Ch 1 Input
Ch 2 Input
*Adjust levels as needed
Off
Inputs
50%*
Mic High
50%*
Yes
50%*
*Rode mic requires power. When using a
mixer, make sure to enable Phantom Power.

USER GUIDE 10
USING DIGIBOOM
DIGIBOOM MENU
Push dial on the side of the Top Hand Control to enter
Digiboom menu. Menu items include:
SINGULARITY
Singularity occurs when the gimbal is
panned to such an extreme that two
motors are working on stabilizing the
same axis. Digiboom will still perform
in singularity, but you will be shooting
without one axis of stabilization.
MODES
CAM ID
Use to set gimbal horizon. Press the joystick left or right to
set the horizon, then hit enter to set.
* After the startup homing phase, horizon should
automatically set after about a minute.
GYRO CAL
Calibrate the gyros. Use as a troubleshooting measure.
REVERSE PAN
REVERSE TILT
PAN/TILT SPEEDS
PAN SPEED
SPORT MODE
Stiffens gimbal motors. Good for running or
when you expect large disturbances. Press
soft key 1 to toggle.
SMOOTH MODE
Digiboom’s default mode. Good stabilizations
for most scenarios. Press soft key 1 to
toggle.
WORLD MODE
Locks on to a direction to matter where the
pole is. Press soft key 3 to toggle.
MAJESTIC MODE
Points forward. Will pan with the pole. Press
soft key 3 to toggle.
1
2
3
The gimbal’s peak state.
Each axis is independent of
the other two axes.
J1 and J3 are stabilizing
the same axis, leaving the
roll axis unstabilized.
3 AXES OF STABILIZATION SINGULARITY
Table of contents
Other Redrock Micro Camera Accessories manuals

Redrock Micro
Redrock Micro Halo Solo Complete User manual

Redrock Micro
Redrock Micro Scout HS User manual

Redrock Micro
Redrock Micro Scout HS Troubleshooting guide

Redrock Micro
Redrock Micro Navigator User manual

Redrock Micro
Redrock Micro microRemote System User manual

Redrock Micro
Redrock Micro ATLAS User manual