Regent DAB+151 User manual

1
Instrukcja obsługi wer. 1
Przeczytaj w pełni niniejszą instrukcję przed użyciem urządzenia.
FM |DAB+ |BT digital radio with bass reex

2 3
Dziękujemy za zakup produktu Regent. Szczególną wagę przywiązujemy do
NIEZAWODNOŚCI, ŁATWOŚCI OBSŁUGI oraz DESIGNU naszych produktów.
Mamy nadzieję, że cyfrowe radio DAB+ przypadnie Państwu do gustu.
Twój produkt
Zawartość pudełka
• 1 radio Regent DAB+151
• 1 ładowarka sieciowa
• 1 instrukcja obsługi
Charakterystyka techniczna
• Tuner DAB+/FM/Bluetooth
• Zakres fal: FM i DAB+
• Częstotliwość radiowa FM: 87,5 do 108MHz
• Cyfrowa częstotliwość radiowa: od 174,928 do 239,200MHz
• Zakres częstotliwości: 2402MHz - 2480MHz
• Emitowana moc: 0,5mW
• Ekran z wyświetlaczem LCD: wyświetla nazwę stacji i tekst nadawany przez stacje radiowe
• Zaprogramowane stacje: 20
• Moc dźwięku: 5W
• Antena teleskopowa
• Wersja Bluetooth: 4.2
• Zasięg Bluetooth: 7 metrów
• Zasilacz sieciowy
• Model: FJ-SW126K0901 000DE
• Wejście: 100-240V, 50/60Hz, 0,4A maks
• Wyjście: 9V 1A
PL
Opis urządzenia
1. STBY (STANDBY): Włącz lub wyłącz radio.
2. INFO/MENU: Wyświetl informacje o stacji lub przejdź
do ekranu ustawień menu głównego.
3. PREVIOUS: Wróć do ostatniego wyboru, zmniejsz częstotliwość
lub wyszukaj najsilniejszy poprzedni sygnał.
4. PRESET: Dostęp do zaprogramowanych stacji.
5. VOLUME+/-: Pokrętło regulacji głośności.
6. MODE: Naciśnij ten klawisz kilka razy, aby zmienić tryb odtwarzania.
7. ENTER/SCAN: Potwierdź wybór lub rozpocznij skanowanie.
8. NEXT: Przejdź do następnego wyboru, zwiększ częstotliwość
lub wyszukaj następny najsilniejszy sygnał.
9. SLEEP: Włącz tryb gotowości.
10. WYŚWIETLACZ: Ekran wyświetlacza.
panel przedni
11. Antena teleskopowa.
12. Zasilanie 9V DC.
panel tylny

4 5
Instrukcja użycia
PRZED UŻYCIEM URZĄDZENIA PROSIMY O UWAŻNE
PRZECZYTANIE TEJ INSTRUKCJI I JEJ ZACHOWANIE, ABY
MOŻNA BYŁO PÓŹNIEJ SIĘ DO NIEJ ODWOŁYWAĆ.
Ogólne instrukcje
Części tego urządzenia nie mogą być naprawiane lub wymieniane przez użytkownika.
Naprawy i konserwacja mogą być wykonywane wyłącznie przez wykwalikowany
personel. Jakikolwiek demontaż urządzenia powoduje utratę gwarancji użytkownika.
• Sprawdź, czy napięcie zasilania pokazane na tabliczce znamionowej
zasilacza jest zgodne z napięciem instalacji elektrycznej.
• To urządzenie nie może być używane przez dzieci bez nadzoru.
Upewnij się, że dzieci nie bawią się urządzeniem.
• Nie używaj urządzenia:
• jeśli kabel zasilający jest uszkodzony,
• jeśli urządzenie nie działa prawidłowo,
• jeśli urządzenie zostało w jakikolwiek sposób uszkodzone.
• Upewnij się, że przewód zasilający nie jest zgnieciony ani uwięziony, szczególnie
wokół wtyczek, gniazdek i punktu połączenia z urządzeniem.
• Nie otwieraj urządzenia pod żadnym pozorem.
• Nigdy nie używaj ostrych przedmiotów, aby uzyskać dostęp do wnętrza urządzenia.
• Odłącz urządzenie podczas burzy lub podczas długich
okresów nieużywania, aby uniknąć uszkodzenia.
Kongurowanie urządzenia
• Ustaw urządzenie na płaskiej, suchej i stabilnej powierzchni.
• Nie umieszczaj tego urządzenia w pobliżu źródeł ciepła, takich jak kaloryfery, wyloty
gorącego powietrza, piece lub inne urządzenia (w tym wzmacniacze), które generują ciepło.
• Nie umieszczaj urządzenia w pobliżu źródeł otwartego ognia (na przykład zapalonej
świecy), nie umieszczaj źródeł otwartego ognia na urządzeniu lub w jego pobliżu.
• Nie stawiaj urządzenia na wibrującej powierzchni.
• Zawsze podłączaj urządzenie do gniazdka sieciowego, które jest łatwo dostępne.
• Używaj tego urządzenia w umiarkowanym środowisku. To urządzenie
nie może być używane w klimacie tropikalnym.
• Urządzenie należy wyłączyć przed odłączeniem kabla od adaptera.
• Nigdy nie odłączaj urządzenia od zasilania ciągnąc za
przewód zasilający, ale trzymając za wtyczkę.
• Jeśli urządzenie nie działa normalnie, zwłaszcza jeśli wydaje dźwięki lub
zapachy, które wydają się nienormalne, natychmiast odłącz je od zasilania
i przekaż do sprawdzenia wykwalikowanemu technikowi.
PL
Trzymaj z dala od wody
• Nie pozwól, aby płyny dostały się do urządzenia i nie stawiaj na nim
przedmiotów zawierających płyny (na przykład wazonu).
• Nie wystawiać tego urządzenia na działanie deszczu, wilgoci i pryskającej wody.
• Nigdy nie zanurzaj urządzenia w wodzie ani innym płynie.
• Nie używaj tego urządzenia w pobliżu wody lub jakichkolwiek źródeł
wilgoci, takich jak wanna, zlew, zlew kuchenny, basen, w mokrej
piwnicy lub w jakimkolwiek innym wilgotnym miejscu.
Ostrzeżenie dotyczące wentylacji
• Urządzenie to należy ustawić w miejscu lub pozycji, które nie mają wpływu
na jego właściwą wentylację. Zawsze zostawiaj 10 cm wolnej przestrzeni
do wentylacji wokół urządzenia. Upewnij się, że otwory wentylacyjne nie są
zasłonięte przedmiotami, takimi jak gazety, obrusy, zasłony itp. Urządzenia tego
nie wolno nigdy umieszczać w meblach bez wystarczającej wentylacji.
• Nie wkładaj żadnych przedmiotów do otworów wentylacyjnych.
Czyszczenie urządzenia
• Przed czyszczeniem odłącz odbiornik od prądu.
• Czyść urządzenie z zewnątrz za pomocą szmatki lekko
zwilżonej wodą i łagodnym detergentem.
• Nie używaj rozpuszczalników, takich jak alkohol, benzen lub rozcieńczalniki:
te produkty mogą uszkodzić obudowę urządzenia.
Wyposażenie elektroniczne
• Twoje radio Bluetooth wykorzystuje technologię Bluetooth. Nadaje
i odbiera częstotliwości radiowe (HF) około 2,4 GHz.
• Te emisje o wysokiej częstotliwości mogą zakłócać działanie wielu urządzeń elektronicznych.
Aby uniknąć wypadków, wyłącz radio Bluetooth, gdy przebywasz w następujących miejscach:
• miejsca, w których występuje łatwopalny gaz, w szpitalu, w pociągu, samolocie lub na
stacji benzynowej, w pobliżu automatycznych drzwi lub alarmów przeciwpożarowych,
• obszary wybuchów.
• Jeśli masz rozrusznik serca lub inne sztuczne części, poproś lekarza o poradę.
Podłączanie do gniazdka sieciowego
Podłącz jeden koniec kabla zasilającego do złącza zasilania 9V DC znajdującego się z tyłu
urządzenia, a następnie podłącz drugi koniec do gniazdka elektrycznego. Upewnij się, że
zasilanie w Twoim domu jest zgodne z tym podanym na tabliczce znamionowej urządzenia.
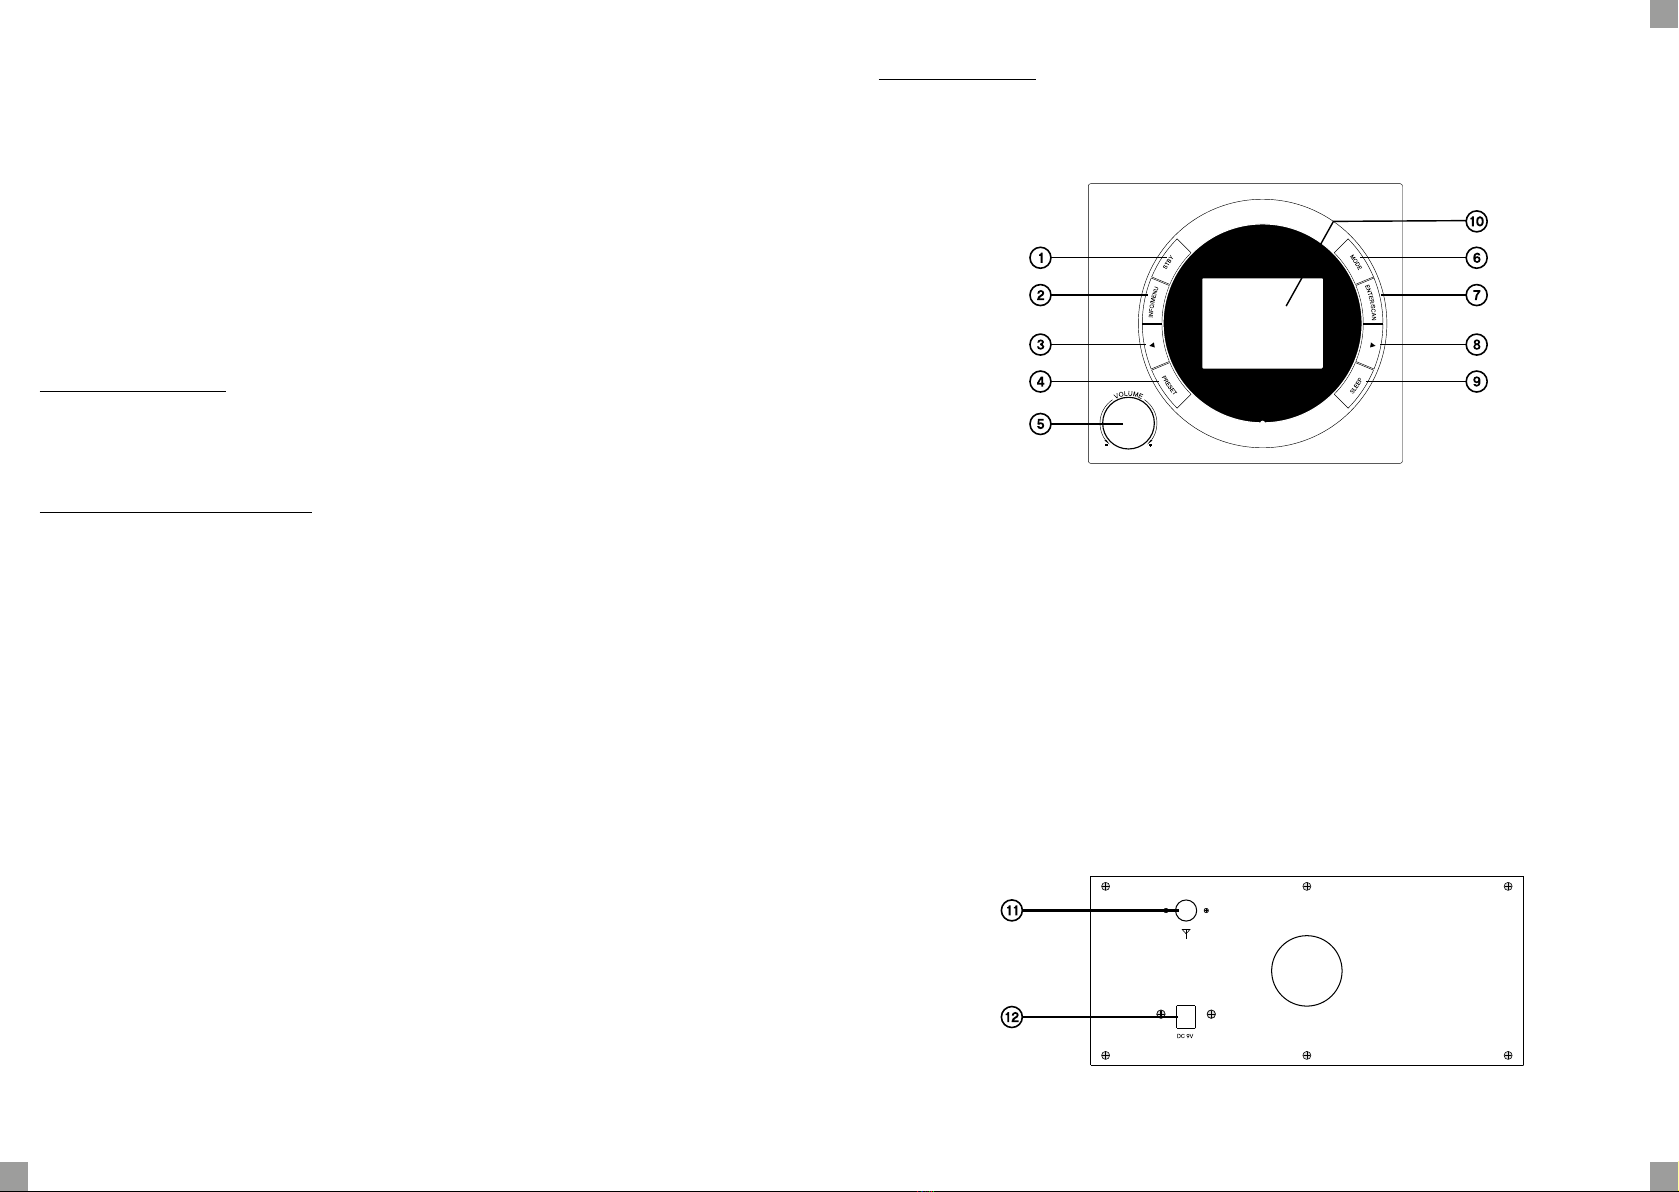
instalacja

6 7
podstawowe zastosowanie
Korzystanie po raz pierwszy
Ustawienie języka jest wyświetlane po włączeniu radia po raz pierwszy. Użyj przycisków
◄i ►oraz ENTER/SCAN, aby wybrać język. Następnie urządzenie powraca do ekranu
gotowości. Naciśnij przycisk STBY (tryb gotowości), aby rozpocząć skanowanie. Na ekranie
wyświetlany jest pasek postępu wskazujący postęp wyszukiwania i liczbę znalezionych
stacji radiowych. Po zakończeniu wyszukiwania radio nadaje pierwszą znalezioną stację.
Ustawianie menu głównego
Naciśnij i przytrzymaj przycisk INFO/MENU, aby uzyskać dostęp do ekranu ustawień menu
głównego. Użyj przycisków ◄lub ►oraz ENTER/SCAN, aby poruszać się między różnymi
opcjami menu. <Ustawienia czasu>, <Alarmy>, <Uśpienie>, <Podświetlenie>, <Język>,
<Wersja oprogramowania>. Wybierz jedną z opcji, a następnie naciśnij ENTER/SCAN.
Włączanie odbiornika
Aby włączyć radio, naciśnij przycisk STBY. Aby wyłączyć radio, naciśnij ponownie przycisk
STBY. Uwaga: radio automatycznie przejdzie w stan uśpienia po 15 minutach bezczynności.
Informacje o stacji
Naciśnij przycisk INFO/MENU, aby wyświetlić informacje o stacji.
Ustawianie podświetlenia ekranu
Możesz ustawić czas trwania podświetlenia: “Zawsze włączone”, 10, 20, 30, 45, 60, 90, 120
lub 180 sekund. Wybierz poziom podświetlenia ekranu za pomocą opcji <LEVEL>.
Ustawianie głośności
Obróć pokrętło, aby zwiększyć lub zmniejszyć głośność. Uważaj, słuchanie z dużą
głośnością przez długi czas może spowodować uszkodzenie słuchu.
Wybór źródła odtwarzania
Po włączeniu radia naciśnij krótko przycisk MODE, aby wybrać żądane
źródło odtwarzania: radio DAB, radio FM lub Bluetooth.
PL
Ustawianie daty i godziny
AUTOMATYCZNA REGULACJA
Data i godzina są ustawiane automatycznie za pomocą sygnału DAB/FM pod warunkiem,
że odbierany jest wystarczająco silny sygnał. Rozważ całkowite wysunięcie anteny.
REGULACJA RĘCZNA
Jeśli sygnał nie jest wystarczająco silny lub jeśli jeszcze nie
odebrałeś sygnału DAB, możesz ustawić czas ręcznie.
Data i godzina są wyświetlane w formacie DD-MM-RRRR, 00:00. Użyj
przycisków ◄i ►oraz naciśnij ENTER/SCAN, aby zmienić ustawienia daty
i czasu. Możesz także wybrać format czasu (12 lub 24 godziny).
Aktualizacja automatyczna: do wyboru są dwie opcje: <Bez aktualizacji> lub
<Z radia>. Następnie naciśnij przycisk ENTER/SCAN, aby potwierdzić wybór.
Wybór automatycznego okresu czuwania (funkcja uśpienia)
Aby przejść do trybu SLEEP, naciśnij i przytrzymaj przycisk SLEEP.
Aby wybrać okres czuwania, naciśnij krótko przycisk SLEEP i wybierz
pomiędzy WYŁĄCZONE, 15, 30, 45, 60, 90 lub 120 minut. Po upływie
ustawionego czasu urządzenie przechodzi w tryb uśpienia.
Języki systemowe
Wybierz żądany język spośród różnych opcji dostępnych podczas
przeglądania za pomocą przycisków ◄i ►.
Ustawienia fabryczne
Aby zresetować wszystkie ustawienia odbiornika do oryginalnych ustawień fabrycznych, przejdź
do ekranu resetowania urządzenia, <Kontynuować?> i wybierz <TAK>. Po przywróceniu ustawień
fabrycznych odbiornik uruchomi się ponownie i rozpocznie nowe automatyczne skanowanie.
Wersja oprogramowania
Ta opcja wyświetla numer wersji oprogramowania zainstalowanego w odbiorniku.

8 9
słuchanie radia cyfrowego (DAB/DAB+)
Co to jest DAB+?
DAB to skrót od Digital Audio Broadcast, który jest europejską nazwą radia cyfrowego.
Dlaczego warto korzystać z radia DAB+?
Aby poprawić wrażenia muzyczne.
Czy radio FM jest nadal dostępne?
Tak, FM pozostanie dostępne w Twoim kraju.
Jakie są zalety radia cyfrowego DAB+?
• lepsza jakość dźwięku
• brak zakłóceń lub trzasków
• większy wybór stacji
• łatwe wyszukiwanie: radia są sortowane w kolejności alfabetycznej
• więcej informacji widocznych na ekranie
Czy potrzebuję dodatkowego wyposażenia do DAB+?
Nie, po prostu wybierz DAB+ w swoim odbiorniku.
Tryb DAB/DAB+
Po włączeniu radia naciśnij przycisk MODE, aby przejść do trybu DAB/DAB+.
Po zmianie trybu na DAB/DAB+ odbiornik automatycznie wyszukuje dostępne
stacje w okolicy, w której się znajdujesz. Za pomocą przycisków ◄lub ►
uzyskaj dostęp do listy stacji i wybierz poprzednie lub następne stacje,
a następnie naciśnij przycisk ENTER/SCAN, aby aktywować stację.
Wyszukiwanie stacji
Naciśnij i przytrzymaj przycisk ENTER/SCAN, a odbiornik automatycznie
wyszuka dostępne stacje w okolicy, w której się znajdujesz.
Strojenie stacji
Naciśnij i przytrzymaj przycisk INFO/MENU i wybierz jedną z dwóch
następujących opcji: <Pełne skanowanie> i <Ręczne strojenie>.
1. Pełne skanowanie: naciśnij przycisk ENTER/SCAN, aby aktywować pełne skanowanie.
2. Strojenie ręczne: Użyj przycisków ◄lub ►, aby przełączać się między
zakresami częstotliwości 5A (174,928 MHz) i 13F (239,200 MHz).
Następnie naciśnij przycisk ENTER/SCAN, aby aktywować wybraną stację.
Konguracja menu DAB
Naciśnij i przytrzymaj przycisk INFO/MENU, aby uzyskać dostęp do ekranu
konguracji menu DAB: lista stacji, pełne skanowanie, ręczna synchronizacja,
kolejność stacji, DRC, przycinanie i główne menu systemu.
PL
Tryby wyświetlania
Za każdym naciśnięciem przycisku INFO/MENU, ekran zmienia się z jednego
trybu wyświetlania na inny: czas/data, szybkość transmisji, błąd sygnału,
moc sygnału, typ programu, nazwa programu, częstotliwość, DLS.
• Czas/data: wyświetla informacje o czasie i dacie dostarczone przez nadawcę.
• Szybkość transmisji: wyświetla przepływ danych, z którymi przesyłany jest sygnał.
• PTY (typ programu): wyświetla typ i opis programu dostarczanego przez stację DAB/DAB+.
• Częstotliwość: wyświetla numer i częstotliwość kanału transmisyjnego stacji.
• Informacje tekstowe DLS: Wyświetla przewijane informacje
tekstowe dostarczone przez nadawcę.
Uwaga: w przeciwieństwie do zwykłego radia, DAB grupuje kilka
stacji radiowych i nadaje je na jednej częstotliwości.
słuchanie radia FM
Wbudowany tuner RDS umożliwia odbiór stacji w paśmie FM. RDS (Radio Data System)
przesyła tekst i informacje wraz z sygnałem audio. Nie wszystkie stacje radiowe FM
nadają informacje RDS. Charakter informacji RDS jest określany przez stację radiową.
Po włączeniu radia naciśnij przycisk MODE, aby przejść do trybu FM.
Wyszukiwanie stacji
Aby wyszukać stację FM między 87,5 a 108,00 MHz:
• Naciśnij przyciski ◄lub ►, aby przejść do poprzedniej lub następnej częstotliwości.
• Naciśnij i przytrzymaj przyciski ◄lub ►, aby przejść do poprzedniej
lub następnej stacji o najsilniejszym sygnale.
Po znalezieniu stacji skanowanie zatrzyma się automatycznie. Jeśli nie zostanie znaleziona
żadna stacja, skanowanie zatrzyma się po przeskanowaniu całej częstotliwości.
Synchronizowanie stacji
Naciśnij i przytrzymaj przycisk ENTER/SCAN, aby wyszukać stacje. Na ekranie wyświetlany
jest pasek postępu wskazujący postęp wyszukiwania i liczbę znalezionych stacji radiowych.
Po zakończeniu wyszukiwania radio nada pierwszą znalezioną stację.
Zapisywanie stacji radiowej FM
Możesz zapisać do 20 zaprogramowanych stacji radiowych FM.
Umożliwi to szybki i łatwy dostęp do ulubionych stacji.
1. Słuchaj stacji, którą chcesz zapisać.
2. Naciśnij przycisk PRESET.
3. Użyj przycisków ◄lub ►, aby wybrać żądany numer pamięci (od 1 do 20).
4. Naciśnij przycisk ENTER/SCAN i przytrzymaj, aby potwierdzić.
5. Powtórz powyższe kroki, aby zapisać inne stacje radiowe FM.

10 11
Słuchanie zapisanej stacji radiowej FM
1. Naciśnij przycisk PRESET.
2. Następnie za pomocą przycisków ◄lub ►wybierz zapisaną stację, której chcesz słuchać.
3. Naciśnij przycisk ENTER/SCAN, aby potwierdzić.
4. Możesz także nacisnąć i przytrzymać przycisk INFO/MENU i wybrać
opcję <Lista stacji FM>, aby wyświetlić listę zapisanych stacji FM.
Tryby wyświetlania
Naciśnij przycisk INFO/MENU, aby przewijać informacje FM dostarczane przez stacje:
Typ programu (PTY) Czas/Data
Moc sygnału DLS (Tekst)
połączenie Bluetooth
Naciśnij kilkakrotnie przycisk MODE i wybierz tryb Bluetooth.
1. W trybie Bluetooth na ekranie pojawi się komunikat <Łączenie>. Jeśli żadne urządzenie
nie zostanie znalezione, a opcja <Łączenie> zostanie zastąpiona przez <Parowanie>,
oznacza to, że urządzenie jest gotowe do sparowania z nowym urządzeniem.
2. Aktywuj swoje urządzenie Bluetooth i wyszukaj na liście urządzenie o nazwie „RT DAB+151”.
3. Wybierz i włącz parowanie dla urządzenia „RT DAB+151”. Jeśli
pojawi się monit o hasło, wprowadź „0000”. Rozlegnie się sygnał
dźwiękowy, a wzmianka BLUETOOTH pozostanie włączona.
4. Po zakończeniu parowania rozlegnie się sygnał dźwiękowy,
a <Parowanie> zostanie zastąpione przez <Połączono>.
5. Jeśli podłączone urządzenie jest poza zasięgiem, radio będzie próbowało
nawiązać połączenie przez 2 minuty. Gdy urządzenie znajdzie się
w zasięgu, radio automatycznie nawiąże połączenie.
6. Teraz możesz cieszyć się muzyką na swoim urządzeniu.
7. Aby odłączyć urządzenia, naciśnij przycisk MODE na radiu, aby przełączyć
się na inny tryb i dezaktywować funkcję Bluetooth w urządzeniu.
• Zasięg działania Bluetooth to około 7 metrów. Jakakolwiek przeszkoda
między urządzeniami może zmniejszyć ten zasięg.
• Jednocześnie można sparować tylko jedno urządzenie Bluetooth.
• Nie wszystkie urządzenia Bluetooth są kompatybilne.
PL
ustawianie alarmów
W tym odbiorniku można ustawić dwa alarmy.
Aby ustawić dwa alarmy
1. Po ustawieniu czasu naciśnij przycisk ENTER/SCAN, aby
uzyskać dostęp do ekranu ustawiania alarmu 1.
2. Następnie należy wybrać częstotliwość alarmu: Wył., Raz,
Codziennie, Dni powszednie lub Weekendy.
3. Ustaw godzinę alarmu za pomocą przycisków ◄i ►.
4. Ustaw tryb alarmu: DAB, FM, alarm.
5. Aby wyregulować głośność alarmu: naciśnij przyciski ◄lub ►, aby zwiększyć
lub zmniejszyć głośność i naciśnij przycisk ENTER/SCAN, aby potwierdzić.
6. Gdy ustawienia są prawidłowe, naciśnij przycisk ENTER/SCAN, aby zapisać alarm.
Włączanie przypomnienia o alarmie
Gdy alarm włączy się w trybie czuwania, obróć pokrętło głośności, aby włączyć funkcję SNOOZE.
Alarm włączy się ponownie po 5 minutach.
Dezaktywacja alarmów
Aby anulować alarm, przejdź do ekranu ustawień alarmu 1, naciśnij przycisk
ENTER/SCAN, aby wybrać„OFF”, a następnie zapisz ustawienie alarmu.
Aby anulować drugi alarm, postępuj zgodnie z tymi samymi
instrukcjami, co w przypadku pierwszego alarmu.
Oświadczenie CE
Niniejszym Ferguson Sp. z o.o. oświadcza, że to urządzenie audio jest zgodne z zasadniczymi
wymaganiami i innymi odpowiednimi postanowieniami dyrektywy RED 2014/53/UE. Pełny
tekst deklaracji zgodności UE jest dostępny pod linkiem http://www.ferguson-digital.eu

12 13
rozwiązywanie problemów
PROBLEM MOŻLIWE PRZYCZYNY ROZWIĄZANIA
Radio się nie włącza.
Urządzenie nie jest
podłączone.
Podłącz adapter urządzenia
do gniazdka sieciowego.
Prąd nie dociera do
gniazdka elektrycznego.
Podłącz inne urządzenie do
tego samego gniazdka, aby
przeprowadzić test krzyżowy.
Brak dźwięku.
Głośność jest ustawiona
na minimum.
Dostosuj głośność obracając
pokrętło regulacji głośności.
Wybrane źródło jest
nieprawidłowe.
Wybierz odpowiednie źródło
naciskając przycisk MODE.
Awaria. Radio nie działa normalnie
lub emituje dziwny dźwięk.
Odłącz urządzenie na 30
minut. Po 30 minutach włącz
ponownie urządzenie.
Słaby odbiór FM.
Antena nie jest
podłączona z tyłu radia. Podłącz antenę.
Występują zakłócenia
z innymi urządzeniami
elektrycznymi (kuchenka
mikrofalowa, telewizor itp.)
Odsuń radio od możliwych
źródeł zakłóceń.
Słaby odbiór DAB.
Antena nie jest
całkowicie wysunięta. Rozciągnij antenę.
W Twoim regionie jest
słaby sygnał DAB.
Sprawdź zasięg DAB
w Twojej okolicy.
Nie można nawiązać
połączenia Bluetooth.
Twoje źródło dźwięku nie
jest w trybie parowania.
Więcej informacji
znajdziesz w instrukcji
obsługi źródła dźwięku.
Upewnij się, że radio i urządzenie Bluetooth znajdują się
w promieniu 7 metrów od siebie oraz że żadne ściany
ani urządzenia elektroniczne nie zakłócają transmisji. User Manual ver. 1
Please read these instructions fully before using.
FM |DAB+ |BT digital radio with bass reex
EN

14 15
Thank you for purchasing a Regent product. We pay particular
attention to the RELIABILITY, EASE OF USE and DESIGN of our
products. We hope that you will enjoy this DAB+ digital radio.
Your product
Contents of the box
• 1 Regent DAB+151 radio
• 1 AC charger
• 1 user manual
Technical characteristics
• DAB Tuner+/FM/Bluetooth
• Waveband: FM and DAB+
• FM radio frequency: 87.5 to 108 MHz
• Digital radio frequency: 174.928 to 239.200 mHz
• Frequency range: 2402mHz - 2480mHz
• Power emitted: 0.5mW
• Screen with LCD display: displays the name of the station and the text broadcast by the radios
• Preset stations: 20
• Sound power: 5W
• Telescopic antenna
• Bluetooth version: 4.2
• Bluetooth range: 7 meters
• Mains power supply
• Model: FJ-SW126K0901 000DE
• Input: 100-240V, 50/60Hz, 0.4A max
• Output: 9V 1A
EN
Description of the device
1. STBY (STANDBY): Turn on or turn o the radio.
2. INFO/MENU: Display the station information or access
the setting screen of the main menu.
3. PREVIOUS: Return to the last selection, decrease the frequency,
or search for the strongest previous signal.
4. PRESET: Access preset stations.
5. VOLUME+/-: Volume adjustment wheel.
6. MODE: Press this key several times to change the playback mode.
7. ENTER/SCAN: Conrm the selection or start a scan.
8. NEXT: Move to the next selection, increase the frequency
or search for the next strongest signal.
9. SLEEP: Enable standby.
10. DISPLAY SCREEN: Display screen.
front view
11. Telescopic antenna.
12. 9V DC Power supply.
rear view

16 17
Instructions for use
PLEASE READ THESE INSTRUCTIONS CAREFULLY BEFORE USING THE
DEVICE AND KEEP THEM SO YOU CAN REFER BACK AT A LATER DATE.
General instructions
The parts of this device cannot be repaired or replaced by the user.
Repairs and maintenance are only to be carried out by qualied sta.
Any disassembly of the device will void the user’s warranty.
• Check that the power supply voltage shown on the nameplate of
the AC adapter matches that of your electrical ttings.
• This device must not be used by children without supervision.
Ensure that children do not play with the device.
• Do not use the device:
• if the power cable is damaged,
• if the device is not working properly,
• if the device has been damaged in any way.
• Make sure that the power cord cannot be crushed or trapped, particularly
around plugs, sockets, and the connection point of the device.
• Do not open the device for any reason whatsoever.
• Never use sharp objects to access the inside of the device.
• Unplug this device during thunderstorms or during long
periods of non-use in order to avoid damage.
Setting up the device
• Place the device on a at, dry and stable surface.
• Do not place this device near heat sources such as radiators, hot air outlets,
stoves, or other appliances (including ampliers) that generate heat.
• Do not place near naked ame sources (a lit candle, for
example) on the device or in close proximity to it.
• Do not place the device on a vibrating surface.
• Always connect the device to an AC outlet that is easily accessible.
• Use this device in a temperate environment. This device
must not be used in a tropical climate.
• The device must be turned o before disconnecting the cable from the adapter.
• Never disconnect the device by pulling on the power cord but by holding the mains plug.
• If your device is not working normally, particularly if it is making sounds or smells which
appear abnormal, unplug it immediately and have it inspected by a qualied technician.
EN
Keeping this device away from water
• Do not let liquids enter the unit and do not place objects containing
liquid (a vase, for example) on top of the unit.
• Do not expose this appliance to rain, moisture and splashing water.
• Never immerse the device in water or any other liquid.
• Do not use this device near water or any sources of moisture, such as a bath tub, sink,
kitchen sink, a swimming pool, in a wet basement or in any other damp area.
Ventilation warning
• This device must be placed in a location or position which does not aect its proper
ventilation. Always leave a space of 10cm for ventilation around the device. Ensure that
the ventilation outlets are not obstructed by objects such as newspapers, tablecloths,
curtains, etc. This device must never be placed in furniture without sucient ventilation.
• Do not insert objects or points in the ventilation outlets.
Cleaning the device
• Disconnect the radio before cleaning.
• Clean the outside of the device using a cloth slightly
dampened with water and a mild detergent.
• Do not use solvents such as alcohol, benzene or thinners: these
products could damage the casing of the device.
Electronic equipment
• Your Bluetooth radio uses Bluetooth technology. It transmits and
receives radio frequencies (HF) of around 2.4 GHz.
• These high-frequency emissions may disrupt the operation of many
electronic devices. In order to avoid any accidents, turn o your
Bluetooth radio when you are in the following locations:
• places where ammable gas is present, in a hospital, on a train, a plane
or a gas station, close to automatic doors or re alarms,
• blasting areas.
• If you have a pacemaker or any other articial parts, ask your doctor for advice.
Connecting to an AC outlet
Connect one end of the power cable to the 9V DC power supply connector located on
the back of the unit, and then connect the other end to a power outlet. Make sure that
your home’s power supply corresponds to that indicated on the device’s nameplate.
installation

18 19
basic use
Using for the rst time
The language setting is displayed when you turn on the radio for the rst time. Use the
◄and ►and ENTER/SCAN buttons to select the language. The device then returns to
the standby screen. Press the STBY (standby) button to start a scan. The screen displays
a progress bar indicating the progress of the search and the number of radio stations found.
Once the search is complete, the radio broadcasts the rst station that it has found.
Setting the main menu
Press and hold the INFO/MENU button to access the setting screen of the main
menu. Use the ◄or ►and ENTER/SCAN buttons to navigate between the dierent
menu options. <Time Setup>, <Alarms>, <Sleep>, <backlight>, <language>,
<SW version>. Select one of the options, and then press ENTER/SCAN.
Turning on the radio
To turn on your radio, press the STBY button. To turn o the radio, press the STBY button
again. Note: The radio will go to sleep automatically after 15 minutes of inactivity.
Station information
Press the INFO/MENU button to display the station’s information.
Setting the screen backlight
You can adjust the duration of the backlight: “Always On”, 10, 20, 30, 45, 60, 90, 120
or 180 seconds. Select the backlight level of the screen with the <LEVEL> option.
Setting the volume
Turn the dial to increase or decrease the volume. Be careful, listening at a high
volume for a long period of time may damage your hearing.
Selecting the playback source
After you turn on your radio, briey press the MODE button to select the
playback source of your choice: DAB radio, FM radio or Bluetooth.
EN
Setting the date and time
AUTOMATIC ADJUSTMENT
The date and time are set automatically via the DAB/FM signal, provided you
receive a suciently strong signal. Consider extending the antenna fully.
MANUAL ADJUSTMENT
If the signal is not strong enough or if you are yet to receive
a DAB signal, you can set the time manually.
The date and time appear in the format DD-MM-YYYY, 00:00. Use the
◄and ►buttons and press ENTER/SCAN to change the date and time
settings. You can also choose the time format (12 or 24 hours).
Automatic Update: You can choose between two options:“No update”or“From
radio”. Then press the ENTER/SCAN button to conrm your choice.
Selecting an automatic standby period (sleep function)
To enter SLEEP mode, press and hold the SLEEP button.
To select the standby period, briey press the SLEEP button and choose between OFF, 15,
30, 45, 60, 90 or 120 minutes. When the time is up, the device goes into sleep mode.
System languages
Select the language of your choice among the various options
available by browsing using the ◄and ►buttons.
Factory settings
To reset all the settings on your radio to the original factory settings, go
into the reset screen of the device, <Proceed?> and select <YES>. After the
factory reset, the radio will restart and begin a new automatic scan.
Software version
This option displays the version number of the software installed on your radio.

20 21
listening to digital radio (DAB/DAB+)
What is DAB+?
DAB stands for Digital Audio Broadcast which is the European name for digital radio.
Why use a DAB+ radio?
To improve the musical experience.
Is FM radio still available?
Yes, FM will remain available in your country.
What are the benets of DAB+ digital radio?
• better sound quality
• no interference or crackling
• a larger choice of stations
• easy searching: radios are sorted in alphabetical order
• more information visible on the screen
Do I need additional equipment for DAB+?
No, simply select DAB+ on your radio.
DAB/DAB+ mode
After turning on the radio, press the MODE button to change to DAB/DAB+ mode.
When you change the mode to DAB/DAB+, the radio automatically searches
for the available stations in the area where you are. Press the ◄or ►
buttons to access the list of stations and select the previous or next stations,
and then press the ENTER/SCAN button to activate the station.
Performing a search
Press and hold the ENTER/SCAN button, and the radio will automatically
scan available stations in the area where you are.
Synchronizing stations
Press and hold the INFO/MENU button and choose between the
following two options: <Full scan> and <Manual tune>.
1. Full scan: press the ENTER/SCAN button to activate full scan.
2. Manual tune: Use the ◄or ►buttons to switch between the 5A
(174.928MHz) and 13F (239.200Mhz) frequency ranges.
Then press the ENTER/SCAN button to activate the selected station.
Conguration du menu DAB
Press and hold the INFO/MENU button to access the DAB menu setup screen: station
list, full scan, manual sync, station order, DRC, clipping, and the system’s main menu.
EN
Display modes
Each time you press the INFO/MENU button, the screen changes from
one display mode to another: Time/Date, Bit rate, Signal error, Signal
power, Type of program, Program name, Frequency, DLS.
• Time/Date: Displays time and date information provided by the broadcaster.
• Bit rate: Displays the ow of data at which the signal is transmitted.
• PTY (Program type): Displays the type and the description
of the program provided by the DAB/DAB+ station.
• Frequency: Displays the number and frequency of the station’s transmission channel.
• DLS text information: Displays scrolling text information provided by the broadcaster.
Note: Unlike normal radio, DAB groups together several radio
stations and transmits them on a single frequency.
listening to the FM radio
The built-in RDS tuner allows you to receive stations on the FM band. The RDS (Radio Data
System) transmits text and information together with the audio signal. Not all FM radio stations
transmit RDS information. The nature of the RDS information is determined by the radio station.
After you have turned on the radio, press the MODE button to switch to FM mode.
Selecting stations
To search for an FM station between 87.5 and 108,00 MHz:
• Press the ◄or ►buttons to move to the previous or to the next frequency.
• Press and hold the ◄or ►buttons to move to the previous
or the next station with the strongest reception.
Once a station has been found, scanning will stop automatically. If no station
is found, the scanning will stop once the entire frequency has been scanned.
Synchronizing stations
Press and hold the ENTER/SCAN button to search for stations. The screen displays a progress
bar indicating the progress of the search and the number of radio stations found.
Once the search is complete, the radio will broadcast the rst station that it has found.
Storing an FM radio station
You can store up to 20 preset FM radio stations. This will allow you
to access your favourite stations quickly and easily.
1. Listen to the station that you want to store.
2. Press the PRESET button.
3. Use the ◄or ►buttons to select the desired memory number (1 to 20).
4. Press the ENTER/SCAN button and hold to conrm.
5. Repeat to store other FM radio stations.

22 23
Listening to a stored FM radio station
1. Press the PRESET button.
2. Then press the ◄or ►buttons to select the stored station that you want to listen to.
3. Press the ENTER/SCAN button to conrm.
4. You can also press and hold the INFO/MENU button and select the
option <FM station list> to display the list of stored FM stations.
Display modes
Press the INFO/MENU button to scroll through the FM information provided by the stations:
Bluetooth connection
Press the MODE button several times and select Bluetooth mode.
1. Once in Bluetooth mode, the message <Connecting> will appear on the display
screen. If no device is found and the <Connecting> option is replaced by
<Pairing>, this means that the device is ready to pair with a new device.
2. Activate your Bluetooth device and search the list for a device named“RT DAB+151”.
3. Select and enable pairing for the“RT DAB+151”device. If you are prompted for a password,
enter“0000”. A beep will sound and the mention BLUETOOTH will then stay on.
4. When pairing is complete, a beep will sound and <Pairing> is replaced with <Connected>.
5. If the connected device is out of range, the radio will attempt to connect for
2 minutes. When the device is in range, the radio will automatically reconnect.
6. Now you can enjoy music on your device.
7. To disconnect the devices, press the MODE button on the radio to switch to
another mode and deactivate the Bluetooth function of your device.
• The range in which Bluetooth can operate is approximately 7 meters.
Any obstacle between the devices can reduce this range.
• Only one Bluetooth device can be paired at one time.
• Not all Bluetooth devices are compatible.
EN
setting alarms
Two alarms can be set on this radio.
To set two alarms
1. After you have set the time, press the ENTER/SCAN button
to access the screen for setting alarm 1.
2. You must then select the frequency of the alarm: O, Once, Daily, Weekdays, or Weekends.
3. Set the alarm time using the ◄and ►buttons.
4. Set the alarm mode: DAB, FM, alarm.
5. To adjust the volume of the alarm: press the ◄or ►buttons to increase
or decrease the volume, and press the ENTER/SCAN button to conrm.
6. Once your settings are correct, press the ENTER/SCAN button to save the alarm.
Activating the alarm reminder
When the alarm sounds in standby mode, turn the volume
wheel to activate the SNOOZE function.
The alarm will sound again after 5 minutes.
Deactivating the alarms
To cancel the alarm, go to the setting screen for alarm 1, press the ENTER/
SCAN button to select “OFF”and then save the alarm setting.
To set the second alarm, follow the same instructions as for the rst alarm.
CE Statement
Hereby, Ferguson Sp. z o.o. declares that this audio device is in compliance with the essential
requirements and other relevant provisions of RED Directive 2014/53/EU. The full text of the
EU declaration of conformity is available by following the link http://www.ferguson-digital.eu

24 25
troubleshooting guide
ISSUE POSSIBLE CAUSES SOLUTIONS
The radio is not turning on.
The device is not
plugged in.
Plug the device adapter
into an AC outlet.
Electricity is not reaching
the power outlet.
Plug another device
into the same outlet to
perform a cross test.
No sound.
The volume is set
to minimum.
Adjust the volume by
turning the volume
control wheel.
The selected source
is not correct.
Select the proper source by
pressing the MODE button.
Malfunction.
The radio is not performing
normally or is emitting
a strange sound.
Unplug the device for 30
minutes. After 30 minutes,
turn the device on again.
Poor FM reception.
The antenna is not
connected to the
back of the radio.
Connect an antenna.
There is interference with
other electrical appliances
(microwave, TV, etc.)
Move your radio away
from possible sources
of interference.
Poor DAB reception.
The antenna is not
fully extended. Extend the antenna.
Your region is not
covered by DAB.
Check the DAB coverage
in your area.
The Bluetooth connection
can not be established.
Your audio source is
not in pairing mode.
Consult the user manual
of your audio source
for more details.
Ensure that the radio and your Bluetooth device are
within 7 meters of one another and that no wall or
electronic devices are interfering with the transmission.
Benutzerhandbuch ver. 1
Bitte lesen Sie diese Anweisungen vollständig durch, bevor Sie sie verwenden.
FM |DAB+ |BT digital radio with bass reex
DE

26 27
Vielen lieben Dank für den Kauf eines Regent Produktes. Bei
unseren Produkten legen wir besonderes Augenmerk auf
ZUVERLÄSSIGKEIT, EINFACHE BENUTZUNG und DESIGN. Wir
hoen, dass Sie Spaß mit unserem DAB+ Digitalradio haben.
ihr Produkt
Packungsinhalt
• 1 Regent DAB+151 Radio
• 1 Wechselstrom-Ladegerät
• 1 Bedienungsanleitung
Technische Eigenschaften
• DAB Tuner+/UKW/Bluetooth
• Wellenband: UKW und DAB+
• UKW Radiofrequenz: 87,5 MHz bis 108 MHz
• Digital Radiofrequenz: 174,928 MHz bis 239,200 MHz
• Frequenzbereich: 2402 MHz bis 2480 MHz
• Abgegebene Leistung: 0,5 mW
• LCD-Bildschirm: Anzeige des Radiosenders und Texts, welcher
von den Radiostationen übermittelt wird
• Voreingestellte Sender: 20
• Lautsprecherleistung: 5W
• Teleskopantenne
• Bluetooth-Version: 4.2
• Bluetooth-Reichweite: 7 Meter
• Stromversorgung
• Modell: FJ-SW126K0901 000DE
• Leistungseingang: 100 V bis 240 V, 50 Hz/ 60 Hz, 0,4 A maximal
• Leistungsausgang: 9V 1A
DE
Gerätebeschreibung
1. STBY (STANDBY): Schaltet das Radio an/aus.
2. INFO/MENU: Zeigt Informationen zum Radiosender an oder
greift auf das Hauptmenü im Einstellungsbildschirm zu.
3. PREVIOUS: Geht zur vorangegangenen Auswahl, verringert die
Frequenz oder sucht nach dem stärksten vorherigen Signal.
4. PRESET: Greift auf die vorprogrammierten Sender zu.
5. VOLUME+/-: Knopf zum Regeln der Lautstärke.
6. MODE: Drücken Sie diese Taste mehrmals, um den Wiedergabemodus zu ändern.
7. ENTER/SCAN: Bestätigen Sie Ihre Auswahl oder beginnen Sie den Suchprozess.
8. NEXT: Gehen Sie zur nächsten Auswahl, erhöhen Sie die Frequenz
oder suchen Sie nach dem nächststärkeren Signal.
9. SLEEP: Stand-by aktivieren.
10. DISPLAY SCREEN: Display, Bildschirm.
vorderansicht
11. Teleskopantenne.
12. 9-V-Gleichstrom-Netzteil.
rückansicht

28 29
bedienungsanleitung
BITTE LESEN SIE DIESE ANWEISUNGEN SORGFÄLTIG DURCH, BEVOR
SIE DAS GERÄT IN BETRIEB NEHMEN UND BEWAHREN SIE DIESE
ANLEITUNG FÜR SPÄTERES NACHSCHLAGEN SORGFÄLTIG AUF.
Allgemeine Anweisungen
Die Teile dieses Gerätes können nicht instand gesetzt werden und sind nicht
dafür gedacht, vom Benutzer repariert oder ersetzt zu werden. Reparatur- und
lnstandhaltungsarbeiten dürfen nur von qualiziertem Personal durchgeführt
werden. Jegliches Önen des Geräts führt zum Erlöschen der Garantie.
• Überprüfen Sie die Versorgungsspannung auf Ihrer Steckdose, um sicherzustellen,
dass die dort aufgedruckten Werte mit dem Netzteil übereinstimmen.
• Dieses Gerät darf von Kindern nur unter Aufsicht von Erwachsenen verwendet
werden. Stellen Sie sicher, dass Kinder nicht mit dem Gerät spielen.
• Benutzen Sie das Gerät nicht, falls:
• das Netzkabel beschädigt ist,
• falls das Gerät nicht ordnungsgemäß funktioniert,
• falls das Gerät in irgendeiner Weise beschädigt ist.
• Stellen Sie sicher, dass das Netzkabel nicht gequetscht oder eingeklemmt ist,
besonders in der Nähe der Stecker, Steckdosen, und Anschlussstelle des Geräts.
• Auf keinen Fall das Gerät önen.
• Benutzen Sie niemals scharfe Objekte, um in das Geräteinnere zu gelangen.
• Trennen Sie das Gerät bei Gewitter oder falls Sie planen, es für eine längere
Zeit nicht zu nutzen, vom Stromnetz, um Schaden zu vermeiden.
Das Gerät einrichten
• Platzieren Sie das Gerät auf einer achen, trockenen und stabilen Oberäche.
• Platzieren Sie das Gerät nicht in der Nähe von Hitzequellen wie Heizkörpern, Luftauslässen,
Öfen oder anderen Geräten, die Wärme erzeugen (einschließlich Verstärkern).
• Platzieren sie das Gerät nicht in der Nähe von oenen
Feuerquellen, wie z. B. brennenden Kerzen.
• Platzieren sie das Gerät nicht auf vibrierenden Oberächen.
• Verbinden Sie das Gerät stets mit der Steckdose, die am nächsten gelegen ist.
• Benutzen Sie das Gerät nur in gemäßigter Umgebung. Das Gerät
ist nicht für den Gebrauch in tropischem Klima gedacht.
• Das Gerät muss ausgeschaltet sein, bevor Sie das Kabel vom Netzgerät trennen.
• Entfernen Sie das Gerät nie vom Netz durch Ziehen am
Kabel, benutzen Sie immer den Stecker dafür.
• Nehmen Sie das Gerät vom Stromnetz, falls es nicht ordnungsgemäß funktioniert,
besonders wenn dieses ungewöhnliche Geräusche macht oder riecht.
DE
Halten Sie das Gerät fern von Wasser
• Stellen Sie sicher, dass keine Flüssigkeiten in das Gerät gelangen, und platzieren
Sie es auch nicht in der Nähe von Wasserquellen, wie z. B. Blumenvasen.
• Halten Sie das Gerät fern von Regen, Feuchtigkeit und Spritzwasser.
• Tauchen Sie das Gerät unter keinen Umständen in Wasser oder andere Flüssigkeiten.
• Benutzen Sie das Gerät nicht in der Nähe von Feuchtigkeitsquellen, wie z. B. Badewanne,
Waschbecken, Schwimmbad, einem feuchten Keller oder einer anderen klammen Umgebung.
Lüftungswarnung
• Das Gerät muss so aufgestellt werden, dass es ausreichend belüftet wird.
Stellen Sie das Gerät so auf, dass rundum immer zehn (10) Zentimeter Raum frei
bleiben. Stellen Sie sicher, dass die Belüftungsönungen nicht durch Zeitungen,
Tischdecken, Vorhänge oder Ähnliches verdeckt sind. Das Gerät darf nicht in
Möbel gestellt werden, welche nicht ausreichend Belüftung bieten.
• Führen Sie keine Objekte in die Belüftungsönungen des Gerätes ein.
Reinigen des Gerätes
• Nehmen Sie das Gerät vor dem Reinigen vom Stromnetz.
• Reinigen Sie das Gerät mit einem weichen Tuch, welches mit einem
milden Reinigungsmittel und Wasser leicht angefeuchtet wurde.
• Benutzen Sie auf keinen Fall Lösungsmittel wie Alkohol, Benzol oder Verdünner.
Diese Produkte können das Gehäuse des Gerätes beschädigen.
Elektronische Ausrüstung
• Ihr Bluetooth Radio benutztBluetooth Technologie. Das Gerät sendet und
empfängt Radiofrequenzen (Kurzwellen) im 2,4-GHz-Bereich.
• Die Emissionen von Kurzwellen können den Betrieb von anderen
Elektrogeräten beeinussen. Um Unfälle zu vermeiden, schalten Sie das
Bluetooth Radio aus, wenn Sie sich an folgenden Orten benden:
• Orte, an denen ammbare Gase vorhanden sind, in Krankenhäusern, Zügen,
Flugzeugen, Tankstellen, nahe automatischer Türen oder Feuermeldern sowie
• Sprenggebieten.
• Bitte konsultieren Sie Ihren Arzt, falls Sie einen Herzschrittmacher
oder andere künstliche Implantate tragen.
Anschluss an die Steckdose
Schließen Sie ein Ende des Kabels mit dem 9-V-Netzstecker an der Rückseite des Geräts an
und verbinden Sie das andere mit einer Steckdose. Stellen Sie sicher, dass die Spannung
der Stromversorgung mit der des Netzteils und des Gerätes übereinstimmt.
Installation

30 31
grundlegende Benutzung
Erstmalige Benutzung
Bei erstmaligem Starten des Gerätes wird die Spracheinstellung angezeigt. Benutzen
Sie die ◄, ►und ENTER/SCAN Tasten, um die Sprache einzustellen. Das Gerät begibt
sich danach in den Stand-by-Betrieb. Drücken Sie die STBY (standby) Taste, um einen
Suchlauf zu starten. Auf dem Bildschirm wird ein Fortschrittsbalken angezeigt, welcher
den Fortschritt der Suche sowie die Anzahl der gefundenen Radiosender darstellt. Sobald
die Suche beendet ist, wird das Radio den ersten gefundenen Sender abspielen.
Das Hauptmenü einrichten
Halten Sie die INFO/MENU Taste gedrückt, um zum Einstellungsbildschirm zu gelangen.
Benutzen Sie die ◄oder ►sowie die ENTER/SCAN Tasten, um zwischen den Menüoptionen zu
wechseln. <Zeiteinstellung>, <Alarme>, <Sleep>, <Hintergrundbeleuchtung>, <Sprache>, <SW-
Version>. Wählen Sie die gewünschte Option aus und bestätigen Sie mit der ENTER/SCAN Taste.
Das Radio einschalten
Schalten Sie das Radio mit der STBY Taste an. Durch erneutes Drücken
der STBY Taste schalten Sie das Radio aus. Hinweis: Das Radio geht nach
fünfzehn (15) Minuten Inaktivität automatisch in den Sleep-Modus.
Senderinformation
Drücken Sie die INFO/MENU Tasten, um die Information der Radiostation anzuzeigen.
Die Hintergrundbeleuchtung einrichten
Sie können die Dauer der Hintergrundbeleuchtung einstellen:“Immer an”,
10, 20, 30, 45, 60, 90, 120, oder 180 Sekunden. Wählen Sie die Intensität
der Hintergrundbeleuchtung mit der <LEVEL> Option.
Lautstärke einstellen
Drehen Sie den Knopf, um die Lautstärke zu erhöhen oder zu verringern. Bitte beachten
Sie, das Hören mit hoher Lautstärke über lange Zeit kann Ihr Gehör beschädigen.
Wiedergabequelle auswählen
Nach Einschalten des Radios drücken Sie kurz die MODE Taste, um die
Wiedergabequelle auszuwählen: DAB-Radio, UKW-Radio oder Bluetooth.
DE
Datum und Uhrzeit einstellen
AUTOMATISCHE EINSTELLUNG
Datum und Uhrzeit werden automatisch mithilfe des DAS/UKW-Signals eingestellt, vorausgesetzt
es ist stark genug. Ziehen Sie die Nutzung einer externen Antenne in Erwägung.
MANUELLE EINSTELLUNG
Falls das Signal nicht stark genug sein sollte oder Sie noch kein DAS-
Signal empfangen haben, können Sie die Zeit manuell einstellen.
Das Datum und die Uhrzeit werden in folgendem Format angezeigt TT-MM-JJJJ, 00:00.
Benutzen Sie die ◄und ►Tasten und drücken Sie ENTER/SCAN, um Datum und
Uhrzeit zu ändern. Sie können zwischen 12- und 24-Stunden-Zählungen wählen.
Automatische Updates: Sie haben zwei Optionen:„Keine Updates“ oder
„Vom Radio“. Bestätigen Sie Ihre Auswahl mit der ENTER/SCAN Taste.
Die automatische Stand-by Zeit auswählen (Sleep-Modus)
Halten Sie die SLEEP Taste gedrückt, um in den Sleep-Modus zu gelangen.
Wählen Sie die Stand-by-Periode aus, indem Sie kurz auf die SLEEP Taste
drücken und zwischen AUS, 15, 30, 45, 60, 90 oder 120 Minuten auswählen.
Sobald die Zeit abgelaufen ist, geht das Radio in den Sleep-Modus.
Systemsprachen
Wählen Sie die Sprache aus den verschiedenen Optionen mithilfe der ◄und ►Tasten aus.
Werkseinstellungen
Um das Radio in die Werkseinstellungen zu versetzen, gehen Sie in den Rücksetzbildschirm
des Gerätes, wählen Sie <Weiter?> und Bestätigen Sie mit <JA>. Danach wird
das Radio neu starten und mit einem automatischen Suchlauf beginnen.
Softwareversion
Diese Option zeigt die Versionsnummer der installierten Radiosoftware dar.

32 33
digitales Radio hören (DAB/DAB+)
Was ist DAB+?
DAB steht für Digital Audio Broadcasting, dem europäischen Standard für digitales Radio.
Warum DAB+ Radio nutzen?
Um das Musikerlebnis in derselben Weise zu verbessern, wie der DVB-T (Digital Video
Broadcasting - Terrestrial) das audiovisuelle Erlebnis für das Fernsehen bereichert hat.
Gibt es UKW noch?
Ja, UKW bleibt in Deutschland, Österreich und der Schweiz eingeschränkt bestehen.
Was sind die Vorteile von DAB+ Radio?
• Bessere Tonqualität
• Keine statischen Hintergrundgeräusche
• Eine breitere Auswahl an Radiosendern
• Einfachere Suche: Radiosender können alphabetisch angeordnet werden
• Mehr Informationen auf dem Display
Brauche ich zusätzliche Ausrüstung für den Empfang von DAB+?
Nein, wählen Sie DAB+ an Ihrem Radio.
DAB/DAB+ Modus
Drücken Sie die MODE Taste nach dem Einschalten Ihres
Radios, um den DAB/DAB+ Modus zu wechseln.
Sobald Sie den DAB/DAB+ Modus gewechselt haben, wird das Radio
automatisch nach den verfügbaren Sendern in Ihrer Region suchen. Drücken
Sie die ◄oder ►Tasten, um die Liste der Radiosender auszuwählen, und
drücken Sie die ENTER/SCAN, um den ausgewählten Sender zu hören.
Suchen
Halten Sie die ENTER/SCAN Taste gedrückt, und das Radio wird
automatisch nach Sendern in Ihrer Region suchen.
Sender synchronisieren
Halten Sie die INFO/MENU Taste gedrückt und wählen Sie zwischen den folgenden
Optionen: <Vollständiger Sendersuchlauf> und <Manueller Sendersuchlauf>.
1. Vollständiger Sendersuchlauf: Drücken Sie die ENTER/SCAN Taste,
um den vollständigen Sendersuchlauf zu aktivieren.
2. Manueller Sendersuchlauf: Benutzen Sie die ◄oder ►Tasten, um zwischen den
5A (174,928 MHz) und 13F (239,200Mhz) Frequenzbereichen zu wechseln.
Drücken Sie danach die ENTER/SCAN Taste, um den ausgewählten Sender zu hören.
DAB-Menü kongurieren
Halten Sie die INFO/MENU Taste gedrückt, um auf den Einstellungsbildschirm,
vollständigen/manuellen Sendersuchlauf, die Senderliste, Senderreihenfolge, das
digitale Radio, Clipping sowie das Hauptmenü des Systems zuzugreifen.
DE
Anzeigemodi
Jedes Mal, wenn Sie die INFO/MENU Taste drücken, wechselt das Display von
einem Modus zum anderen: Datum/Uhrzeit, Bitrate, Signalstärke, Programmtyp,
Programmname, Frequenz und DLS (Dynamic Label Segment).
• Zeit/Datum: Zeigt vom Sender bereitgestellte Zeit und Datum an.
• Bitrate: Zeigt den Datenstrom des übertragenen Signals.
• PTY (Programmtyp): Stellt die Art und Beschreibung des Programms
dar, welche von dem DAB/DAB+ Sender übermittelt werden.
• Frequenz: Stellt die Nummer und Frequenz des Radiosignals dar.
• DLS Textinformationen: Stellt fortlaufenden Text dar, welcher vom Sender übermittelt wird.
Hinweis: Im Vergleich zu regulärem Radio gruppiert DAB verschiedene
Radiosender zusammen und überträgt diese in einer einzelnen Frequenz.
UKW-Rundfunk hören
Der eingebaute RDS-Tuner erlaubt es Ihnen auch, Sender im UKW-Bereich zu empfangen. Das
RDS (Radio Data System) überträgt Text und Informationen zusammen mit dem Tonsignal. Nicht
alle UKW-Radiosender nutzen RDS. Die Art der RDS-lnformation wird vom Sender bestimmt.
Drücken Sie die MODE Taste nach Einschalten des Radios, um in den UKW-Modus zu wechseln.
Senderauswahl
Um in einer Frequenz zwischen 87,5 MHz und 108,00 MHz zu suchen:
• Drücken Sie die ◄oder ►Taste, um zur vorherigen oder nächsten Frequenz zu springen.
• Halten Sie die ◄oder ►Taste gedrückt, um zum vorherigen oder
nächsten Sender mit dem stärksten Signal zu springen.
Sobald ein Sender gefunden wurde, hört der Suchlauf automatisch auf. Falls kein Sender
gefunden wird, hört der Suchlauf auf, sobald der ganze Frequenzbereich durchsucht wurde.
Sender synchronisieren
Halten Sie die ENTER/SCAN Taste gedrückt, um nach Sendern zu suchen. Auf
dem Bildschirm wird ein Fortschrittsbalken angezeigt, welcher den Fortschritt
der Suche sowie die Anzahl der gefundenen Radiosender darstellt.
Sobald der Suchlauf beendet ist, wird das Radio den ersten Sender abspielen.
Speichern von UKW-Sendern
Sie können bis zu zehn (20) voreingestellte DAS-Radiostationen speichern. Dies
ermöglicht Ihnen immer schnellen und einfachen Zugri auf Ihre Lieblingssender.
1. Anhören des Senders, welcher gespeichert werden soll.
2. Drücken Sie die PRESET Taste.
3. Benutzen Sie die ◄oder ►Tasten, um die gewünschte
Nummer (1 bis 20) zum Speichern auszuwählen.
4. Halten Sie die ENTER/SCAN Taste gedrückt, um zu bestätigen.
5. Wiederholen Sie den Prozess, um weitere UKW-Sender zu speichern.

34 35
Gespeicherte UKW-Sender anhören
1. Drücken Sie die PRESET Taste.
2. Danach drücken Sie die ◄oder ►Taste, um den gespeicherten Sender anzuhören.
3. Drücken Sie die ENTER/SCAN Taste zum Bestätigen.
4. Sie können auch die INFO/MENU Taste gedrückt halten und mithilfe der Option
<UKW-Senderliste> die gespeicherten UKW-Sender anzeigen lassen.
Anzeigemodi
Drücken Sie die INFO/MENU Taste, um die UKW-Informationen
anzuzeigen, welche vom Sender bereitgestellt werden.
Programmart Datum & Uhrzeit
Signalleistung Radiotext
Bluetooth-Verbindung
Drücken Sie wiederholt die MODE Taste, um den Bluetooth-Modus auszuwählen.
1. Sobald der Bluetooth-Modus ausgewählt wurde, erscheint die Nachricht <Verbinden>
im Display. Falls ein Gerät gefunden wurde, wird <Verbinden> mit der Nachricht
<Koppeln> ersetzt. Dies bedeutet, dass ein Gerät zum Koppeln gefunden wurde.
2. Aktivieren Sie Ihr Bluetooth-Gerät und suchen Sie nach “RT DAB+151”.
3. Wählen Sie “RT DAB+151” aus und koppeln Sie die Geräte. Falls nach einem
Passwort gefragt wird, geben Sie “0000” ein. Es ertönt ein akustisches
Signal und der Schriftzug BLUETOOTH erscheint im Display.
4. Sobald der Prozess beendet ist, ertönt ein akustisches Signal und
die Nachricht “Koppeln” wird mit “Verbunden” ersetzt.
5. Falls Ihr gekoppeltes Gerät außer Reichweite sein sollte, wird das Radio
versuchen für zwei (2) Minuten zu verbinden. Das Radio verbindet
sich automatisch, sobald das Gerät in Reichweite ist.
6. Jetzt können Sie Ihre Musik auf dem Gerät genießen.
7. Um verbundene Geräte zu entkoppel, drücken Sie die MODE Taste, um in
einen anderen Modus zu wechseln und Bluetooth zu deaktivieren.
• Die Reichweite von Bluetooth beträgt etwa sieben (7) Meter. Jede
Form von Hindernis kann diese Reichweite verringern.
• Es kann immer nur ein Bluetooth-Gerät gleichzeitig gekoppelt werden.
• Nicht alle Bluetooth-Geräte sind kompatibel.
DE
alarm einrichten
Das Radio kann bis zu zwei Alarme stellen.
Zwei Alarme stellen
1. Sobald Sie die Zeit eingestellt haben, drücken Sie die ENTER/SCAN
Taste, um auf den Bildschirm für Alarm 1 zuzugreifen.
2. Sie müssen die Frequenz Ihres Alarms festlegen: Aus, Einmalig,
Täglich, an Wochentagen, an Wochenenden.
3. Stellen Sie die Alarmzeit mithilfe der ◄und ►Tasten.
4. Den Alarm stellen: DAB, UKW, Alarm.
5. Um die Lautstärke einzustellen, drücken Sie die ◄oder ►Taste.
Drücken Sie die ENTER/SCAN Taste zum Bestätigen.
6. Sobald die Einstellungen richtig sind, drücken Sie die ENTER/
SCAN taste, um den Alarm zu speichern.
Aktvieren Sie die Alarmerinnerung
Sobald der Alarm im Stand-by-Modus ertönt, drehen Sie am
Lautstärkeregler, um die SNOOZE Funktion zu aktivieren.
Der Alarm wird erneut in fünf Minuten ertönen.
Alarme deaktivieren
Um den Alarm zu deaktivieren, gehen Sie auf den Einstellungsbildschirm für Alarm 1, drücken Sie
die ENTER/SCAN Taste und wählen Sie das Menü “Aus”, um diese Alarmeinstellung zu speichern.
Folgen Sie den Anweisungen für Alarm 1, um den zweiten Alarm einzustellen.
CE-Erklärung
Hiermit hat Ferguson Sp. z o.o. erklärt, dass dieses Audiogerät den grundlegenden
Anforderungen und anderen relevanten Bestimmungen der ROTEN Richtlinie
2014/53/EU entspricht. Der vollständige Text der EU-Konformitätserklärung
ist unter dem Link http://www.ferguson-digital.eu verfügbar.

36 37
Fehlersuchanleitung
PROBLEM MÖGLICHE URSACHEN LÖSUNGEN
Das Radio schaltet
sich nicht an.
Das Gerät ist nicht
angeschlossen.
Stecken Sie das Netzteil
in die Steckdose.
Die Steckdose hat
keinen Strom.
Schließen Sie ein anderes
Gerät an dieselbe Steckdose,
um festzustellen, ob diese
unter Strom steht.
Kein Ton.
Die Lautstärke ist nach
ganz unten gedreht. Drehen Sie am Lautstärkeregler.
Die ausgewählte Quelle
ist nicht korrekt.
Wählen Sie die richtige Quelle
durch Drücken der MODE Taste.
Fehlfunktion.
Das Radio funktioniert nicht
erwartungsgemäß oder
gibt ein ungewöhnliches
Geräusch von sich.
Nehmen Sie das Gerät für
dreißig (30) Minuten vom Strom.
Schalten Sie das Gerät nach
dreißig (30) Minuten wieder ein.
Schlechter
UKW-Empfang.
Die Antenne ist nicht hinten
am Radio angeschlossen. Schließen Sie die Antenne an.
Es gibt Störungen mit
anderen Elektrogeräten
(Mikrowelle, TV, usw.).
Bewegen Sie Ihr Radio weg
von potenziellen Störquellen.
Schlechter
DAB-Empfang.
Die Antenne ist nicht
vollständig ausgefahren. Fahren Sie die Antenne aus.
Ihre Region hat keine
DAB-Signalabdeckung.
Überprüfen Sie die DAB-
Signalabdeckung in Ihrer Region.
Es kann keine
Bluetooth-
Verbindung
hergestellt
werden.
Ihre Audioquelle ist eventuell
nicht in Reichweite.
Konsultieren Sie die
Bedienungsanleitung
Ihrer Audioquelle für
weitere Informationen.
Stellen Sie sicher, dass Ihr Radio und Bluetooth-Gerät nicht weiter
als sieben (7) Meter voneinander entfernt sind und das keine
Wand oder andere Elektronikgeräte die Verbindung stören.
Gebruikershandleiding ver. 1
Lees deze instructies voor gebruik volledig door.
FM |DAB+ |BT digital radio with bass reex
NL

38 39
Bedankt voor de aankoop van een Regent-product. Wij besteden bijzondere
aandacht aan de BETROUWBAARHEID, het GEBRUIKSGEMAK en DESIGN van
onze producten. Wij hopen dat u zult genieten van deze DAB+ digitale radio.
uw product
Inhoud van de doos
• 1 Regent DAB+151 radio
• 1 wisselstroomlader
• 1 gebruikershandleiding
Technische eigenschappen
• DAB Tuner+/FM/Bluetooth
• Golfband: FM en DAB+
• FM-radiofrequentie: 87,5 tot 108 MHz
• Digitale radiofrequentie: 174.928 tot 239,200 mHz
• Frequentiebereik: 2402mHz - 2480mHz
• Uitgezonden vermogen: 0,5 mW
• Scherm met LCD-display: toont de naam van de zender en
de tekst die door de zenders wordt uitgezonden
• Vooraf ingestelde stations: 20
• Geluidsvermogen: 5W
• Telescopische antenne
• Bluetooth versie: 4.2
• Bluetooth bereik: 7 meter
• Controleer de stroomtoevoer
• Medel: FJ-SW126K0901 000DE
• Ingang: 100-240 V, 50/60 Hz, 0,4 A maximum
• Uitgang: 9V 1A
NL
Beschrijving van het apparaat
1. STBY (STANDBY): Schakel de radio in of uit.
2. INFO/MENU: Geef de zenderinformatie weer of ga naar
het instellingenscherm van het hoofdmenu.
3. PREVIOUS: Keer terug naar de laatste selectie, verlaag de
frequentie of zoek naar het sterkste varige signaal.
4. PRESET: Toegang tot vooraf ingestelde zenders.
5. VOLUME+/-: Volume-instelwiel.
6. MODE: Druk meerdere malen op deze knop om de afspeelmodus te wijzigen.
7. ENTER/SCAN: Bevestig de selectie of start een scan.
8. NEXT: Keer terug naar de laatste selectie, verhoog de frequentie
of zoek naar het sterkste volgende signaal.
9. SLEEP: Stand-by inschakelen.
10. DISPLAY SCREEN: Weergavescherm.
voorkant
11. Telescopische antenne.
12. 9V gelijkstroomvoeding.
achterkant
Table of contents
Languages: