manuals.online logo
Brands
  1. Home
  2. •
  3. Brands
  4. •
  5. Rehau
  6. •
  7. Accessories
  8. •
  9. Rehau REH TA3 User manual

Rehau REH TA3 User manual

INSTRUCTIONS
© 2015 OJ Electronics A/S
1
Intelligent Room Sensor - Wired
English
Product programme
REH TA3 Room sensor with temperature adjustment
REH TM3 Room sensor with temperature adjustment and mode switch (Auto,
Day, Night, Frost Protection)
REH TD3 Room sensor with temperature adjustment, mode switch (Auto, Day,
Night, Frost Protection) and floor limit sensor
Mounting of sensor (figs 1 and 2)
The unit is used for comfort temperature control in rooms. The unit should
be mounted on an internal wall approx. 1.4-1.7 metres above the floor in
such a way as to allow free air circulation around it. Draughts and direct
sunlight or other heat sources must be avoided.
Fig. 1 Removing the front cover
BR 1026A11a
Fig. 2
BR1026A01a
Room sensors - bus connection (figs 3 and 4)
Only REHAU units which are suitable for two-wire communication can be used.
Standard installation cable of minimum 2 x 0.25 mm² can be used. Units can
be connected in conventional star formation or in bus mode (daisy chain). The
master has four sets of terminals marked SENSOR/CONTROLLER BUS that can be
used for connecting the 2-core signal cable from the unit.
Any unit can be connected to any pair of terminals. The total length of
the 2-wire system can be up to 300 m with a maximum length of 100 m
between any two units. For further information see the table below.
Remember to connect + to + and – to – .
67338 02/15 (HKT)
• English
Fig. 3 Sensors connected in star formation
BR935A03A
Fig. 4 Sensors connected in bus mode (daisy chain)
BR935A03A
Setting up which room sensor is paired with which thermal actuator
(fig. 5)
Each unit can be set to operate a specific output which in turn controls a
thermal actuator on the manifold. A selector can be accessed under the
front cover of the unit where the number of its output (i.e. its channel no.)
can be set with a screwdriver.
Please note that channels 10 to 14 are marked as A through E on the
selector.
A unit set to CH1 will activate the thermal actuator connected to output 1
on the master. The channel number can be set before power is connected
to the system.
The channel set on the unit can be subsequently changed if needed.
If two units are placed in the same room and set to the same channel,
temperature will be controlled by the average of the temperature recorded
by both units.
© 2015 OJ Electronics A/S
2
Fig. 5
BR1025A05a
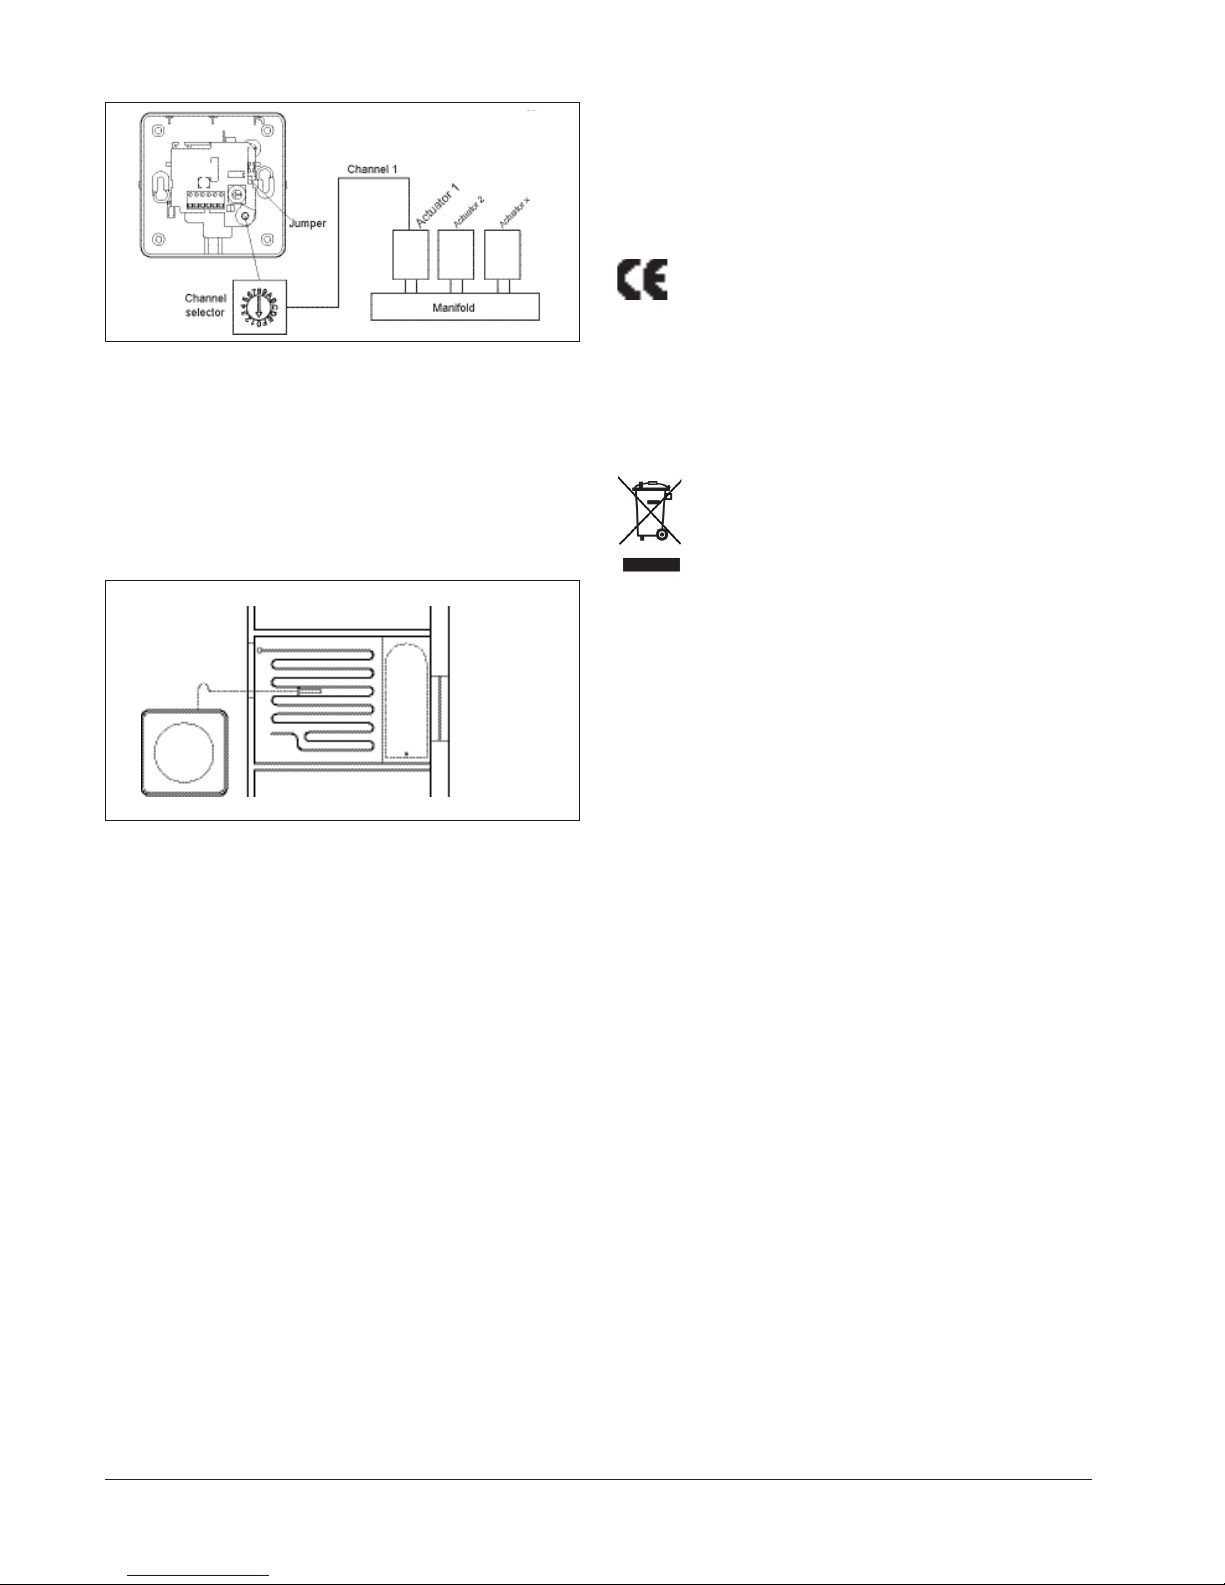
Mounting of floor limit sensor (fig. 6)
REH TD3: Floor limit sensor
Units with floor limit sensor have a mechanical jumper on the printed circuit
board allowing limits to be set for MIN. or MAX. temperature regulation. If set for
MAX., the limit setting will be 27°C. If set for MIN., the limit setting will be 17°C.
These temperatures are fixed when used with REHAU BA3 masters unless the
unit has been allocated to a zone group controlled by a REH CT3 room controller.
In this case, the limit settings can be increased or decreased via the room
controller. The limits then set will apply to all relevant room sensors with floor
limit sensor belonging to that group. If a REHAU FC-BMS3 master is used, the
limit settings can be changed using the programming buttons on the master.
Fig. 6
BR1026A04a
Jumper connected: max. limitation
Jumper removed: min. limitation
Jumper location, see fig. 5.
Max. temperature limitation is used to prevent the floor from becoming
too warm. This may be required if special floor surfaces (e.g. solid wood)
are used. The sensor should be positioned where it can read the true
temperature of the floor and should always be within the heated area.
Min. temperature limitation is used to keep the floor surface warm,
irrespective of room temperature. In tiled bathrooms or pool areas, for
example, water will dry more quickly if the floor surface is kept warm. The
sensor should be positioned where it can read the true temperature of the
floor and should always be within the heated area.
To ease replacement, we recommend that all floor sensors are mounted
in a tube positioned between two heating pipes. The inner end of the tube
should be sealed, and the floor sensor cable led back to the bottom of
the wall. If required, the sensor cable can be extended up to 30 m with
standard installation cable.
REH TM3: Use of external room sensor
A remote room sensor can be used instead of the built-in sensor by
connecting the jumper across the two-pin bridge on the printed circuit
board beneath the room sensor cover. From the factory, the jumper is
“parked”on one pin. Jumper location, see fig. 5.
Jumper connected: External room sensor
Jumper removed: Built-in room sensor
See the Installation Manual for further instructions.
Maintenance
The unit is maintenance free.
Keep the air vents (openings) on the unit clean and unobstructed at all
times.
Certications
CE marking
REHAU Limited hereby declares that the product conforms with the following
Directives of the European Parliament and of the Council:
• CE marking: 1993/68/EEC
• EMC - electromagnetic compatibility: 2004/108/EC
• RoHS - restriction on the use of certain hazardous substances: 2011/65/
EU
• WEEE - waste electrical and electronic equipment: 2012/19/EU
Applied standard(s)
EN 61000-6-2, EN 61000-6-3
Disposal and recycling
Recycling of packaging
Protect the environment by disposing of the packaging in accordance with
local regulations for waste processing.
Disposal of the product
Equipment containing electrical components must not be
disposed of together with domestic waste.
It must be collected separately along with other electrical and
electronic waste according to local and currently valid legislation.
Technical Specifications
Purpose of control..................Wired electronic room sensor for controlling
hydronic floor heating and cooling
Connection type ................................2-wire, 5 V, communication bus
Cable type ...............................Standard installation cable ≥0.25 mm²
Cable length ...................Up to 300 m with max. 100 m between two units
Control principle ..................................................PI or ON/OFF
Ambient operating temperature ........................................0/+40°C
Floor limit sensor .....................................................Max. 30 m
Power drain .............................................................<1 mA
Temperature adjustment ..................................................±4°C
Functions REH TA3................................................... None
REH TM3, REH TD3........Auto, comfort, setback, frost protection
Room sensor ...........................................................Internal
Floor limit sensor
REH TA3, REH TM3......................................... None
REH TD3 ........................................Incl. floor sensor
Mounting method..................For mounting direct on wall or in wall socket
Enclosure rating ...........................................................IP 21
Dimensions .........................................H/86.0, W/86.0, D/25.5 mm
© 2015 OJ Electronics A/S
3
The OJ trademark is a registered trademark belonging to OJ Electronics A/S · © 2015 OJ Electronics A/S
4
REHAU Limited
Hill Court, Walford, Ross-on-Wye, Herefordshire, HR9 5QN
Tel: +44 1989 762600 · Fax +44 1989 762601
[email protected] · www.rehau.uk
Our verbal and written application engineering advice is based upon experience and the best of our knowledge. However it is to be regarded as non-binding information. Working
conditions and use under conditions for which the product was not intended and over which we have no influence exclude any claim resulting from our information. We recommend
that a suitable check is made as to whether the REHAU product is suitable for the envisaged purpose. Application, use and processing of the products is carried out beyond the scope
of our control and are therefore carried out exclusively at your own responsibility. If liability should still apply, then this is restricted, in the case of all damage, the value of the goods
supplied by us and used by you.
Our warranty applies to the consistent quality of our products as per our specification and in accordance with our general terms and conditions of delivery and payment. This document
is protected by copyright. All rights based on this are reserved. No part of this publication may be translated, reproduced or transmitted in any form or by any similar means, electronic
or mechanical, photocopying, recording or otherwise, or stored in a data retrieval system.

This manual suits for next models

2

Other Rehau Accessories manuals

Rehau NEA SMART 2.0 Instructions for use

Rehau

Rehau NEA SMART 2.0 Instructions for use

Rehau NEA SMART R BASIS 230 V Instructions for use

Rehau

Rehau NEA SMART R BASIS 230 V Instructions for use

Rehau RE.GUARD User manual

Rehau

Rehau RE.GUARD User manual

Rehau NEA SMART R BASIS 230 V User manual

Rehau

Rehau NEA SMART R BASIS 230 V User manual

Popular Accessories manuals by other brands

Konica Minolta APLUS brochure

Konica Minolta

Konica Minolta APLUS brochure

Muller METS-WTEx operating manual

Muller

Muller METS-WTEx operating manual

Interactive Technologies 60-362 user manual

Interactive Technologies

Interactive Technologies 60-362 user manual

Collingwood Lighting Lentus low bay installation instructions

Collingwood Lighting

Collingwood Lighting Lentus low bay installation instructions

Lightolier Calculite C6CFL32 specification

Lightolier

Lightolier Calculite C6CFL32 specification

Iget SECURITY M3P1 installation manual

Iget

Iget SECURITY M3P1 installation manual

Schmalz FS-5-D-2NA-K Assembly instructions

Schmalz

Schmalz FS-5-D-2NA-K Assembly instructions

Universal Electronics NevoConnect NC-50 quick start guide

Universal Electronics

Universal Electronics NevoConnect NC-50 quick start guide

EnOcean 02LINE TRI02SYS Installation and operating manual

EnOcean

EnOcean 02LINE TRI02SYS Installation and operating manual

ProMed HKP-1.6 XL Instruction leaflet

ProMed

ProMed HKP-1.6 XL Instruction leaflet

SICK SureSense HSE18L operating instructions

SICK

SICK SureSense HSE18L operating instructions

CS Instruments VA 521 instruction manual

CS Instruments

CS Instruments VA 521 instruction manual

Orion 8684 instruction manual

Orion

Orion 8684 instruction manual

Byron Victoria Bell installation instructions

Byron

Byron Victoria Bell installation instructions

Cub Elecparts BLE SENSOR 4 user manual

Cub Elecparts

Cub Elecparts BLE SENSOR 4 user manual

Antelope Orion owner's manual

Antelope

Antelope Orion owner's manual

VOLTCRAFT 20 00 92 operating instructions

VOLTCRAFT

VOLTCRAFT 20 00 92 operating instructions

LEGRAND Wattstopper UW-100 installation instructions

LEGRAND

LEGRAND Wattstopper UW-100 installation instructions

manuals.online logo
manuals.online logoBrands
  • About & Mission
  • Contact us
  • Privacy Policy
  • Terms and Conditions

Copyright 2025 Manuals.Online. All Rights Reserved.