Rehau RE.GUARD User manual

RE.GUARD Water Sensor
EN Operation manual
RE.GUARD Water Sensor is a wireless sensor powered by ER14250
battery. It is used for detecting water overflowing. It can communicate
with an associated Z-Wave device, such as RE.GUARD Water Control,
Siren, Smart Switch, etc.
The features list:
1. Z-Wave Plus certified for wide compatibility (500 serials product).
2. Supports security 0 and security 2 protected mode with AES-128
encryption.
3. Contains an extension water detecting probe.
4. Temperature measurement.
5. The battery life is up to 1 year.
6. Support low battery alarm function.
7. Support firmware OTA.
01 General information about water sensor
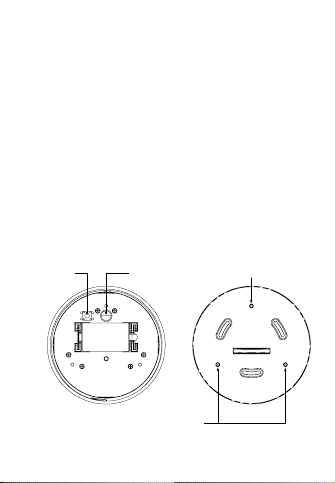
01.01 Product layout
Temperature detectZ-Button LED-Indicator
Flooding detect

01.02 Spezifikation
Power supply: ER14250 3.6 V Battery
Storage environment: –20 °C – +60 °C
0 % – 90 % r.H.
Operational temperature: ±0 °C – +40 °C
Radio protocol: Z-Wave plus
Radio frequency: 868.42MHz (EU version)
869 MHz (RU version)
Range: More than 100 m outdoors
up to 30 m indoors (depending on building
materials)
Dimensions: Main body: 65 mm x 65 mm x 22 mm
Cable lenght extension probe: 1 m
Working current: About 40 mA
Standby current: About 24 μA
Transmitted power: –7.08 dBm ERP
02 Activation
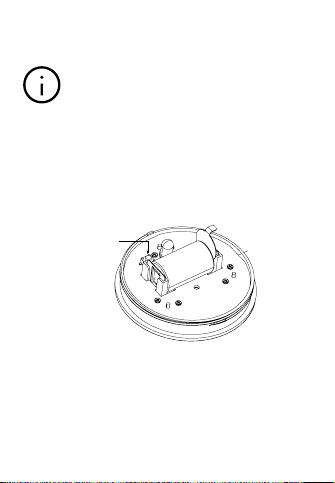
1. Turn the cover counter-clockwise and open it.
Open with coin

2. Remove the battery blocker or insert a battery ER14250 3.6V
Note:
When powered, the device will indicate Z-Wave status with LED:
1. Blink slowly: the device is not added to any Z-Wave network.
2. Solid: the device is already added to the Z-Wave network.
3. Add the device (see “04 Adding/removing the device”).
4. Close the cover and turn it clockwise.
5. Place the sensor on a surface prone to flooding, or use the extension
probe (see “03 Installation”).
Battery Blocker
Close with coin

03 Installation:
Water Sensor should not be mounted directly on or near metal framing
or other large metallic objects since metal objects may weaken the radio
signal strength.
After “activation” process, the sensor can work without any installation.
Furthermore, you can use the extension probe to fix sensor body.
To install with extension probe, follow the steps:
1. Screw the baseplate of extension probe into the wall and then
magnet the sensor body.
2. Glue the extension probe to a location that may be aected by water
leakage.
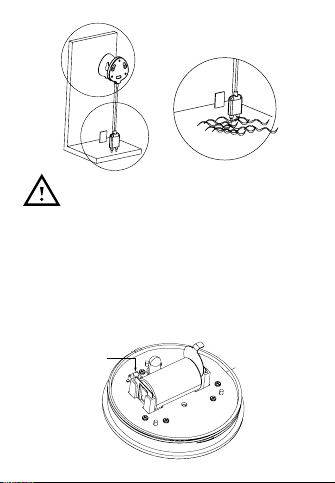
3M
Note:
Wipe clean the surface where the Water Sensor will be mounted.
Any dust and particles can reduce the adhesion of double-sided
mounting tape
04 Adding/removing the device
Adding:
1. Open the cover.
2. Place the device within the direct range of your Z-Wave controller,
e.g. RE.HUB Gateway.
3. Set the main controller’s adding mode (see the controller’s manual),
e.g. via RE.GUARD App.
4. Press the Z-button once or press it briefly three times, the LED indi-
cator should blink fast in blue.
Z-Button
5. Wait for the adding process to end.
6. Successful adding will be confirmed by the Z-Wave controller’s
message.
Tip:
If you want your Water Sensor to be a security device that uses
secure/encrypted message to communicate in a Z-Wave network,
then a security enabled Z-Wave controller is needed.
Z-Button
5. Wait for the end of the removing process.
6. Successful removing will be confirmed by the Z-Wave controller.
05 Resetting
Reset procedure clears the Water Sensor’s memory, including Z-Wave
network controller information and advanced configuration.
To reset a Water Sensor:
Press and hold the Z-button for more than 20 seconds until blinking ends.
Removing:
1. Open the cover.
2. Place the device within the direct range of your Z-Wave controller,
e.g. RE.HUB Gateway.
3. Set the main controller remove mode (see the controller’s manual),
e.g. via RE.GUARD App.
4. Press the Z-button briefly three times, the LED indicator should blink
fast in orange.
Note:
Use this procedure only in the event that the network primary
controller is missing or otherwise inoperable
06 Association
Association allows Water Sensor to control other Z-Wave device such
as siren, smart switch, etc. The Water Sensor supports two association
groupings.
Group 1 reports the flooding detection, temperature and the battery
level. Group 2 is assigned to send BASIC SET command.
Tip:
1. The max number of associated nodes of all these 2 groups is 5.
2. Association allows for direct transmission of control command
between devices and takes place without the participation of the
main controller.
07 WAKE-UP
Wake-up-interval:
Available settings: 0-2678400
Default setting: 0, setting via RE.GUARD App: 86400
Defining a time period by which the Water Sensor sends a wake up
notification command frame to communicate with the assigned device,
update parameters, update software, detects battery level.
Wake up interval set to 0 disables the sending wake up notification
command, in such configuration it is needed to manually wake up the
device by pressing the Z-button.
Note:
3600 seconds is the step of wake up interval time, which means Water
Sensor will send wake up notification command by a timeline that is
multiple of 3600 seconds.
Setting examples:
0~3599 = 0 second, the device will not wake up by itself.
3600~7199 = 3600 seconds, the device will wake up every
3600 seconds.

08 Advanced configuration
Water Sensor oers a wide variety of advanced configuration settings.
Below parameters can be accessed from main controllers configuration
interface.
Parameter No. 14 Enable/Disable BASIC SET command
Water Sensor can send BASIC SET command to nodes associated
with group 2.
0 – Disable.
1 – Enable.
Default setting: 0
Parameter size: 1 [byte]
Parameter No. 15Value of the BASIC SET
Water sensor can reverse its value of BASIC SET when flooding is
triggered.
0 – Send BASIC SET VALUE = 255 to nodes associated with group 2
when flooding alarm is triggered.
Send BASIC SET VALUE = 0 to nodes associated with group 2 when
flooding alarm is canceled.
1 – Send BASIC SET VALUE = 0 to nodes associated with group 2 when
flooding alarm is triggered.
Send BASIC SET VALUE = 255 to nodes associated with group 2
when flooding alarm is canceled.w
Default setting: 0
Parameter size: 1 [byte]
Parameter No. 17 Set resend flooding alarm interval (minute)
Available settings: 1 – 240
Default setting: 5
Parameter size: 1 [byte]

Parameter No. 19 Temperature report time (10 minutes)
Parameter No.19 Temperature report time (10 minutes) The sensor mea-
sures the temperature every ten minutes, change of 1 degree Celsius
will be reported. By default, it must report at least once a day.
Available settings: 3 – 240
Default setting: 144
Parameter size: 1 [byte]
Parameter No. 20 Set the high temperature alarm trigger value
Available settings (US): –670 – 2570 (–67 °F – 257 °F)
Available settings (Other): –550 – 1250 (–55 °C – 125 °C)Default
setting (US): 1040 (104 °F)
Default setting (Other): 400 (40 °C)
Parameter size: 2 [byte]
Parameter No. 22 Set the low temperature alarm trigger value
Available settings (US): –670 – 2570 (–67 °F – 257 °F)
Available settings (Other): –550 – 1250 (–55 °C – 125 °C)
Default setting (US): 320 (32 °F)
Default setting (Other): 0 (0 °C)
Parameter size: 2 [byte]
Parameter No. 24 Enable/Disable blinking LED when alarm being
triggered
0 – Disable.
1 – Enable.
Default setting: 1
Parameter size: 1 [byte]
Parameter No. 32 Level of low battery
This parameter defines a battery level as the “low battery”.
Available settings: 10 – 50 (10 % – 50 %)
Default setting: 50 (50 %)
Parameter size: 1 [byte]

10 Further information
For further information and technical documents of the Water Sensor or
related products like RE.HUB Gateway please refer to:
https://www.rehau.com/ti
Please observe the relevant technical product information, which can be
obtained online at www.rehau.com/ti. Subject to technical changes.
This document is protected by copyright. All rights based on this are
reserved. No part of this publication may be translated, reproduced
or transmitted in any form or by any similar means, electronic or
mechanical, photocopying, recording or otherwise, or stored in a data
retrieval system.
© REHAU AG + Co
Rheniumhaus
95111 Rehau
410604 EN 11.2020
09 Simplified declaration of EU conformity
REHAU AG+Co hereby declares that the device complies with the basic
requirements and relevant provisions of the 2014/30/EU, 2011/65/EU
and 2014/53/EU Directives.
The complete text of the Declaration of Conformity is available at the
following Internet address:
www.rehau.de/zertifikate-hochbau
Other manuals for RE.GUARD
1
Table of contents
Other Rehau Accessories manuals


